For this example, VxRail node 4 is connected to the fabric and powered on. It is in Rack 2 and connected to Leaf2A and Leaf2B, as shown in SmartFabric and VxRail cluster expansion.
Add DNS records

Create a server interface profile
To add the ports that are connected to the new VxRail node to the VxRail networks, perform the following steps.
- In the SFS UI, select the Server Interface tab.
- Under Server Interface Profile, click +IMPORT FROM FABRIC. The Discovered Server Interface page displays.
- For the new VxRail node interfaces, the Server Type column indicates VxRail, as shown.
Figure 82. VxRail interfaces discovered  Note: In this example, there is one new VxRail node connected to Leaf2A and Leaf2B, resulting in two discovered VxRail interfaces. Other connected devices that support LLDP that have not yet been onboarded will also appear in the list. If other devices are connected, it may help to sort the list by clicking the Server Type column heading.
- Check the boxes next to all VxRail-connected interfaces and click +ADD TO SERVER PROFILE.
- In the Server Profile dialog box:
- Select Existing Server Profile.
- Next to Server Profile ID, select the VxRail profile name created earlier, named vxrail-profile in this example. The page appears as shown:
Figure 83. Sever Profile configuration window 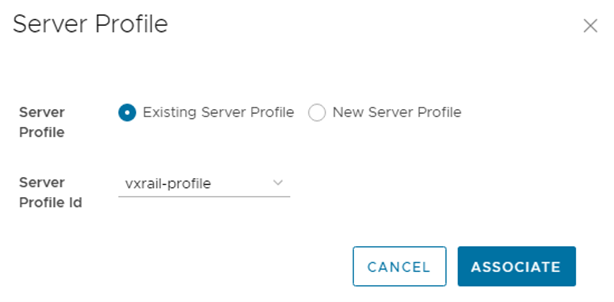
- Click ASSOCIATE. The profile is associated with the new VxRail node interfaces, as shown.
Figure 84. New profile associated with VxRail interfaces 
- Check the boxes next to all VxRail interfaces associated with the vxrail-profile and click +ADD NETWORKS.
- In the Add Server Interface Networks window, do the following:
- Next to Tagged Networks, select the same networks as the existing VxRail nodes in the cluster that the new node is joining. For this example, the networks are as follows:
- extmgmt (VLAN-1811)
- vmotion (VLAN-1812)
- vsan (VLAN-1813)
- vmnet_A (VLAN-1814) – optional guest network
- vmnet_B (VLAN-1815) – optional guest network
- Client_Control_Network (VLAN-3939) – automatically created VxRail node discovery network
- Next to Untagged Network, select Client_Management_Network (VLAN-4091).
- Click ADD.
The Discovered Server Interface page appears as shown:
Figure 85. Interfaces placed in VxRail networks 
- Next to Tagged Networks, select the same networks as the existing VxRail nodes in the cluster that the new node is joining. For this example, the networks are as follows:
- Click the box next to all VxRail interfaces associated with the vxrail-profile and click CREATE to apply the configuration.
- In the Importing Server Interface Profiles window, a success message is displayed for each interface as shown:
Figure 86. Success messages displayed 
- Click OK.
The newly added VxRail interfaces appear in the Server Interface Profile list, along with the existing VxRail interfaces. They can be identified by their switch and port number. In this example, the new interfaces are on Leaf2A and Leaf 2B. When an interface is selected, the associated networks are displayed to the right of the interface profile list. The networks for one of the additional VxRail interfaces are outlined in red in the lower right corner of the following figure.
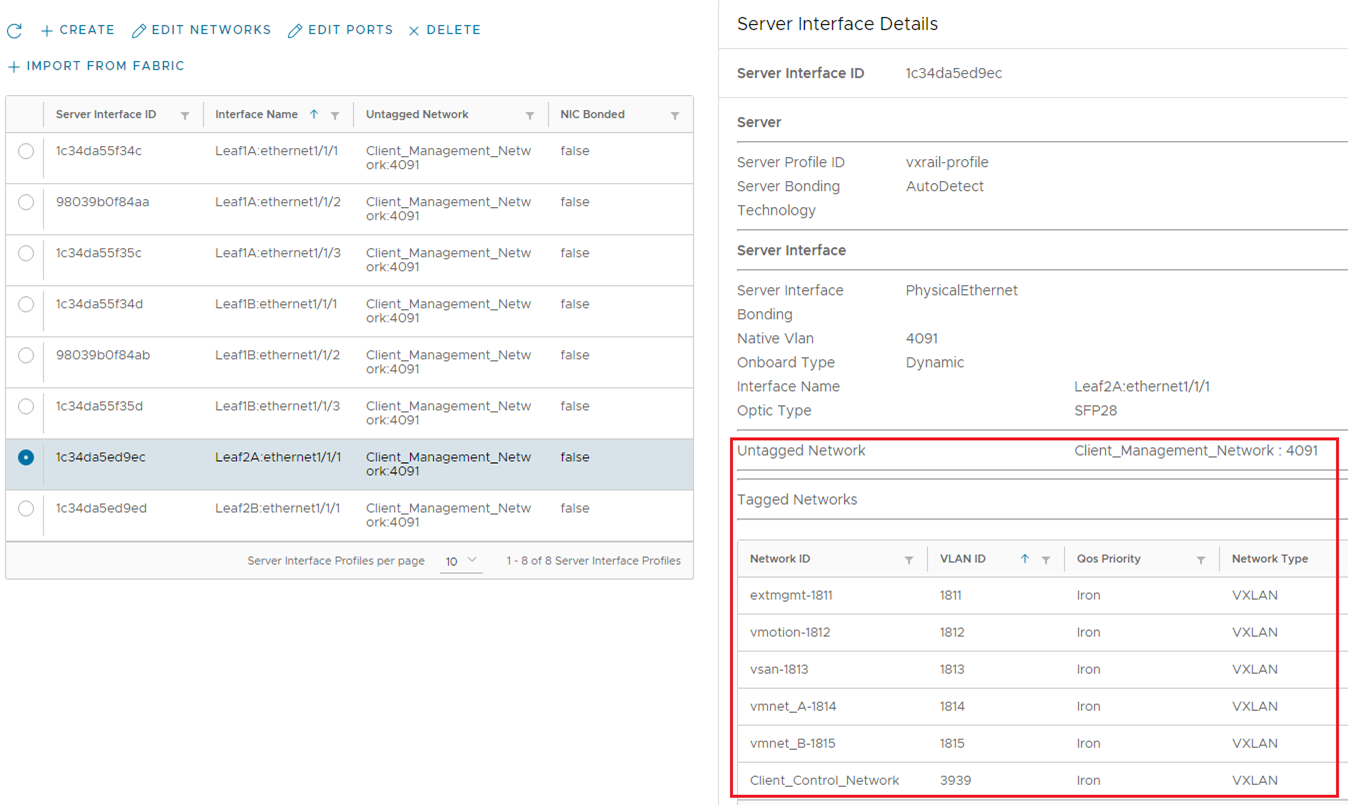
Ensure that the VxRail interfaces for the new node are in the correct networks.
Optionally, verify the network to interface configuration at the CLI of the leaf switches by running the show virtual-network command on the leaf switches that the new VxRail node is connected to.
Use the vSphere Client to add the VxRail node
Use the vSphere Client to add the VxRail node as follows:
- Connect to the vCenter in a browser and launch the vSphere Client.
- In the vSphere Client, select the cluster and select Configure > VxRail > Hosts.
- In the Cluster Hosts window, click ADD.
- In the Discovered Hosts window, after a brief scan, the new VxRail node in Rack 2 is discovered. Check the box next to the service tag, as shown in the following figure.
Figure 88. Discovered Hosts window 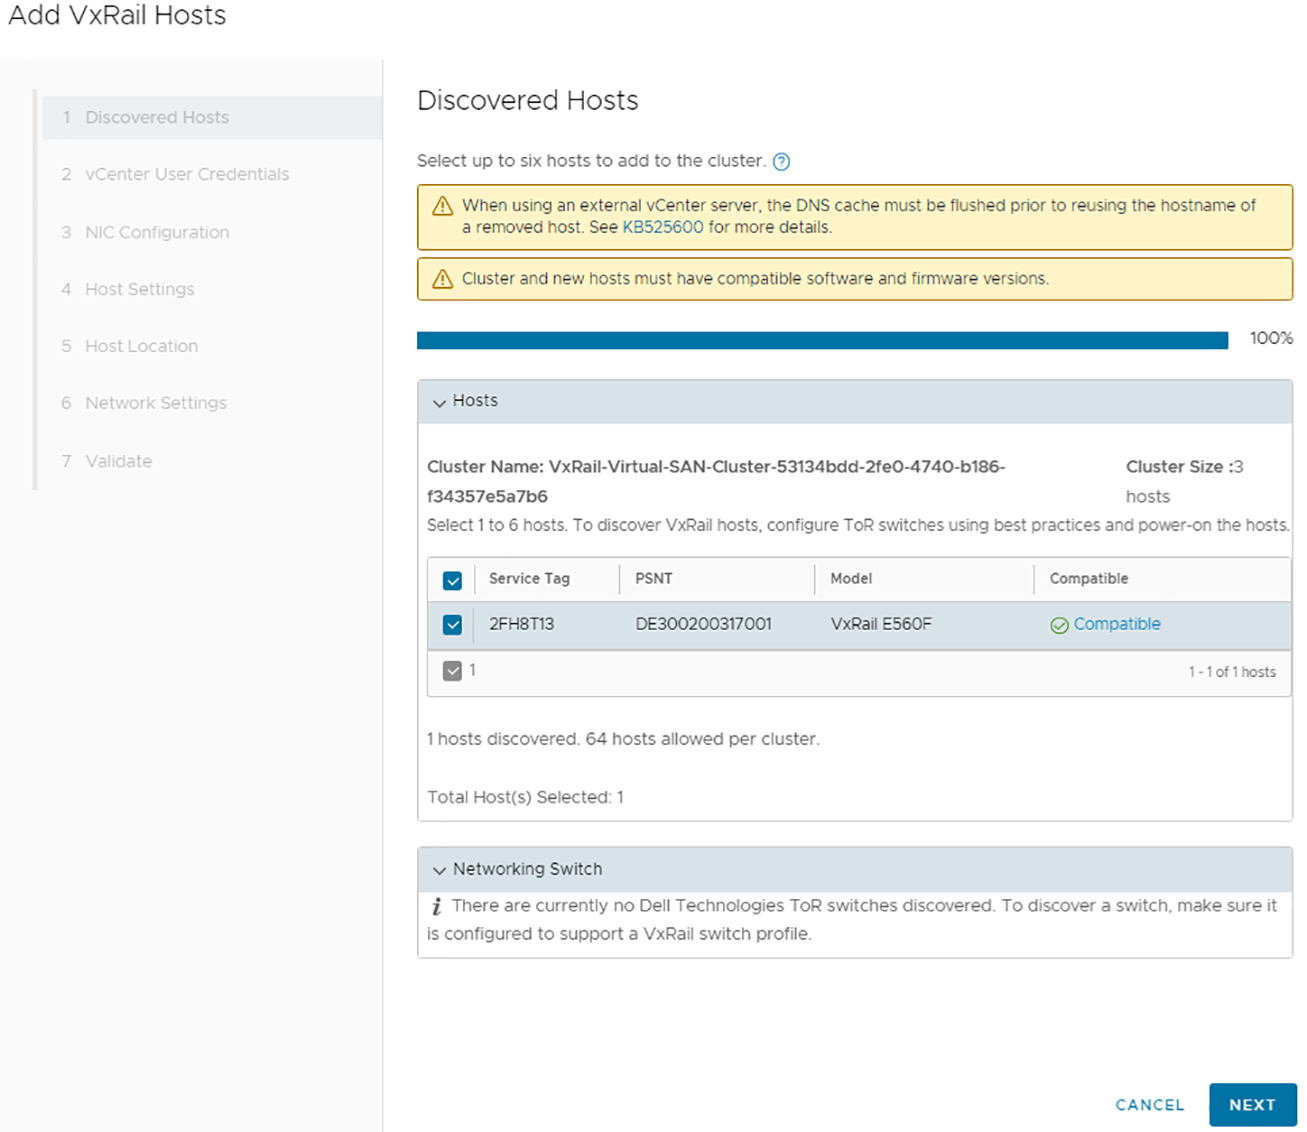
- Click NEXT.
- In the User Credentials window, enter the vCenter credentials, as shown in the figure below.
Figure 89. User Credentials window 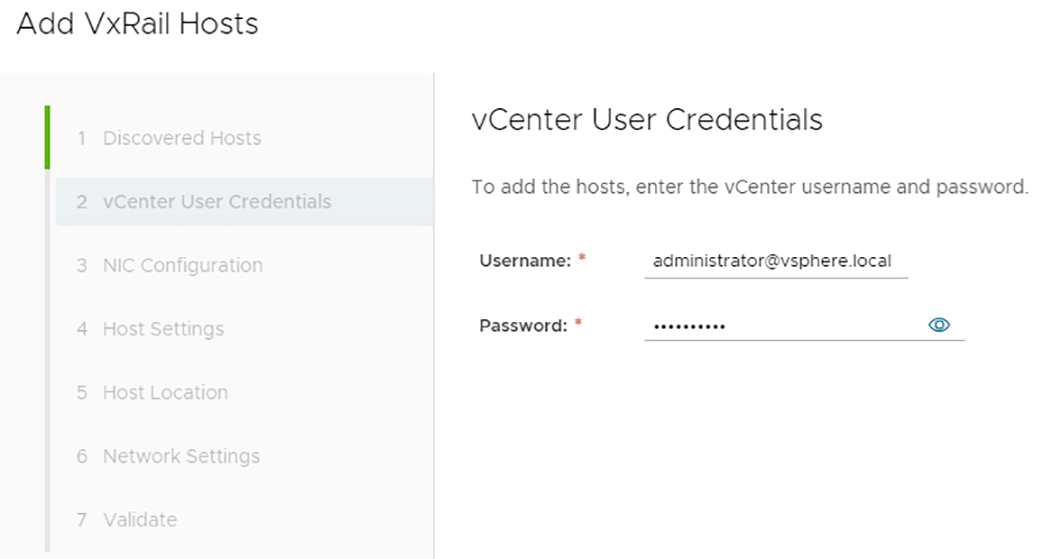
- Click NEXT.
- In the NIC Configuration window, the default values are used, as shown.
Figure 90. NIC Configuration window 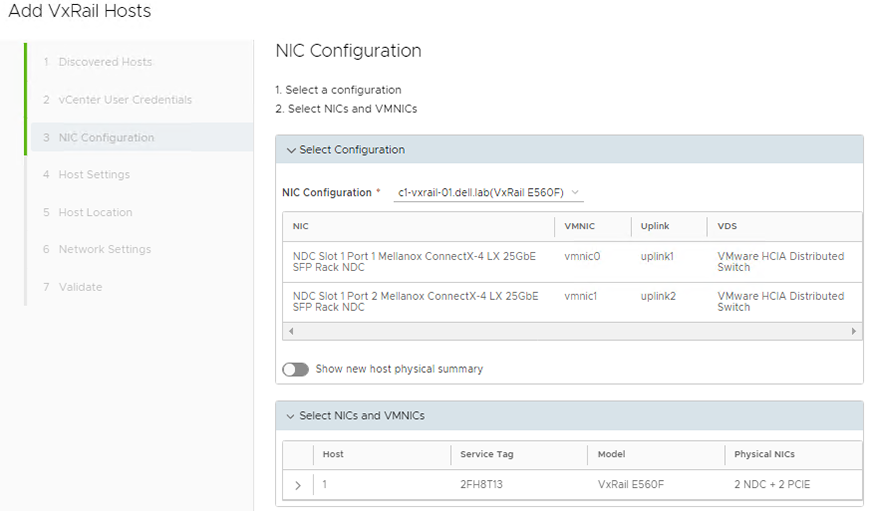
- Click NEXT.
- In the Host Settings window, the hostname, IP address, and credentials for the new host are specified.
Figure 91. Host Settings window 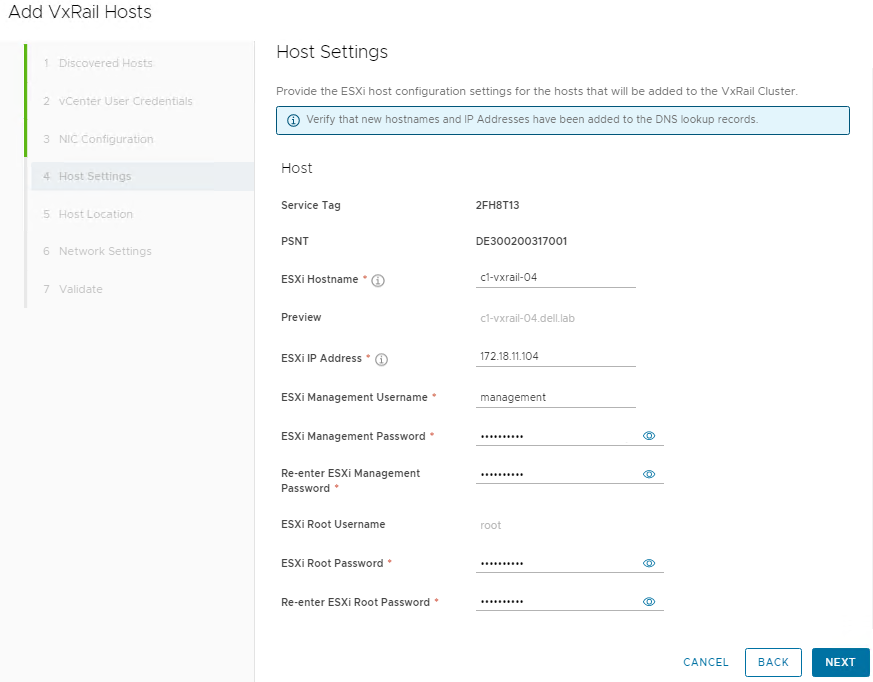
- Click NEXT.
- (Optional) In the Host Location window, the Rack Name and Rack Position may be entered. These fields are left blank in this example.
Figure 92. Host Location window 
- Click NEXT.
- In the Network Settings window, provide the vSAN and vMotion IP addresses for the host, as shown in the following figure.
Figure 93. Network Settings window 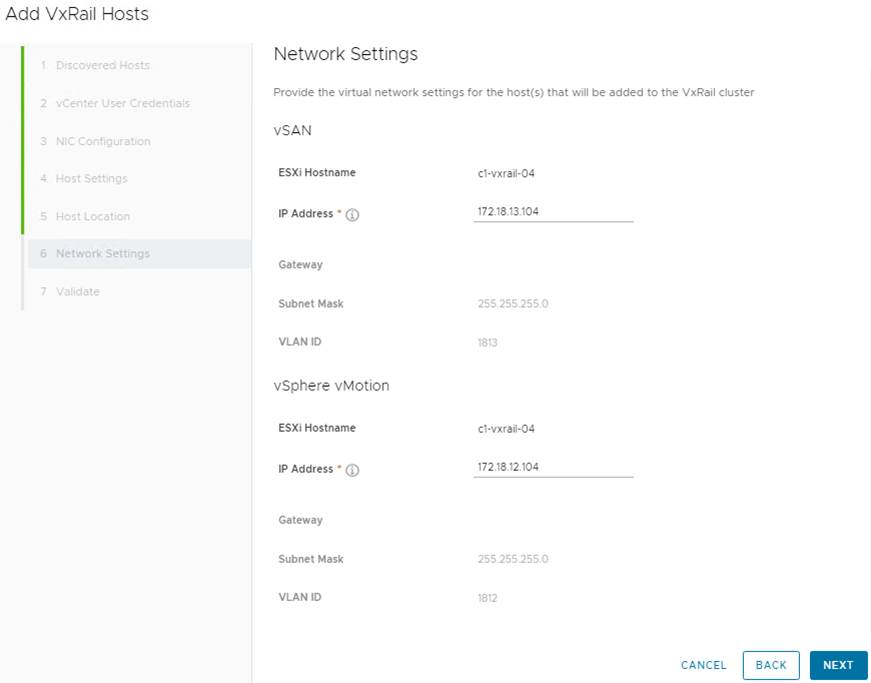
- Click NEXT.
- Review the settings in the Validate window, as shown
Figure 94. Validate screen 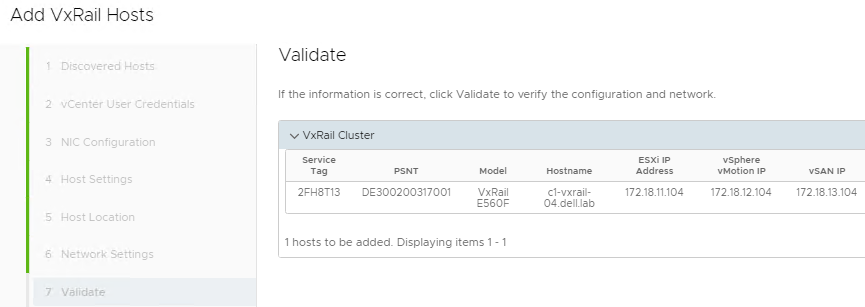
- If no changes are needed, click VALIDATE. Validation may take about five minutes. A Success message displays when the validation passes.
Figure 95. Successful validation notification screen 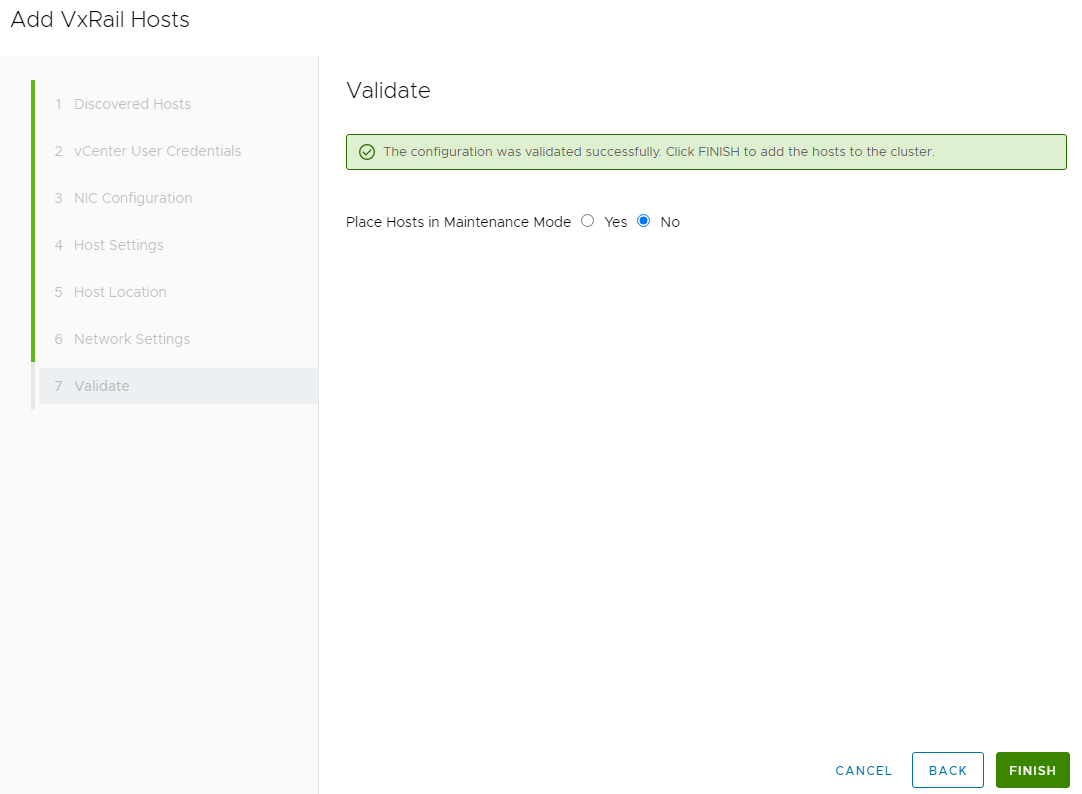
- An option to put the added host in maintenance mode is provided. In this example, this option is kept in the default No setting.
- Click FINISH.
On the Cluster Hosts page, the Adding status displays as shown.
Note: The process may take 10 to 15 minutes to complete.
Figure 96. Adding host to the cluster 
- When complete, a success message displays as shown.
Figure 97. Host successfully added 
- The fourth VxRail node displays in the VxRail cluster as shown in the figure below.
Figure 98. Fourth VxRail node added to the cluster 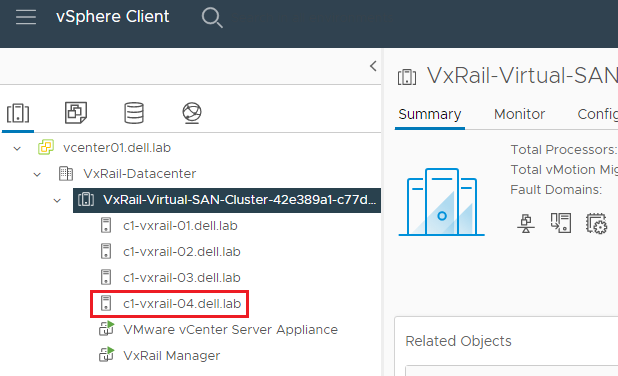 CAUTION: Review any warnings that may appear in the vSphere Client.
