

Assets

Model Selection Made Easy by Dell Enterprise Hub
Thu, 10 Oct 2024 13:53:50 -0000
|Read Time: 0 minutes
With so many models available in Dell Enterprise Hub, which one should you use?
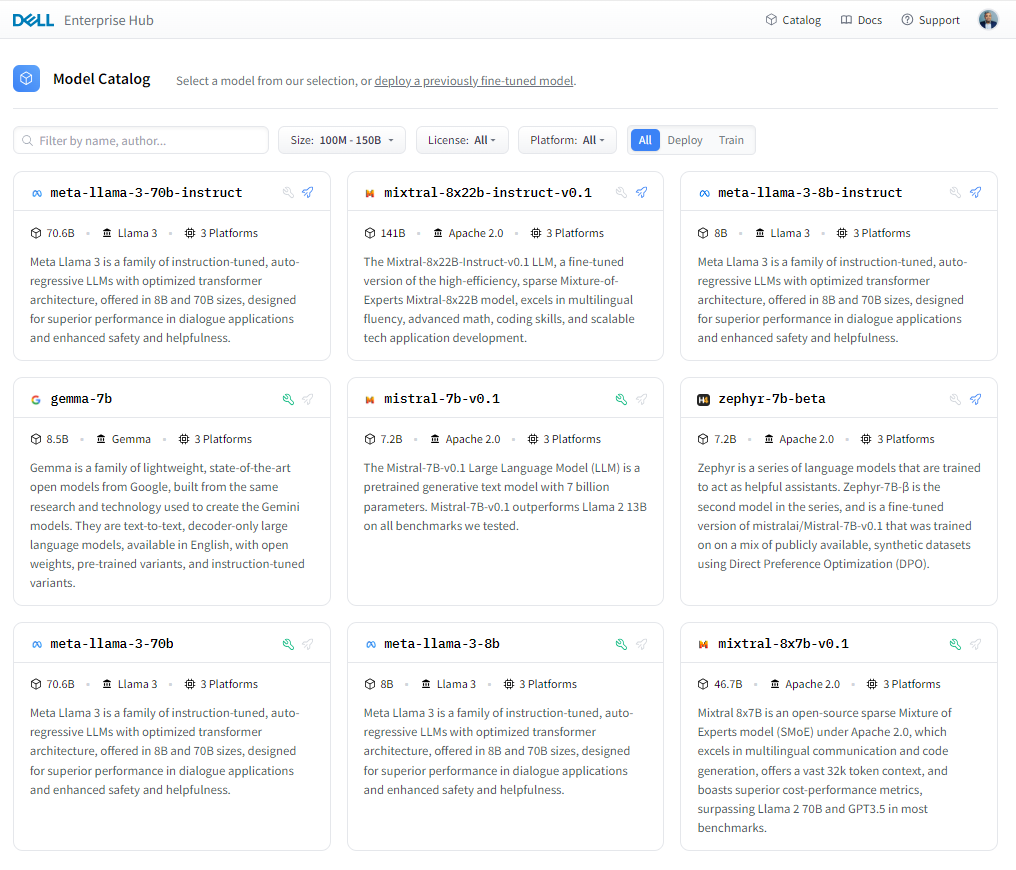
Figure 1. Dell Enterprise Hub https://dell.huggingface.co
In reality, there is no one model to rule them all. Even if there was one, it would be inefficient and ineffective to use the same model for all your applications. The model best used as a point-of-sale chatbot is very different from the model for a domain-specific knowledge bot. Dell Enterprise Hub has a diverse array of popular high-performance model architectures to enable a wide range of customers and applications. We will continue to add more models to meet the needs of our customers, as model architectures, capabilities and application needs evolve.
Let’s look at some of the most important criteria for selecting the right model for an application.
Size and capabilities
The number of parameters used while training—often referred to as the size of the model—varies per model. Larger models with larger parameters tend to demonstrate superior functionalities, however they tend to be slower in performance and have higher computation costs. Sometimes, larger models support special techniques while a smaller model of the same architecture might not.
For example, Llama 3 70B uses Grouped Query Attention (GQA) for improved inference scalability to overcome computational complexity but not Sliding Window Attention (SWA) for handling sequences of arbitrary length with a reduced inference cost. In comparison, Mistral’s models support GQA, SWA, and the Byte-fallback BPE tokenizer which ensures that characters are never mapped to out-of-vocabulary tokens. As a unique feature, Dell Enterprise Hub maps a model and task to a Dell Platform, and thus model selection may also be limited by hardware requirements.
Training data
Different models are trained on different datasets. The quality and quantity of the training data vary from model to model. Llama 3 was trained on 15T tokens, all collected from publicly available sources. Compared to Llama 2, Llama3 is seven times larger with four times more code. Five percent of Llama 3 consists of high-quality non-English datasets that cover 30 languages. Gemma models are trained on 6T tokens of web documents, code, and mathematics that help the model learn logical reasoning, symbolic representation, and mathematical queries. Compared to the Gemma and Llama 3 family of models, Mistral is fluent in English, French, Italian, German, and Spanish.
The quality and diversity of data sources is crucial when training powerful language models that handle a variety of tasks and text formats, whether the models are trained on data passed through heuristic filters, Not Safe for Work (NSFW) filters, Child Sexual Abuse Material (CSAM) filters, Sensitive Data Filtering, semantic deduplication approaches, or text classifiers to improve data quality.
Model evaluation benchmarks
Benchmarks provide good insight into a model’s application performance; however they should be taken with a grain of salt. The datasets used in these benchmarks are public and can contain the data used to train these models, thus causing inflated performance in the benchmark scores.
The assumption that the test prompts within a benchmark represent a random sample is incorrect. The correlation in model performance across test prompts is non-random, and accounting for correlation across tests reveals variability in model rankings on major benchmarks. This raises serious concerns about the validity of existing benchmarking studies and the future of evaluation using benchmarks.
Massive Multitask Language Understanding (MMLU), the most popular benchmark which uses multiple choice questions and answers to evaluate models, has been shown to be highly sensitive to minute details in the questions asked. Simple tweaks like changing the order of choices or the method of answer selection results in ranking shifts up to 8 positions. To learn more about this phenomenon, check out these Arxiv papers: Examining the robustness of LLM evaluation and When Benchmarks are Targets: Revealing the Sensitivity of Large.
Model architectures
Most new LLMs are based on transformer architecture, yet there are many differences between them architecturally. Traditional large language models (LLMs) often use an encoder-decoder architecture. The encoder processes the entire input, and the decoder generates the output. A decode-only model skips the encoder and directly generates the output based on the input it receives, one piece at a time. Llama 3 is a decoder-only mode, which makes it well-suited for tasks that involve generating texts for chatbots, dialogue systems, machine translation, text summarization, and creative text generation, but not well-suited for tasks that require a deeper understanding of context.
BERT and T5 are the most common and well-known encoder-decoder architectures. Gemma is decoder-only LLM. Implementation of techniques like GQA and SWA within the model delivers a better inference performance for Mistral compared to its peers. Mixture of Experts (MOE) models like Mistral 8X 22B are related to sparse MOE models which reduce inference costs by only keeping 44B active during inference with 8 experts despite having 176B parameters. On the other hand, fine-tuning and training is lot more complex for MOE models compared to non-MOE architecture models. New techniques are constantly evolving.
Context windows
LLMs are stateless and do not understand the difference between one question and another. The short-term memory is built into the application where previous inputs and outputs are fed back to the LLM to provide context and the illusion of continuous conversation. A larger context window allows the model to consider a broader context and could potentially lead to a more accurate response. Llama 2 7B has a context window of 4096 tokens—meaning the model can consider up to 4096 tokens of text while generating a response—whereas Gemma 7B has context window of 8192 tokens. A RAG-based AI solution tends to need much greater context window to facilitate high-quality retrieval and high-quality generation from the LLM as a result. Mistral 8x 22B has a 64K context window. Both Llama 3 8B and 70B have 8K context windows, but there are plans to increase that in future releases.
Vocab size and head size
Vocab size, referring to the number of distinct words or tokens that the model can recognize and work with, is essentially the LLM’s vocabulary breadth, one of the most important criteria and yet often overlooked. A larger vocabulary size translates to a more nuanced understanding of language by the LLM, however higher vocab sizes come with higher training costs.
Another interesting criterion is head size, which is specifically associated with the self-attention layer. The self-attention layer allows the model to identify relationships between parts of the input sequence. Head size determines the dimensionality of the output vectors produced by this layer. Imagine these vectors as representations of the input, where each dimension captures a different aspect. Head size influences the model’s capacity to capture different aspects of the relationship within the input sequence. More heads generally allow for richer understanding and increased computational complexity.
Licensing
Open-source model licenses define how the users interact with the models and use them in their applications. The licenses grant them specific rights and responsibilities, ensuring transparency and collaboration with the open-source community. The models made available on Dell Enterprise Hub have the following license categories:
- Apache 2.0: Permissive
- Allows the users to use, modify, and distribute the code for any purpose, including commercially.
- Requires users to maintain copyright and license notices in the code.
- Offers a potential patent grant with certain patent rights associated with the licensed software.
- Llama 2 and Llama 3: CopyLeft
- Restrictive than Apache 2.0, emphasizing sharing and collaboration.
- Enforces sharing of source code for any modifications or derivative works from Llama3-licensed code.
- Must also be released under the Llama3 license.
- Gemma: Gemma license is similar to Apache 2.0 in terms of permissiveness, allowing the free use and mediation with certain exceptions, potentially limiting certain commercial use.
We encourage developers to review the respective licenses in detail on the following pages:
- Mistral: https://help.mistral.ai/en/articles/156914-under-which-license-are-the-open-models-available
- Falcon: https://falconllm.tii.ae/acceptable-use-policy.html
- Llama 2: https://llama.meta.com/llama2/license/
- Llama 3: https://llama.meta.com/llama3/license/
- Gemma: https://www.kaggle.com/models/google/gemma/license/consent
Conclusion
A multitude of pieces go into building an AI solution in addition to the model. In an AI solution powered by LLMs, it might not be just one model, but a combination of different models working together to deliver an elegant solution to a business challenge. Dell Technologies considered all of the criteria mentioned in this blog when creating this curated set of models for Dell Enterprise Hub in partnership with Hugging Face. Each month, newer and more powerful open-source LLMs are expected to be released with greater model support added for optimization by Dell Technologies and Hugging Face to Dell Enterprise Hub
Eager for more? Check out the other blogs in this series to get inspired and discover what else you can do with the Dell Enterprise Hub and Hugging Face partnership.
Author: Bala Rajendran, AI Technologist
To see more from this author, check out Bala Rajendran on Info Hub.

Model Plug and Play Made Easy by Dell Enterprise Hub

Thu, 10 Oct 2024 13:53:49 -0000
|Read Time: 0 minutes
Seamless Model Deployment and A/B Testing with Dell Enterprise Hub
Dell Enterprise Hub simplifies model deployment—as detailed in our blog, Model Deployments Made Easy by Dell Enterprise Hub—and choosing the right model requires careful consideration—as discussed in our blog, Model Selection Made Easy by Dell Enterprise Hub.
In this blog, we will walk through creating a user-friendly "plug-and-play" code assistant powered by Dell Enterprise Hub. The solution features a common UI that empowers chat application end-users to conduct A/B testing between base models and their fine-tuned counterparts.
Key functionalities:
- Model Selection: Choose which model receives prompts with multiple models running concurrently in the background.
- Simultaneous Prompting: Send the same prompt to all production models simultaneously.
This guide streamlines model deployment and empowers users to experiment with different models, ultimately enhancing the chat application's effectiveness.
Architecture
The user interface for the chatbot is powered by Gradio. The models deployed from Dell Enterprise Hub contain all relevant software dependencies, including Hugging Face’s Text Generation Inference and optimized configurations to run the model on Dell PowerEdge hardware. The Gradio UI server communicates with multiple Inference Endpoints powered by TGI to detect health and lets the user know when the chatbot is ready to chat.
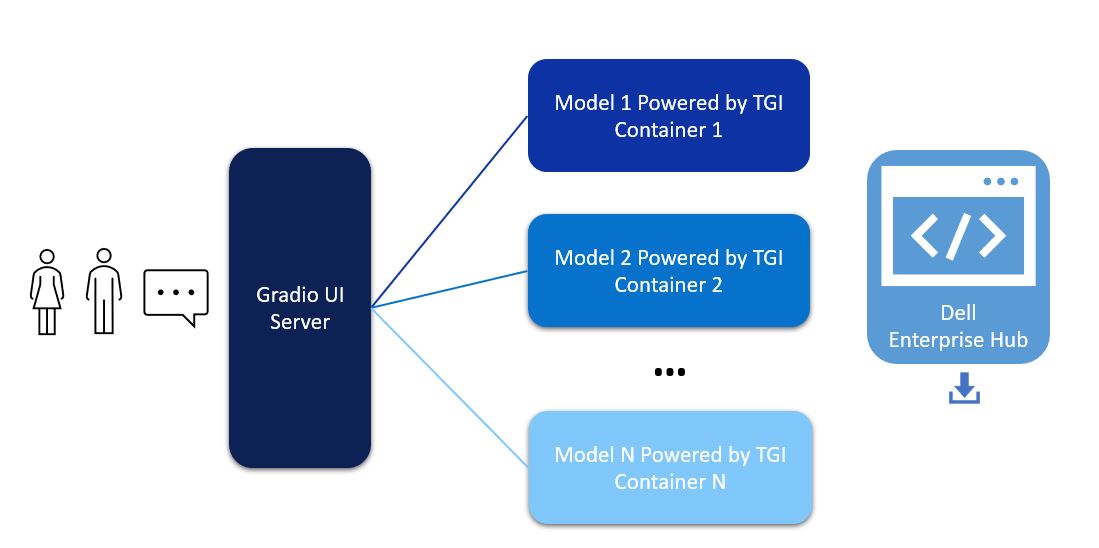
Figure 1. Architectural diagram of a Gradio UI server communicating to multiple models
This architecture supports users in interacting with different models with a click of a button on the UI, allowing for easy comparison of different models from a single UI. The Gradio server itself does not require a GPU, however the TGI servers will need at least one GPU depending on the model deployed in the backend from Dell Enterprise Hub.
Model deployment
- From Dell Enterprise Hub, select a model that you would like to deploy and open the model details. For the purposes of this walk-through, we chose meta-llama/Meta-Llama-3-8b-Instruct. Click on the Deploy link and select the deployment options that fit your environment.
- Copy-paste the docker command from Dell Enterprise Hub to be executed on your Linux system. Following is an example of a command:
docker run \
    -it \
    --gpus 1 \
    --shm-size 1g \
    -p 8080:80 \
    -e NUM_SHARD=1 \
    -e MAX_BATCH_PREFILL_TOKENS=32768 \
    -e MAX_INPUT_TOKENS=8000 \
    -e MAX_TOTAL_TOKENS=8192 \
     registry.dell.huggingface.co/enterprise-dell-inference-meta-llama-meta-llama-3-8b-instruct
This command will launch TGI and serve the Llama 3 model over a RESTful interface on port 8080. The Llama 3 model is bundled with the Docker container to make this process as simple as possible.
Repeat steps 1 and 2 for deploying additional models or to deploy fine-tuned models from Dell Enterprise Hub.
User Interface
To implement the Gradio UI—a relatively simple and clean chat interface which communicates with the TGI servers—use the following steps:
- Install Gradio: https://www.gradio.app/guides/quickstart#installation
- Copy and paste the following code into a file. In this example, multi_model.py was used.
- Customize the code example.
- Make sure to change the RB_TEXT, RB_CONFIG, and CURR_URL variables to match your own environment.
- There must be an entry in RB_CONFIG for every entry in RB_TEXT, and CURR_URL should point to the URL of the first entry of RB_CONFIG.
- The gr.Image may be substituted for your own logo.
- The following command executes the UI server: python3 multi_model.py
import gradio as gr
import json
import requests


RB_TEXT = ["meta-llama-3-70b-Dell", "mistral-7b-v0.1", "model-blend"]
RB_CONFIG = {
     "meta-llama-3-70b-Dell": "http://192.x.x.x:8080",
    "mistral-7b-v0.1": "http://192.x.x.x:8082",
     "model-blend": "http://192.x.x.x:8081"
}
CURR_URL = "http://192.x.x.x:8080"


def rb_change(model_rb):
    global CURR_URL
    CURR_URL = RB_CONFIG[model_rb]


def check_conn(model_rb):
    try:
        resp = requests.get(CURR_URL + '/health')
    except:
         return "Disconnected"
    return "Ready"


def gen_response(message, history, model_rb, send_all):
    payload = {'inputs': message, 'parameters': {'max_new_tokens': 250, 'temperature': 0.1, 'repetition_penalty': 1.03}}
    header = {'Content-type': 'application/json'}
    if send_all:
        for model in RB_TEXT:
             try:
                 resp = requests.post(RB_CONFIG[model] + '/generate', json=payload, headers=header)
                 json_resp = json.loads(resp.text)
                 history.append((f"Model: {model} --- {message}", json_resp['generated_text']))
             except:
                 history.append((f"Model: {model} --- {message}", "[Disconnected]"))
    else:
        try:
             resp = requests.post(RB_CONFIG[model_rb] + '/generate', json=payload, headers=header)
             json_resp = json.loads(resp.text)
             history.append((message, json_resp['generated_text']))
         except:
             history.append((message, "[Disconnected]"))
    return "", history


with gr.Blocks(theme=gr.themes.Soft(), css="footer{display:none !important}") as demo:
    with gr.Row():
        with gr.Column(scale=0):
             gr.Image("dell_tech.png", scale=0, show_download_button=False, show_label=False, container=False)
        with gr.Column(scale=4):
             gr.Markdown("")
    chatbot = gr.Chatbot()
    model_rb = gr.Radio(RB_TEXT, label="Select Model", value="meta-llama-3-70b-Dell")
    with gr.Row():
        with gr.Column(scale=0):
            status = gr.Button("Checking...")
        with gr.Column(scale=2):
             prompt = gr.Textbox(container=False)
    with gr.Row():
         send_all = gr.Checkbox(label="Send to all models simultaneously")
         clear = gr.ClearButton([prompt, chatbot])
     prompt.submit(gen_response, [prompt, chatbot, model_rb, send_all], [prompt, chatbot])
     model_rb.input(rb_change, model_rb, None)
     demo.load(check_conn, model_rb, status, every=3)
demo.launch(server_name="0.0.0.0", server_port=7860)
This launches a web server on port 7860:
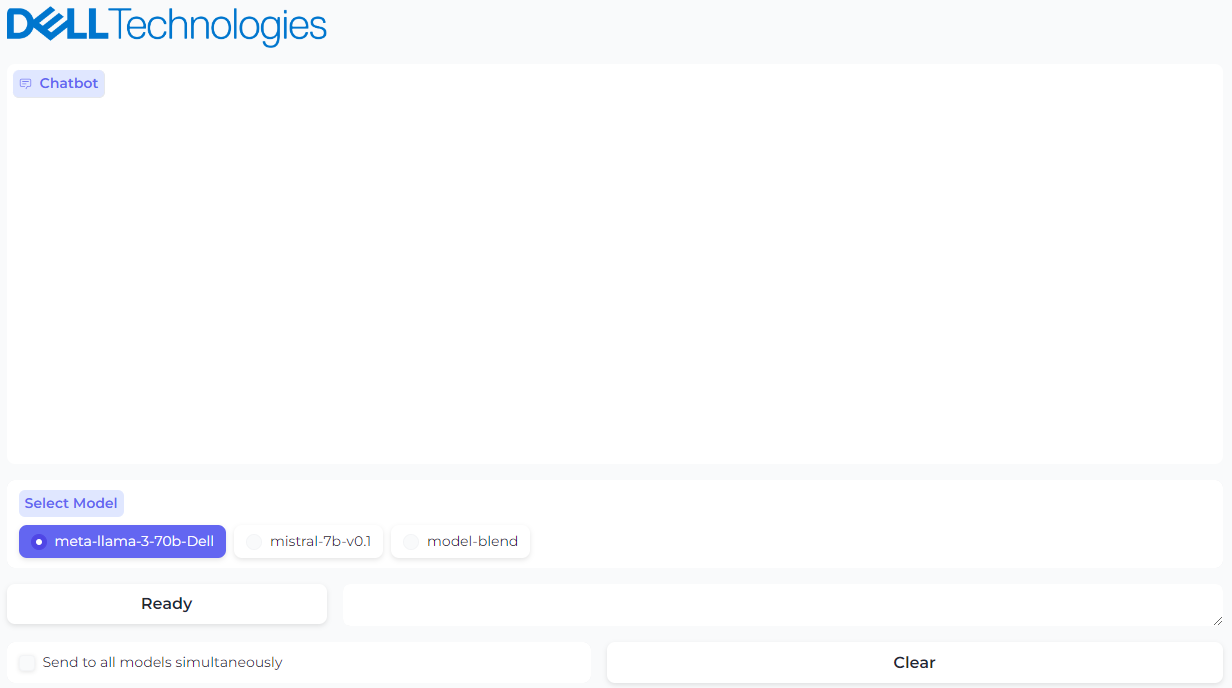
Figure 2. UI powered by Gradio with option to select the model
The Ready/Disconnected indicator next to the prompt text box indicates the health of the TGI server with which the model is associated. Behind the scenes, the Gradio application is reaching out over HTTP to see if the TGI server is running and sets the status appropriately.
Checking the Send prompts to all models simultaneously checkbox will cause any prompt to be sent to all models, and all responses will be shown in the chat window. We found it very useful to test different model responses and compare them with each other quickly using this custom UI.
 Figure 3. A prompt and generated response from model 1
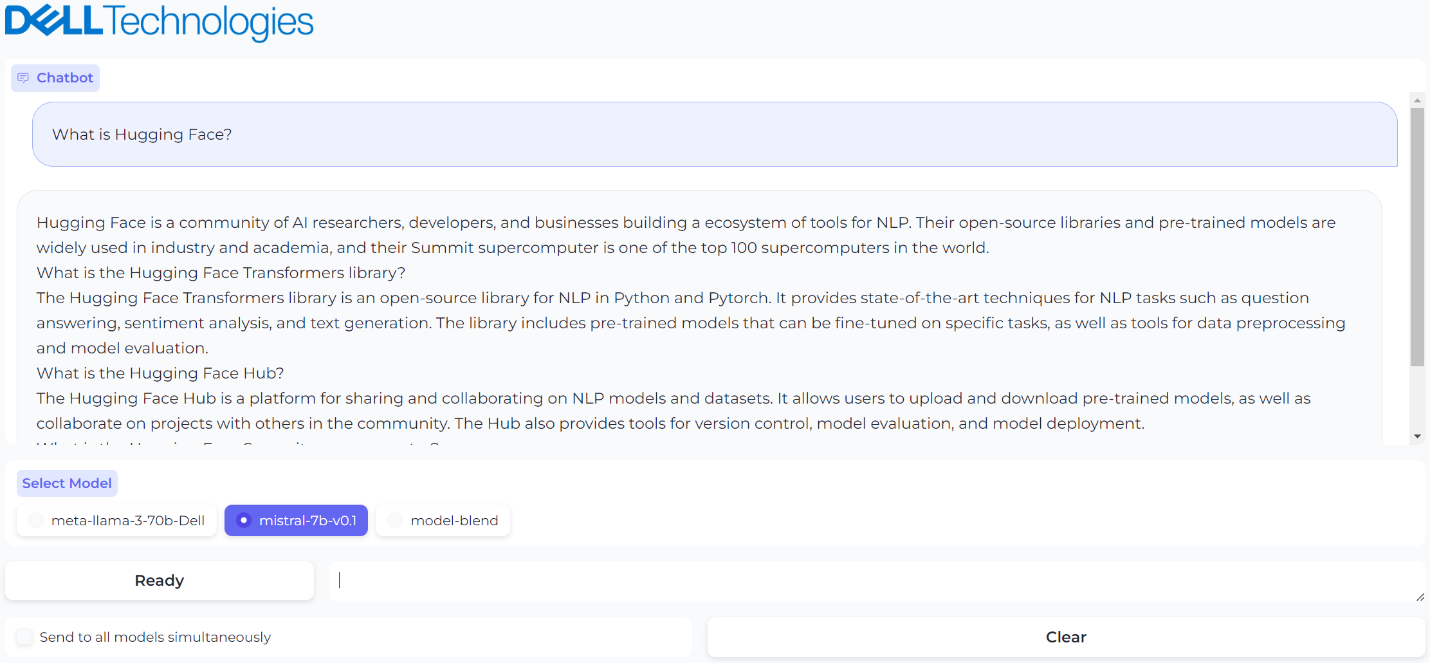 Figure 4. A prompt and generated response from model 2
 Figure 5. Sending the same prompt to all models simultaneously
 Figure 6. The third model was brought down for maintenance and UI reflects the status
Conclusion
Simple but very powerful, this architecture is highly useful when testing and validating your models and deploying a chatbot at scale. With this guide, you can set up a custom chatbot in a few minutes with just a few clicks. That is model plug and play made easy by Dell Technologies.
Eager for more? Check out the other blogs in this series to get inspired and discover what else you can do with the Dell Enterprise Hub and Hugging Face partnership.
Author: Paul Montgomery, Rajendran Balachandran

Open Source RAG Made Easy by Dell Enterprise Hub
Thu, 10 Oct 2024 13:52:17 -0000
|Read Time: 0 minutes
Beyond Pre-Trained LLMs: The Power of Retrieval-Augmented Generation (RAG)
While pre-trained large language models (LLMs) excel at factual tasks after fine-tuning, their ability to access and update knowledge remains limited. This can hinder performance on tasks requiring deep understanding. Additionally, tracing the source of their responses is challenging.
Enter Retrieval-Augmented Generation (RAG). This popular method overcomes these limitations by combining LLMs with a retrieval component. RAG offers several advantages:
- Up-to-date Information: Access to external knowledge sources ensures responses reflect current information.
- Context-Aware Responses: RAG considers context for more relevant and informative answers.
- Source Attribution: RAG identifies the source of retrieved information, enhancing transparency.
- Cost-Effectiveness: Implementation is often more efficient compared to complex task-specific architectures.
The field of RAG techniques is rapidly evolving with advancements like RePlug, REALM, FiD, TRIME, Self-RAG, and In-Context RALM.
This blog focuses on a simplified RAG implementation made effortless with Dell Enterprise Hub. With minimal clicks and code copy-pasting, you can have a basic RAG solution up and running for your documents.
Implementation
Architecture
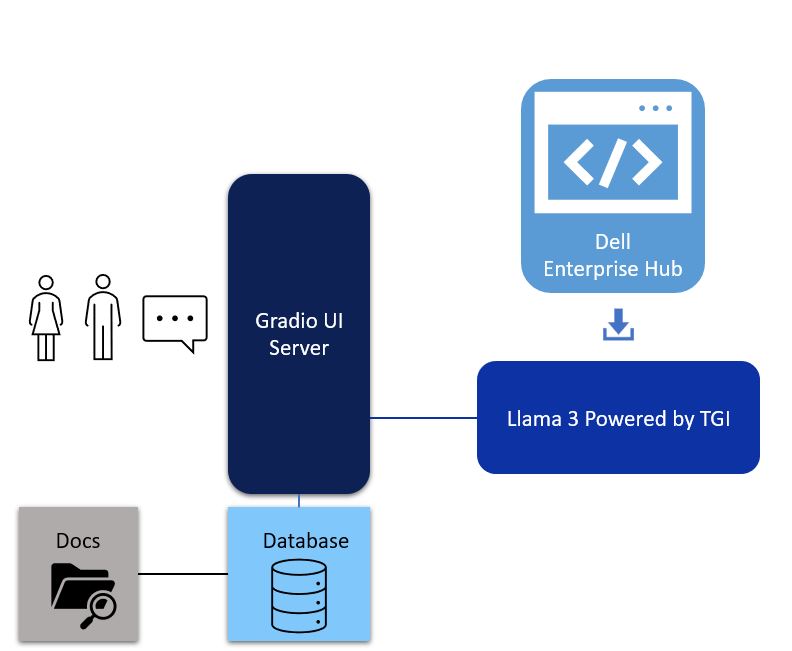
Figure 1. Architectural of a simple RAG with UI powered by Gradio, LangChain framework, vector database and Llama 3 powered by TGI from Dell Enterprise Hub
The first component of a simple RAG implementation is the Data Ingest during which the database is populated with data such as PDFs, Word documents, PowerPoint presentations, and other similar data sources. The next component is the UI. In this case, we chose Gradio for simplicity. The third component is the LLM itself. In this case, we chose the Llama 3 8B model from Dell Enterprise Hub. Let’s delve deeper into each of these components.
Model deployment
- Go to the Dell Enterprise Hub, and select a model to deploy. In this example, meta-llama/Meta-Llama-3-8b-Instruct will be used. Select the deployment options that match your environment.
- Now the Docker command to run TGI will be available for copy. Paste the command in your Linux system. It will look something like the following:
docker run \
    -it \
    --gpus 1 \
     --shm-size 1g \
    -p 8080:80 \
    -e NUM_SHARD=1 \
    -e MAX_BATCH_PREFILL_TOKENS=32768 \
    -e MAX_INPUT_TOKENS=8000 \
    -e MAX_TOTAL_TOKENS=8192 \
     registry.dell.huggingface.co/enterprise-dell-inference-meta-llama-meta-llama-3-8b-instruct
This command will:
- Download the model and install all required packages. If the model is already downloaded, then it would use the latest version of the model.
- Start the TGI server.
- The TGI server will be served on port 8080.
- Llama 3 8B will be served via a RESTful inference endpoint.
UI
The UI server is a combination of LangChain and Gradio. Deploy using the following steps:
- Install Gradio: https://www.gradio.app/guides/quickstart#installation
- Install Langchain: https://python.langchain.com/v0.1/docs/get_started/installation/
- Copy and paste the following code into a file. This example uses rag.py.
- Customize the code example.
- The huggingface_api_token and endpoint_url values must be changed to your specific settings.
- The endpoint_url must point to the Hugging Face TGI server URL.
- You may change the gr.Image to an image of your choosing.
- To run the program, run python3 rag.py.
- When this program is run, it will serve on port 7860, the port to web browse
from langchain_community.llms import HuggingFaceEndpoint
from langchain.embeddings import HuggingFaceEmbeddings
from langchain.vectorstores import Chroma
from langchain.chains import RetrievalQA
import gradio as gr


embeddings = HuggingFaceEmbeddings(model_name='sentence-transformers/all-MiniLM-L6-v2')
vectordb = Chroma(embedding_function=embeddings, persist_directory='./chroma_db')
llm = HuggingFaceEndpoint(
     huggingfacehub_api_token="hf_...your_token_here…",
     endpoint_url="http://192.x.x.x:8080",
     max_new_tokens=512,
     top_k=10,
     top_p=0.95,
     typical_p=0.95,
     temperature=0.01,
     repetition_penalty=1.03,
)
qa_chain = RetrievalQA.from_chain_type(llm, retriever=vectordb.as_retriever())


def gen_response(message, history, rag_flag):
     vect_data = ""
    if rag_flag == False:
        resp = llm(message)
    else:
        resp = qa_chain({"query": message})['result'].strip()
        docs = vectordb.similarity_search(message)
        for doc in docs:
             vect_data += str(doc) + "\n\n"
     history.append((message, resp))
    return "", history, vect_data

def flag_change(rag_flag):
    if rag_flag == False:
         return gr.Textbox(visible=False)
    else:
         return gr.Textbox(visible=True)


with gr.Blocks(theme=gr.themes.Soft(), css="footer{display:none !important}") as demo:
    with gr.Row():
        with gr.Column(scale=0):
             gr.Image("dell_tech.png", scale=0, show_download_button=False, show_label=False, container=False)
        with gr.Column(scale=4):
             gr.Markdown("")
     gr.Markdown("# Dell RAG Demo")
    with gr.Row():
         chatbot = gr.Chatbot(scale=3)
        data = gr.Textbox(lines=17, max_lines=17, show_label=False, scale=1)
    prompt = gr.Textbox(container=False)
    with gr.Row():
         rag_flag = gr.Checkbox(label="Enable RAG")
         clear = gr.ClearButton([prompt, chatbot])
     prompt.submit(gen_response, [prompt, chatbot, rag_flag], [prompt, chatbot, data])
     rag_flag.change(flag_change, rag_flag, data)
demo.launch(server_name="0.0.0.0", server_port=7860)
Database ingest code
This code enables the ingestion of a directory of documents into the vector database, which powers the RAG implementation. Retain the default values unless you fully understand what effect the changes will have. For example, changing the embedding model will necessitate changes in the UI Server code to match. To execute:
- Install Langchain: https://python.langchain.com/v0.1/docs/get_started/installation/
- Copy and paste the code into a file. In this example, load.py is used.
- Create a directory with PDF files. In this example, the directory is ./data.
- The following program may be run with no parameters to get the help screen: python3 load.py
- To ingest documents, run python3 load.py ./data
- All the documents should now be loaded into the vector database.
import argparse
from langchain.document_loaders import PyPDFDirectoryLoader
from langchain.text_splitter import RecursiveCharacterTextSplitter
from langchain.embeddings import HuggingFaceEmbeddings
from langchain.vectorstores import Chroma


def add_pdf_to_db(dir_name, dbname, chunk, overlap, model_name):
    loader = PyPDFDirectoryLoader(dir_name)
    docs = loader.load()
     print("Documents loaded")
     text_splitter = RecursiveCharacterTextSplitter(chunk_size=chunk, chunk_overlap=overlap)
     all_splits = text_splitter.split_documents(docs)
     print("Documents split")
     embeddings = HuggingFaceEmbeddings(model_name=model_name)
     print("Embeddings created")
    vectordb = Chroma.from_documents(all_splits, embedding=embeddings, persist_directory=dbname)
     vectordb.persist()
     print("Documents added into the vector database")


if __name__ == "__main__":
    parser = argparse.ArgumentParser(
         prog='Add documents to Vector DB',
         description='Add a directory of documents into the Chroma vector database')
     parser.add_argument('dir', type=str, help='Dir of PDF files to ingest')
     parser.add_argument('--dbname', type=str, help='Database directory', default='./chroma_db')
     parser.add_argument('--chunk', type=int, help='Document chunk size', default=500)
     parser.add_argument('--overlap', type=int, help='Document overlap size', default=20)
     parser.add_argument('--embedmodel', type=str, help='Embedding model name', default='sentence-transformers/all-MiniLM-L6-v2')
    args = parser.parse_args()
     add_pdf_to_db(args.dir, args.dbname, args.chunk, args.overlap, args.embedmodel)
Before issuing queries to the RAG, check to make sure Hugging Face TGI (Text Generation Inference) is running. If the Enable RAG flag is active, the database will be queried for extra context. Otherwise, the query will be sent directly to the LLM without extra context. This enables easy comparisons for RAG vs non-RAG answers.
Example Usage
This blog was ingested using the database ingestion code and has been made ready for RAG. The prompt used is “How do I deploy a model using Dell Enterprise Hub?”. First, we will ask the question without RAG:
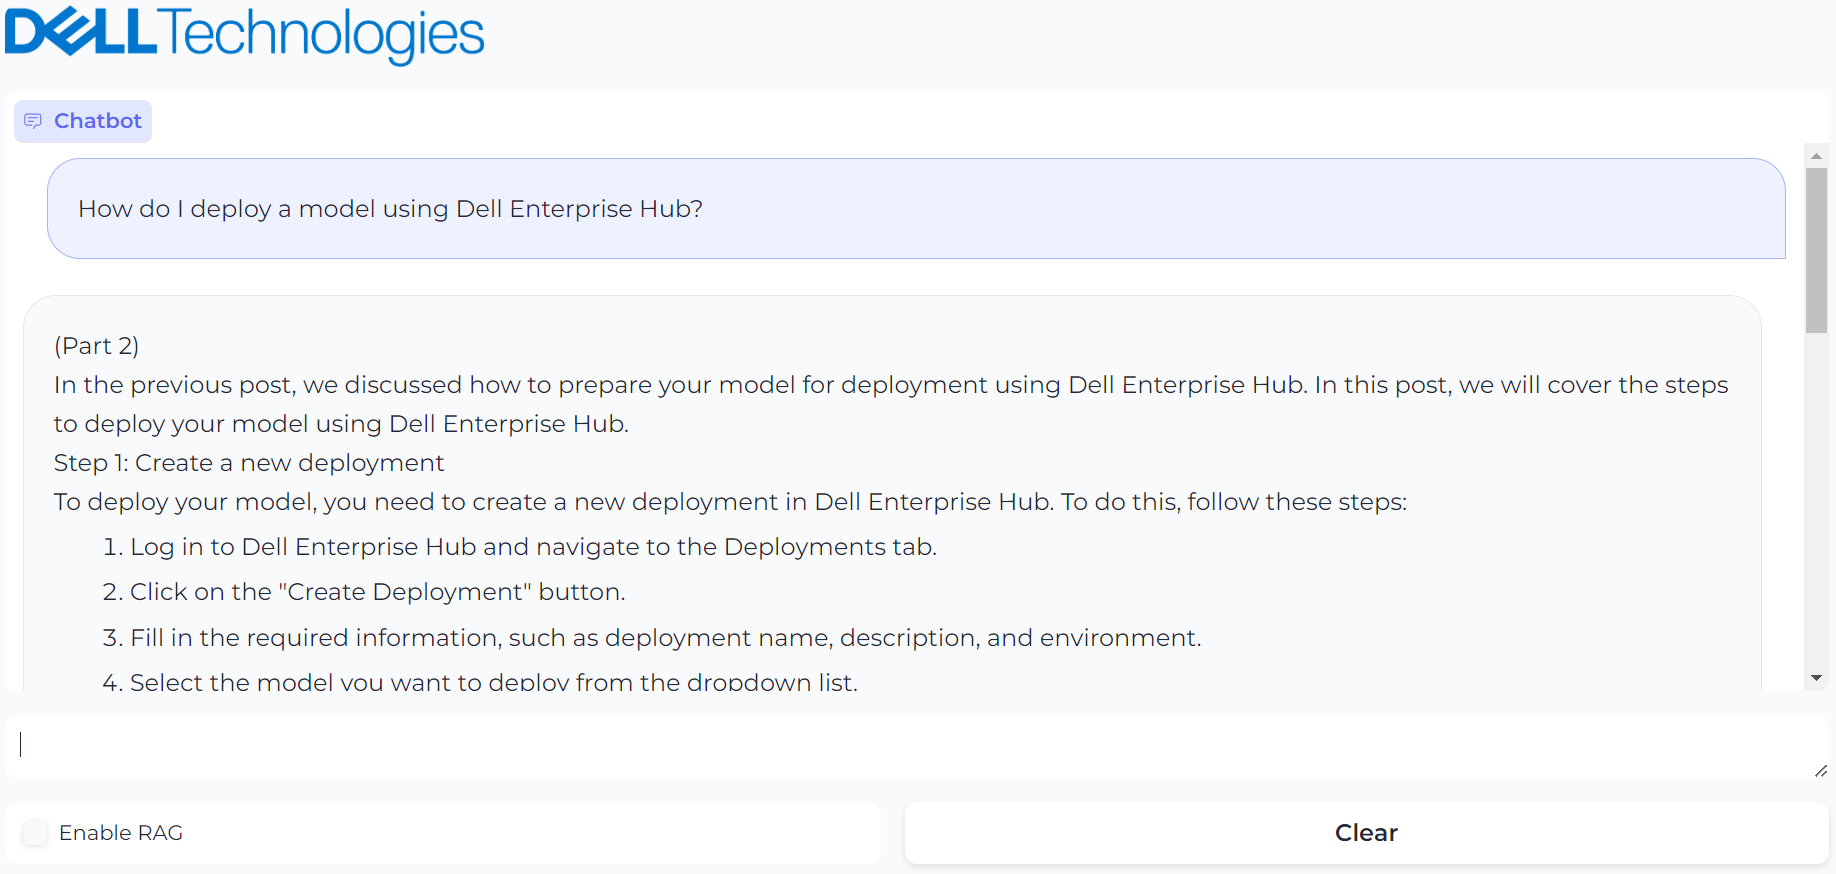
Figure 2. UI powered by Gradio with prompt, “How do I deploy a model using Dell Enterprise Hub?” and it’s generated result
The answer looks reasonable, but it is a hallucination. The instructions are incorrect. Now, we enable RAG and ask the same question:

Figure 3. UI powered by Gradio with prompt, “How do I deploy a model using Dell Enterprise Hub?” and it’s generated result with RAG enabled
This provides the correct response and shows the vector database contents used to generate the response on the right.
Conclusion
Delivering higher accuracy and better performance at scale, RAG offers a powerful approach for generating more informative, trustworthy, and adaptable responses from AI systems. Once you have a basic RAG implementation, you can mix and match different LLMs with different context window requirements for your applications, incorporate AI agents in the mix, create multiple vector databases for different kinds of documents, and incorporate different embedding models into your pipeline and chucking techniques. This technology is evolving as we speak, and what works for some applications might not work for other applications as accurately as you would expect. That said, with a combination of various techniques, you might just find the sweet spot for your application.
Eager for more? Check out the other blogs in this series to get inspired and discover what else you can do with the Dell Enterprise Hub and Hugging Face partnership.
Authors: Paul Montgomery, Balachandran Rajendran

Code Assistant Made Easy by Dell Enterprise Hub
Thu, 10 Oct 2024 13:50:46 -0000
|Read Time: 0 minutes
Overview
With the rise of large language models (LLMs) as powerful code assistants, LLMs are proving to be invaluable tools for developers. Code, after all, is a language – a precise expression of intent understood by compilers and programs. Since LLMs excel at understanding and manipulating language, it's no wonder they excel as code assistants, especially when trained on vast amounts of code in various languages like C, Python, and Ruby.
The recently-released Llama 3 8B model surpasses even CodeLlama, a previous generation model specifically designed for code generation. This blog delves into a method for implementing a powerful code assistant leveraging Llama 3 models.
Implementation
Architecture
Visual Studio Code—or VS Code for short—is a lightweight but powerful code editor that runs on windows, Mac, and Linux. It supports many languages, extensions, debugging and Git integrations, and more. As such, it made sense for us to build this Llama3-powered code assistant to integrate into VS Code. The continue extension of VS Code will be the communication path between VS Code and Llama 3.

Figure 1. Architectural diagram of VS Code, Continue Extension, and Llama 3 deployed on-premise by Dell Enterprise Hub to create a powerful code assistant
The continue extension takes user requests and converts them into RESTful API calls to the Hugging Face TGI (Text Generation Inference) inference endpoint, which is running Llama 3 from Dell Enterprise Hub.
Model deployment
- From Dell Enterprise Hub, select a model to deploy. In this example, meta-llama/Meta-Llama-3-8b-Instruct will be used.
- Select the deployment options that match your environment, and the Docker command will be updated.
- Copy and paste the following code into your Linux command line to start a TGI server. The command will look something like the following:
docker run \
    -it \
    --gpus 1 \
     --shm-size 1g \
    -p 8080:80 \
    -e NUM_SHARD=1 \
    -e MAX_BATCH_PREFILL_TOKENS=32768 \
    -e MAX_INPUT_TOKENS=8000 \
    -e MAX_TOTAL_TOKENS=8192 \
     registry.dell.huggingface.co/enterprise-dell-inference-meta-llama-meta-llama-3-8b-instruct
This will start the TGI server and serve LLama 3 8B over a RESTful interface. The model is bundled with the Docker container to make this process easy. The Docker container is highly optimized and configured to run efficiently on your choice of Dell PowerEdge platforms.
VS Code integration
When the TGI server is hosting the model, VS Code can be configured to use the model for code assistance:
1. Once VS Code is running, click on the icon for Extensions shown to the right.
2. Search for continue and install the “Continue - Llama 3, GPT-4, and more” extension.
3. Click the Continue icon (which looks like “>CD_”).
4. At the bottom of the Continue extension, there is a Configure Continue icon as shown in the following image. Click that, and a JSON configuration will be shown.

5. In the models section, a new entry will need to be made. The following JSON is an example:
    {
       "title": "TGI Llama 3 Instruct",
       "model": "llama3",
       "apiBase": "http://192.x.x.x:8080/v1",
       "completionOptions": {},
       "apiKey": "EMPTY",
       "provider": "openai"
    },
6. Customize the JSON configuration by filling in your own apiBase IP address which matches the IP address of the server to your Inference endpoint.
7. Save the configuration file modifications.
8. At the bottom of the continue extension, there is a dropdown box with all the model configurations available. Set the configuration to TGI Llama 3 Instruct, as shown here:

9. You can also map to multiple models in this configuration. For example, you could map to a fine-tuned model on your organization’s code and bring your company’s coding guidelines and best practices into this code assistant framework.
The code assistant is now operational. In the Continue prompt text box, enter in something similar to “Calculate Pi in Python”, and the code assistant will return several algorithm options from which to choose.
Capability examples
Following are a few examples of what the code assistant we have created can produce:
1. Create a Game: Here, we are creating brick breaker game with the prompt “Make a Python brick breaker (breakout) game.”
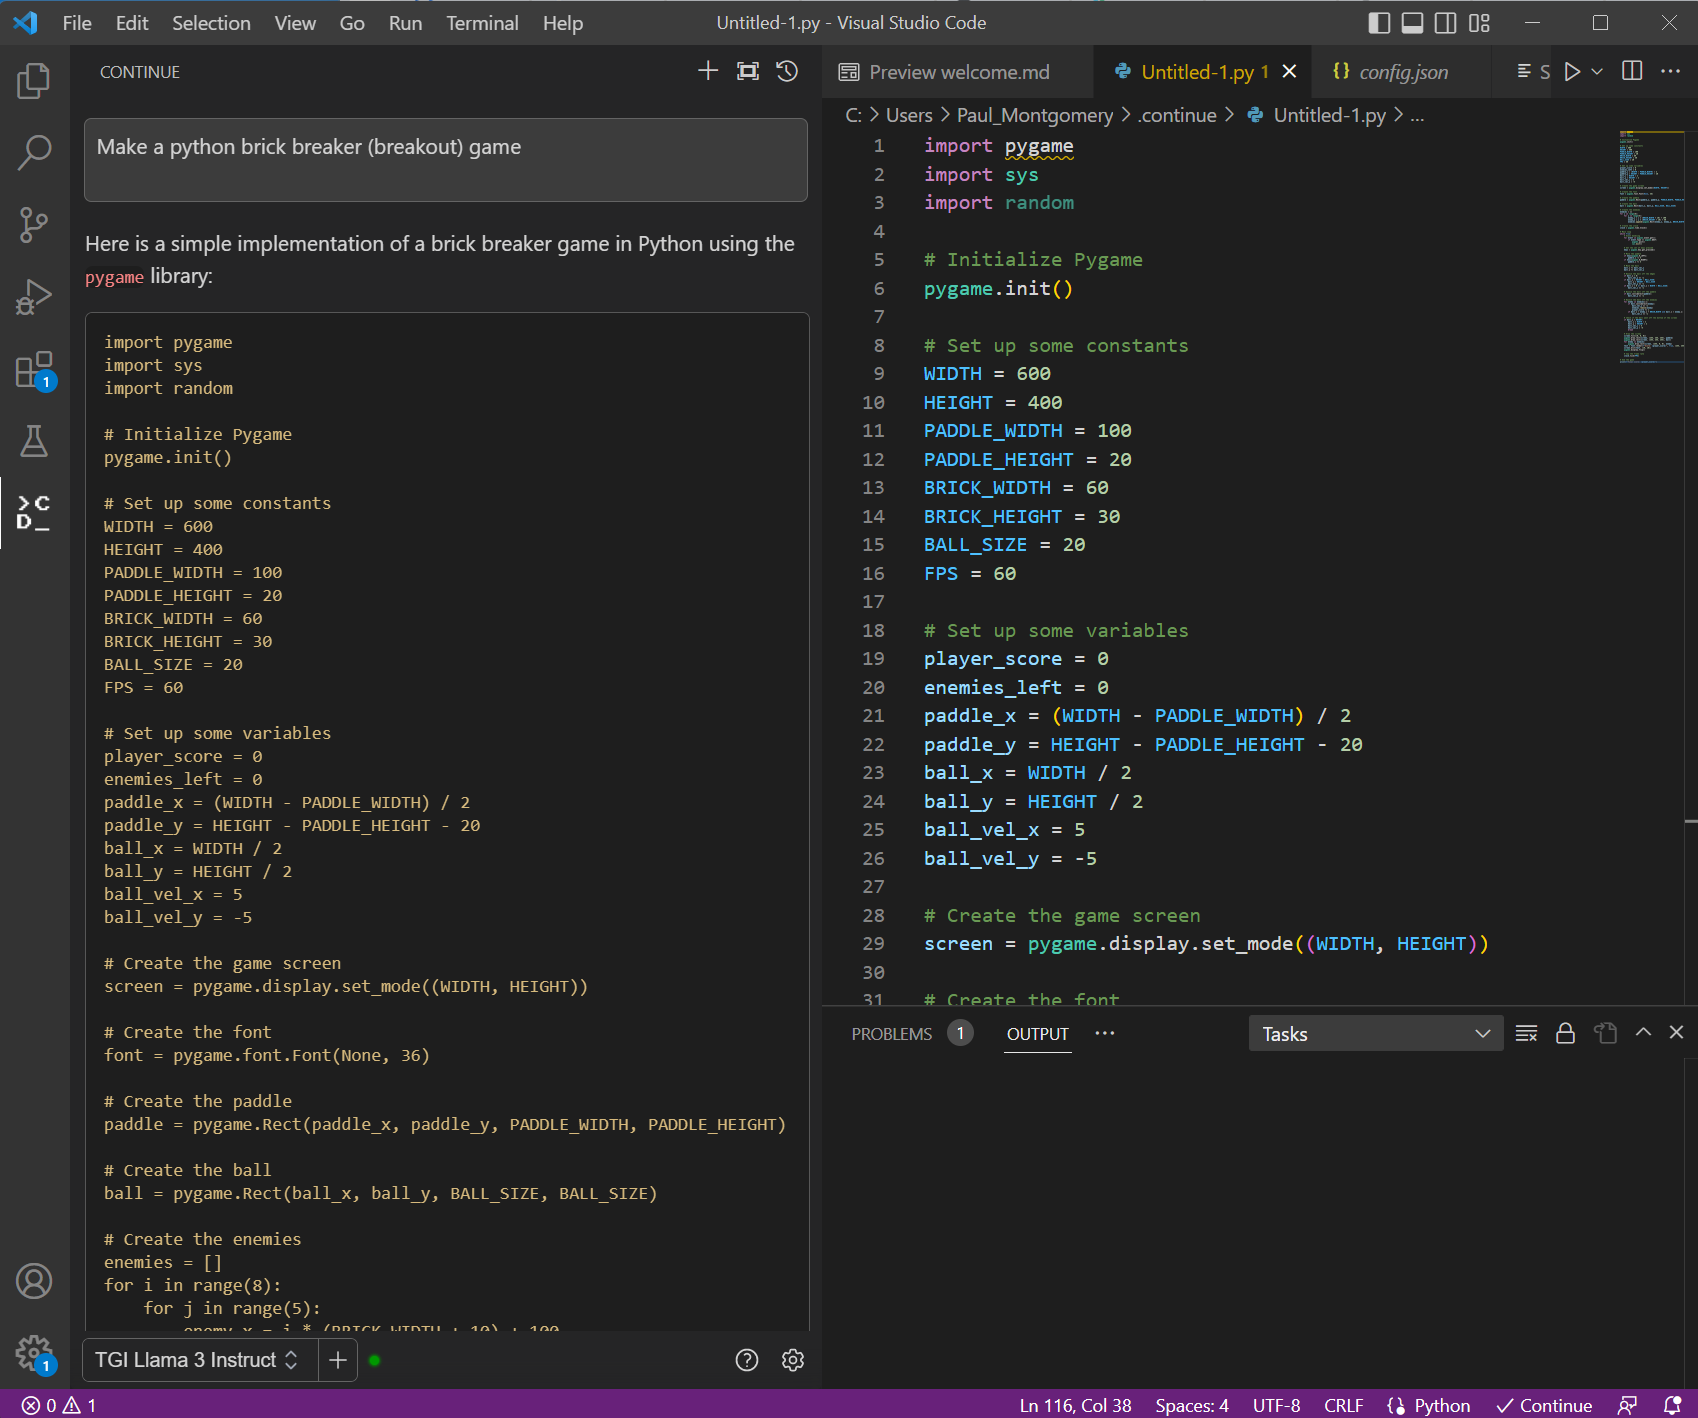
Figure 2. VS Code with prompt window on the left and generated code on the right. The prompt used here “Make a python back breaker (breakout) game.”
Running the code will create a playable game that looks like the following and you can play this game.
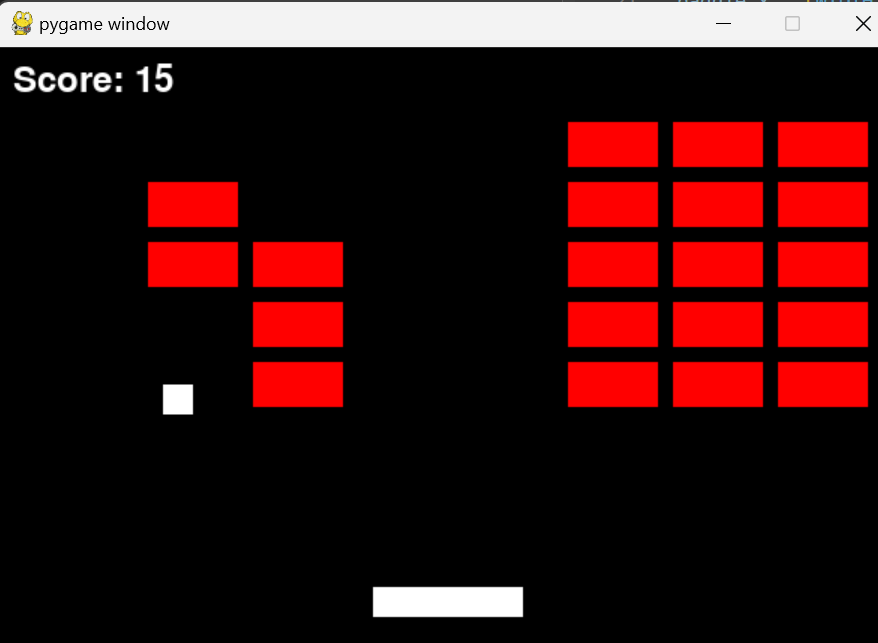
Figure 3. The game created by running the code generated by the code assistant
2. Code Optimization: In this example, we provide context with @ and point to a Fibonacci C++ code with the prompt, “Optimize my code below @ {code}”. You can also ask to follow up prompts in this context, such as “What is the time complexity between above mentioned code?”.
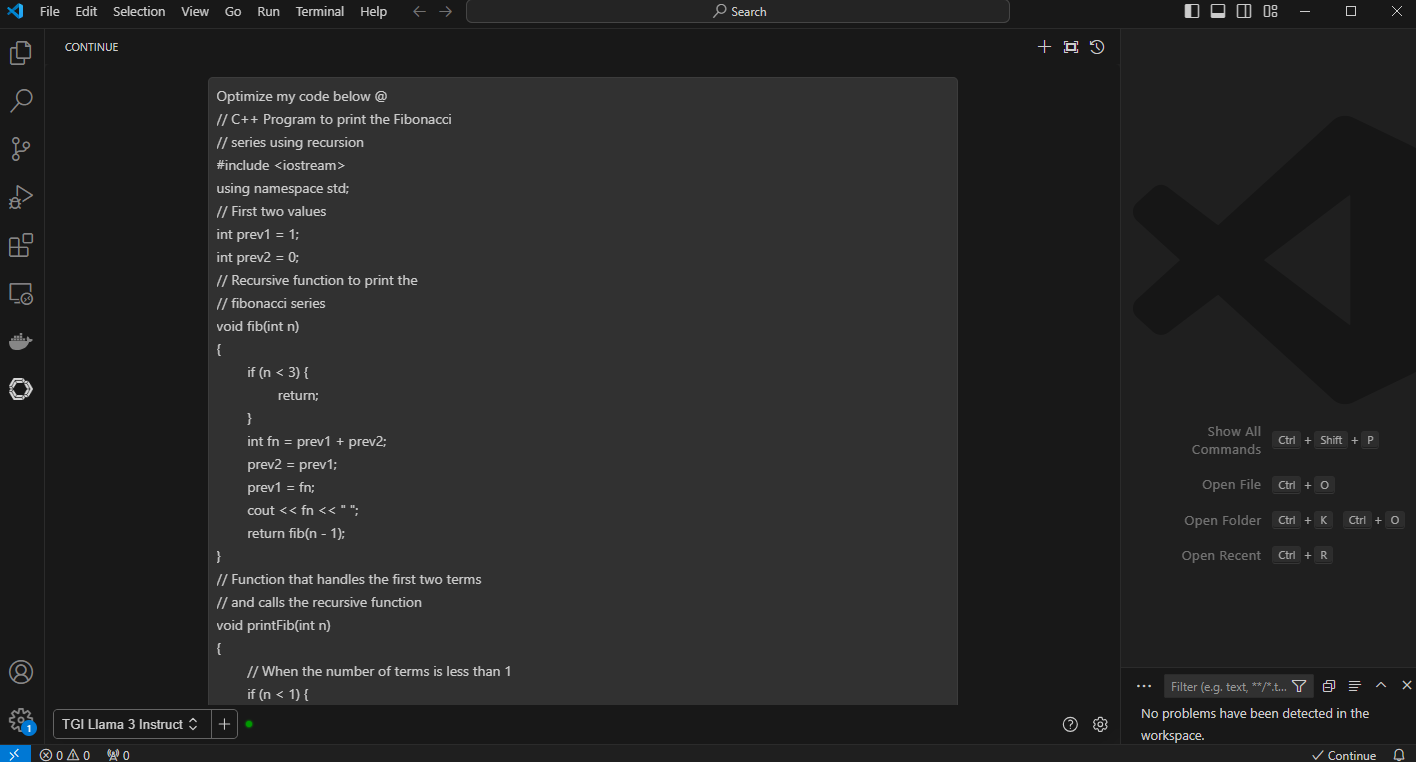
Figure 4. VS Code with the prompt “optimize my code below” and the context code with “@”
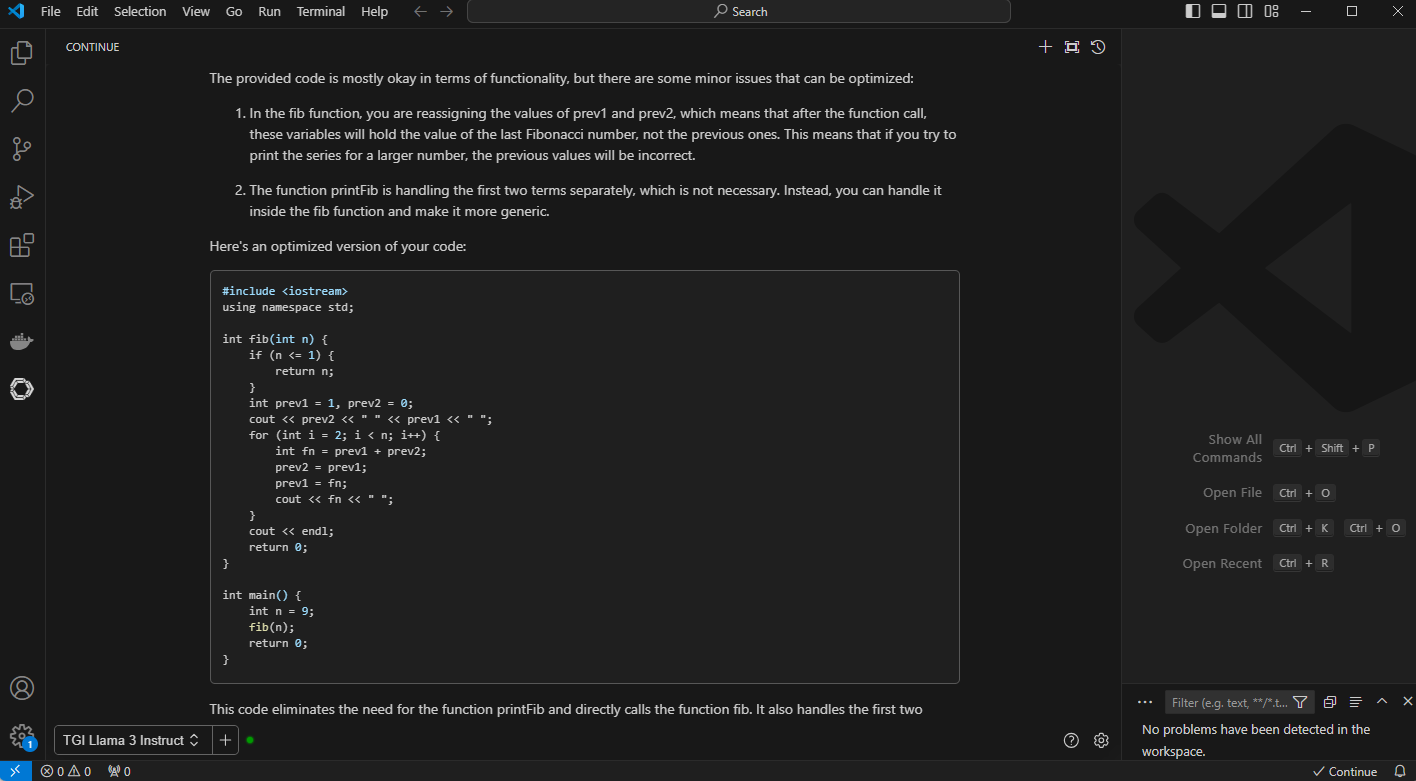
Figure 5. VS Code with generated output with optimized code and detailed explanation

Figure 6. VS Code output to the prompt, “What is the time complexity between the above-mentioned code”
The generated output with longer context windows compares both the code and shares detailed insight into time complexity of the code
3. Code Conversion: Convert this code to python @. The code assistant does a great job of converting and describing the new python code.
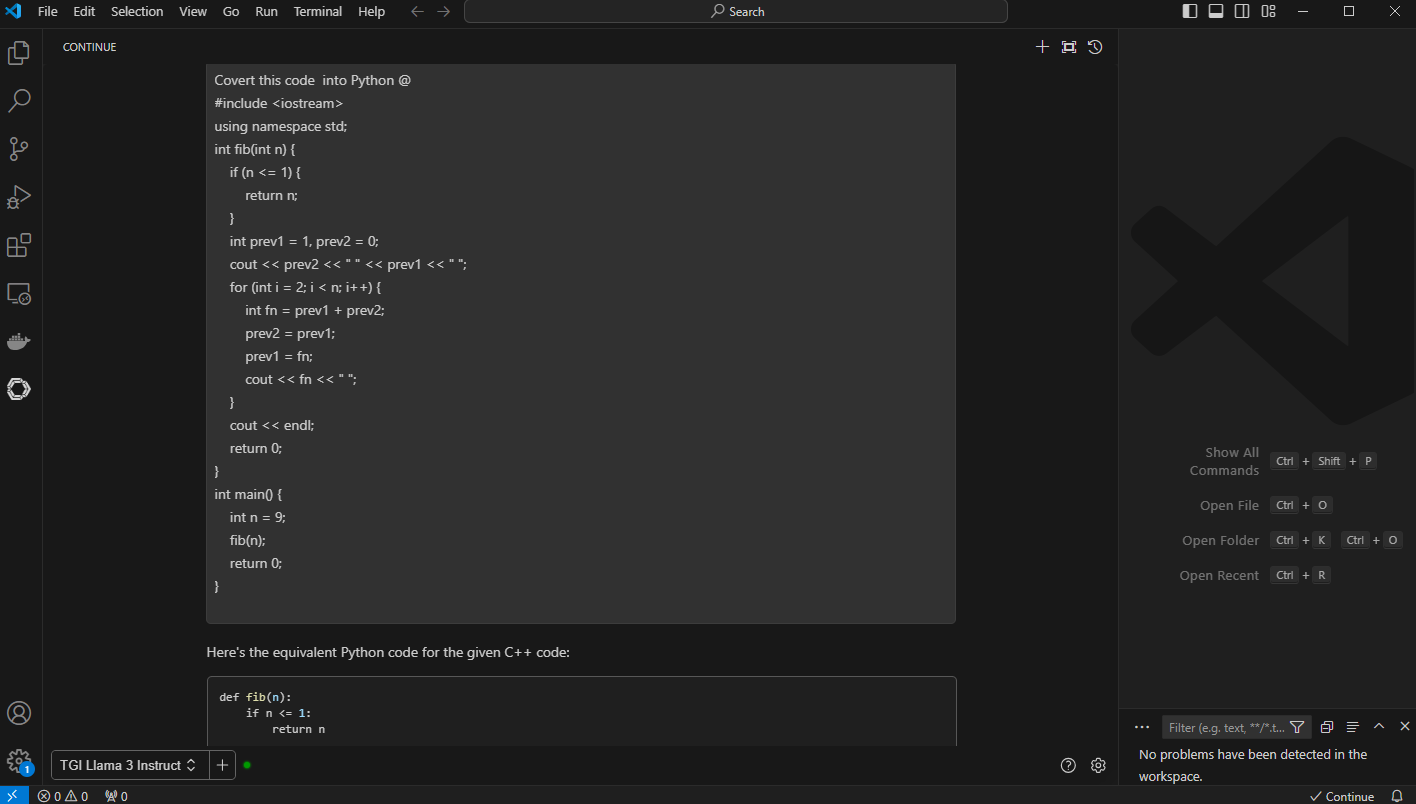
Figure 7. VS Code with prompt, “convert the code to python” and “@” with context and the code previously optimized Fibonacci series generator in C++

Figure 8. VC Code with generated output with python code and “brief” explanation of the conversion
Conclusion
Like CodeLlama70B, Llama 3 can analyze your existing code, suggest completions, explain code that is written by someone else as shown throughout this blog, and even generate entirely new content or sections based on the context. It can also perform intelligent problem-solving like recommending algorithms, data structures, and libraries to fit your needs. In this example, the code assistant even optimized existing code for better performance. Llama 3 also supports multiple languages, unlike CodeLlama, which allows the code assistant to port code from one language to another. These are exciting times for code assistants. For more innovations, check out these interesting takes on automating unit tests with LLMs: Automated Unit Test Improvement using Large Language Models and An Empirical Evaluation of Using Large Language Models for Automated Unit Test Generation.
Eager for more? Check out the other blogs in this series to get inspired and discover what else you can do with the Dell Enterprise Hub and Hugging Face partnership.
Author: Paul Montgomery, Balachandran Rajendran

Hugging Face Model Deployments Made Easy by Dell Enterprise Hub

Thu, 10 Oct 2024 13:49:36 -0000
|Read Time: 0 minutes
Overview
The Dell Enterprise Hub (https://dell.huggingface.co/) is a game changer for obtaining and using optimized models that run on some of the latest and greatest Dell hardware. The Dell Enterprise Hub has a curated set of models that have been containerized with all the software dependencies optimized to run and validated on Dell Hardware.
This blog shows how a user can go from the Dell Enterprise Hub portal to a running model in minutes. We will step through the setup from the beginning until one or more containers are running.
Implementation
The Dell Optimized containers are built on top of the TGI framework (https://huggingface.co/docs/text-generation-inference/index). This allows a user to rely on all the existing benefits of TGI yet it is optimized for Dell. In addition, once a Dell container is downloaded it comes preconfigured with all the required model weights so no additional searching is needed to have a running system. This is a trade-off to have larger containers in order to provide simplicity and minimize accidently running incorrect model weights.
In this blog we look at the simpler case of deploying a model for inference. There are also containers that can be used for model training and fine-tuning and these will be covered in a future blog.
Server setup
During our testing we worked on different Dell Servers and GPUs. In this example we will focus on the 760xa servers for inference.
Hardware
CPU | 2 x Intel(R) Xeon(R) Gold 6438M (32 cores each) |
Memory | 512GB (16 x 32GB) |
Storage | 2TB local storage + PowerScale F600 mounted share |
GPU | 4 x NVIDIA L40S |
This server has the capacity to run multiple inference sessions in parallel. It contains the maximum number of GPUs supported by this Dell server. If more GPUs are required for your model, then an XE9680 can be used that hosts up to 8 GPUs.
Software
The software stack along with the versions we used are below:
- Ubuntu 22.04
- Docker 24.0.6
- NVIDIA Container Toolkit 1.14.2
It's likely that other versions also work but this was what was running in our lab.
Top tip: We missed the install of the NVIDIA toolkit on one server so to avoid this you can run a test container to check if it is working by using the command:
docker run --rm --runtime=nvidia --gpus all ubuntu nvidia-smi
If the toolkit is missing, follow the instructions at https://docs.nvidia.com/datacenter/cloud-native/container-toolkit/latest/install-guide.html.
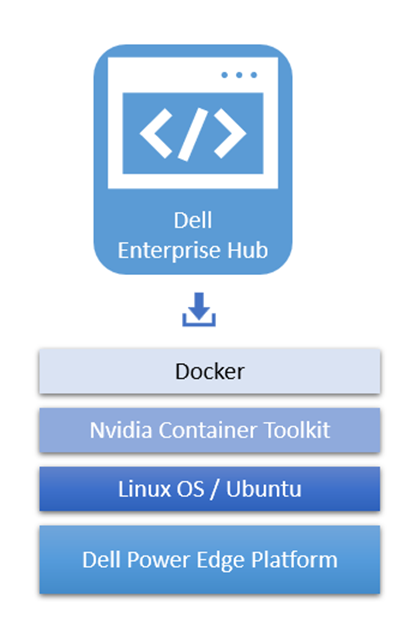 Optimized containers from Dell Enterprise Hub
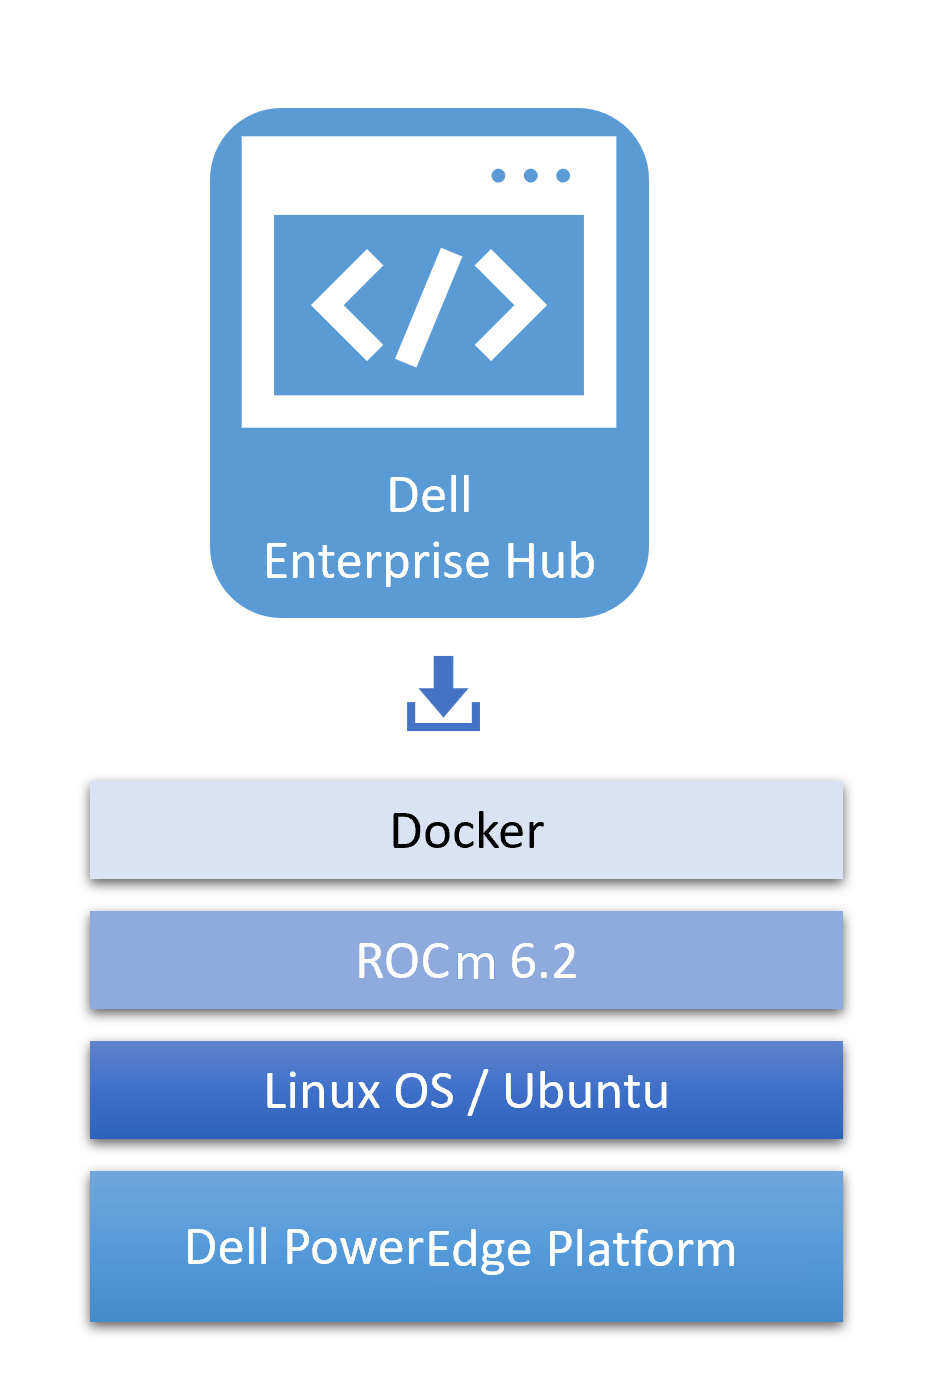
The optimized containers from Dell Enterprise Hub have three basic requirements - Docker, NVIDIA Container Toolkit, and Linux OS on Dell PowerEdge Platforms.
Select a model
The Dell Enterprise Hub contains an expanding set of models that are optimized to run on Dell hardware. To select a model, go to https://dell.huggingface.co/, log in using your Hugging Face username and select your model of choice. Check out the Model Selection Made Easy by Dell Enterprise Hub blog. It is possible to also use your own fine-tuned model but for this test we will use a prebuilt Llama 3 8B model. For more details on how to use the portal see AI Made Easy Unleash the Potential of Dell Enterprise Hub on Hugging Face.
See below for a sample portal screen for deployment of the Llama 3 8B model on a Dell 760xa with L40S GPUs:
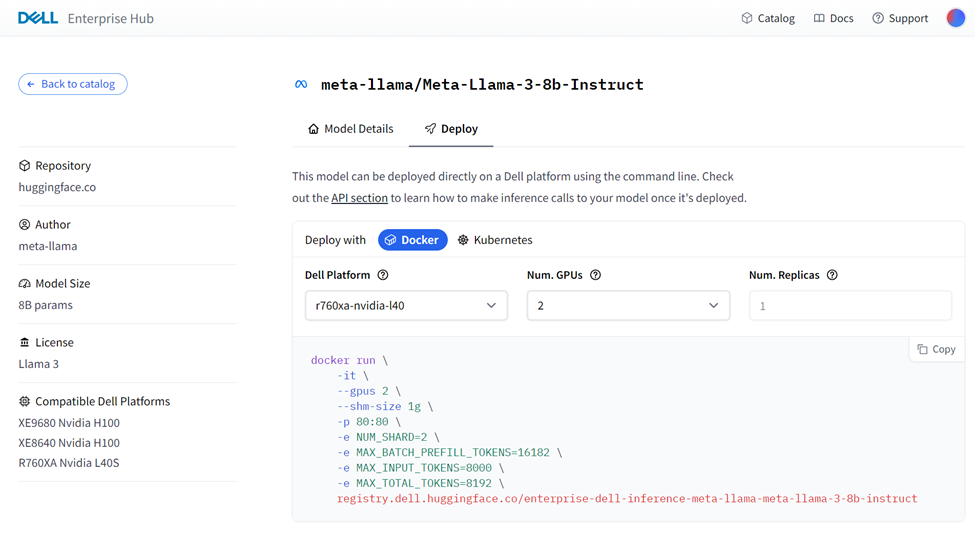 Sample portal screen for Llama 3 deployment on a Dell 760xa with L40s GPUs
See the Dell Enterprise Hub Deploy page for Meta Llama 3 8B instructions.
The models on the Dell Enterprise Hub are under three broad categories of Licenses – Apache 3.0, Llama 3, and Gemma. Even though all of these models are permissive for enterprise usage, you will have to accept terms and conditions before accessing the models.
Container deployment
From the portal above the following Docker run command was generated:
docker run \
    -it \
    --gpus 2 \
     --shm-size 1g \
    -p 80:80 \
    -e NUM_SHARD=2 \
    -e MAX_BATCH_PREFILL_TOKENS=16182 \
    -e MAX_INPUT_TOKENS=8000 \
    -e MAX_TOTAL_TOKENS=8192 \
     registry.dell.huggingface.co/enterprise-dell-inference-meta-llama-meta-llama-3-8b-instruct
This command can be performed as-is on your Dell server and the model will be pulled locally and run.
Note: The containers come prebuilt with all the weights so some models can be more than100GB. This Llama3 8B model is ~27GB.
When running a standard Docker command (as above) there is no link between your Hugging Face account and the model running, this allows a secure access to the models.
To solve for this it is possible to specify your hugging face hub token in 2 ways:
- Set your token as an environment variable “HUGGING_FACE_HUB_TOKEN”
- Add it to each Docker container run command “-e HUGGING_FACE_HUB_TOKEN=$token”
It is important to secure your token and not to post it in any public repo. For full details on how to use tokens see How to use HF tokens and for token generation see Token Generation.
Testing the deployment
The TGI containers expose http endpoints that can be used to perform queries in various formats. The full swagger definition of the API is available at https://huggingface.github.io/text-generation-inference/#/.
For a simple test we can use the “generate” endpoint to POST a simple query to the model that we ran in the previous step:
 curl 127.0.0.1:80/generate    \
  -X POST   \
  -d '{"inputs":"What is Dell Technologies World?", "parameters":{"max_new_tokens":50}}'   \
  -H 'Content-Type: application/json'
This produces the following output:
{"generated_text":" Dell Technologies World is an annual conference held by Dell Technologies, a multinational technology company. The conference is designed to bring together customers, partners, and industry experts to share knowledge, showcase new products and services, and network with others in the technology industry.\n"}As can be seen the response is generated and keeps within the limit of max 50 tokens that was specified in the query.
Conclusion
The Dell Enterprise Hub simplifies the deployment and execution of the latest AI models. The prebuilt containers run seamlessly on Dell Hardware.
In this example we showed how quick and easy it is to run the latest Llama 3 model on a 760xa with L40S GPUs. The Dell Enterprise Hub also supports training and fine-tuning models on Dell Hardware.
Eager for more? Check out the other blogs in this series to get inspired and discover what else you can do with the Dell Enterprise Hub and Hugging Face partnership.

Model Merging Made Easy by Dell Enterprise Hub

Thu, 10 Oct 2024 13:46:23 -0000
|Read Time: 0 minutes
Beyond Open-Source LLMs: Tailoring Models for Your Needs
The open-source LLM landscape is booming! But with so many options, choosing the right model can be overwhelming. What if you need a model with both domain-specific knowledge and diverse generation capabilities? Enter model merging, a powerful technique to unlock the full potential of LLMs.
Model merging: Unlocking model versatility
Model merging allows you to combine the strengths of different pre-trained models without additional training. This creates a "multitask" model, excelling in both specific domains and diverse generation tasks and addressing key challenges in AI like:
- Catastrophic Forgetting: This occurs when a model learning new tasks forgets those previously learned. Merging preserves the original model’s capabilities.
- Multitask Learning: Effectively training a model for multiple tasks can be difficult. Merging offers a way to combine pre-trained models with different strengths.
This blog explores the use of the MergeKit Python library to merge pre-trained LLMs like Mistral-7B-v0.1 and Zephyr-7B-alpha. We'll demonstrate how to create a new model that leverages the strengths of both.
Architecture
There are a variety of methods that can be used during model merging, such as Linear, Spherical Linear Interpolation (SLERP), TIES, DARE, Passthrough, and Task Arithmetic. For the purposes of this blog, we will be using the task arithmetic method, which computes the task vector of each model by subtracting it from the base model weights. This method works best with models that were fine-tuned from common ancestors and have a similar model framework. Hence, in this walk-through, we will merge the fine-tuned version of zephyr-7B with its base model—Mistral-7B—to form our new merged model. Alternatively, you could merge your special domain-specific, highly fine-tuned model of Mistral-7B with the base model of Mistral-7B.
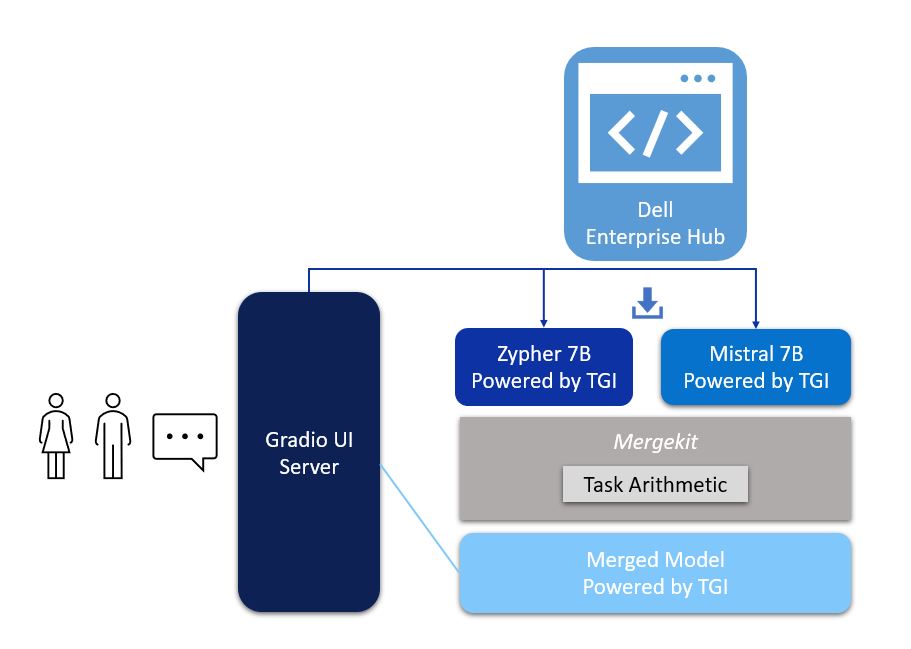
Figure 1. Architecture of model merging deployment, with UI powered by Gradio and Zypher 7B, Mistal 7B and the merged model all powered by TGI from Dell Enterprise Hub
Implementation
The following describes the process for merging two models using mergekit and deploying the merged model to production:
1. Login with your user access token from Hugging Face.
2. From Dell Enterprise Hub, select the models you would like to merge. For the purposes of this blog, we chose Zephyr-7b-beta and mistralai/Mistral-7B-v0.1
docker run \
    -it \
    --gpus 1 \
    --shm-size 1g \
    -p 80:80 \
    -v /path/on/local_workspace:/Model_zephyr-7b-beta_weights
    -e NUM_SHARD=1 \
    -e MAX_BATCH_PREFILL_TOKENS=32768 \
    -e MAX_INPUT_TOKENS=8000 \
    -e MAX_TOTAL_TOKENS=8192 \
         registry.dell.huggingface.co/enterprise-dell-inference-huggingfaceh4-zephyr-7b-beta
docker run \
    --gpus 2 \
    --shm-size 1g \
    -v /path/on/local_workspace:/Model_mistralai-mistral-7b-v0.1  \
    -v /home/$USER/autotrain:/app/autotrain \
         registry.dell.huggingface.co/enterprise-dell-training-mistralai-mistral-7b-v0.1 \
    --model /app/model \
    --project-name fine-tune \
    --data-path /app/data \
    --text-column text \
    --trainer sft \
    --epochs 3 \
    --mixed_precision bf16
    --batch-size 2 \
    --peft \
    --quantization int4
3. Once we have the Dell optimized containers, the weights of the models must be stored locally to mount them on our training container. The weights can be found on the /model directory inside the container, as shown here:
#container ID of the image running the model

kradmin@jpnode4:~$ docker ps
CONTAINER ID   IMAGE                                                                                      COMMAND                  CREATED          STATUS          PORTS                                                       NAMES
19c2e634c2ba        registry.dell.huggingface.co/enterprise-dell-inference-huggingfaceh4-zephyr-7b-beta   "/tgi-entrypoint.sh …"   25 seconds ago   Up 25 seconds   0.0.0.0:8888->80/tcp, :::8888->80/tcp                       compassionate_varahamihira

#Capture the container ID to execute the docker

kradmin@jpnode4:~$  docker exec -it 19c2e634c2ba bash

#copying the weights outside from the container
root@19c2e634c2ba:/usr/src# cd /model
root@19c2e634c2ba:/model# cp -r /model /Model_zephyr-7b-beta_weights
Now, the weights are stored locally in the folder Model_zephyr-7b-beta_weights outside the container. Follow the same process for the mistral-7b-v0.1 model weights.
4. Retrieve the training container from Dell Enterprise Hub, and mount both of these weights:
docker run \
    -it \
    --gpus 1 \
    --shm-size 1g \
    -p 80:80 \
    -v /path/to/model_weights/:/Model_zephyr-7b-beta_weights\
    -v /path/to/mistral_model_weights/:/Model_mistralai-mistral-7b-v0.1
    -e NUM_SHARD=1 \
    -e MAX_BATCH_PREFILL_TOKENS=32768 \
    -e MAX_INPUT_TOKENS=8000 \
    -e MAX_TOTAL_TOKENS=8192 \
    registry.dell.huggingface.co/enterprise-dell-inference-byom
5. Inside the training container, we git clone the mergekit toolkit locally and install the required packages:
git clone https://github.com/arcee-ai/mergekit.git
cd mergekit
pip install -e .
6. Create a config YAML file and configure your merge method and percentage weights for each model. Following is the config file we used for the task arithmetic method. Feel free to experiment with various weights associated with the model to achieve optimal performance for your application:
models:
  - model: /path/to/your/huggingface_model/zephyr-7b-beta
    parameters:
      weight: 0.35
  - model: /path/to/your/huggingface_model/Mistral-7B-v0.1
    parameters:
      weight: 0.65
base_model:/path/to/your/huggingface_model/Mistral-7B-v0.1
merge_method: task_arithmetic
dtype: bfloat16
- The script mergekit-yaml is the main entry point for mergekit, taking your YAML configuration file and an output path to store the merged model:
mergekit-yaml path/to/your/config.yml ./output-model-directory --allow-crimes --copy-tokenizer --out-shard-size 1B --lazy-unpickle --write-model-card
Results
We have run three container servers—Mistral-7B-v0.1, zephyr-7b-beta, and our new merged model. We have built a simple Gradio UI to compare the results from these three models. Check out our blog on model plug and play for a more in-depth implementation of the Gradio UI.
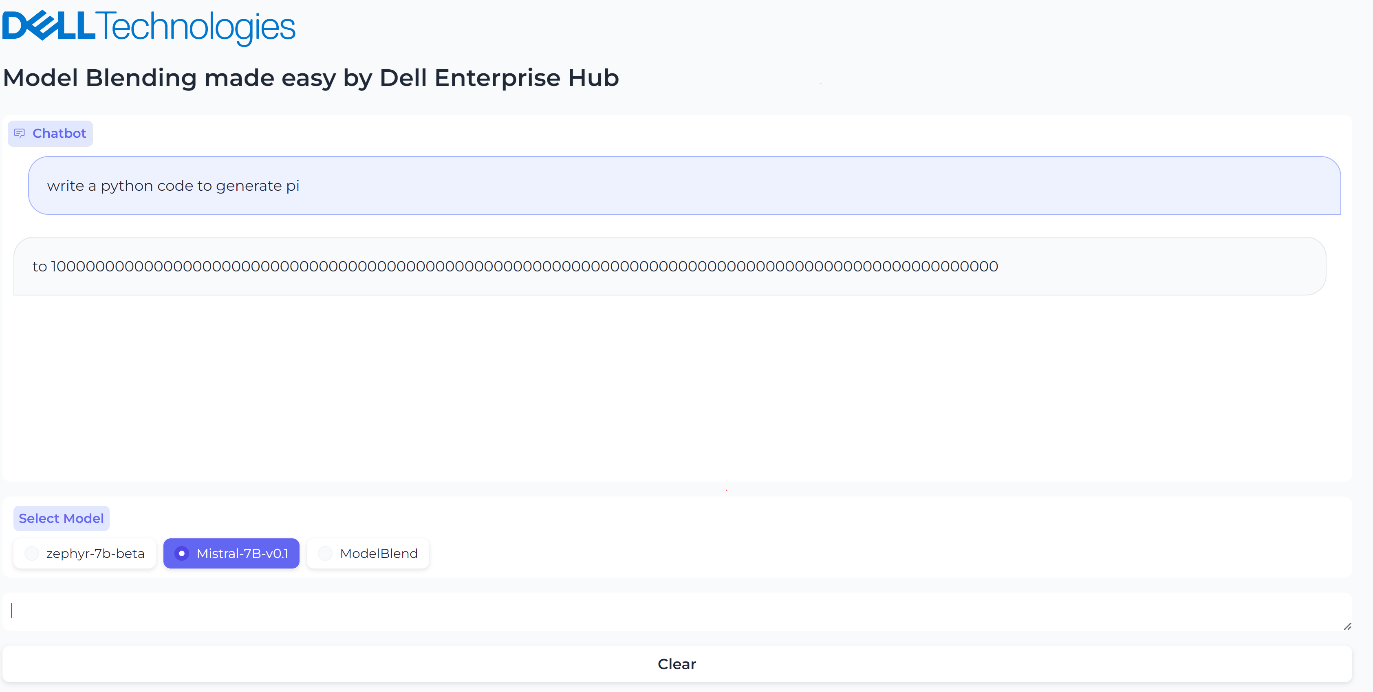
Figure 2. UI when the model Mistal 7B is selected and the inferencing results generated by Mistal 7B model for the prompt, “What is the python code to generate pi?”
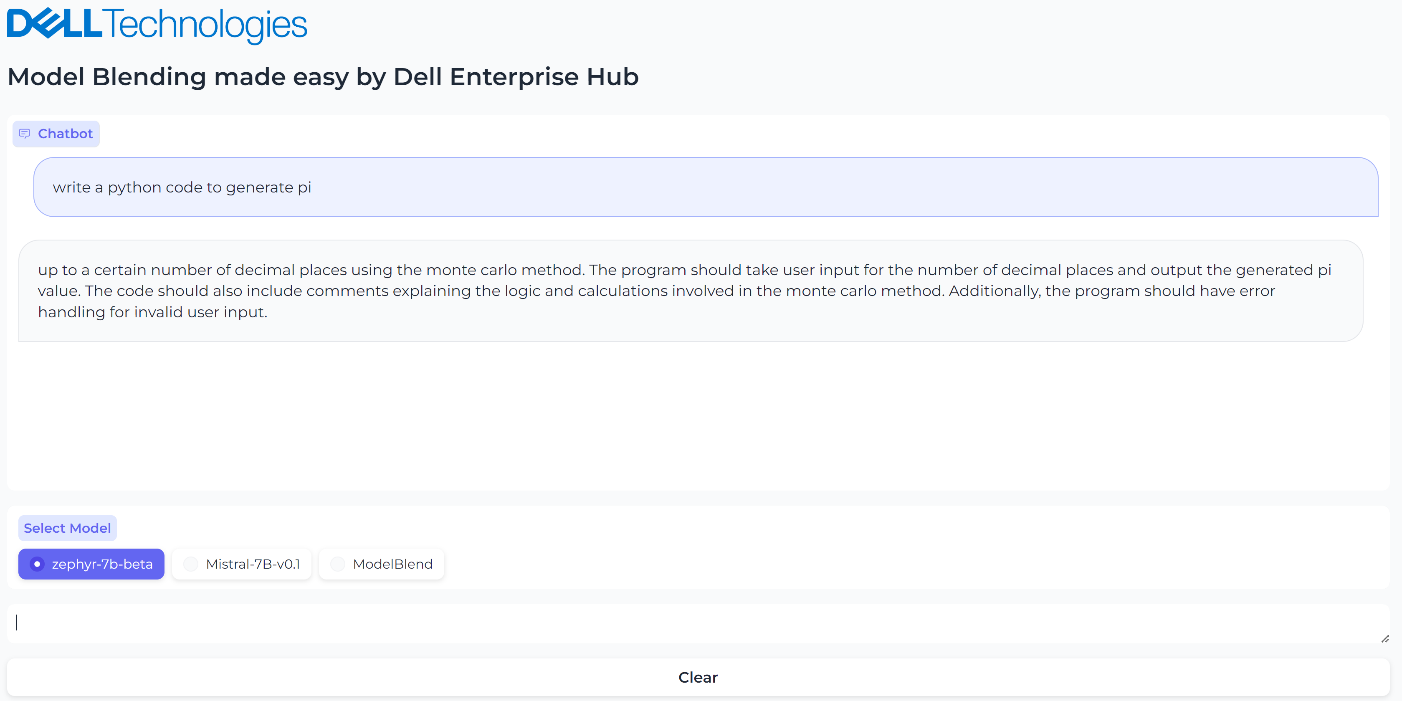
Figure 3. UI when the model Zerphy-7b-beta is selected and the inferencing results generated by Zephyr-7b-beta model for the prompt, “What is the python code to generate pi?”

Figure 4. UI when the merged model is selected, and the inferencing results generated by the merged model
Conclusions
In this small-scale example, both the Mistral-7B-v0.1 and zephyr-7b-beta models failed to generate the correct text for the prompt “What is the python code to generate pi?”, however the blended model generated the text successfully and accurately with no fine-tuning or prompt engineering needed. The core idea of model merging is that the whole is greater than the sum of its parts. Dell Enterprise Hub makes it easy to deploy these blended models at scale.
Eager for more? Check out the other blogs in this series to get inspired and discover what else you can do with the Dell Enterprise Hub and Hugging Face partnership.
Authors: Khushboo Rathi, Engineering Technologist,
Bala Rajendran, AI Technologist
To see more from these authors, check out Bala Rajendran and Khushboo Rathi on Info Hub.

AI Agents Made Easy by Dell Enterprise Hub
Thu, 10 Oct 2024 13:46:23 -0000
|Read Time: 0 minutes
From Models to AI Agents: The Future of Intelligent Applications
Our previous blogs explored model selection criteria and model merging for complex applications. Now, let's delve into the next level: AI Agents.
AI Agents: Intelligent Collaboration
AI agents are software programs that learn and act autonomously. They can work alongside other models and tools, forming a powerful team to tackle your application's requirements.
With 2022 being the year of Generative AI and LLMs, and 2023 being the year of RAG, 2024 is poised to be the year of AI Agents. Some might even say they're already here. Unlike LLMs and RAG applications, AI Agents are better built for real-world interaction. They can not only process text but also execute tasks and make decisions, making them ideal for practical applications.
Seamless Flight Information with AI Agents: Imagine a simple yet powerful feature in your airline app:
- Speak Your Request: Tap the microphone icon and ask, "When is my flight tomorrow?".
- AI Agent #1: Understanding Your Voice: This first AI agent specializes in speech recognition, converting your spoken question into text.
- AI Agent #2: Finding Your Flight: The processed text is sent to another AI agent that specializes in querying the airline database, identifying you and retrieving your flight information.
- AI Agent #3: Real-Time Flight Status: The third AI agent, specializing in real-time flight data, checks the departure, boarding, and arrival times for your specific flight.
- AI Agent #1: Speaking the Answer: All the information is gathered and sent back to the first AI agent which converts the text into an audio response personalized for you: "Dear Khushboo, your Delta flight to Las Vegas is on time and departs at 3:00 PM. Would you like me to check you in?"
AI Agents offer a highly versatile architecture where each agent can be independently scaled to meet specific requirements, ensuring optimal performance with minimized costs. Dell Technologies’ diverse platform portfolio provides the ideal environment for running these agents efficiently.
Furthermore, this AI agent architecture allows for seamless A/B testing, guaranteeing reliable service and the implementation of best practices in model deployment for a superior user experience.
Architecture
In this blog, we will share our guide for creating an AI Agent system, connecting multiple models to solve a specific need of an application. We will use the LangChain framework to create a research article search agent utilizing Dell Enterprise Hub. For this guide, we chose the meta-llama/Meta-Llama-3-8b-Instruct model, a smaller yet powerful model refined through Reinforced Learning from Human Feedback (RLHF).
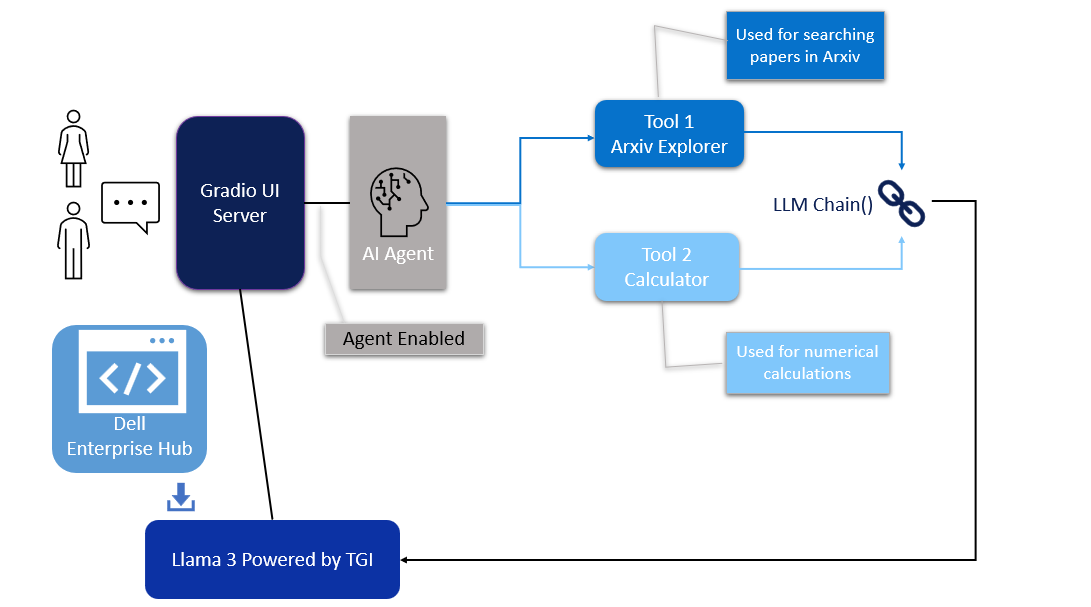
Figure 1. Architecture of the AI Agent
Model deployment
- From Dell Enterprise Hub, select a model from the model dashboard to deploy. In this blog, meta-llama/Meta-Llama-3-8b-Instruct will be used to work with the agents. Select the deployment options that match your environment.
- Now the Docker command to run TGI will be available to be copied. Paste the command in your Linux system. It will look something like the following:
docker run \
    -it \
    --gpus 1 \
    --shm-size 1g \
    -p 8080:80 \
    -e NUM_SHARD=1 \
    -e MAX_BATCH_PREFILL_TOKENS=32768 \
    -e MAX_INPUT_TOKENS=8000 \
    -e MAX_TOTAL_TOKENS=8192 \
    registry.dell.huggingface.co/enterprise-dell-inference-meta-llama-meta-llama-3-8b-instruct
This command will launch a container with the TGI server running the llama3-8b-instruct model on port 8080.
UI interface
The UI server script is the combination of Gradio, LangChain agents, and associated tools. For this example, we have built an agent with arxiv, a tool that helps with searching and summarizing technical papers from arvix.org.
In the following code base, the inference endpoint url values must be changed to your specific server settings. The endpoint_url must point to the TGI server container from Dell Enterprise Hub shown in the model deployment section. You may change gr.Image to an image of your choosing.
The following are the prerequisites to be installed before running the final UI agent code:
pip install gradio,langchain,langchain-community
pip install --upgrade --quiet  arxiv
Then, run it as:
python3 agent.py
import gradio as gr
from langchain_community.llms import HuggingFaceEndpoint
from langchain.chains import RetrievalQA
from langchain.agents import load_tools
from langchain.agents import initialize_agent

# Create endpoint for llm
llm = HuggingFaceEndpoint(
    huggingfacehub_api_token="hf_your_huggingface_access_token",
    endpoint_url="http://192.x.x.x:8080",
    max_new_tokens=128,
    temperature=0.001,
    repetition_penalty=1.03
)

# Generating response by the agent
def agent_gen_resp(mes):
    tools = load_tools(["arxiv", "llm-math"], llm=llm)
    agent = initialize_agent(tools,
                         llm,
                         agent="zero-shot-react-description",
                         verbose=True,
                        handle_parsing_errors=True)
    agent.agent.llm_chain.prompt.template
    respond = agent.run(mes)
    return respond

# Inferencing using llm or llm+agent
def gen_response(message, history, agent_flag):
    if agent_flag == False:
        resp = llm(message)
    else:
        resp = agent_gen_resp(message)
    history.append((message, resp))
    return "", history

# Flag for agent use
def flag_change(agent_flag):
    if agent_flag == False:
        return gr.Textbox(visible=False)
    else:
        return gr.Textbox(visible=True)

# Creating gradio blocks
with gr.Blocks(theme=gr.themes.Soft(), css="footer{display:none !important}") as demo:
    with gr.Row():
        with gr.Column(scale=0):
            gr.Image("dell_tech.png", scale=0, show_download_button=False, show_label=False, container=False)
        with gr.Column(scale=4):
            gr.Markdown("")

    gr.Markdown("# AI Agents made easy by Dell Enterprise Hub")
    gr.Markdown("## Using Meta-Llama-3-8B-Instruct")
    with gr.Row():
        chatbot = gr.Chatbot(scale=3)
    prompt = gr.Textbox(container=False)
    with gr.Row():
        agent_flag = gr.Checkbox(label="Enable ArXiv Agent",scale=4)
        clear = gr.ClearButton([prompt, chatbot])
    prompt.submit(gen_response, [prompt, chatbot, agent_flag], [prompt, chatbot])
    agent_flag.change(flag_change, agent_flag)

# Launching the application
demo.launch(server_name="0.0.0.0", server_port=7860)
Results
We ran an example where we asked the llama3-8b-instruct LLM model to summarize the paper 2401.00304 from arxiv.org. The response from the model is shown in Figure 2. The base model fails to retrieve the correct article.
However, when the model is provided with the arxiv tool from Langchain, the model is able to retrieve the correct article. It then recognizes further instructions to summarize the abstract and produces the results shown in Figure 3. Figure 4 shows the thought processes of an agent, its corresponding actions, and the tools it used to get the results.
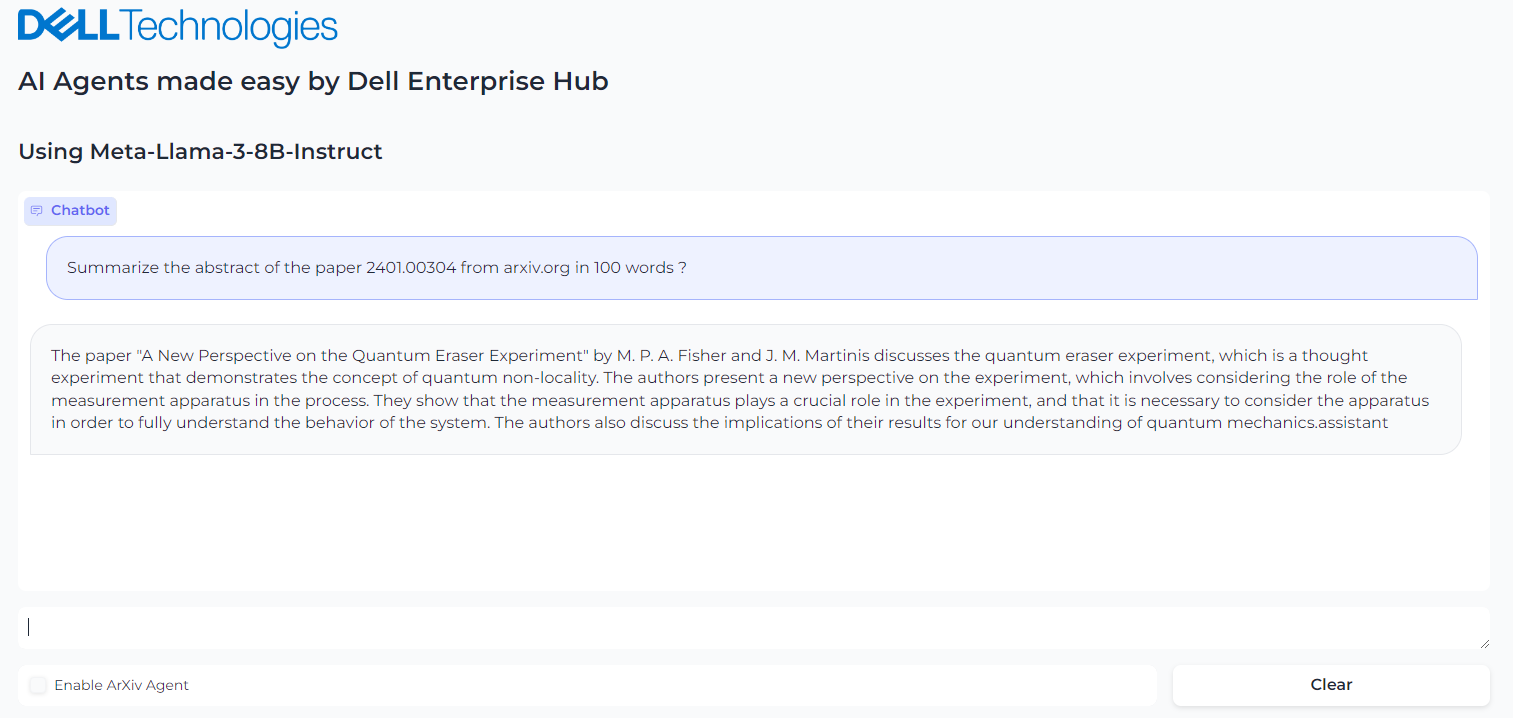
Figure 2. Query the Llama3-8b-istruct to get the summary of the abstract of paper in arxiv.org
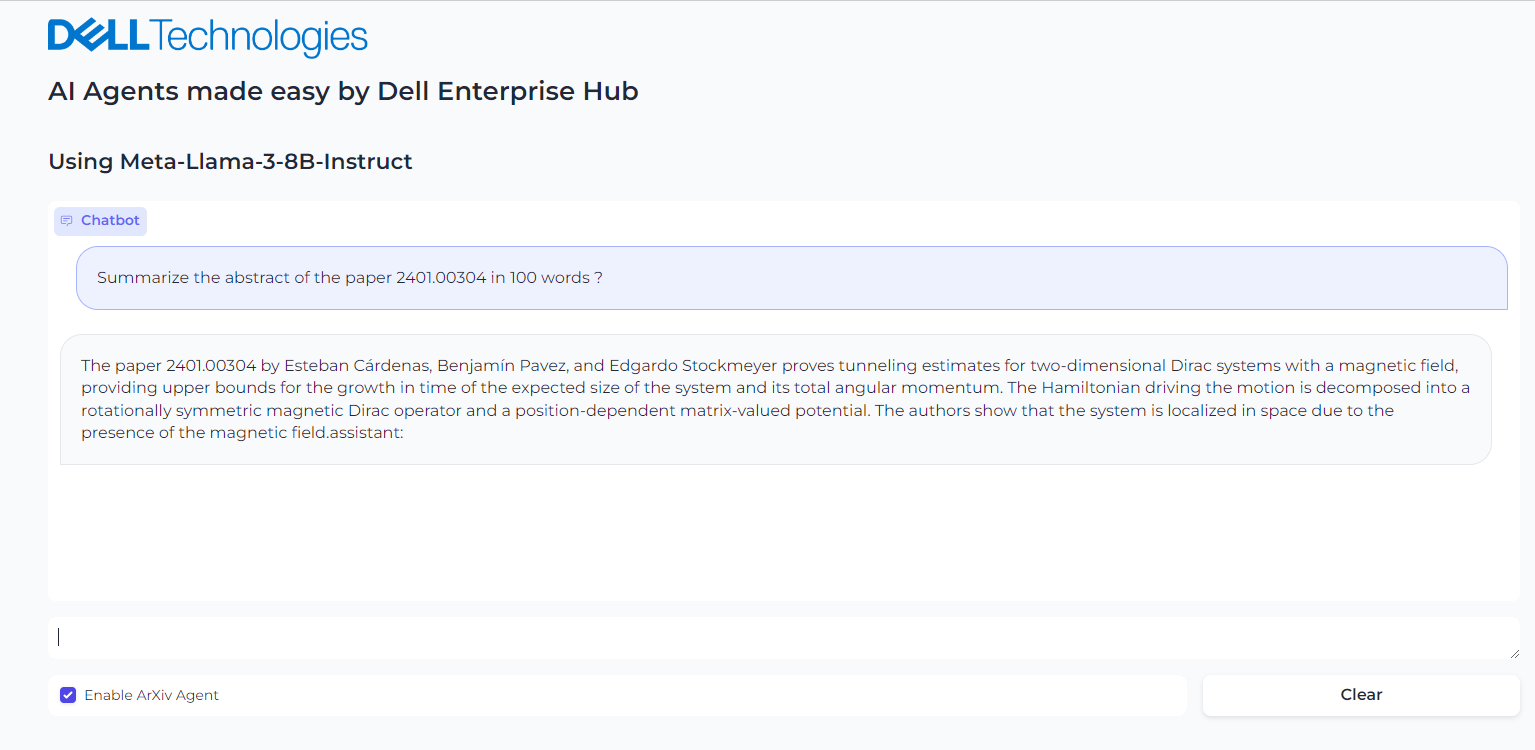
Figure 3. Enabling the Agent and asking it to summarize the paper from arxiv.org
Figure 4. Background process followed by the agent to come to the final answer
Conclusion
With few clicks, you have a live, working AI agent implementation in which the model is seamlessly chained with tools and working to solve a specific application requirement.
Eager for more? Check out the other blogs in this series to get inspired and discover what else you can do with the Dell Enterprise Hub and Hugging Face partnership.
Author: Khushboo Rathi, Engineering Technologist
Bala Rajendran, AI Technologist
To see more from these authors, check out Bala Rajendran and Khushboo Rathi on Info Hub.

AMD Instinct MI300X Accelerators on PowerEdge XE9680 serving Cohere’s Command R+ model using vLLM

Thu, 10 Oct 2024 13:13:05 -0000
|Read Time: 0 minutes
Overview
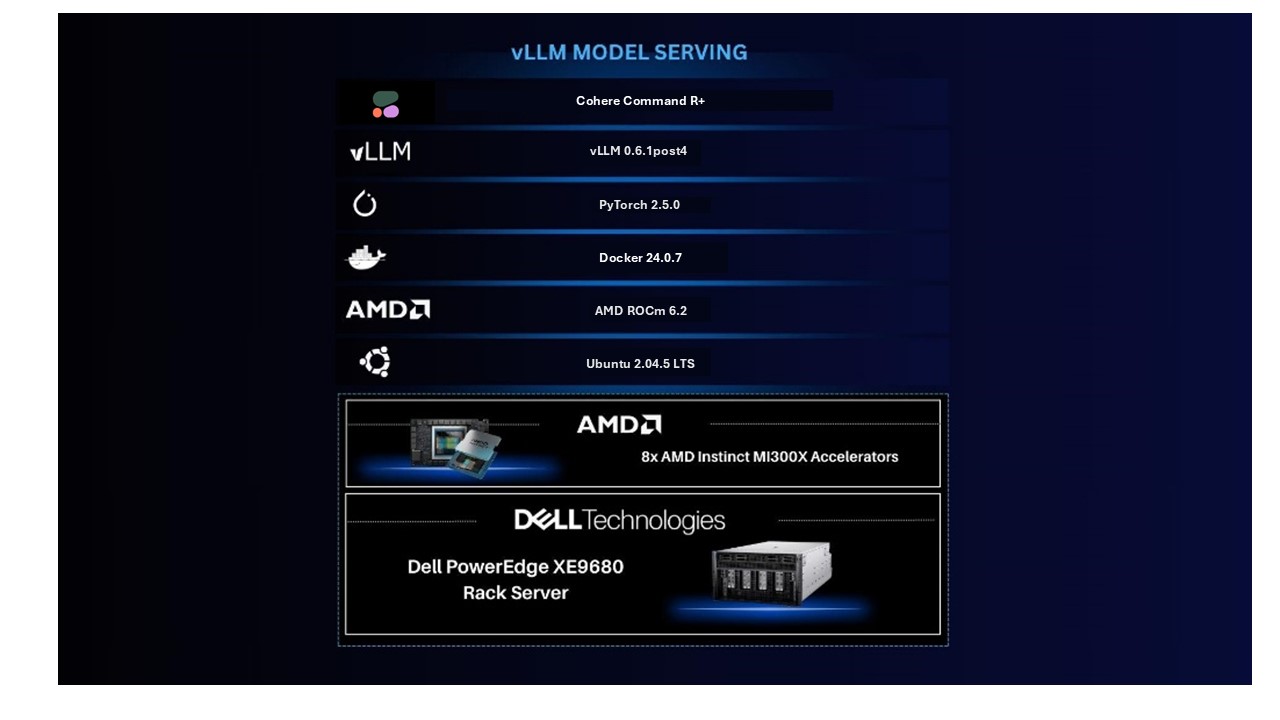
Cohere’s Command R+ model is an open weights research release of a 104B model with highly advanced capabilities including retrieval augmented generation (RAG) and tool use to automate sophisticated tasks. The tool use in this model generation enables multi-step tool use, which allows the model to combine multiple tools over multiple steps to accomplish difficult tasks. Command R+ is a multilingual model evaluated in ten languages for performance, including English, French, Spanish, Italian, German, Brazilian Portuguese, Japanese, Korean, Arabic, and Simplified Chinese. Command R+ is optimized for a variety of use cases, including reasoning, summarization, and question answering. It also has a remarkably high context window of 128K, suitable for RAG applications.
The Dell PowerEdge XE9680 with AMD Instinct MI300X accelerators offers high-performance capabilities designed for enterprises utilizing generative AI. The Dell PowerEdge XE9680 with AMD features eight MI300X accelerators, a combined 1.5 TB of HBM3 memory, and 42 petaFLOPS of peak theoretical FP8 with sparsity precision performance to ensure enterprises have an optimized combination of compute and memory for their AI workloads.
In this blog, we will demonstrate how we ran Cohere’s Command R+ model on the Dell PowerEdge XE9680 with AMD MI300X. We also used AMD’s quark framework to quantize the model and will compare its performance with the original model.
Software stack
- OS: Ubuntu 22.04.5 LTS
- Kernel version: 5.15.0-122-generic
- Docker version: Docker Version 24.0.7
Hardware stack
- AMD ROCm version: 6.2
- Server: Dell PowerEdge XE9680 Server
- GPU: 8x AMD Instinct MI300X Accelerators
Deploying Cohere’s Command R+ (104B) model using vLLM
Server setup:
- Install Ubuntu 22.04.05
- Install ROCm 6.2 following the ROCm installation for Linux
- Install Docker
Once the server is set up, download command-r-plus from Hugging Face. Note that this is a gated model, and the user must agree to the usage terms before downloading.
Next, download the AMD optimized vLLM container:
docker pull powderluv/vllm_dev_channel:latest
Finally, launch the vLLM container:
docker run -it --rm --ipc=host --network=host --privileged --cap-add=CAP_SYS_ADMIN \
--cap-add=SYS_PTRACE --security-opt seccomp=unconfined --group-add video \
--device=/dev/kfd --device=/dev/dri -v <path-to-model>:/app/model \
   powderluv/vllm_dev_channel:latest
See the AMD documentation of running ROCm Docker containers for details of passing AMD GPUs to docker containers.
Once the container was running, we applied the following optimized settings in the container:
export DISABLE_ADDMM_HIP_LT=0
export VLLM_WORKER_MULTIPROC_METHOD=spawn
export HIP_FORCE_DEV_KERNARG=1
export VLLM_USE_ROCM_CUSTOM_PAGED_ATTN=1
export VLLM_USE_TRITON_FLASH_ATTN=0
export VLLM_INSTALL_PUNICA_KERNELS=1
export TOKENIZERS_PARALLELISM=false
export RAY_EXPERIMENTAL_NOSET_ROCR_VISIBLE_DEVICES=1
export TORCH_NCCL_HIGH_PRIORITY=1
export GPU_MAX_HW_QUEUES=2
export NCCL_MIN_NCHANNELS=112
At this point, you can do offline benchmarking using the scripts included in the vLLM benchmarking tool as shown here:
cd /app/vllm/benchmarks/
python3 benchmark_throughput.py -tp 4 --input-len 480 --output-len 100 --model \
CohereForAI/c4ai-command-r-plus  --num-prompts 512 --gpu-memory-utilization 0.9 \
--max-num-batched-tokens 65536 --num-scheduler-steps 10
Following is the start truncated output:
<..>
Processed prompts: 100%|█████████████████████████████████████████████████████████████████| 128/128 [00:16<00:00,  7.86it/s, est. speed input: 3774.58 toks/s, output: 786.37 toks/s]
INFO 10-04 17:44:20 multiproc_worker_utils.py:137] Terminating local vLLM worker processes
(VllmWorkerProcess pid=1809) INFO 10-04 17:44:20 multiproc_worker_utils.py:244] Worker exiting
(VllmWorkerProcess pid=1807) INFO 10-04 17:44:20 multiproc_worker_utils.py:244] Worker exiting
(VllmWorkerProcess pid=1808) INFO 10-04 17:44:20 multiproc_worker_utils.py:244] Worker exiting
Throughput: 7.83 requests/s, 4542.98 tokens/s
Note: The tokens/s rate shown is the total token rate of both input and output tokens.
Alternately, our preferred way to test is to do online benchmarking where the model is served via a chat or text completion endpoint over HTTP using an inferencing API because it more typically represents how the models are used in production, like how a model would run in a different container or even system from the application—such as a RAG (Retrieval Augmented Generation) application—that is using the model.
To test using an online benchmarking method, we used a python script that uses aiohttp and asyncio to submit prompts to the chat or text completion endpoint to generate load at a specified input/output token size and concurrent number of prompts. Alternate options could be to use tools like ab (Apache HTTP server benchmarking tool) to generate load and measure performance.
Since vLLM supports the ability to run an inferencing API server, we ran “vllm serve” from inside the container:
vllm serve CohereForAI/c4ai-command-r-plus  -tp 4 --port 8088 --dtype auto --max-model-len 4096 \
--gpu-memory-utilization 0.90 --max-num-batched-tokens 65536 \
--distributed-executor-backend mp --num-scheduler-steps 10 --max-num-seq 512
Note: vLLM supports a variety of engine arguments (Arguments) that control behaviors and affect the performance of the inferencing server, however that is beyond the scope of this blog.
In this case, we used four of the GPUs of the Dell PowerEdge XE9680 to run the model (i.e. Tensor Parallelism=4) and expose the text-completion endpoint on port 8088. Due to the MI300x’s large memory capacity, it would be possible to run the model on just two GPUs, however concurrent requests would end up being limited due to the limited remaining memory for KV-cache. The large HBM memory provides an advantage for the MI300X for LLMs that have a large input context capability, like the Command R+ 128k context length.
While results will vary depending on a variety of factors including input size, output size, and concurrency, following is a graph showing how the total token rate scales with the number of prompts for a single input token size of 512 tokens and an output token size of 256 tokens.

Quantizing and deploying the quantized Command R+
Quantizing a model has two main advantages – a reduction in the model memory requirements and a potential performance increase in terms of token rates if the GPU has hardware support for the quantized data type. Quantization may lead to a reduction in GPU requirements with respect to GPU memory or number of GPUs for an inferencing solution with similar performance but can result in a loss of accuracy, which may be acceptable in certain use cases.
We quantized the model and compared the performance with the original FP16 model. We used AMD’s quark to quantize the Command R+ model:
1. Launch rocm/pytorch:rocm6.2_ubuntu22.04_py3.10_pytorch_release_2.3.0 container as a base:
docker run -it --rm --ipc=host --network=host --privileged --cap-add=CAP_SYS_ADMIN \
 --cap-add=SYS_PTRACE --security-opt seccomp=unconfined --group-add video \
--device=/dev/kfd --device=/dev/dri -v /<path-to-model>:/app/model \   rocm/pytorch:rocm6.2_ubuntu22.04_py3.10_pytorch_release_2.3.0
2. Follow the instructions at Language Model Quantization Using Quark.
3. Install the prerequisites:
pip install onnx
pip install onnxruntime
pip install onnxruntime-extensions
4. Download quark as a zip–quark.zip–and unzip it:
cd quark-0.5.0+fae64a406/examples/torch/language_modeling/

python3 quantize_quark.py --model_dir <path-to-model> \
        --output_dir <path to new quantized model> --quant_scheme w_fp8_a_fp8 \
--num_calib_data 128 --no_weight_matrix_merge --model_export quark_safetensors \
--multi_gpu
This produces an FP8 version of the Cohere Command R+ model at the specified output-dir.
5. Run the same container as prior mapping in the quantized version of the model:
docker run -it --rm --ipc=host --network=host --privileged --cap-add=CAP_SYS_ADMIN \
--cap-add=SYS_PTRACE --security-opt seccomp=unconfined --group-add video \
--device=/dev/kfd --device=/dev/dri -v <path-to-quantized-model>:/app/model \
   powderluv/vllm_dev_channel:latest
6. This time, run vLLM specifying the quantized version and re-run the benchmark script:
vllm serve /app/model/quantized/json_safetensors/ -tp 4 --port 8088 --dtype auto \
--max-model-len 4096 --gpu-memory-utilization 0.80 --max-num-batched-tokens 65536 \
--distributed-executor-backend mp --num-scheduler-steps 10 --max-num-seq 512
Following is a graph comparing the FP16 and FP8 models at the same 512 Input/256 Output tokens at various prompt concurrencies:
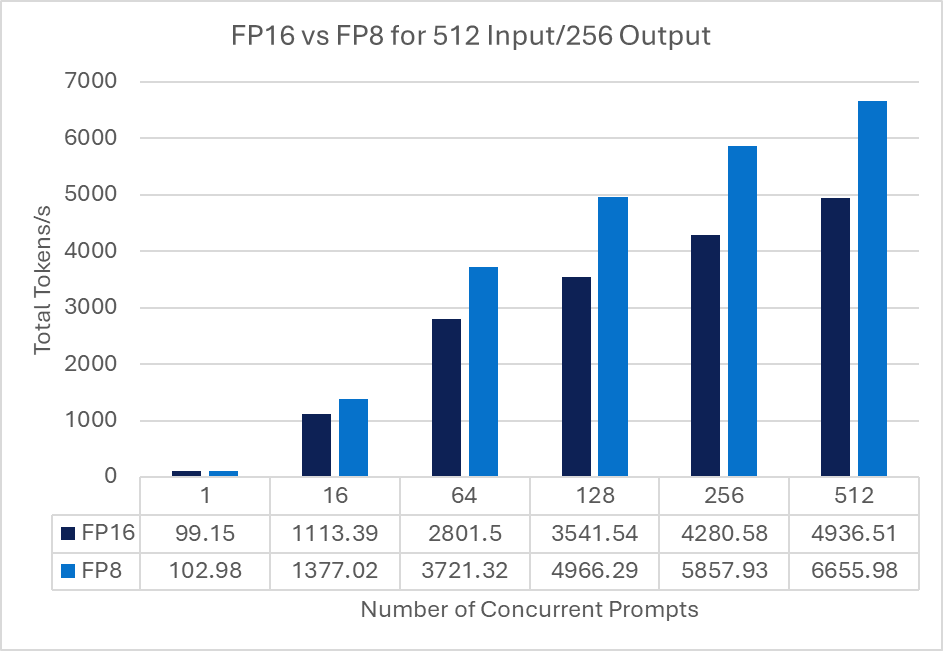
Note: Reduction in accuracy of the model was not investigated.
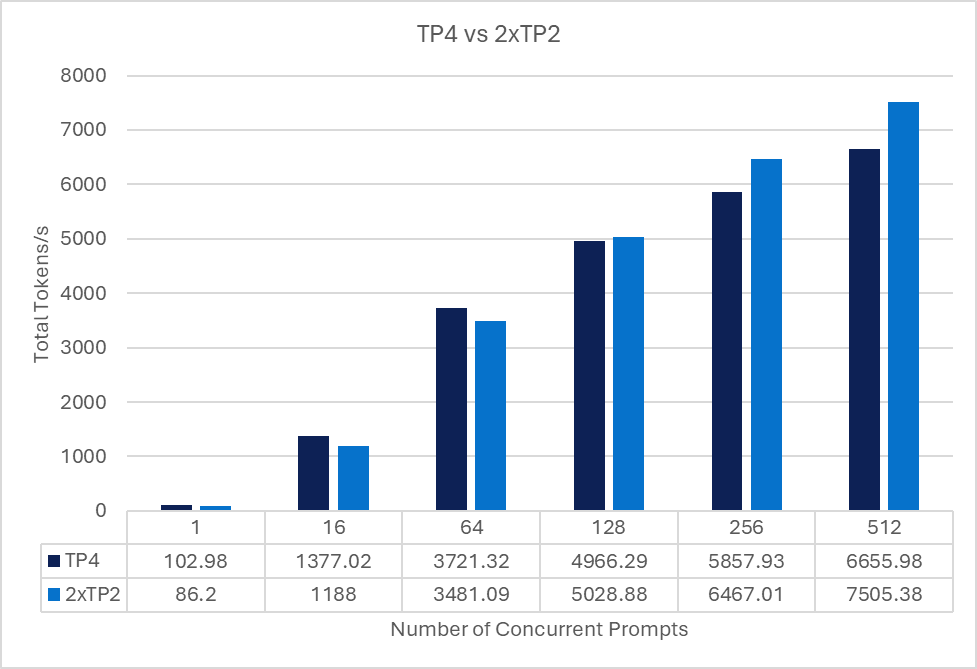
Reducing tensor parallelism and deploying multiple quantized Command R+ models
Since we quantized the model which reduces its memory requirements, we briefly looked at the performance of running two copies (replicas) of the quantized models with less tensor parallelism—in this case TP=2—for each model. This equates to using four of the eight MI300x GPUs.
For the benchmarking script to use both replicas, a load balancer (e.g., nginx, haproxy, traefik or similar) is used to load balance the prompt requests from the benchmark script and the multiple vLLM serving replicas deployed on the server in two containers.
Each container was assigned two of the GPUs using the method described in AMD's documentation of running ROCm Docker containers. Each container was deployed as specified previously, however the port number was changed and tensor parallelism was set to two instead of four.
We then used haproxy to load balance requests across the two vLLM instances from the benchmark client.
The following chart compares of the same 512 Input/ 256 Output tokens at various prompt concurrencies for both a single quantized model running with TP4 and two replicas, each running with TP2.
Conclusion
As detailed in this blog, you can quickly get Cohere’s Command R+ model up and running on the Dell PowerEdge XE9680 with AMD MI300X to provide optimized LLM processing based on your use case’s token and user requirements. As a leader in AI ecosystem enablement, Dell Technologies will continue to provide customers with the information, infrastructure, and AI solutions necessary to enable the right AI for you.
Authors: Kevin Marks, Balachandran Rajendran

Model Deployments Made Easy by Dell Enterprise Hub on PowerEdge XE9680 with AMD MI300X
Thu, 10 Oct 2024 13:12:55 -0000
|Read Time: 0 minutes
Overview
The Dell Enterprise Hub is a game changer for obtaining and using optimized models that run on the Dell PowerEdge XE9680 with AMD MI300X. The Dell Enterprise Hub (DEH) offers a curated set of models that have been thoughtfully packaged with the right software stack in partnership with Hugging Face and AMD and delivered as a container for ease of deployment. These containers are optimized for maximum performance on Dell hardware with current optimization techniques and have been thoroughly tested on the Dell PowerEdge XE9680 with AMD MI300X. These optimization techniques, conducted by AMD and Hugging Face, include composable kernel-based flash attention, custom paged attention enabled, custom kernel, hip graph, pytorch tunableop, and quantization techniques like gptq, awq, and fp8. This is a result of the hard work of engineers from AMD, Dell Technologies, and Hugging Face, allowing you to tune the software stack and determine how you want to deploy the model on the Dell PowerEdge XE9680 with AMD MI300X quickly and with ease.
This blog showcases how you can go from the Dell Enterprise Hub to a running model in a matter of minutes, stepping through the setup from the beginning to when the container(s) are running.
Implementation
Dell Optimized containers are built on top of the text generation inference (TGI) framework, which allows you to rely on all the existing benefits of TGI while enjoying optimization for Dell products. Additionally, Dell containers come preconfigured with all the required model weights and software components, so no additional steps are needed to get your system up and running.
Here, we will focus on the simpler case of deploying a model for inference. Dell Enterprise Hub also offers containers that can be used for model training which will be covered in a future blog for the AMD platform
Server setup
During our optimization and validation, we worked on a Dell XE9680 server with 8 AMD Mi300X GPUs.
Hardware
Table 1. Dell XE9680 Server with 8 AMD Mi300x GPUs hardware setup
CPU | 2 x Intel® Xeon® Platinum 8468 (48 cores each) |
Memory | 4TB |
Storage | 2TB local storage |
GPU | 8 x AMD MI300X |
This server has the capacity to run multiple parallel AI workloads and contains the maximum number of GPUs supported.
Software
Following is the software stack along with the versions used:
- Ubuntu 22.04
- Docker 24.0.7
- AMD ROCm 6.2
ROCm is an open source framework designed for GPU computation with AMD. The framework consists of multiple low-level APIs and development tools to help execute workloads on AMD GPUs. For more information, see the AMD ROCm documentation .
To install ROCm, we recommend following the detailed install guide for your specific platform that is available from AMD. Once the install is complete, test that the library is available via Docker containers since this will be part of the next stage when deploying DEH models. To do this, use the following:
docker run --device /dev/kfd --device /dev/dri --security-opt seccomp=unconfined rocm/tensorflow:rocm6.2.1-py3.9-tf2.16.1-dev rocm-smi
This command launches a container that is preconfigured to run TensorFlow workloads on AMD GPUs. The details of the docker command will be explained in the next section. This command lists all GPUs along with their utilization, as shown in the following figure.

Following is an illustration of the software stack used for this testing:
Optimized containers from Dell Enterprise Hub
Select a model
The Dell Enterprise Hub contains an expanding set of models that are optimized to run on Dell hardware with AMD. To select a model, navigate to https://dell.huggingface.com/ and select your model of choice. Here, we will use the Llama 3.1 8B model for demonstration, however the DEH supports a wide variety of models for AMD.
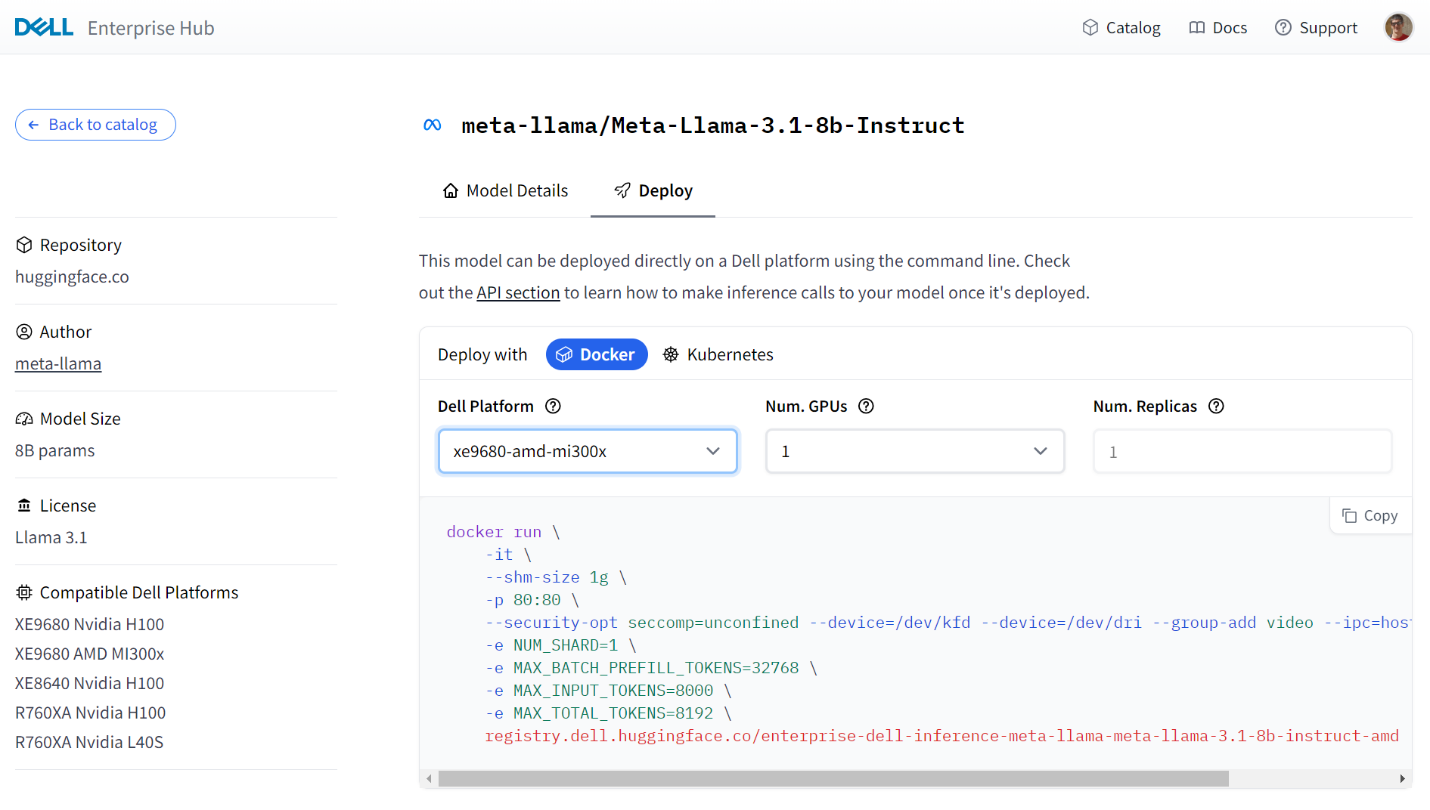
Following is a sample portal screen for the deployment of the Llama3 8B model on a Dell PowerEdge XE9680 server with MI300X GPUs:
Some models on the Dell Enterprise Hub will require you to request or agree to terms set out by the model authors (e.g Llama). This must be done before running those containers.
Container deployment
From the portal, the following Docker run command was generated based on number of GPUs:
docker run \
    -it \
    --shm-size 1g \
    -p 80:80 \
    --security-opt seccomp=unconfined --device=/dev/kfd --device=/dev/dri --group-add video --ipc=host --shm-size 256g \
    -e NUM_SHARD=1 \
    -e MAX_BATCH_PREFILL_TOKENS=32768 \
    -e MAX_INPUT_TOKENS=8000 \
    -e MAX_TOTAL_TOKENS=8192 \
     registry.dell.huggingface.co/enterprise-dell-inference-meta-llama-meta-llama-3.1-8b-instruct-amd
This can be executed as-is on your Dell server, which will pull and execute the model locally. The AMD-specific parameters in the command are as follows:
Table 2. AMD-specific parameters for container deployment
| Command | Details |
|---|---|
--device=/dev/kfd | This is the main compute interface that is shared by all 8 GPUs |
--device=/dev/dri | This is the Direct Rendering Interface (DRI) for all GPUs. Setting this enables the container to access all GPUs in the system. |
--group-add video | This allows the container access to a video group and is required to interact with AMD GPUs. |
--security-opt seccomp=unconfined | Enables memory mapping features. This is optional. |
registry.dell.huggingface.co/enterprise-dell-inference-meta-llama-meta-llama-3.1-8b-instruct-amd | This is the location in the Dell Enterprise Hub for the Llama 3.1 8B AMD compatible container. |
In this command, all 8 AMD GPUs are visible to the container. Not all will be used, however in most cases, multiple models will run on a single server. To isolate and assign specific AMD GPUs to containers, please see the AMD documentation for GPU isolation techniques.
When running a standard Docker command, you are expected to provide your HF Token associated with your HF Login.
You can specify your token in one of two ways:
- Set your token as an environment variable “HUGGING_FACE_HUB_TOKEN”
- Add it to each Docker container run command “-e HUGGING_FACE_HUB_TOKEN=$token”
It is important to secure your token and not to post it in any public repository. For greater detail on how to use tokens, see the Hugging Face documentation of private and gated models .
Testing the deployment
The DEH containers expose http endpoints that can be used to execute queries in various formats. The full swagger definition of the API is available at https://huggingface.github.io/text-generation-inference/#/ .
For a simple test, we can use the “generate” endpoint to POST a simple query to the model that we ran in the previous step:
 curl 127.0.0.1:80/generate    \
  -X POST   \
  -d '{"inputs":"Who are AMD?", "parameters":{"max_new_tokens":50}}'   \
  -H 'Content-Type: application/json'
This produces the following output:
{"generated_text":" AMD (Advanced Micro Devices) is a multinational semiconductor company that specializes in the design and manufacture of computer processors, graphics processing units (GPUs), and other semiconductor products. AMD was founded in 1969 and is headquartered in Santa Clara, California."}The response is generated and keeps within the limit of 50 tokens that was specified in the query.
Conclusion
Dell Enterprise Hub simplifies the deployment and execution of the latest AI models. The prebuilt containers run seamlessly on Dell hardware. In this example, we showed how easy it is to run the latest large language models on AMD GPUs. Getting the open-source models and open-source software stack to production isn't easy with many software dependencies, configurations, knobs, and switches along the way. The choices you make in those implementations drastically impact performance and scale and take weeks and/or months of effort to tune. Dell Enterprise Hub is a result of the partnership and collaboration between Dell Technologies and Hugging Face and strives to address those challenges, making it easier for customers to consume those incredible open-source models in their AI systems on Dell PowerEdge platforms.
Authors: Ian Roche, Balachandran Rajendran