


Model Plug and Play Made Easy by Dell Enterprise Hub


Seamless Model Deployment and A/B Testing with Dell Enterprise Hub
Dell Enterprise Hub simplifies model deployment—as detailed in our blog, Model Deployments Made Easy by Dell Enterprise Hub—and choosing the right model requires careful consideration—as discussed in our blog, Model Selection Made Easy by Dell Enterprise Hub.
In this blog, we will walk through creating a user-friendly "plug-and-play" code assistant powered by Dell Enterprise Hub. The solution features a common UI that empowers chat application end-users to conduct A/B testing between base models and their fine-tuned counterparts.
Key functionalities:
- Model Selection: Choose which model receives prompts with multiple models running concurrently in the background.
- Simultaneous Prompting: Send the same prompt to all production models simultaneously.
This guide streamlines model deployment and empowers users to experiment with different models, ultimately enhancing the chat application's effectiveness.
Architecture
The user interface for the chatbot is powered by Gradio. The models deployed from Dell Enterprise Hub contain all relevant software dependencies, including Hugging Face’s Text Generation Inference and optimized configurations to run the model on Dell PowerEdge hardware. The Gradio UI server communicates with multiple Inference Endpoints powered by TGI to detect health and lets the user know when the chatbot is ready to chat.
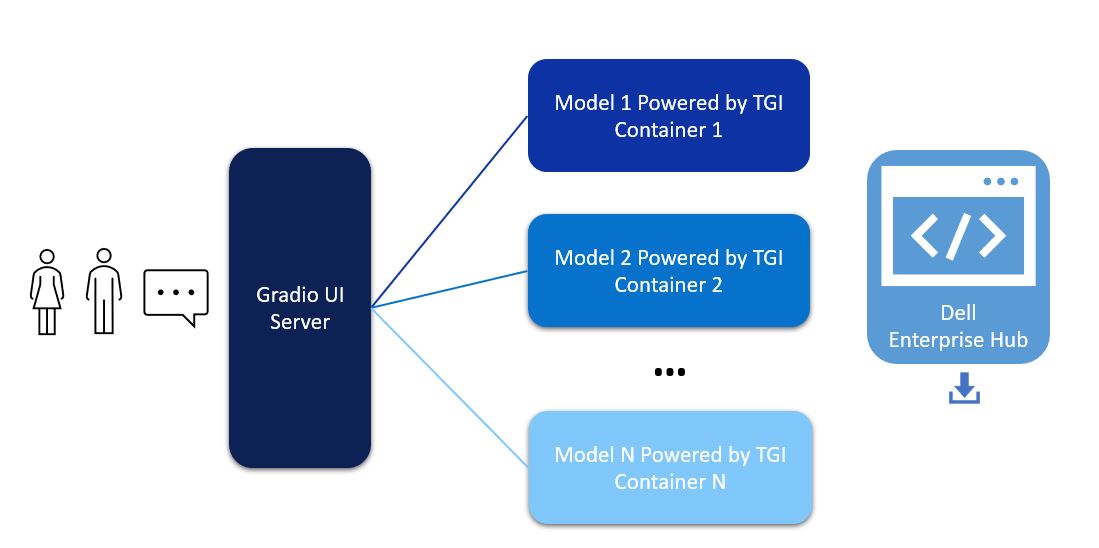
Figure 1. Architectural diagram of a Gradio UI server communicating to multiple models
This architecture supports users in interacting with different models with a click of a button on the UI, allowing for easy comparison of different models from a single UI. The Gradio server itself does not require a GPU, however the TGI servers will need at least one GPU depending on the model deployed in the backend from Dell Enterprise Hub.
Model deployment
- From Dell Enterprise Hub, select a model that you would like to deploy and open the model details. For the purposes of this walk-through, we chose meta-llama/Meta-Llama-3-8b-Instruct. Click on the Deploy link and select the deployment options that fit your environment.
- Copy-paste the docker command from Dell Enterprise Hub to be executed on your Linux system. Following is an example of a command:
docker run \
    -it \
    --gpus 1 \
    --shm-size 1g \
    -p 8080:80 \
    -e NUM_SHARD=1 \
    -e MAX_BATCH_PREFILL_TOKENS=32768 \
    -e MAX_INPUT_TOKENS=8000 \
    -e MAX_TOTAL_TOKENS=8192 \
     registry.dell.huggingface.co/enterprise-dell-inference-meta-llama-meta-llama-3-8b-instruct
This command will launch TGI and serve the Llama 3 model over a RESTful interface on port 8080. The Llama 3 model is bundled with the Docker container to make this process as simple as possible.
Repeat steps 1 and 2 for deploying additional models or to deploy fine-tuned models from Dell Enterprise Hub.
User Interface
To implement the Gradio UI—a relatively simple and clean chat interface which communicates with the TGI servers—use the following steps:
- Install Gradio: https://www.gradio.app/guides/quickstart#installation
- Copy and paste the following code into a file. In this example, multi_model.py was used.
- Customize the code example.
- Make sure to change the RB_TEXT, RB_CONFIG, and CURR_URL variables to match your own environment.
- There must be an entry in RB_CONFIG for every entry in RB_TEXT, and CURR_URL should point to the URL of the first entry of RB_CONFIG.
- The gr.Image may be substituted for your own logo.
- The following command executes the UI server: python3 multi_model.py
import gradio as gr
import json
import requests


RB_TEXT = ["meta-llama-3-70b-Dell", "mistral-7b-v0.1", "model-blend"]
RB_CONFIG = {
     "meta-llama-3-70b-Dell": "http://192.x.x.x:8080",
    "mistral-7b-v0.1": "http://192.x.x.x:8082",
     "model-blend": "http://192.x.x.x:8081"
}
CURR_URL = "http://192.x.x.x:8080"


def rb_change(model_rb):
    global CURR_URL
    CURR_URL = RB_CONFIG[model_rb]


def check_conn(model_rb):
    try:
        resp = requests.get(CURR_URL + '/health')
    except:
         return "Disconnected"
    return "Ready"


def gen_response(message, history, model_rb, send_all):
    payload = {'inputs': message, 'parameters': {'max_new_tokens': 250, 'temperature': 0.1, 'repetition_penalty': 1.03}}
    header = {'Content-type': 'application/json'}
    if send_all:
        for model in RB_TEXT:
             try:
                 resp = requests.post(RB_CONFIG[model] + '/generate', json=payload, headers=header)
                 json_resp = json.loads(resp.text)
                 history.append((f"Model: {model} --- {message}", json_resp['generated_text']))
             except:
                 history.append((f"Model: {model} --- {message}", "[Disconnected]"))
    else:
        try:
             resp = requests.post(RB_CONFIG[model_rb] + '/generate', json=payload, headers=header)
             json_resp = json.loads(resp.text)
             history.append((message, json_resp['generated_text']))
         except:
             history.append((message, "[Disconnected]"))
    return "", history


with gr.Blocks(theme=gr.themes.Soft(), css="footer{display:none !important}") as demo:
    with gr.Row():
        with gr.Column(scale=0):
             gr.Image("dell_tech.png", scale=0, show_download_button=False, show_label=False, container=False)
        with gr.Column(scale=4):
             gr.Markdown("")
    chatbot = gr.Chatbot()
    model_rb = gr.Radio(RB_TEXT, label="Select Model", value="meta-llama-3-70b-Dell")
    with gr.Row():
        with gr.Column(scale=0):
            status = gr.Button("Checking...")
        with gr.Column(scale=2):
             prompt = gr.Textbox(container=False)
    with gr.Row():
         send_all = gr.Checkbox(label="Send to all models simultaneously")
         clear = gr.ClearButton([prompt, chatbot])
     prompt.submit(gen_response, [prompt, chatbot, model_rb, send_all], [prompt, chatbot])
     model_rb.input(rb_change, model_rb, None)
     demo.load(check_conn, model_rb, status, every=3)
demo.launch(server_name="0.0.0.0", server_port=7860)
This launches a web server on port 7860:
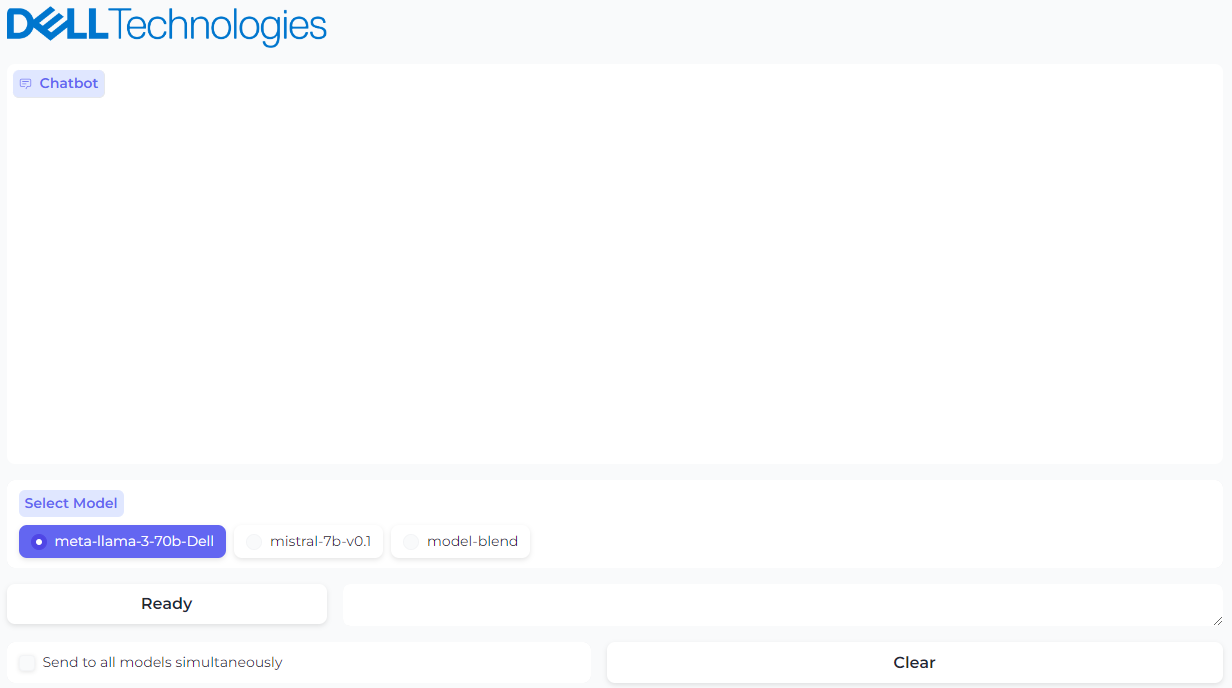
Figure 2. UI powered by Gradio with option to select the model
The Ready/Disconnected indicator next to the prompt text box indicates the health of the TGI server with which the model is associated. Behind the scenes, the Gradio application is reaching out over HTTP to see if the TGI server is running and sets the status appropriately.
Checking the Send prompts to all models simultaneously checkbox will cause any prompt to be sent to all models, and all responses will be shown in the chat window. We found it very useful to test different model responses and compare them with each other quickly using this custom UI.
 Figure 3. A prompt and generated response from model 1
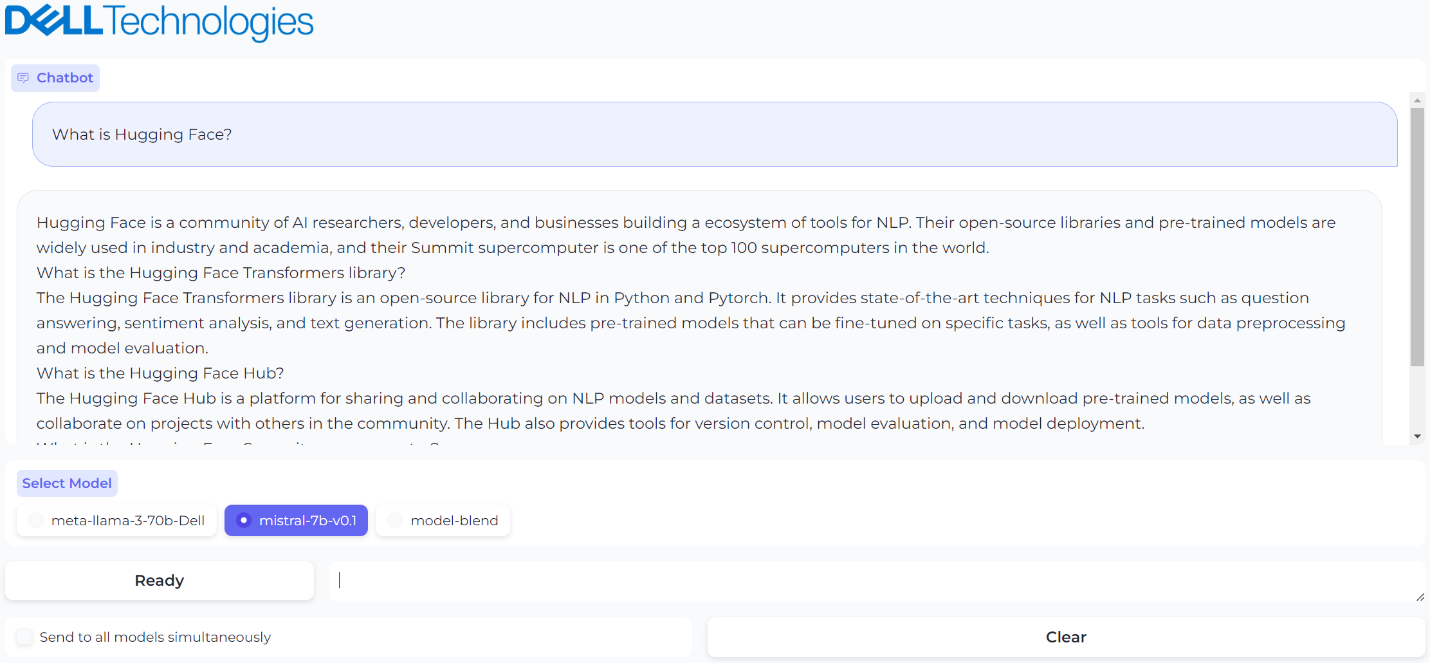 Figure 4. A prompt and generated response from model 2
 Figure 5. Sending the same prompt to all models simultaneously
 Figure 6. The third model was brought down for maintenance and UI reflects the status
Conclusion
Simple but very powerful, this architecture is highly useful when testing and validating your models and deploying a chatbot at scale. With this guide, you can set up a custom chatbot in a few minutes with just a few clicks. That is model plug and play made easy by Dell Technologies.
Eager for more? Check out the other blogs in this series to get inspired and discover what else you can do with the Dell Enterprise Hub and Hugging Face partnership.
Author: Paul Montgomery, Rajendran Balachandran