


OneFS Smartfail

OneFS protects data stored on failing nodes or drives in a cluster through a process called smartfail. During the process, OneFS places a device into quarantine and, depending on the severity of the issue, the data on it into a read-only state. While a device is quarantined, OneFS reprotects the data on the device by distributing the data to other devices.
After all data eviction or reconstruction is complete, OneFS logically removes the device from the cluster, and the node or drive can be physically replaced. OneFS only automatically smartfails devices as a last resort. Nodes and/or drives can also be manually smartfailed. However, it is strongly recommended to first consult Dell Technical Support.
Occasionally a device might fail before OneFS detects a problem. If a drive fails without being smartfailed, OneFS automatically starts rebuilding the data to available free space on the cluster. However, because a node might recover from a transient issue, if a node fails, OneFS does not start rebuilding data unless it is logically removed from the cluster.
A node that is unavailable and reported by isi status as ‘D’, or down, can be smartfailed. If the node is hard down, likely with a significant hardware issue, the smartfail process will take longer because data has to be recalculated from the FEC protection parity blocks. That said, it’s well worth attempting to bring the node up if at all possible – especially if the cluster, and/or node pools, is at the default +2D:1N protection. The concern here is that, with a node down, there is a risk of data loss if a drive or other component goes bad during the smartfail process.
If possible, and assuming the disk content is still intact, it can often be quicker to have the node hardware repaired. In this case, the entire node’s chassis (or compute module in the case of Gen 6 hardware) could be replaced and the old disks inserted with original content on them. This should only be performed at the recommendation and under the supervision of Dell Technical Support. If the node is down because of a journal inconsistency, it will have to be smartfailed out. In this case, engage Dell Technical Support to determine an appropriate action plan.
The recommended procedure for smartfailing a node is as follows. In this example, we’ll assume that node 4 is down:
From the CLI of any node except node 4, run the following command to smartfail out the node:
# isi devices node smartfail --node-lnn 4
Verify that the node is removed from the cluster.
# isi status –q
(An ‘—S-’ will appear in node 4’s ‘Health’ column to indicate it has been smartfailed).
Monitor the successful completion of the job engine’s MultiScan, FlexProtect/FlexProtectLIN jobs:
# isi job status
Un-cable and remove the node from the rack for disposal.
As mentioned previously, there are two primary Job Engine jobs that run as a result of a smartfail:
- MultiScan
- FlexProtect or FlexProtectLIN
MultiScan performs the work of both the AutoBalance and Collect jobs simultaneously, and it is triggered after every group change. The reason is that new file layouts and file deletions that happen during a disruption to the cluster might be imperfectly balanced or, in the case of deletions, simply lost.
The Collect job reclaims free space from previously unavailable nodes or drives. A mark and sweep garbage collector, it identifies everything valid on the filesystem in the first phase. In the second phase, the Collect job scans the drives, freeing anything that isn’t marked valid.
When node and drive usage across the cluster are out of balance, the AutoBalance job scans through all the drives looking for files to re-layout, to make use of the less filled devices.
The purpose of the FlexProtect job is to scan the file system after a device failure to ensure that all files remain protected. Incomplete protection levels are fixed, in addition to missing data or parity blocks caused by drive or node failures. This job is started automatically after smartfailing a drive or node. If a smartfailed device was the reason the job started, the device is marked gone (completely removed from the cluster) at the end of the job.
Although a new node can be added to a cluster at any time, it’s best to avoid major group changes during a smartfail operation. This helps to avoid any unnecessary interruptions of a critical job engine data reprotection job. However, because a node is down, there is a window of risk while the cluster is rebuilding the data from that cluster. Under pressing circumstances, the smartfail operation can be paused, the node added, and then smartfail resumed when the new node has happily joined the cluster.
Be aware that if the node you are adding is the same node that was smartfailed, the cluster maintains a record of that node and may prevent the re-introduction of that node until the smartfail is complete. To mitigate risk, Dell Technical Support should definitely be involved to ensure data integrity.
The time for a smartfail to complete is hard to predict with any accuracy, and depends on:
Attribute | Description |
OneFS release | Determines OneFS job engine version and how efficiently it operates. |
System hardware | Drive types, CPU, RAM, and so on. |
File system | Quantity and type of data (that is, small vs. large files), protection, tunables, and so on. |
Cluster load | Processor and CPU utilization, capacity utilization, and so on. |
Typical smartfail runtimes range from minutes (for fairly empty, idle nodes with SSD and SAS drives) to days (for nodes with large SATA drives and a high capacity utilization). The FlexProtect job already runs at the highest job engine priority (value=1) and medium impact by default. As such, there isn’t much that can be done to speed up this job, beyond reducing cluster load.
Smartfail is also a valuable tool for proactive cluster node replacement, such as during a hardware refresh. Provided that the cluster quorum is not broken, a smartfail can be initiated on multiple nodes concurrently – but never more than n/2 – 1 nodes (rounded up)!
If replacing an entire node pool as part of a tech refresh, a SmartPools filepool policy can be crafted to migrate the data to another node pool across the backend network. When complete, the nodes can then be smartfailed out, which should progress swiftly because they are now empty.
If multiple nodes are smartfailed simultaneously, at the final stage of the process the node remove is serialized with roughly a 60 second pause between each. The smartfail job places the selected nodes in read-only mode while it copies the protection stripes to the cluster’s free space. Using SmartPools to evacuate data from a node or set of nodes, in preparation to remove them, is generally a good idea, and usually a relatively fast process.
SmartPools’ Virtual Hot Spare (VHS) functionality helps ensure that node pools maintain enough free space to successfully re-protect data in the event of a smartfail. Though configured globally, VHS actually operates at the node pool level so that nodes with different size drives reserve the appropriate VHS space. This helps ensure that while data may move from one disk pool to another during repair, it remains on the same class of storage. VHS reservations are cluster wide and configurable, as either a percentage of total storage (0-20%), or as a number of virtual drives (1-4), with the default being 10%.
Note: a smartfail is not guaranteed to remove all data on a node. Any pool in a cluster that’s flagged with the ‘System’ flag can store /ifs/.ifsvar data. A filepool policy to move the regular data won’t address this data. Also, because SmartPools ‘spillover’ may have occurred at some point, there is no guarantee that an ‘empty’ node is completely devoid of data. For this reason, OneFS still has to search the tree for files that may have blocks residing on the node.
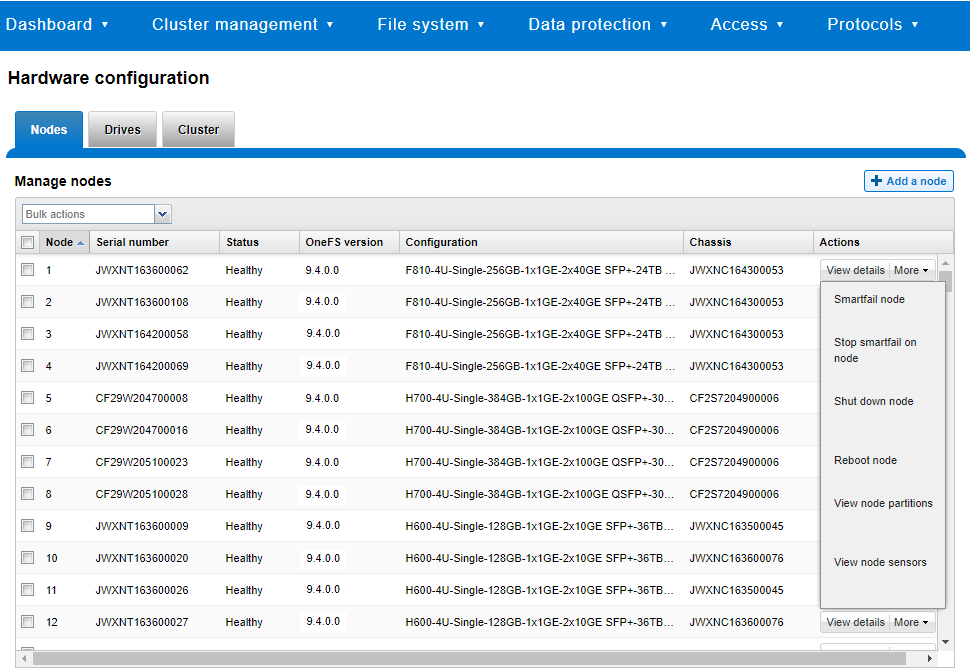
Nodes can be easily smartfailed from the OneFS WebUI by navigating to Cluster Management > Hardware Configuration and selecting ‘Actions > More > Smartfail Node’ for the desired node(s):
Similarly, the following CLI commands first initiate and then halt the node smartfail process, respectively. First, the ‘isi devices node smartfail’ command kicks off the smartfail process on a node and removes it from the cluster.
# isi devices node smartfail -h
Syntax
# isi devices node smartfail
[--node-lnn <integer>]
[--force | -f]
[--verbose | -v]
If necessary, the ‘isi devices node stopfail’ command can be used to discontinue the smartfail process on a node.
# isi devices node stopfail -h
Syntax
isi devices node stopfail
[--node-lnn <integer>]
[--force | -f]
[--verbose | -v]
Similarly, individual drives within a node can be smartfailed with the ‘isi devices drive smartfail’ CLI command.
# isi devices drive smartfail { <bay> | --lnum <integer> | --sled <string> }
        [--node-lnn <integer>]
        [{--force | -f}]
        [{--verbose | -v}]
[{--help | -h}]Author: Nick Trimbee
Related Blog Posts

PowerScale OneFS Release 9.3 now supports Secure Boot

Fri, 22 Oct 2021 20:50:20 -0000
|Read Time: 0 minutes
Many organizations are looking for ways to further secure systems and processes in today's complex security environments. The grim reality is that a device is typically most susceptible to loading malicious malware during its boot sequence.
With the introduction of OneFS 9.3, the UEFI Secure Boot feature is now supported on Isilon A2000 nodes. Not only does the release support the UEFI Secure Boot feature, but OneFS goes a step further by adding FreeBSD’s signature validation. Combining UEFI Secure Boot and FreeBSD’s signature validation helps protect the boot process from potential malware attacks.
The Unified Extensible Firmware Interface (UEFI) Forum standardizes and secures the boot sequence across devices with the UEFI specification. UEFI Secure Boot was introduced in UEFI 2.3.1, allowing only authorized EFI binaries to load.
FreeBSD’s veriexec function is used to perform signature validation for the boot loader and kernel. In addition, the PowerScale Secure Boot feature runs during the node’s bootup process only, using public-key cryptography to verify the signed code, to ensure that only trusted code is loaded on the node.
The Secure Boot feature does not impact cluster performance because the feature is only executed at bootup.
Pre-requisites
The OneFS Secure Boot feature is only supported on Isilon A2000 nodes at this time. The cluster must be upgraded and committed to OneFS 9.3. After the release is committed, proceed with upgrading the Node Firmware Package to 11.3 or higher.
Considerations
PowerScale nodes are not shipped with the Secure Boot feature enabled. The feature must be enabled on each node manually in a cluster. Now, a mixed cluster is supported where some nodes have the Secure Boot feature enabled, and others have it disabled.
A license is not required for the PowerScale Secure Boot feature. The Secure Boot feature can be enabled and disabled at any point, but it requires a maintenance window to reboot the node.
Configuration
You can use IPMI or the BIOS to enable the PowerScale Secure Boot feature, but disabling the feature requires using the BIOS.
For more information about the PowerScale Secure Boot feature, and detailed configuration steps, see the Dell EMC PowerScale OneFS Secure Boot white paper.
For more great information about PowerScale, see the PowerScale Info Hub at: https://infohub.delltechnologies.com/t/powerscale-isilon-1/.
Author: Aqib Kazi

OneFS and HTTP Security
Mon, 22 Apr 2024 20:35:30 -0000
|Read Time: 0 minutes
To enable granular HTTP security configuration, OneFS provides an option to disable nonessential HTTP components selectively. This can help reduce the overall attack surface of your infrastructure. Disabling a specific component’s service still allows other essential services on the cluster to continue to run unimpeded. In OneFS 9.4 and later, you can disable the following nonessential HTTP services:
Service | Description |
PowerScaleUI | The OneFS WebUI configuration interface. |
Platform-API-External | External access to the OneFS platform API endpoints. |
Rest Access to Namespace (RAN) | REST-ful access by HTTP to a cluster’s /ifs namespace. |
RemoteService | Remote Support and In-Product Activation. |
SWIFT (deprecated) | Deprecated object access to the cluster using the SWIFT protocol. This has been replaced by the S3 protocol in OneFS. |
You can enable or disable each of these services independently, using the CLI or platform API, if you have a user account with the ISI_PRIV_HTTP RBAC privilege.
You can use the isi http services CLI command set to view and modify the nonessential HTTP services:
# isi http services list
ID                     Enabled
------------------------------
Platform-API-External Yes
PowerScaleUI          Yes
RAN                   Yes
RemoteService         Yes
SWIFT                 No
------------------------------
Total: 5
For example, you can easily disable remote HTTP access to the OneFS /ifs namespace as follows:
# isi http services modify RAN --enabled=0
You are about to modify the service RAN. Are you sure? (yes/[no]): yes
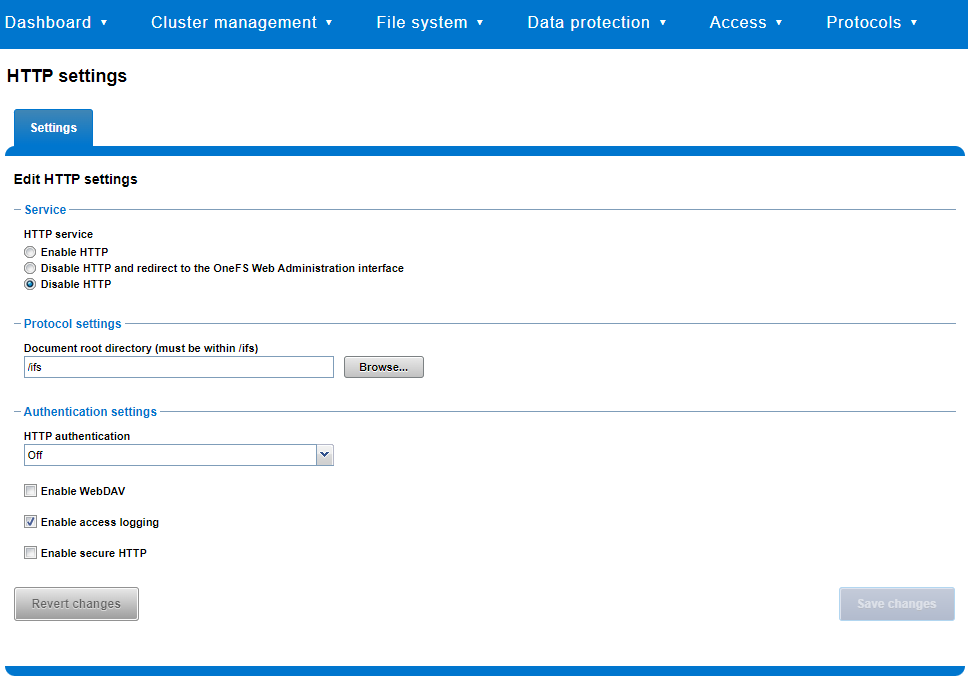
Similarly, you can also use the WebUI to view and edit a subset of the HTTP configuration settings, by navigating to Protocols > HTTP settings:
That said, the implications and impact of disabling each of the services is as follows:
Service | Disabling impacts |
WebUI | The WebUI is completely disabled, and access attempts (default TCP port 8080) are denied with the warning Service Unavailable. Please contact Administrator. If the WebUI is re-enabled, the external platform API service (Platform-API-External) is also started if it is not running. Note that disabling the WebUI does not affect the PlatformAPI service. |
Platform API | External API requests to the cluster are denied, and the WebUI is disabled, because it uses the Platform-API-External service. Note that the Platform-API-Internal service is not impacted if/when the Platform-API-External is disabled, and internal pAPI services continue to function as expected. If the Platform-API-External service is re-enabled, the WebUI will remain inactive until the PowerScaleUI service is also enabled. |
RAN | If RAN is disabled, the WebUI components for File System Explorer and File Browser are also automatically disabled. From the WebUI, attempts to access the OneFS file system explorer (File System > File System Explorer) fail with the warning message Browse is disabled as RAN service is not running. Contact your administrator to enable the service. This same warning also appears when attempting to access any other WebUI components that require directory selection. |
RemoteService | If RemoteService is disabled, the WebUI components for Remote Support and In-Product Activation are disabled. In the WebUI, going to Cluster Management > General Settings and selecting the Remote Support tab displays the message The service required for the feature is disabled. Contact your administrator to enable the service. In the WebUI, going to Cluster Management > Licensing and scrolling to the License Activation section displays the message The service required for the feature is disabled. Contact your administrator to enable the service. |
SWIFT | Deprecated object protocol and disabled by default. |
You can use the CLI command isi http settings view to display the OneFS HTTP configuration:
# isi http settings view
            Access Control: No
      Basic Authentication: No
    WebHDFS Ran HTTPS Port: 8443
                        Dav: No
         Enable Access Log: Yes
                      HTTPS: No
 Integrated Authentication: No
               Server Root: /ifs
                    Service: disabled
           Service Timeout: 8m20s
          Inactive Timeout: 15m
           Session Max Age: 4H
Httpd Controlpath Redirect: No
Similarly, you can manage and change the HTTP configuration using the isi http settings modify CLI command.
For example, to reduce the maximum session age from four to two hours:
# isi http settings view | grep -i age
           Session Max Age: 4H
# isi http settings modify --session-max-age=2H
# isi http settings view | grep -i age
           Session Max Age: 2H
The full set of configuration options for isi http settings includes:
Option | Description |
--access-control <boolean> | Enable Access Control Authentication for the HTTP service. Access Control Authentication requires at least one type of authentication to be enabled. |
--basic-authentication <boolean> | Enable Basic Authentication for the HTTP service. |
--webhdfs-ran-https-port <integer> | Configure Data Services Port for the HTTP service. |
--revert-webhdfs-ran-https-port | Set value to system default for --webhdfs-ran-https-port. |
--dav <boolean> | Comply with Class 1 and 2 of the DAV specification (RFC 2518) for the HTTP service. All DAV clients must go through a single node. DAV compliance is NOT met if you go through SmartConnect, or using 2 or more node IPs. |
--enable-access-log <boolean> | Enable writing to a log when the HTTP server is accessed for the HTTP service. |
--https <boolean> | Enable the HTTPS transport protocol for the HTTP service. |
--https <boolean> | Enable the HTTPS transport protocol for the HTTP service. |
--integrated-authentication <boolean> | Enable Integrated Authentication for the HTTP service. |
--server-root <path> | Document root directory for the HTTP service. Must be within /ifs. |
--service (enabled | disabled | redirect | disabled_basicfile) | Enable/disable the HTTP Service or redirect to WebUI or disabled BasicFileAccess. |
--service-timeout <duration> | The amount of time (in seconds) that the server will wait for certain events before failing a request. A value of 0 indicates that the service timeout value is the Apache default. |
--revert-service-timeout | Set value to system default for --service-timeout. |
--inactive-timeout <duration> | Get the HTTP RequestReadTimeout directive from both the WebUI and the HTTP service. |
--revert-inactive-timeout | Set value to system default for --inactive-timeout. |
--session-max-age <duration> | Get the HTTP SessionMaxAge directive from both WebUI and HTTP service. |
--revert-session-max-age | Set value to system default for --session-max-age. |
--httpd-controlpath-redirect <boolean> | Enable or disable WebUI redirection to the HTTP service. |
Note that while the OneFS S3 service uses HTTP, it is considered a tier-1 protocol, and as such is managed using its own isi s3 CLI command set and corresponding WebUI area. For example, the following CLI command forces the cluster to only accept encrypted HTTPS/SSL traffic on TCP port 9999 (rather than the default TCP port 9021):
# isi s3 settings global modify --https-only 1 –https-port 9921
# isi s3 settings global view
         HTTP Port: 9020
        HTTPS Port: 9999
        HTTPS only: Yes
S3 Service Enabled: Yes
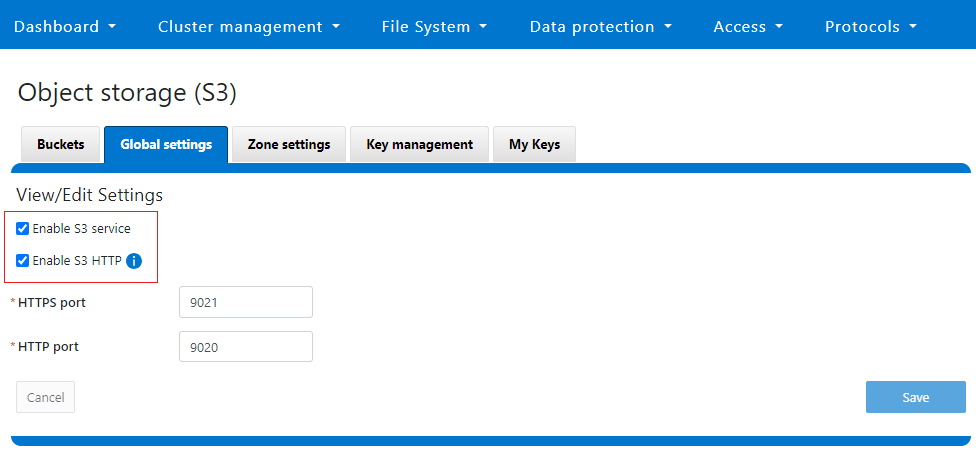
Additionally, you can entirely disable the S3 service with the following CLI command:
# isi services s3 disable
The service 's3' has been disabled.
Or from the WebUI, under Protocols > S3 > Global settings:
Author: Nick Trimbee