Home > Edge > Manufacturing Edge > Guides > Dell Validated Design for Manufacturing Edge - Design Guide with 5 Independent Software Vendors > HA and DR with Telit Cinterion
HA and DR with Telit Cinterion
-
Overview
High Availability (HA) is an approach that minimizes downtime with redundancy and failover—essentially downtime prevention. Disaster Recovery (DR) complements HA by having systems and processes in place to recover quickly with minimal loss from system downtime—downtime mitigation. At the far edge, lightweight computing systems typically provide fewer features to address HA and DR than robust computing platforms, such as VxRail. For these far edge deployments, it is usually more important to leverage the features provided by the edge application.
In this section, the following Telit deviceWISE features are discussed as they relate to building a more HA/DR-aligned far edge deployment:- License server
- Backup and restore with deviceWISE Workbench
- Automated backups with deviceWISE Backup Utility
Note: Using a Dell XR4000, which supports ESXi, at the far edge can offer several HA/DR functions beyond the application-level features that are discussed in this section. See the PowerEdge XR4000 - purpose built for the edge section for more information about HA/DR capabilities of ESXi on the XR400.
Note: If a configuration change is needed, it is best practice to first make a backup of the node. For more information, see Backup and restore with Workbench.
License server
The license server functionality offers simplicity by allowing all license keys and files to be managed on a single node, which has advantages for High Availability. With only a single expiration date to monitor, a lapsed license is easier to avoid.
The license server also provides flexibility in license management, which can help with Disaster Recovery. Adding additional nodes or replacing a node does not require license generation or license installation, and can be done immediately, provided that the server has licenses to spare. Without need for an individualized license, failed hardware can quickly be replaced, a backup project can be installed, and, with the same license client settings, the license is automatically pulled.
The license server may not be right for every application, however. With a license server deployment, the edge nodes rely on at least a periodic connection with the license server to maintain valid licenses. Long periods of disconnection may cause licensing issues. And due to the relatively large gateway, device, and HTTP connection quantities available for purchase, it may not be the best choice for smaller deployments.
For more information about the license server configuration and setting options, see the License server configuration section.
Pooled licenses
Pooled licenses are the license files that need to be installed on the license server edge node host. Client edge nodes then connect and pull a number of the licenses from the available pooled quantity. At the time of writing, pooled licenses can be purchased in quantities of 100 or 250.
Figure 150. An example view of pooled licenses used by a license server node 
Gateways
The Pooled Gateway License specifies the number of edge gateway nodes that can be connected to the license server—this number is indicated in parentheses in the Features column of the Licenses tab on the license server host node. Each connected node consumes one of the available Active Gateway licenses.
Device connections
The Pooled Device License specifies the number of licensed devices that are connected to each edge gateway node—the total number available is indicated in parentheses in the Features column of the Licenses tab on the license server host node.
A device connection is used when starting a connection on the client node to a downstream device, such as a PLC, an MQTT connection, or an OPC UA connection, among others. In the configuration for the client node, the user specifies how many device licenses should be preallocated for that node. When the client node connects to the license server, that specified number of device licenses is pulled from the available Active Devices licenses, and they are reserved for use by that node.
HTTP connections
The Pooled HTTP Connection License specifies the number of licensed HTTP connections that the edge gateway nodes can host—the total number available is indicated in parentheses in the Features column of the Licenses tab on the license server host node.
HTTP connections are consumed when connecting to deviceWISE View displays on the node. HTTP connection licenses provided to edge nodes by the license server are in addition to the five connections allowed on both Asset Gateways and Enterprise Gateways by default. As with the device connections, the user specifies how many HTTP connections will be preallocated to that node in the client configuration. When the client node connects to the license server, that specified number of licenses is pulled from the available Active HTTP Connection licenses and are reserved for use by that node.
When an HTTP connection to the node is established, the five default licenses are used first. Once five connections are established, additional connections use up the preallocated HTTP connection licenses. Once that number is reached, HTTP licenses are pulled dynamically from the server, assuming a connection is maintained between the node and the server. If an HTTP connection is closed, the license is returned to the license server pool on the next lease renewal. If the node is not connected to the server when a dynamic license is required, the connection is denied with an error at login.
Other license types
Outside of the three pooled licenses discussed above, any features that the client nodes require must be licensed at the license server node level. For example, if a client node requires the use of OPC UA, the corresponding license (DeviceWISE OPC) must be installed on the licenser server.
Configuration
Configuration is required on both the server and client side prior to using the license server functionality. All configurations can be done through a single Workbench instance connected to the nodes.
Server configuration
The deviceWISE Edge gateway node hosting the license server must be configured first. To select the node to be used as a license server, consider that the client nodes must be able to establish a network connection with the server to pull licenses. Node uptime and network stability are important for a license server. This could be deployed as a VM on VxRail for maximum HA/DR or on an existing far edge deployment.
The first step in the license server configuration is to obtain the pooled license files and other host node license files from Telit Cinterion support—this requires having the hardware ID (MAC address) of the host machine identified. These files should be imported to the license server node on the Licenses tab in the same way that other license files are imported using the Workbench.
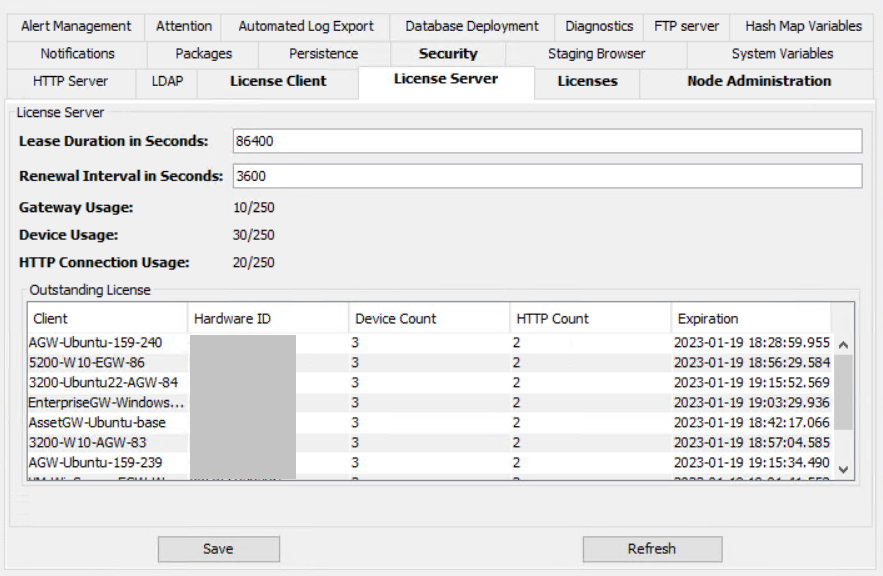
The remaining server configuration is done on the License Server tab of the license server node. Here the Lease Duration and Renewal Interval for the server are configured, as described in the two following sections. Ensure that any changes are saved.
For more information about the license server configuration, see the License server configuration section and Telit Cinterion’s License Server documentation.
Figure 151. Example view of the License Server configuration tab of a license server node 
Lease Duration
The Lease Duration describes how long licenses that are pulled by the client nodes are valid before the client node must reconnect to the server for lease renewal. This essentially describes the maximum disconnection time of a client from the server.
Should a node not be able to reconnect to the license server before the end of its lease duration, any licenses that were pulled by the node are returned to the license server’s pool and are available for other edge nodes to consume.
Renewal Interval
The Renewal Interval describes how frequently the client nodes reach out to the server to renew their licenses. There is typically no communication between the client node and the server node in the interim between lease renewals.
Updates to the license server configuration settings are only pulled by the client node at lease renewal. If the renewal interval is one hour, and then it is changed to five minutes, the edge node only captures this new configuration when renewing at the end of the one-hour period since the last lease renewal. At this renewal, it reconfigures future renewals at five-minute increments.
For more information about both the lease duration and renewal interval, see the License server configuration section.
Client configuration
Once the server is configured, it is ready for client nodes to connect to it. The first node that can utilize the license server functionality is the host node itself.
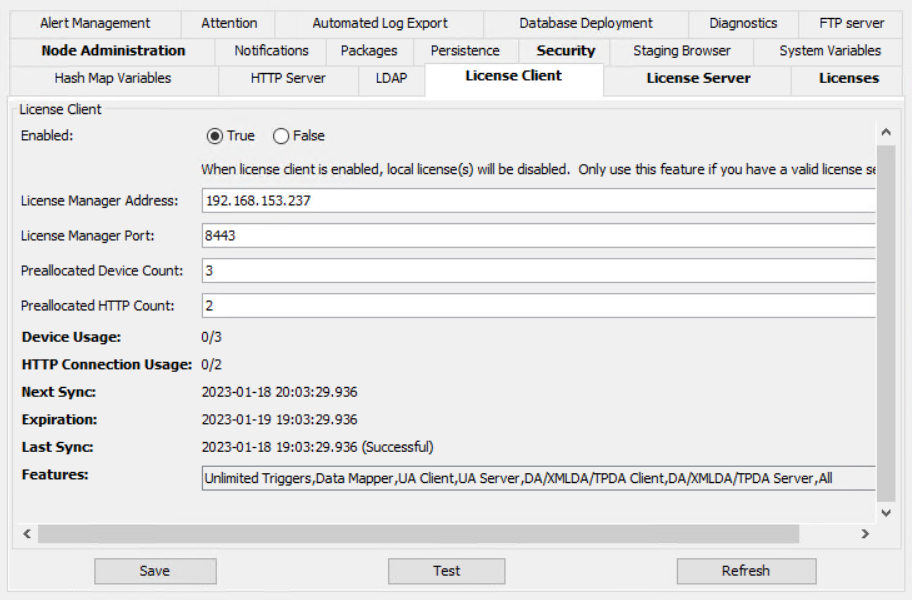
In the License Client settings, point to the configured license server and make appropriate selections based on the system’s needs for the Preallocated Device Count and Preallocated HTTP Count, using the previous descriptions of these parameters. This process can be repeated as needed for additional edge nodes in the deployment.
See the License client configuration and validation section for more detailed instructions.Figure 152. Sample view of the License Client configuration tab of a node 
For more details on license client configuration, see Telit Cinterion’s License Client documentation.
Backup and restore with Workbench
A deviceWISE Edge node’s configuration can be copied using the Back Up functionality through Workbench. When ready, the original node or a new node can be restored with the backup file.
This feature is important for Disaster Recovery because a backup file can be stored and used to duplicate the configuration on an additional node in the case of a hardware failure, or to restore the configuration on a node where software was corrupted or an unintended change to the configuration was made.
Backup
The Back Up functionality is available from Workbench, and can be executed manually when needed, such as prior to a configuration change or on a regular basis.
To perform the backup, the user must locate the node in Workbench, right-click it in the menu, and select Back Up. The backup can be customized in the pop-up window, where individual components can be selected and deselected. Also, the file can be named, and the file location selected.
Note: Ensure that vital backups that are kept for Disaster Recovery purposes are stored on a Highly Available system or with redundancy, per the application’s required service level.
See the Manual backup using Workbench section for details.
Restore
An existing backup file can be used to restore both the node it originated from or another node. This restoration can be executed manually when required.
During the restoration, the user can see the components that are contained in the export file and has the option to deselect components as needed. There is also an option to Restore the started state, which may cause projects, triggers, devices, and other components to start automatically once the restoration is complete. Ensure that this is considered concerning safety and process.Note: Any components in the backup file that are selected for restoration overwrite existing components. If performing a task other than a full backup and restore, consider using the Export and Import functions. See the Component export and import and Manual restore using Workbench sections for more information.
deviceWISE Backup Utility
The deviceWISE Backup Utility is a Windows-based, out-of-band configuration tool for remote backups, both manual and automatic. It is comprised of a UI and several supporting components.
Deployment
Like Workbench, the Backup Utility does not need to live alongside a deviceWISE Edge node. It simply requires a network connection to any edge nodes from which backups are required. While an existing far edge gateway might serve the purpose, deploying the Backup Utility on a Windows-based VM on VxRail allows the HA/DR capabilities and storage resources of the VxRail deployment to be utilized.
Unlike Workbench, the machine hosting the Backup Utility must remain connected to the edge nodes to complete backups. Any disconnection inhibits the creation of these backups, so the location that is chosen for deployment should have uptime and network stability taken into consideration.
Backups that are generated from the utility can be used to restore a machine. For more information, see Restore.
More details on the Backup Utility, and some features not discussed here, can be found in Telit Cinterion’s deviceWISE Backup Utility documentation.
Backup Configurator
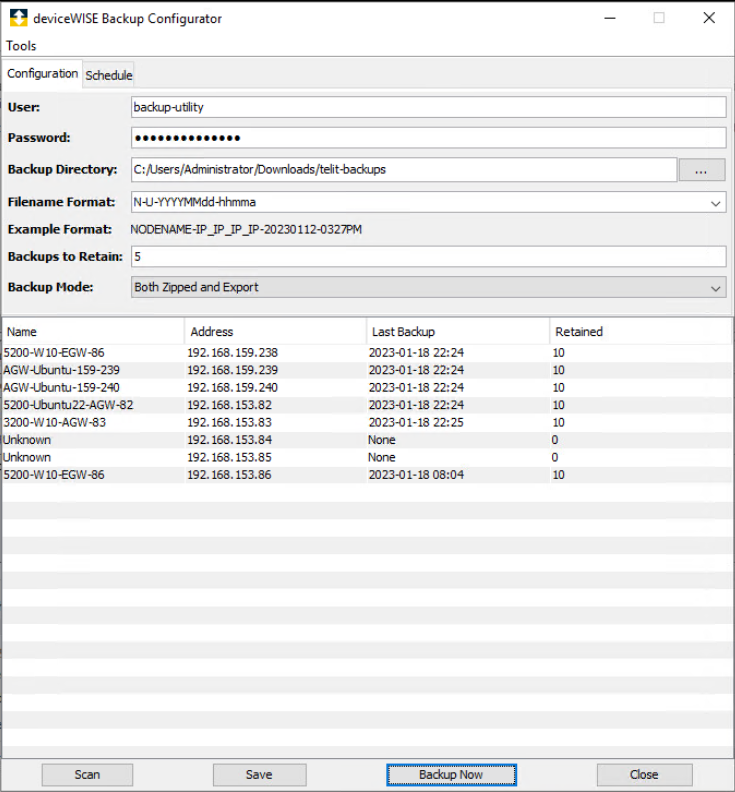
The Backup Configurator is the UI component of the Backup Utility where node connections and backup settings are made.
Figure 153. Sample view of the deviceWISE Backup Configurator 
Configuration
On the Configuration tab of the Backup Configurator, the node connections, the backup file storage details, and retention options can be configured.
There is scanning functionality that can be used to identify nodes by subnet or address. Any discovered nodes are populated in the bottom section of the window. For the Backup Utility to connect to the nodes and pull the backups, a set of access credentials that works for all the nodes must be provided.
Note: Currently, this single set of credentials must work across all nodes. To avoid this, a separate Backup Utility would need to be deployed per set of credentials.
This user must be created on each node in advance, or an AD (Active Directory) user can be used if LDAP (Lightweight Directory Access Protocol) is configured on the nodes. For more information, see Test case: Integrate with AD over LDAP. The Backup Utility only has access to a given node based on the permissions that are granted to the role assigned to the user, so ensure that the user who is assigned to the Backup Utility has access to any features that should be included in the backup files. See Test case: RBAC with local Role for more information about roles and permissions.
Note: It is best practice for services, such as this Backup Utility, to have a designated service account, which is not used by any individual user or other service.
Other options on the UI address the backups that are created. The file location, file naming format, and number of retained backups can be specified. Once the backup count outnumbers the retained number, the oldest backup is removed. Finally, you can choose which of the two types of backups (or both) are to be made. The export file contains the node’s configuration, the same as was generated manually using Workbench. The zipped file contains a copy of the local database files DWCORE, DWAPP, and DWUSER.
Note: The Backups to Retain value looks at full backups, both zipped and export files. If the Backups to Retain value is set to two, older backup files are erased until the backup count is at four—two zipped files and two export files.
For more detailed configuration steps, see the Manual restore using Workbench section.
Schedule
If automatic, scheduled backups are wanted, the deviceWISE Backup Configurator schedule options must be used with one of the automated backup tools.
Note: Without setting up the Backup Daemon (below) or the Backup Console (not discussed in this document), making schedule selections has no effect.
Configure the wanted schedule by selecting the months, weeks, days of the week, and time at which the scheduled backup will occur. Given that only one time may be selected, the maximum backup frequency is once per day.
For expanded scheduling options, see the Windows Task Scheduler section.
Note: Performing backups and transporting the files over the network puts additional stress on the network. It is recommended to manually execute and schedule backups during periods of lower network activity.
These dates and times rely on the Backup Utility host OS’s clock. Ensure that Network Time Protocol (NTP) and time zone settings are configured on the machine appropriately.
Manual backup with the Backup Utility
Once the Backup Configurator settings have been saved, the Backup Now button can be used to generate backups immediately. Even if a manual backup is not necessary, this step is recommended to test that node connections are working and that backup files are named correctly and stored in the correct location before implementing an automated backup scheme.
If a node is disconnected or the provided credentials are not valid on that node, a backup is not generated for that node. It is skipped, and other backups proceed. As confirmation, the values in the Last Backup and Retained columns increase as the backup is completed. The zipped files for all nodes are created first, followed by the export files. This can take from several minutes to over an hour to complete, depending on the number of nodes and the size of the backups of each node.
Note: Performing backups and transporting the files over the network puts additional stress on the network. It is recommended to manually execute and schedule backups during periods of lower network activity.
Backup Daemon
The Backup Daemon is an executable file that invokes the configuration and schedule set in the Backup Configurator to generate backups in the background. While it can be run from the command line or as part of a script, this document covers how it can be launched automatically using the Windows Task Scheduler application hosted on the Windows machine where the Backup Utility is installed.
Windows Task Scheduler
The Task Scheduler application, available on most Windows distributions, can be used to execute scripts or commands under a given condition.
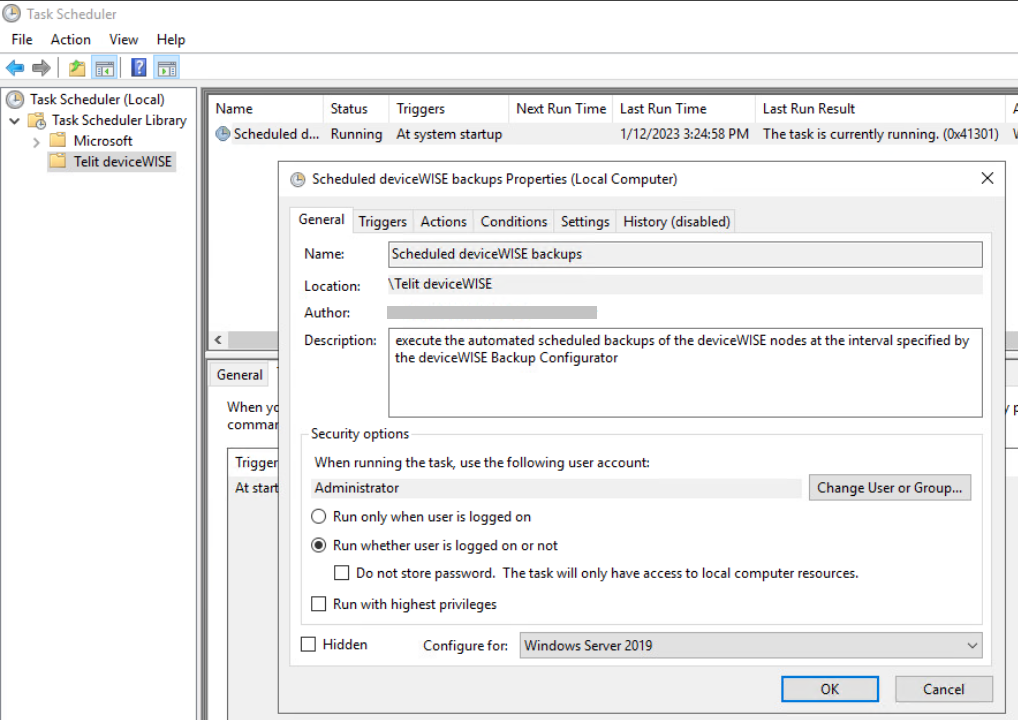
The Task Scheduler can be leveraged to start the Backup Daemon--within the Task Scheduler, a new task can be configured to run on startup, which runs the Backup Daemon executable that is found in the Backup Utility installation folder. With the Backup Daemon running in the background, the backups are executed according to the schedule set in the deviceWISE Backup Configurator.
Note: Alternatively, the Task Scheduler could be configured to execute the Backup Daemon with the runonce option, relying on the Task Scheduler’s settings for the schedule or conditions, but this is not explored in this document.
If changes are made using the Backup Configurator to either the backup configuration or schedule, the Backup Daemon must be restarted for these changes to take effect.Figure 154. Sample view of the task created in the Windows Task Manager to launch the Backup Daemon at system startup 
For more information about the steps on configuring the Backup Daemon using the Task Scheduler, see Schedule automatic backup of multiple nodes using Backup Utility.
For more information about Windows Task Scheduler, see Task Scheduler documentation.
