
For detailed information about server templates, profiles, virtual identities, and deployment, see the OpenManage Enterprise - Modular documentation.
Templates
A template is a set of system configuration settings referred to as attributes. A template may contain a small set of attributes for a specific purpose, or all the attributes for a full system configuration. Templates allow for multiple servers to be configured quickly and automatically without the risk of human error.
Networks (VLANs) are assigned to NICs as part of the server template. When the template is deployed, those networks are programmed on the fabric for the servers that are associated with the template.
The OME-M UI provides the following options for creating templates:
- Most frequently, templates are created by getting the current system configuration from a server that has been configured to the exact specifications required. This is referred to as a Reference Server.
- Templates may be cloned, copied, and edited.
- A template can be created by importing a Server Configuration Profile (SCP) file. The SCP file may be from a server or exported by OpenManage Essentials, OpenManage Enterprise, or OME-M.
- OME-M comes prepopulated with several templates for specific purposes.
Profiles
A server profile is a combination of template and identity settings that are applied to a specific server or multiple servers. When the server template is deployed successfully, OME-M automatically creates and applies a server profile to that template. OME-M also allows you to manually create a server profile that you can apply to the designated compute sleds.
Instead of deleting and re-creating server templates, profiles can be used to deploy with modified attributes on server templates. A single profile can be applied to multiple server templates with modified attributes, or all attributes.
Virtual identities and identity pools
Some of the attributes that are in a template are referred to as identity attributes. Identity attributes identify a device and distinguish it from all other devices on the network. Since identity attributes must uniquely identify a device, it is imperative that each device has a unique network identity. Otherwise, devices cannot communicate with each other over the network.
Devices come with unique manufacturer-assigned identity values preinstalled, such as a factory-assigned MAC address. Those identities are fixed and never change. However, devices can assume a set of alternate identity values, called a “virtual identity.” A virtual identity functions on the network using that identity, as if the virtual identity was its factory-installed identity. The use of virtual identity is the basis for stateless operations.
OME-M uses identity pools to manage the set of values that can be used as virtual identities for discovered devices. It controls the assignment of virtual identity values, selecting values for individual deployments from predefined ranges of possible values. This allows the customer to control the set of values which can be used for identities. The customer does not have to enter all needed identity values with every deployment request, or remember which values have or have not been used. Identity pools make configuration deployment and migration easier to manage.
Identity pools are used with template deployment and profile operations. They provide sets of values that can be used for virtual identity attributes for deployment. After a template is created, an identity pool may be associated with it. Doing this directs the identity pool to get identity values whenever the template is deployed to a target device. The same identity pool can be associated with, or used by, any number of templates. Only one identity pool can be associated with a template.
Each template has specific virtual identity needs, based on its configuration. For example, one template may have iSCSI configured, so it needs the appropriate virtual identities for iSCSI operations. Another template may not have iSCSI configured, but may have FCoE configured, so it needs virtual identities for FCoE operations but not for iSCSI operations.
Upgrade OS10 manually from the CLI in Full Switch mode
To upgrade an OS10 image, first download and unpack the new OS10 binary image as described in Download OS10 image for upgrade in OS10 Installation, Upgrade and Downgrade Guide. Then copy the binary image file to a local server and follow the steps as described in the Perform an OS10 upgrade section.
Starting from Release 10.5.5.1, the system checks for firmware updater version compatibility between the existing image and the new image and ensures that upgrades do not fail because of firmware updater issues. If the firmware updater version in the existing image is:
- Higher than or equal to the firmware updater version in the new image, the system proceeds with upgrade.
- Lower than the firmware updater version in the new image. For example, the system displays the following message on the console and does not initiate upgrade.
Device Firmware version (3.42.5.1-15) is lesser than the minimum expected DUP firmware version (3.42.5.1-17). So please upgrade firmware version first.
If the DUP image does not include the firmware updater, the system proceeds with upgrading the OS10 software.
Perform an OS10 upgrade
Before starting the OS10 upgrade process, ensure that the switch running configuration is saved from the RAM into the switch flash using the copy running-configuration startup-configuration or alternatively using the write memory command in EXEC mode.
Save the running configuration into the startup configuration.
OS10# copy running-configuration startup-configurationBack up the startup configuration of the switch as a backup file on a local machine.
OS10# copy config://startup.xml config://<backup file name>Once the OS10 binary image is downloaded and unpacked, start the image installation process.
The OS10 image can be installed using several methods, such as using an FTP, SCP, or TFTP server. For an example in this document, the tftp:// option has been used to install the OS10 DUP .exe version on the system.
Install the software image for version 10.5.2.6 or later in EXEC mode. In the following example. OS10 version 10.5.5.6 is used to upgrade the Dell PowerSwitch.
OS10# image install tftp://<tftp-server-ip>/file-name .EXEFor example:
OS10# image install tftp://100.67.xx.xx/Network_Firmware_1VR3M_WN64_10.5.5.6_A00.EXE(Optional) Once the image download is started, view the current software download status in EXEC mode.
OS10# show image status Cancel any staged firmware update using the image cancel command.
OS10# image cancel image install command installs the downloaded image to the system standby partition. If you had modified text files or installed custom packages, they are not available with the standby image. Back up the modified files and custom packages and reinstall them after downloading the standby image. (Optional) Once the image download is completed. Verify the standby image version by using the show boot detail command to check.
OS10# show boot detail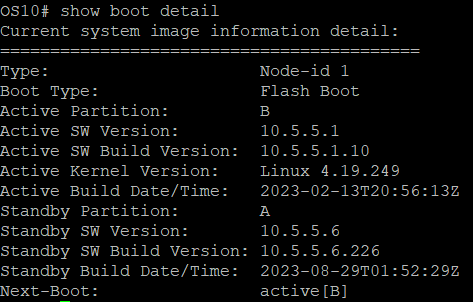
Change the next boot image to the standby image in EXEC mode.
OS10# boot system standbyCheck whether the next boot has changed to the standby image in EXEC mode.
OS10# show boot detail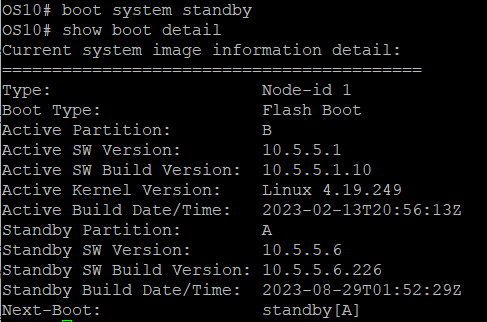
Save the changes and reload the switch to upgrade with the new software image in EXEC mode.
OS10# write memory
OS10# reload
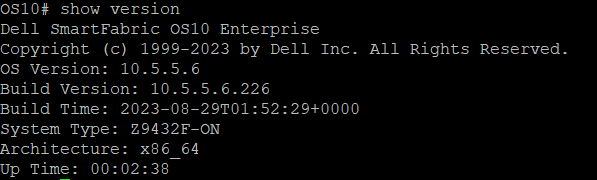
When the switch reboot cycle completes, verify that the new image has been installed successfully using the show version command in EXEC mode.
For more details, see Dell SmartFabric OS10 Installation, Upgrade, and Downgrade Guide.