


OneFS Security and USB Device Control

As we’ve seen over the course of the last several articles, OneFS 9.5 delivers a wealth of security focused features. These span the realms of core file system, protocols, data services, platform, and peripherals. Among these security enhancements is the ability to manually or automatically disable a cluster’s USB ports from either the CLI, platform API, or by activating a security hardening policy.
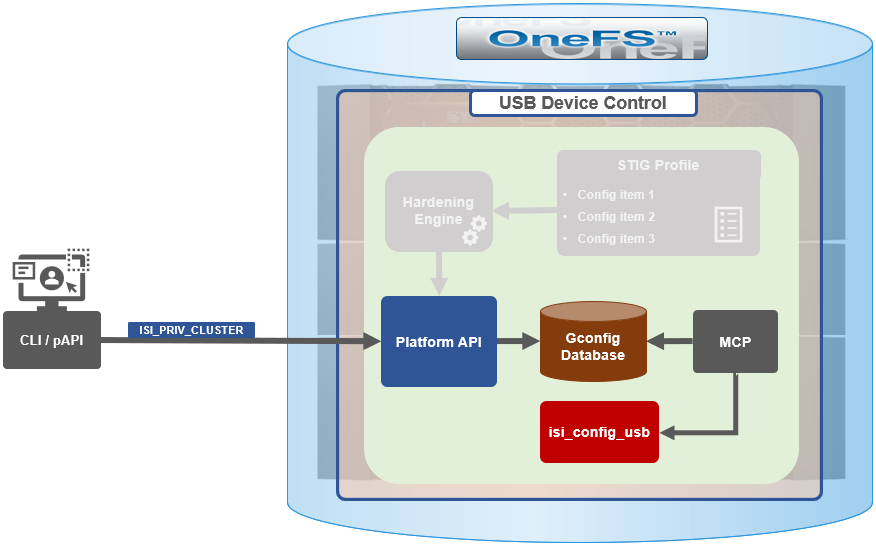
In support of this functionality, the basic USB port control architecture is as follows:
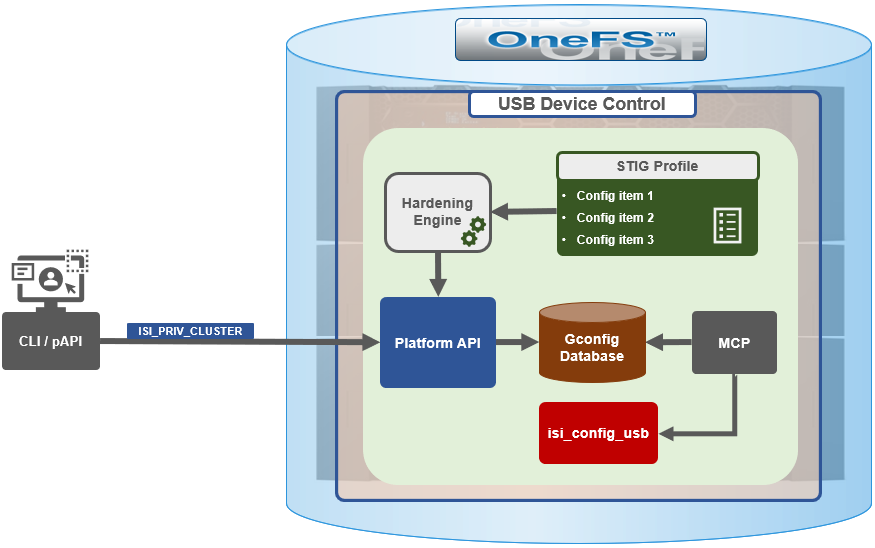
To facilitate this, OneFS 9.5 and subsequent releases see the addition of a new gconfig variable, ‘usb_ports_disabled’, in ‘security_config’, specifically to track the status of USB Ports on a cluster. On receiving an admin request either from the CLI or the platform API handler to disable the USB port, OneFS modifies the security config parameter in gconfig. For example:
# isi_gconfig -t security_config | grep -i usb
usb_ports_disabled (bool) = true
Under the hood, the MCP (master control process) daemon watches for any changes to the ‘isi_security.gcfg’ security config file on the cluster. If the value for the ‘usb_ports_disabled’ variable in the ‘isi_security.gcfg’ file is updated, then MCP executes the ‘isi_config_usb’ utility to enact the desired change. Note that because ‘isi_config_usb’ operates per-node but the MCP actions are global (executed cluster wide), isi_config_usb is invoked across each node by a Python script to enable or disable the cluster’s USB Ports.
The USB Ports enable/disable feature is only supported on PowerScale F900, F600, F200, H700/7000, and A300/3000 clusters running OneFS 9.5 and later, and PowerScale F710 and F210 running OneFS 9.7 or later.
In OneFS 9.5 and later, USB port control can be manually configured from either the CLI or platform API.
Note that there is no WebUI option at this time.
The following table lists the CLI and platform API configuration options for USB port control in OneFS 9.5 and later:
Action | CLI Syntax | Description |
View | isi security settings view | Report the state of a cluster’s USB ports. |
Enable | isi security settings modify --usb-ports-disabled=False | Activate a cluster’s USB ports. |
Disable | isi security settings modify --usb-ports-disabled=True | Disable a cluster’s USB ports. |
For example:
# isi security settings view | grep -i usb
      USB Ports Disabled: No
# isi security settings modify --usb-ports-disabled=True
# isi security settings view | grep -i usb
      USB Ports Disabled: Yes
Similarly, to re-enable a cluster’s USB ports:
# isi security settings modify --usb-ports-disabled=False
# isi security settings view | grep -i usb
      USB Ports Disabled: No
Note that a user account with the OneFS ISI_PRIV_CLUSTER RBAC privilege is required to configure USB port changes on a cluster.
In addition to the ‘isi security settings’ CLI command, there is also a node-local CLI utility:
# whereis isi_config_usb
isi_config_usb: /usr/bin/isi_hwtools/isi_config_usb
As mentioned previously, ‘isi security settings’ acts globally on a cluster, using ‘isi_config_usb’ to effect its changes on each node.
Alternatively, cluster USB ports can also be enabled and disabled using the OneFS platform API with the following endpoints:
API | Method | Argument | Output |
/16/security/settings | GET | No argument required. | JSON object for security settings with USB ports setting. |
/16/security/settings | PUT | JSON object with boolean value for USB ports setting. | None or Error. |
For example:
# curl -k -u <username>:<passwd> https://localhost:8080/platform/security/settings”

 {
 "settings" :
 {
 "fips_mode_enabled" : false,
 "restricted_shell_enabled" : false,
 "usb_ports_disabled" : true
 }
 }
In addition to manual configuration, the USB ports are automatically disabled if the STIG security hardening profile is applied to a cluster.
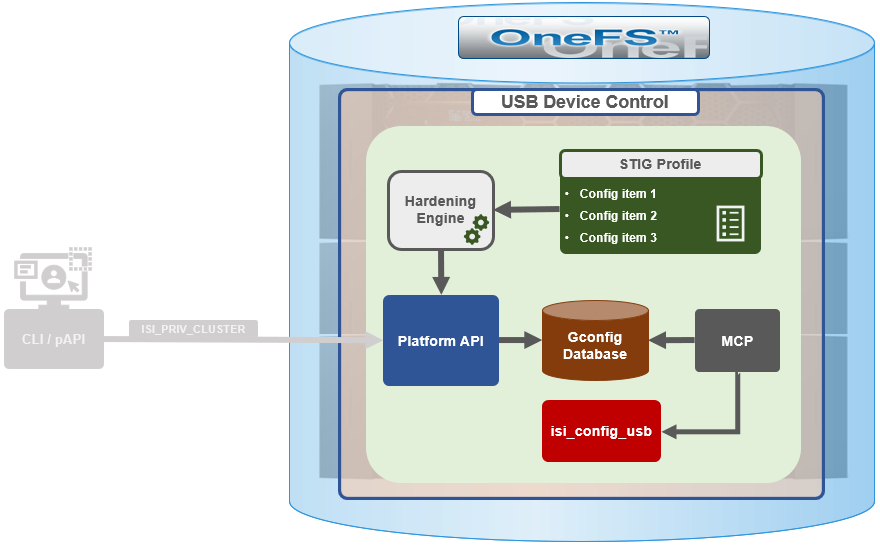
This is governed by the following section of XML code in the isi_hardening configuration file, which can be found at /etc/isi_hardening/profiles/isi_hardening.xml:
<CONFIG_ITEM id ="isi_usb_ports" version = "1">
              <PapiOperation>
                           <DO>
                                        <URI>/security/settings</URI>
                                        <BODY>{"usb_ports_disabled": true}</BODY>
                                        <KEY>settings</KEY>
                           </DO>
                           <UNDO>
                                        <URI>/security/settings</URI>
                                        <BODY>{"usb_ports_disabled": false}</BODY>
                                        <KEY>settings</KEY>
                           </UNDO>
                           <ACTION_SCOPE>CLUSTER</ACTION_SCOPE>
                           <IGNORE>FALSE</IGNORE>
              </PapiOperation>
 </CONFIG_ITEM>
The ‘isi_config_usb’ CLI utility can be used to display the USB port status on a subset of nodes. For example:
# isi_config_usb --nodes 1-10 --mode display
    Node   |   Current  |  Pending
-----------------------------------
    TME-9  |   UNSUP    | INFO: This platform is not supported to run this script.
    TME-8  |   UNSUP    | INFO: This platform is not supported to run this script.
    TME-1  |     On     |
    TME-3  |     On     |
    TME-2  |     On     |
   TME-10  |     On     |
    TME-7  |   AllOn    |
    TME-5  |   AllOn    |
    TME-6  |   AllOn    |
Unable to connect: TME-4
Note: In addition to port status, the output identifies any nodes that do not support USB port control (nodes 8 and 9 above) or that are unreachable (node 4 above).
When investigating or troubleshooting issues with USB port control, the following log files are the first places to check:
Log file | Description |
/var/log/isi_papi_d.log | Will log any requests to enable or disable USB ports. |
/var/log/isi_config_usb.log | Logs activity from the isi_config_usb script execution. |
/var/log/isi_mcp | Logs activity related to MCP actions on invoking the API. |
Author: Nick Trimbee
Related Blog Posts

A Metadata-based Approach to Tiering in PowerScale OneFS

Wed, 24 Apr 2024 13:12:26 -0000
|Read Time: 0 minutes
OneFS SmartPools provides sophisticated tiering between storage node types. Rules based on file attributes such as last accessed time or creation date can be configured in OneFS to drive transparent motion of data between PowerScale node types. This kind of “set and forget” approach to data tiering is ideal for some industries but not workable for most content creation workflows.
A classic case of how this kind of tiering falls short for media is the real-time nature of video playback. For an extreme example, take an uncompressed 4K image sequence (or even 8K), that might require >1.5GB/s of throughput to play properly. If this media has been tiered down to low performing archive storage and it needs to be used, those files must be migrated back up before they will play. This problem causes delays and confusion all around and makes media storage administrators hesitant to archive anything.
The good news is that the PowerScale OneFS ecosystem has a better way of doing things!
The approach I have taken here is to pull metadata from elsewhere in the workflow and use it to drive on demand tiering in OneFS. How does that work? OneFS supports file extended attributes, which are <key/value> pairs (metadata!) that can be written to the files and directories stored in OneFS. File Policies can be configured in OneFS to move data based on those file extended attributes. And a SmartPoolsTree job can be run on only the path that needs to be moved. All this goodness can be controlled externally by combining the DataIQ API and the OneFS API.
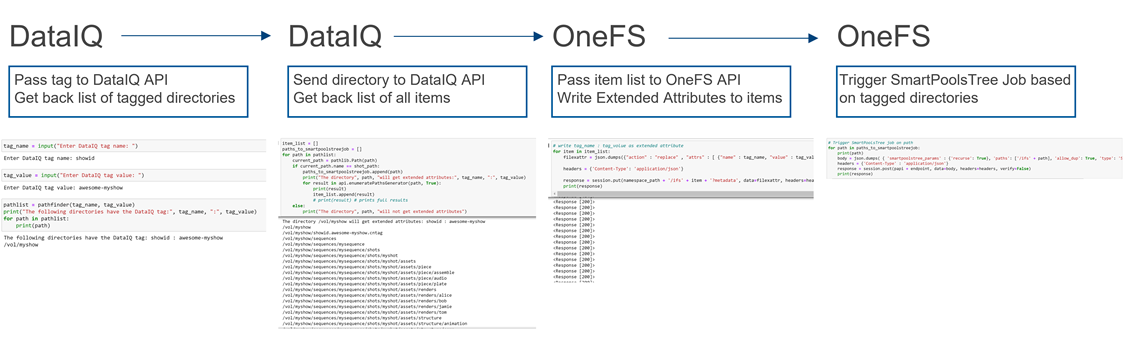
Figure 1: API flow
Note that while I’m focused on combining the DataIQ and OneFS APIs in this post, other API driven tools with OneFS file system visibility could be substituted for DataIQ.
DataIQ
DataIQ is a data indexing and analysis tool. It runs as an external virtual machine and maintains an index of mounted file systems. DataIQ’s file system crawler is efficient, fast, and lightweight, meaning it can be kept up to date with little impact on the storage devices it is indexing.
DataIQ has a concept called “tagging”. Tags in DataIQ apply to directories and provide a mechanism for reporting sets of related data. A tag in DataIQ is an arbitrary <key>/<value> pair. Directories can be tagged in DataIQ in three different ways:
- Autotagging rules:
- Tags are automatically placed in the file system based on regular expressions defined in the Autotagging configuration menu.
- Use of .cntag files:
- Empty files named in the format <key>.<value>.cntag are placed in directories and will be recognized as tags by DataIQ.
- API-based tagging:
- The DataIQ API allows for external tagging of directories.
Tags can be placed throughout a file system and then reported on as a group. For instance, temporary render directories could contain a render.temp.cntag file. Similarly, an external tool could access the DataIQ API and place a <Project/Name> tag on the top-level directory of each project. DataIQ can generate reports on the storage capacity those tags are consuming.
File system extended attributes in OneFS
As I mentioned earlier, OneFS supports file extended attributes. Extended attributes are arbitrary metadata tags in the form of <key/value> pairs that can be applied to files and directories. Extended attributes are not visible in the graphical interface or when accessing files over a share or export. However, the attributes can be accessed using the OneFS CLI with the getexattr and setextattr commands.
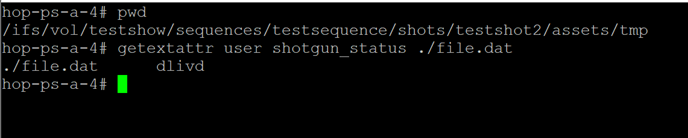
Figure 2: File extended attributes
The SmartPools job engine will move data between node pools based on these file attributes. And it is that SmartPools functionality that uses this metadata to perform on demand data tiering.
Crucially, OneFS supports creation of file system extended attributes from an external script using the OneFS REST API. The OneFS API Reference Guide has great information about setting and reading back file system extended attributes.
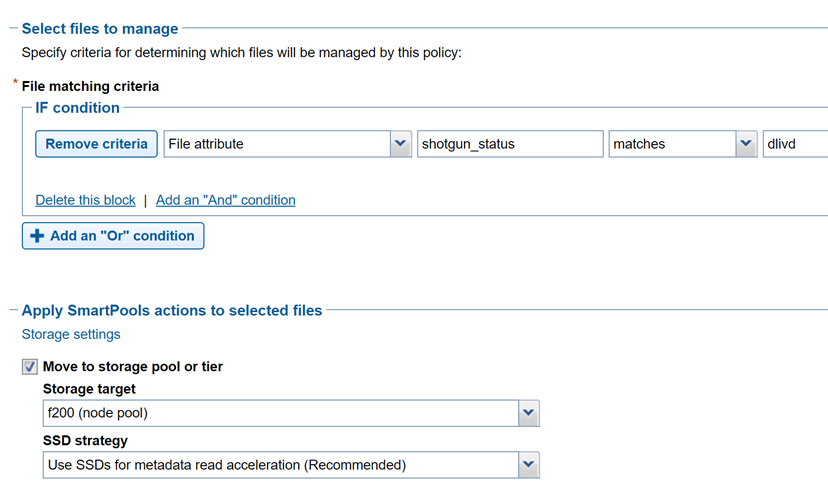
Figure 3: File policy configuration
Tiering example with Autodesk Shotgrid, DataIQ, and OneFS
Autodesk ShotGrid (formerly Shotgun) is a production resource management tool common in the visual effects and animation industries. ShotGrid is a cloud-based tool that allows for coordination of large production teams. Although it isn’t a storage management tool, its business logic can be useful in deciding what tier of storage a particular set of files should live on. For instance, if a shot tracked in ShotGrid is complete and delivered, the files associated with that shot could be moved to archive.
DataIQ plug-in for Autodesk ShotGrid
The open-source DataIQ plug-in for ShotGrid is available on GitHub here:
Dell DataIQ Autodesk ShotGrid Plugin
This plug-in is proof of concept code to show how the ShotGrid and DataIQ APIs can be combined to tag data in DataIQ based on shot status in ShotGrid. The DataIQ tags are dynamically updated with the current shot status in ShotGrid.
Here is a “shot” in ShotGrid configured with various possible statuses:
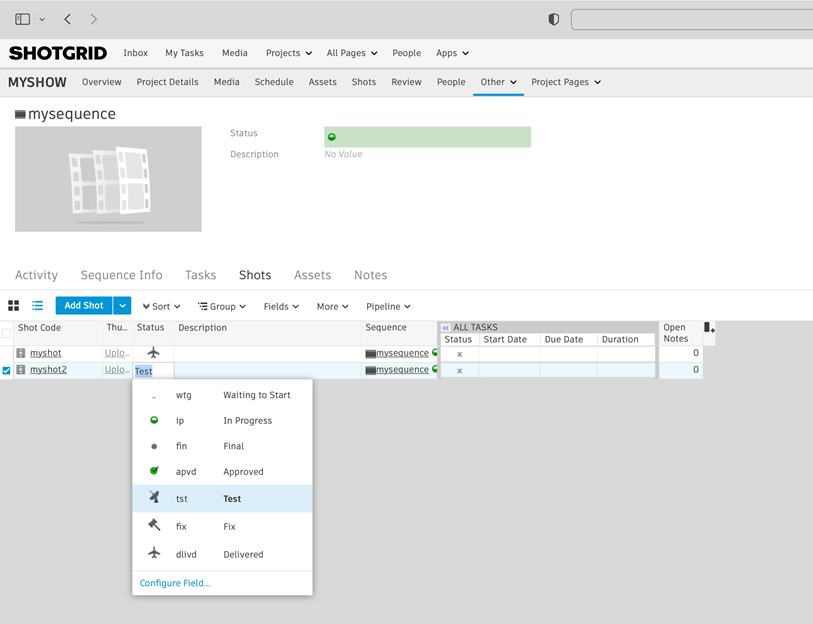
Figure 4: ShotGrid status
The following figure of DataIQ shows where the shot status field from ShotGrid has been automatically applied as a tag in DataIQ.
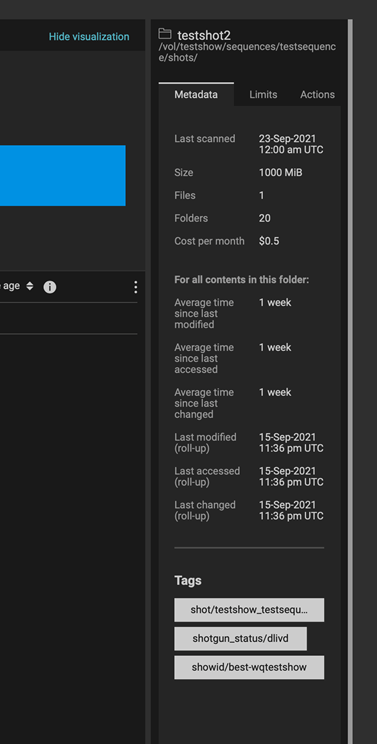
Figure 5: DataIQ tags
Once metadata from ShotGrid has been pulled into DataIQ, that information can be used to drive OneFS SmartPools tiering:
- A user (or system) passes the DataIQ tag <key/values> to the DataIQ API. The DataIQ API returns a list of directories associated with that tag.
- A directory chosen from Step 1 above can be passed back to the DataIQ API to get a listing of all contents by way of the DataIQ file index.
- Those items are passed programmatically to the OneFS API. The <key/value> pair of the original DataIQ tag is written as an extended attribute directly to the targeted files and directories.
- And finally, the SmartPoolsTree job can be run on the parent path chosen in Step 2 above to begin tiering the data immediately.
Using business logic to drive storage tiering
DataIQ and OneFS provide the APIs necessary to drive storage tiering based on business logic. Striking efficiencies can be gained by taking advantage of the metadata that exists in many workflow tools. It is a matter of “connecting the dots”.
The example in this blog uses ShotGrid and DataIQ, however it is easy to imagine that similar metadata-based techniques could be developed using other file system index tools. In the media and entertainment ecosystem, media asset management and production asset management systems immediately come to mind as candidates for this kind of API level integration.
As data volumes increase exponentially, it is unrealistic to keep all files on the highest costing tiers of storage. Various automated storage tiering approaches have been around for years, but for many use cases this automated tiering approach falls short. Bringing together rich metadata and an API driven workflow bridges the gap.
To see the Python required to put this process together, refer to my white paper PowerScale OneFS: A Metadata Driven Approach to On Demand Tiering.
Author: Gregory Shiff, Principal Solutions Architect, Media & Entertainment LinkedIn

OneFS and HTTP Security
Mon, 22 Apr 2024 20:35:30 -0000
|Read Time: 0 minutes
To enable granular HTTP security configuration, OneFS provides an option to disable nonessential HTTP components selectively. This can help reduce the overall attack surface of your infrastructure. Disabling a specific component’s service still allows other essential services on the cluster to continue to run unimpeded. In OneFS 9.4 and later, you can disable the following nonessential HTTP services:
Service | Description |
PowerScaleUI | The OneFS WebUI configuration interface. |
Platform-API-External | External access to the OneFS platform API endpoints. |
Rest Access to Namespace (RAN) | REST-ful access by HTTP to a cluster’s /ifs namespace. |
RemoteService | Remote Support and In-Product Activation. |
SWIFT (deprecated) | Deprecated object access to the cluster using the SWIFT protocol. This has been replaced by the S3 protocol in OneFS. |
You can enable or disable each of these services independently, using the CLI or platform API, if you have a user account with the ISI_PRIV_HTTP RBAC privilege.
You can use the isi http services CLI command set to view and modify the nonessential HTTP services:
# isi http services list
ID                     Enabled
------------------------------
Platform-API-External Yes
PowerScaleUI          Yes
RAN                   Yes
RemoteService         Yes
SWIFT                 No
------------------------------
Total: 5
For example, you can easily disable remote HTTP access to the OneFS /ifs namespace as follows:
# isi http services modify RAN --enabled=0
You are about to modify the service RAN. Are you sure? (yes/[no]): yes
Similarly, you can also use the WebUI to view and edit a subset of the HTTP configuration settings, by navigating to Protocols > HTTP settings:
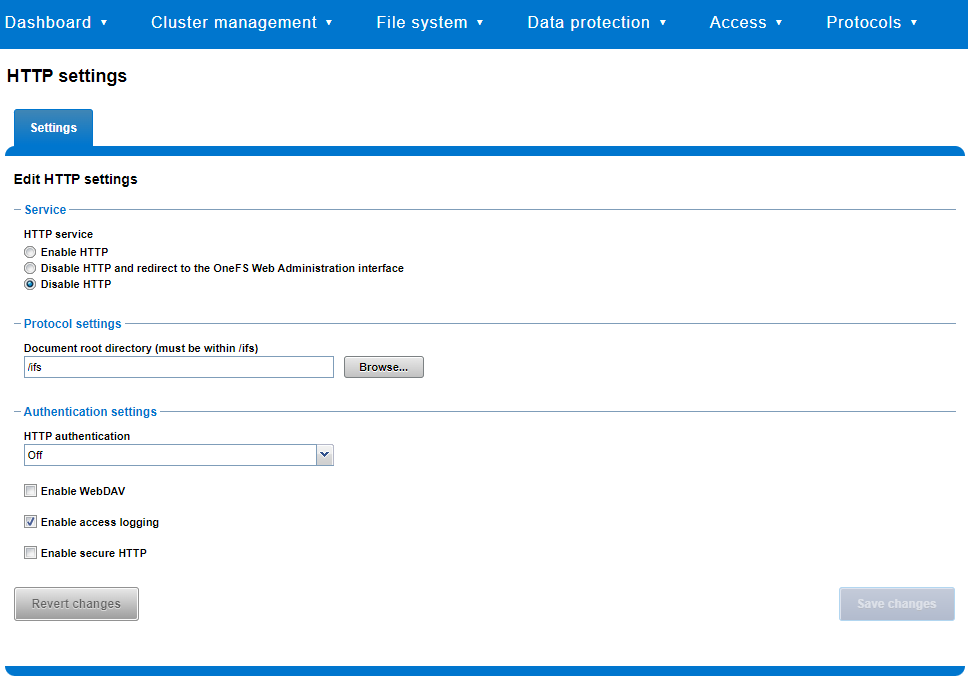
That said, the implications and impact of disabling each of the services is as follows:
Service | Disabling impacts |
WebUI | The WebUI is completely disabled, and access attempts (default TCP port 8080) are denied with the warning Service Unavailable. Please contact Administrator. If the WebUI is re-enabled, the external platform API service (Platform-API-External) is also started if it is not running. Note that disabling the WebUI does not affect the PlatformAPI service. |
Platform API | External API requests to the cluster are denied, and the WebUI is disabled, because it uses the Platform-API-External service. Note that the Platform-API-Internal service is not impacted if/when the Platform-API-External is disabled, and internal pAPI services continue to function as expected. If the Platform-API-External service is re-enabled, the WebUI will remain inactive until the PowerScaleUI service is also enabled. |
RAN | If RAN is disabled, the WebUI components for File System Explorer and File Browser are also automatically disabled. From the WebUI, attempts to access the OneFS file system explorer (File System > File System Explorer) fail with the warning message Browse is disabled as RAN service is not running. Contact your administrator to enable the service. This same warning also appears when attempting to access any other WebUI components that require directory selection. |
RemoteService | If RemoteService is disabled, the WebUI components for Remote Support and In-Product Activation are disabled. In the WebUI, going to Cluster Management > General Settings and selecting the Remote Support tab displays the message The service required for the feature is disabled. Contact your administrator to enable the service. In the WebUI, going to Cluster Management > Licensing and scrolling to the License Activation section displays the message The service required for the feature is disabled. Contact your administrator to enable the service. |
SWIFT | Deprecated object protocol and disabled by default. |
You can use the CLI command isi http settings view to display the OneFS HTTP configuration:
# isi http settings view
            Access Control: No
      Basic Authentication: No
    WebHDFS Ran HTTPS Port: 8443
                        Dav: No
         Enable Access Log: Yes
                      HTTPS: No
 Integrated Authentication: No
               Server Root: /ifs
                    Service: disabled
           Service Timeout: 8m20s
          Inactive Timeout: 15m
           Session Max Age: 4H
Httpd Controlpath Redirect: No
Similarly, you can manage and change the HTTP configuration using the isi http settings modify CLI command.
For example, to reduce the maximum session age from four to two hours:
# isi http settings view | grep -i age
           Session Max Age: 4H
# isi http settings modify --session-max-age=2H
# isi http settings view | grep -i age
           Session Max Age: 2H
The full set of configuration options for isi http settings includes:
Option | Description |
--access-control <boolean> | Enable Access Control Authentication for the HTTP service. Access Control Authentication requires at least one type of authentication to be enabled. |
--basic-authentication <boolean> | Enable Basic Authentication for the HTTP service. |
--webhdfs-ran-https-port <integer> | Configure Data Services Port for the HTTP service. |
--revert-webhdfs-ran-https-port | Set value to system default for --webhdfs-ran-https-port. |
--dav <boolean> | Comply with Class 1 and 2 of the DAV specification (RFC 2518) for the HTTP service. All DAV clients must go through a single node. DAV compliance is NOT met if you go through SmartConnect, or using 2 or more node IPs. |
--enable-access-log <boolean> | Enable writing to a log when the HTTP server is accessed for the HTTP service. |
--https <boolean> | Enable the HTTPS transport protocol for the HTTP service. |
--https <boolean> | Enable the HTTPS transport protocol for the HTTP service. |
--integrated-authentication <boolean> | Enable Integrated Authentication for the HTTP service. |
--server-root <path> | Document root directory for the HTTP service. Must be within /ifs. |
--service (enabled | disabled | redirect | disabled_basicfile) | Enable/disable the HTTP Service or redirect to WebUI or disabled BasicFileAccess. |
--service-timeout <duration> | The amount of time (in seconds) that the server will wait for certain events before failing a request. A value of 0 indicates that the service timeout value is the Apache default. |
--revert-service-timeout | Set value to system default for --service-timeout. |
--inactive-timeout <duration> | Get the HTTP RequestReadTimeout directive from both the WebUI and the HTTP service. |
--revert-inactive-timeout | Set value to system default for --inactive-timeout. |
--session-max-age <duration> | Get the HTTP SessionMaxAge directive from both WebUI and HTTP service. |
--revert-session-max-age | Set value to system default for --session-max-age. |
--httpd-controlpath-redirect <boolean> | Enable or disable WebUI redirection to the HTTP service. |
Note that while the OneFS S3 service uses HTTP, it is considered a tier-1 protocol, and as such is managed using its own isi s3 CLI command set and corresponding WebUI area. For example, the following CLI command forces the cluster to only accept encrypted HTTPS/SSL traffic on TCP port 9999 (rather than the default TCP port 9021):
# isi s3 settings global modify --https-only 1 –https-port 9921
# isi s3 settings global view
         HTTP Port: 9020
        HTTPS Port: 9999
        HTTPS only: Yes
S3 Service Enabled: Yes
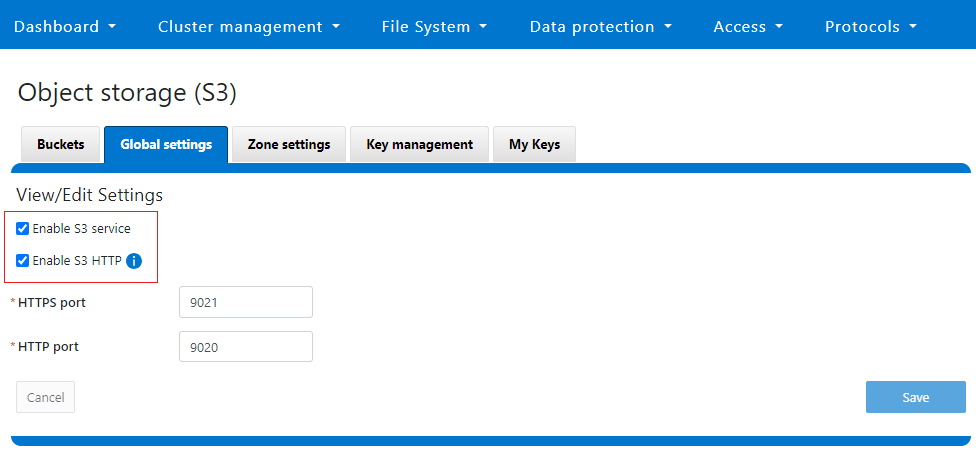
Additionally, you can entirely disable the S3 service with the following CLI command:
# isi services s3 disable
The service 's3' has been disabled.
Or from the WebUI, under Protocols > S3 > Global settings:
Author: Nick Trimbee