
Installing SUSE Rancher
Installing SUSE Rancher
-
Preparing the installation
To prepare the installation:
- For each node’s firewall service, do one of the following:
- Enable and configure the necessary inbound ports.
- Stop and completely disable the firewall service.
- Determine which SSL configuration you want for transport layer security (TLS) termination:
- Rancher-generated TLS certificate (the easiest way of installing SUSE Rancher with self-signed certificates)
- Let’s Encrypt
- Bring your own certificate
- Obtain a Helm binary file that matches the Kubernetes version for this SUSE Rancher implementation by running:
#Obtain helm binary
curl https://raw.githubusercontent.com/helm/helm/main/scripts/get-helm-3 | bash
Note: Enable the corresponding kubeconfig setting for kubectl,
K3s - /etc/rancher/k3s/k3s.yml, to be used by the Helm command:chmod 600 /etc/rancher/k3s/k3s.yaml
export KUBECONFIG=/etc/rancher/k3s/k3s.yaml
echo $KUBECONFIG
Deployment steps
While logged into the compute platform node:
- As root or with sudo privileges, install cert-manager:
- Set the following variable with the wanted version of cert-manager (for example “v1.5.1”):
CERT_MANAGER_VERSION=""
Note: The most current supported version of cert-manager is v1.5.1.
- Create the cert-manager CRDs and apply the Helm chart resource manifest:
kubectl apply -f https://github.com/cert-manager/cert-manager/releases/download/${CERT_MANAGER_VERSION}/cert-manager.crds.yaml
# Add the Jetstack Helm repository
helm repo add jetstack https://charts.jetstack.io
# Update your local Helm chart repository cache
helm repo update
# Install the cert-manager Helm chart
helm install cert-manager jetstack/cert-manager \
--namespace cert-manager \
--create-namespace \
--version ${CERT_MANAGER_VERSION}
- Verify that all pods are in the running status:
kubectl get pods --namespace cert-manager
- Add the SUSE Rancher Helm chart repository:
helm repo add rancher-stable https://releases.rancher.com/server-charts/stable
#update the repo
helm repo update
- Create a namespace for SUSE Rancher:
kubectl create namespace cattle-system
- Prepare to use the Helm chart for SUSE Rancher:
- Set the following variable to the hostname of the SUSE Rancher server instance:
HOSTNAME=""
Note: This hostname must be resolvable to an IP address of the K3s host or a load balancer/proxy server that supports this installation of SUSE Rancher.
- Set the following variable to the number of deployed K3s nodes that are planned to host the SUSE Rancher service (for example “1”):
REPLICAS=""
- Set the following variable to the wanted version of the SUSE Rancher server instance (for example, 2.6.5):
RANCHER_VERSION=""f:
- Install the SUSE Rancher Helm chart:
helm install rancher rancher-stable/rancher \
--namespace cattle-system \
--set hostname=${HOSTNAME} \
--set replicas=${REPLICAS} \
--version=${RANCHER_VERSION}
- Monitor the progress of the installation:
kubectl -n cattle-system rollout status deploy/rancher
- (Optional) Create an SSH tunnel to access SUSE Rancher.
This optional step is useful in cases where NAT routers or firewalls prevent the client web browser from reaching the exposed SUSE Rancher server IP address or port. The step requires that a Linux host be accessible through SSH from the client system and that the Linux host can reach the exposed SUSE Rancher service. The SUSE Rancher hostname must be resolvable to the appropriate IP address by the local workstation.
- Create an SSH tunnel through the Linux host to the IP address of the SUSE Rancher server on the NodePort, as noted in Step 3:
ssh -N -D 8080 user@Linux-host
- On the local workstation web browser, change the SOCKS host settings to "127.0.0.1" and port "8080."
This change routes all traffic from this web browser through the remote Linux host. Ensure that you close the tunnel and revert the SOCKS host settings when you have finished.
- Connect to the SUSE Rancher web UI:
- On a client system, use a web browser to connect to the SUSE Rancher service through https.
- Provide a new admin password.
Important: On the second configuration page, ensure that the Rancher Server URL is set to the hostname you specified when installing the SUSE Rancher Helm chart and that the port is 443.
Deployment best practices
To further optimize the deployment, follow these best practices:
- Availability
Where a load balancer is used to access a K3s cluster, deploying two additional K3s cluster nodes for a total of three nodes makes SUSE Rancher highly available. - Security
The steps that are described in Installing SUSE Rancher are for deploying SUSE Rancher with automatically generated, self-signed security certificates. Other options are to:
- Obtain public certificates through Let’s Encrypt that are associated with a publicly resolvable hostname for the SUSE Rancher server
- Provide preconfigured private certificates
- Integrity
This deployment of SUSE Rancher uses the K3s etcd key/value store to persist its data and configuration, which offers several advantages. With a multinode cluster and this resiliency through replication, providing highly available storage is not necessary. Further, backing up the K3s etcd store protects the cluster and the installation of SUSE Rancher and permits restoration of a given state.
After a successful deployment of the SUSE Rancher solution, review the following topics in the product documentation for information about how to address orchestration of workloads, maintaining security, and more functions:
- "Setting up Kubernetes Clusters in Rancher"
- "Importing Existing Clusters"
- "Cluster Administration"
- "Cluster Access"
Creating K3s downstream clusters in SUSE Rancher
You can create Kubernetes clusters through the SUSE Rancher UI instead of using more complex alternatives. Multiple downstream Kubernetes cluster options are available, as shown in the following figure. Choose the option that best fits your use case.
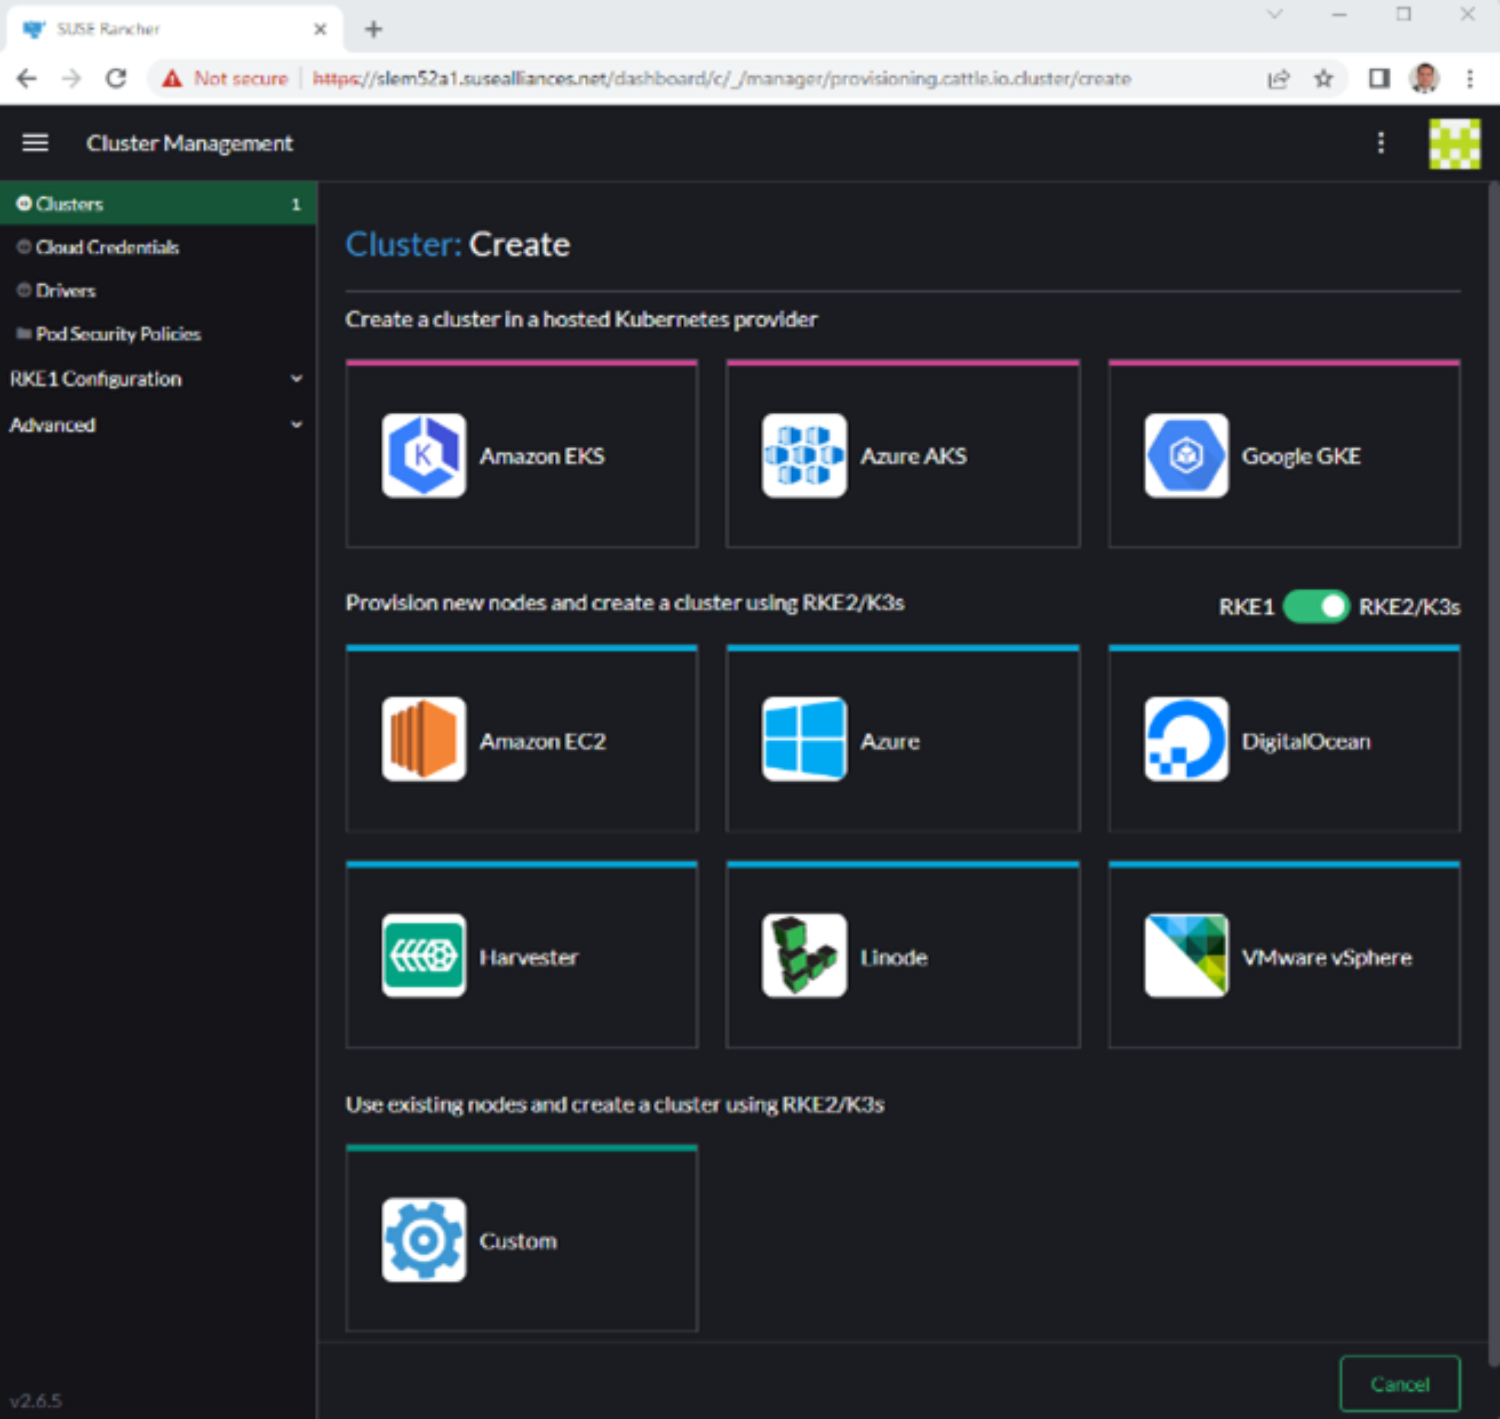
Figure 8. Downstream Kubernetes cluster options
To create a downstream custom cluster:
- Click Custom > Create.
A custom cluster screen is displayed, as shown in the following figure:
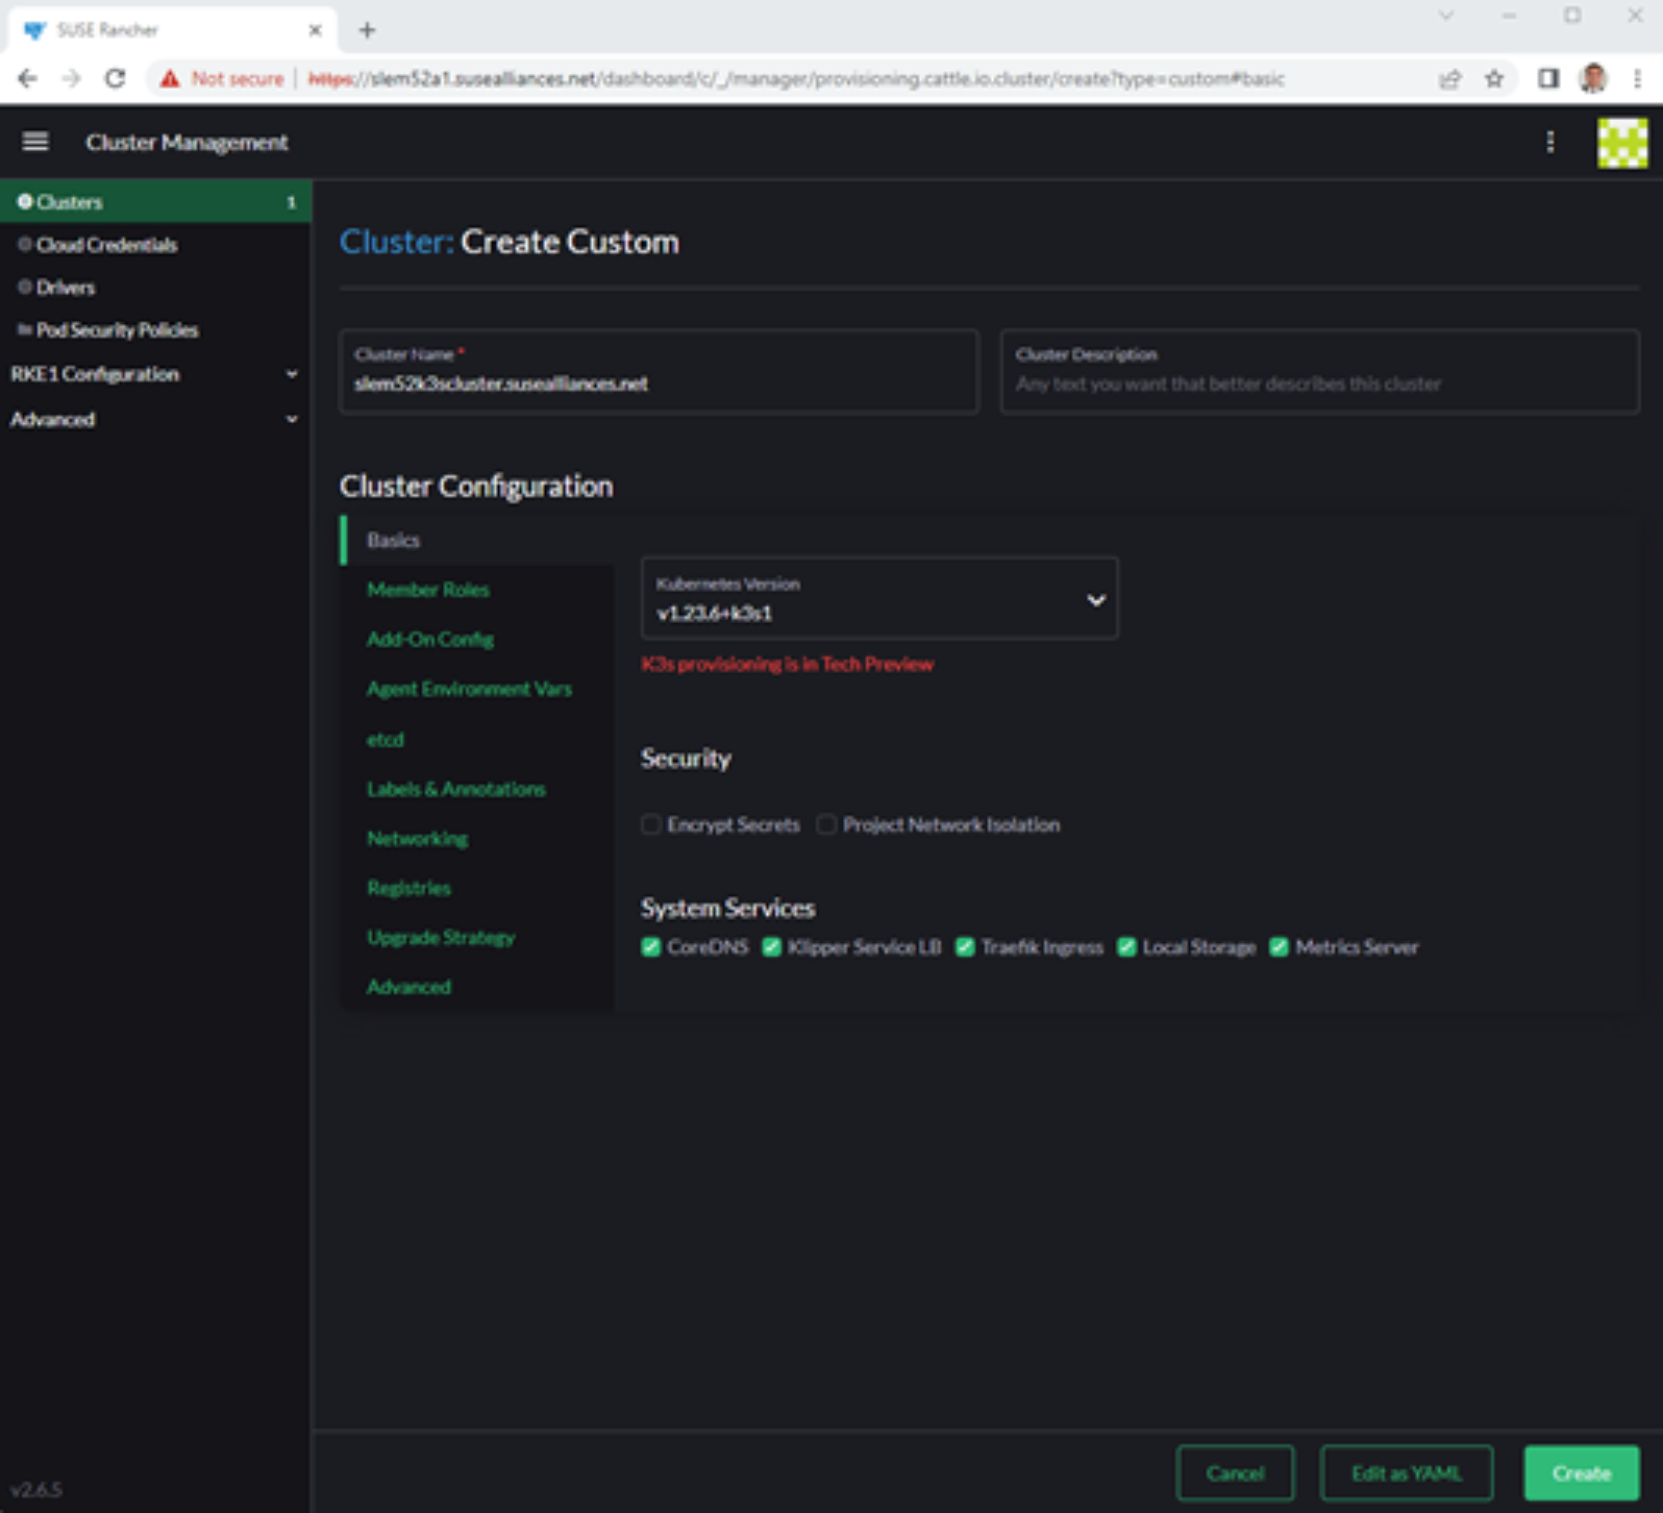
Figure 9. SUSE Rancher: Creating a custom cluster
- Select RKE2/K3S > Custom.
- Enter a Cluster Name.
- In the Cluster Configuration section, click the Basics tab and select the appropriate version of Kubernetes from the drop-down menu.
- Select the System Services options that you want to include and click Create.
As described below, two configuration options are available for the K3S cluster:
- High Availability (HA)
- Standalone
Configuring a HA K3s cluster
To configure the K3s server:
- In the Cluster Management screen, click Clusters in the left navigation panel.
- Select the cluster to be configured.
- Click the Registration tab.
- In the Step 1 section, check the etcd, Control Plane, and Worker boxes.
- In the Step 2 section, copy all the text in the Registration Command box.
- Run the information from the Registration Command section in each of the existing nodes that you want to register.
To set up the K3s agents:
- In the Cluster Management screen, click Clusters in the left navigation panel.
- Select the cluster to be configured.
- Click the Registration tab.
- In the Step 1 section, check the etcd, Control Plane, and Worker boxes.
- In the Step 2 section, copy the text in the Registration Command box, as shown in the following figure.

Figure 10. Creating a K3s agent HA custom cluster in SUSE Rancher
- Run the information from the Registration Command section in each of the existing nodes that you want to register.
After they are registered, the K3S servers and agents join the K3S HA cluster and are displayed in the Cluster Management screen.
Configuring a K3s stand-alone cluster
To configure a K3s stand-alone cluster:
- In the Cluster Management screen, click Clusters in the left navigation panel.
- Select the cluster to be configured.
- Click the Registration tab.
- In the Step 1 section, check the etcd, Control Plane, and Worker boxes.
- In the Step 2 section, copy all the text in the Registration Command box, as shown in the following figure:
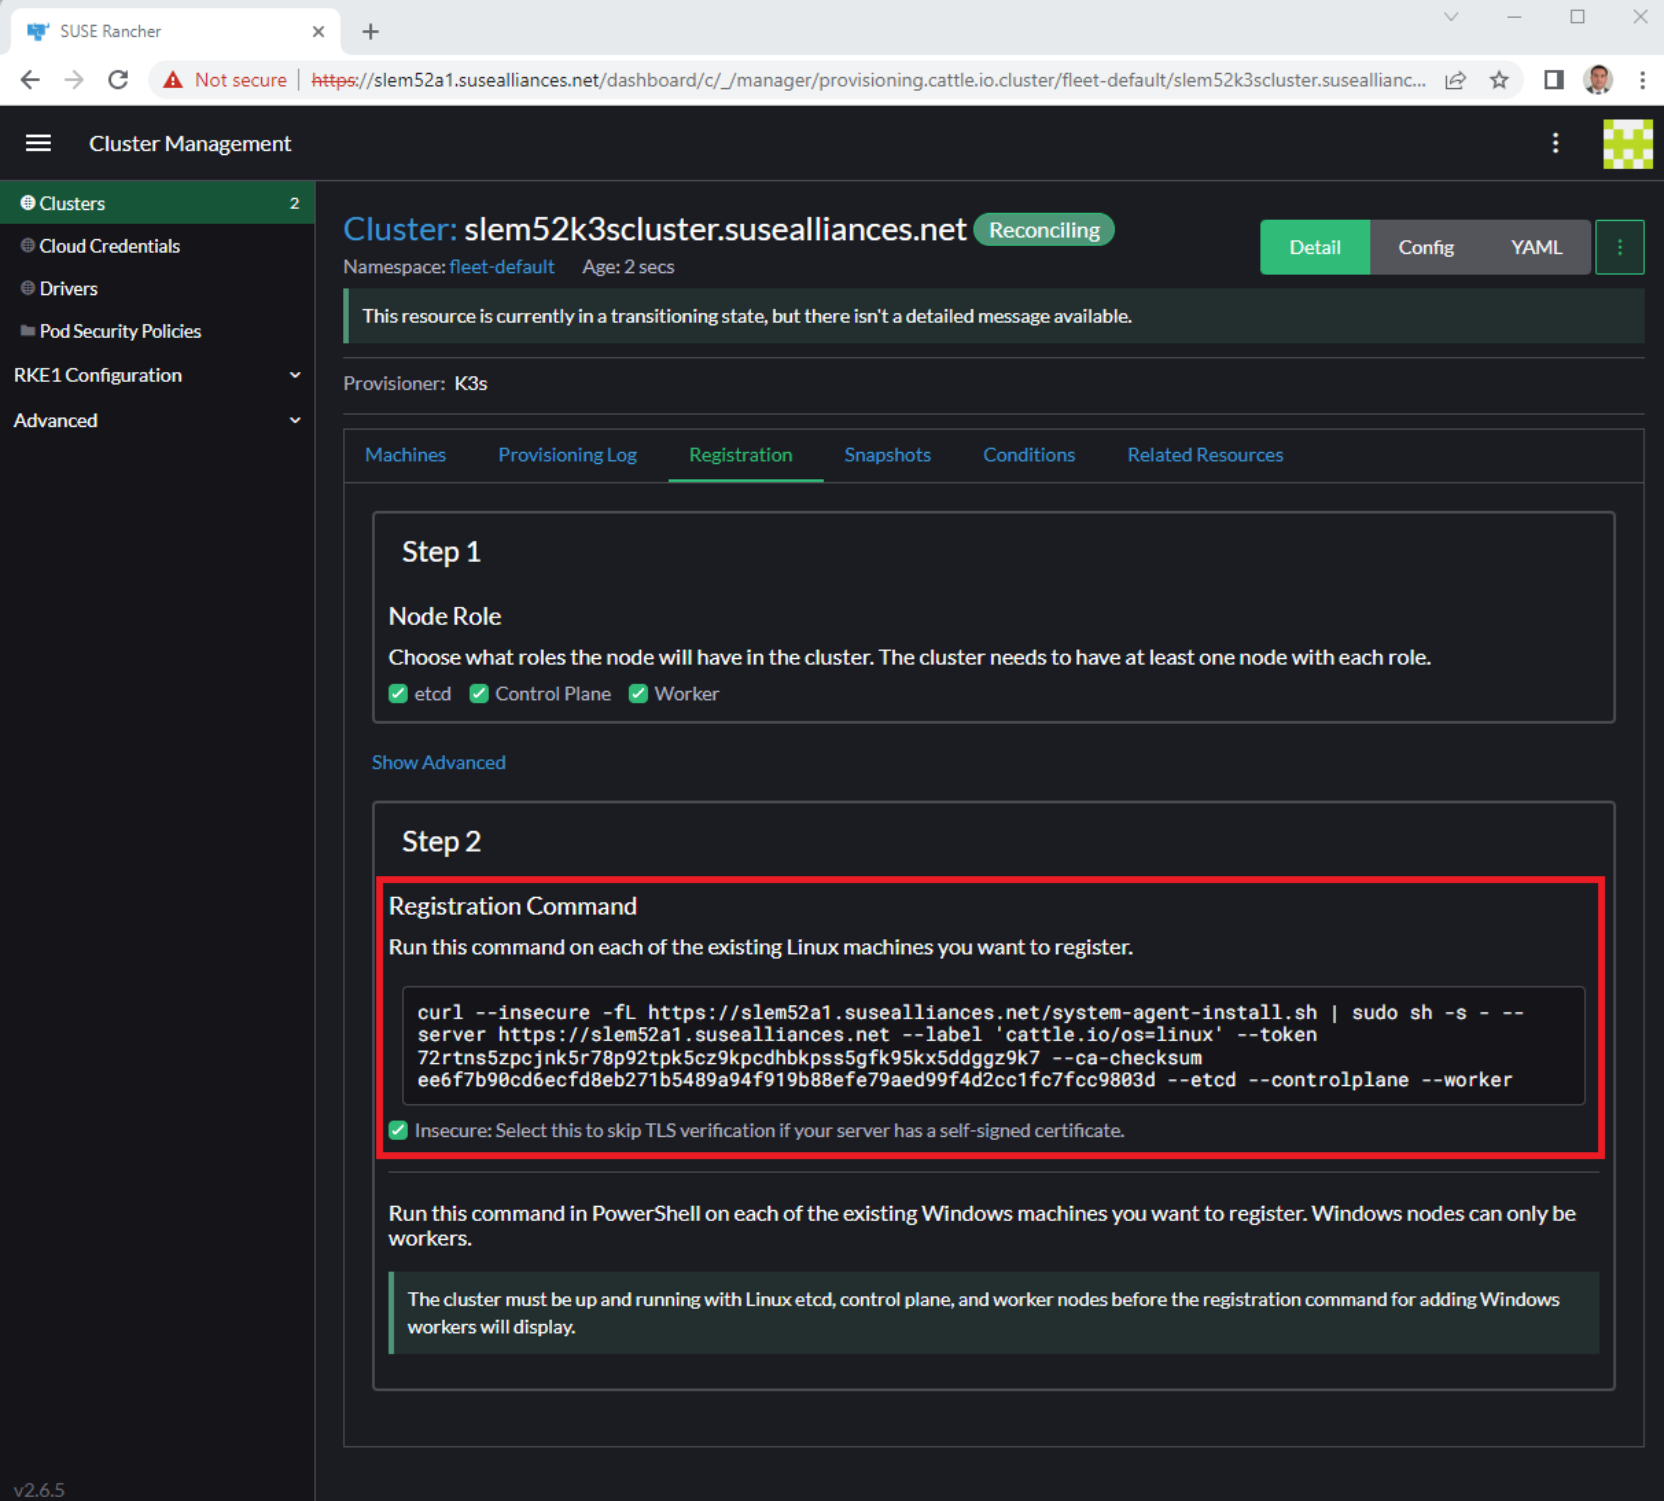
Figure 11. Creating a K3S stand-alone custom cluster
- Run the information from the Registration Command section in each of the existing nodes that you want to register.
After the K3s stand-alone cluster is registered, it is displayed in the Cluster Management screen.