Home > AI Solutions > Artificial Intelligence > Guides > Design Guide—Implementing a Digital Assistant with Red Hat OpenShift AI on Dell APEX Cloud Platform > Model serving environment
Model serving environment
-
This section describes the model serving environment preparation. This preparation includes step-by-step command installation of KServe and dependencies, along with Red Hat OpenShift AI (GitHub).
Note: You have the alternative option of installing the OpenShift AI KServe/Caikit/TGIS stack by using Automated Script installation.
Prerequisites
The following list includes installation prerequisites:
- Your cluster needs a node with minimum 4 CPUs and 16 GB memory to support inferencing.
- You have cluster administrator permissions.
- You have installed the OpenShift CLI (oc).
Procedure
The following procedure describes the steps to deploy RHODS Operator with the dependent services and operators such as Service Mesh, Istio, Knative Serving, Knative gateway, and Kserve.
- Specify the data science operator by setting the TARGET_OPERATOR environment variable to RHODS.
For the RHODS Operator:
export TARGET_OPERATOR=rhods
2. Clone this repository and set up the environment.
git clone https://github.com/DellBizApps/dell-digital-assistent.git

cd dell-digital-assistent/01-rhods

source ./scripts/env.sh
export TARGET_OPERATOR_TYPE=$(getOpType $TARGET_OPERATOR)
export TARGET_OPERATOR_NS=$(getOpNS)
export KSERVE_OPERATOR_NS=$(getKserveNS)
3. Install the Service Mesh operators.
oc apply -f custom-manifests/service-mesh/operators.yaml
sleep 30
oc wait --for=condition=ready pod -l name=istio-operator -n openshift-operators --timeout=300s
oc wait --for=condition=ready pod -l name=jaeger-operator -n openshift-operators --timeout=300s
oc wait --for=condition=ready pod -l name=kiali-operator -n openshift-operators --timeout=300s
4. Create an Istio instance.
oc create ns istio-system
oc apply -f custom-manifests/service-mesh/smcp.yaml
sleep 30
oc wait --for=condition=ready pod -l app=istiod -n istio-system --timeout=300s
oc wait --for=condition=ready pod -l app=istio-ingressgateway -n istio-system --timeout=300s
oc wait --for=condition=ready pod -l app=istio-egressgateway -n istio-system --timeout=300s
oc wait --for=condition=ready pod -l app=jaeger -n istio-system --timeout=300s
5. Install Knative Serving.
oc create ns ${KSERVE_OPERATOR_NS} oc create ns knative-serving oc -n istio-system apply -f custom-manifests/service-mesh/smmr-${TARGET_OPERATOR_TYPE}.yaml oc apply -f custom-manifests/service-mesh/peer-authentication.yaml oc apply -f custom-manifests/service-mesh/peer-authentication-${TARGET_OPERATOR_TYPE}.yamlNote: These commands use PeerAuthentications to enable mutual TLS (mTLS) according to OpenShift Serverless Documentation.
oc apply -f custom-manifests/serverless/operators.yaml
sleep 30
oc wait --for=condition=ready pod -l name=knative-openshift -n openshift-serverless --timeout=300s
oc wait --for=condition=ready pod -l name=knative-openshift-ingress -n openshift-serverless --timeout=300s
oc wait --for=condition=ready pod -l name=knative-operator -n openshift-serverless --timeout=300s
6. Create a KnativeServing Instance.
oc apply -f custom-manifests/serverless/knativeserving-istio.yaml
sleep 15
oc wait --for=condition=ready pod -l app=controller -n knative-serving --timeout=300s
oc wait --for=condition=ready pod -l app=net-istio-controller -n knative-serving --timeout=300s
oc wait --for=condition=ready pod -l app=net-istio-webhook -n knative-serving --timeout=300s
oc wait --for=condition=ready pod -l app=autoscaler-hpa -n knative-serving --timeout=300s
oc wait --for=condition=ready pod -l app=domain-mapping -n knative-serving --timeout=300s
oc wait --for=condition=ready pod -l app=webhook -n knative-serving --timeout=300s
oc delete pod -n knative-serving -l app=activator --force --grace-period=0
oc delete pod -n knative-serving -l app=autoscaler --force --grace-period=0
oc wait --for=condition=ready pod -l app=activator -n knative-serving --timeout=300s
oc wait --for=condition=ready pod -l app=autoscaler -n knative-serving --timeout=300s
7. Generate a wildcard certification for a gateway using OpenSSL.
export BASE_DIR=/tmp/kserve
export BASE_CERT_DIR=${BASE_DIR}/certs
export DOMAIN_NAME=$(oc get ingresses.config.openshift.io cluster -o jsonpath='{.spec.domain}' | awk -F'.' '{print $(NF-1)"."$NF}')
export COMMON_NAME=$(oc get ingresses.config.openshift.io cluster -o jsonpath='{.spec.domain}')

mkdir ${BASE_DIR}
mkdir ${BASE_CERT_DIR}

./scripts/generate-wildcard-certs.sh ${BASE_CERT_DIR} ${DOMAIN_NAME} ${COMMON_NAME}
8. Create the Knative gateway.
oc create secret tls wildcard-certs --cert=${BASE_CERT_DIR}/wildcard.crt --key=${BASE_CERT_DIR}/wildcard.key -n istio-system
oc apply -f custom-manifests/serverless/gateways.yaml
9. Apply the Istio monitoring resources.
oc apply -f ./custom-manifests/service-mesh/istiod-monitor.yaml
oc apply -f ./custom-manifests/service-mesh/istio-proxies-monitor.yaml
10. Apply the cluster role to allow Prometheus access.
oc apply -f ./custom-manifests/metrics/kserve-prometheus-k8s.yaml
11. Deploy KServe with RHODS Operator 2.x.
oc create ns ${TARGET_OPERATOR_NS}
oc create -f custom-manifests/opendatahub/${TARGET_OPERATOR}-operators-2.x.yaml

sleep 10
oc wait --for=condition=ready pod -l name=rhods-operator -n ${TARGET_OPERATOR_NS} --timeout=300soc create -f custom-manifests/opendatahub/kserve-dsc.yaml
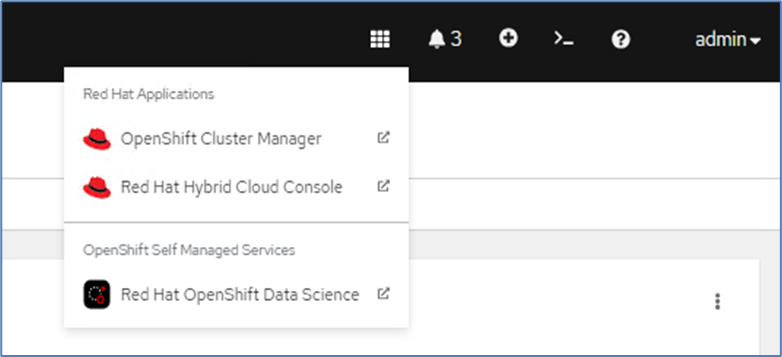
Once RHODS deployment completes along with dependent components, the RHODS dashboard option will become enabled in OpenShift console.

Figure 8. RHODS navigation link in OpenShift console
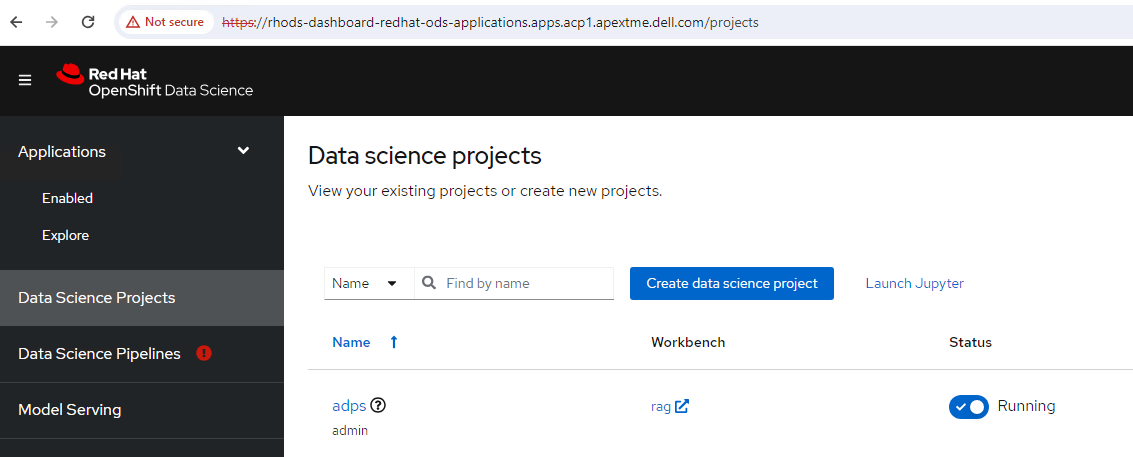
We can navigate to the RHODS Dashboard by clicking the following link. This grants access to the RHODS dashboard shown in Figure 9.

Figure 9. RHODS dashboard in OpenShift console
