Home > Storage > PowerScale (Isilon) > Product Documentation > Data Protection > Dell PowerScale: Backup Using Commvault > PowerScale storage configuration
PowerScale storage configuration
-
The sections that follow provide configuration guidance and best practices for configuring the PowerScale cluster.
Basic
This section describes basic requirements for creating the backup directory on the PowerScale cluster.
Bandwidth
Bandwidth is an important component in overall backup, restore, and Aux/DASH Copy performance. For many deployments, a pair of 10 GbE connections on the CommServe, MediaAgents, and PowerScale cluster nodes will provide good bandwidth and resiliency.
SMB Multichannel
SMB Multichannel is supported in OneFS 7.1.1 and later. This means that both 10 GbE interfaces on each PowerScale node are used automatically when the interfaces are on the same network and the MediaAgents are installed on Microsoft Windows Server 2012 and later.
Commvault backup directory
Commvault will need a backup directory created on PowerScale that will be used as the root of the disk library configuration to store backup data. Within that directory, subdirectories can be created for each of the mount paths that will be defined on the PowerScale disk library so SmartQuotas can be applied to each subdirectory. This will ensure that the appropriate total cluster capacity is visible to Commvault for accuracy and to ensure that Commvault can react accordingly when the disk library free space is low. SmartQuotas can still be applied after an PowerScale disk library has been created with a single common root directory/path using the unique subdirectories Commvault creates for each mount path. However, note that these subdirectories are unique to the minute since the naming includes the date and time to the minute (that is, Folder_12.31.2020_23.59). You might have to monitor the time when adding mount paths in quick succession to a disk library to ensure that each is added during a different minute on the server clock. Otherwise, until enough time has passed for the minute to change due to the directory name collision, Commvault will report an error when a mount path is added.
Commvault backup share and permissions
The default share or export for /ifs can be used to access the newly created backup directory (\\PowerScaleClusterFQDN\ifs\data\CVLibData); however, creating a specific share (that is, \\PowerScaleClusterFQDN\CVLibData) provides better control over access and share settings). Creating a specific share also helps show the workloads on a cluster from a visibility and manageability perspective. Additional details that can be recorded within the share or export description.
The account that will be configured in Commvault to connect to the PowerScale Disk Library should be set up with full control permissions on both the PowerScale share and directory.
Commvault sparse file support: data aging and space reclamation
To enhance space reclamation during the Commvault data aging process of deduplicated data, enable the Sparse File option under the PowerScale SMB share settings. This new option is designed to support the Commvault “Drill Hole” operations to free-up capacity from within backup container files with deduplicated data. The Sparse File option requires Commvault 11 SP10 and later with OneFS 8.2 and later, and it is configurable from the PowerScale CLI. It is in addition to the existing support for space savings from delete and truncate operations on backup container files.
Capacity utilization with sparse file savings is best viewed with the du -sh CLI command on the PowerScale cluster. The file and folder properties from Windows will accurately represent the savings from delete and truncate operations but may not represent the sparse file savings.
For complete configuration procedures, see the PowerScale OneFS CLI Administration Guide. The following CLI example enables SMB sparse file support.
PowerScale-1# isi smb settings share view | grep Sparse
Sparse File: No
PowerScale-1# isi smb settings share modify --sparse-file=True
PowerScale-1# isi smb settings share view | grep Sparse
Sparse File: Yes
Create CIFS/SMB share: WebUI
For complete configuration procedures, see the PowerScale OneFS Web Administration Guide.
Overview:
Ensure that the SMB service is enabled.
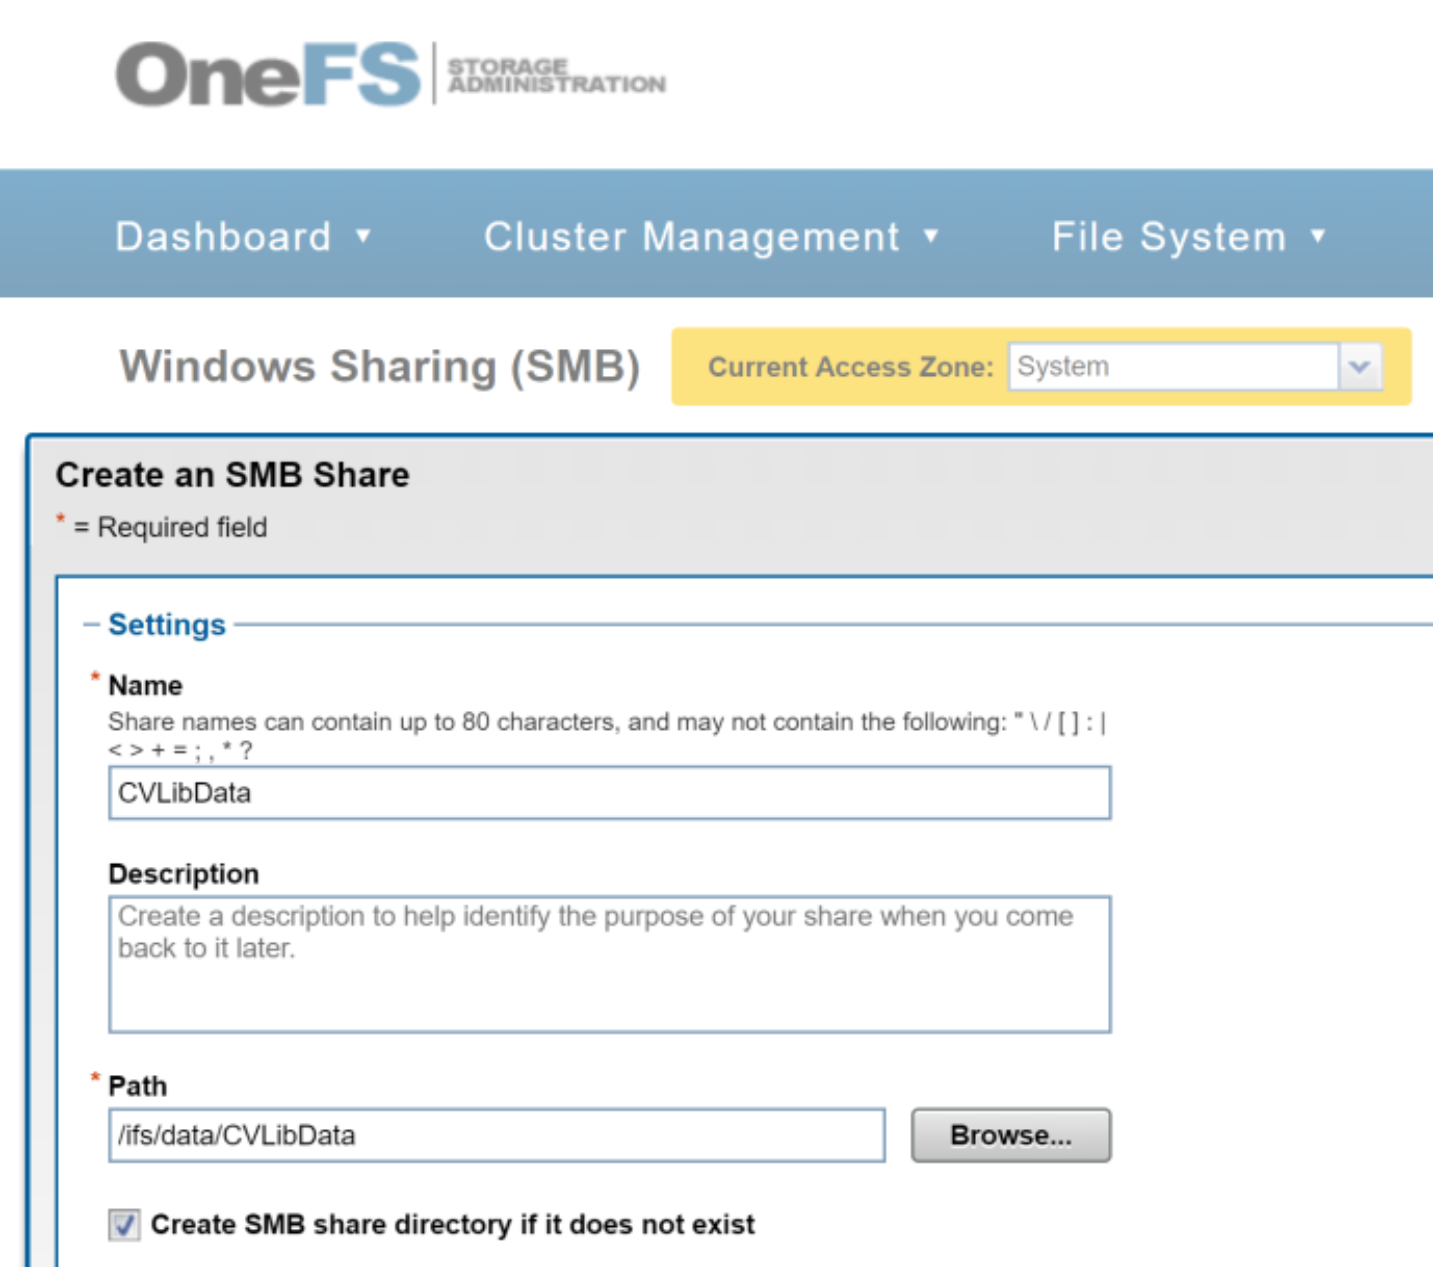
Create the SMB share and backup directory at the same time (see Figure 5).
Add Full Control share permissions for the user account used by the CommServe and MediaAgents.
Create subdirectories for the Disk Library Mount Paths.
Configure SmartQuotas on the subdirectories.
Test the SMB share by browsing to it from the CommServe and MediaAgent servers using the above user account.

Figure 5. PowerScale SMB WebUI
Create NFS export: WebUI
For complete configuration procedures, see the PowerScale OneFS Web Administration Guide.
Overview:
- Ensure that the NFS service is enabled.
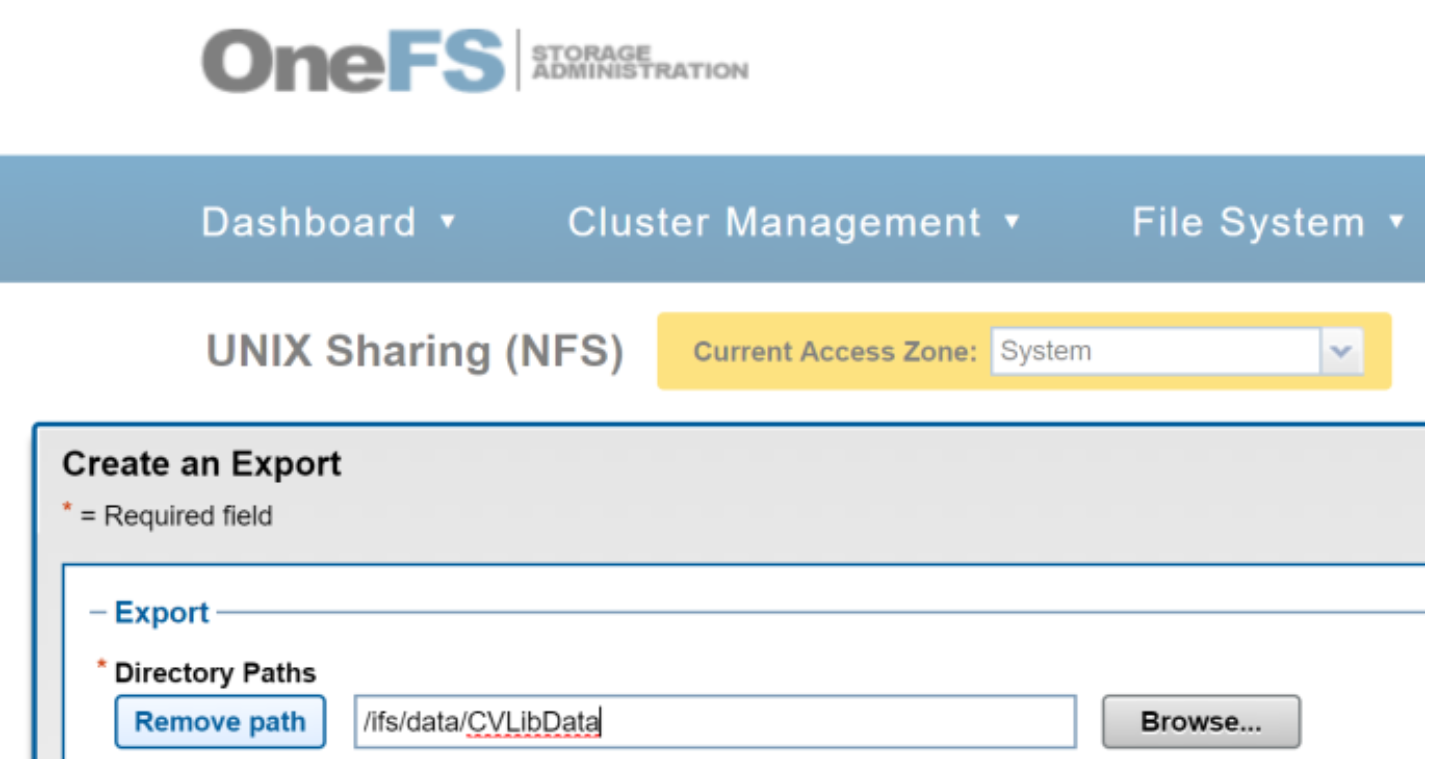
Create an NFS export (see Figure 6).
Add CommServe and MediaAgent Server IP Addresses in the NFS client list and allow Read-Write access.
Create an NFS Alias (optional).
Create subdirectories for the Disk Library Mount Paths.
Configure SmartQuotas on the subdirectories.
Test the NFS export by mounting it on the CommServe and MediaAgent servers.

Figure 6. PowerScale NFS WebUI
Advanced
This section describes the advanced options of creating a Commvault specific share or export on the PowerScale cluster.
Create CIFS/SMB Share – CLI
For complete configuration procedures, see the PowerScale OneFS CLI Administration Guide.
The following CLI example creates the SMB share and backup directory at the same time.
PowerScale-1# isi smb shares create --name=CVLibData --path=/ifs/data/CVLibData --create-path --description="Share for Commvault backup data."
PowerScale-1# isi smb shares permission create --share=CVLibData --user=commvaultuser --permission=full --permission-type=allow
PowerScale-1# chown commvaultuser /ifs/data/CVLibData
Be sure to adjust the share/export and directory permissions so the user account used by the CommServe and MediaAgents has the appropriate access.
Create NFS export: CLI
For complete configuration procedures, see the PowerScale OneFS CLI Administration Guide.
The following CLI example creates the Commvault backup directory, the NFS export, and an NFS alias (optional).
PowerScale-1# mkdir /ifs/data/CVLibData
PowerScale-1# isi nfs exports create /ifs/data/CVLibData --read-write-clients=10.1.2.0/24 --description="Export for Commvault backup data"
PowerScale-1# isi nfs aliases create --name=/CVLibData --path=/ifs/data/CVLibData
PowerScale-1# chown commvaultuser /ifs/data/CVLibData
Be sure to adjust the share/export and directory permissions so the user account used by the CommServe and MediaAgents has the appropriate access.
