Home > Storage > PowerScale (Isilon) > Product Documentation > Data Protection > Dell PowerScale: Backup Using Commvault > Commvault configuration
Commvault configuration
-
The sections that follow provide configuration guidance and best practices for configuring the Commvault CommCell.
Basic
This section describes the basic best practice for configuring a single PowerScale Disk Library to be shared with multiple MediaAgents and the CommCell policy configurations.
PowerScale disk library and storage policy
To ensure that all cluster resources can be appropriately used for Commvault backup, restore, and Aux/DASH copy operations, create the PowerScale Disk Library with multiple mount paths and share it with multiple MediaAgents. Configure a new or existing storage policy to use the PowerScale Disk Library with the appropriate aging rules and other settings needed for the environment. Add the remaining MediaAgents as Data Paths with Round-Robin enabled.
Basic configuration steps:
- Create the PowerScale Disk Library: From the CommCell Console, in the CommCell Browser window expand Storage Resources > right-click Libraries > Add > Disk Library…,select Network Path and the first MediaAgent that will use the disk library, and then fill-in the remaining fields like Name, Connect As (the user configured with permissions to the PowerScale share and directory), Password, and Folder (specify a UNC path to the Commvault share on PowerScale using the DNS A record for the first node in the PowerScale cluster and include the first mount path directory, if created beforehand), click OK (see Figure 7).
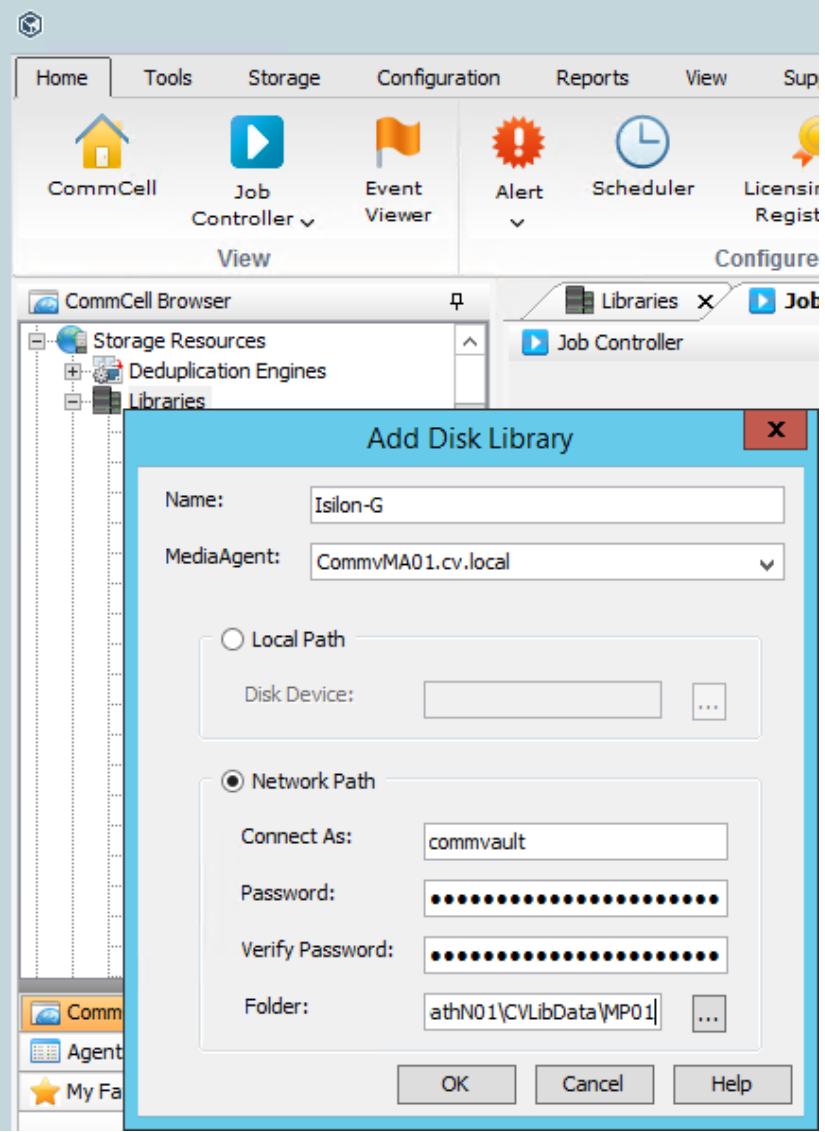
Figure 7. Create an PowerScale disk library: step 1
Add Mount Paths: For each of the remaining PowerScale nodes in the cluster, right-click the newly created PowerScale Disk Library > Add Mount Path, select Network Path and the next MediaAgent that will use the disk library (eventually looping back around to the first MediaAgent), and then fill in the remaining fields similar to Step # 1 above, except use the next node in the PowerScale cluster and the next mount path directory, if created beforehand (see Figure 8).
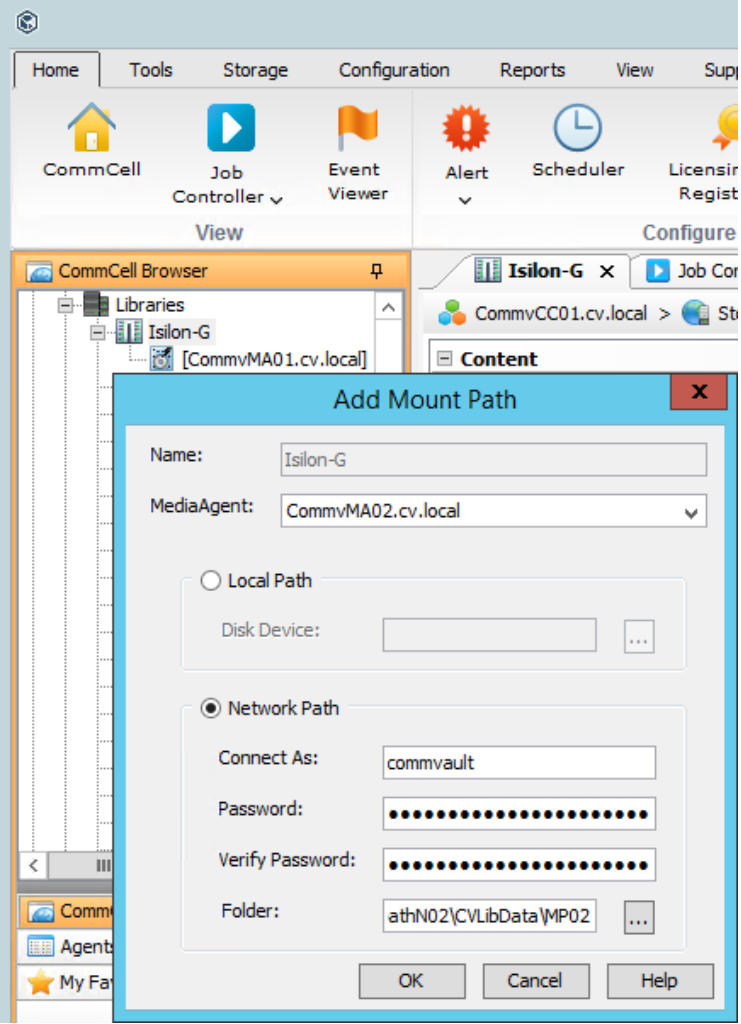
Figure 8. Add mount paths to the PowerScale disk library: step 2
Share Mount Paths with MediaAgents: For each mount path configured on the PowerScale Disk Library, right-click the mount path > Share Mount Path, click Share button > select each of the remaining MediaAgents that will use the disk library, ensure that Read/Write Access is selected, fill-in the password (same as Step # 1 & 2 above), click OK. (see Figure 9).
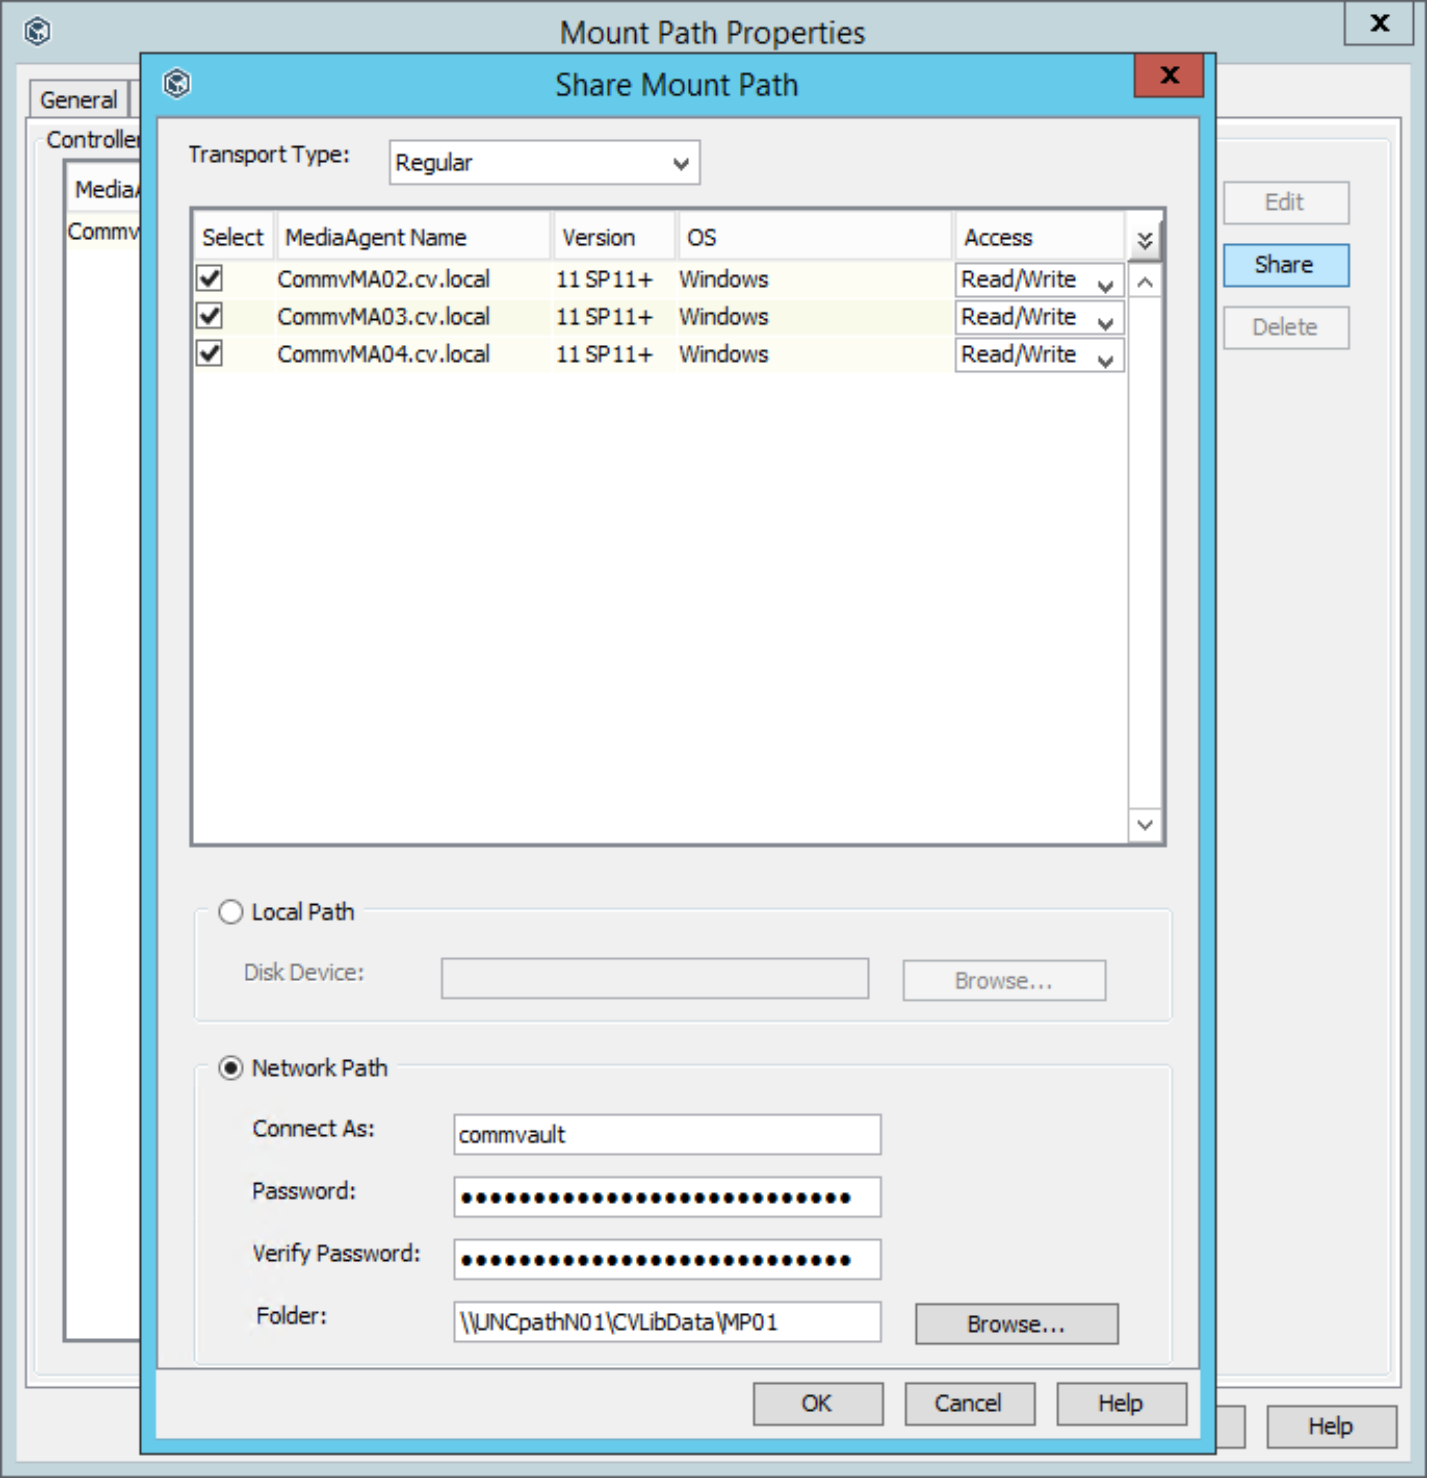
Figure 9. Share mount paths with MediaAgents: step 3
Spill and Fill Setting: Ensure that this option is selected to load balance backup data across all mount paths in the disk library, right-click the PowerScale Disk Library > Properties > Mount Paths tab, ensure that “Spill and fill mount paths (Load balance use of mount paths)” is selected (see Figure 10).
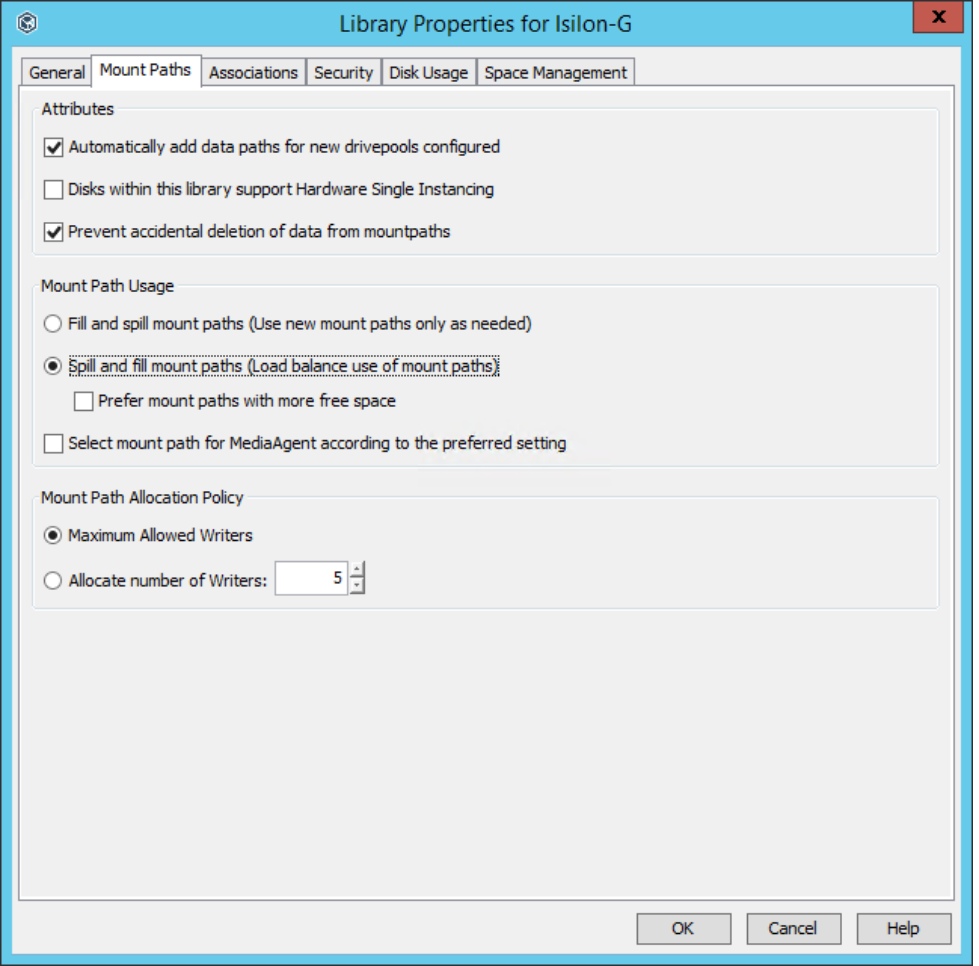
Figure 10. Spill and Fill setting on PowerScale disk library: step 4
Create a Store Policy and add Data Paths: Add each of the remaining MediaAgent (configured on the PowerScale Disk Library) as data paths on the storage policy, right-click the Primary copy of the storage policy configured to use the PowerScale Disk Library > Properties > Data Paths tab > Add button > hold Ctrl + click each of the remaining MediaAgents, click OK, and then on the Data Path Configuration tab > ensure that “Round-Robin between Data Paths” is selected (see Figure 11and Figure 12).
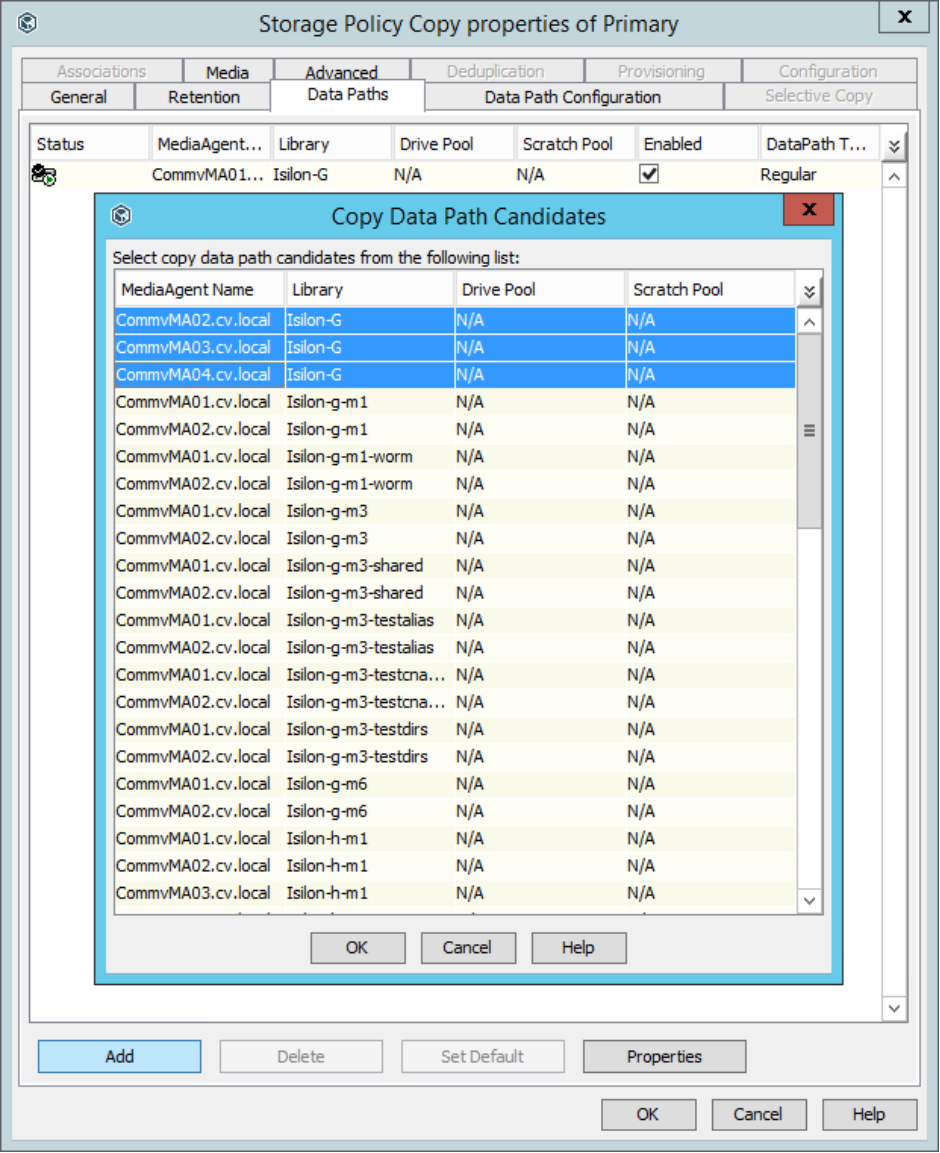
Figure 11. Add data paths to storage policy: step 5
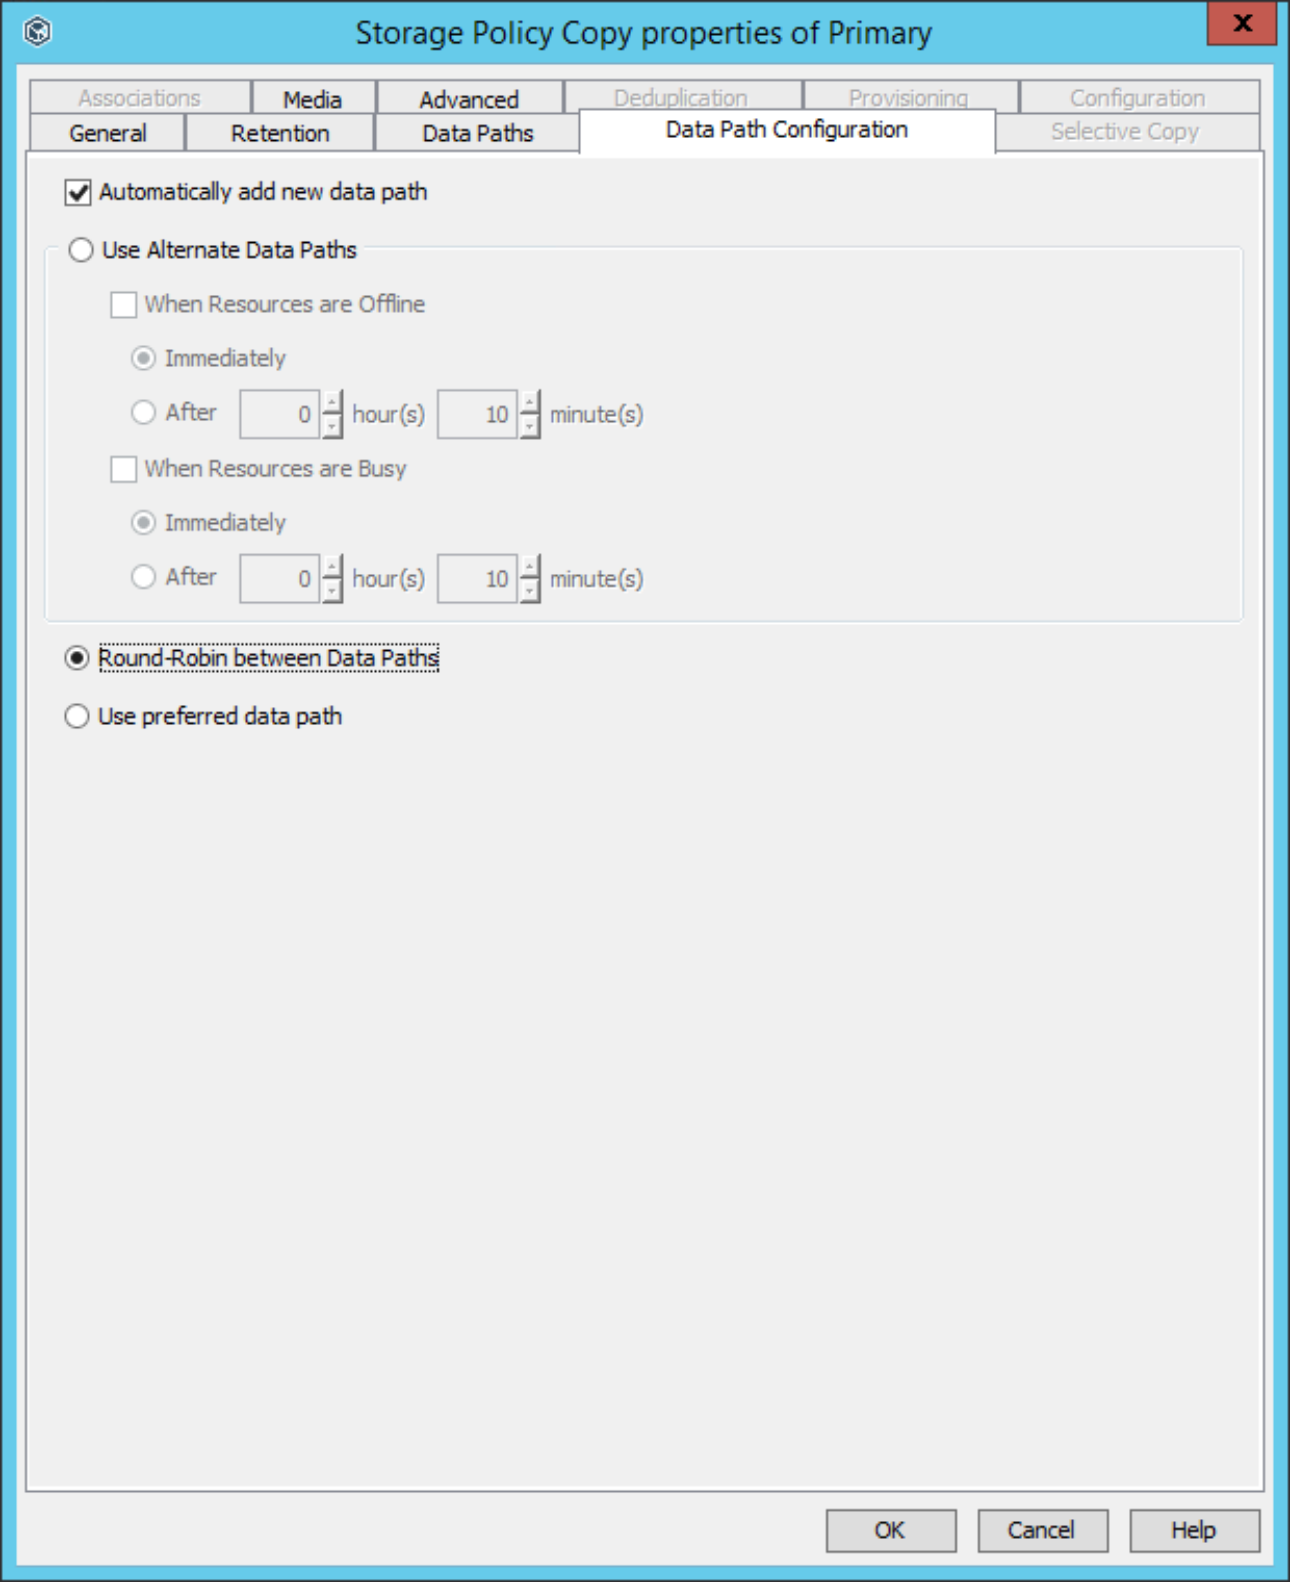
Figure 12. Round-robin data path configuration on storage policy copy: step 5
Storage Policy Stream Settings: Ensure that these two settings are selected, right-click the storage policy configured to use the PowerScale Disk Library > Properties > General tab > ensure that “Enable stream randomization for backup/archiver jobs” and “Distribute data evenly among multiple streams for offline read operations” are selected (Figure 13).
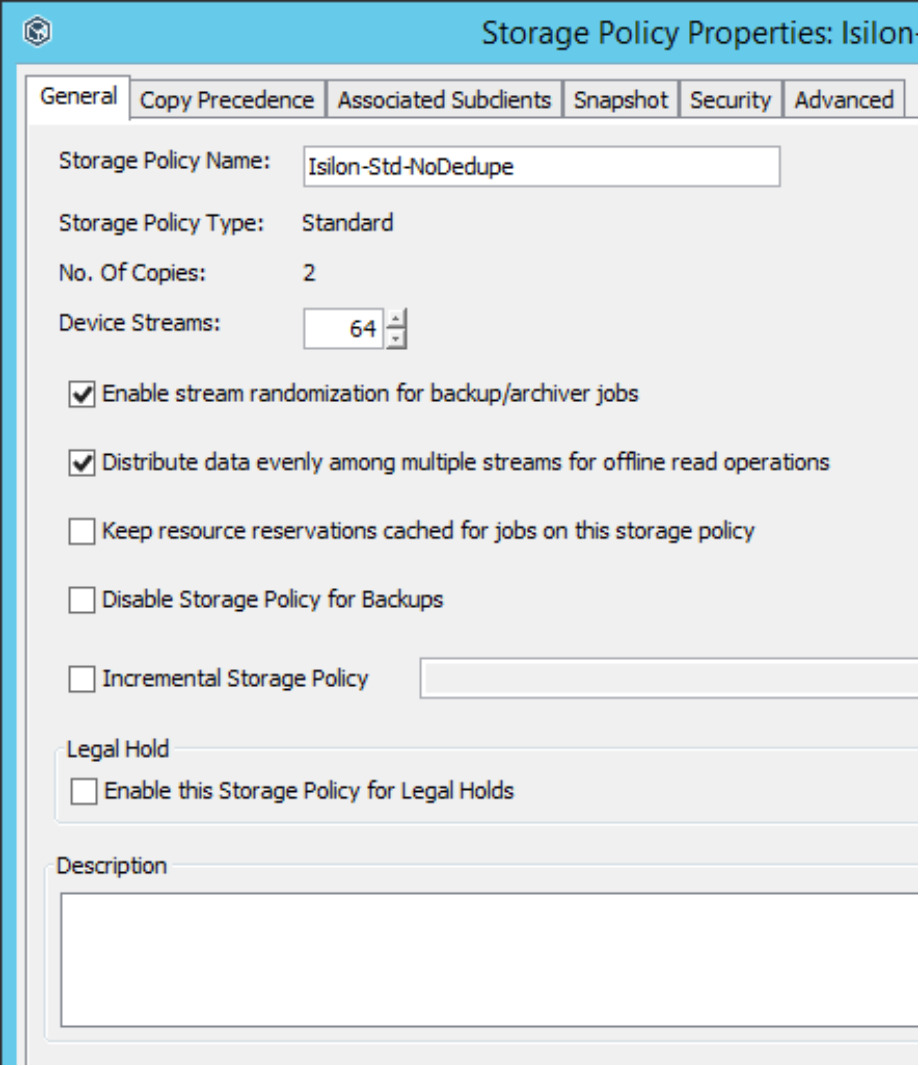
Figure 13. Stream settings on storage policy: step 6
Subclient and schedule policy
Finally, the Subclients should be configured to use the Storage Policy created above with a Full and Incremental schedule policy that is appropriate for the client.
Advanced
This section describes the advanced performance considerations.
Commvault backup performance
The backup process can be a resource-intensive operation with compression and deduplication processes. The amount of spare CPU, RAM, and hard drive performance on a client all contribute to its backup performance.
If a client requires the total backup time to be reduced, in addition to monitoring the CS and MA performance, the client performance should also be monitored during the time of the backups. Additional CPU and RAM can help with the compression and deduplication hashing algorithms and therefore reduce the backup time. Obviously, hard-drive performance affects how quickly the data can be read during the backup process and, therefore, the backup time, so ensure that other workload or maintenance operations are not hampering the backup. If resources cannot be easily increased, test if offloading the compression or deduplication process, or both, from the client to the MediaAgents helps. Consider that these adjustments will cause more network bandwidth to be consumed between the client and the MediaAgent.
For maximum backup and Aux/DASH Copy performance, schedule these different types of jobs to run at different times so they do not overlap; running the operations simultaneously can hinder the performance of either or both.
Commvault mount path writers
The number of writers per mount path can be modified to tune the amount of cluster resources used during backup operations versus other tasks such as restore operations. The number of writers per mount path can be defined on the disk library properties if all the PowerScale nodes are similar, or the number of writers can be defined in the properties of each mount path if the nodes are not similar (see Figure 14and Figure 15).
As a general starting point, set the number of writers per mount path equal to the CPU Cores or LWIO threads available per PowerScale cluster node. Then increase or decrease the writers to use more or fewer cluster resources for backup operations, while leaving some room for restore operations as well. Use InsightIQ to monitor cluster resources to determine if adjustments are needed for the environment.
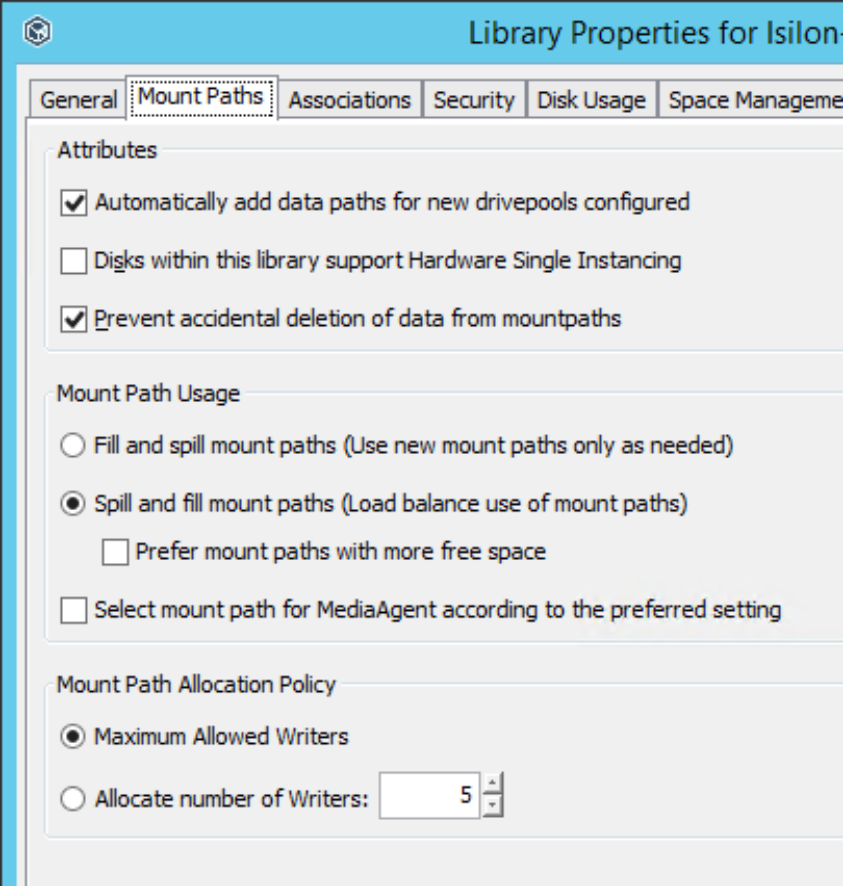
Figure 14. Writers per mount path in disk library properties
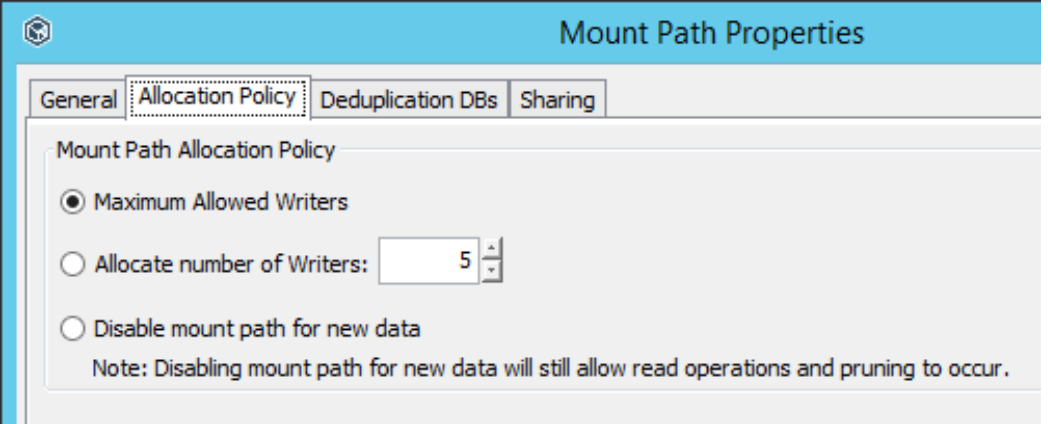
Figure 15. Properties of writers on each mount path
Commvault storage policy streams
The number of device streams on the storage policy can be modified to tune the total amount of cluster resources used during all operations (see Figure 16). This number should be equal to or greater than the total number of writers defined on the disk library, if specified. More device streams than writers will allow other tasks to be performed during backup operations when necessary, such as restore operations. Either increase the number of device streams or reduce the number of writers defined if cluster resource utilization is high during backup operations and resources are limited for other tasks.
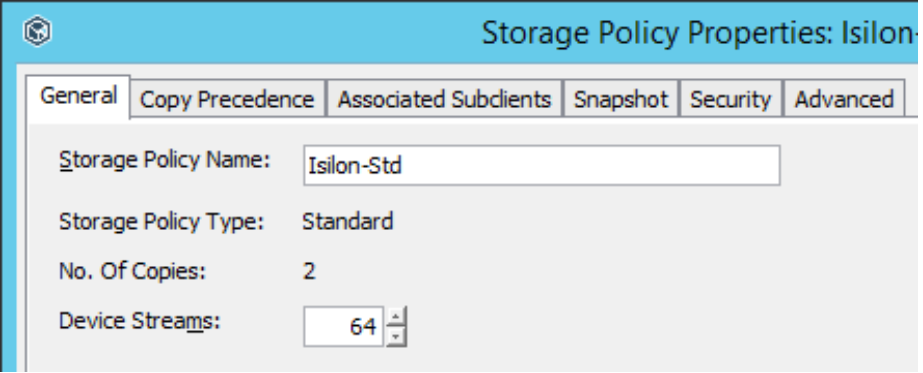
Figure 16. Device streams in storage policy properties
Commvault MediaAgents
The number of MediaAgents available to stream client data to the PowerScale cluster will affect overall backup performance. As a general starting point, deploy one MA for every two PowerScale cluster nodes. Use a minimum of two Mas for redundancy. Requirements will vary based on the CPU, RAM, drive, and networking resources available on the MAs; monitor server resources to determine if more server resources or MAs are needed for the environment.
Commvault data aging and space reclamation
The Commvault data aging process performs delete and truncate operations on the backup container files in disk libraries. When these files contain deduplicated data, the process will also attempt to perform “Drill Hole” operations using SMB sparse file calls. Any data aging that occurred before the Sparse File setting on PowerScale was enabled would have performed the delete and truncate operations on the backup container files, but not the “Drill Hole” operations. The aged data that did not get removed by the “Drill Hole” operations at the time will be deleted when the remaining sections of the backup container files are no longer referenced by other backups and are deleted. There is an option to remove the remaining aged data sooner by running a Data Verification job under the Deduplication Engine with the Reclaim Idle Space on Mountpaths option, though the job will consume resources on the Commvault servers and PowerScale storage to consolidate backup container files into new files without holes and reclaim the old files. This job is tunable using different reclamation levels. If it is determined that it should be run, it would only be needed one time after the Sparse File option under the PowerScale SMB settings is enabled.
To determine the amount of capacity that can be reclaimed from backup container files with holes, use the Data Verification job with the Quick Verification of Deduplication Database option. The log file results will show various levels of reclaimable capacity which corresponds to the reclamation levels under the Reclaim Idle Space on Mountpaths option. Most environments should not need to run a space reclamation job and can allow any remaining aged data to be removed through the normal data aging process.
