Assets

Let’s Talk File (#5) – NFS Protocol Overview
Wed, 24 Apr 2024 17:17:45 -0000
|Read Time: 0 minutes
Introduction
A file access protocol enables clients and storage systems to transmit data using a common syntax and defined rules. PowerStore file supports a wide range of protocols including SMB, NFS, FTP, and SFTP.
In our last blog, we discussed a commonly used protocol for file sharing called Server Message Block (SMB). In this blog, we’ll review another commonly used protocol for file sharing called Network File System (NFS). NFS is commonly used for use cases such as departmental shares, databases, VMware NFS datastores, and more.
NFS versions
PowerStore supports NFSv3 through NFSv4.1. NFSv3 is a stateless protocol that includes basic security, requires external locking mechanisms, and UNIX-based mode bits for permissions. NFSv4 is a stateful protocol that enables enhanced security, integrated locking, ACLs for permissions, and adds other enhancements.
In addition, Secure NFS is also supported. Traditionally, NFS is not the most secure protocol, because it trusts the client to authenticate users and build user credentials and send these in clear text over the network. With the introduction of Secure NFS, Kerberos can be used to secure data transmissions through user authentication and data signing through encryption. Kerberos is a well-known strong authentication protocol where a single key distribution center, or KDC, is trusted rather than each individual client. There are three different Secure NFS modes available on PowerStore:
- Kerberos: Use Kerberos for authentication only
- Kerberos With Integrity: Use Kerberos for authentication and include a hash to ensure data integrity
- Kerberos With Encryption: Use Kerberos for authentication, include a hash, and encrypt the data in-flight
NFS configuration
To configure NFS, you must first enable NFS on the NAS server, create a file system, and an NFS export.
The first step to configure an NFS environment is to provision a NAS server. Each NAS server has options to enable NFSv3 and NFSv4 independently. The following figure shows the NFS protocol options in the NAS server provisioning wizard. 
If at least one NFS protocol is enabled, you are then presented with the option to enable a UNIX Directory Service (UDS). The purpose of the UDS is to provide a mechanism to resolve names to IDs and vice versa. This is necessary because the file system tracks users and files using user IDs and group IDs (UIDs and GIDs). These IDs can be resolved to usernames and group names, and these names are displayed to improve usability for humans. The available options for the UDS are:
- Local Files - Individual files that are uploaded to the NAS server to provide name and ID resolution
- Ideal for small or isolated environments
- Quick and easy to configure
- Do not scale well because files need to be uploaded to each NAS server if anything changes
- These share the same syntax as the configuration files that are found in the /etc/ directory on a UNIX host
- A copy of a local file from a host can be re-purposed for the NAS server
- PowerStore also provides a template with the syntax and descriptions
- NIS/LDAP - Services that provide a centralized user directory for name and ID resolution
- Ideal for large environments that require consistent UID/GID mappings across multiple NAS servers
- Requires upfront work for initial deployment
- Scales well and updates can be easily propagated
In addition to the UDS, Secure NFS can also be enabled at this step. All options in this step are optional and can be skipped if they are not required in your environment. The following figure shows the UNIX Directory Services step of the NAS server provisioning wizard.
When the UDS is configured, the final step in the wizard prompts you to enable DNS for IP address and name resolution. This step is also optional and can be skipped if DNS is not required in your environment.

Any of the settings that are set during the initial provisioning of the NAS server can also be changed afterwards.
NFS exports
When the NFS-enabled NAS server is configured, you can provision a file system along with a NFS export. The NFS export provides a path that clients can use to mount the file system. The initial NFS export can optionally be created as part of the file system provisioning wizard. Additional NFS exports can also be created on existing file systems, if the path exists.
In the NFS export step of the file system provisioning wizard, the only required field is the name for the export. You can also see the name of the NAS Server, local path, file system name, and NFS export path on the right, as shown in the following figure.

You can re-use the local path as the name of the export or provide a different name. If the provided name is different from the local path, then the name is used to create an NFS alias. An NFS alias is another path that can be used to mount the export that is different from the actual path to the share. For example, if the name is fs and the local path is /filesystem, both can be used to mount the export even though the actual path to the export is /filesystem. After the export is created, you can also see that both paths are valid when running the showmount command to the NAS server interface, as shown in the following figure.

The next step in the wizard allows you to configure the access permissions to the NFS export. The following options are available:
- Minimum Security – The minimum authentication method allowed to access the NFS export. The Kerberos options are only available if Secure NFS is enabled.
- Sys (Default) – User authenticates when logging on to the client, so the client passes the user’s IDs to the NFS server without needing to authenticate directly
- Kerberos – Use Kerberos for authentication only
- Kerberos With Integrity – Use Kerberos for authentication and include a hash to ensure data integrity
- Kerberos With Encryption – Use Kerberos for authentication, include a hash, and encrypt the data in-flight
- Default Access – Determines the access permissions for all hosts that attempt to connect to the NFS export. The available options are:
- No Access (Default)
- Read/Write
- Read-Only
- Read/Write, allow Root
- Read-Only, allow Root
Note: The allow root options are the equivalent to no_root_squash on UNIX systems. This means if the user has root access on the client, they are also granted root access to the NFS export. Allow root is required for some use cases, such as VMware NFS datastores.
- Override List - Hosts that need different access than the default can be configured by adding hostnames, IP addresses, or subnets to the override list with one of the access options listed above.
- Comma-Separated - Multiple entries can also be added simultaneously in a comma-separated format. The following table shows the supported options when configuring NFS host access:
Name | Examples | Notes |
Hostname | host1.dell.com | Hostname should be defined in the local hosts file, NIS, LDAP, or DNS |
IPv4 or IPv6 Address | 10.10.10.10 fd00:c6:a8:1::1 |
|
Subnet | 10.10.10.0/255.255.255.0 | IP address/netmask or IP address/prefix |
- CSV File - Host access can also be configured by uploading a CSV file with a list of hosts and their respective access levels.
- PowerStore Manager provides a template with examples of the formatting and syntax for this file. This template can be downloaded from the system, edited, and then imported.
- When multiple NFS exports that require the same access configuration are configured, the same file can be imported multiple times and across multiple clusters as well.
- When the file is imported, the newly imported hosts are appended to the access list.
The following figure shows the host access configuration on an NFS export.

Mounting an NFS export
When you have created the NFS export, you can mount the NFS export on a client that is configured for access. If you attempt to mount the NFS export from a client that has no access, an access denied error is returned. If you attempt to mount a path that is not a valid NFS export, you will also see an access denied error.
To mount the NFS export, use the mount command. The syntax is:
mount <NFS_Server_Interface>:/<Path_or_Alias> /<Mountpoint>.
For example, mount nfs:/fs /mnt/nfs connects to the interface with the DNS name of nfs, looks for the /fs path or alias, and then mounts it to the /mnt/nfs/ directory on the client.
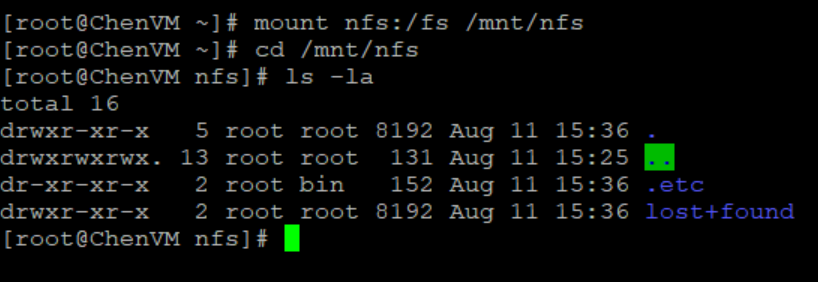
Depending on the client OS version, the default mount option may vary between NFSv3 and NFSv4. If both are enabled on the NAS server and you want to use a specific version, you should specify it using the -t switch in the mount command.
To confirm that the NFS export is mounted and see the mount options, use the mount command, as shown in the following figure.
When it is mounted, you can simply change directory (cd) into /mnt/nfs to access the data on the NFS export.
Conclusion
Great job! You are now familiar with how to use the NFS protocol for file system access. This enables you to start configuring environments using NFS for many use cases and applications. Stay tuned for the next blog in this series where we’ll review how we can hide the .etc and lost+found directories from the end user.
Resources
Author: Wei Chen, Senior Principal Engineering Technologist

Let’s Talk File (#3) – PowerStore File Systems
Wed, 24 Apr 2024 17:05:59 -0000
|Read Time: 0 minutes
Introduction
A file system is a storage resource that holds data and can be accessed through file sharing protocols such as SMB or NFS. The PowerStore file system architecture is designed to be highly scalable, efficient, performance-focused, and flexible. PowerStore offers a 64-bit file system that is mature and robust, enabling it to be used in many of the traditional NAS file use cases.
File system highlights
PowerStore file systems can accommodate large amounts of data, directories, and files. Each individual file system is designed to scale up to 256TB in size, hold 10 million subdirectories per directory, and store 32 billion files. Don’t forget that PowerStore can support up to 500 file systems on an appliance as well!
All file systems are thinly provisioned and always have compression and deduplication enabled. This means that capacity is allocated on demand as capacity is consumed on the file system. In addition, compression and deduplication help reduce the total cost of ownership and increase the efficiency of the system by reducing the amount of physical capacity that is needed to store the data. Savings are not only limited to the file system itself, but also to its snapshots and thin clones. Compression and deduplication occur inline between the system cache and the backend drives. The compression task is offloaded to a dedicated chip on the node, which frees up CPU cycles.
PowerStore file systems are tuned and optimized for high performance across all use cases. In addition, platform components such as Non-Volatile Memory Express (NVMe) drives and high-speed connectivity options enable the system to maintain low response times while servicing large workloads.
How to provision a file system
Now that you understand the benefits of the PowerStore file system, let’s review the file system provisioning process. PowerStore Manager makes it quick and simple to provision a file system, create NFS exports and/or SMB shares, configure access, and apply a protection policy using a single wizard.
To create a file system, open PowerStore Manager and navigate to Storage > File Systems > Create. The file system creation wizard prompts you for the information displayed in the following table.
Name | Description |
NAS Server | Select the NAS server that will be used to access this file system, ensuring the necessary protocols are enabled on the NAS server for client access. |
Name | Provide a name for the file system. |
Size | Specify the size of the file system that is presented to the client, between 3GB and 256TB. |
NFS Export (Optional) | Only displayed if NFS is enabled on the NAS server. Provide a name for the NFS export if NFS access is desired. The NFS Export Path is displayed so you can easily mount the NFS export on the client. |
Configure Access | Only displayed if an NFS export is created. This screen has the following settings:
|
SMB Share (Optional) | Only displayed if SMB is enabled on the NAS server. This screen has the following settings:
|
Protection Policy | Select a protection policy to protect the file system. |
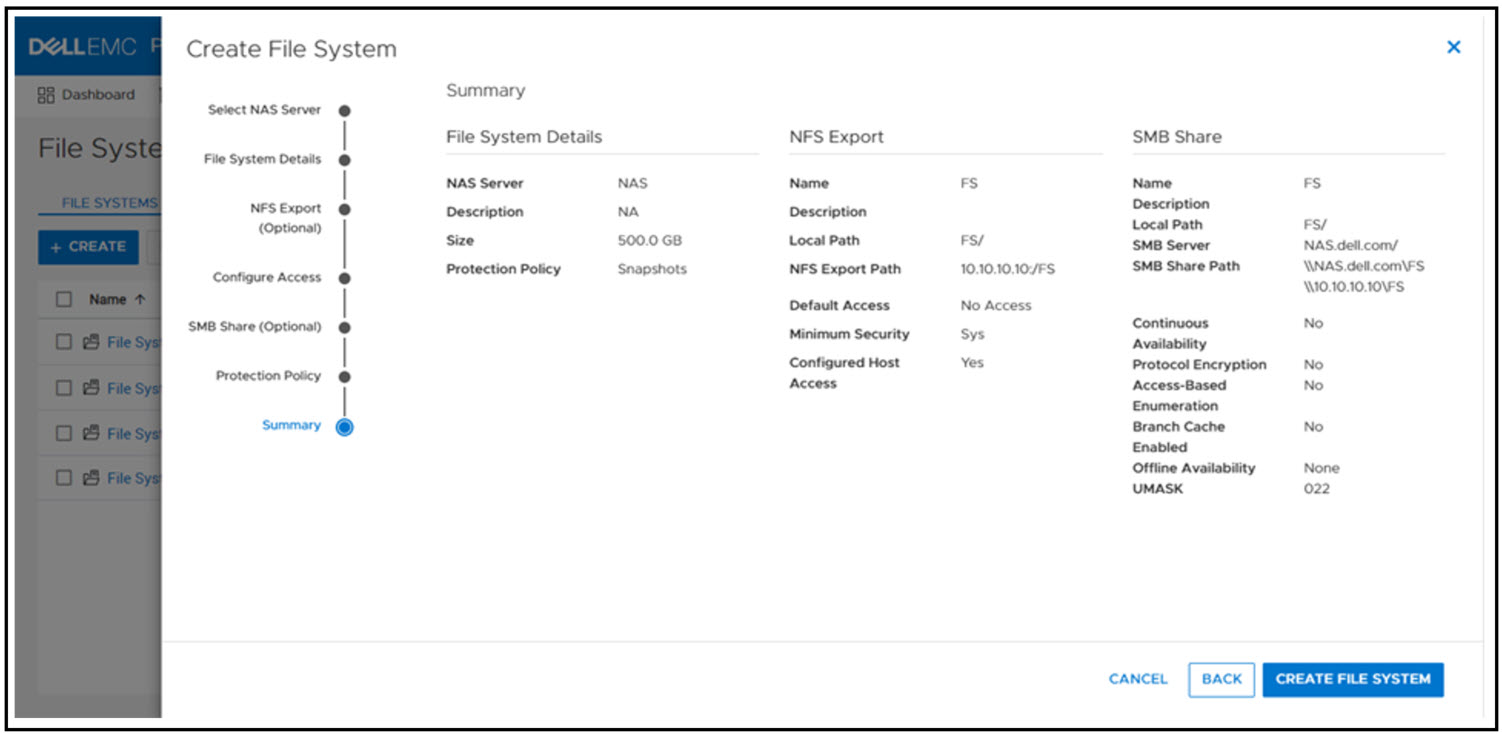
The following screenshot shows an example of the summary page when creating a new file system. In this example, we provisioned the file system, NFS export, SMB share, configured host access, and applied a protection policy to the file system.
If you’re testing file for the first time, you may want to start off with deploying a basic minimum configuration. To do this, all you need to choose is a NAS server, configure a file system name, specify a size, and create either an NFS export or an SMB share. If you enable NFS, you’ll also need to enable host access to your client.
When the file system and NFS export or SMB share is provisioned, you now mount the file system on to your host for access:
- SMB: \\<SMB_Server>\<SMB_Share_Name>
- For example: \\nas\fs
- NFS: mount <NFS_Server>:/<NFS_Export_Name> /<Mountpoint>
- For example: mount nas:/fs /mnt
File system management
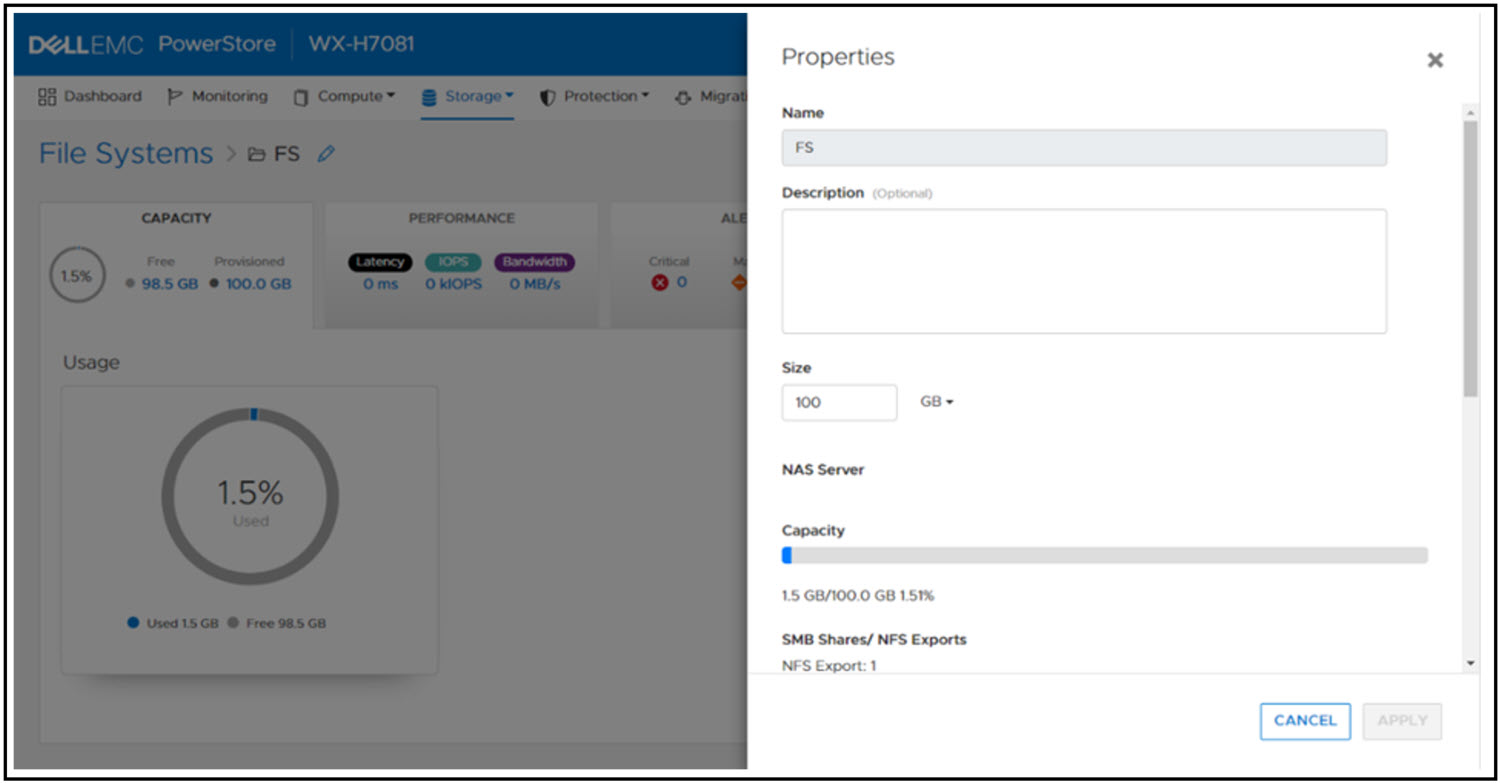
PowerStore file systems provide increased flexibility by providing the ability to shrink and extend file systems as needed. Shrink and extend operations are used to resize the file system and update the capacity that is seen by the client. Extend operations do not change how much capacity is allocated to the file system. However, shrink operations may be able to reclaim unused space, depending on how much capacity is allocated to the file system and the presence of snapshots or thin clones.
If the advertised file system size is too small or full, extending it allows additional data to be written to the file system. If the advertised file system size is too large, shrinking it limits the amount of data that can be written to the file system. For shrink and extend, the minimum value is equal to the used size of the file system; the maximum value is 256 TB. You cannot shrink the file system to less than the used size, because this would cause the client to see the file system as more than 100% full.
The following figure shows the file system properties page in PowerStore Manager, where you can shrink or extend a file system.
File system performance metrics
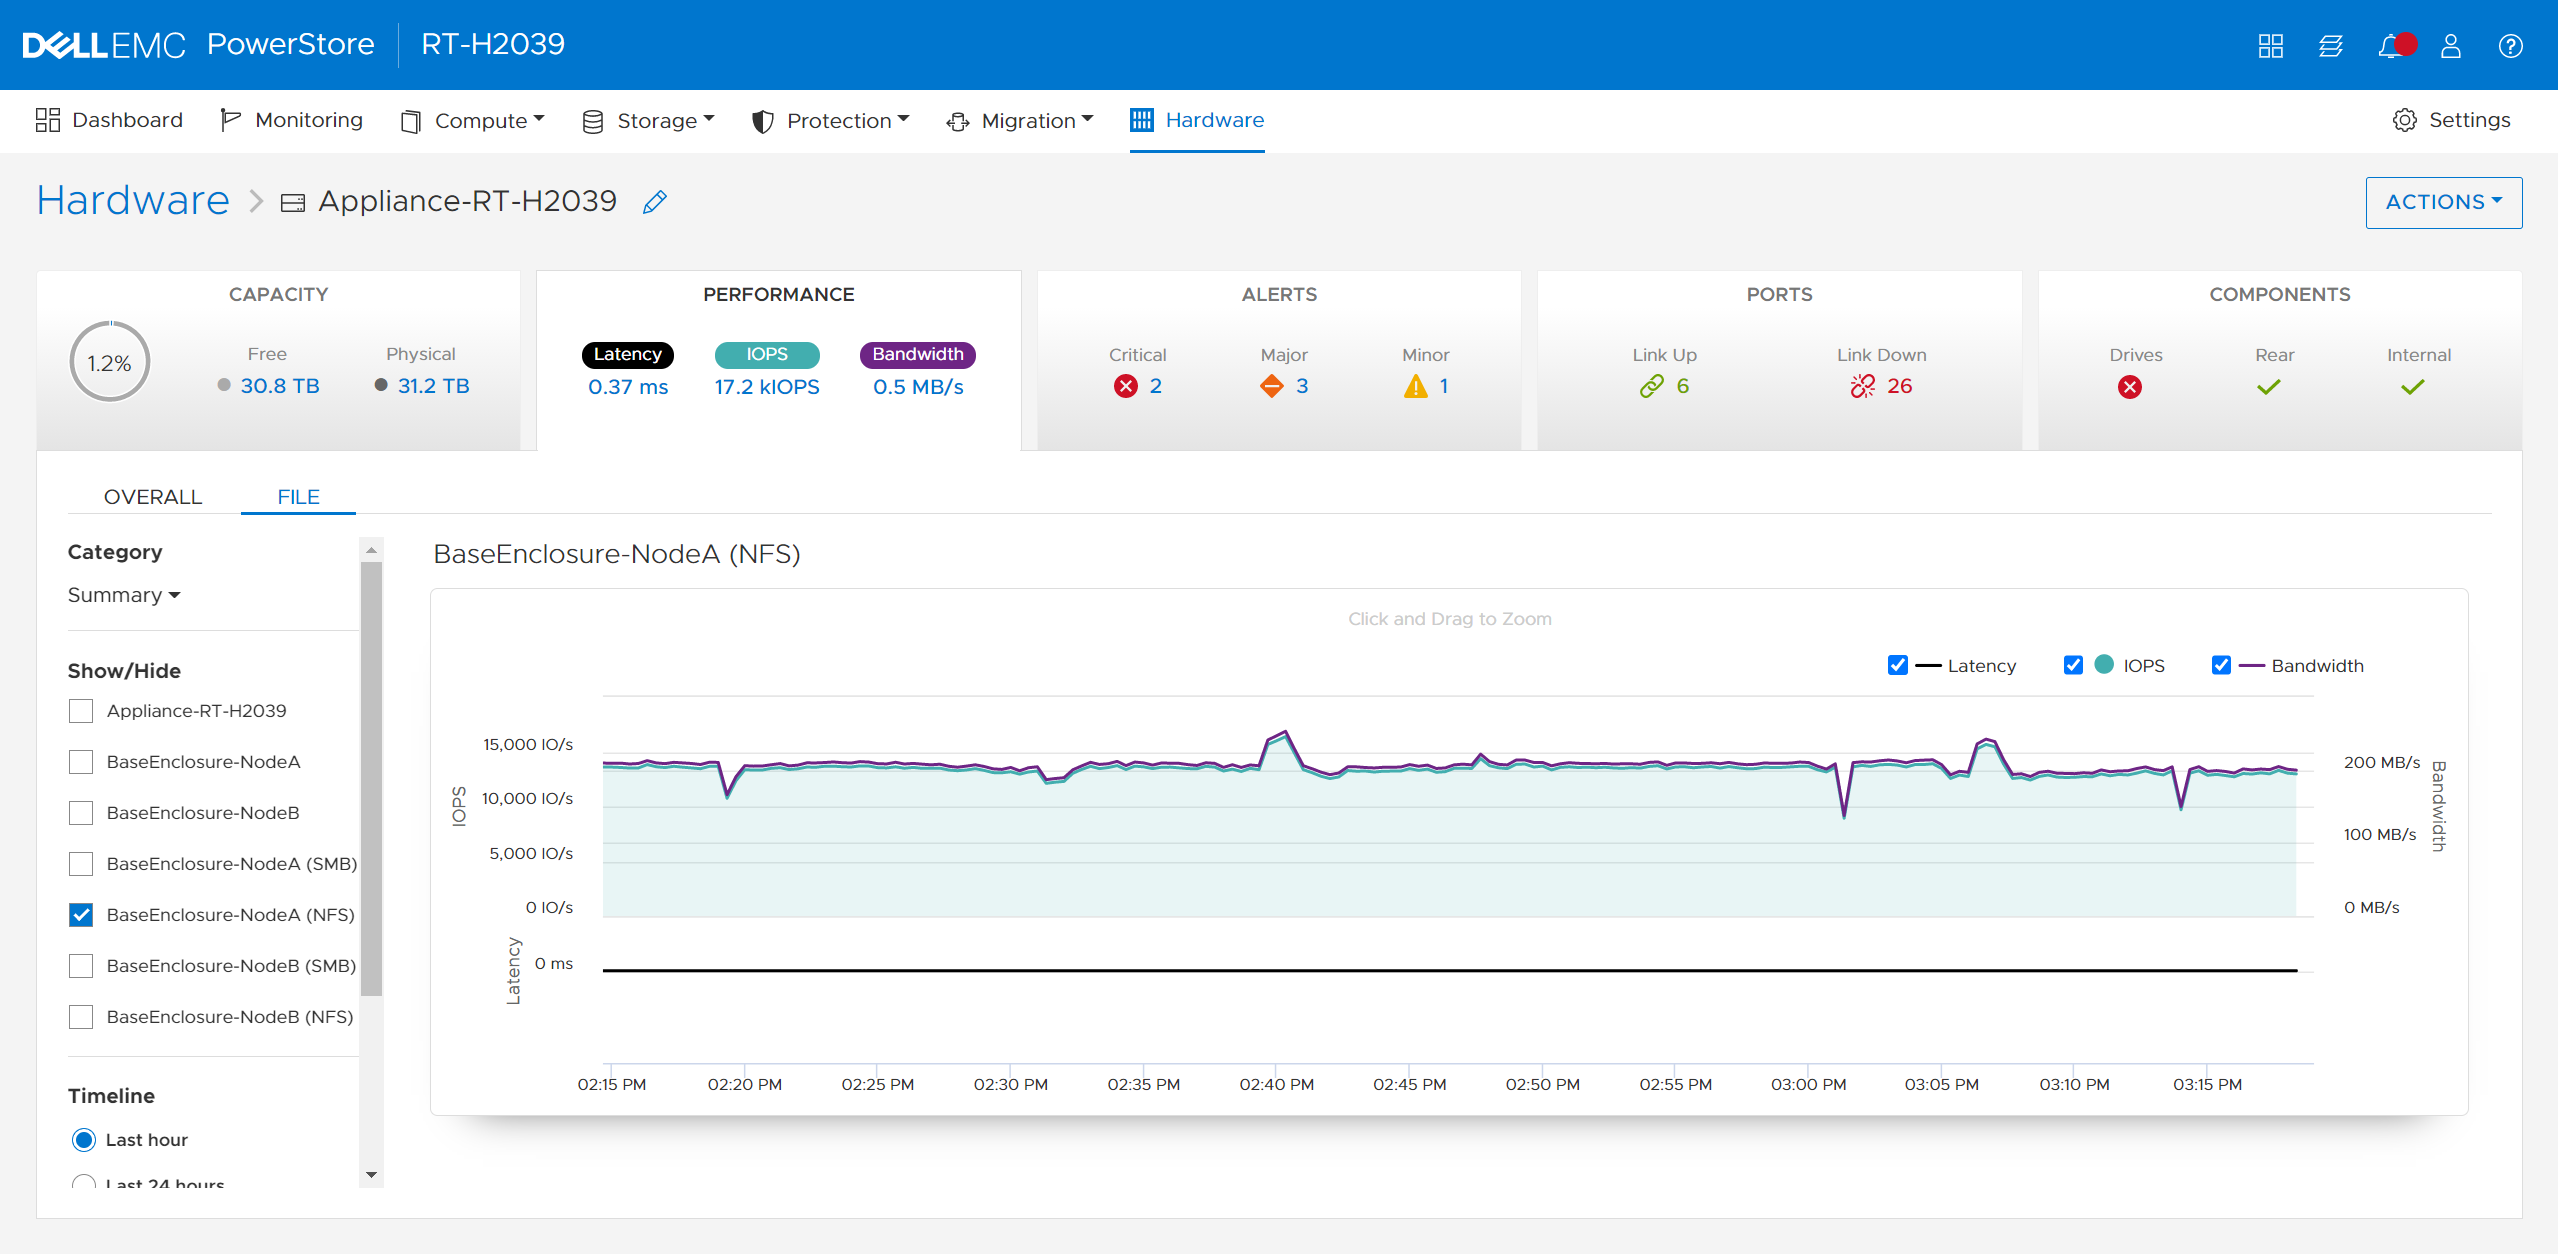
Performance metrics are available to view the latency, IOPS, bandwidth, and IO size at the file system level. You can tweak the timeline to view preset timeframes ranging from the last hour to the last 2 years, or drag and zoom in to specific sections of the graph. You can also export the metrics to file types such as PNG, PDF, JPEG, or CSV.
File-specific metrics are also available at the node, cluster, and appliance level. At the node level, SMB and NFS protocol metrics can also be viewed. The available metrics are:
- Read, Write, and Total IOPS
- Read, Write, and Total Bandwidth
- Read, Write, and Average Latency
- Read, Write, and Average IO Size
The following figure shows the file metrics page that displays the NFS protocol metrics on Node A.
Conclusion
Congratulations! You have successfully provisioned a file system, NFS export, SMB share, and accessed it from a host. Now you can write files and folders or run workloads on the file system. We also reviewed how to leverage shrink and extend to update the file system size, and looked at some of the performance metrics so you can monitor your file systems. Stay tuned for the next blog in this series where we’ll take a deeper dive into the SMB protocol.
Resources
Author: Wei Chen, Senior Principal Engineering Technologist

Configuring PowerStore File Extension Filtering to Prevent Ransomware
Wed, 06 Sep 2023 18:12:28 -0000
|Read Time: 0 minutes
Overview
Disallowing known ransomware extensions from being written to the file system can be a simple and effective mechanism to deter and/or prevent ransomware. PowerStore file systems include a file extension filtering capability that restricts specific file extensions from being stored on an SMB share. Traditionally, this feature has been used to prevent users from storing non-business data on a share, however its uses extend to blocking malicious extensions from being written to a share at all.
File extension filtering can be leveraged in conjunction with other features such as CEPA to implement a ransomware strategy with multiple layers of defense. Let’s dive into how to configure PowerStore file extension filtering to better protect your system today.
Configuration
To configure file extension filtering:
- Go to the \\<SMB_Server>\c$\.etc\.filefilter directory as an administrator
- To configure a filter, create an empty file using the naming convention extension@sharename
- For example, to filter .wcry ransomware files on the FS1 share, create a file named wcry@FS1
- To enable the filter on all shares on the SMB server, create the file with only the extension, such as wcry
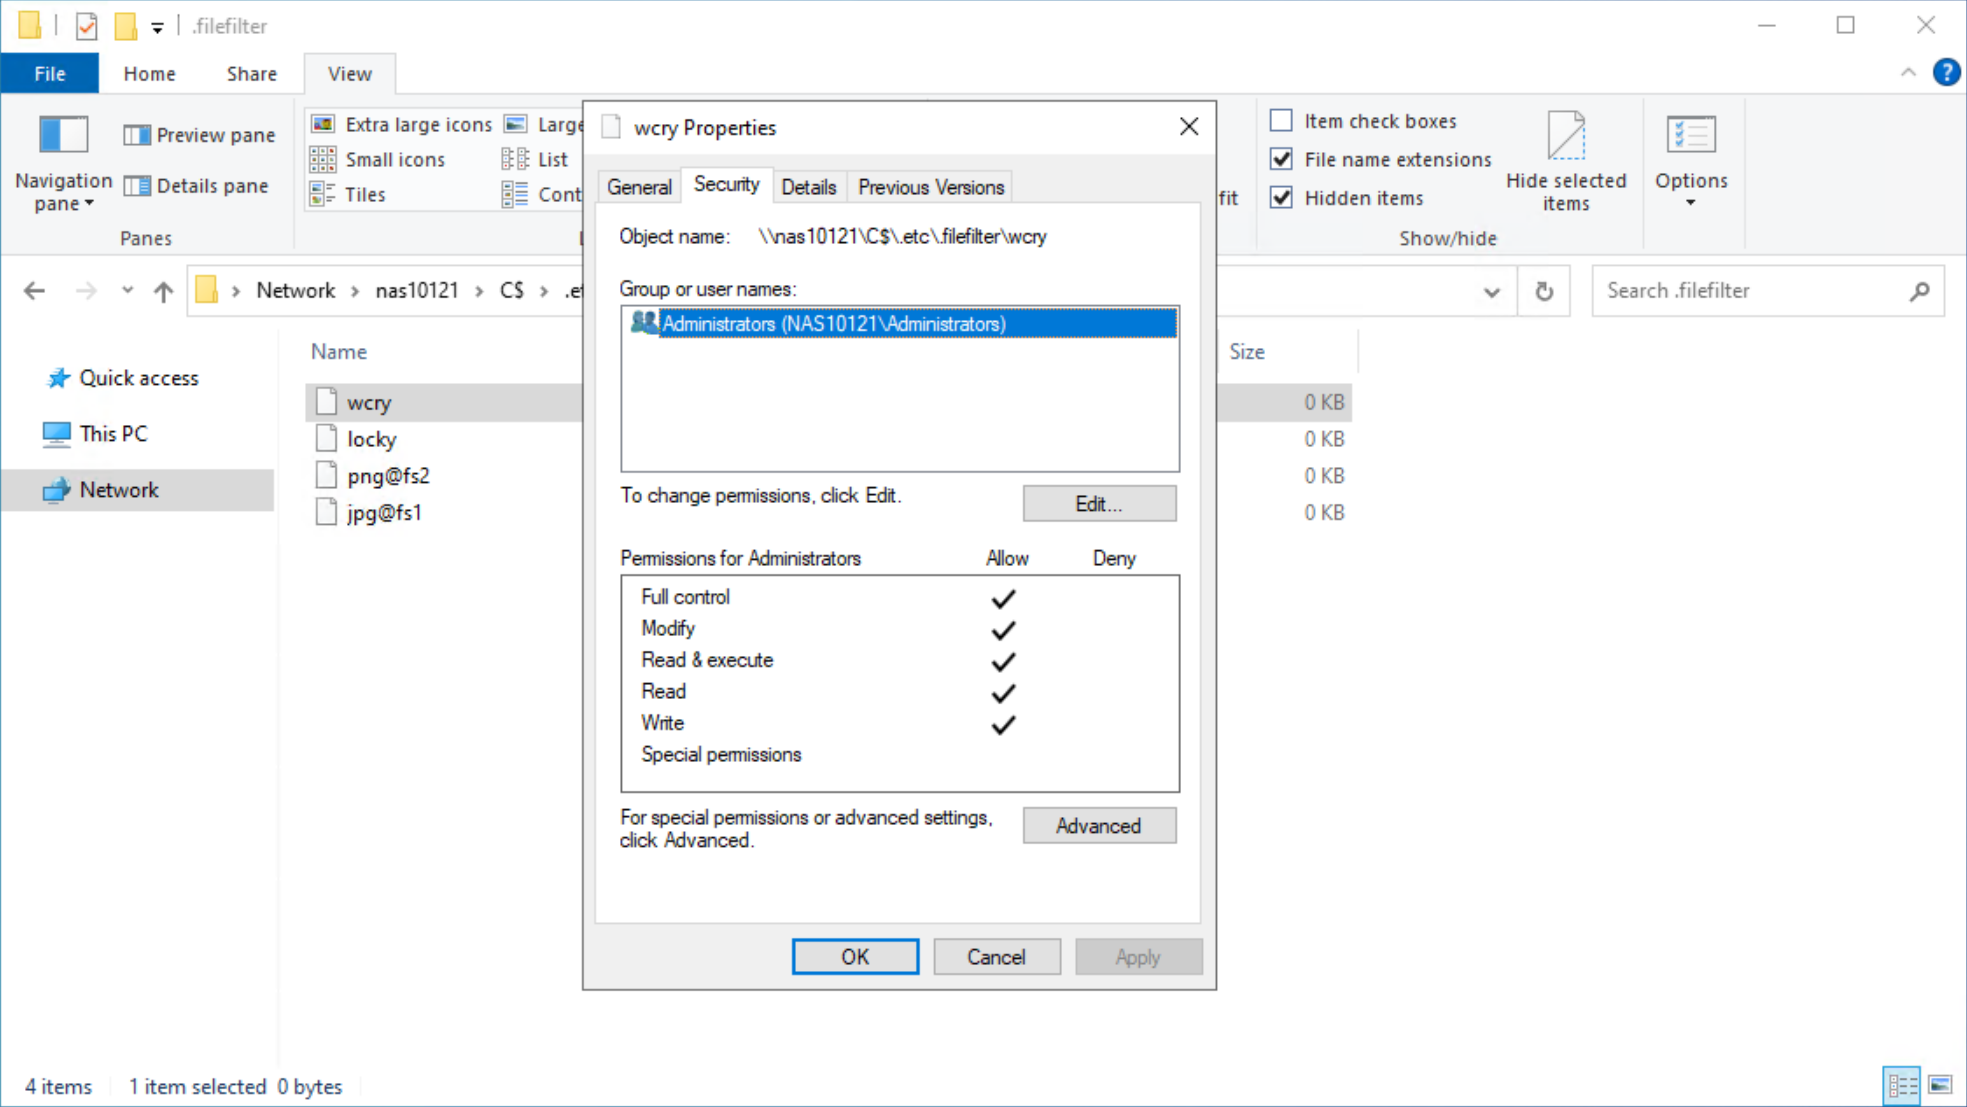
You can configure multiple filters by creating additional files in this directory. For ransomware prevention use cases, create additional filters for other known ransomware extensions. Each SMB server has its own independent file extension filtering configuration, so each can be customized with its own configuration. The following figure shows an example of the configuration of the file extension filtering.

After configuring a file extension filter, you can permit exceptions for specific users or groups by changing the ACL on the filter file to provide Full Control privileges to the users or groups that should be excluded.
For example, if the Administrators group is provided Full Control permissions on the wcry filter file, then users in the Administrators group can store .wcry files on the share, while others cannot. Exceptions can be configured independently for each file filter being created, as shown in the following figure.
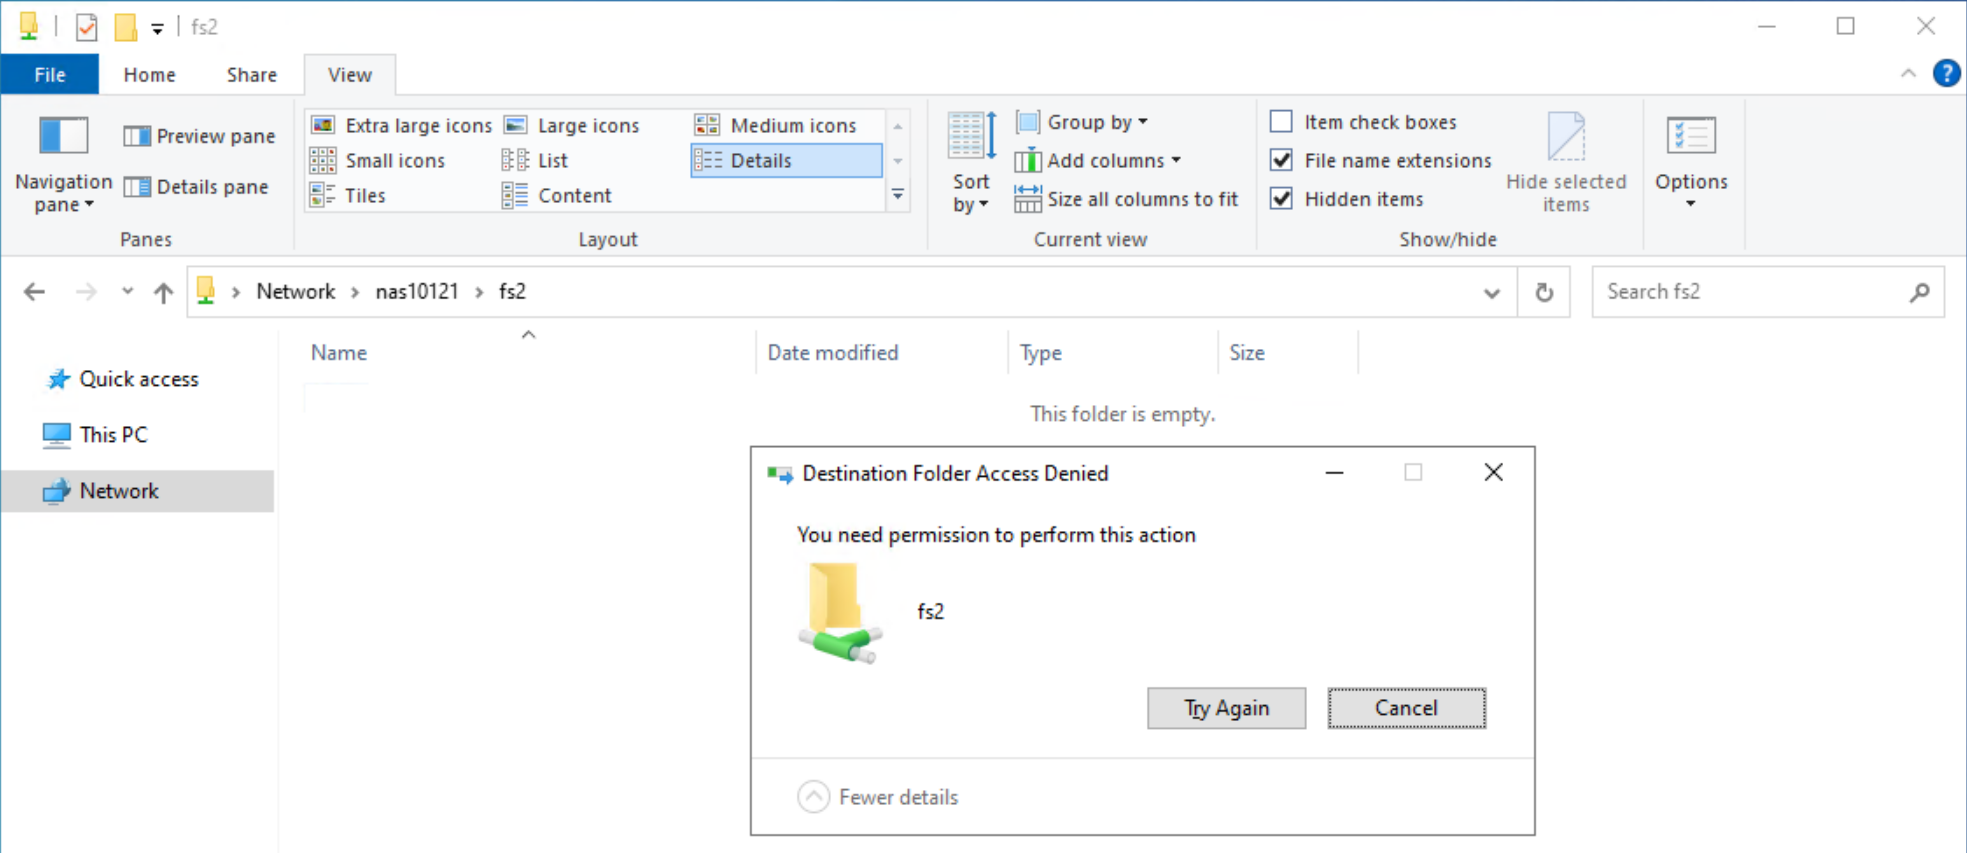
When users attempt to copy a file with a blocked extension, they receive an Access Denied error, as shown in the following figure.
Considerations
Note that this feature only works on SMB and does not filter file extensions when writing over NFS. Users could manually rename file extensions to bypass this filter, provided those other extensions are not also explicitly blocked, however malware may not be able to adapt and work around this as easily. Since the list of filtered extensions must be checked each time a file is written, having many filters could impact performance.
Conclusion
File extension filtering is a simple and powerful capability that provides administrators the ability to control the type of data that is stored on an SMB share. Easy to configure and able to provide an additional layer of protection against ransomware activity, file extension filtering is an effective addition to any comprehensive cybersecurity strategy to protect and secure your data.
Resources
The following resources provide more information about PowerStore:
Author: Wei Chen, Technical Staff, Engineering Technologist

Dell VxRail and Dell PowerStore: Better Together Through Dynamic AppsON
Fri, 05 May 2023 16:48:57 -0000
|Read Time: 0 minutes
Dynamic AppsON overview
When two products come together with new and unique capabilities, customers benefit from the “better together” value that is created. That value is clearly visible with Dynamic AppsON, which is a configuration that provides an exclusive integration between compute-only Dell VxRail dynamic nodes and a Dell PowerStore storage system.
Dynamic AppsON enables independent scaling of compute and storage, providing flexibility of choice by increasing the extensibility of both platforms. It provides VxRail environments access to PowerStore enterprise efficiency, data protection, and resiliency features. Additionally, it helps PowerStore environments quickly expand compute for CPU-intensive workloads in a traditional three-tier architecture.
Another integration point that further enhances the Dynamic AppsON experience is the Virtual Storage Integrator (VSI). VSI brings storage provisioning, management, and monitoring capabilities directly into vCenter. It enables the ability to perform common storage tasks and provides additional visibility into the storage system without needing to launch PowerStore Manager.
With Dynamic AppsON, you have the flexibility to choose the type of datastore and connectivity that fits your environment. Dell Technologies recommends vVols and NVMe/TCP.
Leveraging the native vVol capabilities of PowerStore is the optimal way to provision VM datastores. This enables increased storage granularity at the VM level, offloading of data services to PowerStore, and storage policy-based management directly in vCenter. This further enables vCenter as the common operating environment for the administrator.
For connectivity, NVMe/TCP is recommended because it provides significant advantages. It enables performance that is comparable to direct-attach, while retaining the cost-effectiveness, scalability, and flexibility of traditional Ethernet.
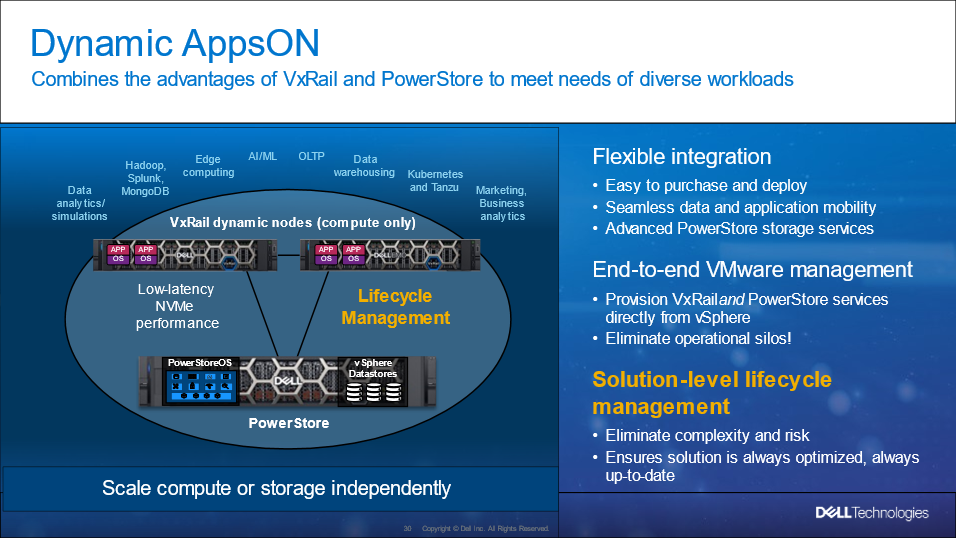
Figure 1. Dynamic AppsON overview
For more information about Dynamic AppsON, see the Dell VxRail and Dell PowerStore: Better Together Through Dynamic AppsON white paper.
Dynamic AppsON lifecycle management
Dell VxRail and Dell PowerStore have taken this integration a step further by introducing lifecycle management for Dynamic AppsON deployments. This enables an administrator to view the PowerStore details and initiate a code upgrade directly from VxRail Manager in vCenter. By leveraging the VxRail Manager user interface and workflows, an administrator does not need to switch between multiple interfaces for the lifecycle management operations.
The lifecycle management functionality from VxRail Manager is exclusively enabled through VSI. Dynamic AppsON lifecycle management is available starting with VxRail 7.0.450, PowerStoreOS 3.0, and Virtual Storage Integrator (VSI) 10.2.
Dynamic AppsON lifecycle management provides the following capabilities in VxRail Manager in vCenter:
- View the attached storage system type and software version
- Upload a code bundle from the local client directly to PowerStore
- Run a Pre-Upgrade Health Check on PowerStore and report any warnings and failures
- Initiate a code upgrade and track the progress until completion
The following figures show these Dynamic AppsON lifecycle management tasks in VxRail Manager.
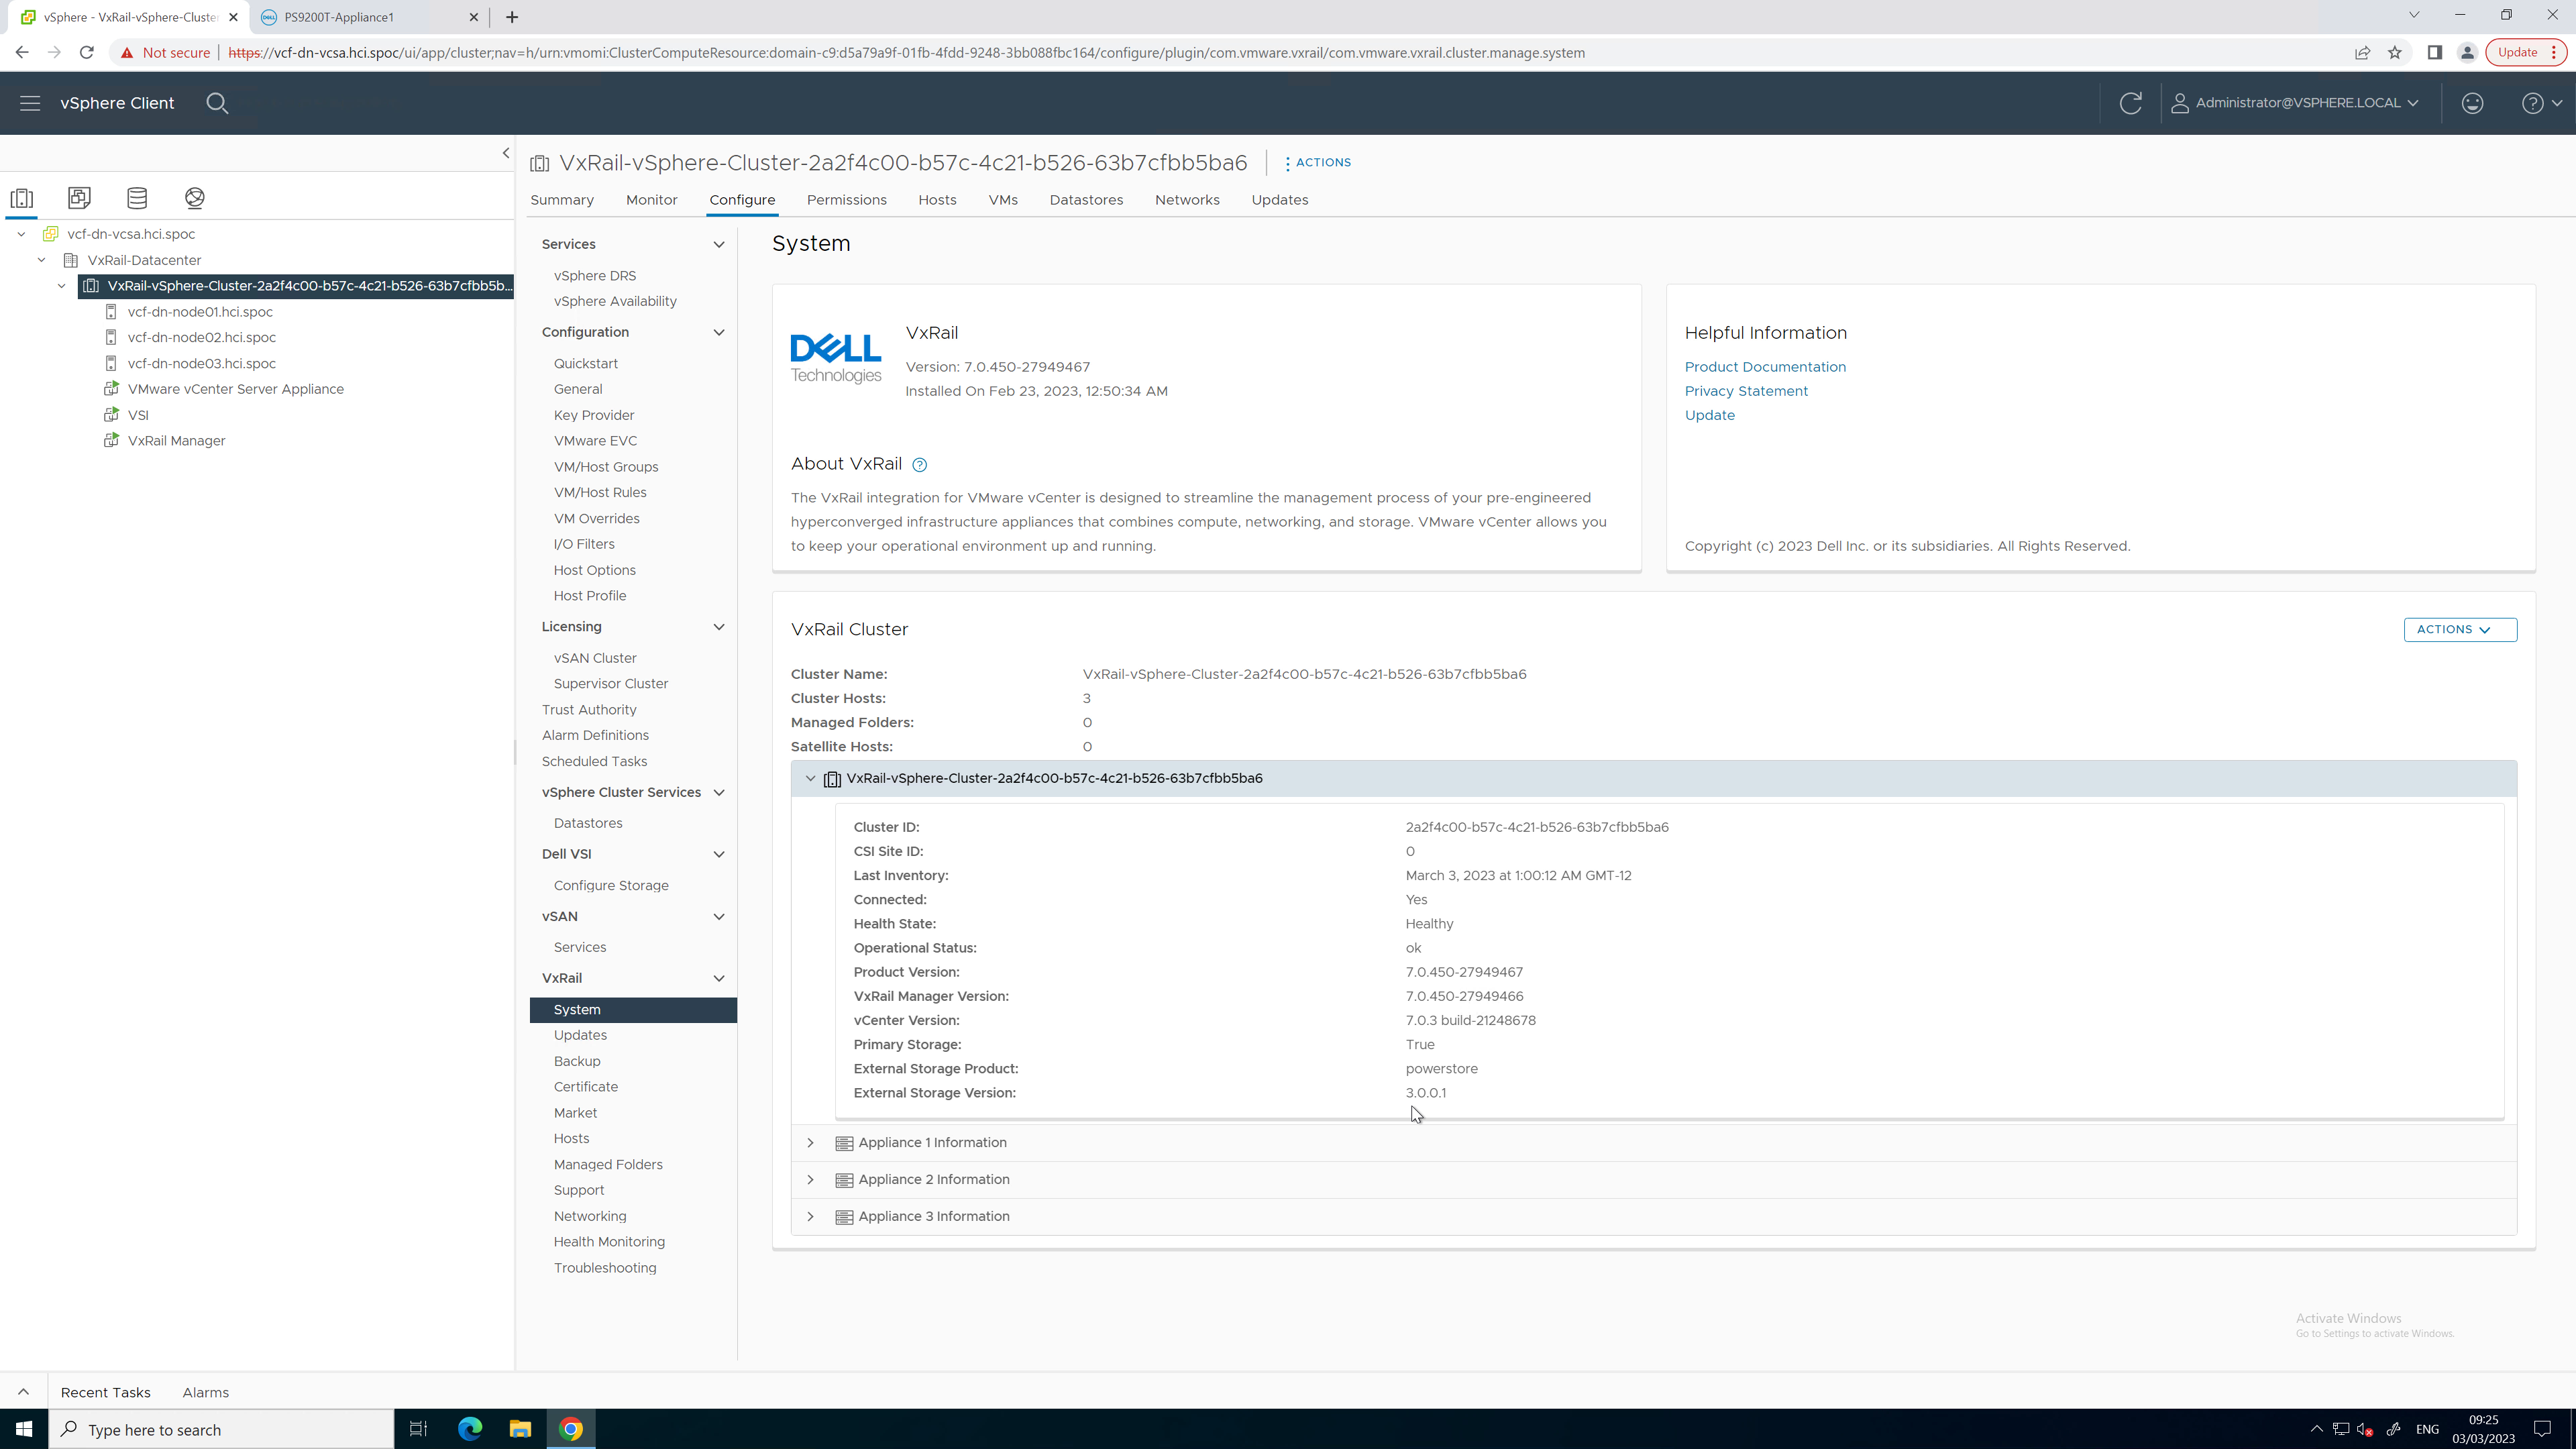
Figure 2. PowerStore code reporting
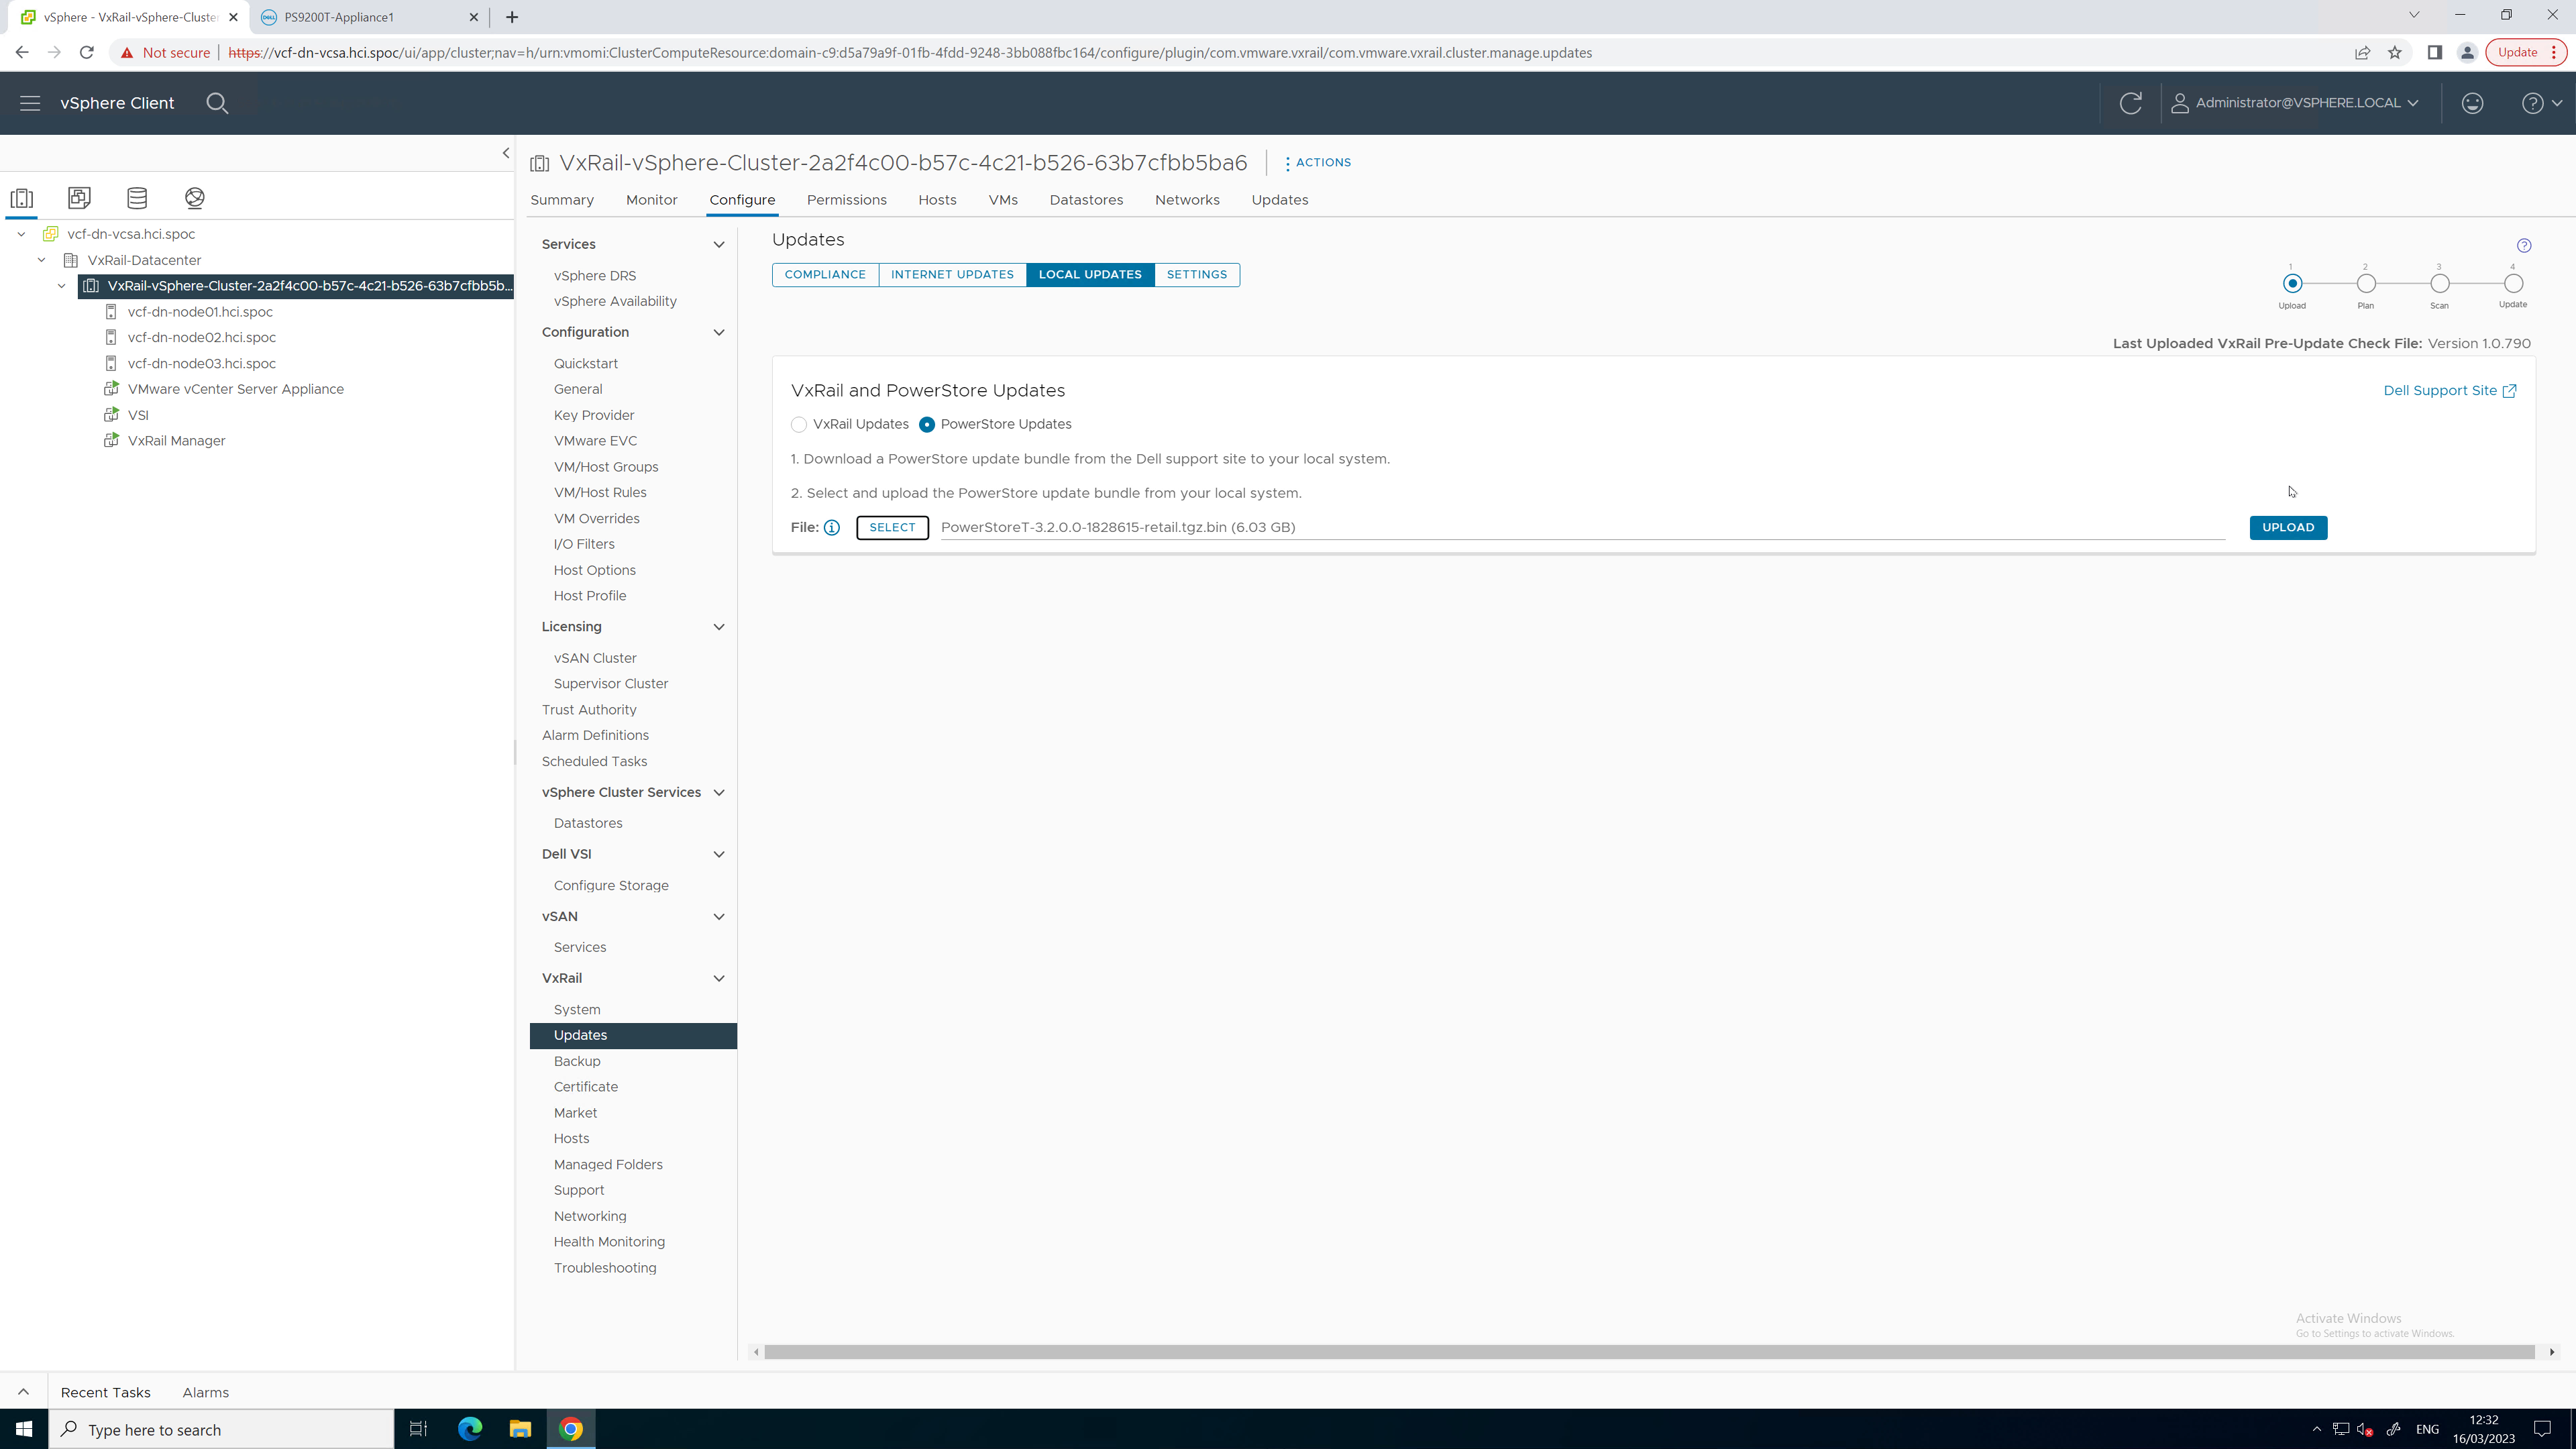
Figure 3. PowerStore code upload
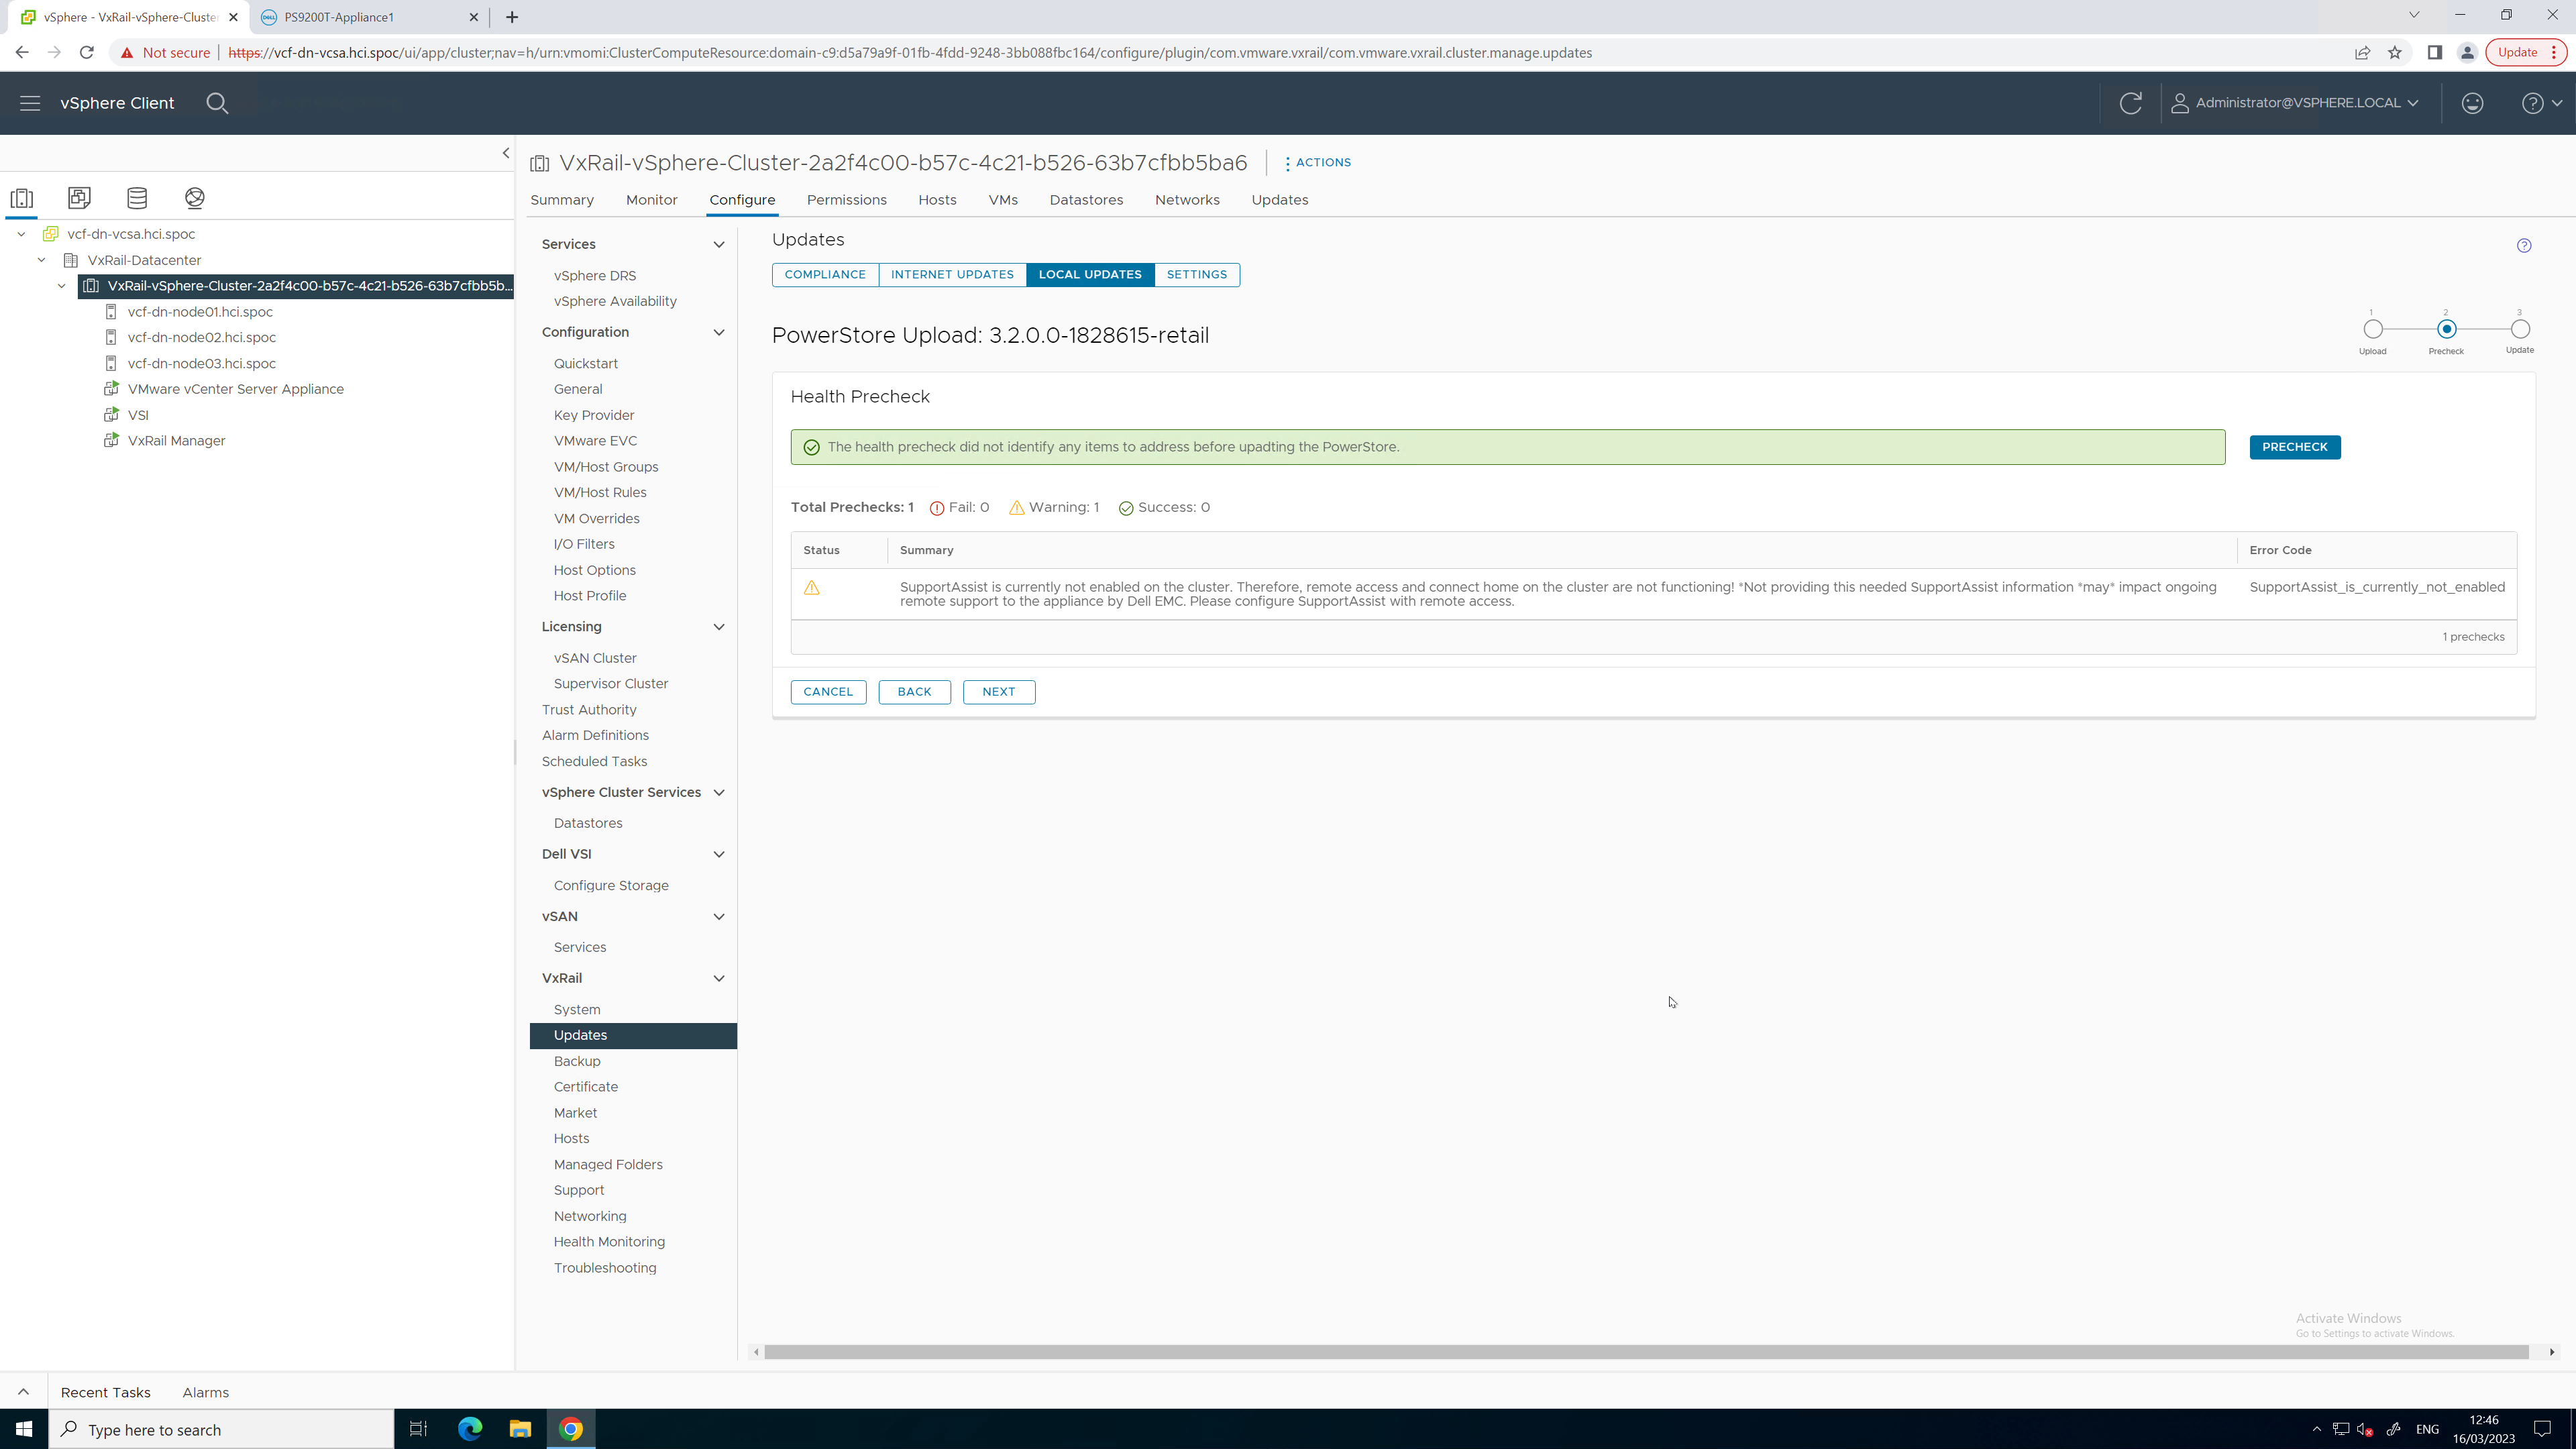
Figure 4. PowerStore Pre-Upgrade Health Check
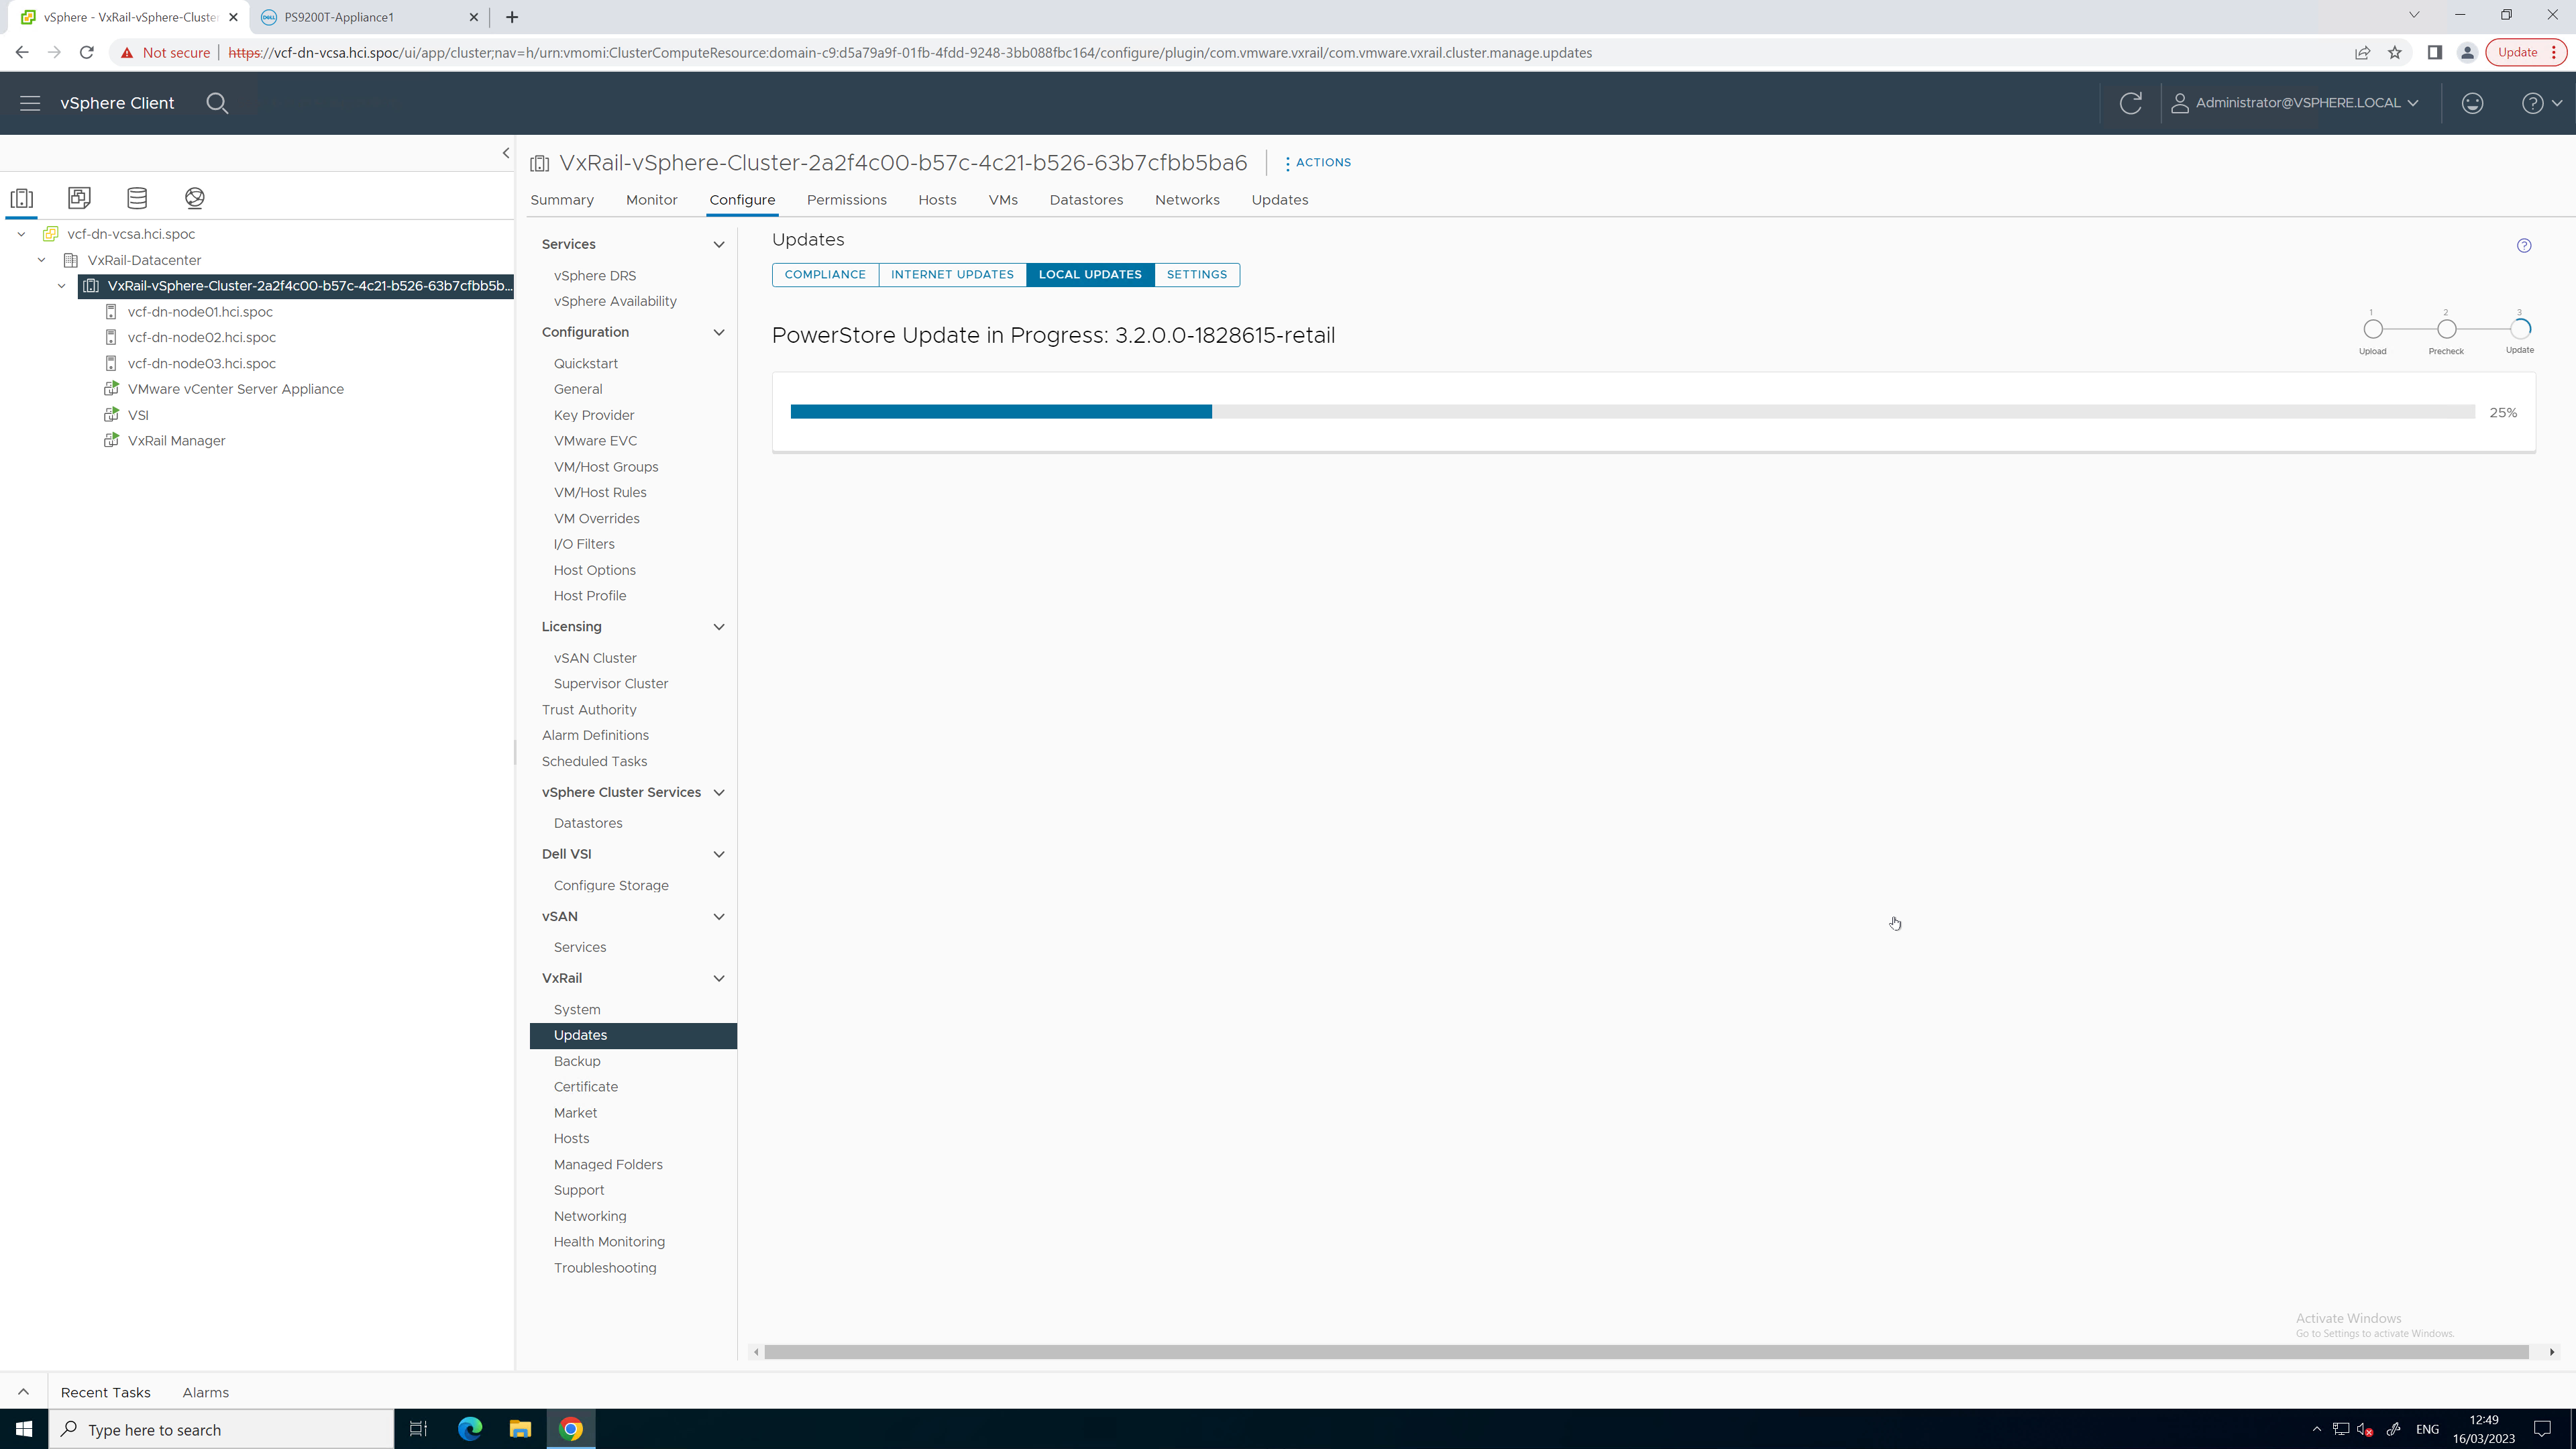
Figure 5. PowerStore upgrade in progress

Figure 6. PowerStore upgrade completed successfully
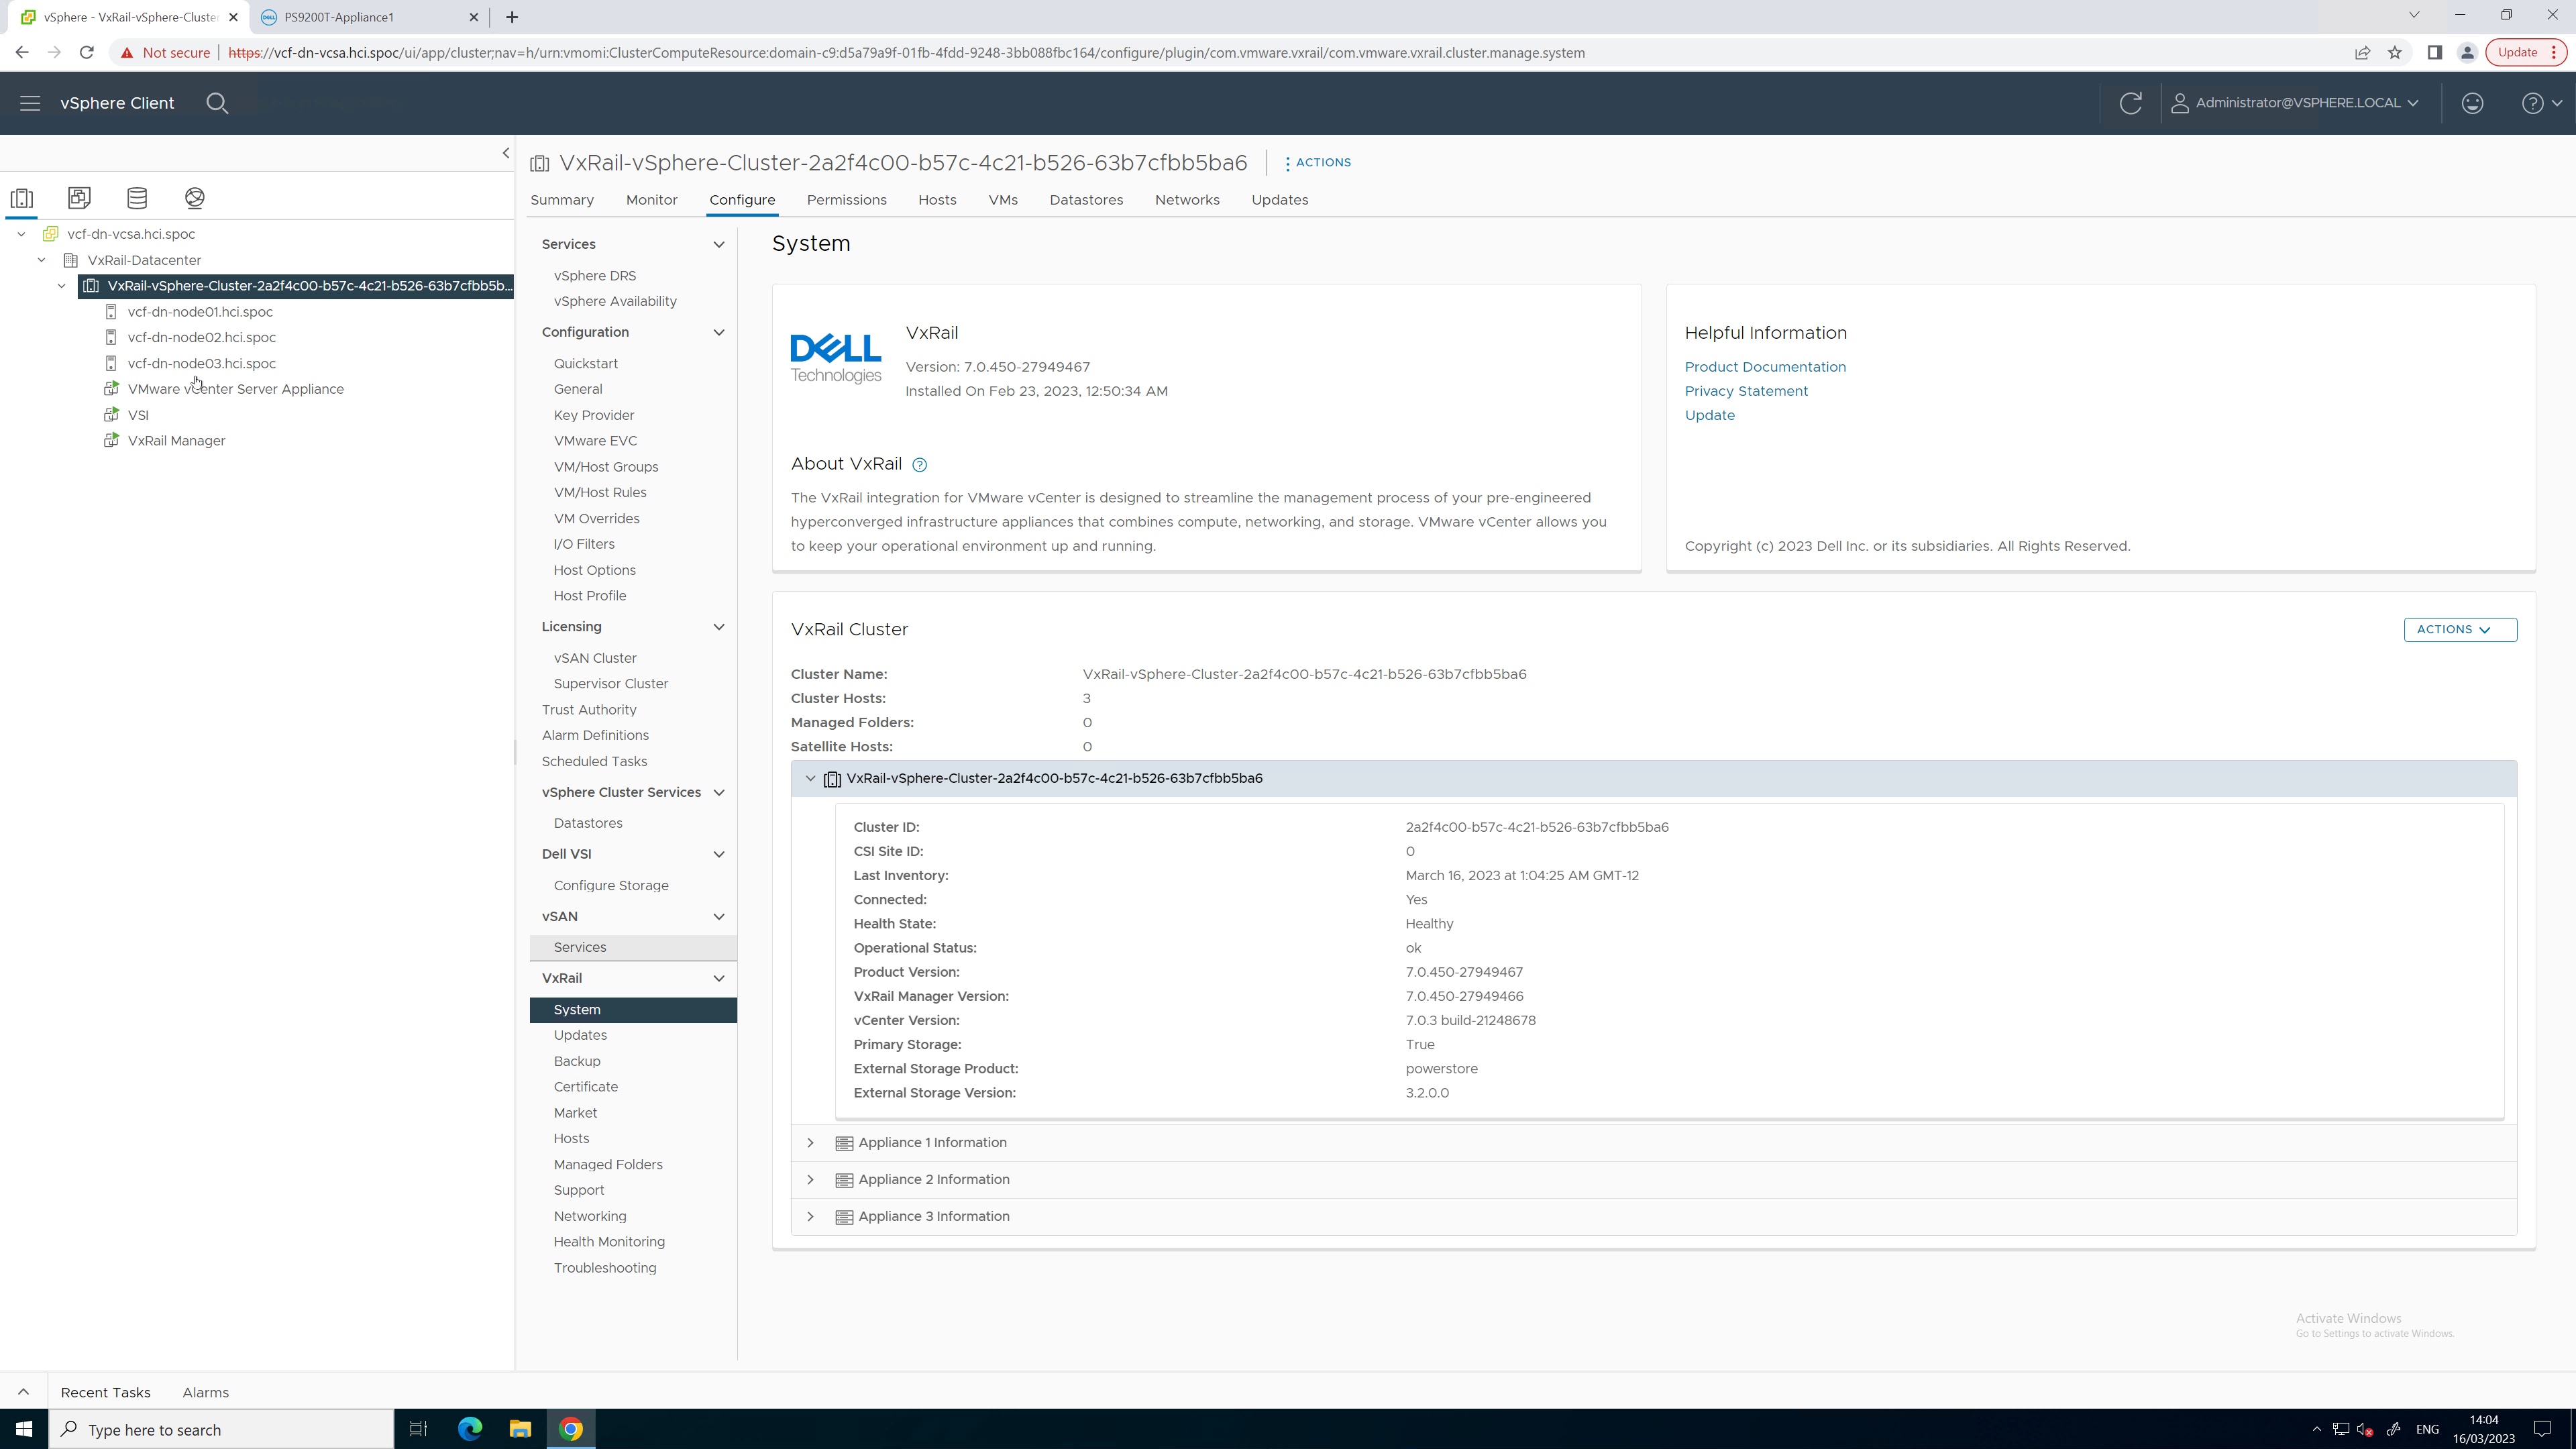
Figure 7. Updated PowerStore code version
To see all these lifecycle management tasks in action from start to finish, refer to this video:
Conclusion
With the addition of lifecycle management for Dynamic AppsON, the number of storage management tasks for which a virtualization and storage administrator has to leave vCenter is reduced. This functionality provides a consistent, common, and efficient management experience for both VxRail and PowerStore. The integration between VxRail, PowerStore, and the VSI plug-in enables consistent workflows and visibility between storage and compute. Better together through Dynamic AppsON, brought to you by Dell VxRail and Dell PowerStore.
Resources
- Dynamic AppsON Lifecycle Management video
- Dynamic AppsON Summary video
- Dynamic AppsON infographic
- Dynamic AppsON: A Better Together Story blog
- Dell VxRail and Dell PowerStore: Better Together Through Dynamic AppsON white paper
- Dell PowerStore: Virtualization Integration white paper
Author: Wei Chen, Technical Staff, Engineering Technologist

Dell VxRail and Dell PowerStore: Better Together Through Dynamic AppsON
Fri, 05 May 2023 16:29:52 -0000
|Read Time: 0 minutes
Dynamic AppsON overview
When two products come together with new and unique capabilities, customers benefit from the “better together” value that is created. That value is clearly visible with Dynamic AppsON, which is a configuration that provides an exclusive integration between compute-only Dell VxRail dynamic nodes and a Dell PowerStore storage system.
Dynamic AppsON enables independent scaling of compute and storage, providing flexibility of choice by increasing the extensibility of both platforms. It provides VxRail environments access to PowerStore enterprise efficiency, data protection, and resiliency features. Additionally, it helps PowerStore environments quickly expand compute for CPU-intensive workloads in a traditional three-tier architecture.
Another integration point that further enhances the Dynamic AppsON experience is the Virtual Storage Integrator (VSI). VSI brings storage provisioning, management, and monitoring capabilities directly into vCenter. It enables the ability to perform common storage tasks and provides additional visibility into the storage system without needing to launch PowerStore Manager.
With Dynamic AppsON, you have the flexibility to choose the type of datastore and connectivity that fits your environment. Dell Technologies recommends vVols and NVMe/TCP.
Leveraging the native vVol capabilities of PowerStore is the optimal way to provision VM datastores. This enables increased storage granularity at the VM level, offloading of data services to PowerStore, and storage policy-based management directly in vCenter. This further enables vCenter as the common operating environment for the administrator.
For connectivity, NVMe/TCP is recommended because it provides significant advantages. It enables performance that is comparable to direct-attach, while retaining the cost-effectiveness, scalability, and flexibility of traditional Ethernet.

Figure 1. Dynamic AppsON overview
For more information about Dynamic AppsON, see the Dell VxRail and Dell PowerStore: Better Together Through Dynamic AppsON white paper.
.
Dynamic AppsON lifecycle management
Dell VxRail and Dell PowerStore have taken this integration a step further by introducing lifecycle management for Dynamic AppsON deployments. This enables an administrator to view the PowerStore details and initiate a code upgrade directly from VxRail Manager in vCenter. By leveraging the VxRail Manager user interface and workflows, an administrator does not need to switch between multiple interfaces for the lifecycle management operations.
The lifecycle management functionality from VxRail Manager is exclusively enabled through VSI. Dynamic AppsON lifecycle management is available starting with VxRail 7.0.450, PowerStoreOS 3.0, and Virtual Storage Integrator (VSI) 10.2.
Dynamic AppsON lifecycle management provides the following capabilities in VxRail Manager in vCenter:
- View the attached storage system type and software version
- Upload a code bundle from the local client directly to PowerStore
- Run a Pre-Upgrade Health Check on PowerStore and report any warnings and failures
- Initiate a code upgrade and track the progress until completion
The following figures show these Dynamic AppsON lifecycle management tasks in VxRail Manager.
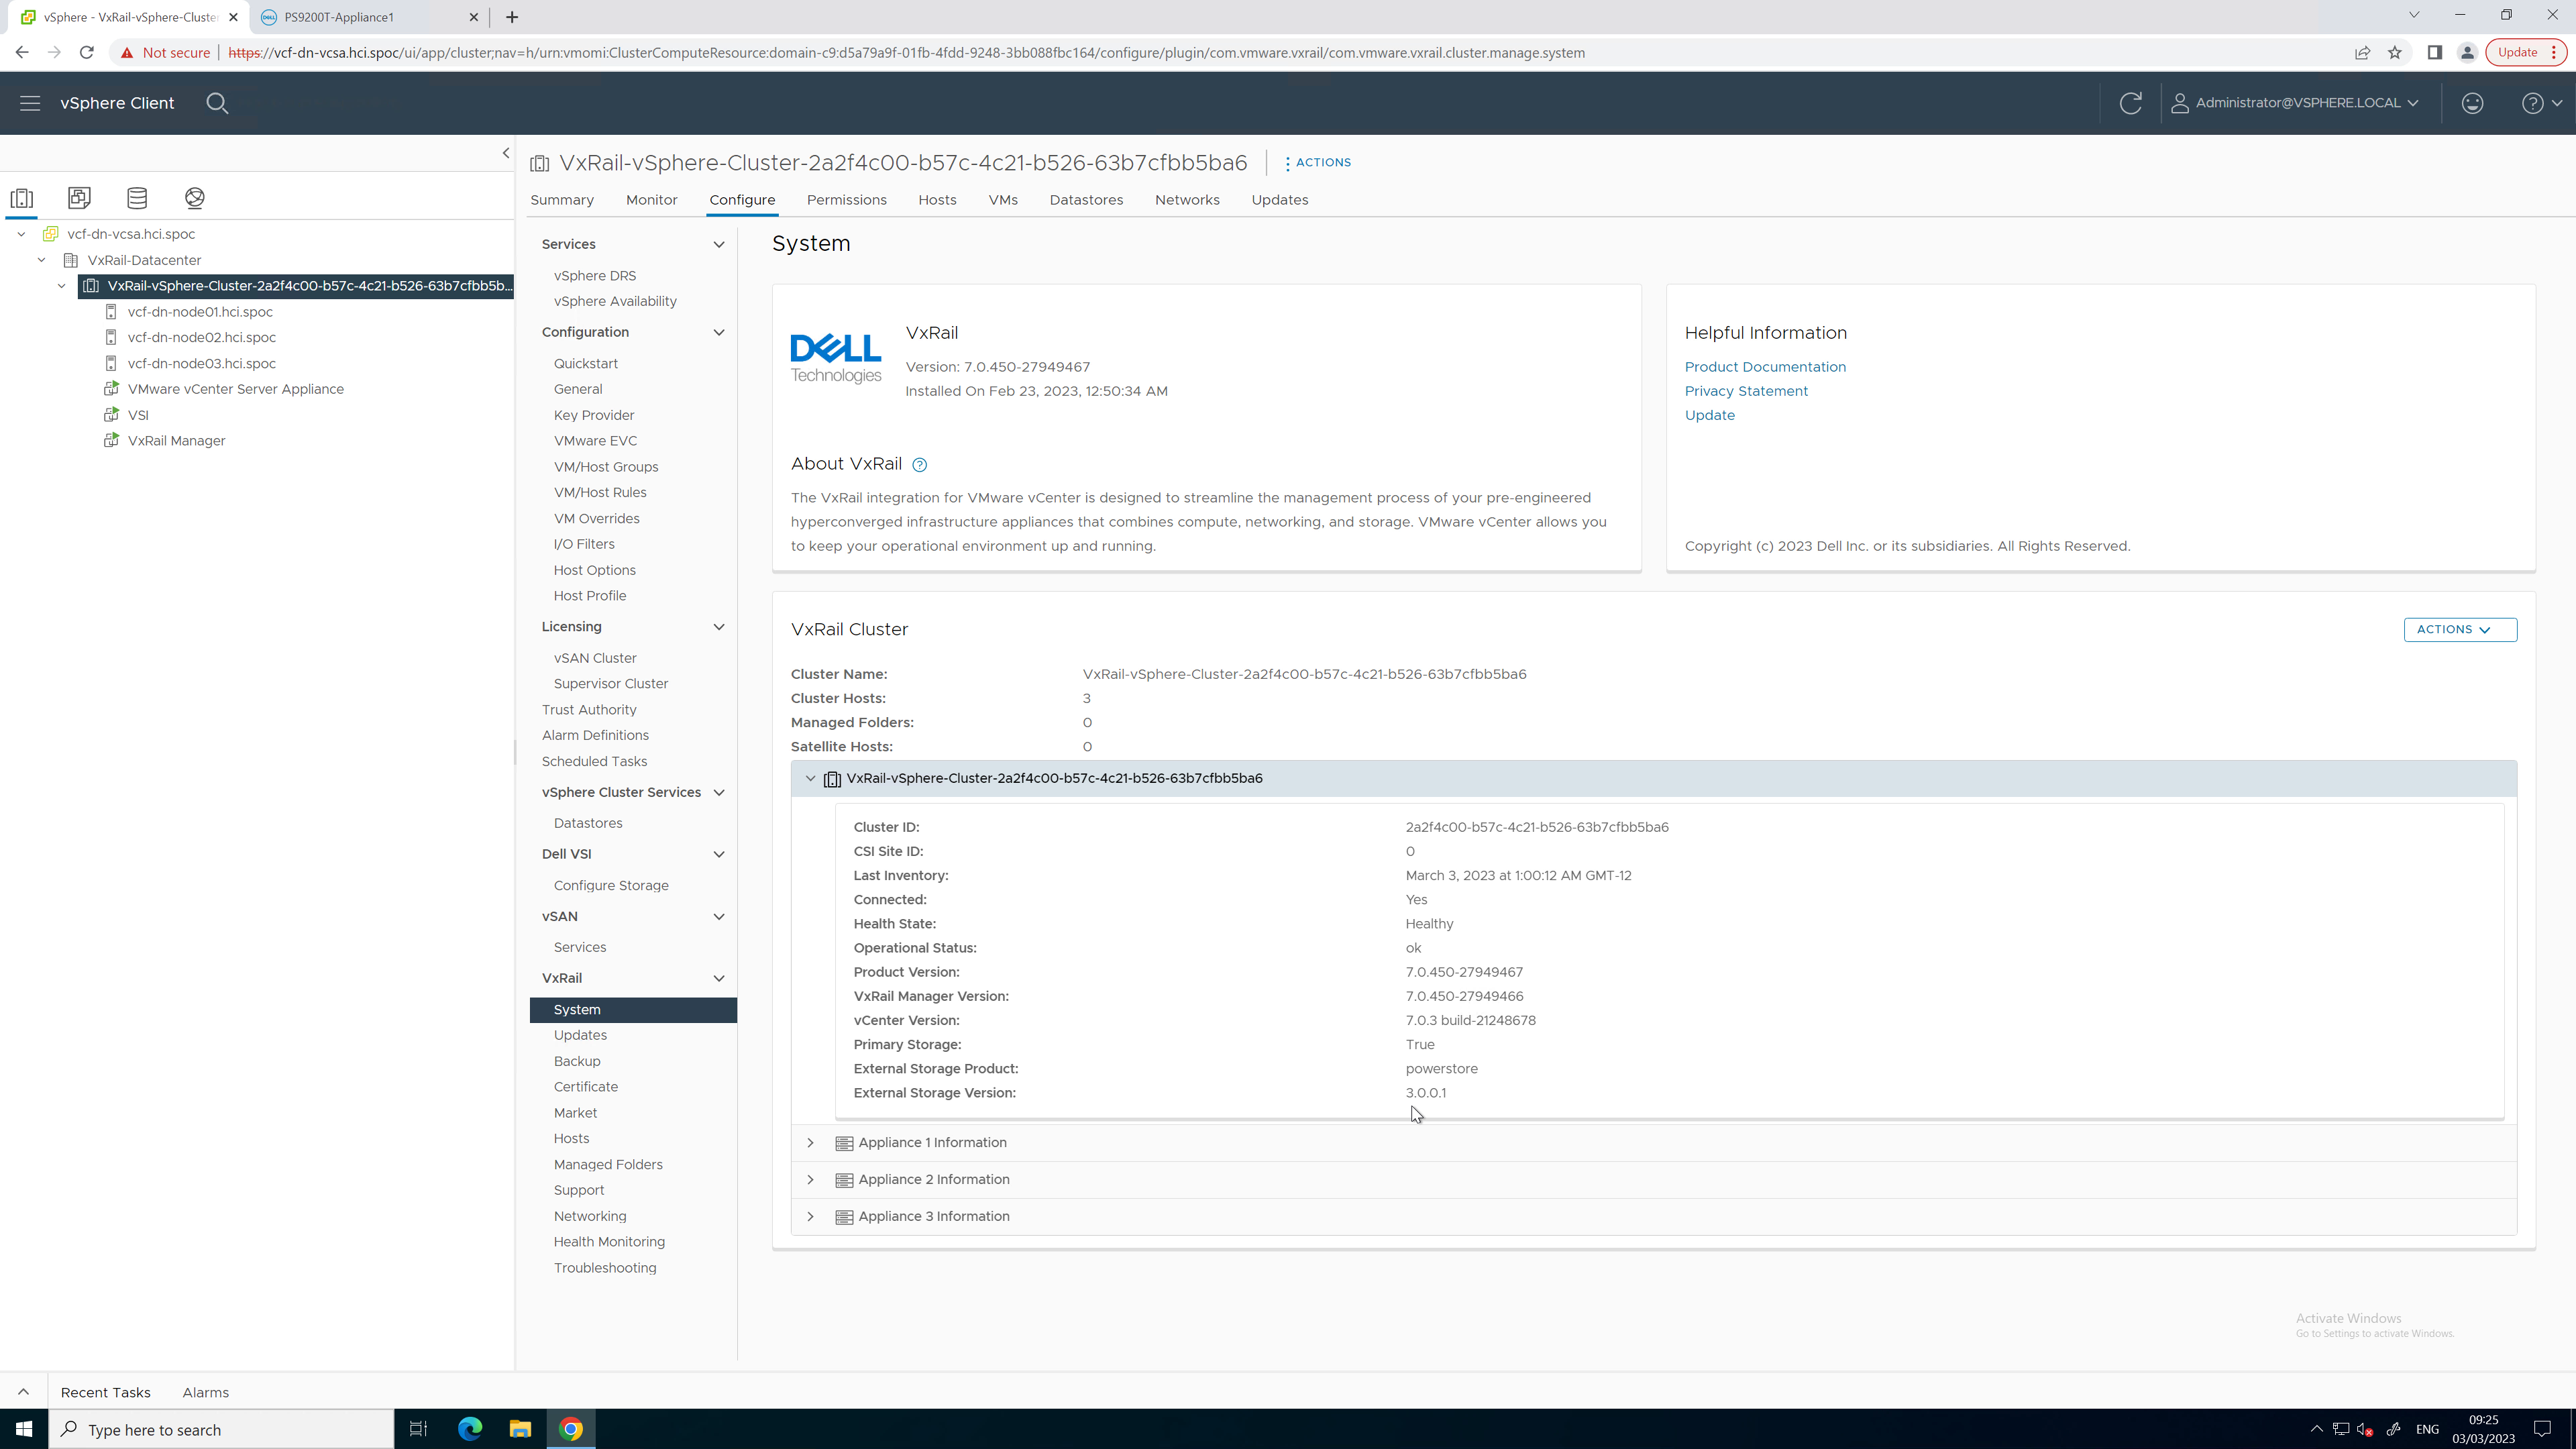
Figure 2. PowerStore code reporting
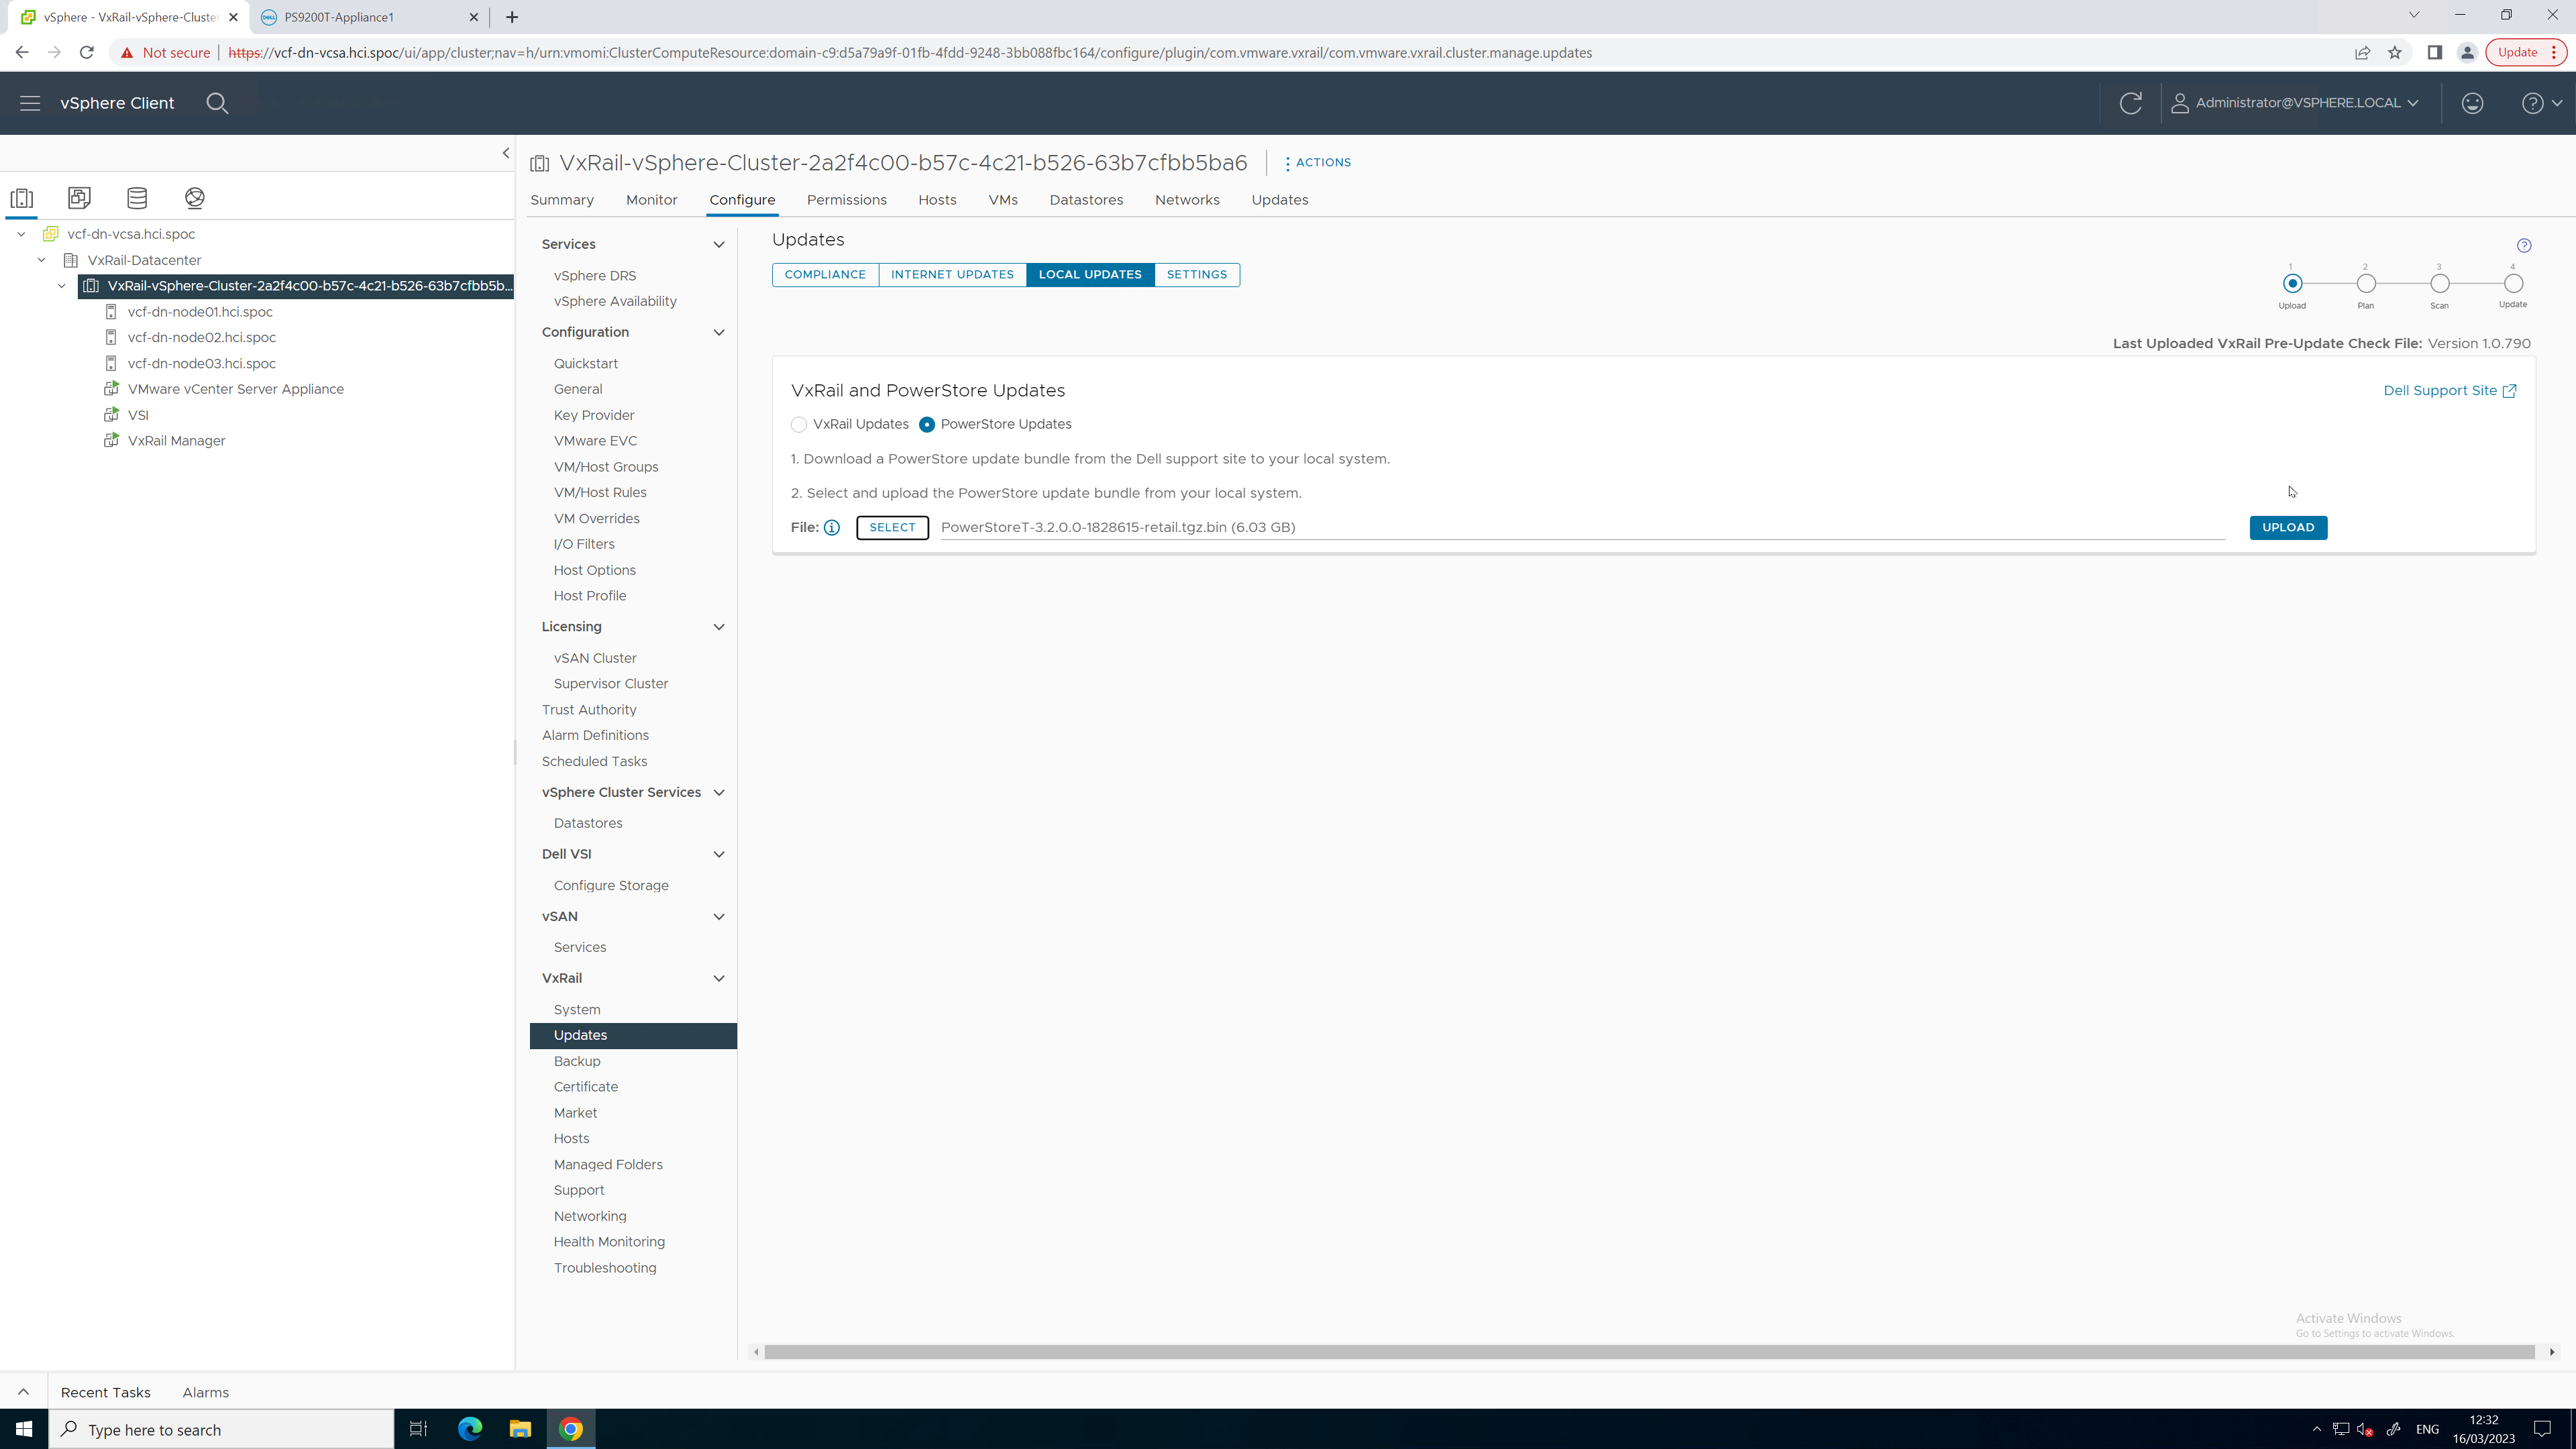
Figure 3. PowerStore code upload
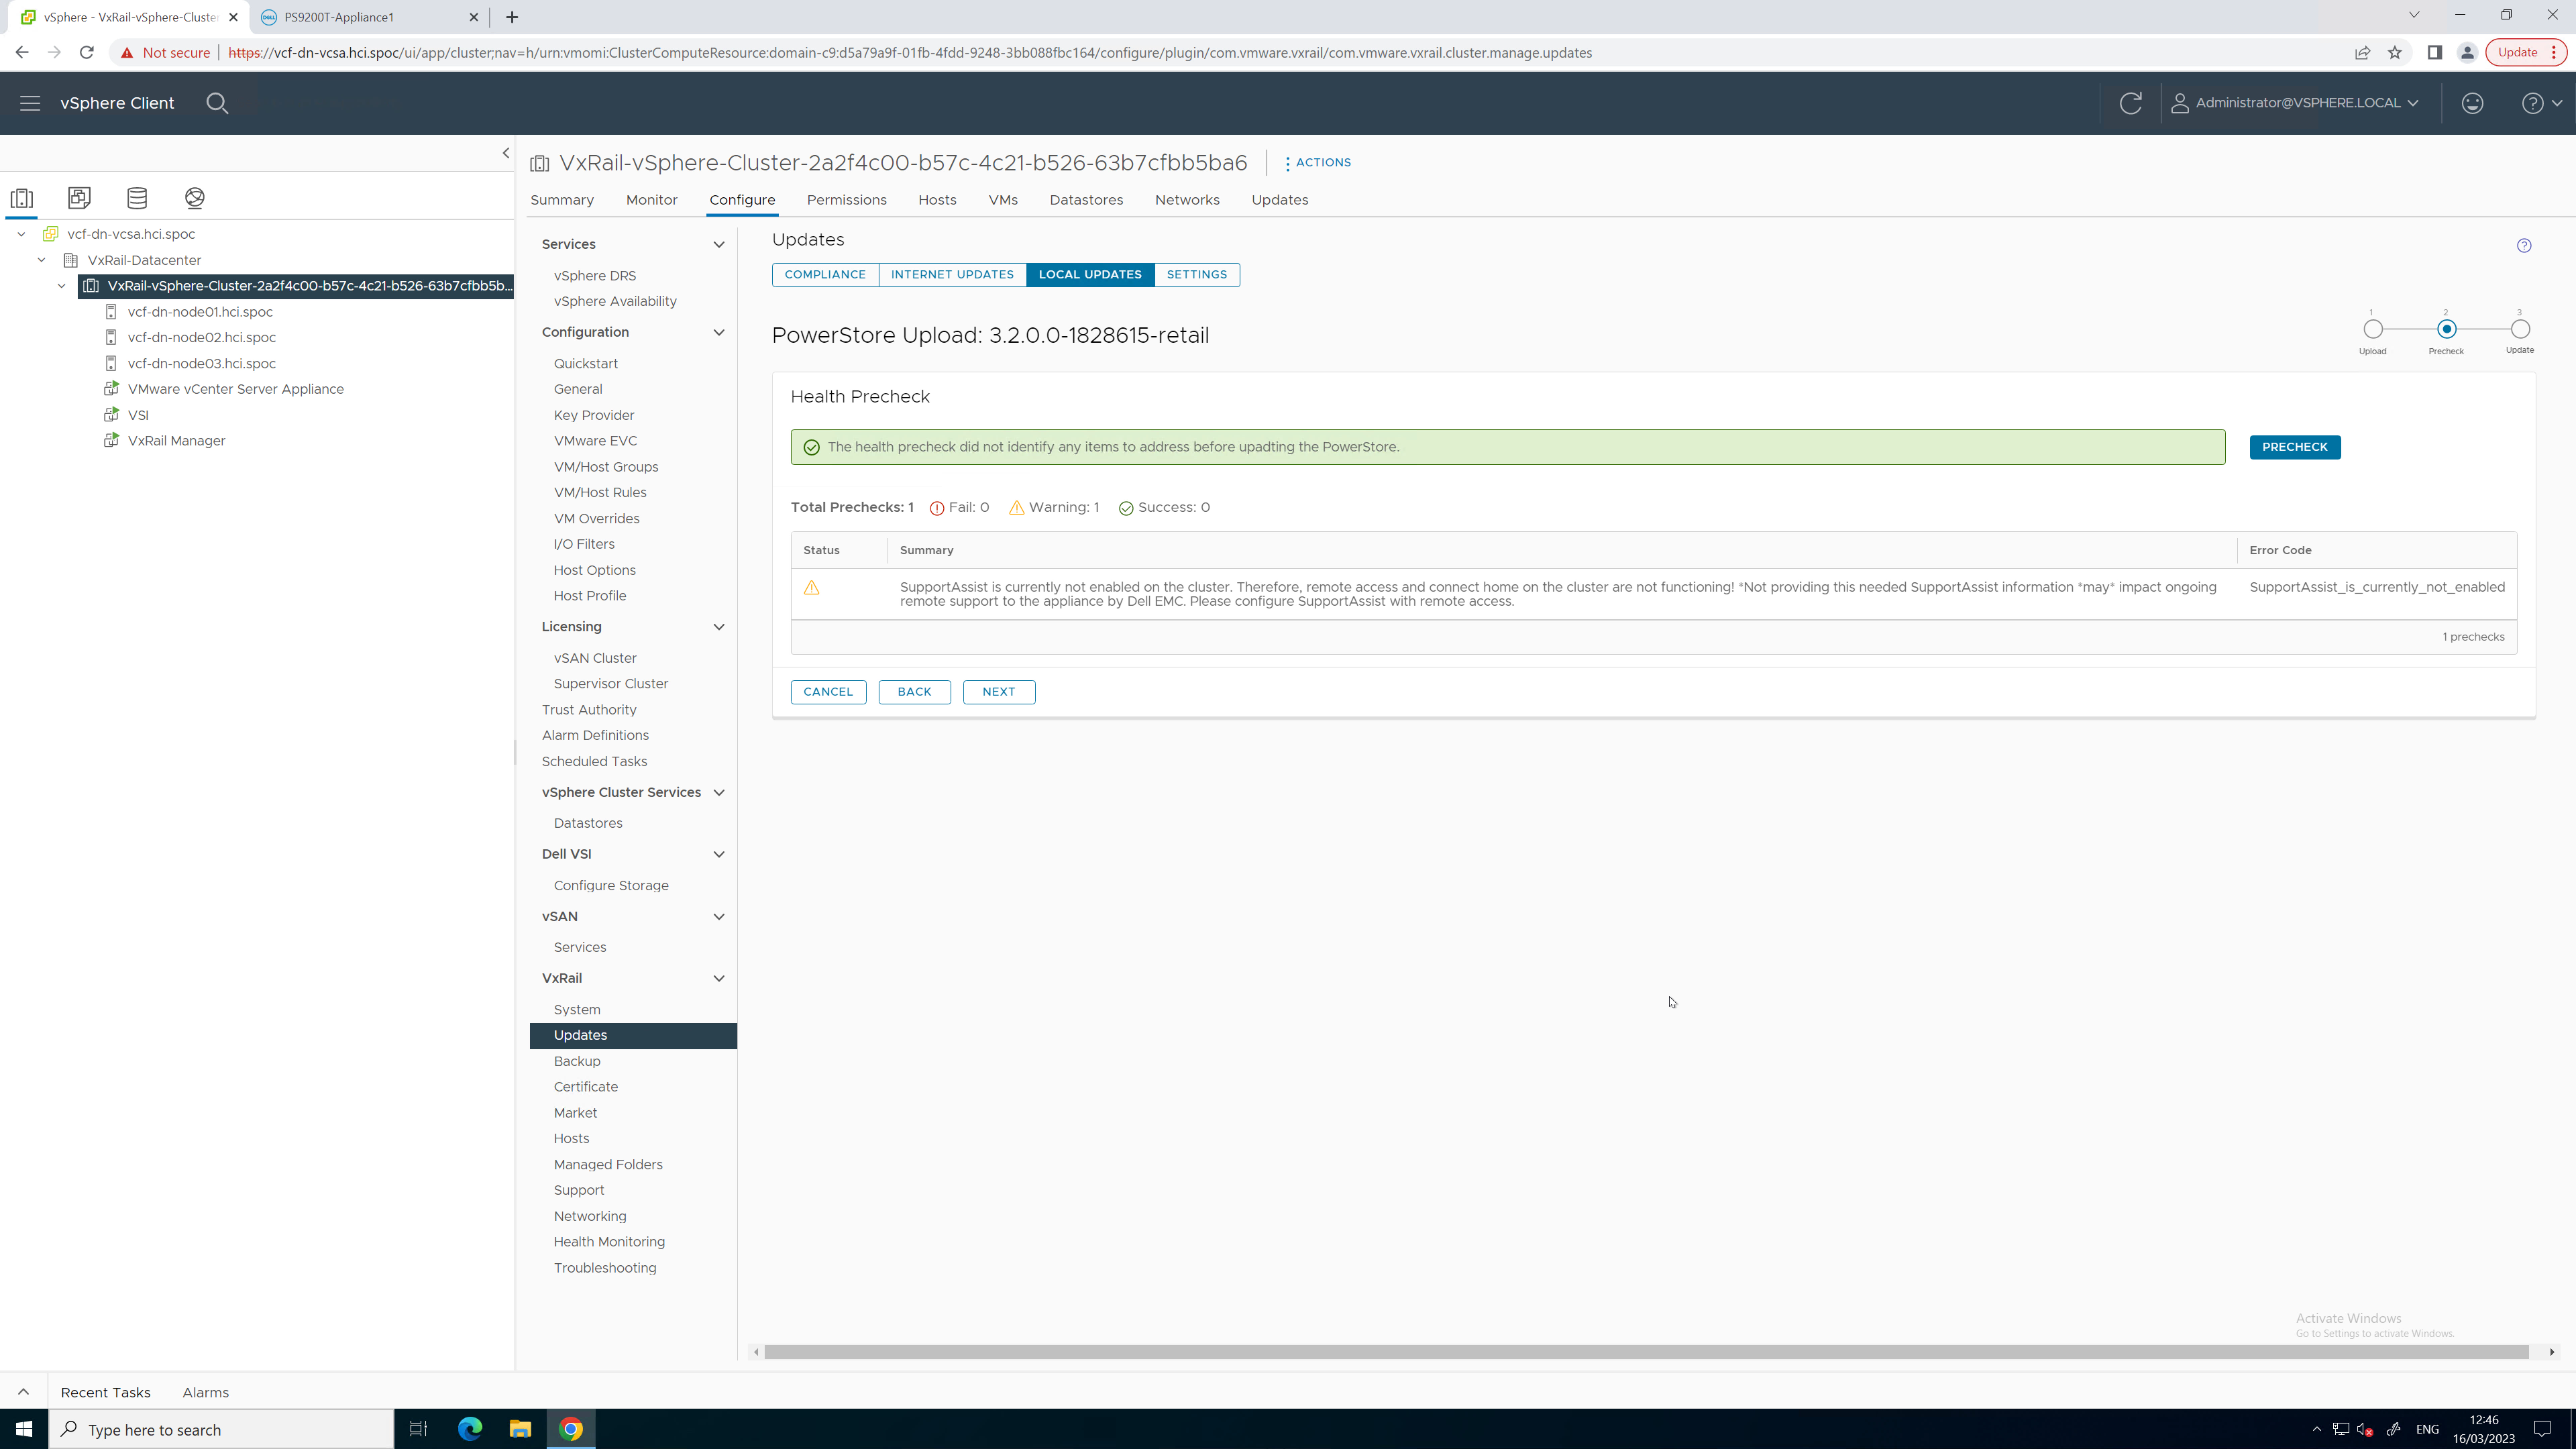
Figure 4. PowerStore Pre-Upgrade Health Check
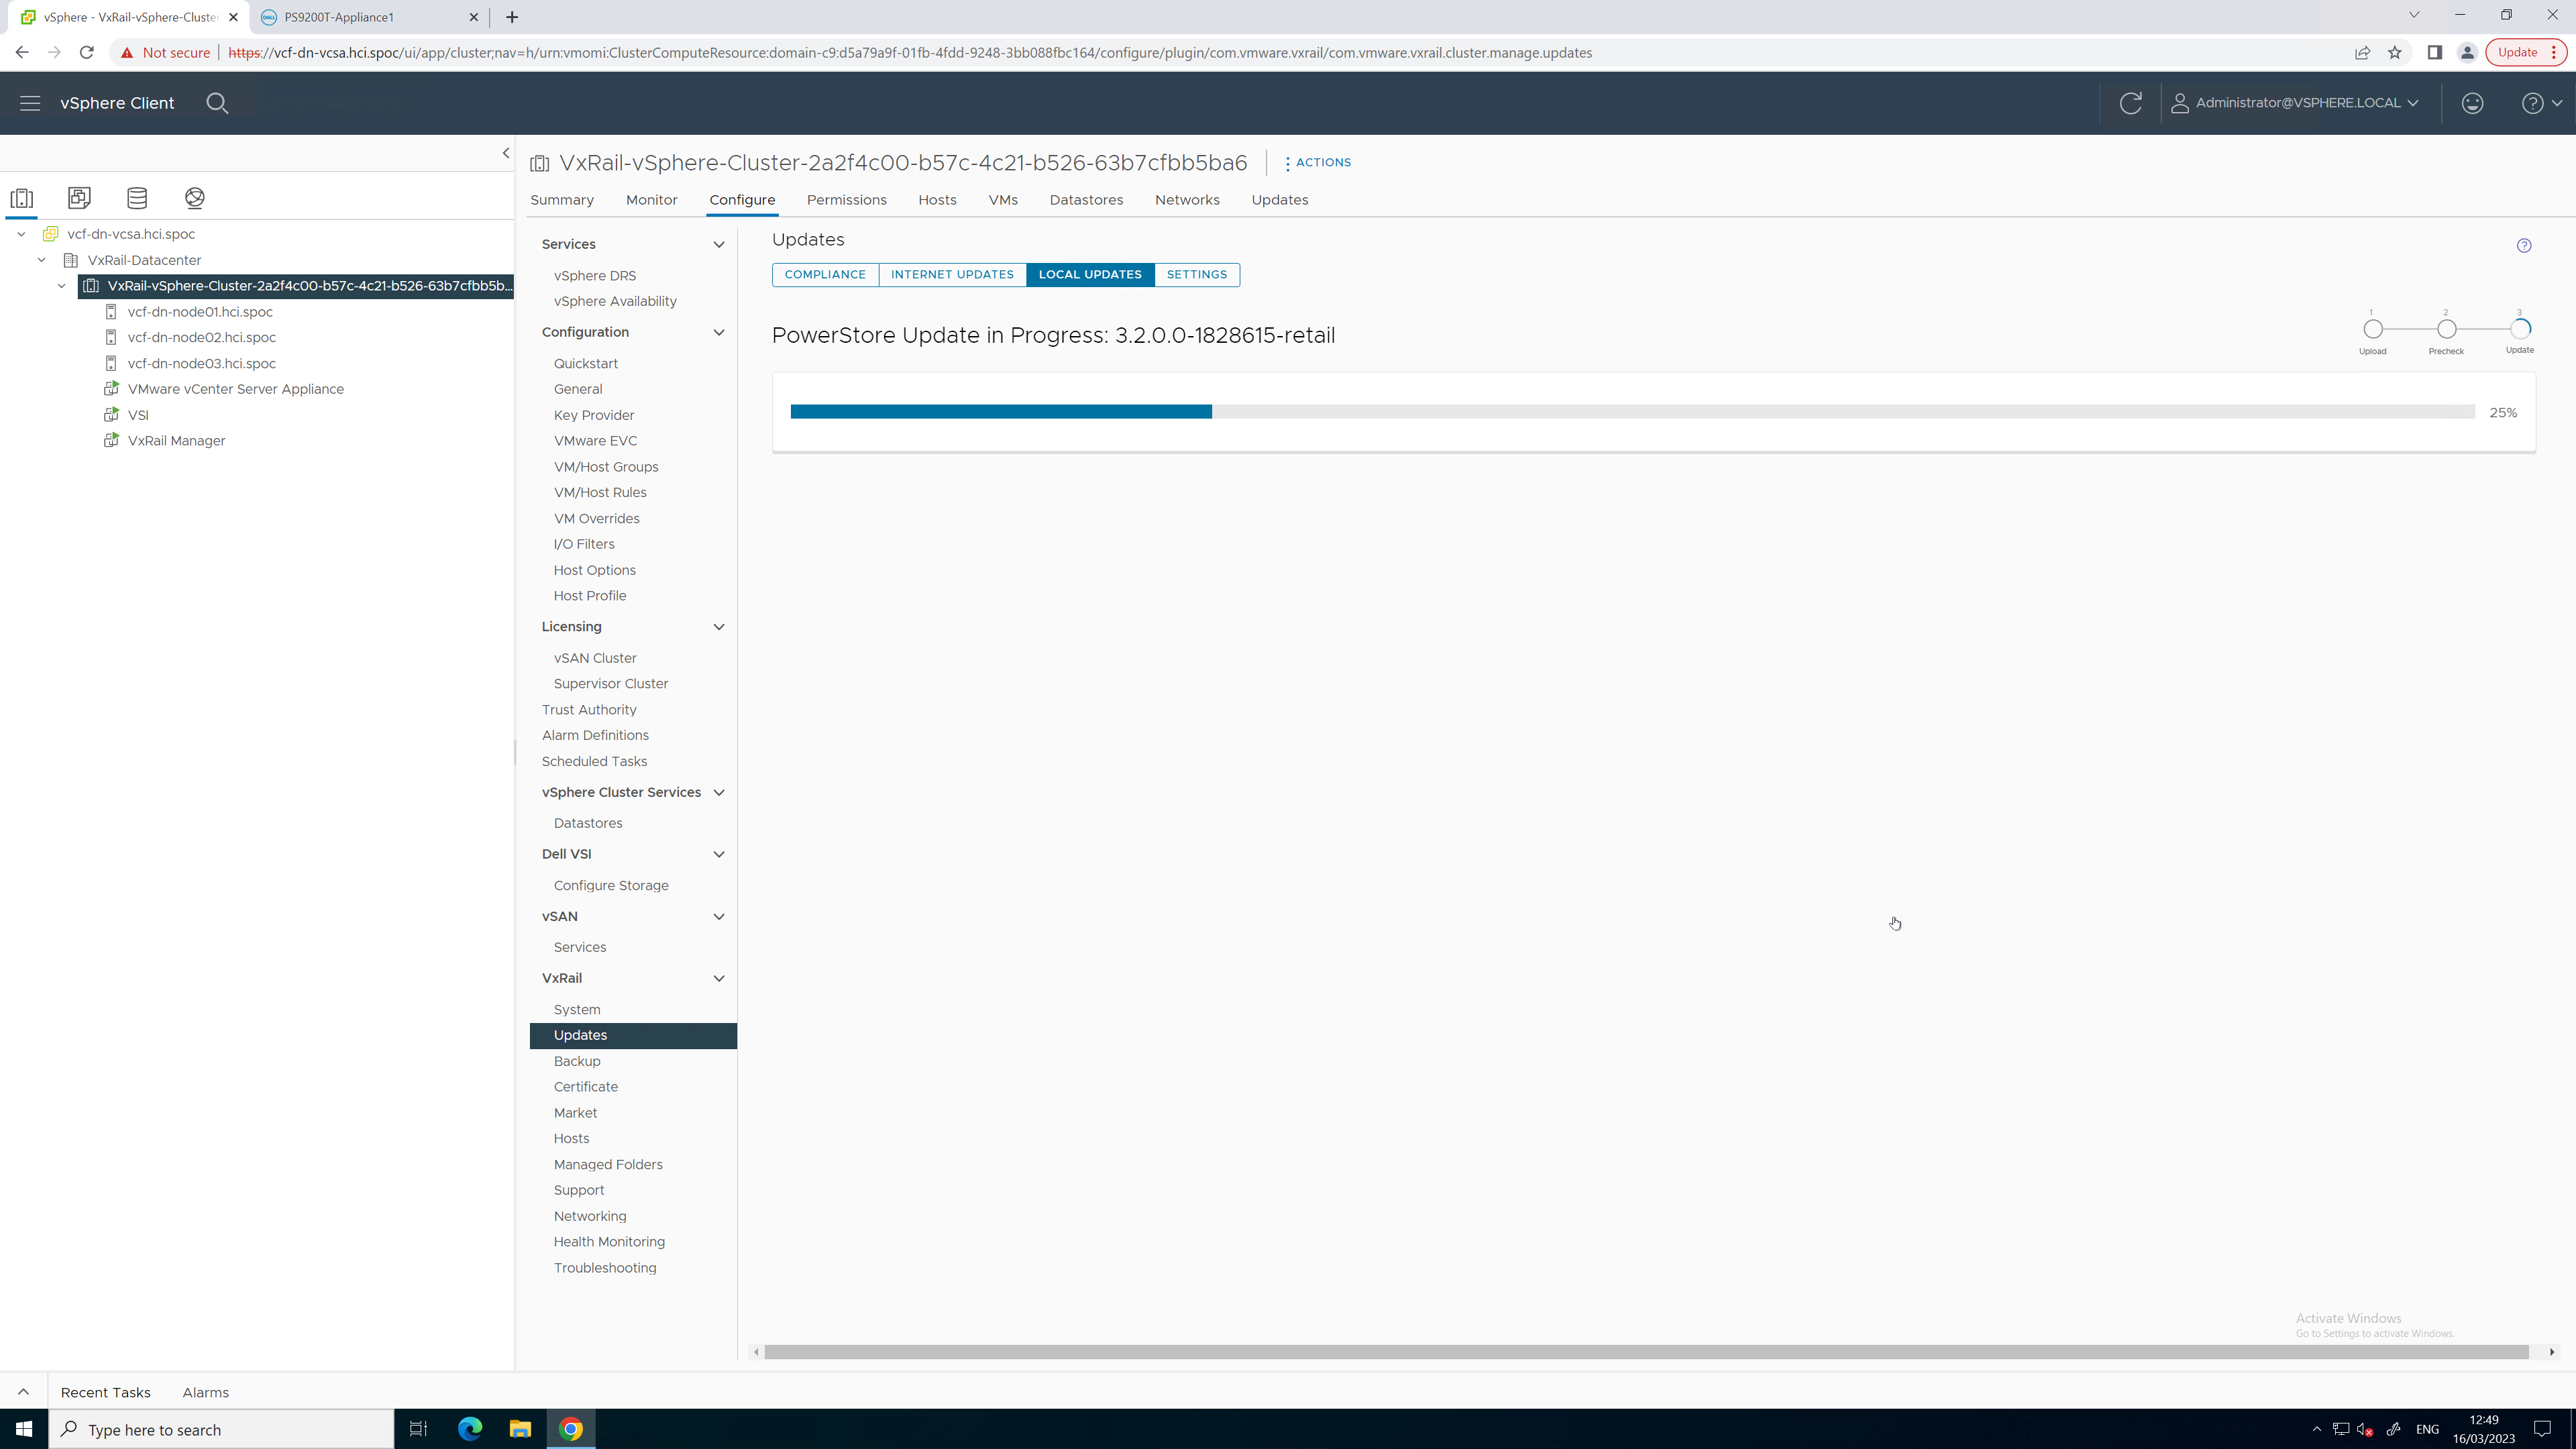
Figure 5. PowerStore upgrade in progress
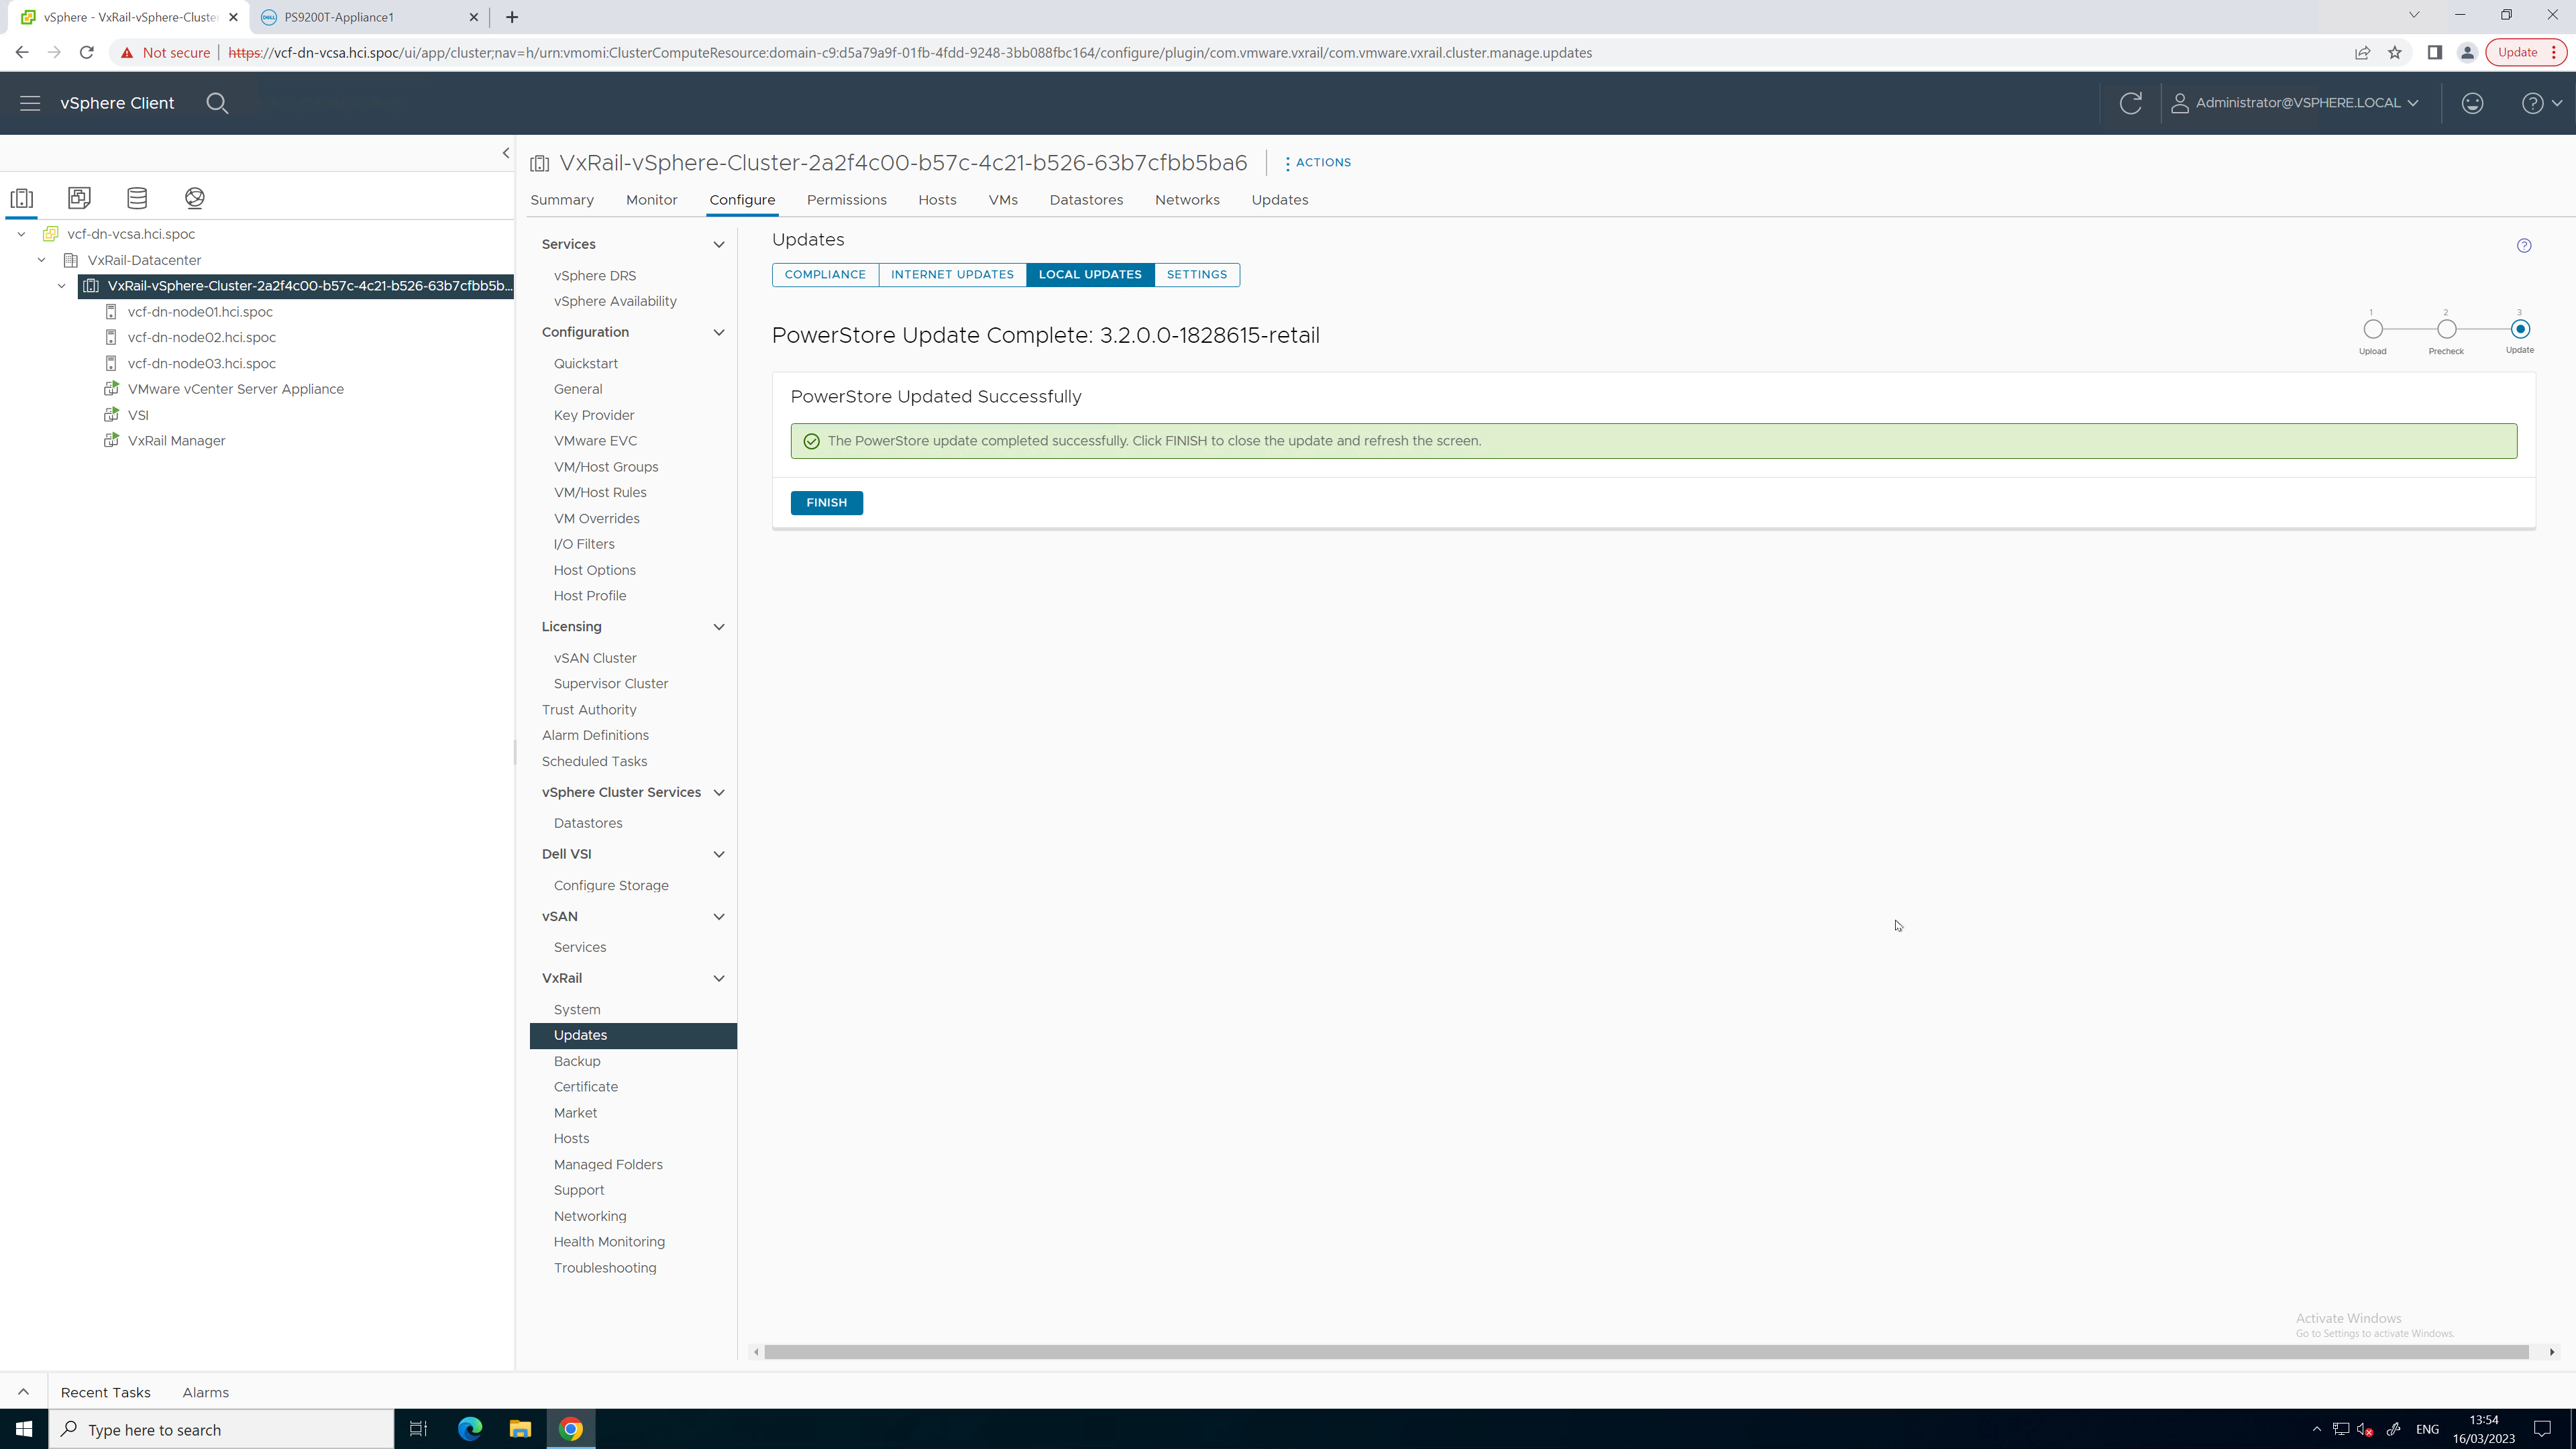
Figure 6. PowerStore upgrade completed successfully
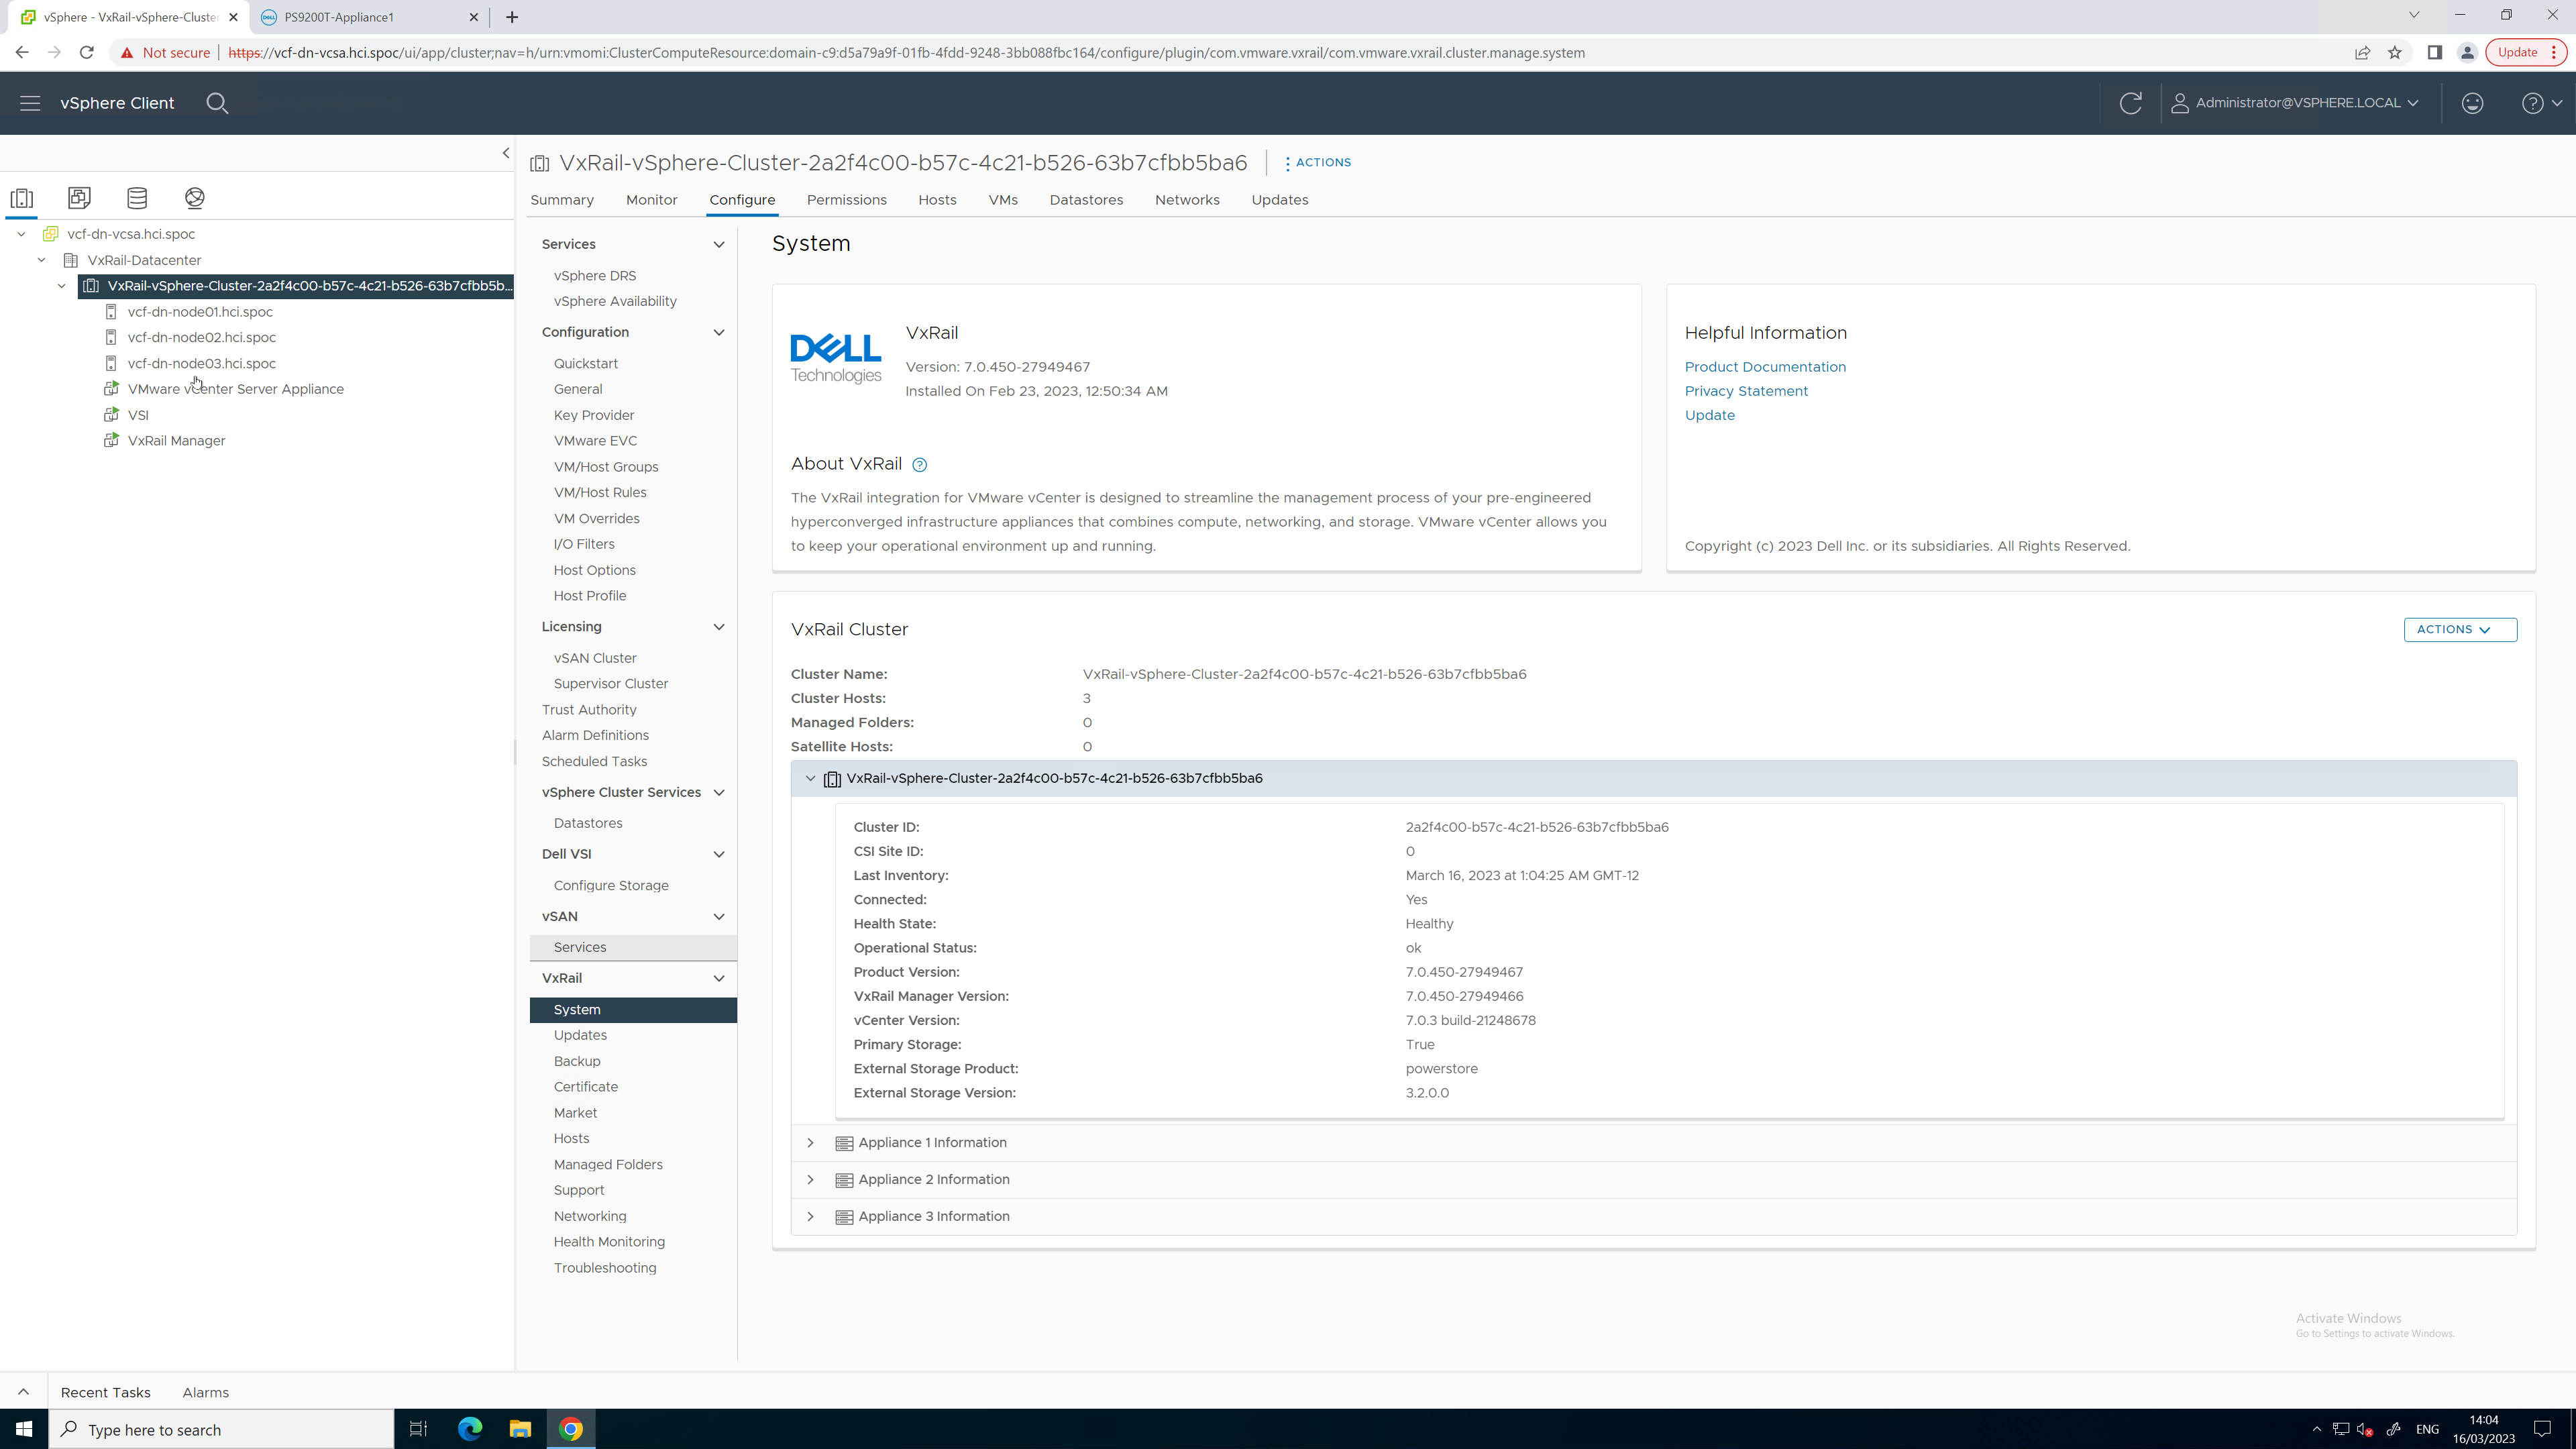
Figure 7. Updated PowerStore code version
To see all these lifecycle management tasks in action from start to finish, refer to this video:
Conclusion
With the addition of lifecycle management for Dynamic AppsON, the number of storage management tasks for which a virtualization and storage administrator has to leave vCenter is reduced. This functionality provides a consistent, common, and efficient management experience for both VxRail and PowerStore. The integration between VxRail, PowerStore, and the VSI plug-in enables consistent workflows and visibility between storage and compute. Better together through Dynamic AppsON, brought to you by Dell VxRail and Dell PowerStore.
Resources
- Dynamic AppsON Lifecycle Management video
- Dynamic AppsON Summary video
- Dynamic AppsON infographic
- Dynamic AppsON: A Better Together Story blog
- Dell VxRail and Dell PowerStore: Better Together Through Dynamic AppsON white paper
- Dell PowerStore: Virtualization Integration white paper
Author: Wei Chen, Technical Staff, Engineering Technologist

PowerStore—The Power of Clustering
Mon, 27 Feb 2023 14:01:20 -0000
|Read Time: 0 minutes
Overview
PowerStore is designed to be a continuously modern storage platform. Its adaptable architecture allows for deploying appliances into a single- or multi-appliance cluster. Configuring a multi-appliance cluster with two to four appliances enables additional powerful functionality that you can be leveraging in your environment today!
PowerStore clustering capabilities are designed to simplify administration, provide integrated intelligence, and add flexibility, enabling multiple appliances to function as a single cohesive system. This blog discusses many of the benefits of deploying a multi-appliance cluster.
Simplicity
Configuring and managing a multi-appliance cluster is designed to be as simple as managing a single appliance. For both single- and multi-appliance clusters, storage administration is accomplished through a single user interface. The HTML5-based PowerStore Manager GUI provides an easy-to-use interface for management actions and monitoring operations that are crucial to an organization’s needs. There is no additional learning curve to manage your multi-appliance cluster.

Many PowerStore objects, such as protection policies, remote systems, vCenter and VASA provider connections, vVol storage containers, and hosts, exist at the cluster level. These objects can be used on all appliances, regardless of the size of the cluster. This alleviates the need to repeat operations on each appliance in the cluster.
For example, host registration for volume access needs to be completed just once. Hosts can be configured to have active initiators to one, some, or all appliances within the cluster, depending on your access requirements. This also enables volumes to be migrated between appliances within the cluster without any added management overhead. This can be used in situations such as if an appliance runs low on capacity, and when making service level changes, consolidating workloads, and more.
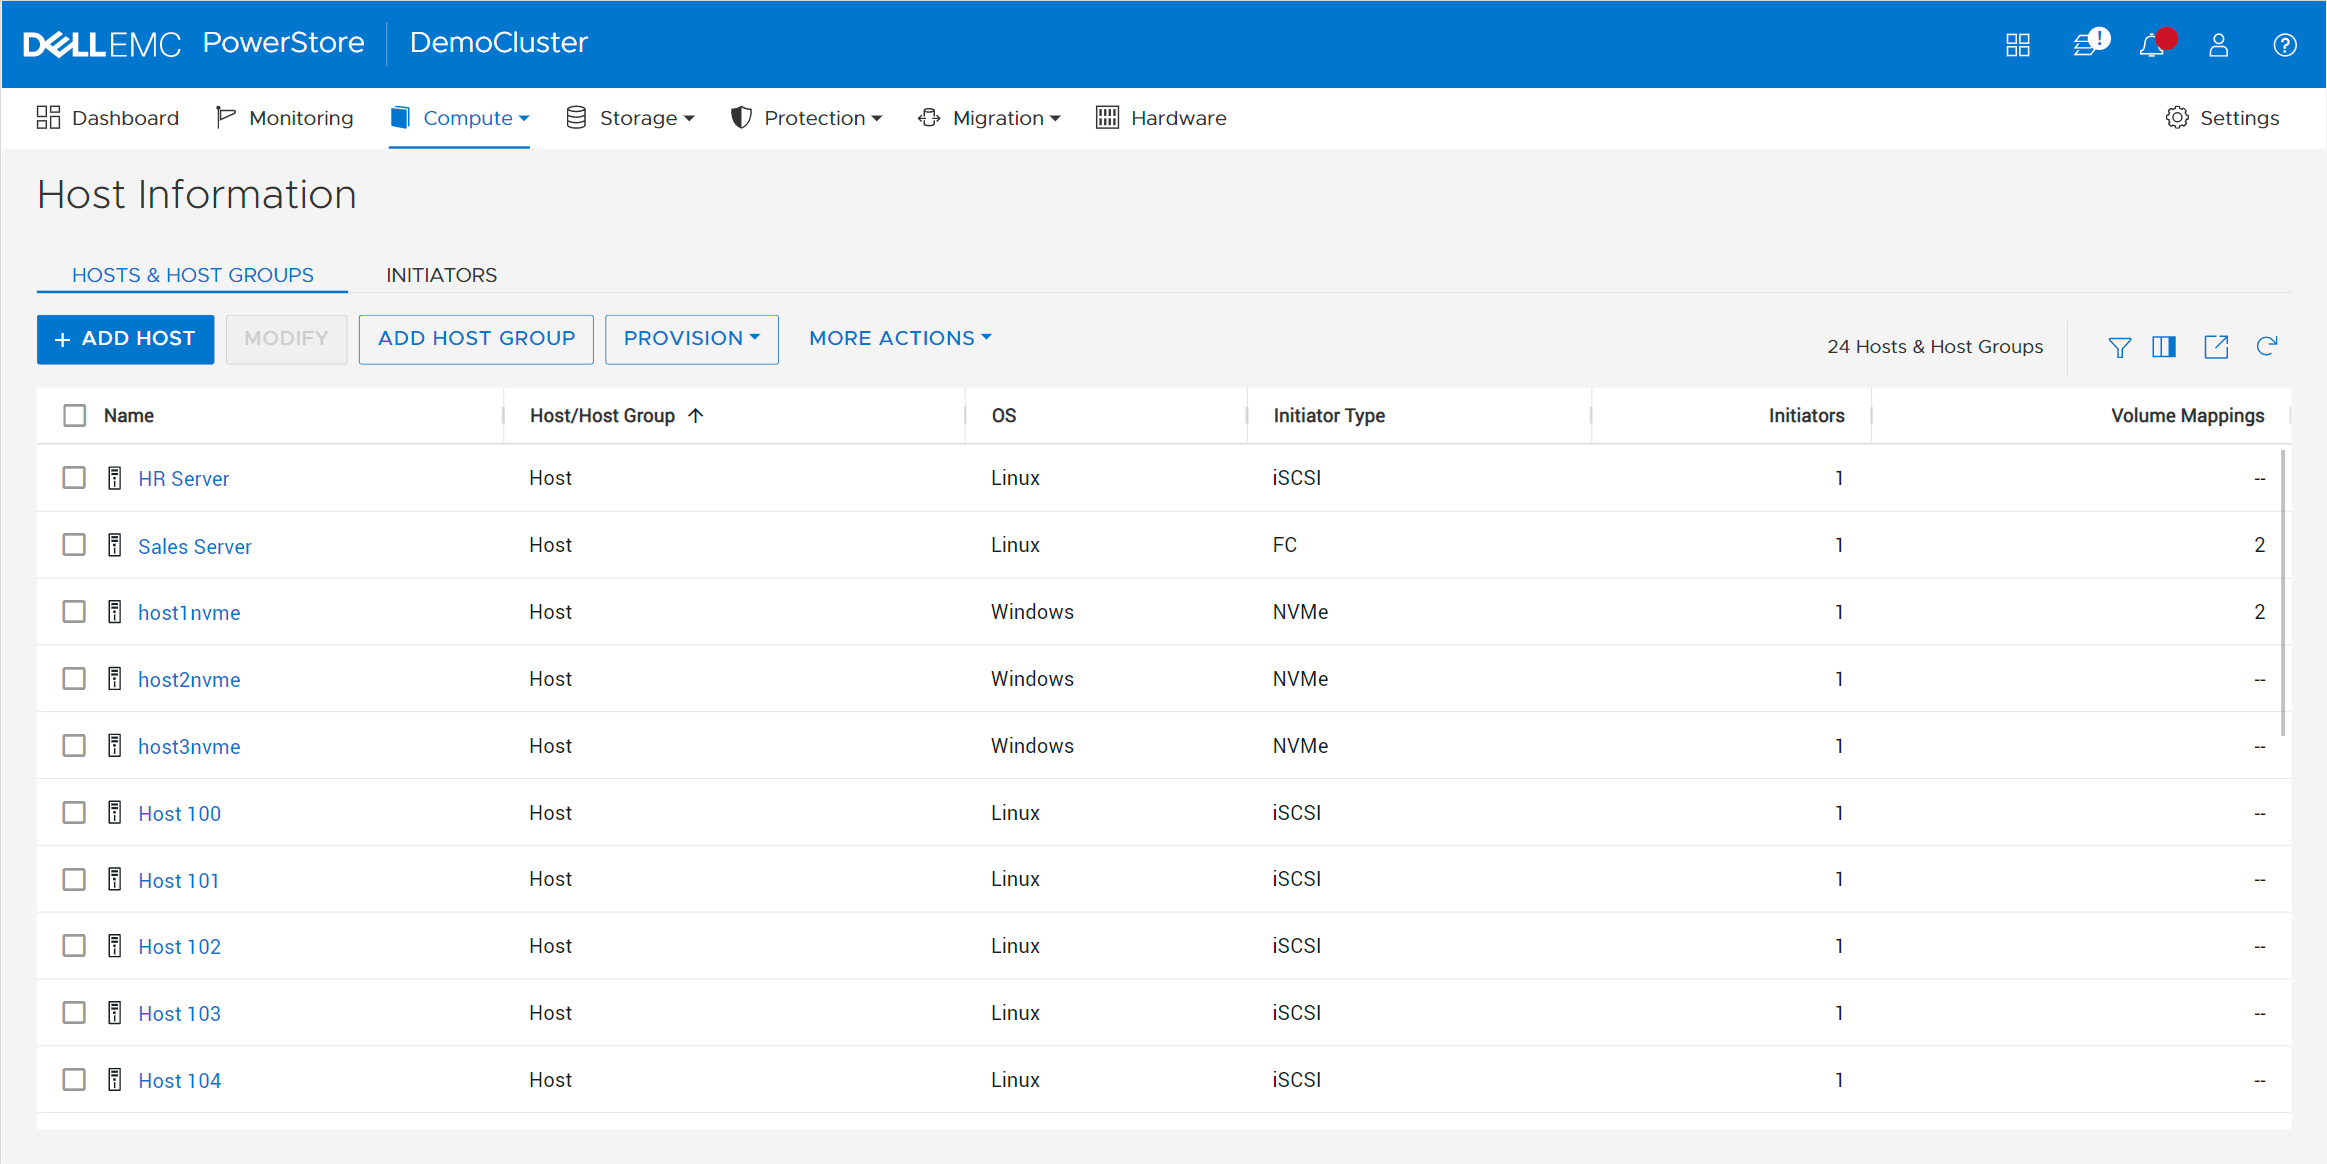
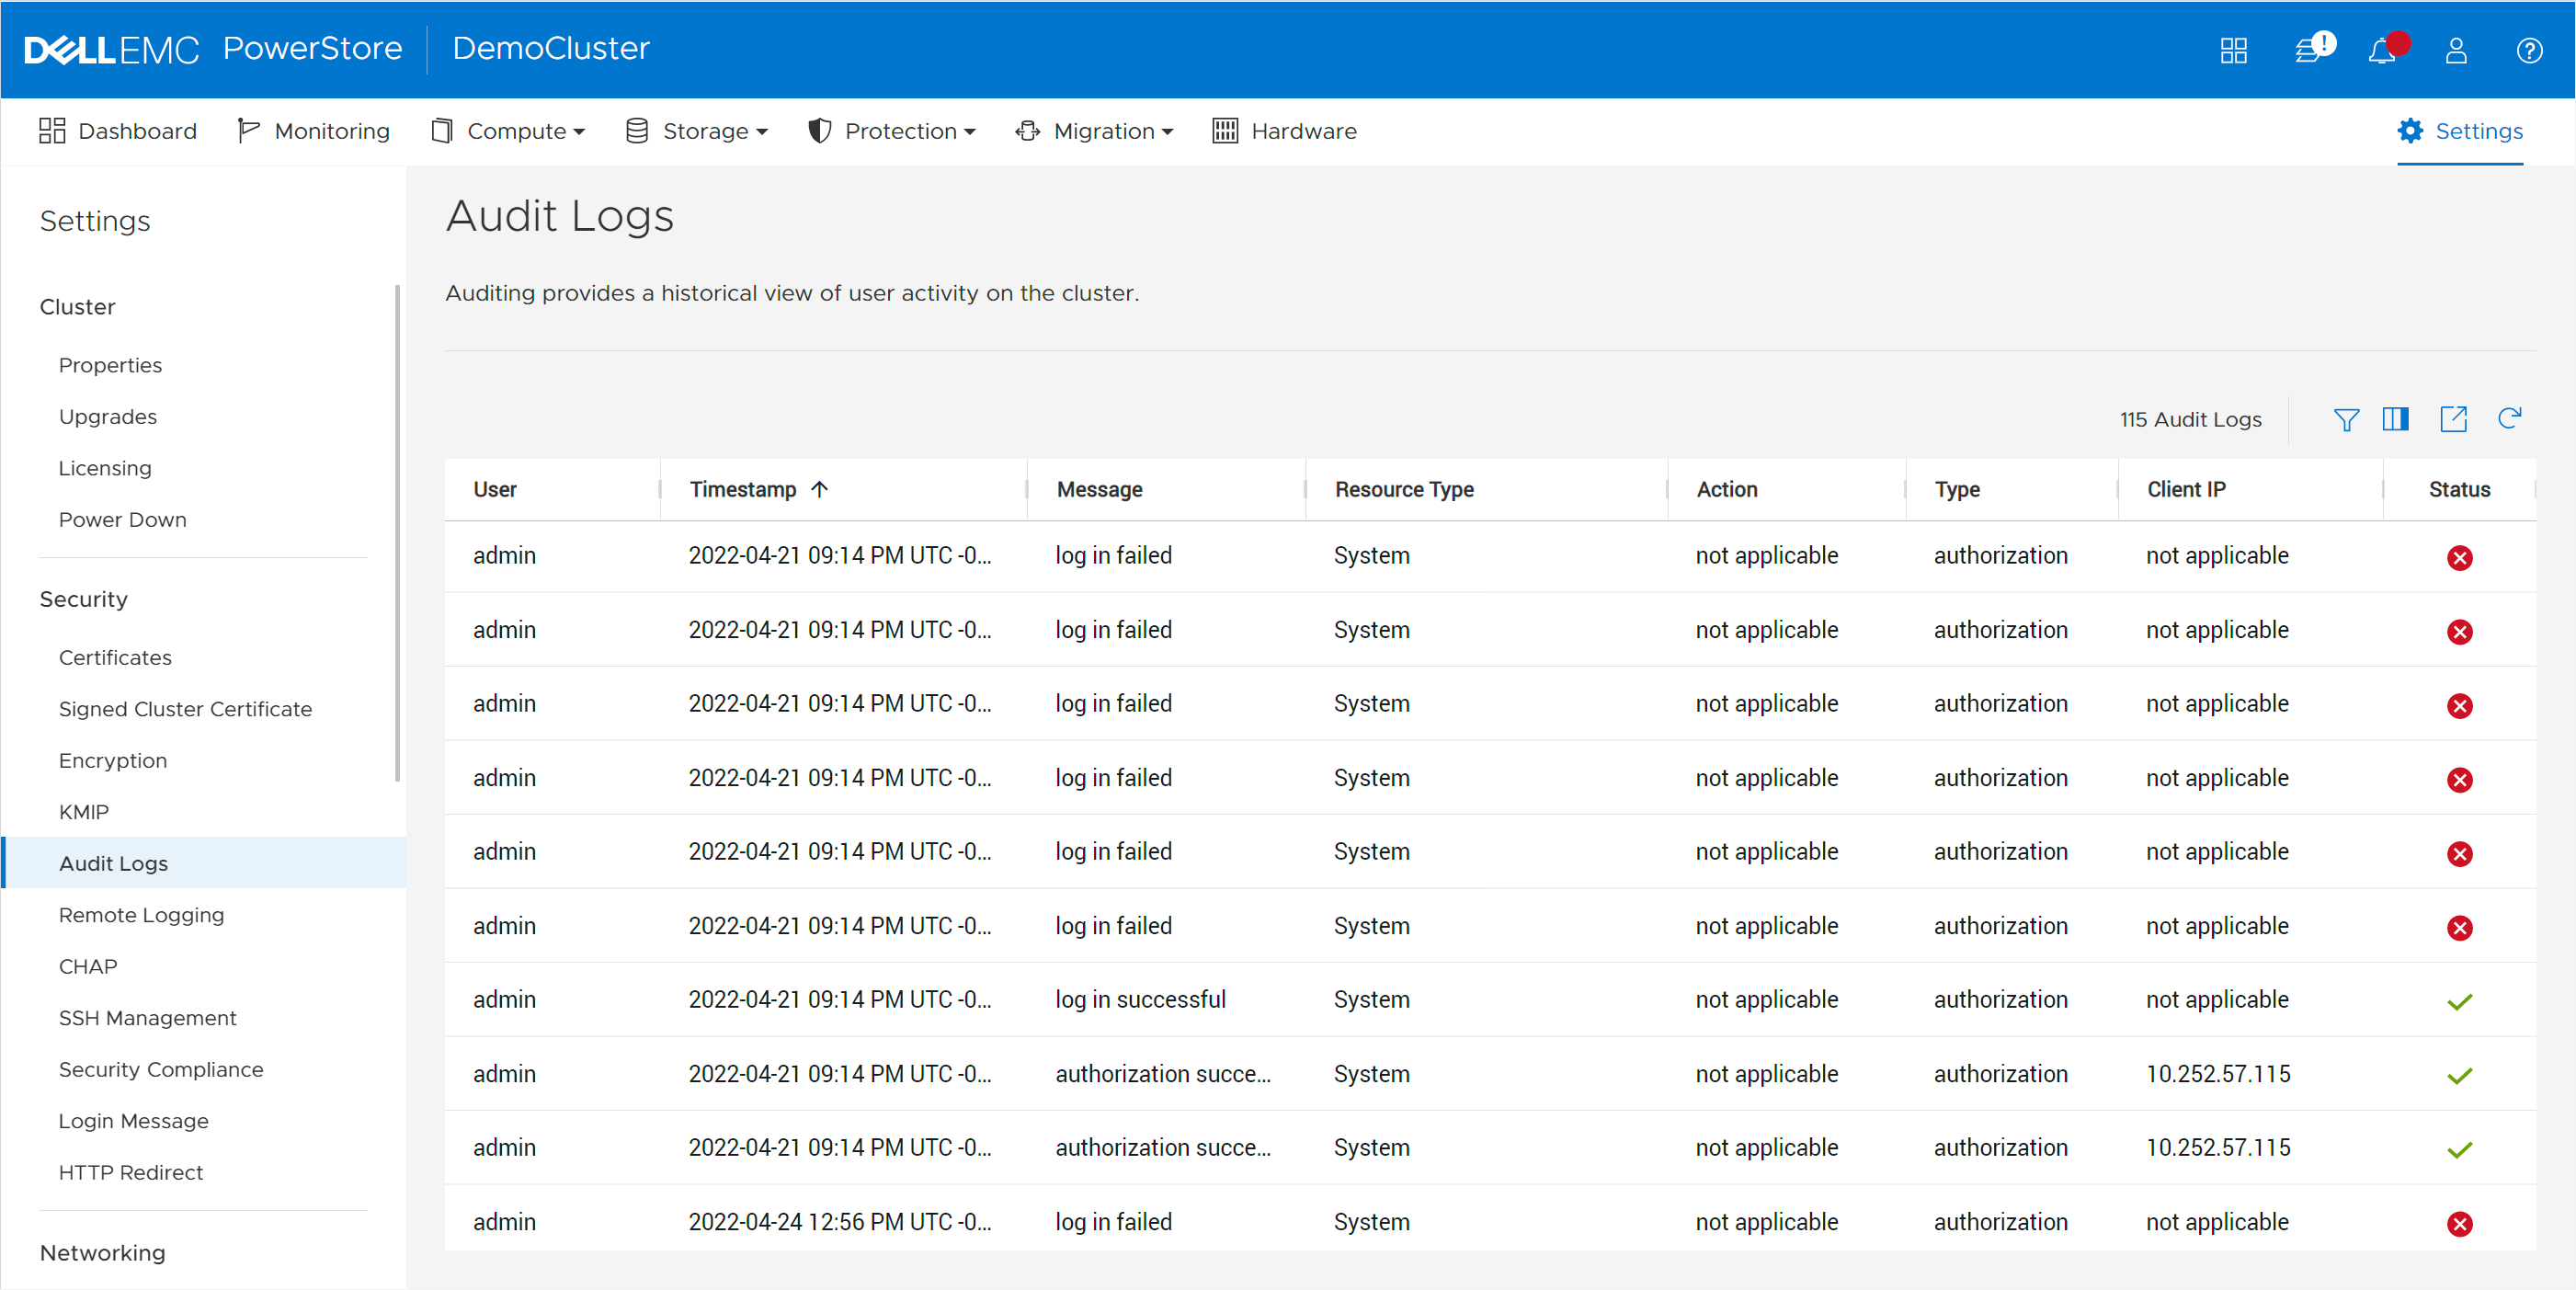
Most settings are also applied at the cluster level. These include PowerStoreOS code upgrades, security settings, network settings, user management, support materials, and more. Alerts, events, jobs, and audit logs are consolidated into a centralized area for all appliances in the cluster, eliminating the need to monitor each appliance individually. Performance and capacity metrics are available at the cluster, appliance, and resource levels. This provides the administrator with multiple levels of granularity needed for different tasks.
In multi-appliance configurations, each appliance has its own set of initiators for volume access. This level of granularity enables the highest level of control, providing the flexibility to connect specific hosts to specific appliances. However, if you want to connect a host to all appliances, you don’t need to go through the tedious effort of connecting to each appliance individually. PowerStore offers the option to configure a Global Storage Discovery IP address. This is a single, global, floating storage IP address that can be used to discover all paths for all the appliances in the cluster.
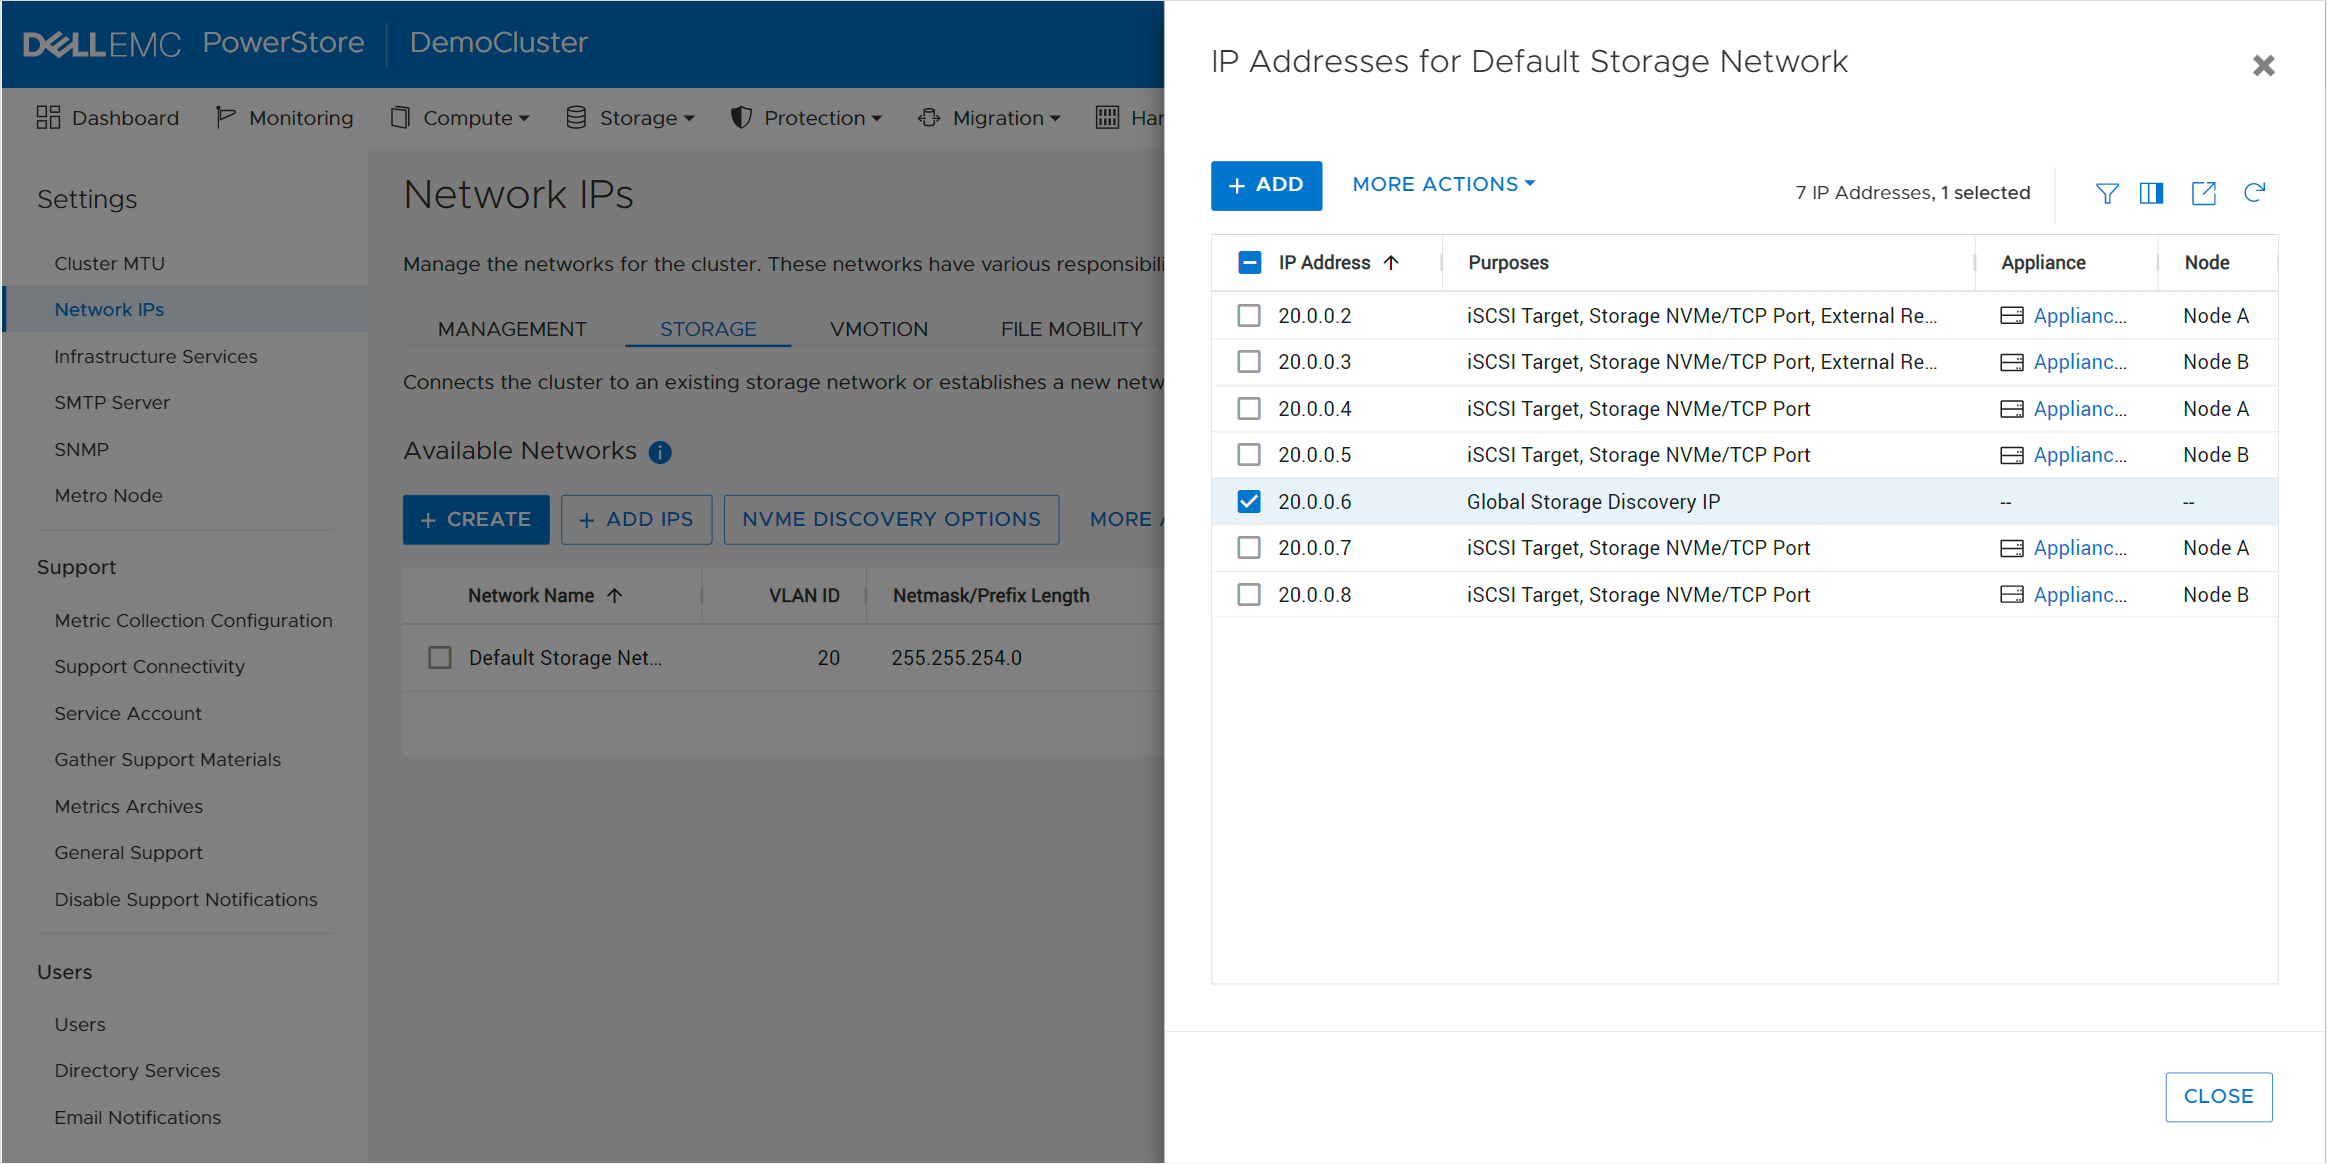
Intelligence
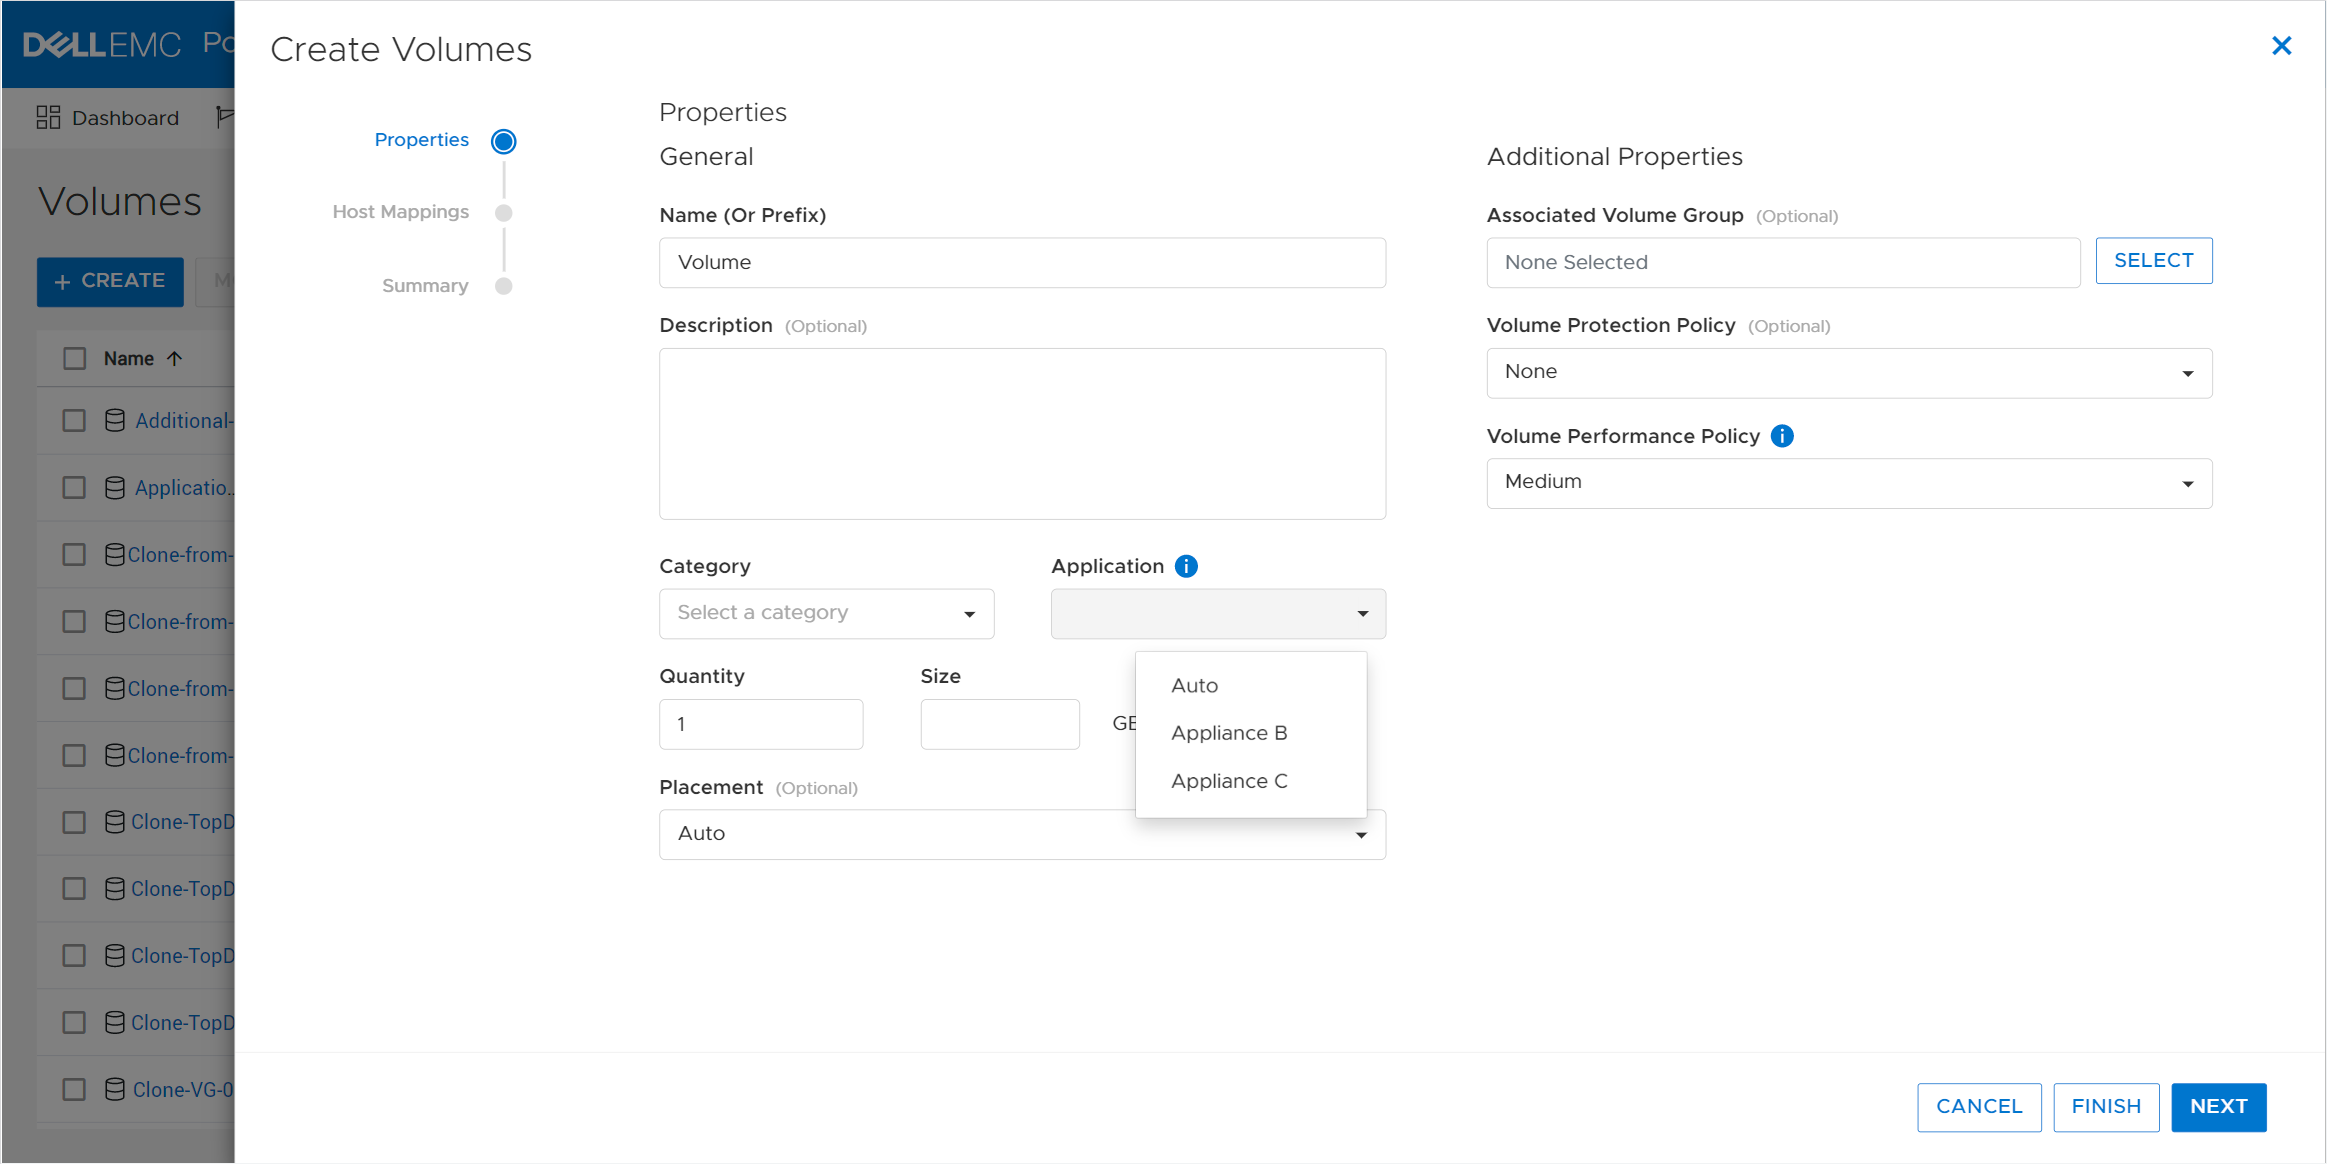
PowerStore includes integrated intelligence that is used to determine the initial placement of a new volume. This is known as the Resource Balancer, which is designed to streamline operations with an integrated machine-learning engine and seamless automation. Resource Balancer works at both the cluster and appliance levels. When a volume is provisioned, the default selection for placement is “Auto.” This setting allows the Resource Balancer to determine the best appliance for the new volume, depending on capacity metrics and configured host access. You can always maintain full control of volume placement by selecting a specific appliance for the volume as well.
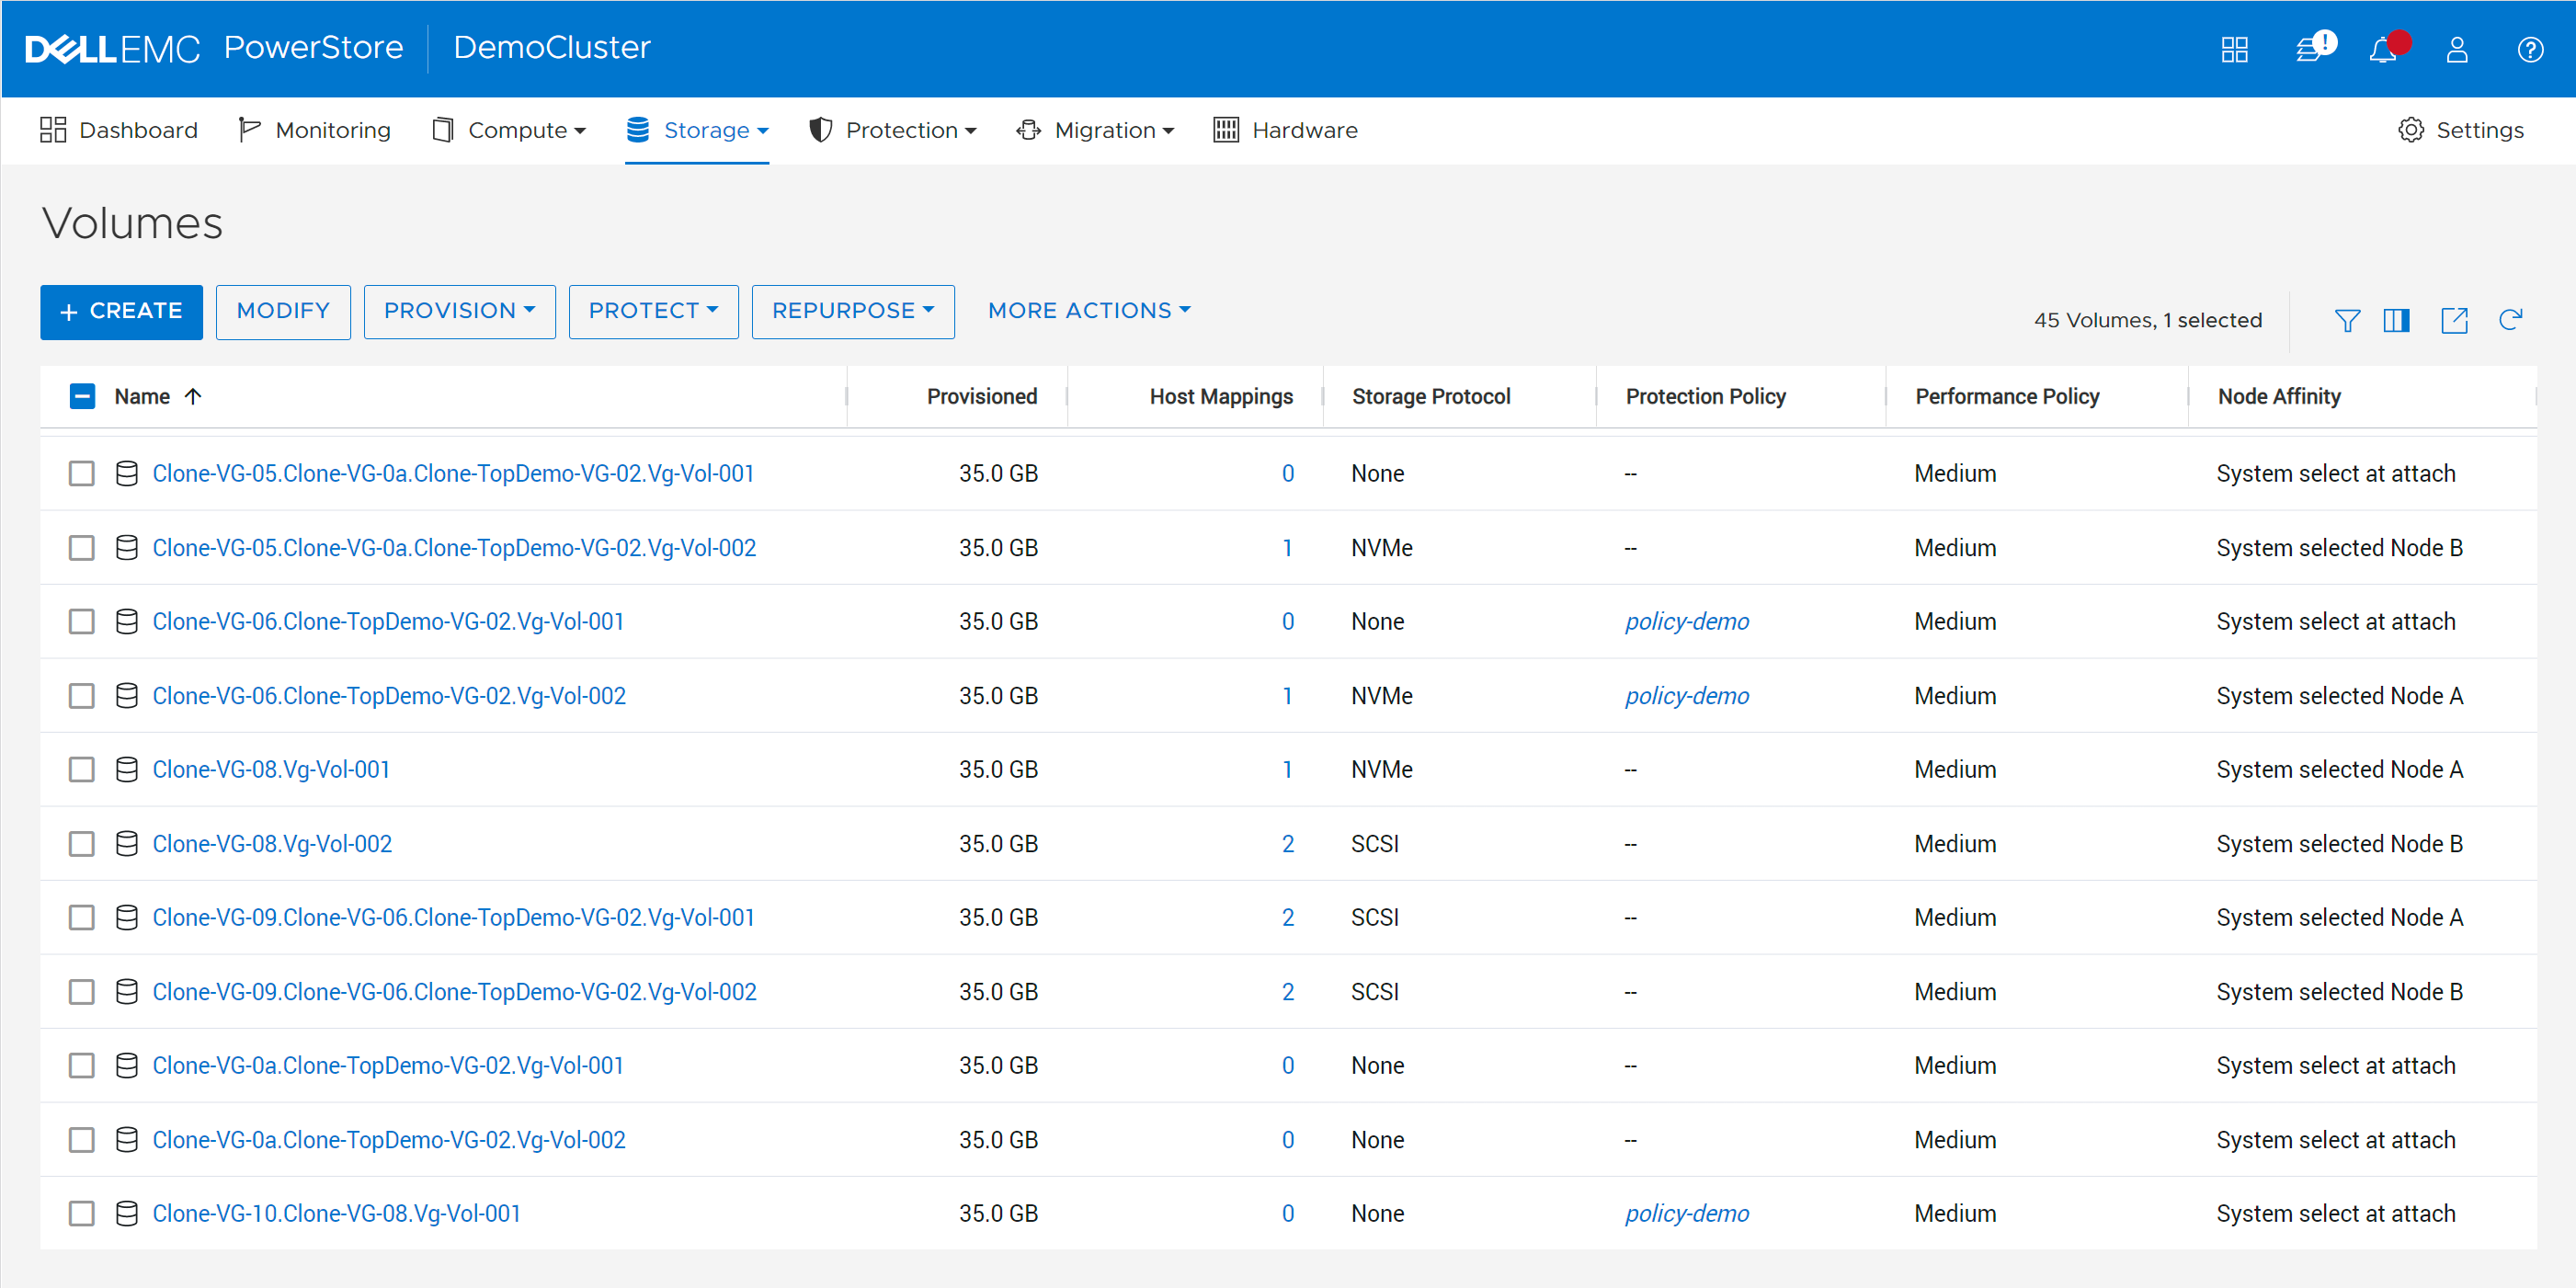
The PowerStore active/active architecture means that volumes can always be accessed through both nodes of an appliance. When a volume is attached to a host, Resource Balancer also selects which node within the appliance to advertise as optimized for host access to that volume. This is known as node affinity. It enables both nodes within the appliance to actively service I/O simultaneously to multiple volumes, so all available hardware is efficiently utilized.
Workload characteristics might evolve over time and cause imbalances between nodes within an appliance. PowerStore features dynamic node affinity, which enables automatic balancing of node affinity of block storage resources between nodes. Dynamic node affinity allows the system to maintain relatively consistent utilization, latency, and performance between both nodes of an appliance. This intelligent architecture enables both seamless load-balancing and high availability.
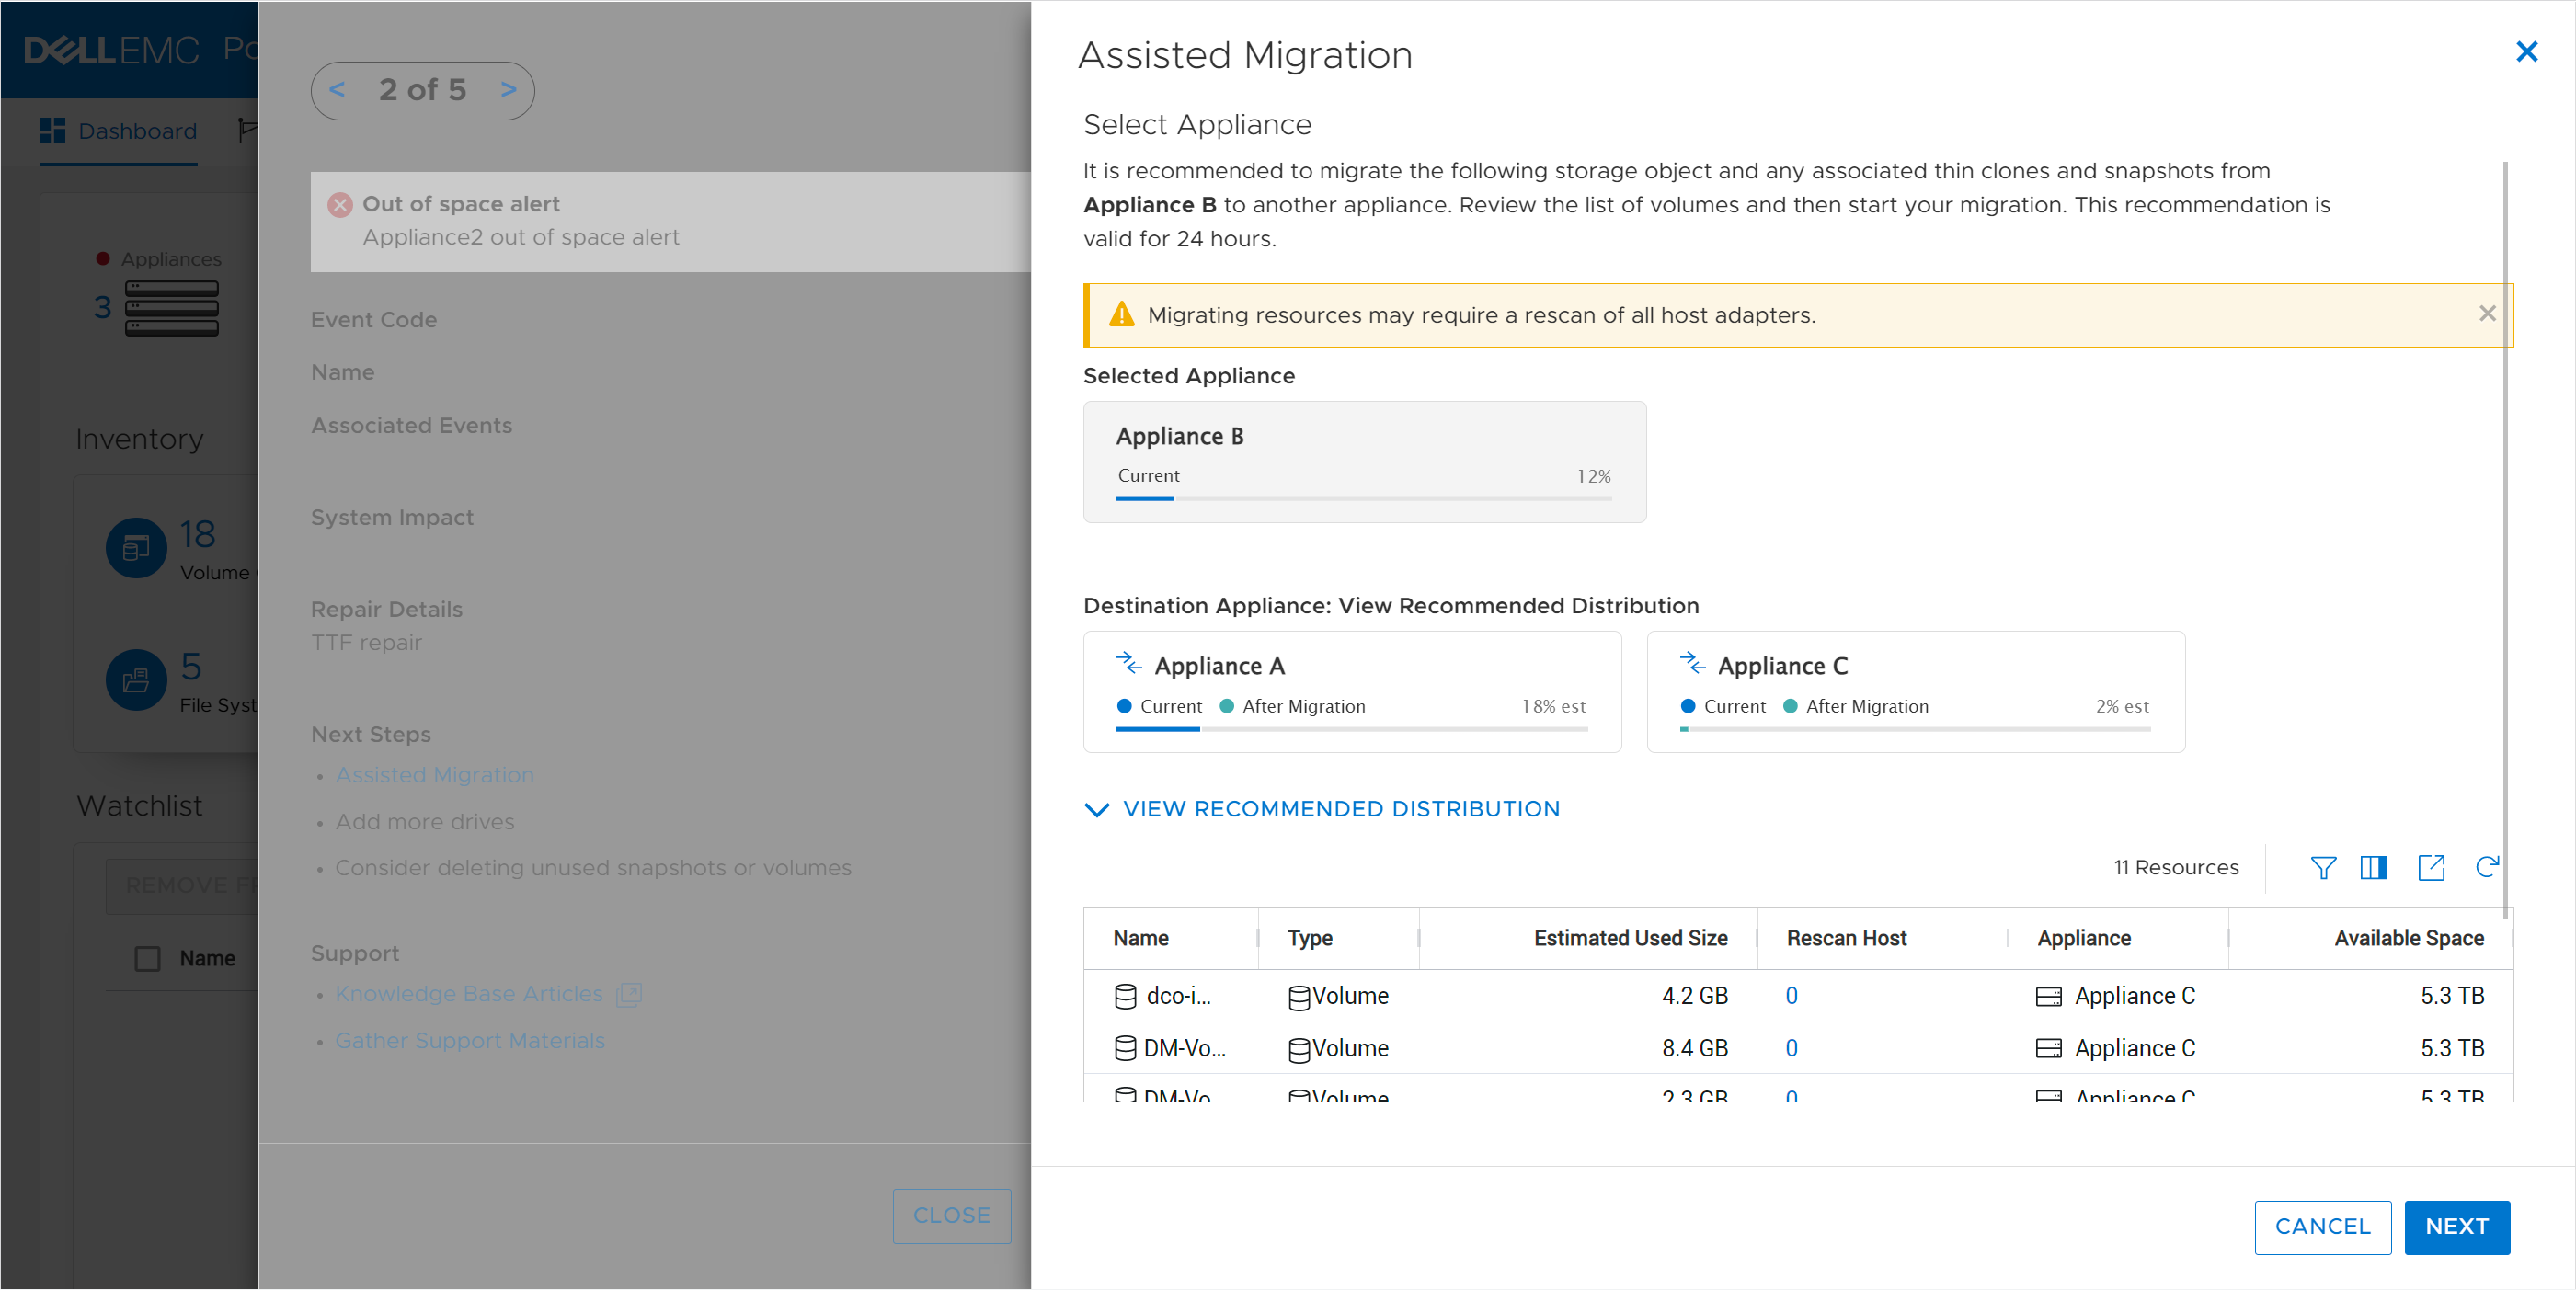
PowerStore also allows for nondisruptive migration of volumes, volume groups, and vVols across the cluster. As capacity and performance characteristics and requirements change, users can initiate manual or assisted resource migrations of resources from one appliance to another. When resources are migrated, all associated storage objects, such as snapshots and thin clones, are also moved to the same destination.
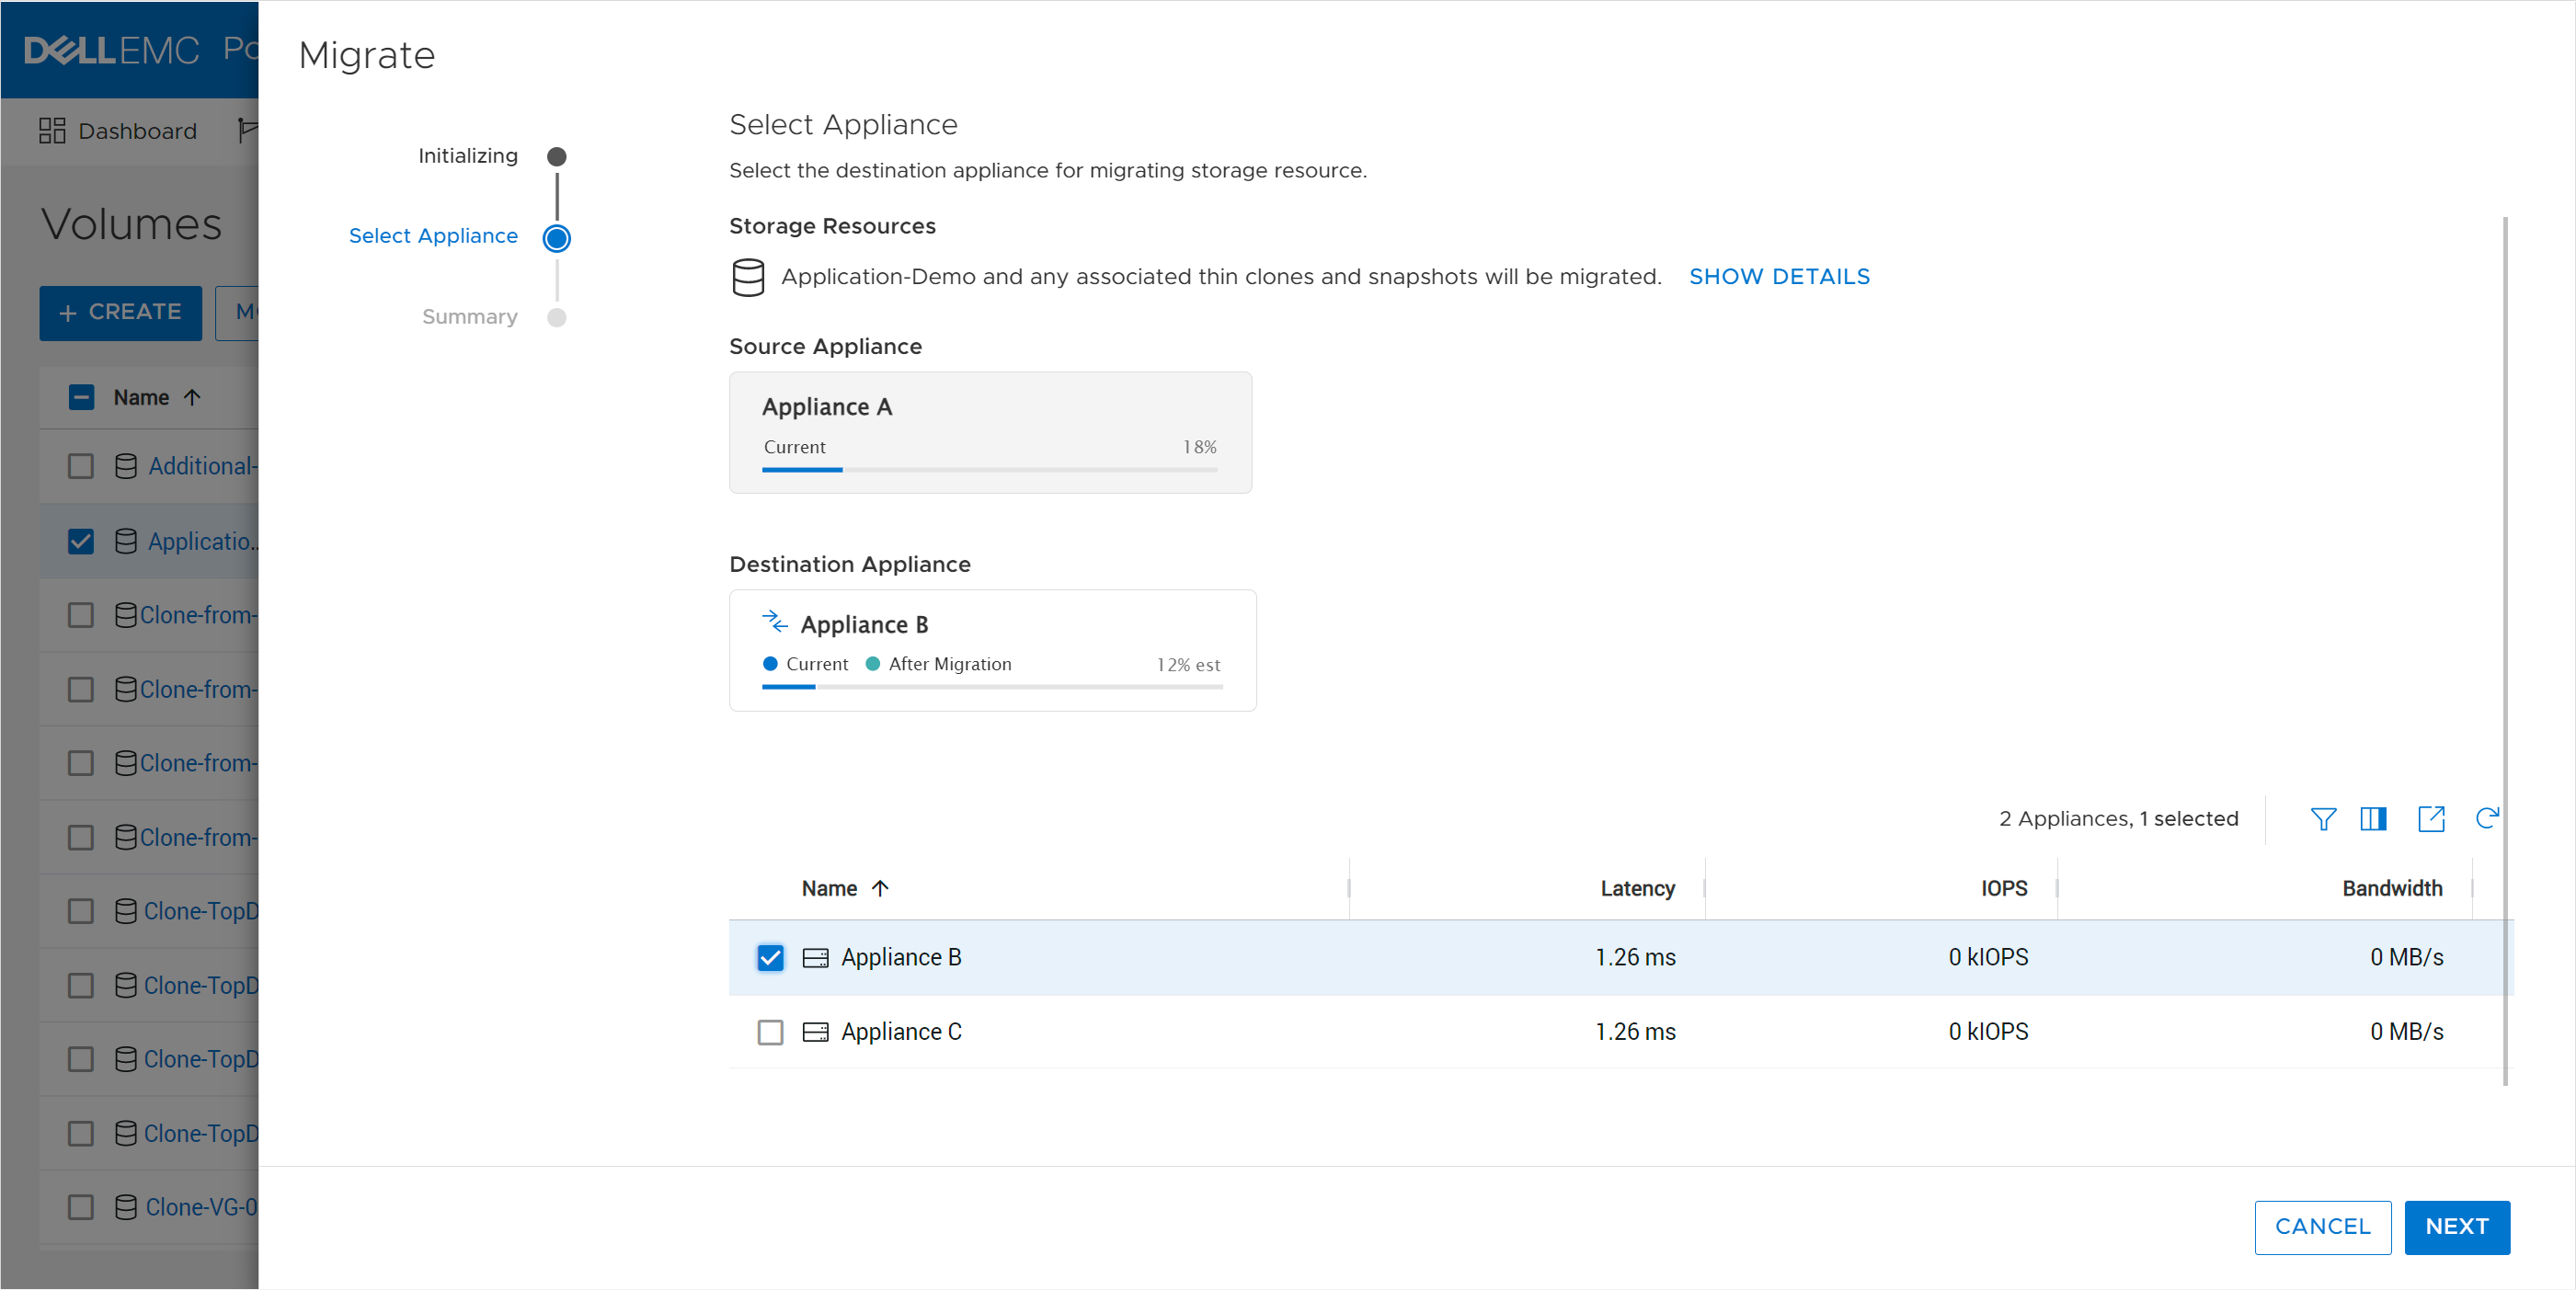
The system periodically monitors storage resource utilization across all appliances within the cluster. As storage consumption increases over time, an appliance might start to run out of available capacity. In this scenario, the system generates migration recommendations based on factors such as drive wear, appliance capacity, and health. If the administrator accepts the recommendation, a migration session is automatically created. The PowerStore cluster can do all the planning for you!
Flexibility
PowerStore clusters offer flexibility by providing the ability to scale up, out, and down as needed. The initial cluster can be created with anywhere from one to a maximum of four appliances. If the maximum appliance count has not been reached, you can add appliances to the cluster at any time after the initial configuration without any disruption. The additional appliances can be used to add capacity, increase performance, and expand limits.
Within a cluster, you can mix appliances with different configurations such as models, drives, I/O modules, and fault-tolerance levels. NVMe expansion enclosures can be added to specific appliances within the cluster if additional capacity is needed. This allows each appliance in the cluster to have its own individual configuration that’s tailored for its specific use
Administrators can tell PowerStore to evacuate storage resources such as volumes, volume groups, and vVols from an appliance. This operation can be useful in situations where an appliance needs to be powered off for maintenance or removed from a cluster, or when migrating to a new appliance.
Appliances can just as easily be removed from a cluster. For example, after migrating data from one appliance to another, you might want to decommission or repurpose the original appliance. After ensuring that all the data is migrated, the appliance can be safely removed from the cluster. After the appliance is removed, it is reverted to factory settings so it’s ready to be configured as a new cluster, added to an existing cluster, or powered off.
Clustering can be used as an end-to-end life cycle management strategy to make operations such as hardware refreshes painless. The new appliance can be joined to the existing cluster without any impact, enabling both the old and new appliances to be used together. The existing data can be seamlessly and nondisruptively migrated from the old appliance to the new one. The migration can be done either incrementally over time or all at once. Once all the data is migrated, the old appliance can be repurposed or removed from the cluster. All these features and benefits of PowerStore clustering provide you with essential investment protection.
Conclusion
The PowerStore continuously modern storage architecture allows for deploying appliances into a single- or multi-appliance cluster with minimal complexity. PowerStore multi-appliance clusters provide many benefits and advantages, with simplified configuration and administration, integrated intelligence, and increased flexibility.
Resources
Author:
Wei Chen, Senior Principal Engineering Technologist
LinkedIn

Protect Your Systems and Data with Dell Technologies
Tue, 07 Feb 2023 23:04:19 -0000
|Read Time: 0 minutes
Threats can come from anywhere, which is why it is critical to secure all aspects of your enterprise network — from edge to endpoint, data center to cloud. At Dell Technologies, we make it easier to protect your data wherever it is stored, managed or used with security that’s built into our industry‑leading servers, storage, hyperconverged infrastructure (HCI) and data protection appliances.
Dell PowerStore systems provide a great example of the protection we offer. PowerStore is renowned for helping companies across the globe store and manage data resources. Businesses have come to rely on PowerStore for many reasons, but mainly it’s chosen for its high performance and scale‑out capabilities, versatility, and rich feature set, which delivers all things to all customers. Part of that rich feature set is layer upon layer of security.
Here’s a glimpse into some of the key security features that come with Dell PowerStore systems, and how these features can help to protect your data and system.
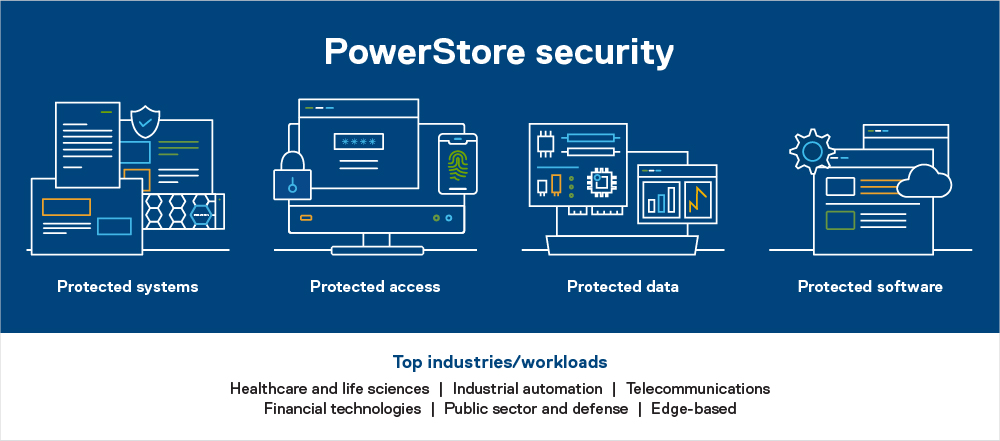
Protected systems
PowerStore includes numerous built-in features designed to protect the system. Features include the hardware root of trust and secure boot, which help to combat rootkit attacks and prevent unwanted code from executing on the OS.
Hardware root of trust provides an immutable, silicon-based solution to cryptographically attest to the integrity of the BIOS and firmware. It ensures that there have been no malicious modifications made throughout the supply chain or after installation.
Likewise, Data at Rest Encryption (D@RE) in PowerStore uses FIPS 140-2 validated self-encrypting drives (SEDs). This capability and KMIP (internal and external key manager support) are critical components of the feature set that help prevent data from being accessed physically, if a drive is removed.
Protected access
We’ve also included access control and logging capabilities with PowerStore to help you manage access to data and systems. Role-based access control and LDAP/LDAPS can reduce employee downtime, improve productivity, and make it easier to set access policies. Audit logging tracks changes and events on the system and can notify you to anomalies.
Dell PowerStore Manager is a critical tool that helps you manage system settings related to security topics, including encryption, and managing SSH access. TLS and IPsec are used to encrypt plaintext communication, protecting sensitive data that PowerStore appliances transmit over the cluster network. HTTP redirect adds another layer of security by redirecting any HTTP request to the more secure HTTPS protocol.
Additional access-related security measures include features like customizable login banners, third-party certificate support, VLAN segmentation, IPv6 support and Secure Connect Gateway.
Protected data
When looking to protect the data that resides on your PowerStore system, you should know that Dell Technologies offers various functionalities to help protect against ransomware and viruses from infecting your system — or to mitigate data loss in unforeseen circumstances.
Read-only snapshots, for example, enable point-in-time restores for data corruption or accidental deletion. PowerStore also allows you to perform asynchronous remote replication to another cluster for localized disasters such as floods or earthquakes. Metro replication lets you replicate synchronously to another cluster at short distances in an active/active configuration. This can help protect against power outages and other natural disasters.
But that’s not all. Other data protection functionality in PowerStore includes things like FLR, CEPA/CAVA for virus and ransomware, Secure NFS (Kerberos), SMB3 data-in-flight encryption, iSCSI CHAP, and Dynamic Resiliency Engine.
Protected software
Finally, to help protect software, Dell Technologies relies heavily on CloudIQ, which is a cloud-based AIOps proactive monitoring and predictive analytics application for Dell systems. CloudIQ uses machine learning and predictive analytics to identify potential issues, anomalies, and security risks, and proactively notifies users, allowing them to take quick action to remediate identified issues. In addition to identifying security risks, the cybersecurity feature in CloudIQ also consolidates security advisories about vulnerabilities in Dell infrastructure products discovered by Dell security specialists and the industry at large.
In addition, our Secure Development Lifecycle Program / Dell maturity model is aligned with NIST guidelines and directives to ensure high standards when it comes to protection. We also offer digitally signed firmware validation, software code integrity, and plug-ins.
Prioritize data protection
Data is the lifeblood of your organization. It’s what makes your business function, which is why you want to take special precautions to protect it.
Dell PowerStore systems make the process of protecting your data easier than ever. Plus, with such a comprehensive feature set to draw from, you’ll find exactly what you need to address your unique security situation and requirements.
Take advantage of the many PowerStore features to protect your data — and the system itself.
Learn more about PowerStore and its security features by checking out these resources:
- Dell PowerStore: Cybersecurity
- Dell PowerStore Manager Overview
- Dell PowerStore: Replication Technologies
- Dell PowerStore: Snapshots and Thin Clones

Protect Your Systems and Data with Dell Technologies
Mon, 23 Jan 2023 15:24:08 -0000
|Read Time: 0 minutes
Threats can come from anywhere, which is why it is critical to secure all aspects of your enterprise network — from edge to endpoint, data center to cloud. At Dell Technologies, we make it easier to protect your data wherever it is stored, managed or used with security that’s built into our industry‑leading servers, storage, hyperconverged infrastructure (HCI) and data protection appliances.
Dell PowerStore systems provide a great example of the protection we offer. PowerStore is renowned for helping companies across the globe store and manage data resources. Businesses have come to rely on PowerStore for many reasons, but mainly it’s chosen for its high performance and scale‑out capabilities, versatility, and rich feature set, which delivers all things to all customers. Part of that rich feature set is layer upon layer of security.
Here’s a glimpse into some of the key security features that come with Dell PowerStore systems, and how these features can help to protect your data and system.

Protected systems
PowerStore includes numerous built-in features designed to protect the system. Features include the hardware root of trust and secure boot, which help to combat rootkit attacks and prevent unwanted code from executing on the OS.
Hardware root of trust provides an immutable, silicon-based solution to cryptographically attest to the integrity of the BIOS and firmware. It ensures that there have been no malicious modifications made throughout the supply chain or after installation.
Likewise, Data at Rest Encryption (D@RE) in PowerStore uses FIPS 140-2 validated self-encrypting drives (SEDs). This capability and KMIP (internal and external key manager support) are critical components of the feature set that help prevent data from being accessed physically, if a drive is removed.
Protected access
We’ve also included access control and logging capabilities with PowerStore to help you manage access to data and systems. Role-based access control and LDAP/LDAPS can reduce employee downtime, improve productivity, and make it easier to set access policies. Audit logging tracks changes and events on the system and can notify you to anomalies.
Dell PowerStore Manager is a critical tool that helps you manage system settings related to security topics, including encryption, and managing SSH access. TLS and IPsec are used to encrypt plaintext communication, protecting sensitive data that PowerStore appliances transmit over the cluster network. HTTP redirect adds another layer of security by redirecting any HTTP request to the more secure HTTPS protocol.
Additional access-related security measures include features like customizable login banners, third-party certificate support, VLAN segmentation, IPv6 support and Secure Connect Gateway.
Protected data
When looking to protect the data that resides on your PowerStore system, you should know that Dell Technologies offers various functionalities to help protect against ransomware and viruses from infecting your system — or to mitigate data loss in unforeseen circumstances.
Read-only snapshots, for example, enable point-in-time restores for data corruption or accidental deletion. PowerStore also allows you to perform asynchronous remote replication to another cluster for localized disasters such as floods or earthquakes. Metro replication lets you replicate synchronously to another cluster at short distances in an active/active configuration. This can help protect against power outages and other natural disasters.
But that’s not all. Other data protection functionality in PowerStore includes things like FLR, CEPA/CAVA for virus and ransomware, Secure NFS (Kerberos), SMB3 data-in-flight encryption, iSCSI CHAP, and Dynamic Resiliency Engine.
Protected software
Finally, to help protect software, Dell Technologies relies heavily on CloudIQ, which is a cloud-based AIOps proactive monitoring and predictive analytics application for Dell systems. CloudIQ uses machine learning and predictive analytics to identify potential issues, anomalies, and security risks, and proactively notifies users, allowing them to take quick action to remediate identified issues. In addition to identifying security risks, the cybersecurity feature in CloudIQ also consolidates security advisories about vulnerabilities in Dell infrastructure products discovered by Dell security specialists and the industry at large.
In addition, our Secure Development Lifecycle Program / Dell maturity model is aligned with NIST guidelines and directives to ensure high standards when it comes to protection. We also offer digitally signed firmware validation, software code integrity, and plug-ins.
Prioritize data protection
Data is the lifeblood of your organization. It’s what makes your business function, which is why you want to take special precautions to protect it.
Dell PowerStore systems make the process of protecting your data easier than ever. Plus, with such a comprehensive feature set to draw from, you’ll find exactly what you need to address your unique security situation and requirements.
Take advantage of the many PowerStore features to protect your data — and the system itself.
Learn more about PowerStore and its security features by checking out these resources:
- Dell PowerStore: Cybersecurity
- Dell PowerStore Manager Overview
- Dell PowerStore: Replication Technologies
- Dell PowerStore: Snapshots and Thin Clones

Let’s Talk File (#4) – SMB Protocol Overview
Fri, 01 Jul 2022 19:28:26 -0000
|Read Time: 0 minutes
Introduction
A file access protocol enables clients and storage systems to transmit data using a common syntax and defined rules. PowerStore file supports a wide range of protocols, including SMB, NFS, FTP, and SFTP. In this blog, we’ll focus on a commonly used protocol for file sharing called Server Message Block (SMB). SMB is commonly used for use cases such as departmental shares, home directories, Microsoft SQL Server, Hyper-V, Exchange, and more.
SMB versions
The SMB option on the NAS server enables or disables SMB connectivity to the file systems.
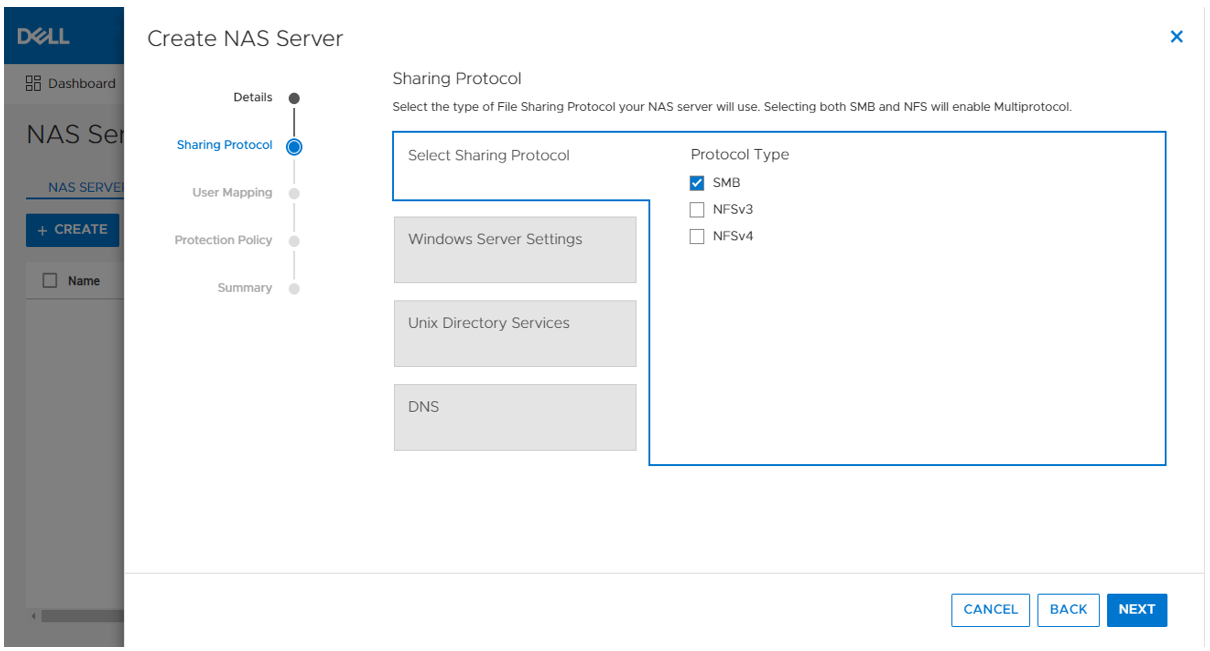
PowerStore file supports SMB1 through 3.1.1. The SMB version that is negotiated depends on the client operating system:
- CIFS: Windows NT 4.0
- SMB1: Windows 2000, Windows XP, Windows Server 2003, and Windows Server 2003 R2
- SMB2: Windows Vista (SP1 or later) and Windows Server 2008
- SMB2.1: Windows 7 and Windows Server 2008 R2
- SMB3.0: Windows 8 and Windows Server 2012
- SMB3.02: Windows 8.1 and Windows Server 2012 R2
- SMB3.1.1: Windows 10 and Windows Server 2016 and Windows Server 2019
Due to the age of the protocol and potential security vulnerabilities, client access using SMB1 is disabled by default. If client access using SMB1 is required, it can be enabled by modifying the cifs.smb1.disabled parameter. Using SMB2 at a minimum is recommended because it provides security enhancements and increases efficiency, as compared to SMB1.
NAS servers use SMB2 to communicate with the domain controllers for operations such as authentication, SID lookups, Group Policies, and so on. If SMB2 is not available, the NAS server attempts to use SMB1 as a backup option. This means that any domain controllers that are running older operating systems that only support SMB1 can continue to function.
Standalone SMB server configuration
When enabling SMB support on a NAS server, the SMB server can either be standalone or Active Directory (AD) domain-joined. Standalone SMB servers are not associated with an AD domain so they only support local authentication. The information required when configuring a new standalone SMB server is shown in the following table.
Name | Description |
Workgroup | Name of the Windows workgroup where the file systems will be shared. |
Netbios Name | Network name of the standalone SMB server (15 characters maximum). |
Administrator Password | Set the initial password for the local Administrator user. |
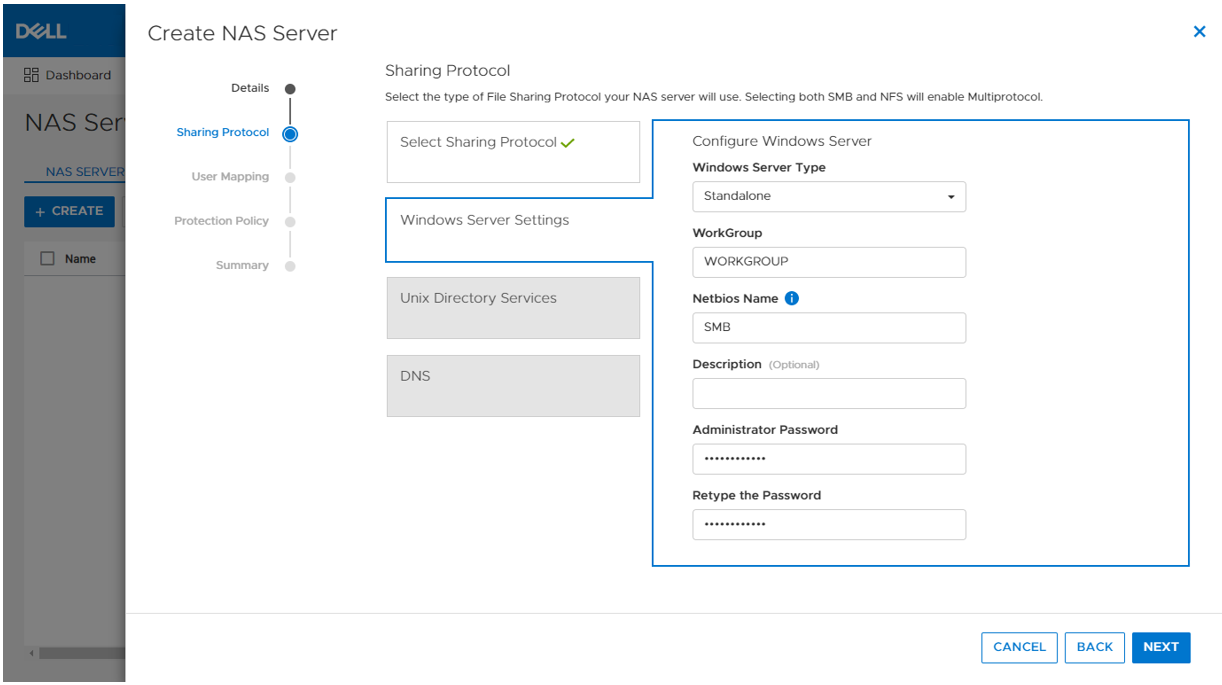
On the next step in the wizard, you can also optionally enable DNS on the standalone SMB server for IP address and name resolution.
When the SMB server is created, it’s designed to have the same behavior and support many of the same tools as a Windows server. The administrator can manage it using standard Microsoft Windows tools such as the Computer Management MMC Console. These are the same tools that are used to manage a standard Windows server deployment, reducing the learning curve for administrators who are transitioning to PowerStore. There are also lots of tutorials and applicable documentation available online.
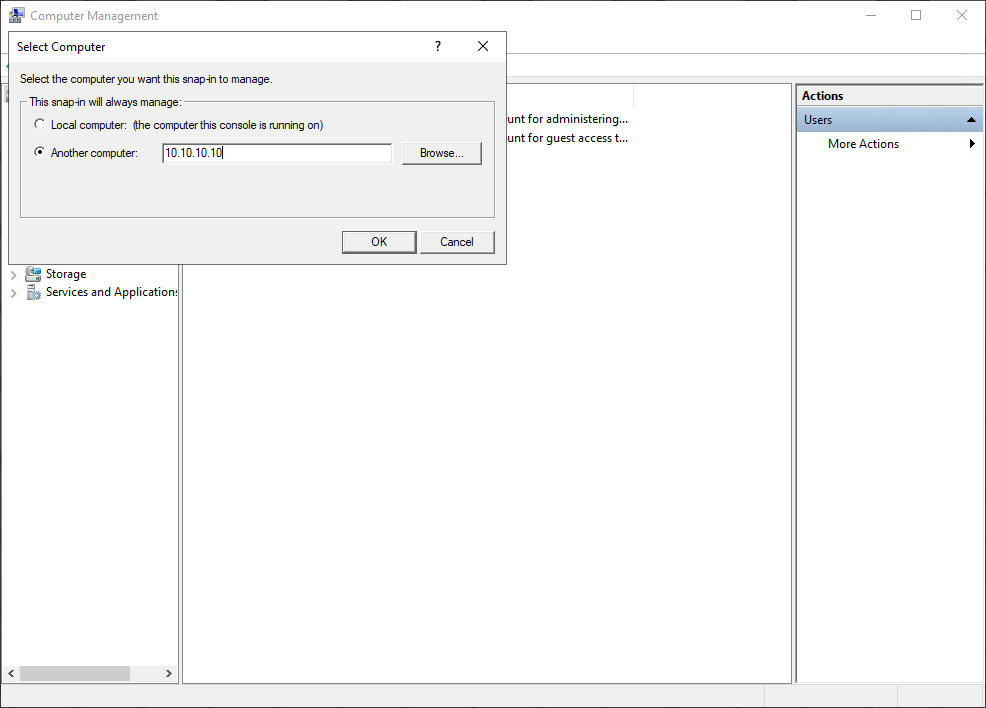
You can connect to the standalone SMB server by connecting to another computer and specifying the IP address of the NAS server.
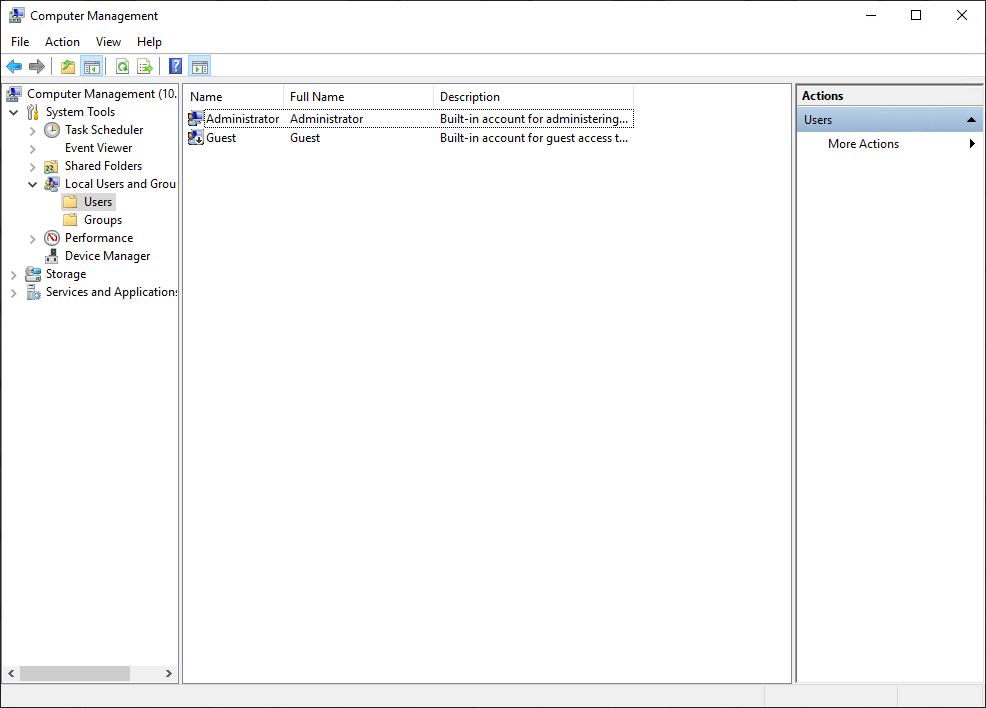
The local users are stored in the Local Users and Groups Database. Upon creation of a new standalone SMB server, only the local Administrator user is available. In the following figure, the Guest account is disabled by default, as noted by the down arrow at the bottom left corner of the Guest icon. Additional users and groups can be created here, if needed.
Domain-joined SMB server configuration
Domain-joined SMB servers are associated with an AD domain. AD is leveraged for centralized user authentication, applying group policies, enforcing security, implementing password requirements, and more.
The following information is required when configuring a new standalone SMB server:
Name | Description |
SMB Computer Name | Name of the computer object to be created in Active Directory |
Windows Domain | Name of the domain to which to join the SMB server |
Domain Username | Username of an account that has domain joining privileges |
Password | Password for the specified user |
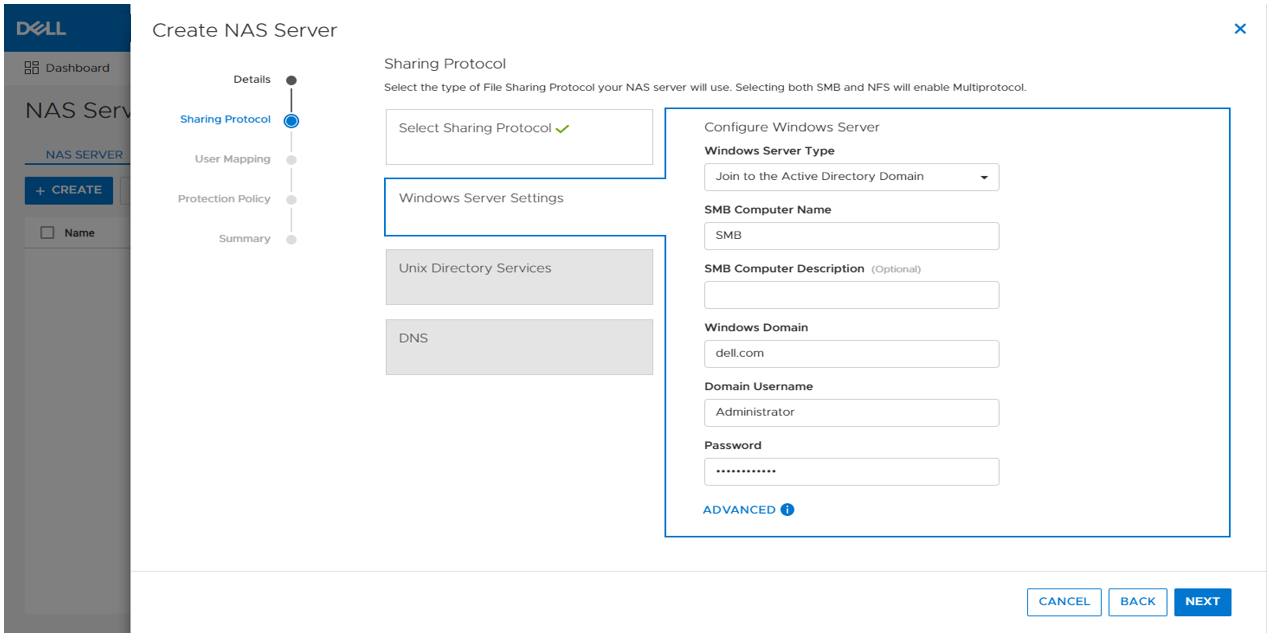
As part of the domain joining process, a computer object is created in the AD domain and DNS entries are created for IP address and name resolution. Domain-joined SMB servers require DNS to be configured, but this configuration is optional for standalone SMB servers. Domain-joined NAS servers are placed in the CN=Computers container, by default. The computer object can be configured to be stored in a different OU location in the advanced settings.
SMB shares
When the SMB server is configured, you can provision a file system along with an SMB share. The SMB share provides a path that clients can map to access the file system. The initial SMB share can be created as part of the file system provisioning wizard. Additional SMB shares can also be created on existing file systems, as long as the path exists.
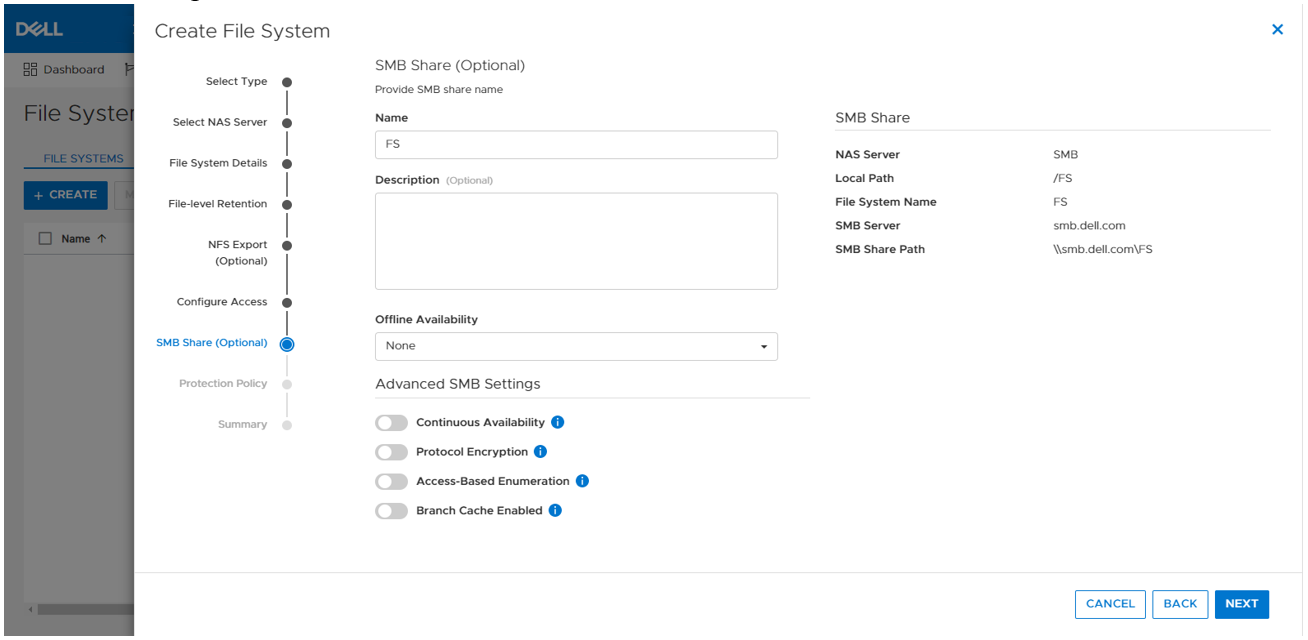
The figure below shows the SMB share step of the file system provisioning wizard. The only required field is the name for the share. On the right, you can also see the name of the NAS Server, local path, file system name, SMB server name, and the SMB share path for the share.
Take note of the SMB share path because that is what you will use to map the share from the client. This is called a UNC (Universal Naming Convention) path and the format is \\<SMB_Server>\<SMB_Share_Name>. For example, \\smb\fs.
You can disregard the other advanced SMB settings for now. We’ll cover those in a later blog.
Mapping a share
Now we are ready to map the share on a client. On a client, you can simply enter the UNC path into MS Explorer to access the share, as shown below.
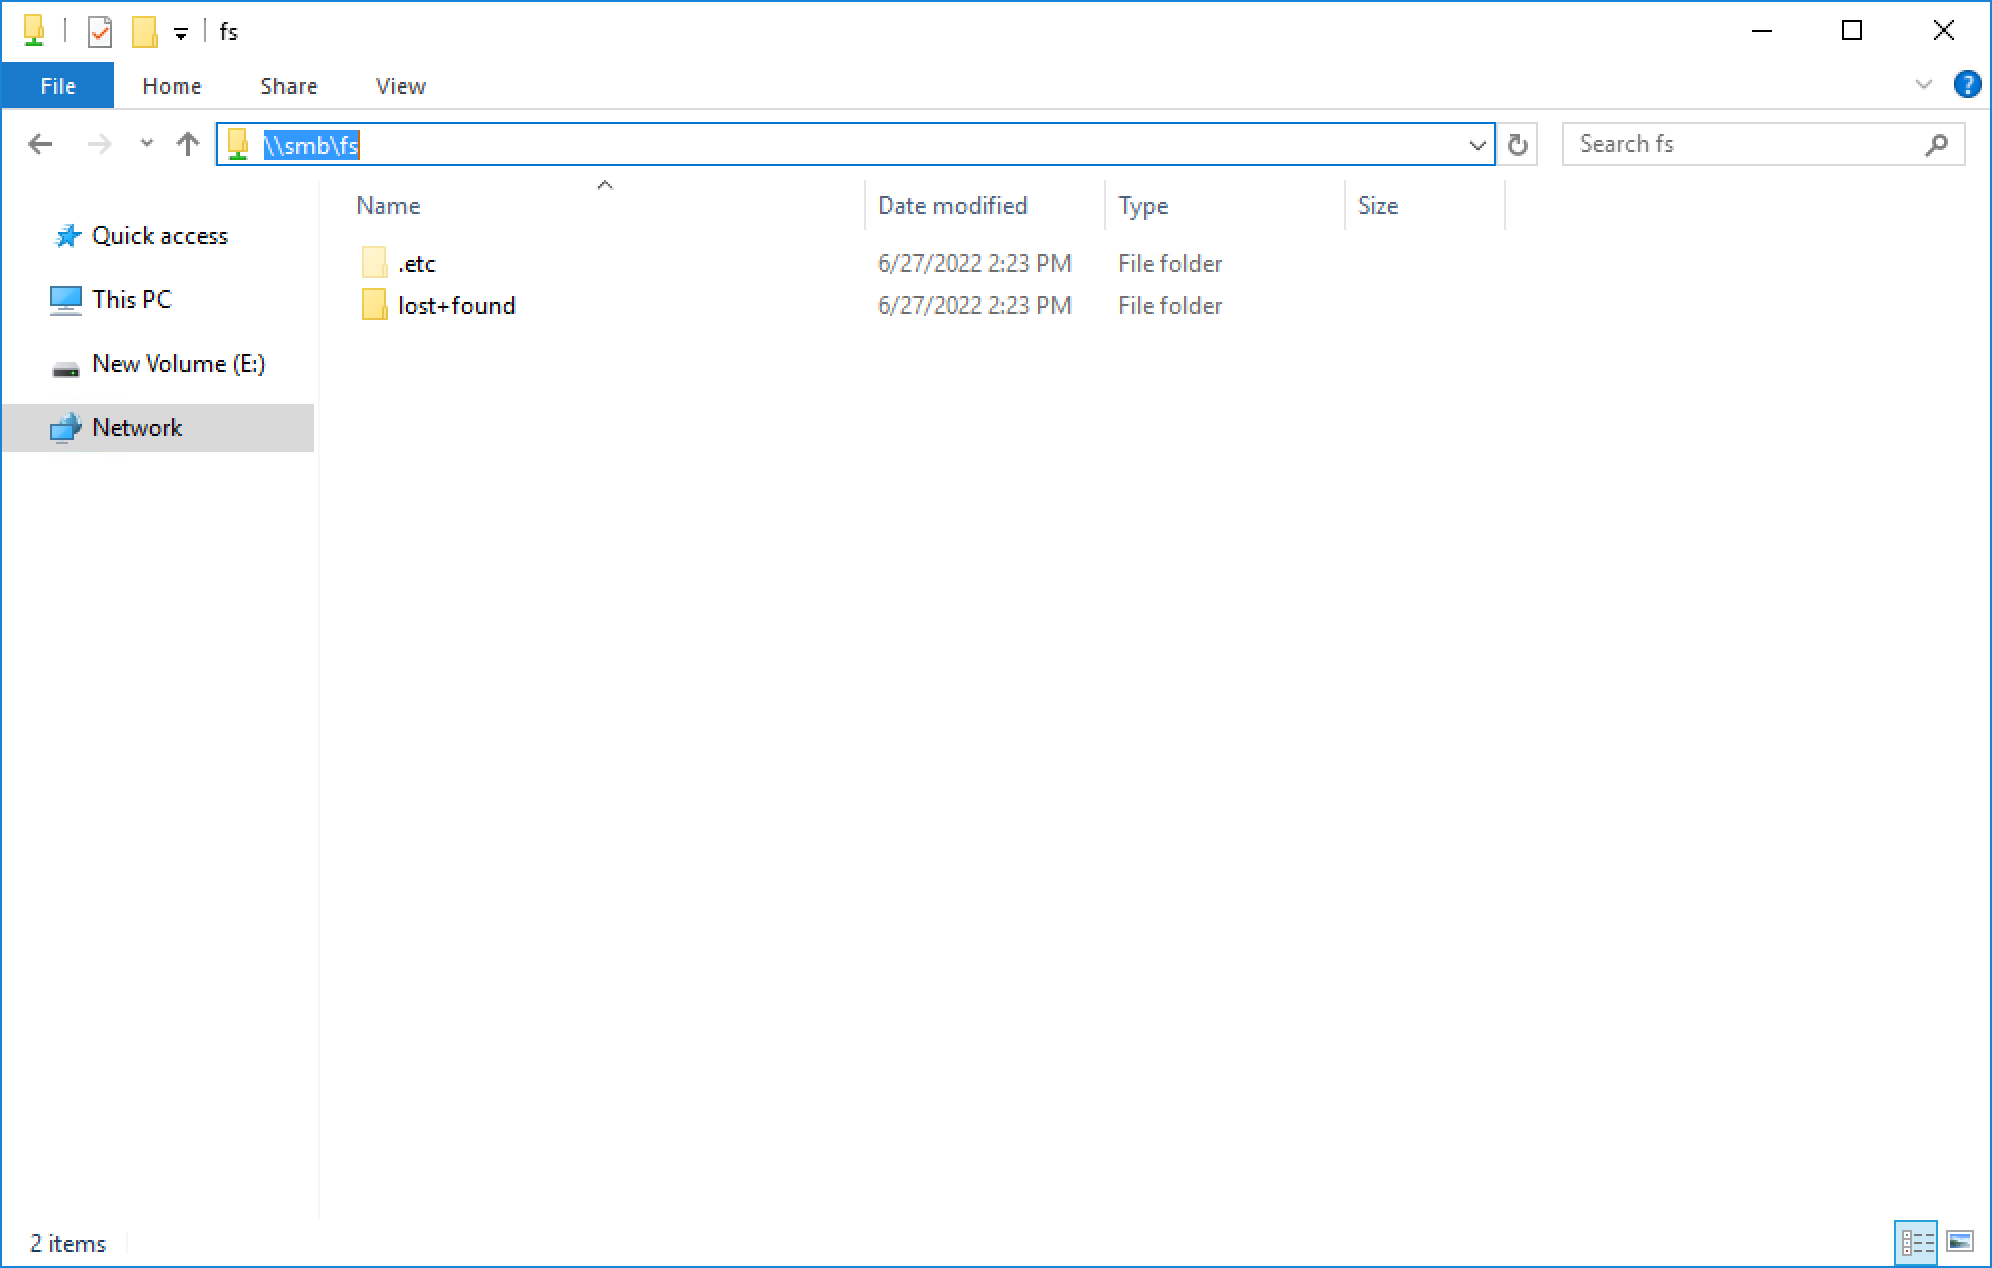
If your client is logged in using an account that is on the same domain as the domain-joined SMB server, your credentials are passed automatically and the share opens. If you’re attempting to map an SMB server that is in a foreign domain, you are prompted for credentials in order to access the share. Alternatively, you can also connect using a local user’s credentials.
For standalone SMB servers, you can only connect using a local user’s credentials. You are prompted for the username and password when connecting to the share. By default, only the local Administrator user exists and the password is set during the initial configuration of the standalone SMB server.
To map the share to a drive letter (so that you can easily access it in the future), click the Map Network Drive button in Explorer, as shown here.
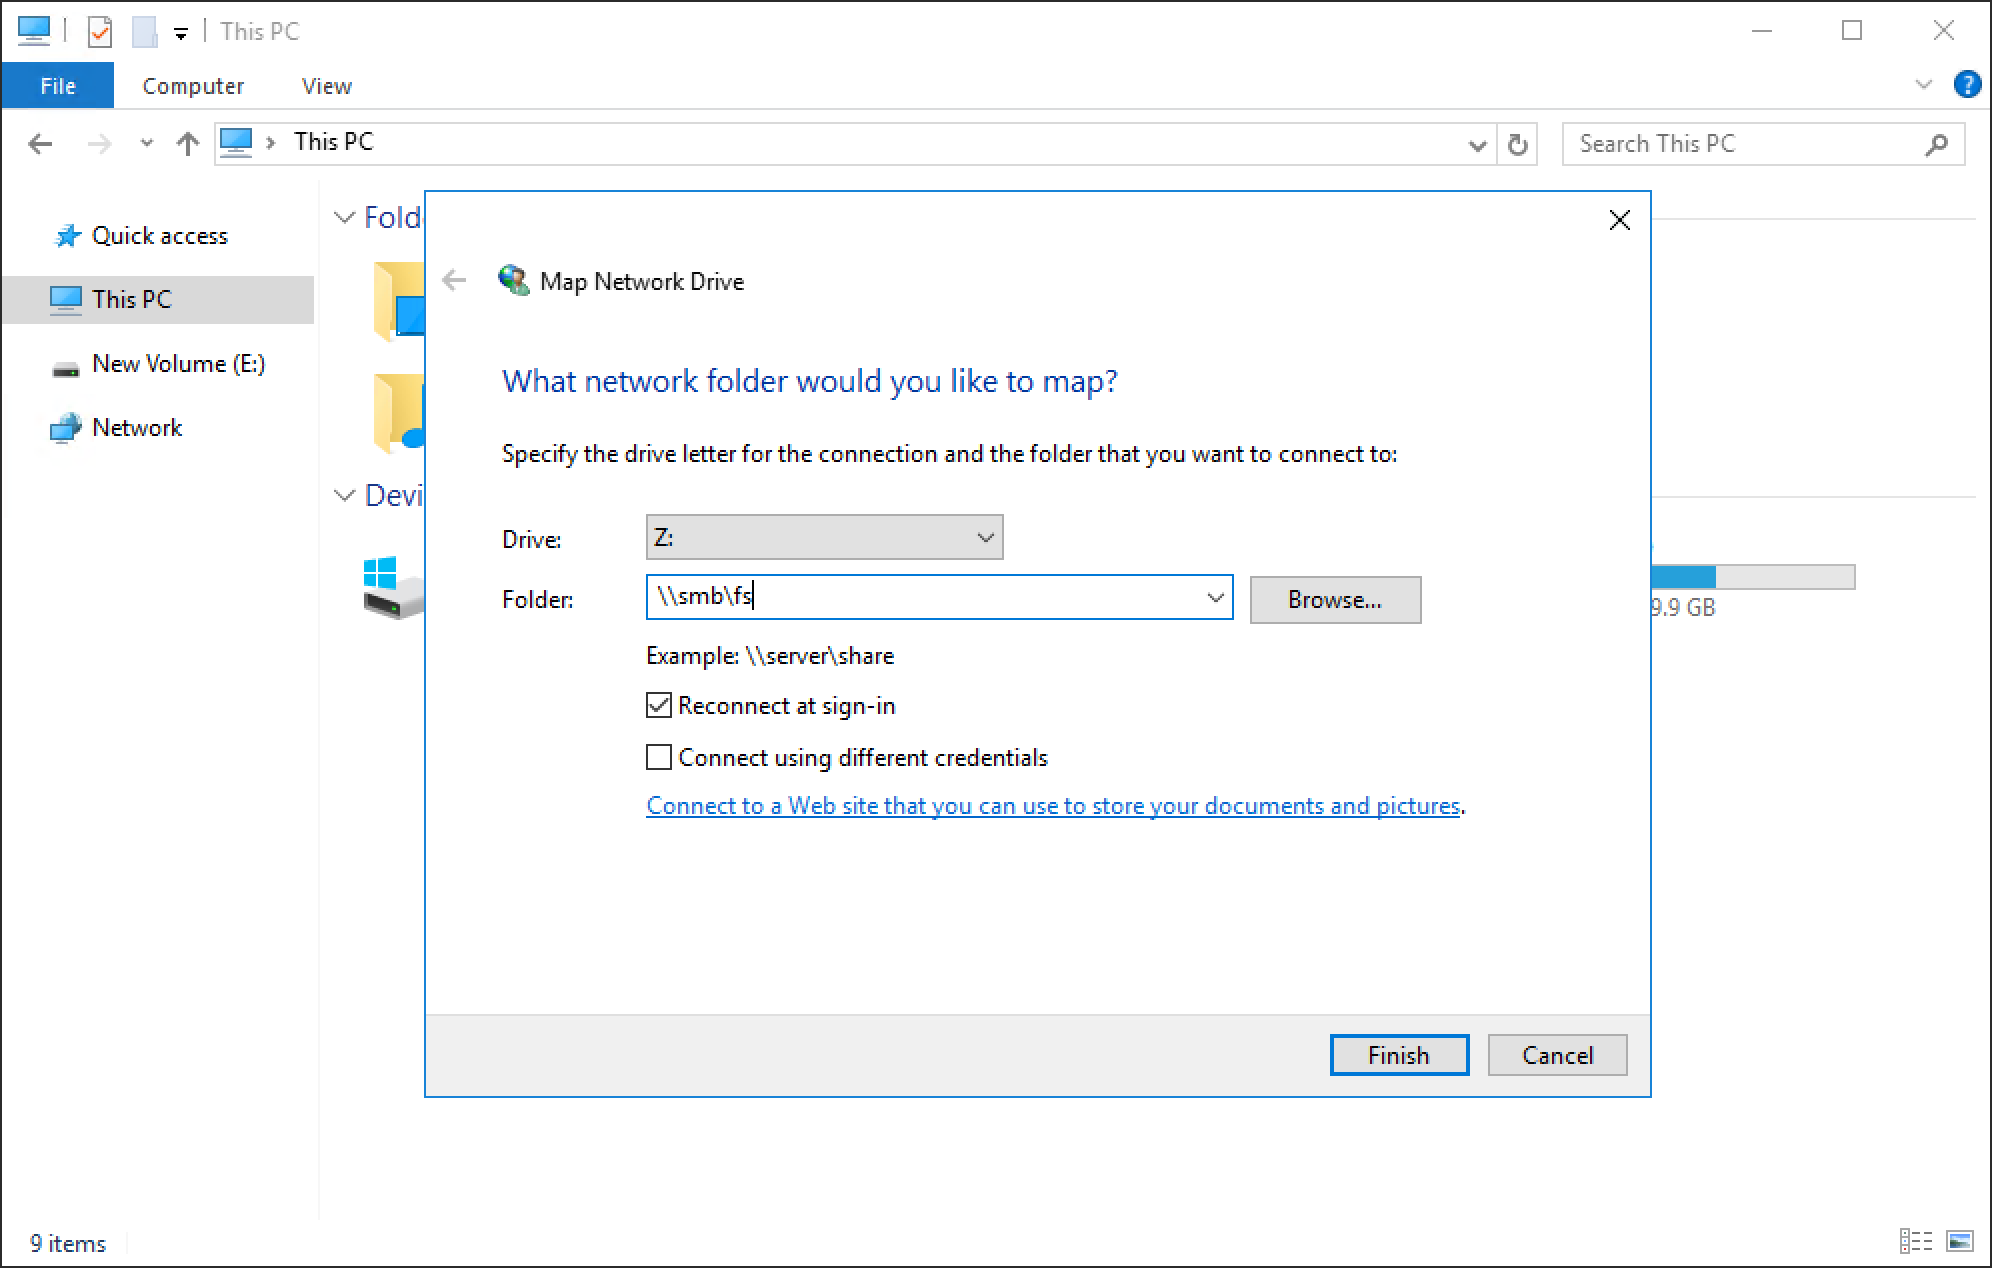
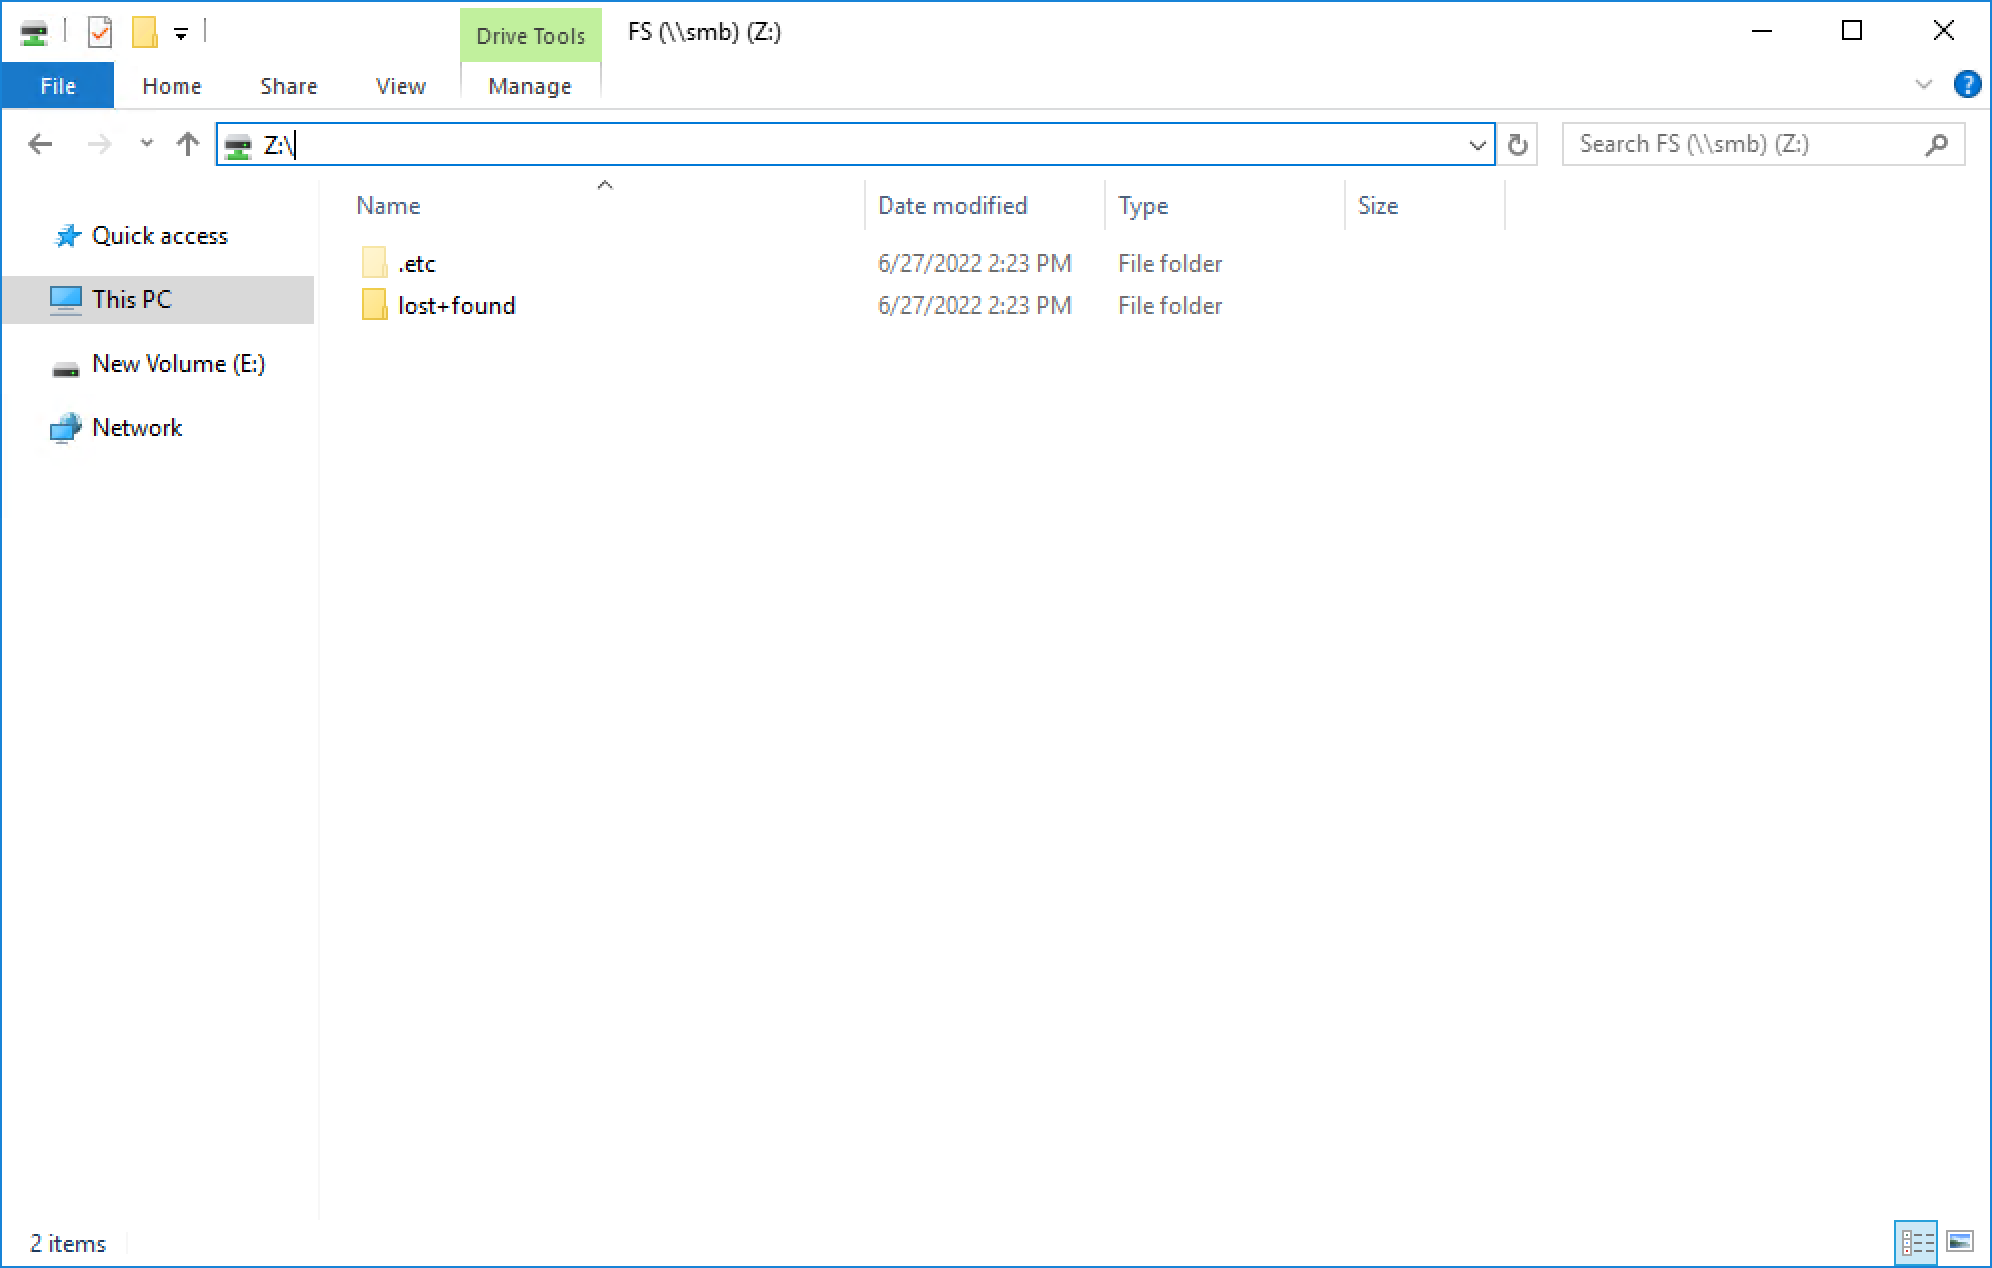
You can select a drive letter to which to map the drive, specify the UNC path, and select options such as reconnect at sign-in or connect using different credentials. When the drive is mapped, you can access it using the assigned drive letter, as shown in the following figure.
Conclusion
Great job! You are now familiar with how to use the SMB protocol for file system access. This enables you to start configuring environments using SMB for many use cases and applications. Stay tuned for the next blog in this series where we’ll take a look at another commonly used file protocol: NFS.
Resources
Author: Wei Chen, Senior Principal Engineering Technologist

Let’s Talk File (#2) – PowerStore NAS Servers
Wed, 20 Apr 2022 17:22:25 -0000
|Read Time: 0 minutes
Introduction
PowerStore file uses virtualized file servers that are called NAS servers, which are a critical piece of a file environment. In this blog, we will review what NAS servers are, study the NAS server architecture and its benefits, take a quick look at the NAS server settings, and walk through the process to create a new NAS server using PowerStore Manager.
What is a NAS server? A NAS server provides administrators with the ability to specify how PowerStore and its clients should connect, authenticate, and communicate with each other. It contains the configuration, interfaces, and environmental information that is used to facilitate access to the data residing on the file systems. In addition, features such as anti-virus protection, backups, user mappings, and more are also configured on the NAS server.
NAS Server Architecture
PowerStore’s modern NAS server architecture provides many inherent benefits. NAS servers have many responsibilities, including enabling access to file systems, providing data separation, and acting as a basis for multi-tenancy. They are also used as components for load balancing and high availability. This makes it quick and simple to deploy a feature-rich and enterprise-level file solution that meets your business requirements. The image below illustrates the NAS server architecture on PowerStore.
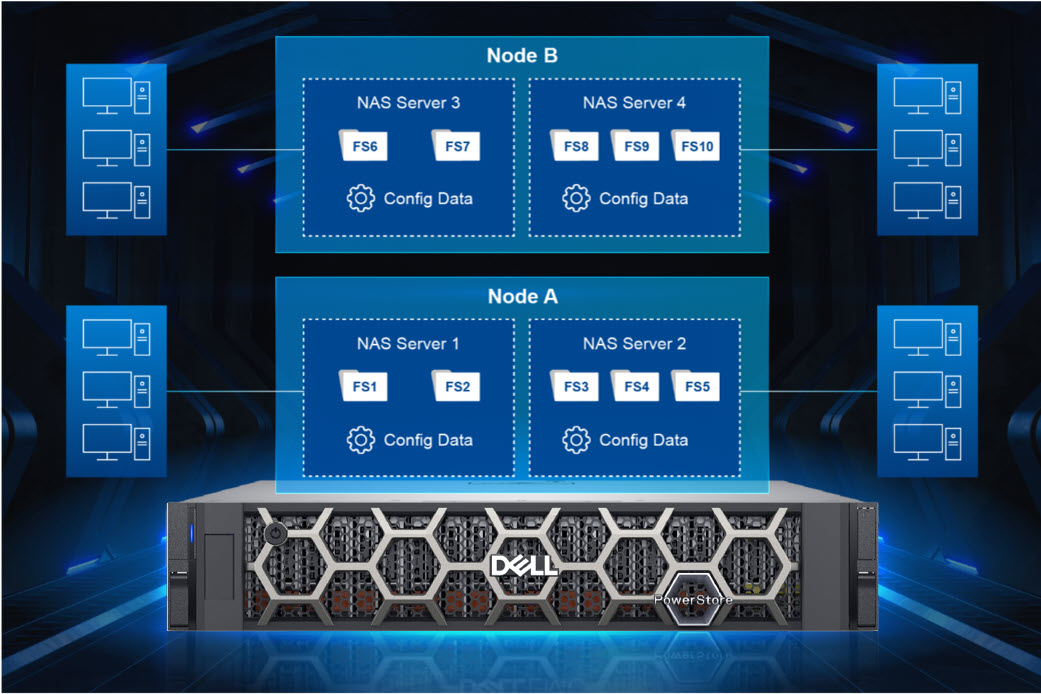
Each NAS server has its own independent configuration, enabling it to be used to enforce multitenancy. This is useful when hosting multiple tenants on a single system, such as for service providers. Each NAS server can be tailored to meet the requirements of each tenant without impacting the other NAS servers on the same appliance.
When creating a file system, the file system is assigned to a NAS server. Each NAS server has its own set of file systems to store file data. Because each NAS server is logically separated from the others, clients that have access to one NAS server do not inherently have access to the file systems on the other NAS servers. To access file systems on a different NAS server, clients must separately authenticate using the methods specified by that NAS server.
Each PowerStore node can host multiple NAS servers and both nodes are actively used to service file IO. New NAS servers are automatically assigned on a round-robin basis across both available nodes. This active/active architecture enables load balancing, provides high availability, and allows both nodes to serve file data simultaneously. If a PowerStore node reboots, NAS servers and their corresponding file systems automatically fail over to the surviving node. NAS servers are also automatically moved to the peer node and back during the upgrade process. After the upgrade completes, the NAS servers return to the node they were assigned to at the beginning of the upgrade.
NAS Server Settings
Let’s do a quick review of some of the items that can be configured on a NAS server. See the following table for a list of items along with a short description of their purpose.
Don’t worry if you’re not familiar with some of these services or terms because they’re not all required. You only need to enable and configure services that you are actively using in your specific environment. We’ll also cover these services in more detail in future blogs in this series.
Name | Description |
Interfaces | IP address, subnet, gateway, and VLAN to access the NAS server |
Access Protocols | Server Message Block (SMB) – Primarily used by Windows clients for SMB shares |
Network File System (NFS) – Primarily used by UNIX and VMware ESXi clients for NFS exports | |
File Transfer Protocol (FTP) – Used by all clients for file transfers | |
SSH File Transfer Protocol (SFTP) - Used by all clients for secure file transfers | |
Lightweight Directory Access Protocol (LDAP) / Network Information Service (NIS) / Local Files | Resolving user IDs and names to each other |
Domain Name System (DNS) | Resolving IP addresses and names to each other |
Anti-virus | Anti-virus servers used to identify and eliminate known viruses before they infect other files |
Network Data Management Protocol (NDMP) | A standard used for backing up file storage |
Kerberos | A distributed authentication service used for Secure NFS |
How to Configure a NAS Server
When deploying a file environment, the first resource you should provision on PowerStore is the NAS server. Now that you understand how they work, let’s go ahead and create one. To do this, open PowerStore Manager and navigate to Storage > NAS Servers. The NAS server creation wizard prompts you for the information displayed in the table below. All of these options can also be modified after creation, if needed.
Name | Description |
Interface Details (Required) |
|
Sharing Protocols (Optional) |
Note: If both SMB and NFS protocols are enabled, multiprotocol access is automatically enabled |
UNIX Directory Services (shown if NFS is enabled) |
|
DNS (Required for AD Joined SMB Servers, but otherwise optional) |
|
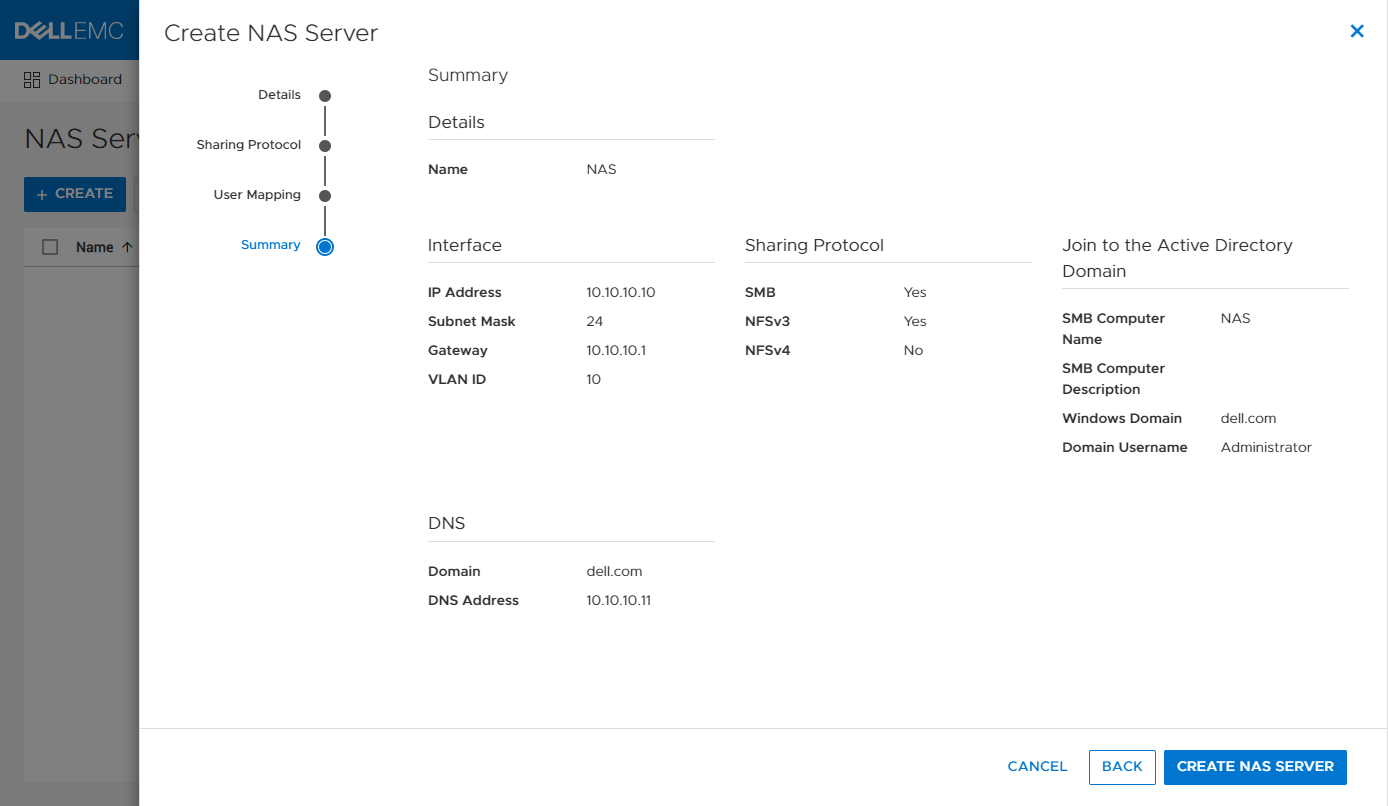
The screenshot below shows an example of the summary page when configuring a new NAS server. In this example, we created an interface, AD-joined SMB Server, NFSv3, and DNS.
If you’re testing file for the first time, you may want to start off with deploying a basic minimum configuration. To do this, all you need to configure is an interface and enable at least one access protocol.
Conclusion
Now that we have our NAS server configured, our clients have a communication path to connect to PowerStore using a file protocol! This is the first major step, but we’re not done yet. Next, we need to provision a file system to store our data and shares or exports to make the file system accessible to clients. Stay tuned for the next blog in this series where we’ll review file system provisioning, management, and monitoring.
Resources
Author: Wei Chen, Senior Principal Engineering Technologist

Let’s Talk File (#1) – PowerStore File Overview
Mon, 21 Mar 2022 14:15:46 -0000
|Read Time: 0 minutes
Introduction
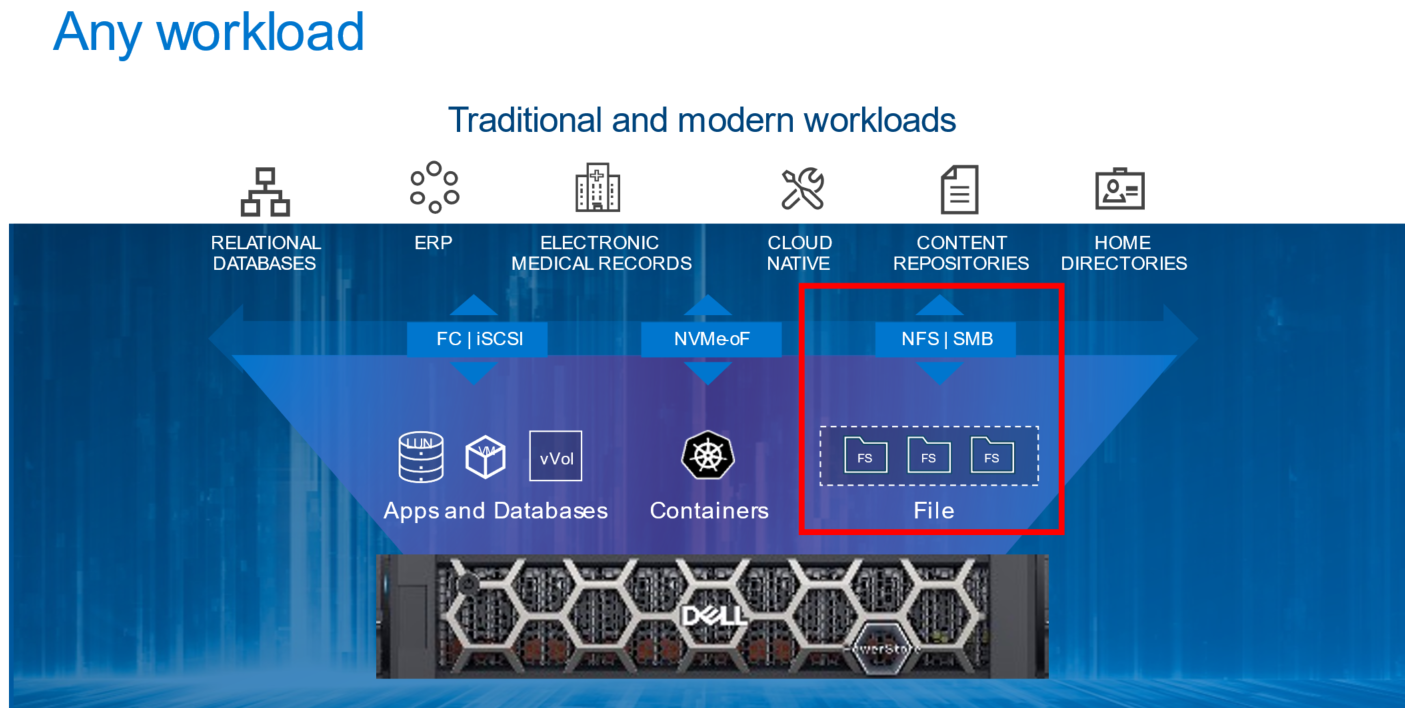
Our customers have a wide variety of traditional and modern workloads. Each of these workloads connects to the underlying infrastructure using various networking protocols. PowerStore’s single architecture for block, file, and vVols uses the latest technologies to achieve these disparate objectives without sacrificing the cost-effective nature of midrange storage. PowerStore provides the ultimate workload flexibility and enables IT to simplify and consolidate infrastructure.
PowerStore features a native file solution that is highly scalable, efficient, performance-focused, and flexible. In this new series, we’ll visit the vast world of PowerStore file and review the comprehensive set of features that it offers. Over the course of this series, we’ll cover everything from NAS servers, file systems, quotas, snapshots and thin clones, protocols, multiprotocol, directory services, and more. We’ll start with the basics before diving in deeper, so no previous file experience or knowledge is required!
File Overview
Let’s start with a quick and high-level overview of file. File-level storage is a storage type where files are shared across a network to a group of heterogeneous clients. It is also known as Network-Attached Storage (NAS). File-level storage is widely used across small and medium-sized businesses to large enterprises across the world. If you’ve ever connected to a shared drive such as a home directory or departmental share, then you’ve used file-level storage before.
PowerStore File
File functionality is natively available on PowerStore T model appliances that are configured in Unified mode. There are no extra pieces of software, hardware, or licenses required to enable this functionality. All file management, monitoring, and provisioning capabilities are available in the HTML5-based PowerStore Manager.
Within an appliance, both nodes are used for both file as well as block. This configuration creates a fully redundant and active/active architecture where both nodes are used to serve file data simultaneously. This design provides the ability to load balance across both nodes while also ensuring high availability.
PowerStore supports the following file access protocols:
- Server Message Block (SMB) – Primarily used by Windows clients for SMB shares
- Network File System (NFS) – Primarily used by UNIX clients for NFS exports
- File Transfer Protocol (FTP) – Used by all clients for file transfers
- SSH File Transfer Protocol (SFTP) – Used by all clients for secure file transfers
PowerStore File Systems
PowerStore features a 64-bit file system architecture that is designed to be highly scalable, efficient, performant, and flexible. PowerStore also includes a rich supporting file feature set to ensure that the data is secure, protected, and can be easily monitored.
PowerStore file systems are also tuned and optimized for high performance. In addition, platform components such as Non-Volatile Memory Express (NVMe) drives and dual-socket CPUs enable the system to maintain low response times while servicing large workloads.
The maturity and robustness of the PowerStore file system combined with these supporting features enables it to be used in many file-level storage use cases, such as departmental shares or home directories.
Conclusion
With the native file capabilities available on PowerStore, administrators can easily implement a file solution that is designed for the modern data center. Throughout this blog series, we’ll review how quick and easy it is to configure file in your data center.
Now that we have an overview of file, we can begin jumping into more specific technical details. Stay tuned for the next blog in this series where we’ll start by looking at NAS servers and their role in facilitating access to the data residing on the file systems.
Resources
Author: Wei Chen, Senior Principal Engineering Technologist

