


Let’s Talk File (#5) – NFS Protocol Overview

Introduction
A file access protocol enables clients and storage systems to transmit data using a common syntax and defined rules. PowerStore file supports a wide range of protocols including SMB, NFS, FTP, and SFTP.
In our last blog, we discussed a commonly used protocol for file sharing called Server Message Block (SMB). In this blog, we’ll review another commonly used protocol for file sharing called Network File System (NFS). NFS is commonly used for use cases such as departmental shares, databases, VMware NFS datastores, and more.
NFS versions
PowerStore supports NFSv3 through NFSv4.1. NFSv3 is a stateless protocol that includes basic security, requires external locking mechanisms, and UNIX-based mode bits for permissions. NFSv4 is a stateful protocol that enables enhanced security, integrated locking, ACLs for permissions, and adds other enhancements.
In addition, Secure NFS is also supported. Traditionally, NFS is not the most secure protocol, because it trusts the client to authenticate users and build user credentials and send these in clear text over the network. With the introduction of Secure NFS, Kerberos can be used to secure data transmissions through user authentication and data signing through encryption. Kerberos is a well-known strong authentication protocol where a single key distribution center, or KDC, is trusted rather than each individual client. There are three different Secure NFS modes available on PowerStore:
- Kerberos: Use Kerberos for authentication only
- Kerberos With Integrity: Use Kerberos for authentication and include a hash to ensure data integrity
- Kerberos With Encryption: Use Kerberos for authentication, include a hash, and encrypt the data in-flight
NFS configuration
To configure NFS, you must first enable NFS on the NAS server, create a file system, and an NFS export.
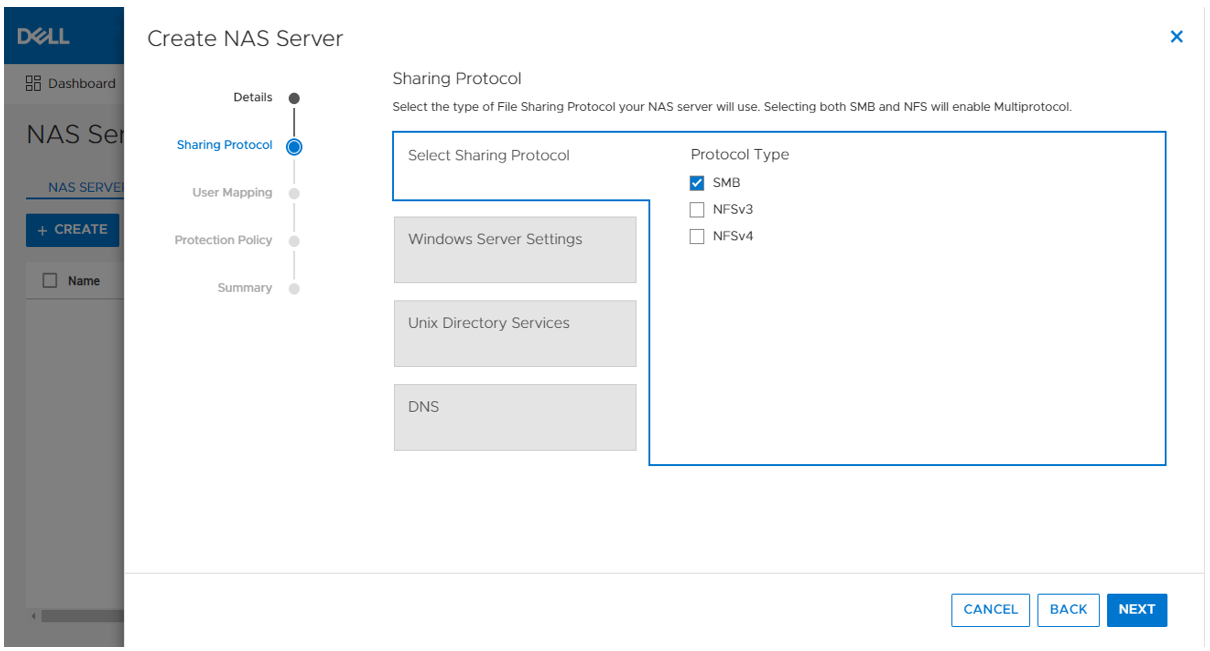
The first step to configure an NFS environment is to provision a NAS server. Each NAS server has options to enable NFSv3 and NFSv4 independently. The following figure shows the NFS protocol options in the NAS server provisioning wizard. 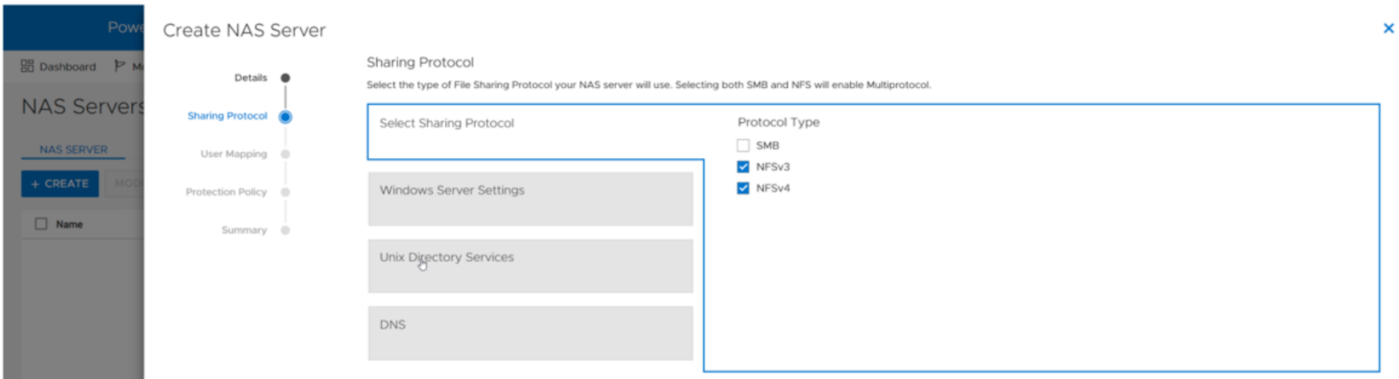
If at least one NFS protocol is enabled, you are then presented with the option to enable a UNIX Directory Service (UDS). The purpose of the UDS is to provide a mechanism to resolve names to IDs and vice versa. This is necessary because the file system tracks users and files using user IDs and group IDs (UIDs and GIDs). These IDs can be resolved to usernames and group names, and these names are displayed to improve usability for humans. The available options for the UDS are:
- Local Files - Individual files that are uploaded to the NAS server to provide name and ID resolution
- Ideal for small or isolated environments
- Quick and easy to configure
- Do not scale well because files need to be uploaded to each NAS server if anything changes
- These share the same syntax as the configuration files that are found in the /etc/ directory on a UNIX host
- A copy of a local file from a host can be re-purposed for the NAS server
- PowerStore also provides a template with the syntax and descriptions
- NIS/LDAP - Services that provide a centralized user directory for name and ID resolution
- Ideal for large environments that require consistent UID/GID mappings across multiple NAS servers
- Requires upfront work for initial deployment
- Scales well and updates can be easily propagated
In addition to the UDS, Secure NFS can also be enabled at this step. All options in this step are optional and can be skipped if they are not required in your environment. The following figure shows the UNIX Directory Services step of the NAS server provisioning wizard.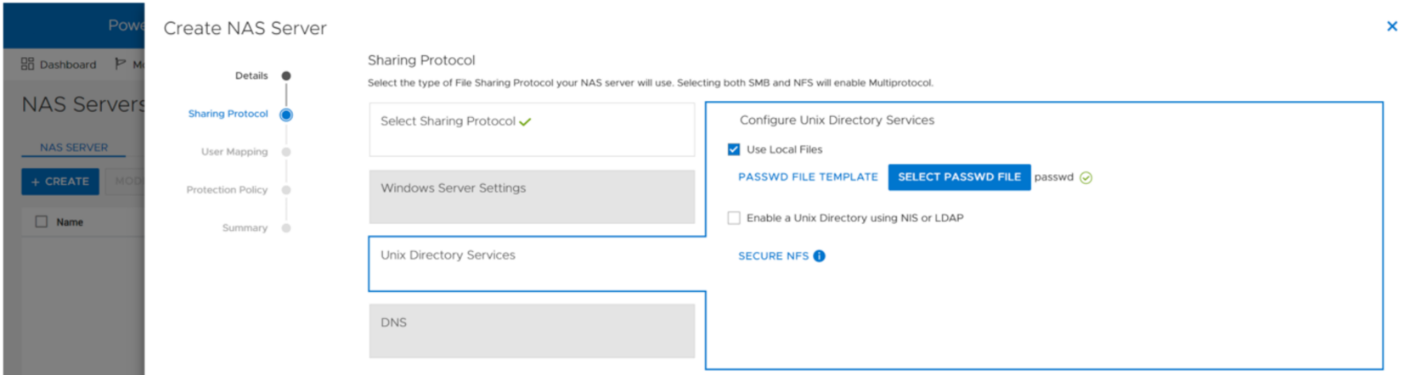
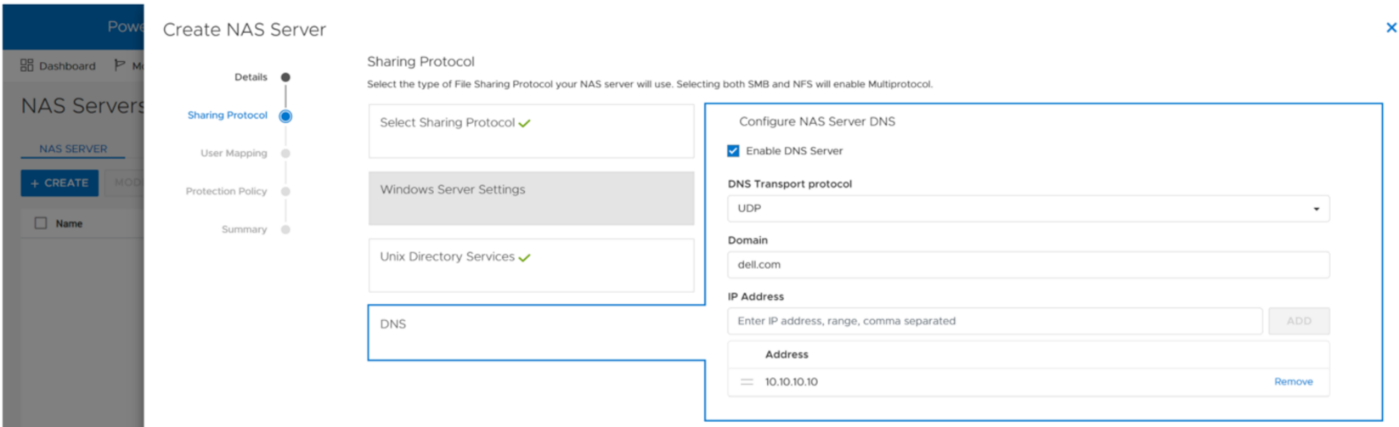
When the UDS is configured, the final step in the wizard prompts you to enable DNS for IP address and name resolution. This step is also optional and can be skipped if DNS is not required in your environment.
Any of the settings that are set during the initial provisioning of the NAS server can also be changed afterwards.
NFS exports
When the NFS-enabled NAS server is configured, you can provision a file system along with a NFS export. The NFS export provides a path that clients can use to mount the file system. The initial NFS export can optionally be created as part of the file system provisioning wizard. Additional NFS exports can also be created on existing file systems, if the path exists.
In the NFS export step of the file system provisioning wizard, the only required field is the name for the export. You can also see the name of the NAS Server, local path, file system name, and NFS export path on the right, as shown in the following figure.
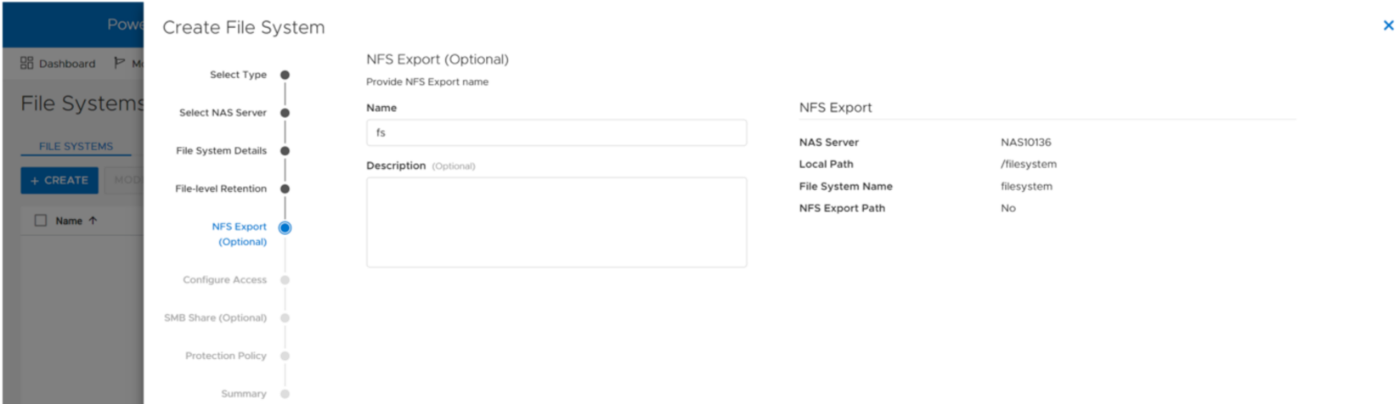
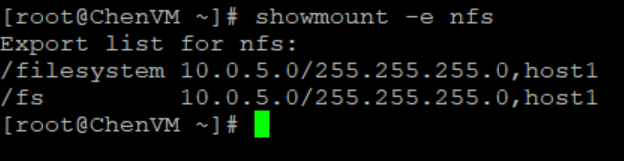
You can re-use the local path as the name of the export or provide a different name. If the provided name is different from the local path, then the name is used to create an NFS alias. An NFS alias is another path that can be used to mount the export that is different from the actual path to the share. For example, if the name is fs and the local path is /filesystem, both can be used to mount the export even though the actual path to the export is /filesystem. After the export is created, you can also see that both paths are valid when running the showmount command to the NAS server interface, as shown in the following figure.
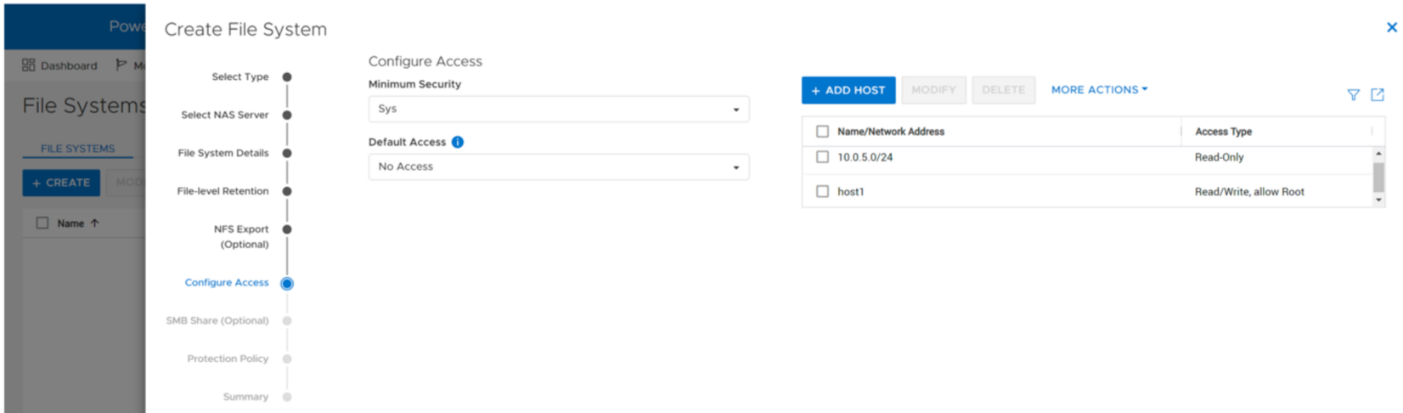
The next step in the wizard allows you to configure the access permissions to the NFS export. The following options are available:
- Minimum Security – The minimum authentication method allowed to access the NFS export. The Kerberos options are only available if Secure NFS is enabled.
- Sys (Default) – User authenticates when logging on to the client, so the client passes the user’s IDs to the NFS server without needing to authenticate directly
- Kerberos – Use Kerberos for authentication only
- Kerberos With Integrity – Use Kerberos for authentication and include a hash to ensure data integrity
- Kerberos With Encryption – Use Kerberos for authentication, include a hash, and encrypt the data in-flight
- Default Access – Determines the access permissions for all hosts that attempt to connect to the NFS export. The available options are:
- No Access (Default)
- Read/Write
- Read-Only
- Read/Write, allow Root
- Read-Only, allow Root
Note: The allow root options are the equivalent to no_root_squash on UNIX systems. This means if the user has root access on the client, they are also granted root access to the NFS export. Allow root is required for some use cases, such as VMware NFS datastores.
- Override List - Hosts that need different access than the default can be configured by adding hostnames, IP addresses, or subnets to the override list with one of the access options listed above.
- Comma-Separated - Multiple entries can also be added simultaneously in a comma-separated format. The following table shows the supported options when configuring NFS host access:
Name | Examples | Notes |
Hostname | host1.dell.com | Hostname should be defined in the local hosts file, NIS, LDAP, or DNS |
IPv4 or IPv6 Address | 10.10.10.10 fd00:c6:a8:1::1 |
|
Subnet | 10.10.10.0/255.255.255.0 | IP address/netmask or IP address/prefix |
- CSV File - Host access can also be configured by uploading a CSV file with a list of hosts and their respective access levels.
- PowerStore Manager provides a template with examples of the formatting and syntax for this file. This template can be downloaded from the system, edited, and then imported.
- When multiple NFS exports that require the same access configuration are configured, the same file can be imported multiple times and across multiple clusters as well.
- When the file is imported, the newly imported hosts are appended to the access list.
The following figure shows the host access configuration on an NFS export.
Mounting an NFS export
When you have created the NFS export, you can mount the NFS export on a client that is configured for access. If you attempt to mount the NFS export from a client that has no access, an access denied error is returned. If you attempt to mount a path that is not a valid NFS export, you will also see an access denied error.
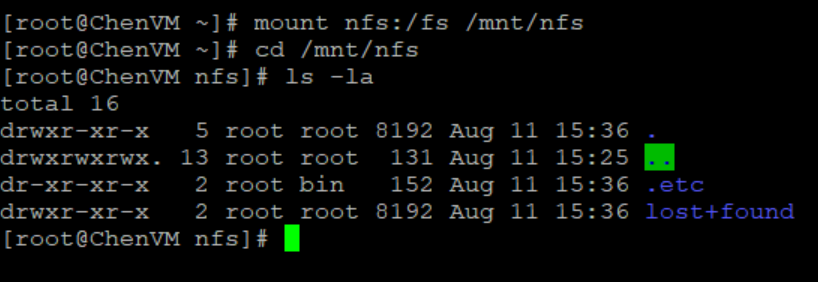
To mount the NFS export, use the mount command. The syntax is:
mount <NFS_Server_Interface>:/<Path_or_Alias> /<Mountpoint>.
For example, mount nfs:/fs /mnt/nfs connects to the interface with the DNS name of nfs, looks for the /fs path or alias, and then mounts it to the /mnt/nfs/ directory on the client.
Depending on the client OS version, the default mount option may vary between NFSv3 and NFSv4. If both are enabled on the NAS server and you want to use a specific version, you should specify it using the -t switch in the mount command.
To confirm that the NFS export is mounted and see the mount options, use the mount command, as shown in the following figure.
When it is mounted, you can simply change directory (cd) into /mnt/nfs to access the data on the NFS export.
Conclusion
Great job! You are now familiar with how to use the NFS protocol for file system access. This enables you to start configuring environments using NFS for many use cases and applications. Stay tuned for the next blog in this series where we’ll review how we can hide the .etc and lost+found directories from the end user.
Resources
Author: Wei Chen, Senior Principal Engineering Technologist
Related Blog Posts

Let’s Talk File (#4) – SMB Protocol Overview
Fri, 01 Jul 2022 19:28:26 -0000
|Read Time: 0 minutes
Introduction
A file access protocol enables clients and storage systems to transmit data using a common syntax and defined rules. PowerStore file supports a wide range of protocols, including SMB, NFS, FTP, and SFTP. In this blog, we’ll focus on a commonly used protocol for file sharing called Server Message Block (SMB). SMB is commonly used for use cases such as departmental shares, home directories, Microsoft SQL Server, Hyper-V, Exchange, and more.
SMB versions
The SMB option on the NAS server enables or disables SMB connectivity to the file systems.
PowerStore file supports SMB1 through 3.1.1. The SMB version that is negotiated depends on the client operating system:
- CIFS: Windows NT 4.0
- SMB1: Windows 2000, Windows XP, Windows Server 2003, and Windows Server 2003 R2
- SMB2: Windows Vista (SP1 or later) and Windows Server 2008
- SMB2.1: Windows 7 and Windows Server 2008 R2
- SMB3.0: Windows 8 and Windows Server 2012
- SMB3.02: Windows 8.1 and Windows Server 2012 R2
- SMB3.1.1: Windows 10 and Windows Server 2016 and Windows Server 2019
Due to the age of the protocol and potential security vulnerabilities, client access using SMB1 is disabled by default. If client access using SMB1 is required, it can be enabled by modifying the cifs.smb1.disabled parameter. Using SMB2 at a minimum is recommended because it provides security enhancements and increases efficiency, as compared to SMB1.
NAS servers use SMB2 to communicate with the domain controllers for operations such as authentication, SID lookups, Group Policies, and so on. If SMB2 is not available, the NAS server attempts to use SMB1 as a backup option. This means that any domain controllers that are running older operating systems that only support SMB1 can continue to function.
Standalone SMB server configuration
When enabling SMB support on a NAS server, the SMB server can either be standalone or Active Directory (AD) domain-joined. Standalone SMB servers are not associated with an AD domain so they only support local authentication. The information required when configuring a new standalone SMB server is shown in the following table.
Name | Description |
Workgroup | Name of the Windows workgroup where the file systems will be shared. |
Netbios Name | Network name of the standalone SMB server (15 characters maximum). |
Administrator Password | Set the initial password for the local Administrator user. |
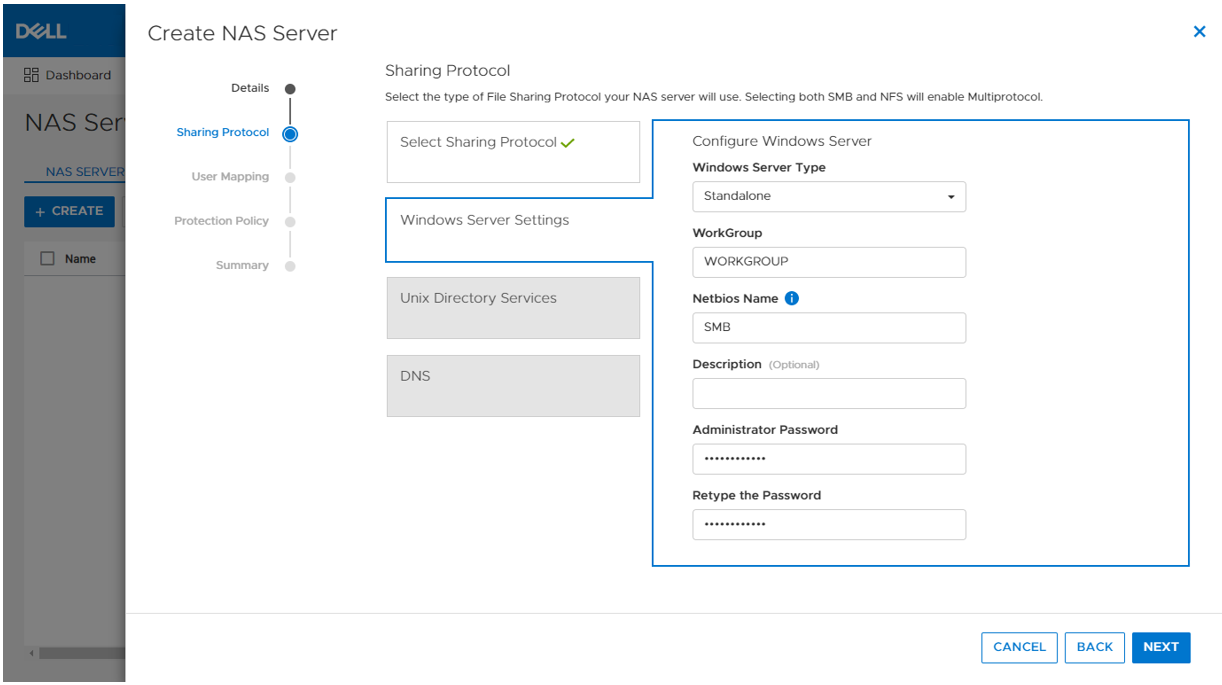
On the next step in the wizard, you can also optionally enable DNS on the standalone SMB server for IP address and name resolution.
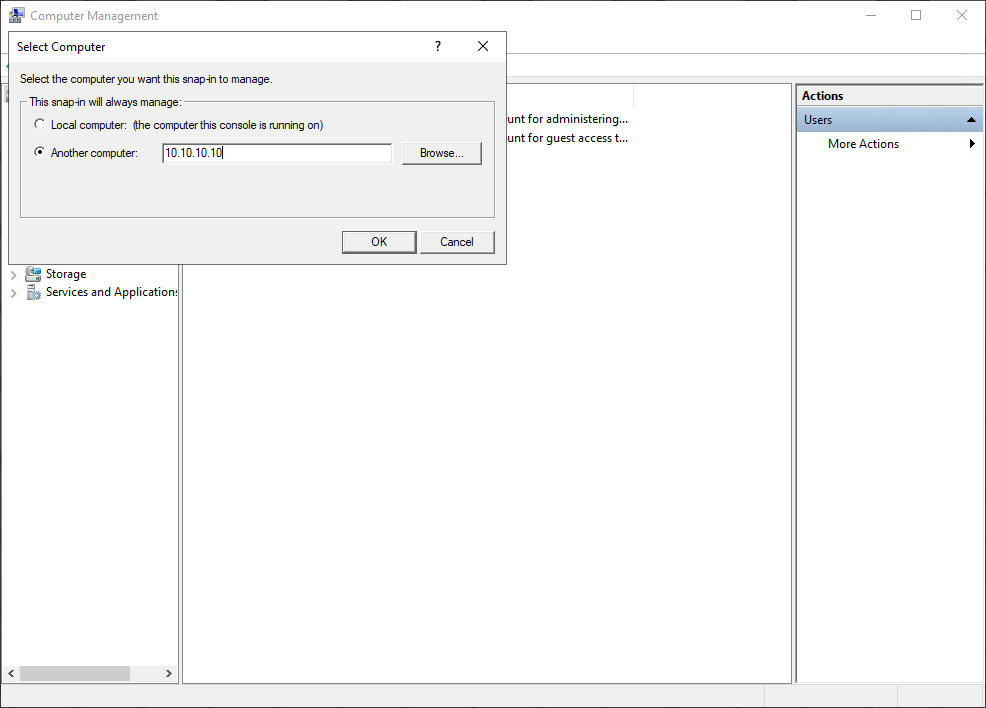
When the SMB server is created, it’s designed to have the same behavior and support many of the same tools as a Windows server. The administrator can manage it using standard Microsoft Windows tools such as the Computer Management MMC Console. These are the same tools that are used to manage a standard Windows server deployment, reducing the learning curve for administrators who are transitioning to PowerStore. There are also lots of tutorials and applicable documentation available online.
You can connect to the standalone SMB server by connecting to another computer and specifying the IP address of the NAS server.
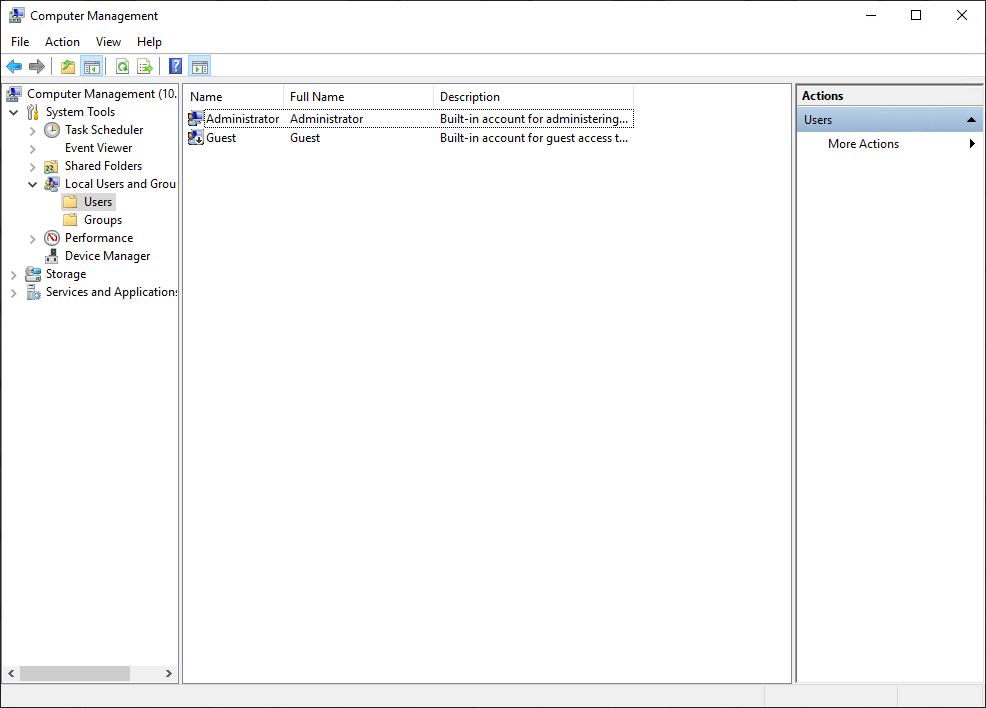
The local users are stored in the Local Users and Groups Database. Upon creation of a new standalone SMB server, only the local Administrator user is available. In the following figure, the Guest account is disabled by default, as noted by the down arrow at the bottom left corner of the Guest icon. Additional users and groups can be created here, if needed.
Domain-joined SMB server configuration
Domain-joined SMB servers are associated with an AD domain. AD is leveraged for centralized user authentication, applying group policies, enforcing security, implementing password requirements, and more.
The following information is required when configuring a new standalone SMB server:
Name | Description |
SMB Computer Name | Name of the computer object to be created in Active Directory |
Windows Domain | Name of the domain to which to join the SMB server |
Domain Username | Username of an account that has domain joining privileges |
Password | Password for the specified user |
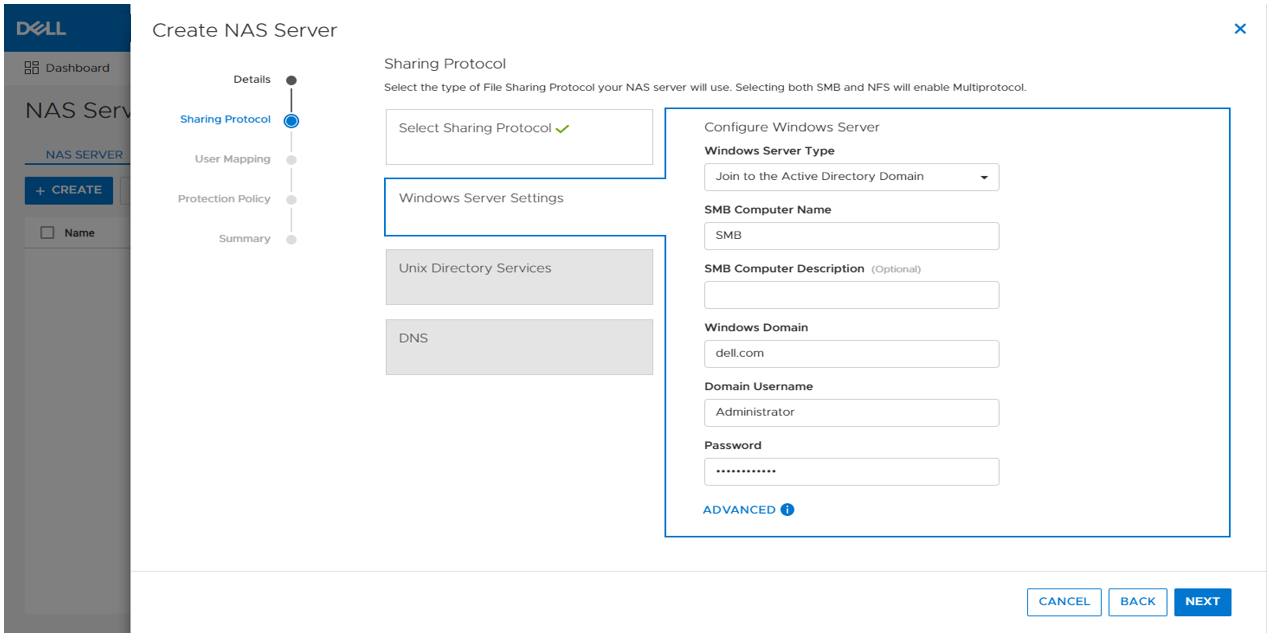
As part of the domain joining process, a computer object is created in the AD domain and DNS entries are created for IP address and name resolution. Domain-joined SMB servers require DNS to be configured, but this configuration is optional for standalone SMB servers. Domain-joined NAS servers are placed in the CN=Computers container, by default. The computer object can be configured to be stored in a different OU location in the advanced settings.
SMB shares
When the SMB server is configured, you can provision a file system along with an SMB share. The SMB share provides a path that clients can map to access the file system. The initial SMB share can be created as part of the file system provisioning wizard. Additional SMB shares can also be created on existing file systems, as long as the path exists.
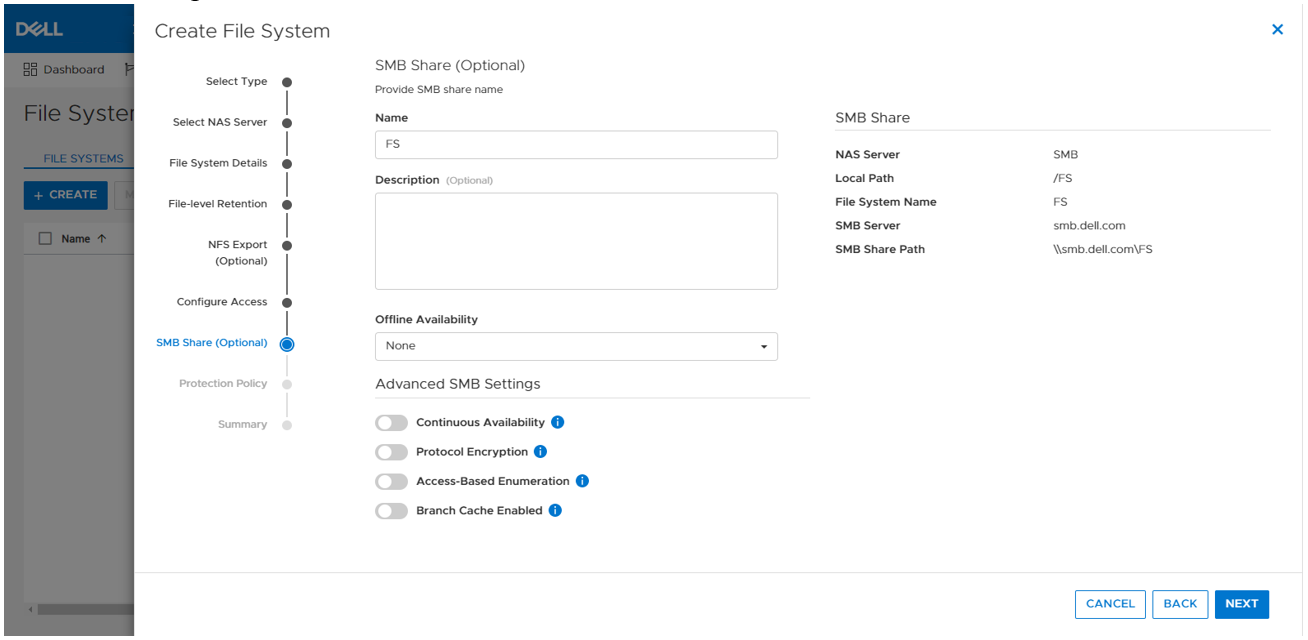
The figure below shows the SMB share step of the file system provisioning wizard. The only required field is the name for the share. On the right, you can also see the name of the NAS Server, local path, file system name, SMB server name, and the SMB share path for the share.
Take note of the SMB share path because that is what you will use to map the share from the client. This is called a UNC (Universal Naming Convention) path and the format is \\<SMB_Server>\<SMB_Share_Name>. For example, \\smb\fs.
You can disregard the other advanced SMB settings for now. We’ll cover those in a later blog.
Mapping a share
Now we are ready to map the share on a client. On a client, you can simply enter the UNC path into MS Explorer to access the share, as shown below.
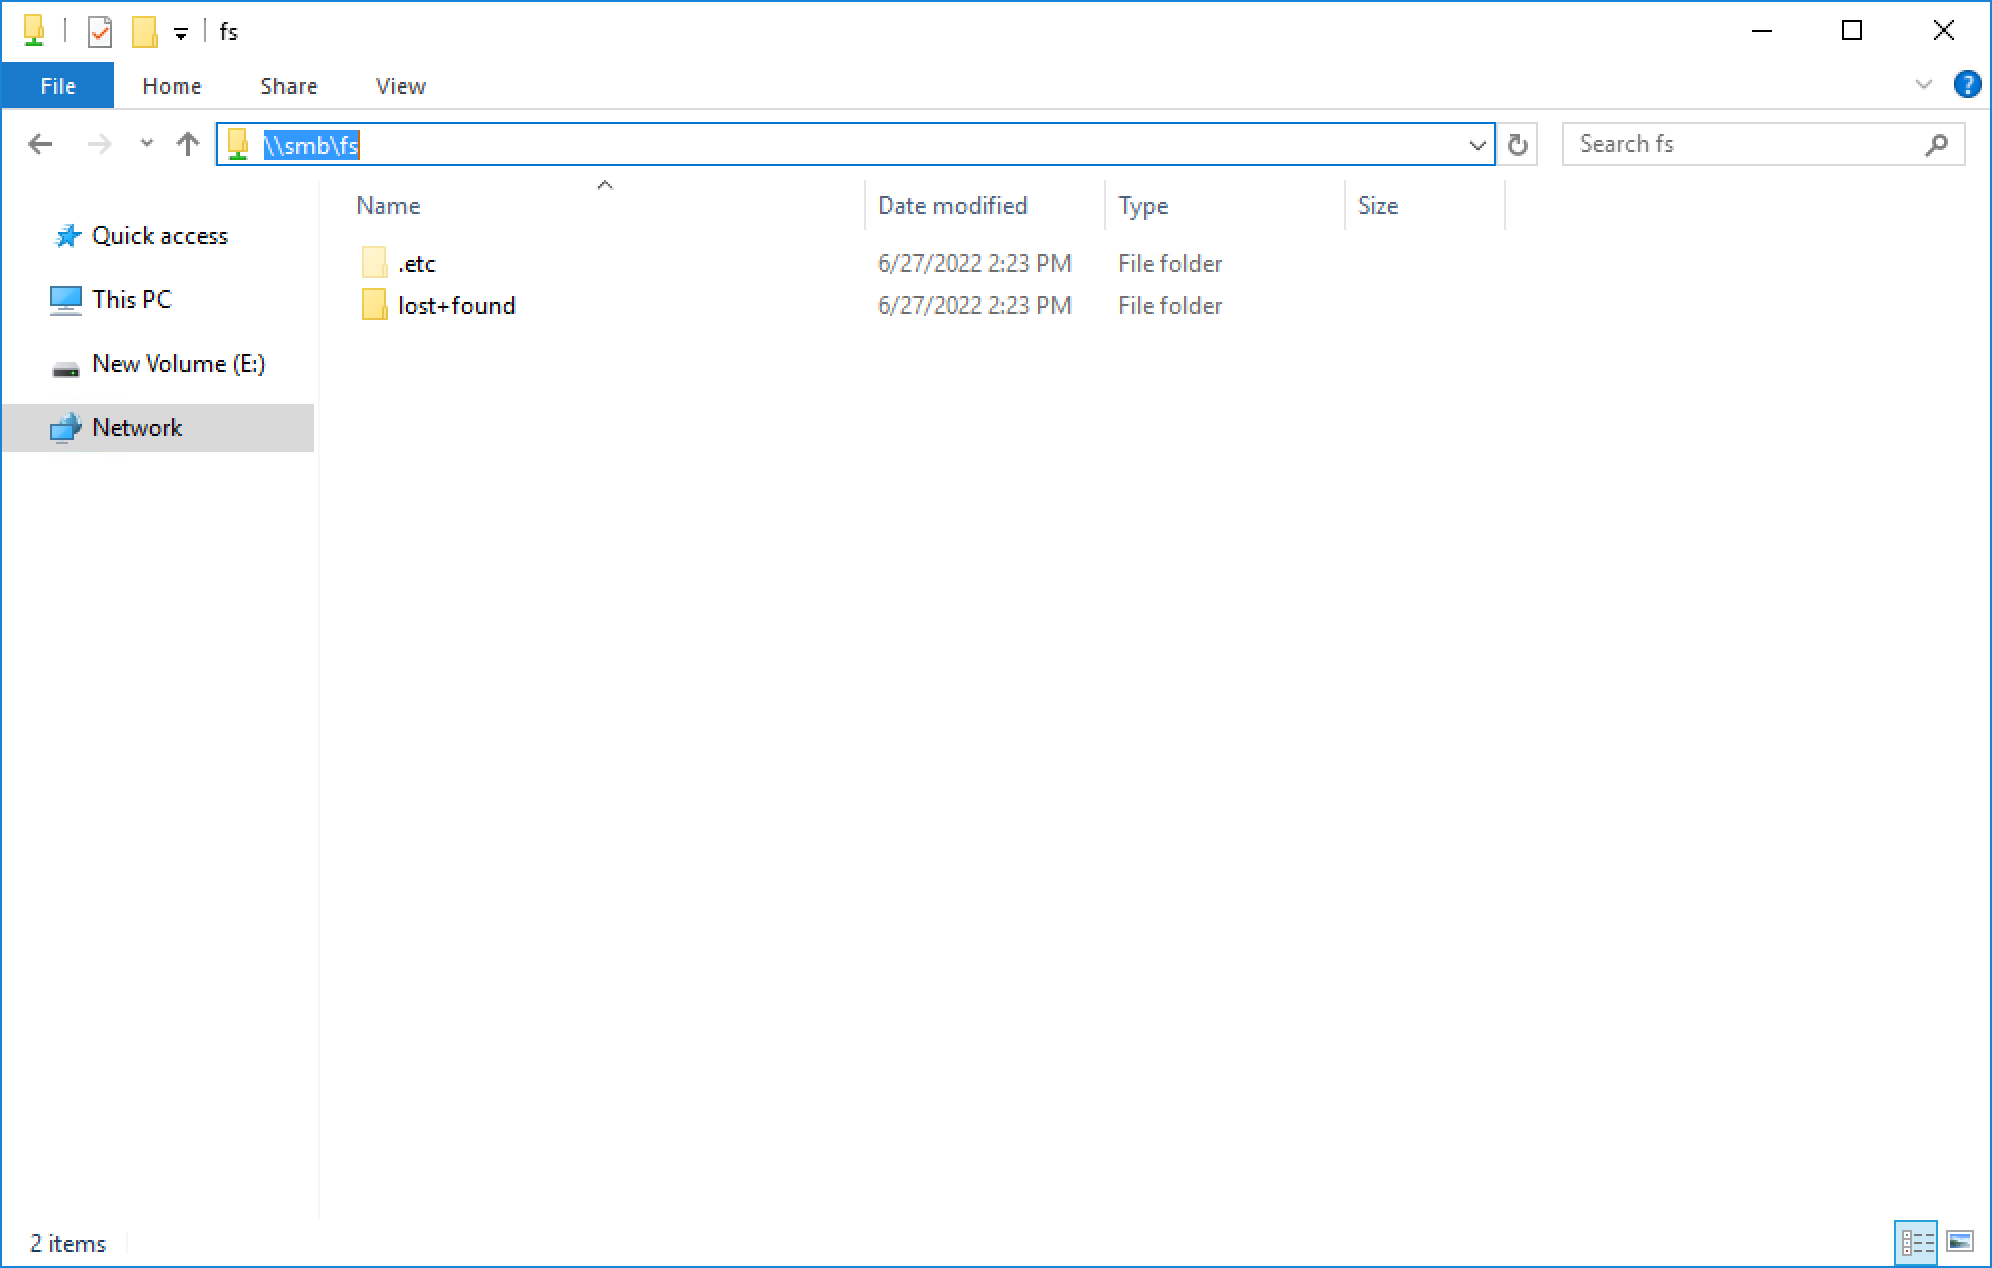
If your client is logged in using an account that is on the same domain as the domain-joined SMB server, your credentials are passed automatically and the share opens. If you’re attempting to map an SMB server that is in a foreign domain, you are prompted for credentials in order to access the share. Alternatively, you can also connect using a local user’s credentials.
For standalone SMB servers, you can only connect using a local user’s credentials. You are prompted for the username and password when connecting to the share. By default, only the local Administrator user exists and the password is set during the initial configuration of the standalone SMB server.
To map the share to a drive letter (so that you can easily access it in the future), click the Map Network Drive button in Explorer, as shown here.
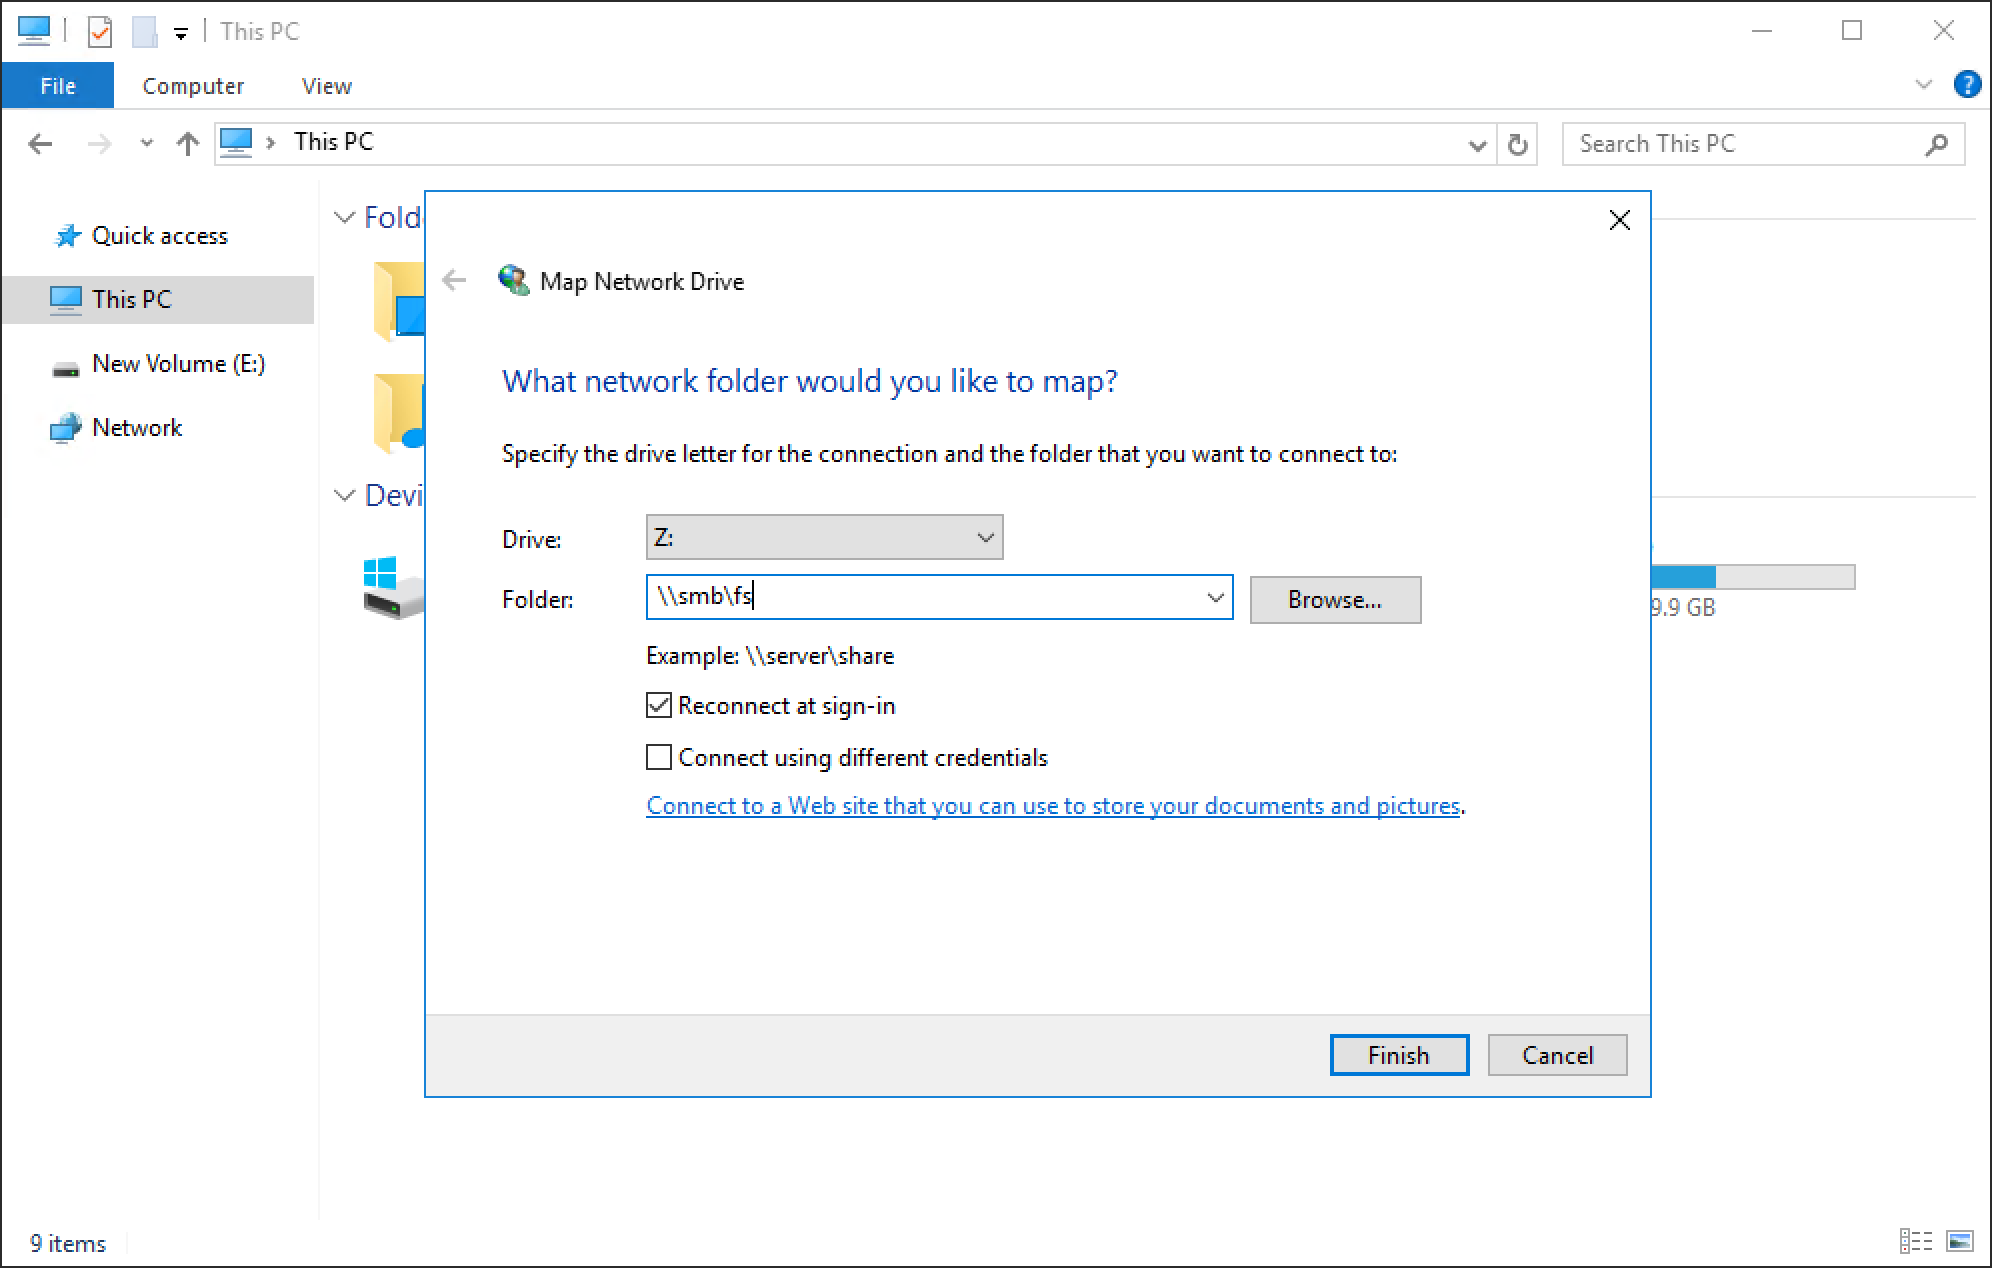
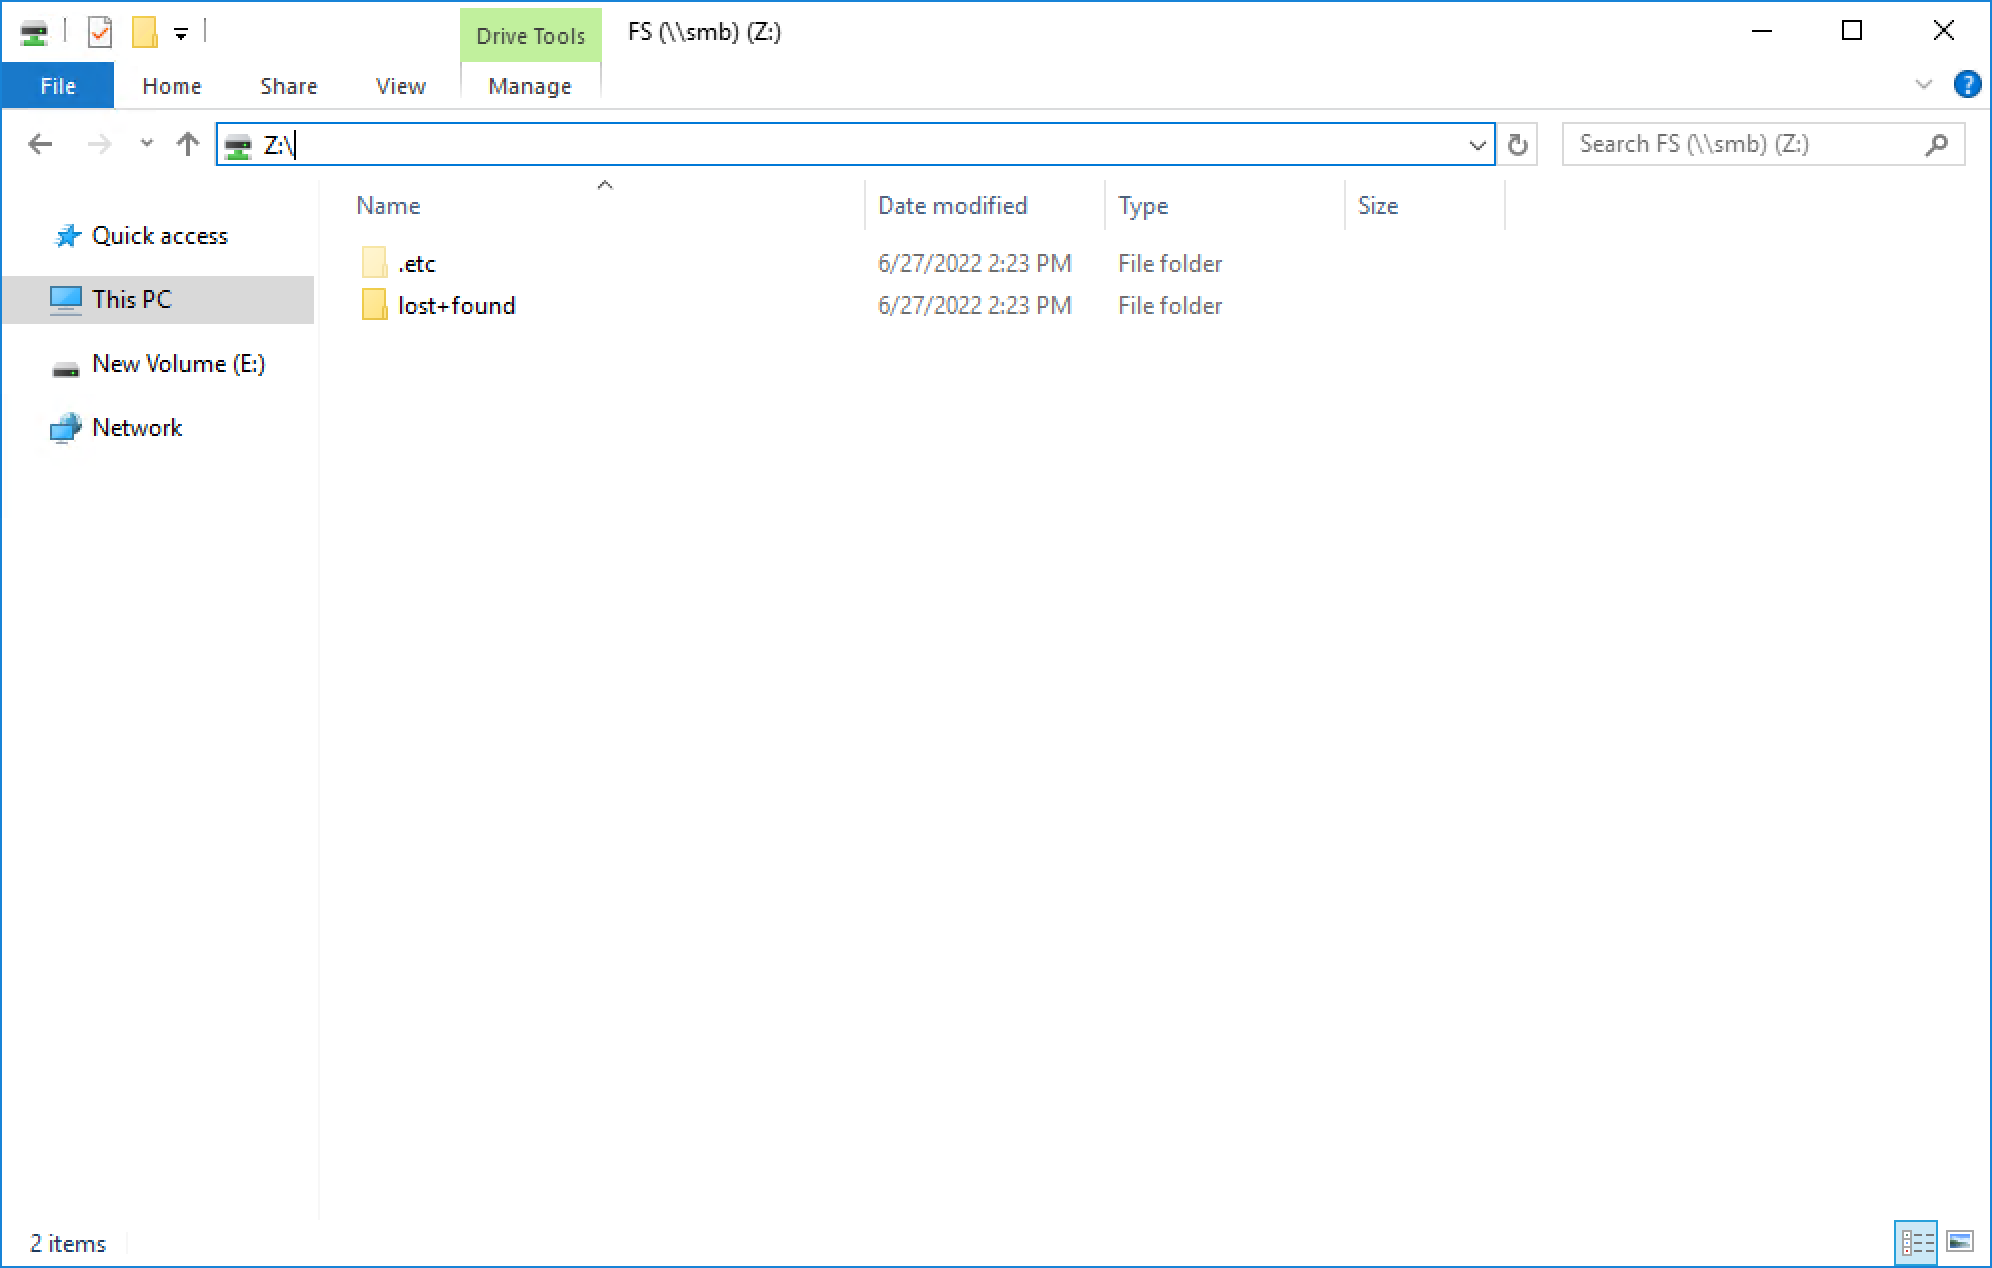
You can select a drive letter to which to map the drive, specify the UNC path, and select options such as reconnect at sign-in or connect using different credentials. When the drive is mapped, you can access it using the assigned drive letter, as shown in the following figure.
Conclusion
Great job! You are now familiar with how to use the SMB protocol for file system access. This enables you to start configuring environments using SMB for many use cases and applications. Stay tuned for the next blog in this series where we’ll take a look at another commonly used file protocol: NFS.
Resources
Author: Wei Chen, Senior Principal Engineering Technologist

Let’s Talk File (#3) – PowerStore File Systems
Wed, 24 Apr 2024 17:05:59 -0000
|Read Time: 0 minutes
Introduction
A file system is a storage resource that holds data and can be accessed through file sharing protocols such as SMB or NFS. The PowerStore file system architecture is designed to be highly scalable, efficient, performance-focused, and flexible. PowerStore offers a 64-bit file system that is mature and robust, enabling it to be used in many of the traditional NAS file use cases.
File system highlights
PowerStore file systems can accommodate large amounts of data, directories, and files. Each individual file system is designed to scale up to 256TB in size, hold 10 million subdirectories per directory, and store 32 billion files. Don’t forget that PowerStore can support up to 500 file systems on an appliance as well!
All file systems are thinly provisioned and always have compression and deduplication enabled. This means that capacity is allocated on demand as capacity is consumed on the file system. In addition, compression and deduplication help reduce the total cost of ownership and increase the efficiency of the system by reducing the amount of physical capacity that is needed to store the data. Savings are not only limited to the file system itself, but also to its snapshots and thin clones. Compression and deduplication occur inline between the system cache and the backend drives. The compression task is offloaded to a dedicated chip on the node, which frees up CPU cycles.
PowerStore file systems are tuned and optimized for high performance across all use cases. In addition, platform components such as Non-Volatile Memory Express (NVMe) drives and high-speed connectivity options enable the system to maintain low response times while servicing large workloads.
How to provision a file system
Now that you understand the benefits of the PowerStore file system, let’s review the file system provisioning process. PowerStore Manager makes it quick and simple to provision a file system, create NFS exports and/or SMB shares, configure access, and apply a protection policy using a single wizard.
To create a file system, open PowerStore Manager and navigate to Storage > File Systems > Create. The file system creation wizard prompts you for the information displayed in the following table.
Name | Description |
NAS Server | Select the NAS server that will be used to access this file system, ensuring the necessary protocols are enabled on the NAS server for client access. |
Name | Provide a name for the file system. |
Size | Specify the size of the file system that is presented to the client, between 3GB and 256TB. |
NFS Export (Optional) | Only displayed if NFS is enabled on the NAS server. Provide a name for the NFS export if NFS access is desired. The NFS Export Path is displayed so you can easily mount the NFS export on the client. |
Configure Access | Only displayed if an NFS export is created. This screen has the following settings:
|
SMB Share (Optional) | Only displayed if SMB is enabled on the NAS server. This screen has the following settings:
|
Protection Policy | Select a protection policy to protect the file system. |
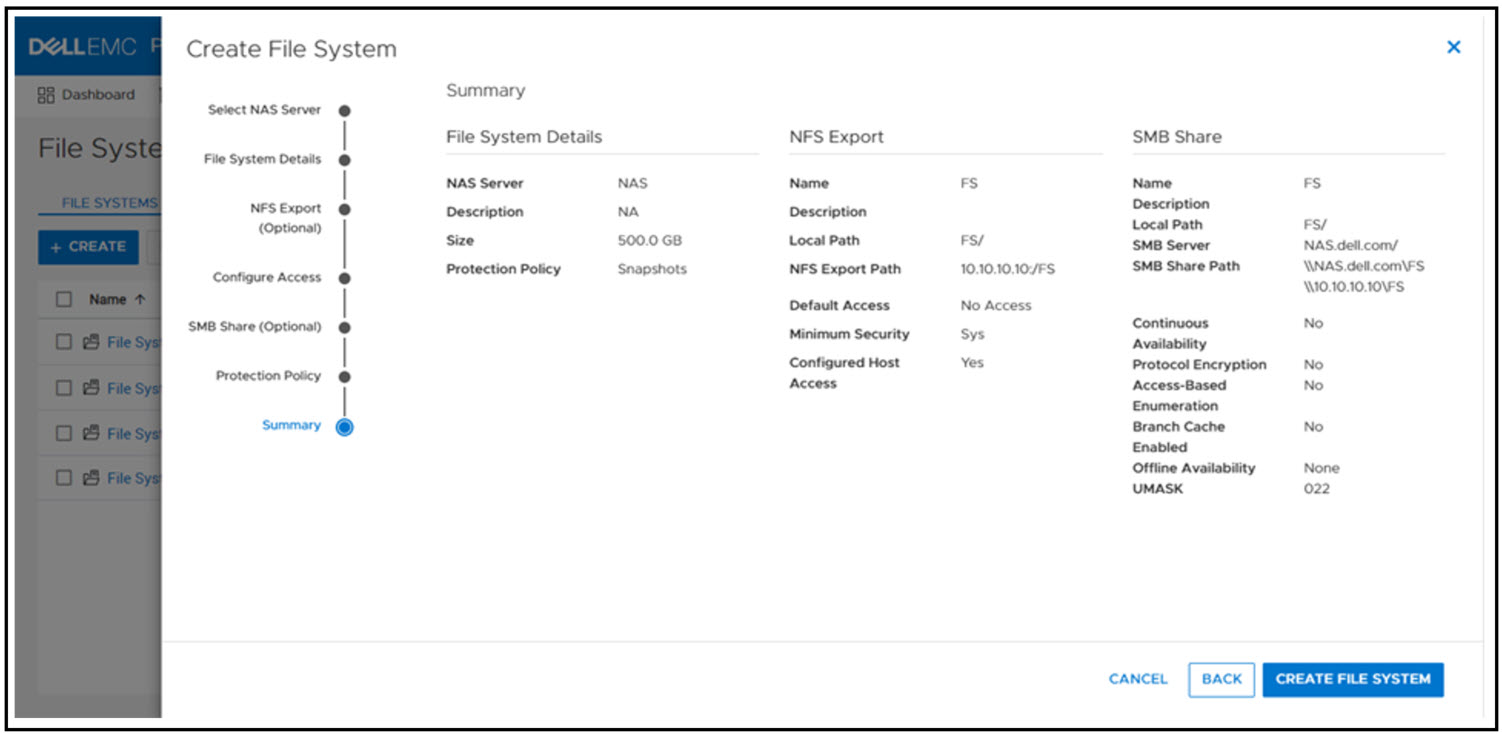
The following screenshot shows an example of the summary page when creating a new file system. In this example, we provisioned the file system, NFS export, SMB share, configured host access, and applied a protection policy to the file system.
If you’re testing file for the first time, you may want to start off with deploying a basic minimum configuration. To do this, all you need to choose is a NAS server, configure a file system name, specify a size, and create either an NFS export or an SMB share. If you enable NFS, you’ll also need to enable host access to your client.
When the file system and NFS export or SMB share is provisioned, you now mount the file system on to your host for access:
- SMB: \\<SMB_Server>\<SMB_Share_Name>
- For example: \\nas\fs
- NFS: mount <NFS_Server>:/<NFS_Export_Name> /<Mountpoint>
- For example: mount nas:/fs /mnt
File system management
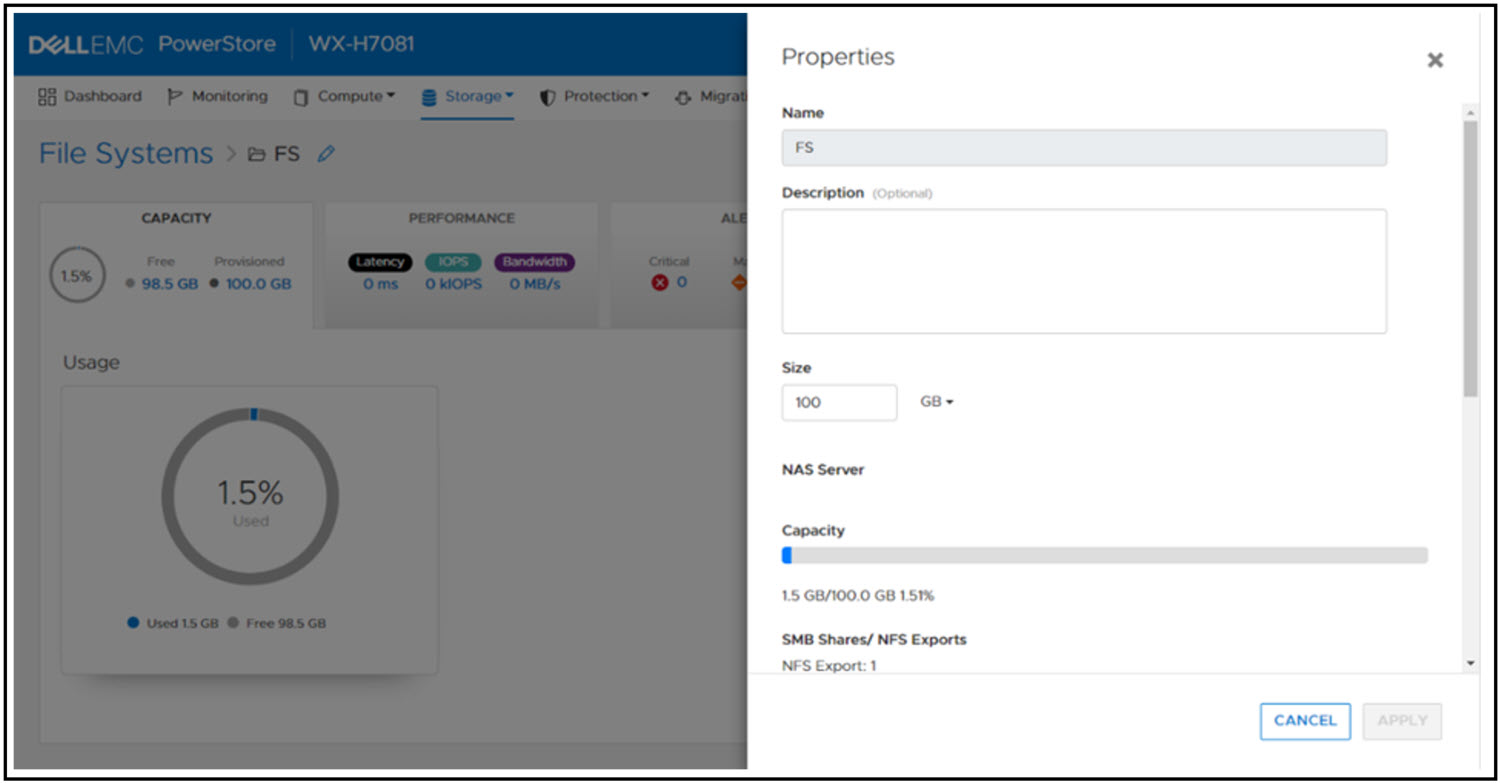
PowerStore file systems provide increased flexibility by providing the ability to shrink and extend file systems as needed. Shrink and extend operations are used to resize the file system and update the capacity that is seen by the client. Extend operations do not change how much capacity is allocated to the file system. However, shrink operations may be able to reclaim unused space, depending on how much capacity is allocated to the file system and the presence of snapshots or thin clones.
If the advertised file system size is too small or full, extending it allows additional data to be written to the file system. If the advertised file system size is too large, shrinking it limits the amount of data that can be written to the file system. For shrink and extend, the minimum value is equal to the used size of the file system; the maximum value is 256 TB. You cannot shrink the file system to less than the used size, because this would cause the client to see the file system as more than 100% full.
The following figure shows the file system properties page in PowerStore Manager, where you can shrink or extend a file system.
File system performance metrics
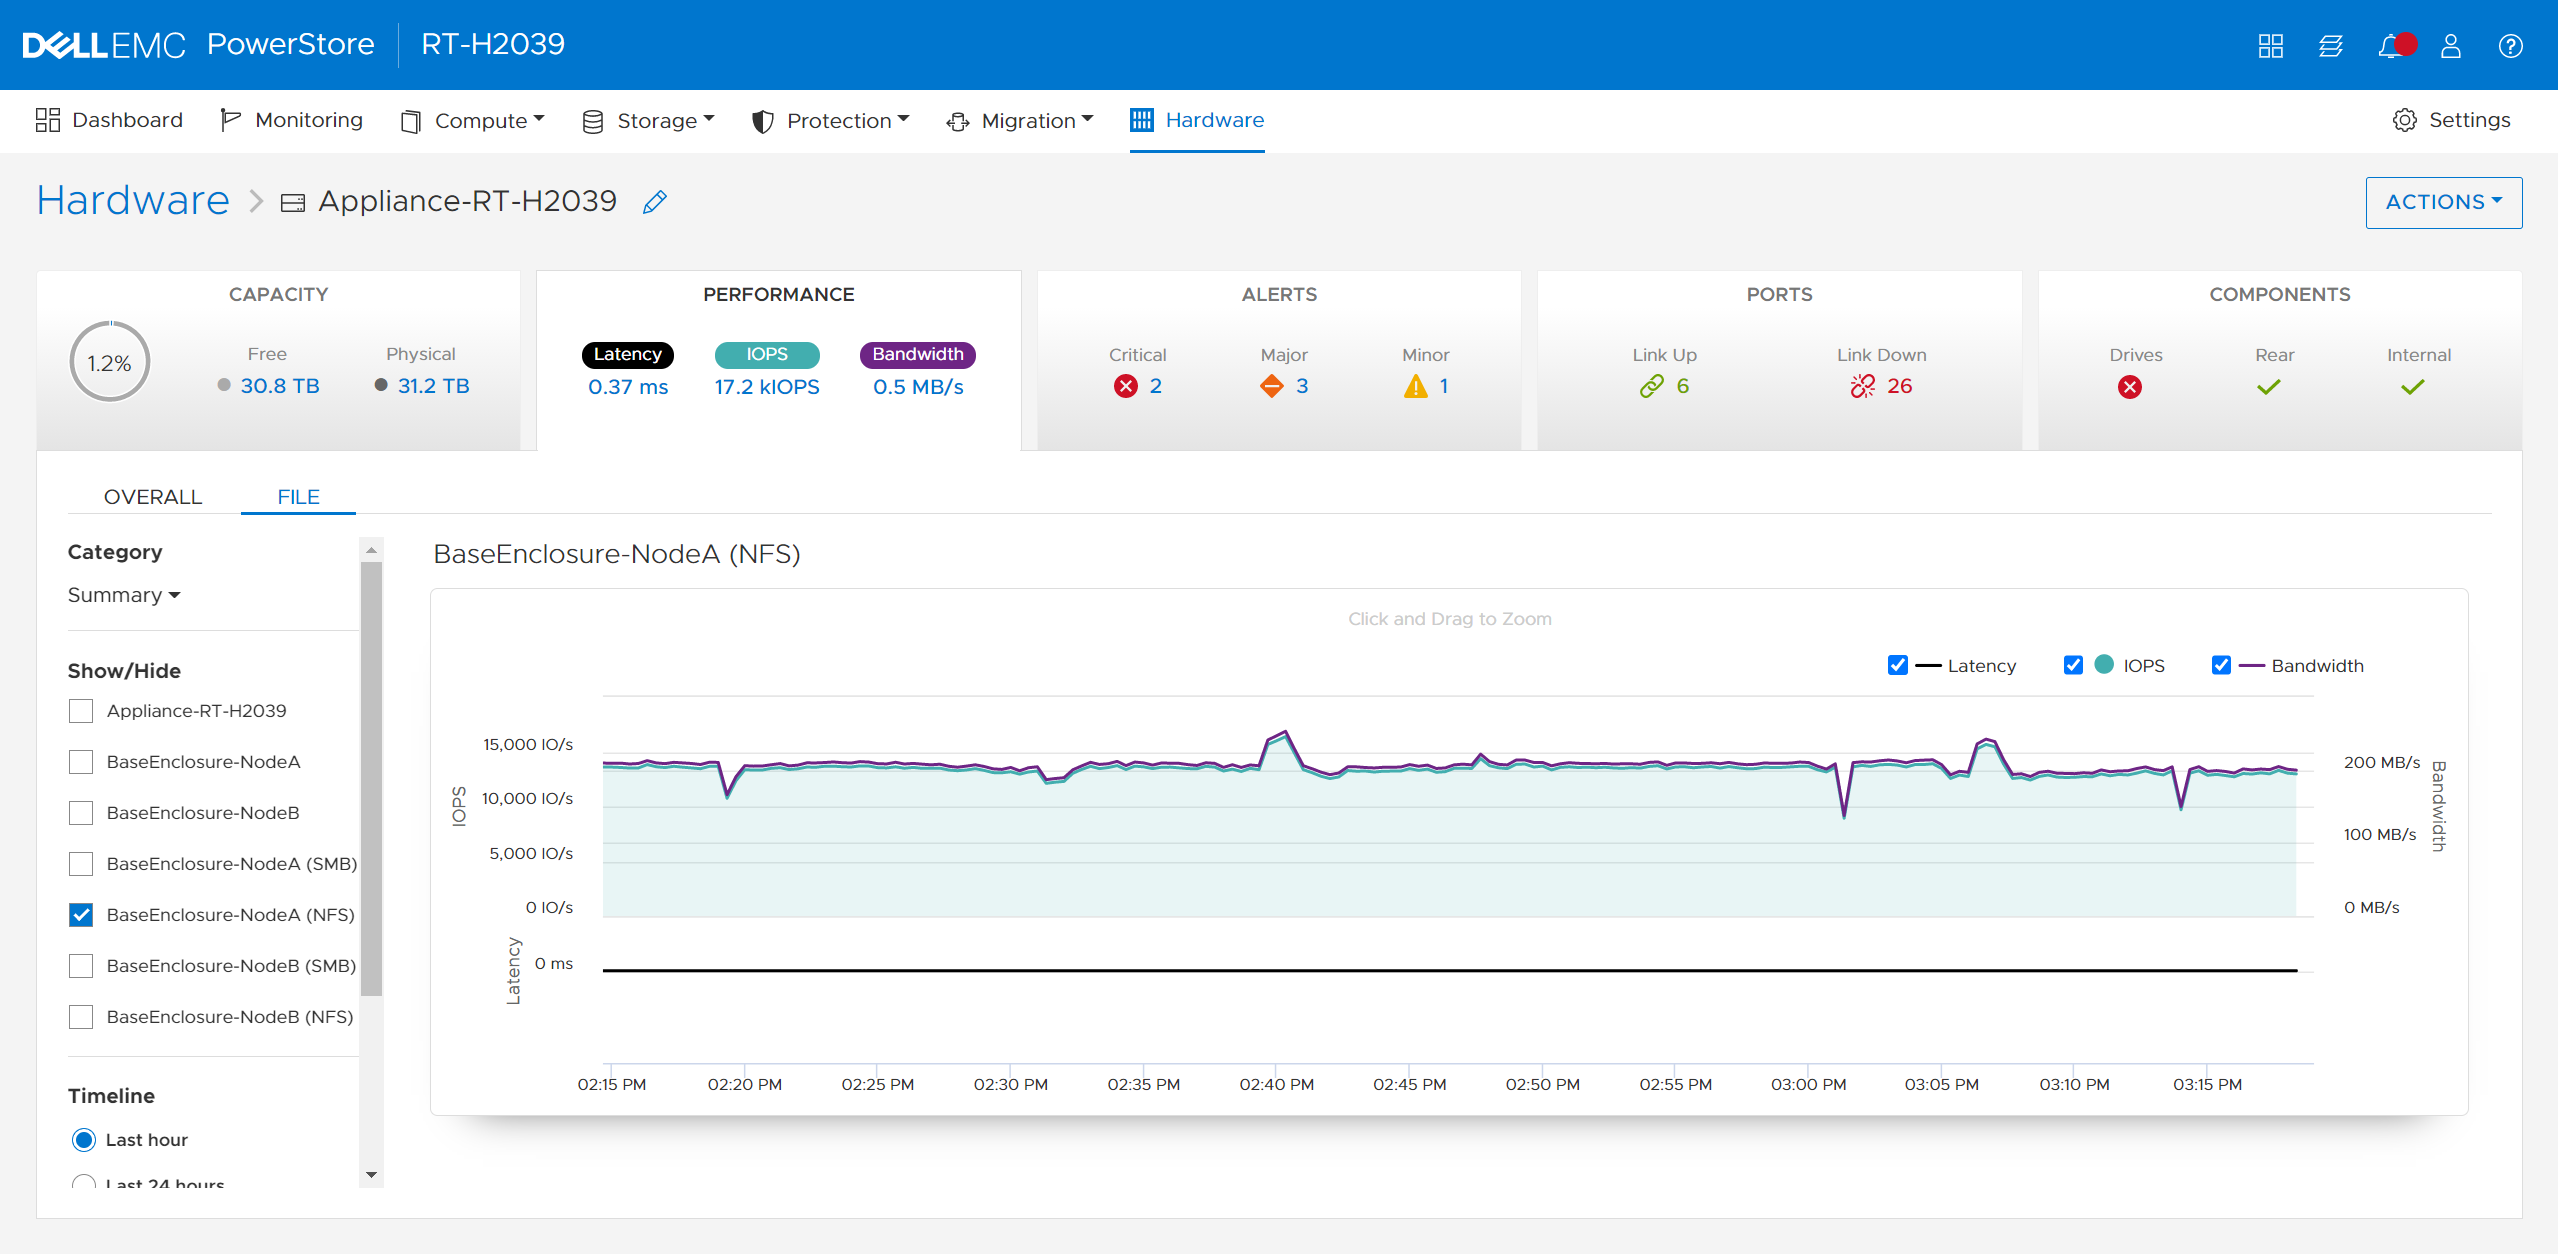
Performance metrics are available to view the latency, IOPS, bandwidth, and IO size at the file system level. You can tweak the timeline to view preset timeframes ranging from the last hour to the last 2 years, or drag and zoom in to specific sections of the graph. You can also export the metrics to file types such as PNG, PDF, JPEG, or CSV.
File-specific metrics are also available at the node, cluster, and appliance level. At the node level, SMB and NFS protocol metrics can also be viewed. The available metrics are:
- Read, Write, and Total IOPS
- Read, Write, and Total Bandwidth
- Read, Write, and Average Latency
- Read, Write, and Average IO Size
The following figure shows the file metrics page that displays the NFS protocol metrics on Node A.
Conclusion
Congratulations! You have successfully provisioned a file system, NFS export, SMB share, and accessed it from a host. Now you can write files and folders or run workloads on the file system. We also reviewed how to leverage shrink and extend to update the file system size, and looked at some of the performance metrics so you can monitor your file systems. Stay tuned for the next blog in this series where we’ll take a deeper dive into the SMB protocol.
Resources
Author: Wei Chen, Senior Principal Engineering Technologist