


Let’s Talk File (#2) – PowerStore NAS Servers

Introduction
PowerStore file uses virtualized file servers that are called NAS servers, which are a critical piece of a file environment. In this blog, we will review what NAS servers are, study the NAS server architecture and its benefits, take a quick look at the NAS server settings, and walk through the process to create a new NAS server using PowerStore Manager.
What is a NAS server? A NAS server provides administrators with the ability to specify how PowerStore and its clients should connect, authenticate, and communicate with each other. It contains the configuration, interfaces, and environmental information that is used to facilitate access to the data residing on the file systems. In addition, features such as anti-virus protection, backups, user mappings, and more are also configured on the NAS server.
NAS Server Architecture
PowerStore’s modern NAS server architecture provides many inherent benefits. NAS servers have many responsibilities, including enabling access to file systems, providing data separation, and acting as a basis for multi-tenancy. They are also used as components for load balancing and high availability. This makes it quick and simple to deploy a feature-rich and enterprise-level file solution that meets your business requirements. The image below illustrates the NAS server architecture on PowerStore.
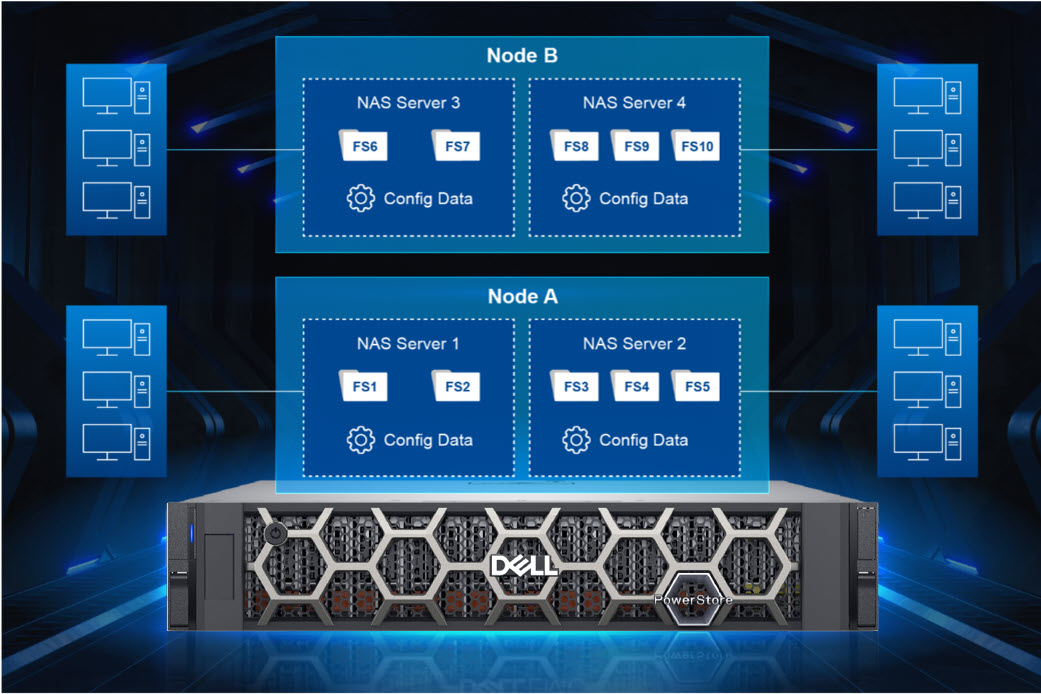
Each NAS server has its own independent configuration, enabling it to be used to enforce multitenancy. This is useful when hosting multiple tenants on a single system, such as for service providers. Each NAS server can be tailored to meet the requirements of each tenant without impacting the other NAS servers on the same appliance.
When creating a file system, the file system is assigned to a NAS server. Each NAS server has its own set of file systems to store file data. Because each NAS server is logically separated from the others, clients that have access to one NAS server do not inherently have access to the file systems on the other NAS servers. To access file systems on a different NAS server, clients must separately authenticate using the methods specified by that NAS server.
Each PowerStore node can host multiple NAS servers and both nodes are actively used to service file IO. New NAS servers are automatically assigned on a round-robin basis across both available nodes. This active/active architecture enables load balancing, provides high availability, and allows both nodes to serve file data simultaneously. If a PowerStore node reboots, NAS servers and their corresponding file systems automatically fail over to the surviving node. NAS servers are also automatically moved to the peer node and back during the upgrade process. After the upgrade completes, the NAS servers return to the node they were assigned to at the beginning of the upgrade.
NAS Server Settings
Let’s do a quick review of some of the items that can be configured on a NAS server. See the following table for a list of items along with a short description of their purpose.
Don’t worry if you’re not familiar with some of these services or terms because they’re not all required. You only need to enable and configure services that you are actively using in your specific environment. We’ll also cover these services in more detail in future blogs in this series.
Name | Description |
Interfaces | IP address, subnet, gateway, and VLAN to access the NAS server |
Access Protocols | Server Message Block (SMB) – Primarily used by Windows clients for SMB shares |
Network File System (NFS) – Primarily used by UNIX and VMware ESXi clients for NFS exports | |
File Transfer Protocol (FTP) – Used by all clients for file transfers | |
SSH File Transfer Protocol (SFTP) - Used by all clients for secure file transfers | |
Lightweight Directory Access Protocol (LDAP) / Network Information Service (NIS) / Local Files | Resolving user IDs and names to each other |
Domain Name System (DNS) | Resolving IP addresses and names to each other |
Anti-virus | Anti-virus servers used to identify and eliminate known viruses before they infect other files |
Network Data Management Protocol (NDMP) | A standard used for backing up file storage |
Kerberos | A distributed authentication service used for Secure NFS |
How to Configure a NAS Server
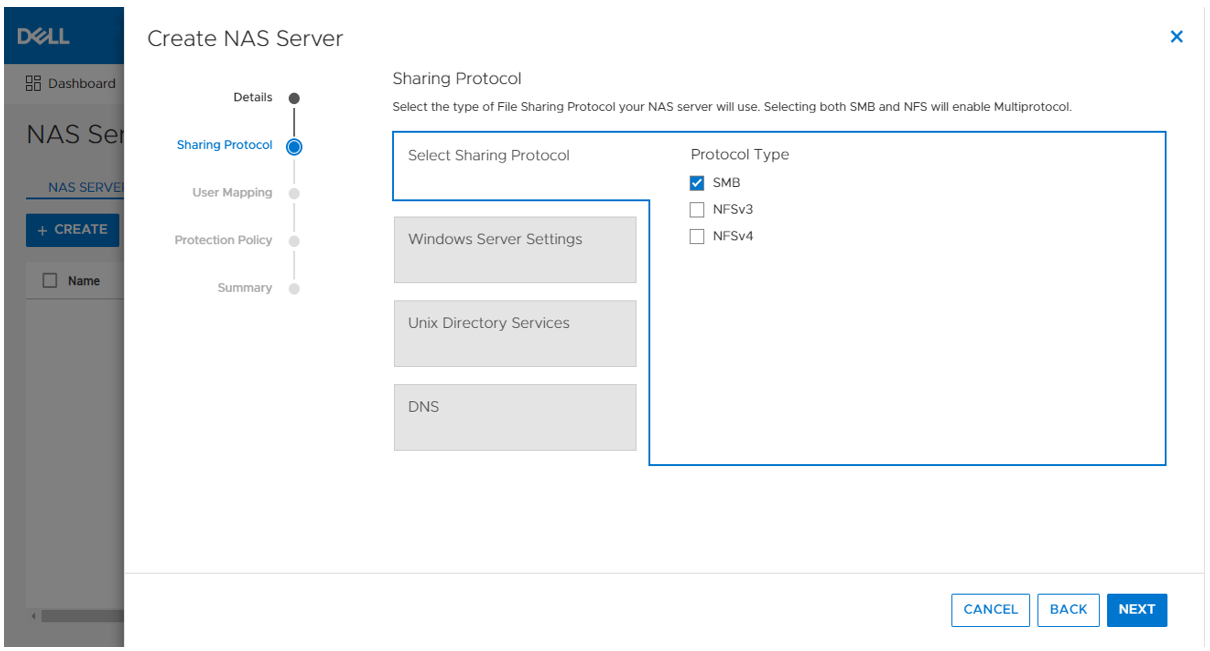
When deploying a file environment, the first resource you should provision on PowerStore is the NAS server. Now that you understand how they work, let’s go ahead and create one. To do this, open PowerStore Manager and navigate to Storage > NAS Servers. The NAS server creation wizard prompts you for the information displayed in the table below. All of these options can also be modified after creation, if needed.
Name | Description |
Interface Details (Required) |
|
Sharing Protocols (Optional) |
Note: If both SMB and NFS protocols are enabled, multiprotocol access is automatically enabled |
UNIX Directory Services (shown if NFS is enabled) |
|
DNS (Required for AD Joined SMB Servers, but otherwise optional) |
|
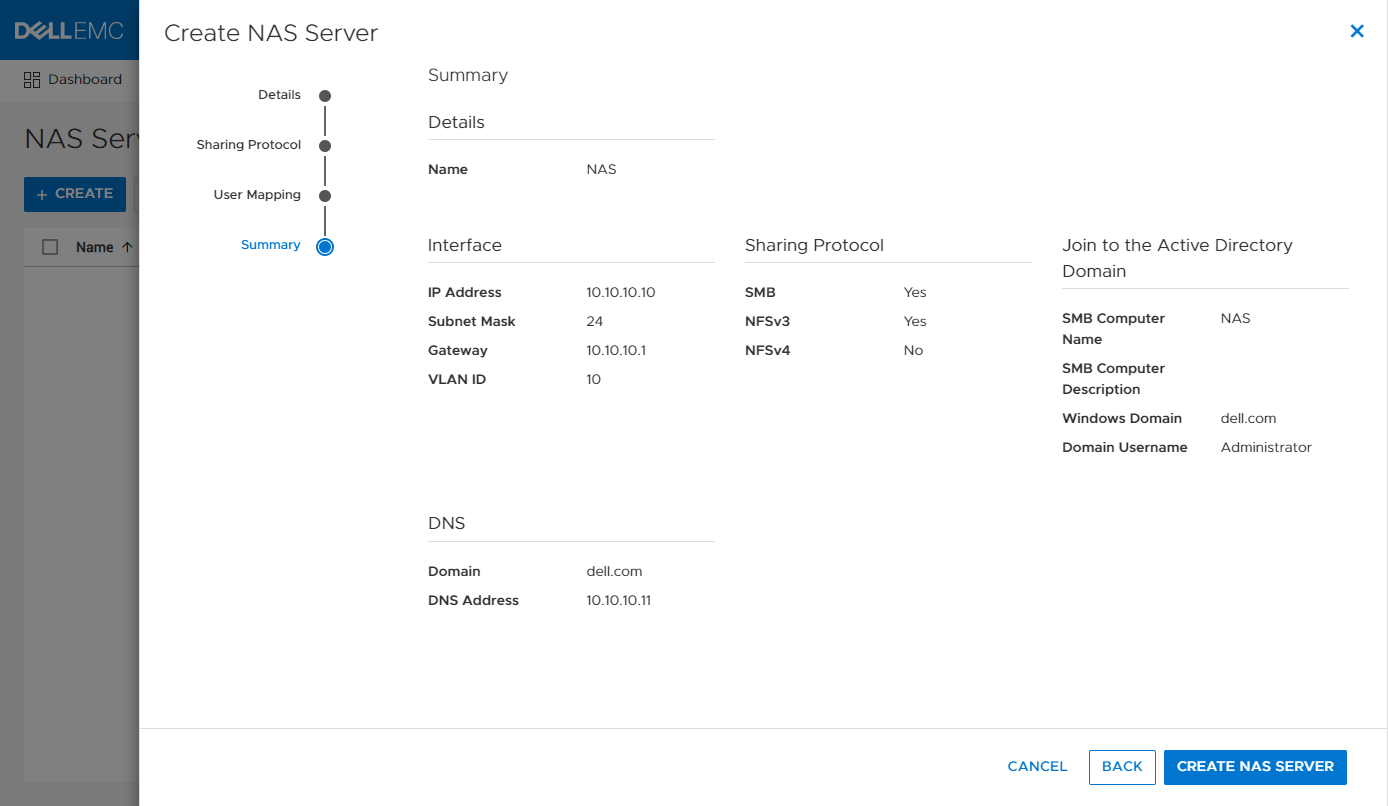
The screenshot below shows an example of the summary page when configuring a new NAS server. In this example, we created an interface, AD-joined SMB Server, NFSv3, and DNS.
If you’re testing file for the first time, you may want to start off with deploying a basic minimum configuration. To do this, all you need to configure is an interface and enable at least one access protocol.
Conclusion
Now that we have our NAS server configured, our clients have a communication path to connect to PowerStore using a file protocol! This is the first major step, but we’re not done yet. Next, we need to provision a file system to store our data and shares or exports to make the file system accessible to clients. Stay tuned for the next blog in this series where we’ll review file system provisioning, management, and monitoring.
Resources
Author: Wei Chen, Senior Principal Engineering Technologist
Related Blog Posts

Let’s Talk File (#4) – SMB Protocol Overview
Fri, 01 Jul 2022 19:28:26 -0000
|Read Time: 0 minutes
Introduction
A file access protocol enables clients and storage systems to transmit data using a common syntax and defined rules. PowerStore file supports a wide range of protocols, including SMB, NFS, FTP, and SFTP. In this blog, we’ll focus on a commonly used protocol for file sharing called Server Message Block (SMB). SMB is commonly used for use cases such as departmental shares, home directories, Microsoft SQL Server, Hyper-V, Exchange, and more.
SMB versions
The SMB option on the NAS server enables or disables SMB connectivity to the file systems.
PowerStore file supports SMB1 through 3.1.1. The SMB version that is negotiated depends on the client operating system:
- CIFS: Windows NT 4.0
- SMB1: Windows 2000, Windows XP, Windows Server 2003, and Windows Server 2003 R2
- SMB2: Windows Vista (SP1 or later) and Windows Server 2008
- SMB2.1: Windows 7 and Windows Server 2008 R2
- SMB3.0: Windows 8 and Windows Server 2012
- SMB3.02: Windows 8.1 and Windows Server 2012 R2
- SMB3.1.1: Windows 10 and Windows Server 2016 and Windows Server 2019
Due to the age of the protocol and potential security vulnerabilities, client access using SMB1 is disabled by default. If client access using SMB1 is required, it can be enabled by modifying the cifs.smb1.disabled parameter. Using SMB2 at a minimum is recommended because it provides security enhancements and increases efficiency, as compared to SMB1.
NAS servers use SMB2 to communicate with the domain controllers for operations such as authentication, SID lookups, Group Policies, and so on. If SMB2 is not available, the NAS server attempts to use SMB1 as a backup option. This means that any domain controllers that are running older operating systems that only support SMB1 can continue to function.
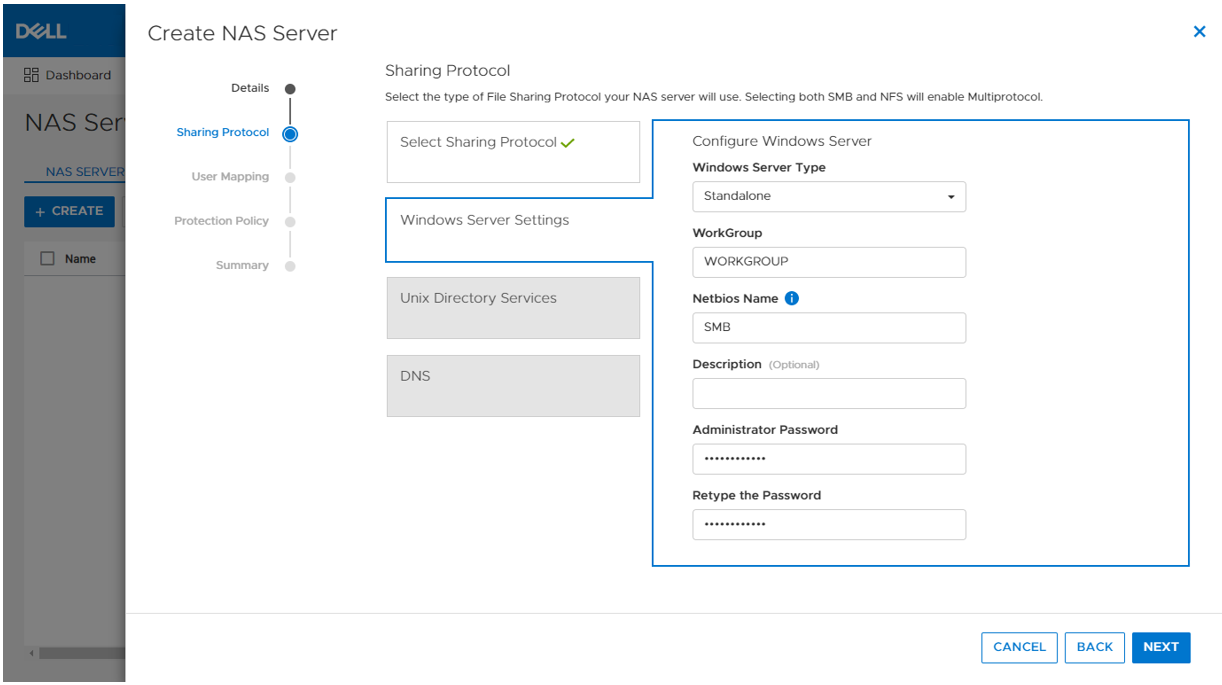
Standalone SMB server configuration
When enabling SMB support on a NAS server, the SMB server can either be standalone or Active Directory (AD) domain-joined. Standalone SMB servers are not associated with an AD domain so they only support local authentication. The information required when configuring a new standalone SMB server is shown in the following table.
Name | Description |
Workgroup | Name of the Windows workgroup where the file systems will be shared. |
Netbios Name | Network name of the standalone SMB server (15 characters maximum). |
Administrator Password | Set the initial password for the local Administrator user. |
On the next step in the wizard, you can also optionally enable DNS on the standalone SMB server for IP address and name resolution.
When the SMB server is created, it’s designed to have the same behavior and support many of the same tools as a Windows server. The administrator can manage it using standard Microsoft Windows tools such as the Computer Management MMC Console. These are the same tools that are used to manage a standard Windows server deployment, reducing the learning curve for administrators who are transitioning to PowerStore. There are also lots of tutorials and applicable documentation available online.
You can connect to the standalone SMB server by connecting to another computer and specifying the IP address of the NAS server.
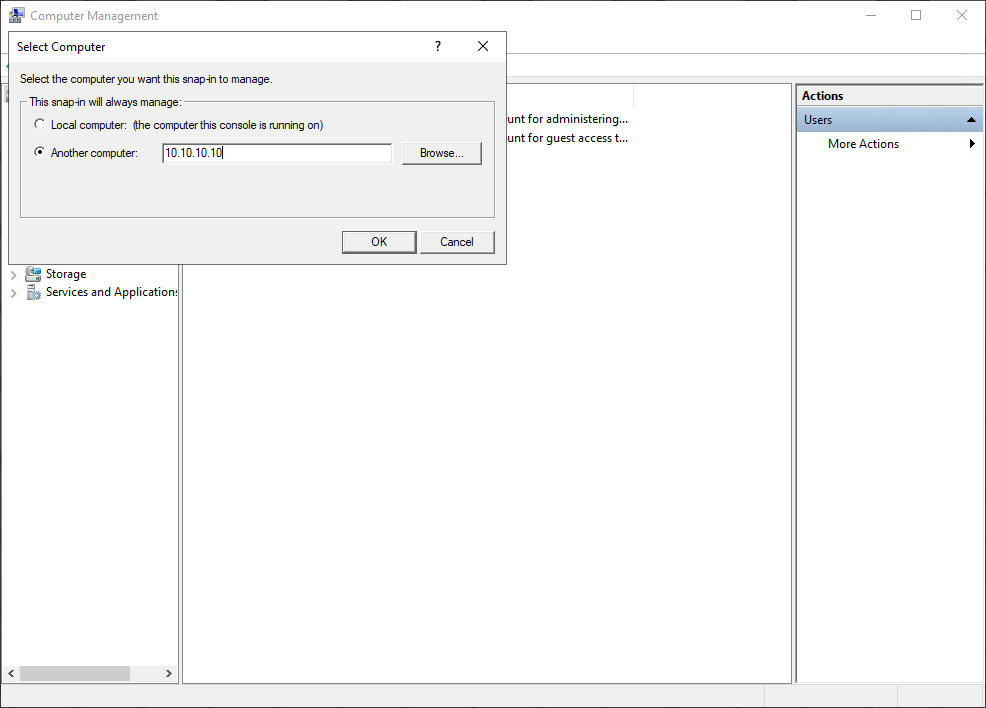
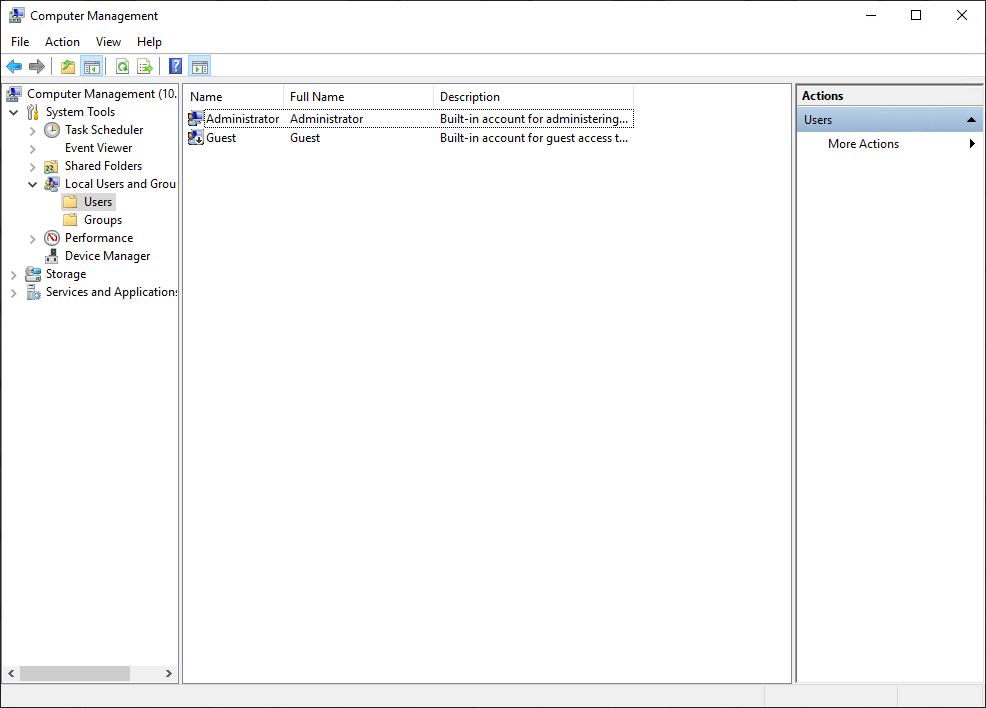
The local users are stored in the Local Users and Groups Database. Upon creation of a new standalone SMB server, only the local Administrator user is available. In the following figure, the Guest account is disabled by default, as noted by the down arrow at the bottom left corner of the Guest icon. Additional users and groups can be created here, if needed.
Domain-joined SMB server configuration
Domain-joined SMB servers are associated with an AD domain. AD is leveraged for centralized user authentication, applying group policies, enforcing security, implementing password requirements, and more.
The following information is required when configuring a new standalone SMB server:
Name | Description |
SMB Computer Name | Name of the computer object to be created in Active Directory |
Windows Domain | Name of the domain to which to join the SMB server |
Domain Username | Username of an account that has domain joining privileges |
Password | Password for the specified user |
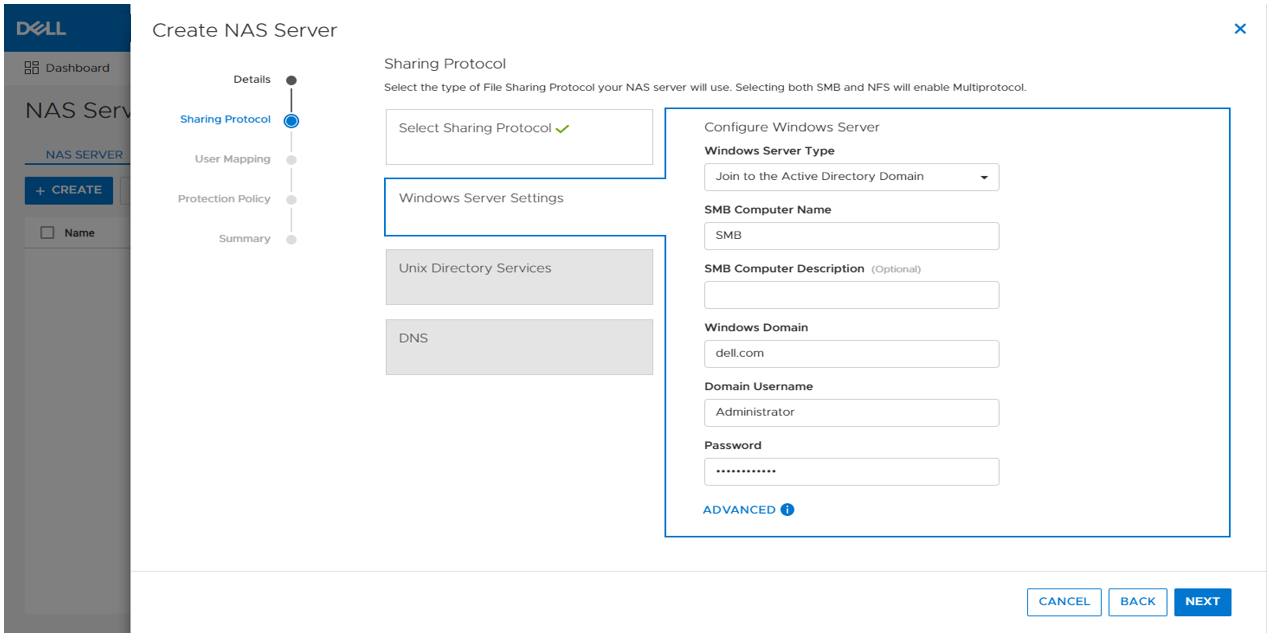
As part of the domain joining process, a computer object is created in the AD domain and DNS entries are created for IP address and name resolution. Domain-joined SMB servers require DNS to be configured, but this configuration is optional for standalone SMB servers. Domain-joined NAS servers are placed in the CN=Computers container, by default. The computer object can be configured to be stored in a different OU location in the advanced settings.
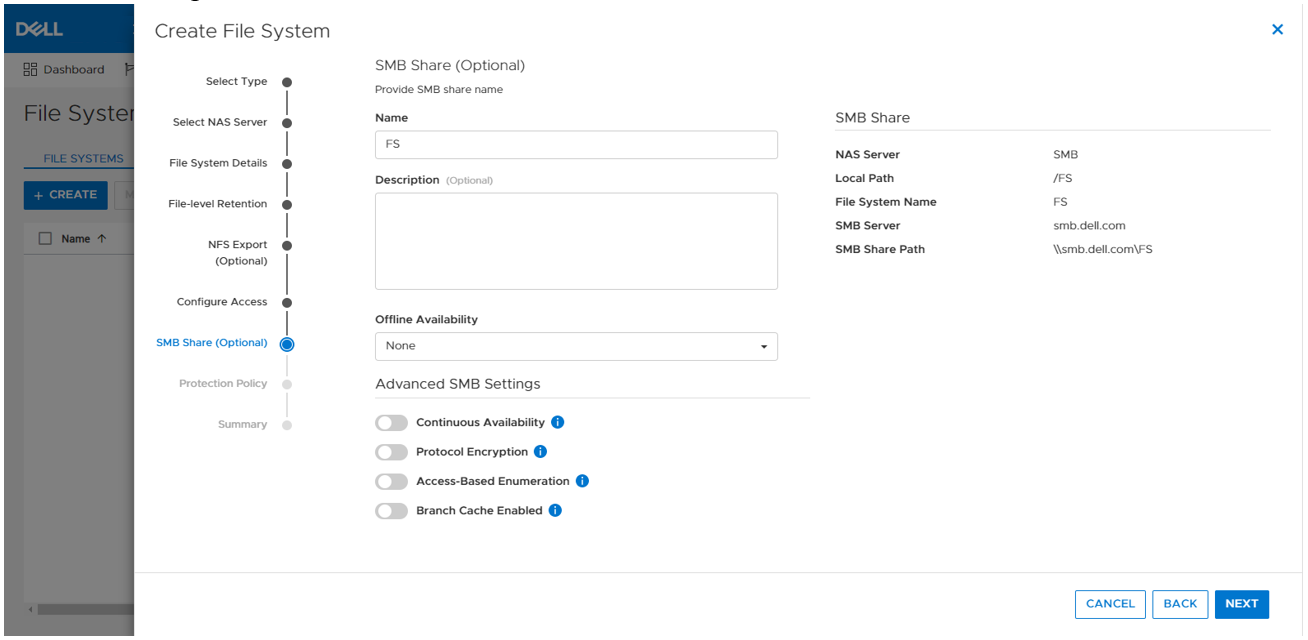
SMB shares
When the SMB server is configured, you can provision a file system along with an SMB share. The SMB share provides a path that clients can map to access the file system. The initial SMB share can be created as part of the file system provisioning wizard. Additional SMB shares can also be created on existing file systems, as long as the path exists.
The figure below shows the SMB share step of the file system provisioning wizard. The only required field is the name for the share. On the right, you can also see the name of the NAS Server, local path, file system name, SMB server name, and the SMB share path for the share.
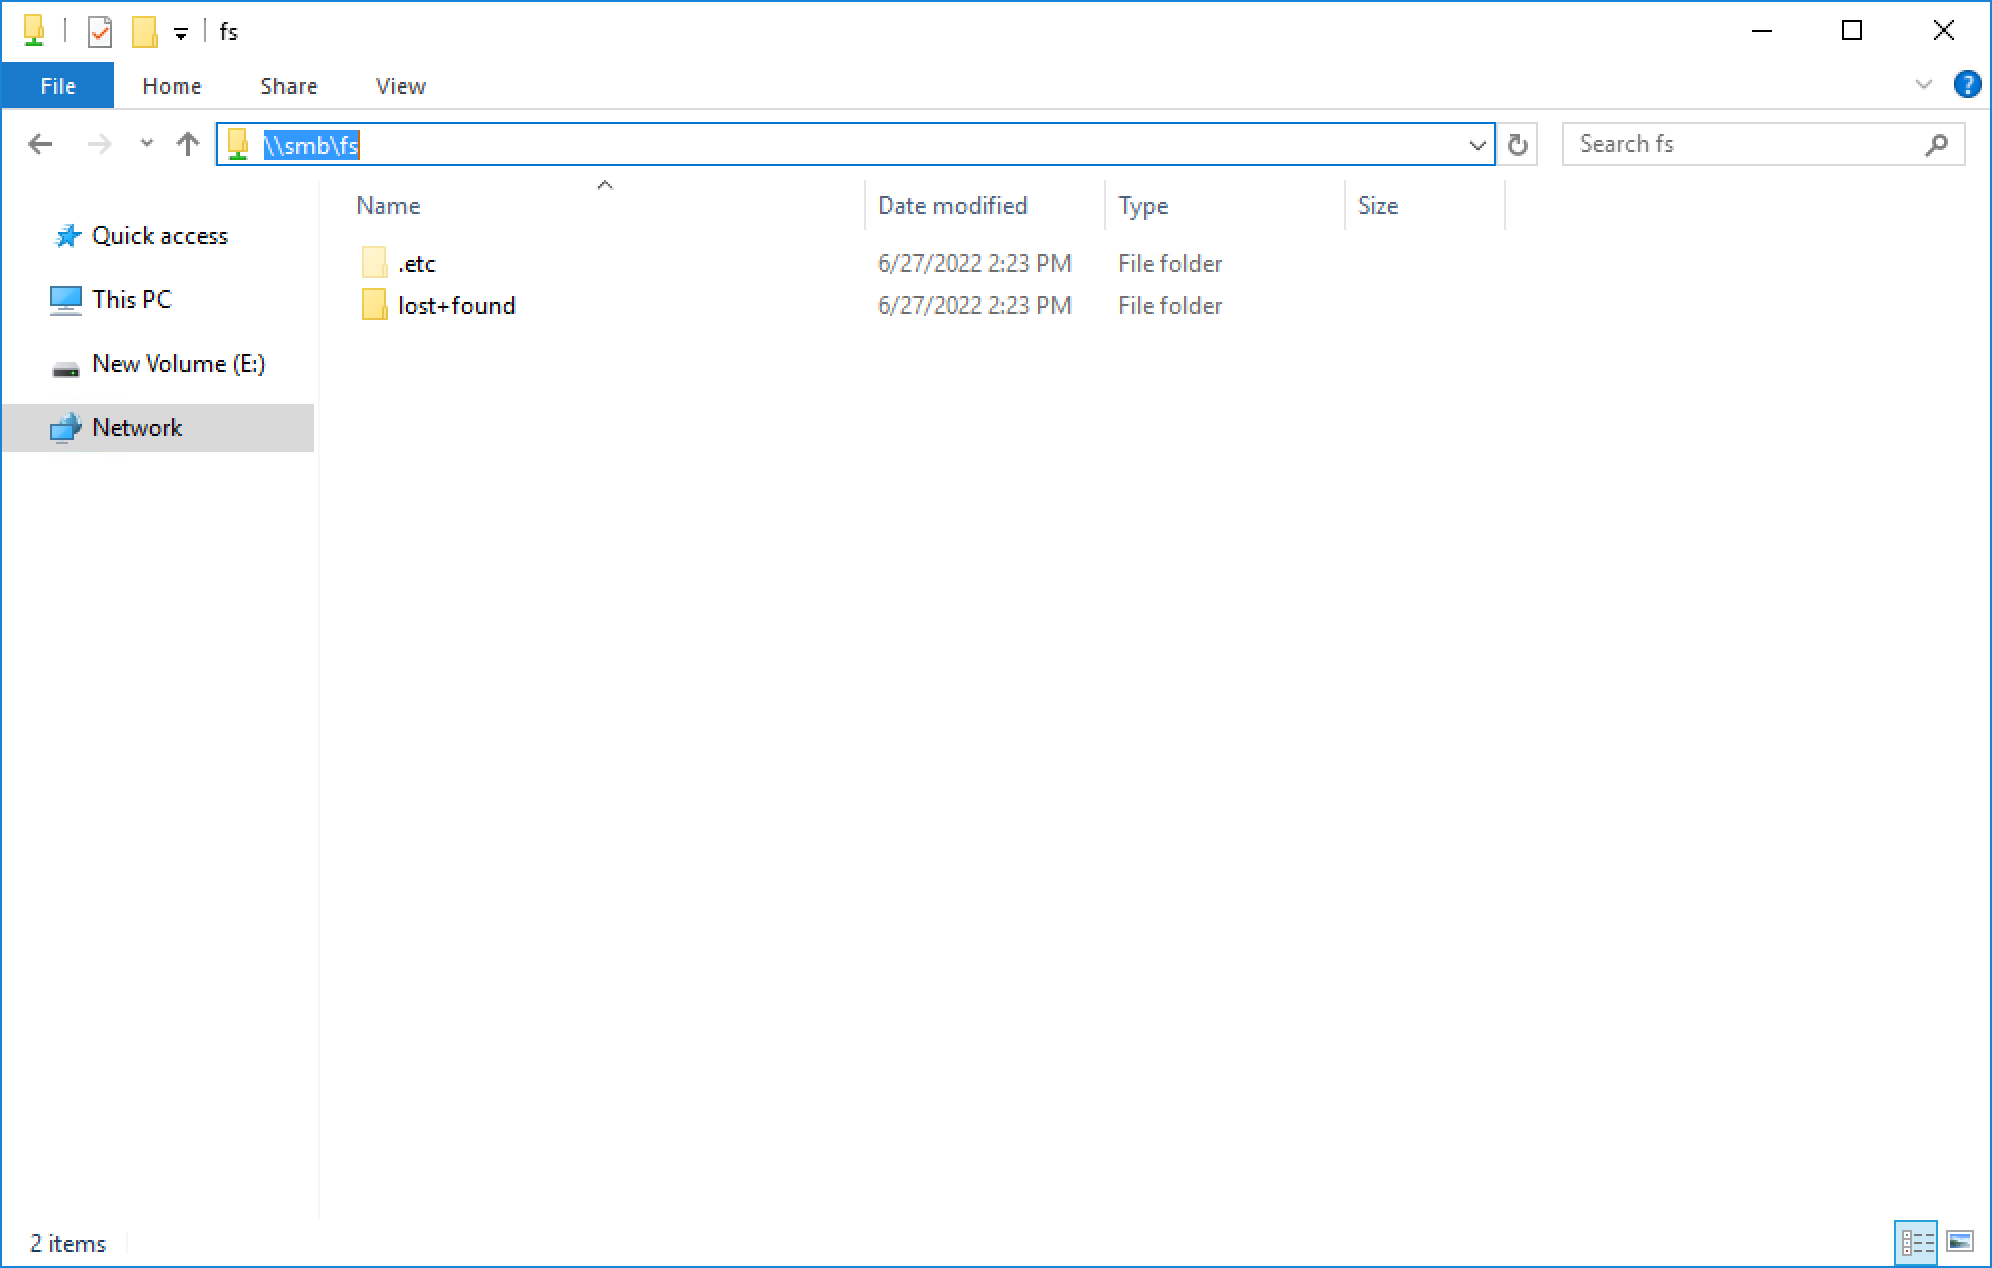
Take note of the SMB share path because that is what you will use to map the share from the client. This is called a UNC (Universal Naming Convention) path and the format is \\<SMB_Server>\<SMB_Share_Name>. For example, \\smb\fs.
You can disregard the other advanced SMB settings for now. We’ll cover those in a later blog.
Mapping a share
Now we are ready to map the share on a client. On a client, you can simply enter the UNC path into MS Explorer to access the share, as shown below.
If your client is logged in using an account that is on the same domain as the domain-joined SMB server, your credentials are passed automatically and the share opens. If you’re attempting to map an SMB server that is in a foreign domain, you are prompted for credentials in order to access the share. Alternatively, you can also connect using a local user’s credentials.
For standalone SMB servers, you can only connect using a local user’s credentials. You are prompted for the username and password when connecting to the share. By default, only the local Administrator user exists and the password is set during the initial configuration of the standalone SMB server.
To map the share to a drive letter (so that you can easily access it in the future), click the Map Network Drive button in Explorer, as shown here.
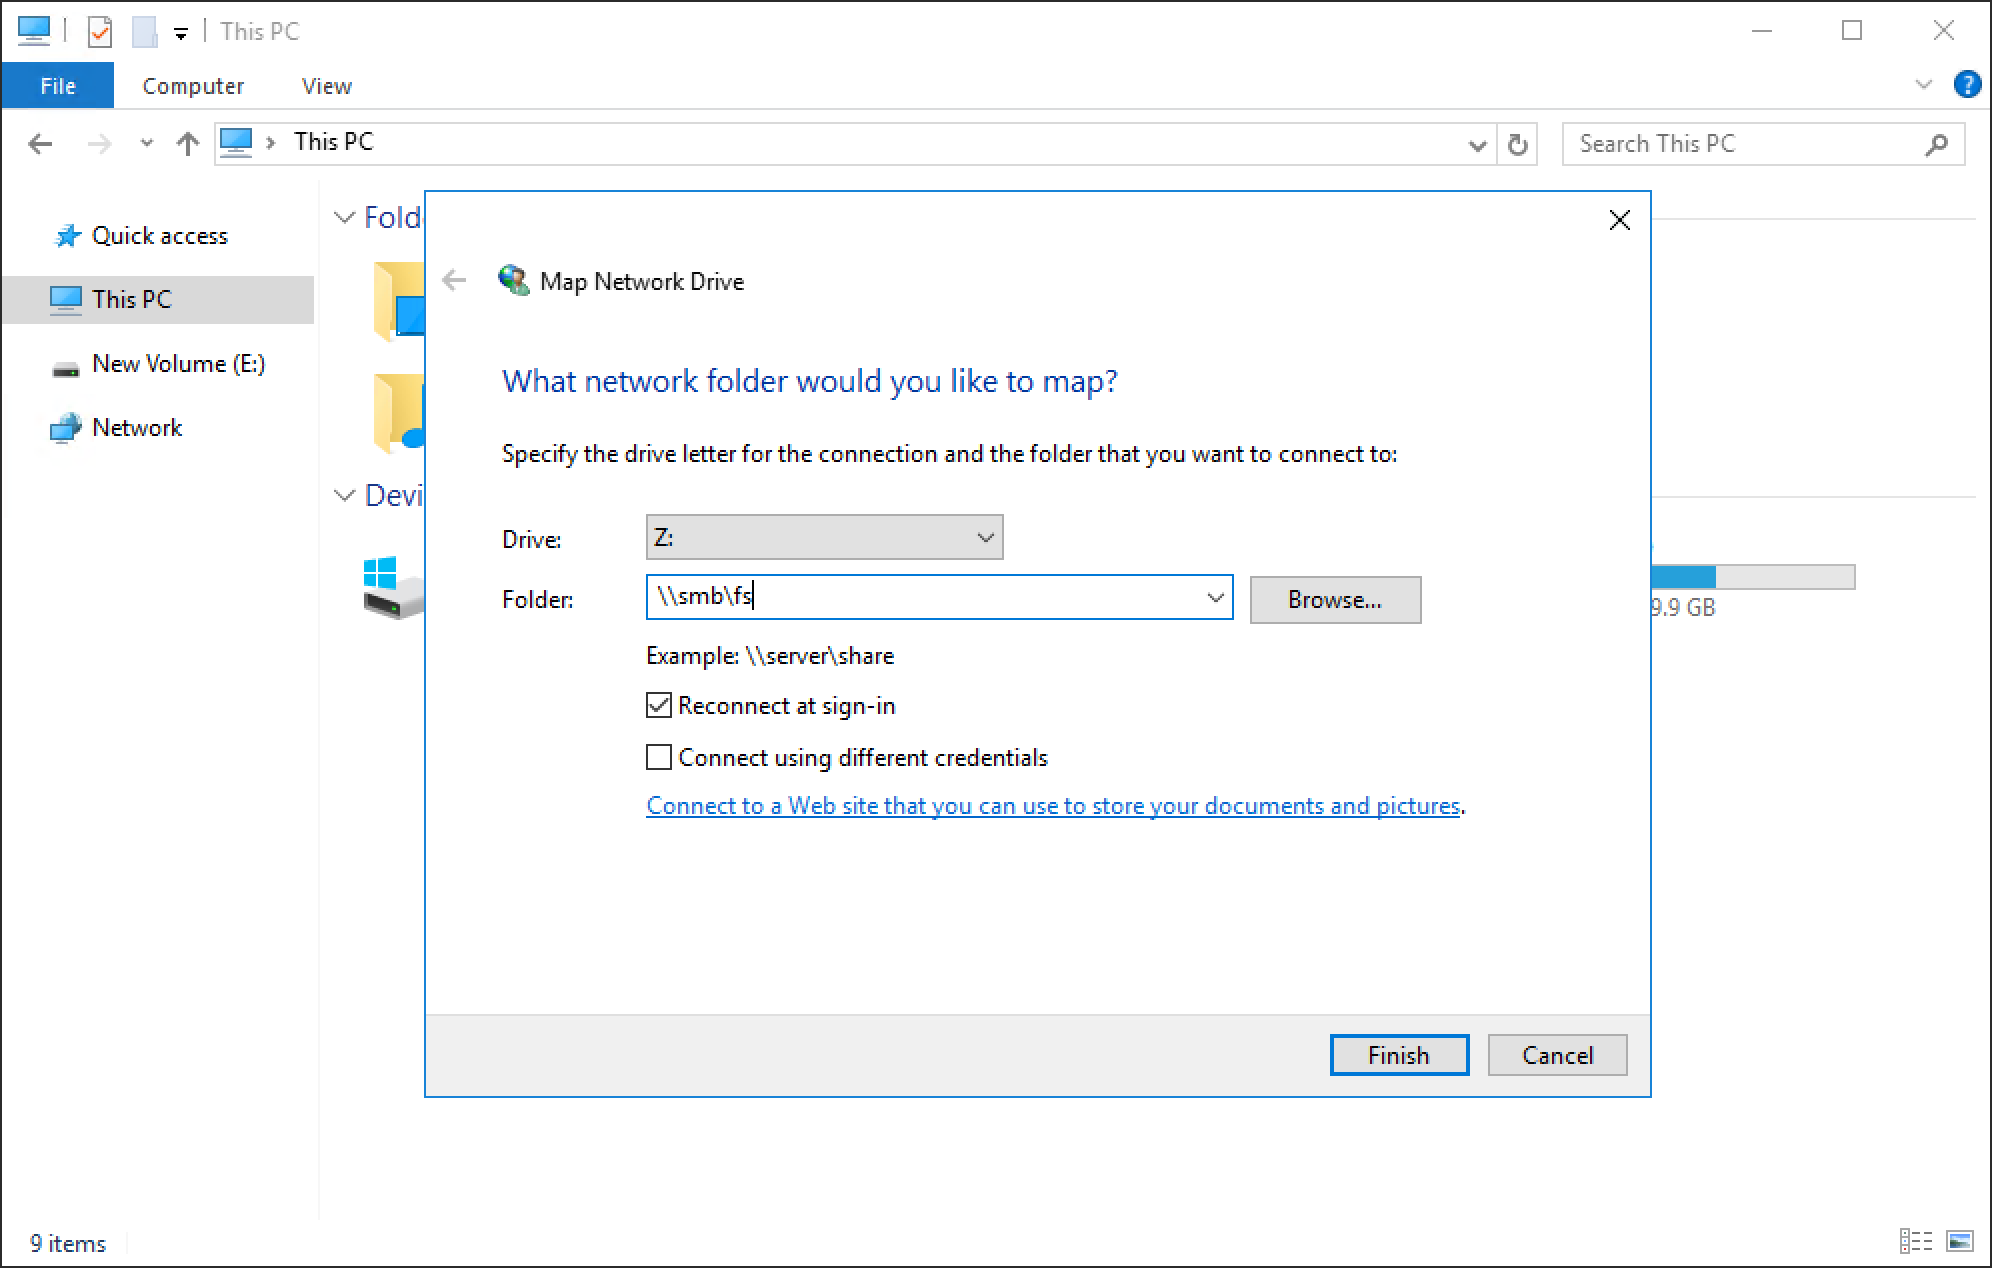
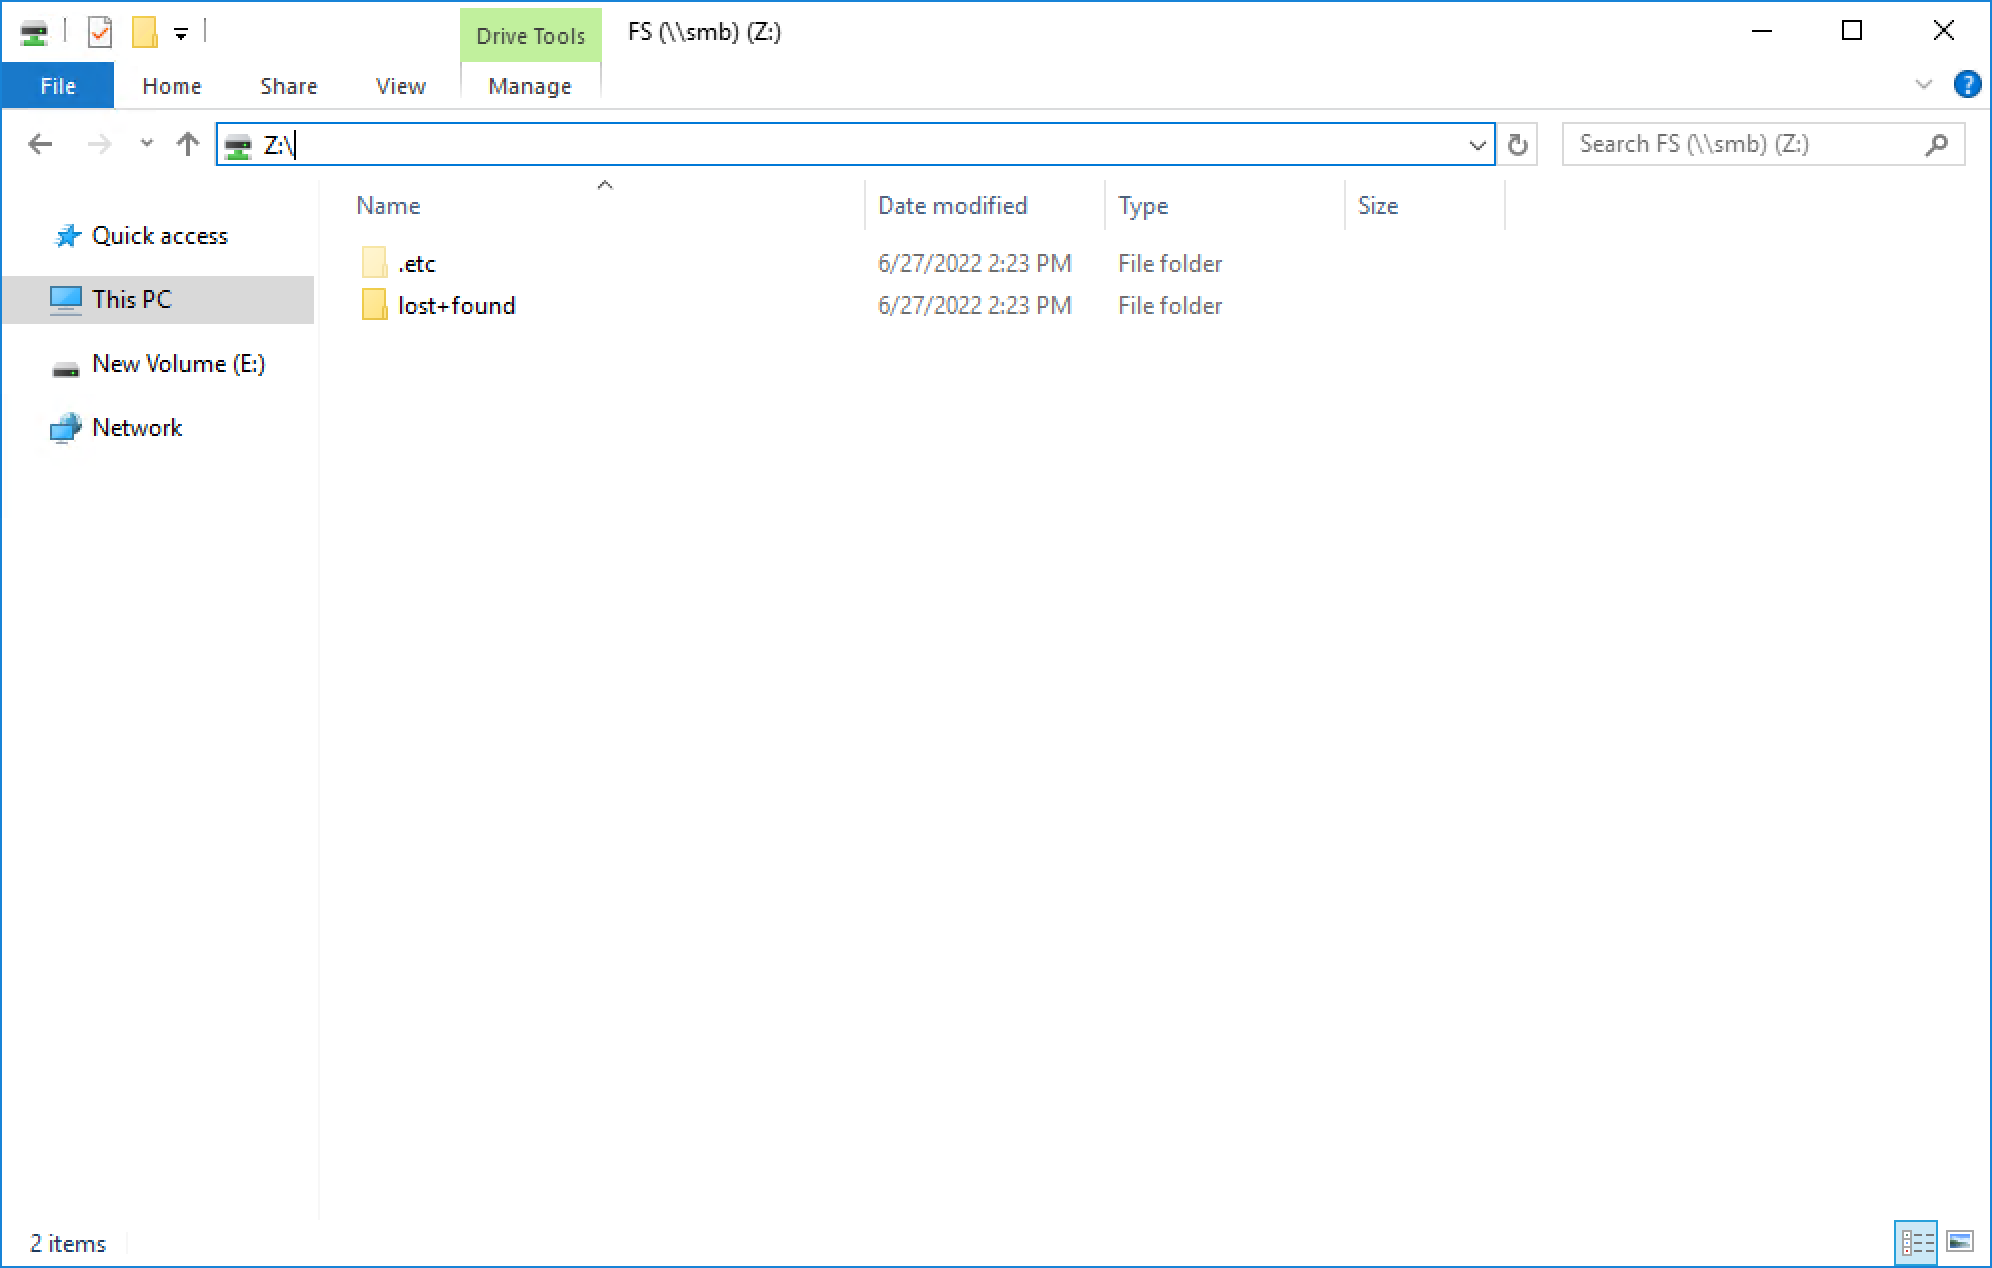
You can select a drive letter to which to map the drive, specify the UNC path, and select options such as reconnect at sign-in or connect using different credentials. When the drive is mapped, you can access it using the assigned drive letter, as shown in the following figure.
Conclusion
Great job! You are now familiar with how to use the SMB protocol for file system access. This enables you to start configuring environments using SMB for many use cases and applications. Stay tuned for the next blog in this series where we’ll take a look at another commonly used file protocol: NFS.
Resources
Author: Wei Chen, Senior Principal Engineering Technologist

Let’s Talk File (#3) – PowerStore File Systems
Wed, 24 Apr 2024 17:05:59 -0000
|Read Time: 0 minutes
Introduction
A file system is a storage resource that holds data and can be accessed through file sharing protocols such as SMB or NFS. The PowerStore file system architecture is designed to be highly scalable, efficient, performance-focused, and flexible. PowerStore offers a 64-bit file system that is mature and robust, enabling it to be used in many of the traditional NAS file use cases.
File system highlights
PowerStore file systems can accommodate large amounts of data, directories, and files. Each individual file system is designed to scale up to 256TB in size, hold 10 million subdirectories per directory, and store 32 billion files. Don’t forget that PowerStore can support up to 500 file systems on an appliance as well!
All file systems are thinly provisioned and always have compression and deduplication enabled. This means that capacity is allocated on demand as capacity is consumed on the file system. In addition, compression and deduplication help reduce the total cost of ownership and increase the efficiency of the system by reducing the amount of physical capacity that is needed to store the data. Savings are not only limited to the file system itself, but also to its snapshots and thin clones. Compression and deduplication occur inline between the system cache and the backend drives. The compression task is offloaded to a dedicated chip on the node, which frees up CPU cycles.
PowerStore file systems are tuned and optimized for high performance across all use cases. In addition, platform components such as Non-Volatile Memory Express (NVMe) drives and high-speed connectivity options enable the system to maintain low response times while servicing large workloads.
How to provision a file system
Now that you understand the benefits of the PowerStore file system, let’s review the file system provisioning process. PowerStore Manager makes it quick and simple to provision a file system, create NFS exports and/or SMB shares, configure access, and apply a protection policy using a single wizard.
To create a file system, open PowerStore Manager and navigate to Storage > File Systems > Create. The file system creation wizard prompts you for the information displayed in the following table.
Name | Description |
NAS Server | Select the NAS server that will be used to access this file system, ensuring the necessary protocols are enabled on the NAS server for client access. |
Name | Provide a name for the file system. |
Size | Specify the size of the file system that is presented to the client, between 3GB and 256TB. |
NFS Export (Optional) | Only displayed if NFS is enabled on the NAS server. Provide a name for the NFS export if NFS access is desired. The NFS Export Path is displayed so you can easily mount the NFS export on the client. |
Configure Access | Only displayed if an NFS export is created. This screen has the following settings:
|
SMB Share (Optional) | Only displayed if SMB is enabled on the NAS server. This screen has the following settings:
|
Protection Policy | Select a protection policy to protect the file system. |
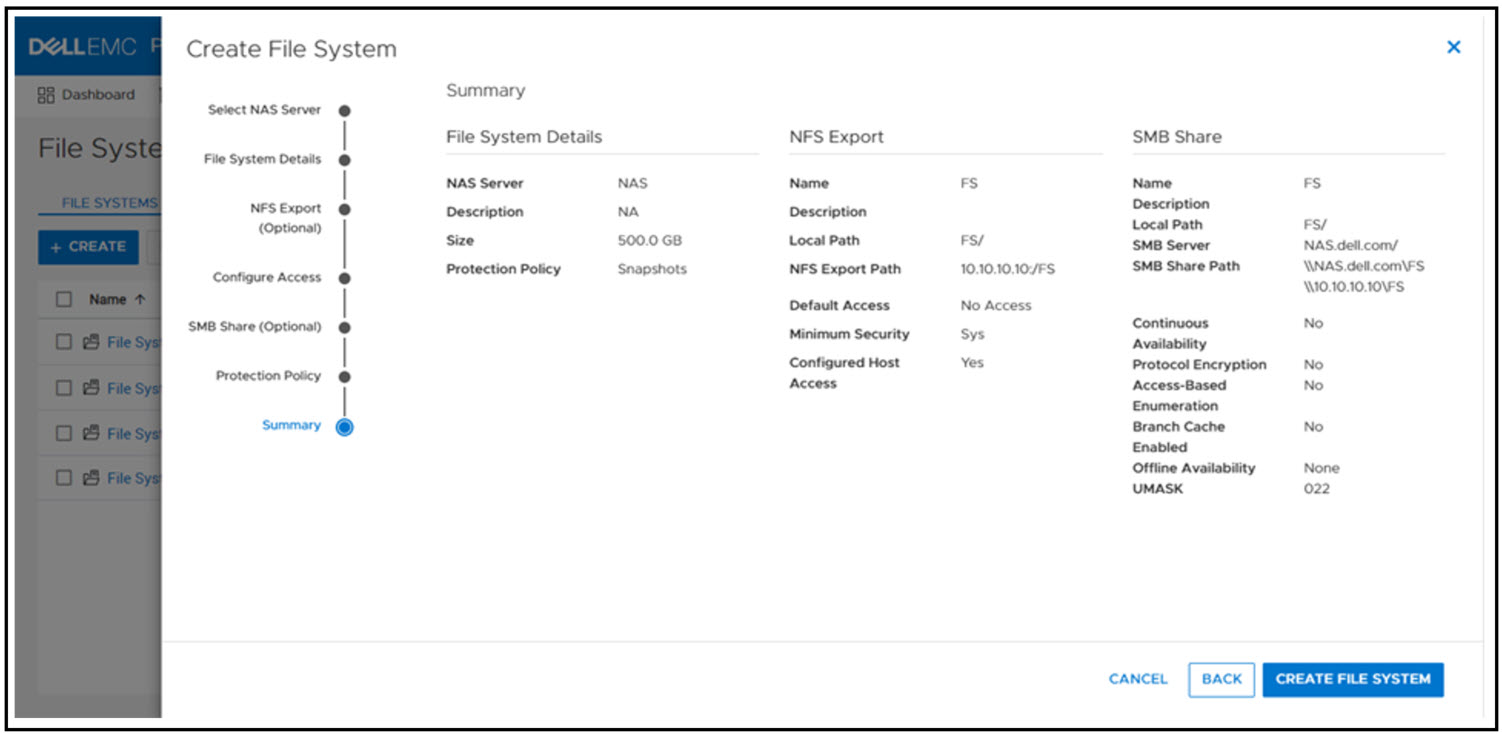
The following screenshot shows an example of the summary page when creating a new file system. In this example, we provisioned the file system, NFS export, SMB share, configured host access, and applied a protection policy to the file system.
If you’re testing file for the first time, you may want to start off with deploying a basic minimum configuration. To do this, all you need to choose is a NAS server, configure a file system name, specify a size, and create either an NFS export or an SMB share. If you enable NFS, you’ll also need to enable host access to your client.
When the file system and NFS export or SMB share is provisioned, you now mount the file system on to your host for access:
- SMB: \\<SMB_Server>\<SMB_Share_Name>
- For example: \\nas\fs
- NFS: mount <NFS_Server>:/<NFS_Export_Name> /<Mountpoint>
- For example: mount nas:/fs /mnt
File system management
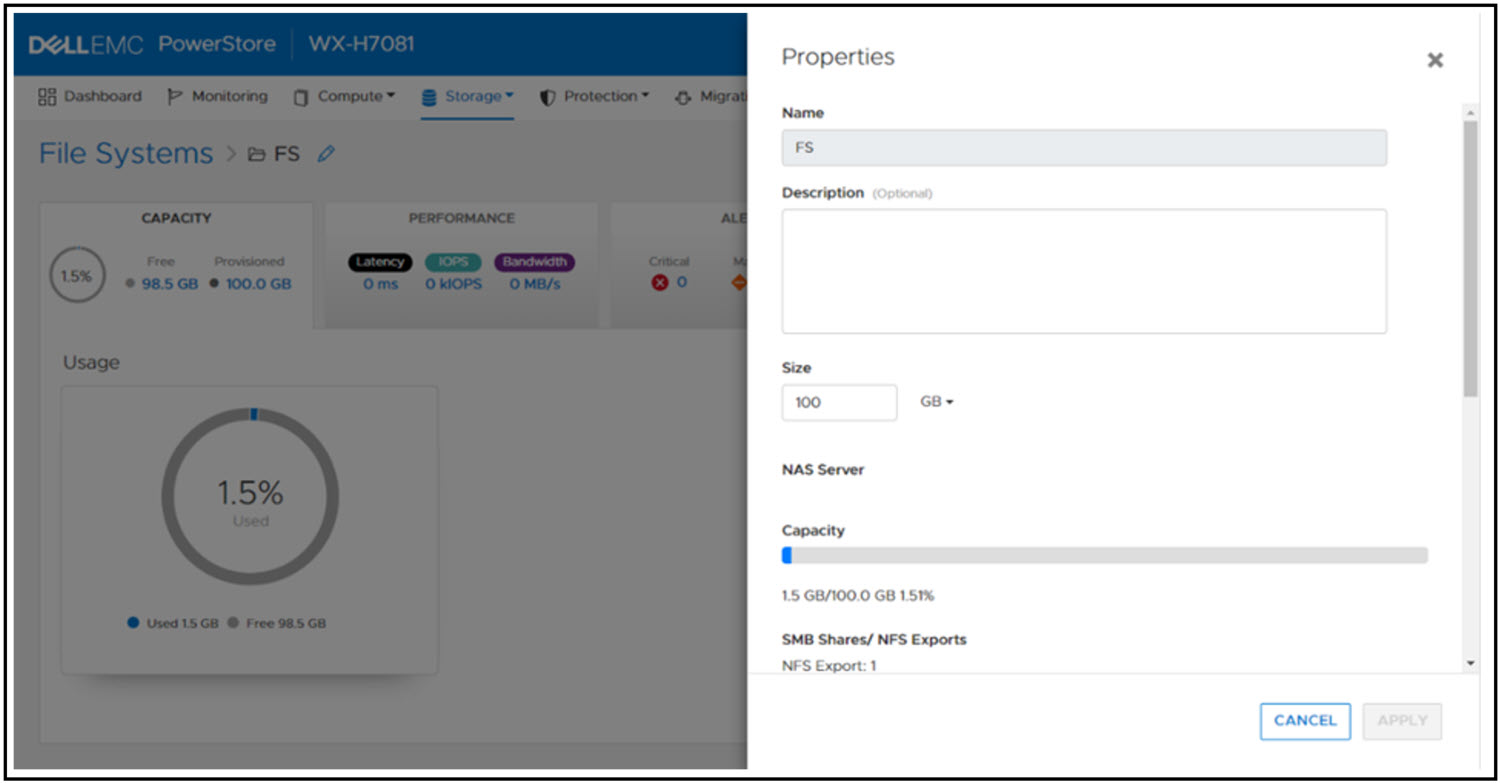
PowerStore file systems provide increased flexibility by providing the ability to shrink and extend file systems as needed. Shrink and extend operations are used to resize the file system and update the capacity that is seen by the client. Extend operations do not change how much capacity is allocated to the file system. However, shrink operations may be able to reclaim unused space, depending on how much capacity is allocated to the file system and the presence of snapshots or thin clones.
If the advertised file system size is too small or full, extending it allows additional data to be written to the file system. If the advertised file system size is too large, shrinking it limits the amount of data that can be written to the file system. For shrink and extend, the minimum value is equal to the used size of the file system; the maximum value is 256 TB. You cannot shrink the file system to less than the used size, because this would cause the client to see the file system as more than 100% full.
The following figure shows the file system properties page in PowerStore Manager, where you can shrink or extend a file system.
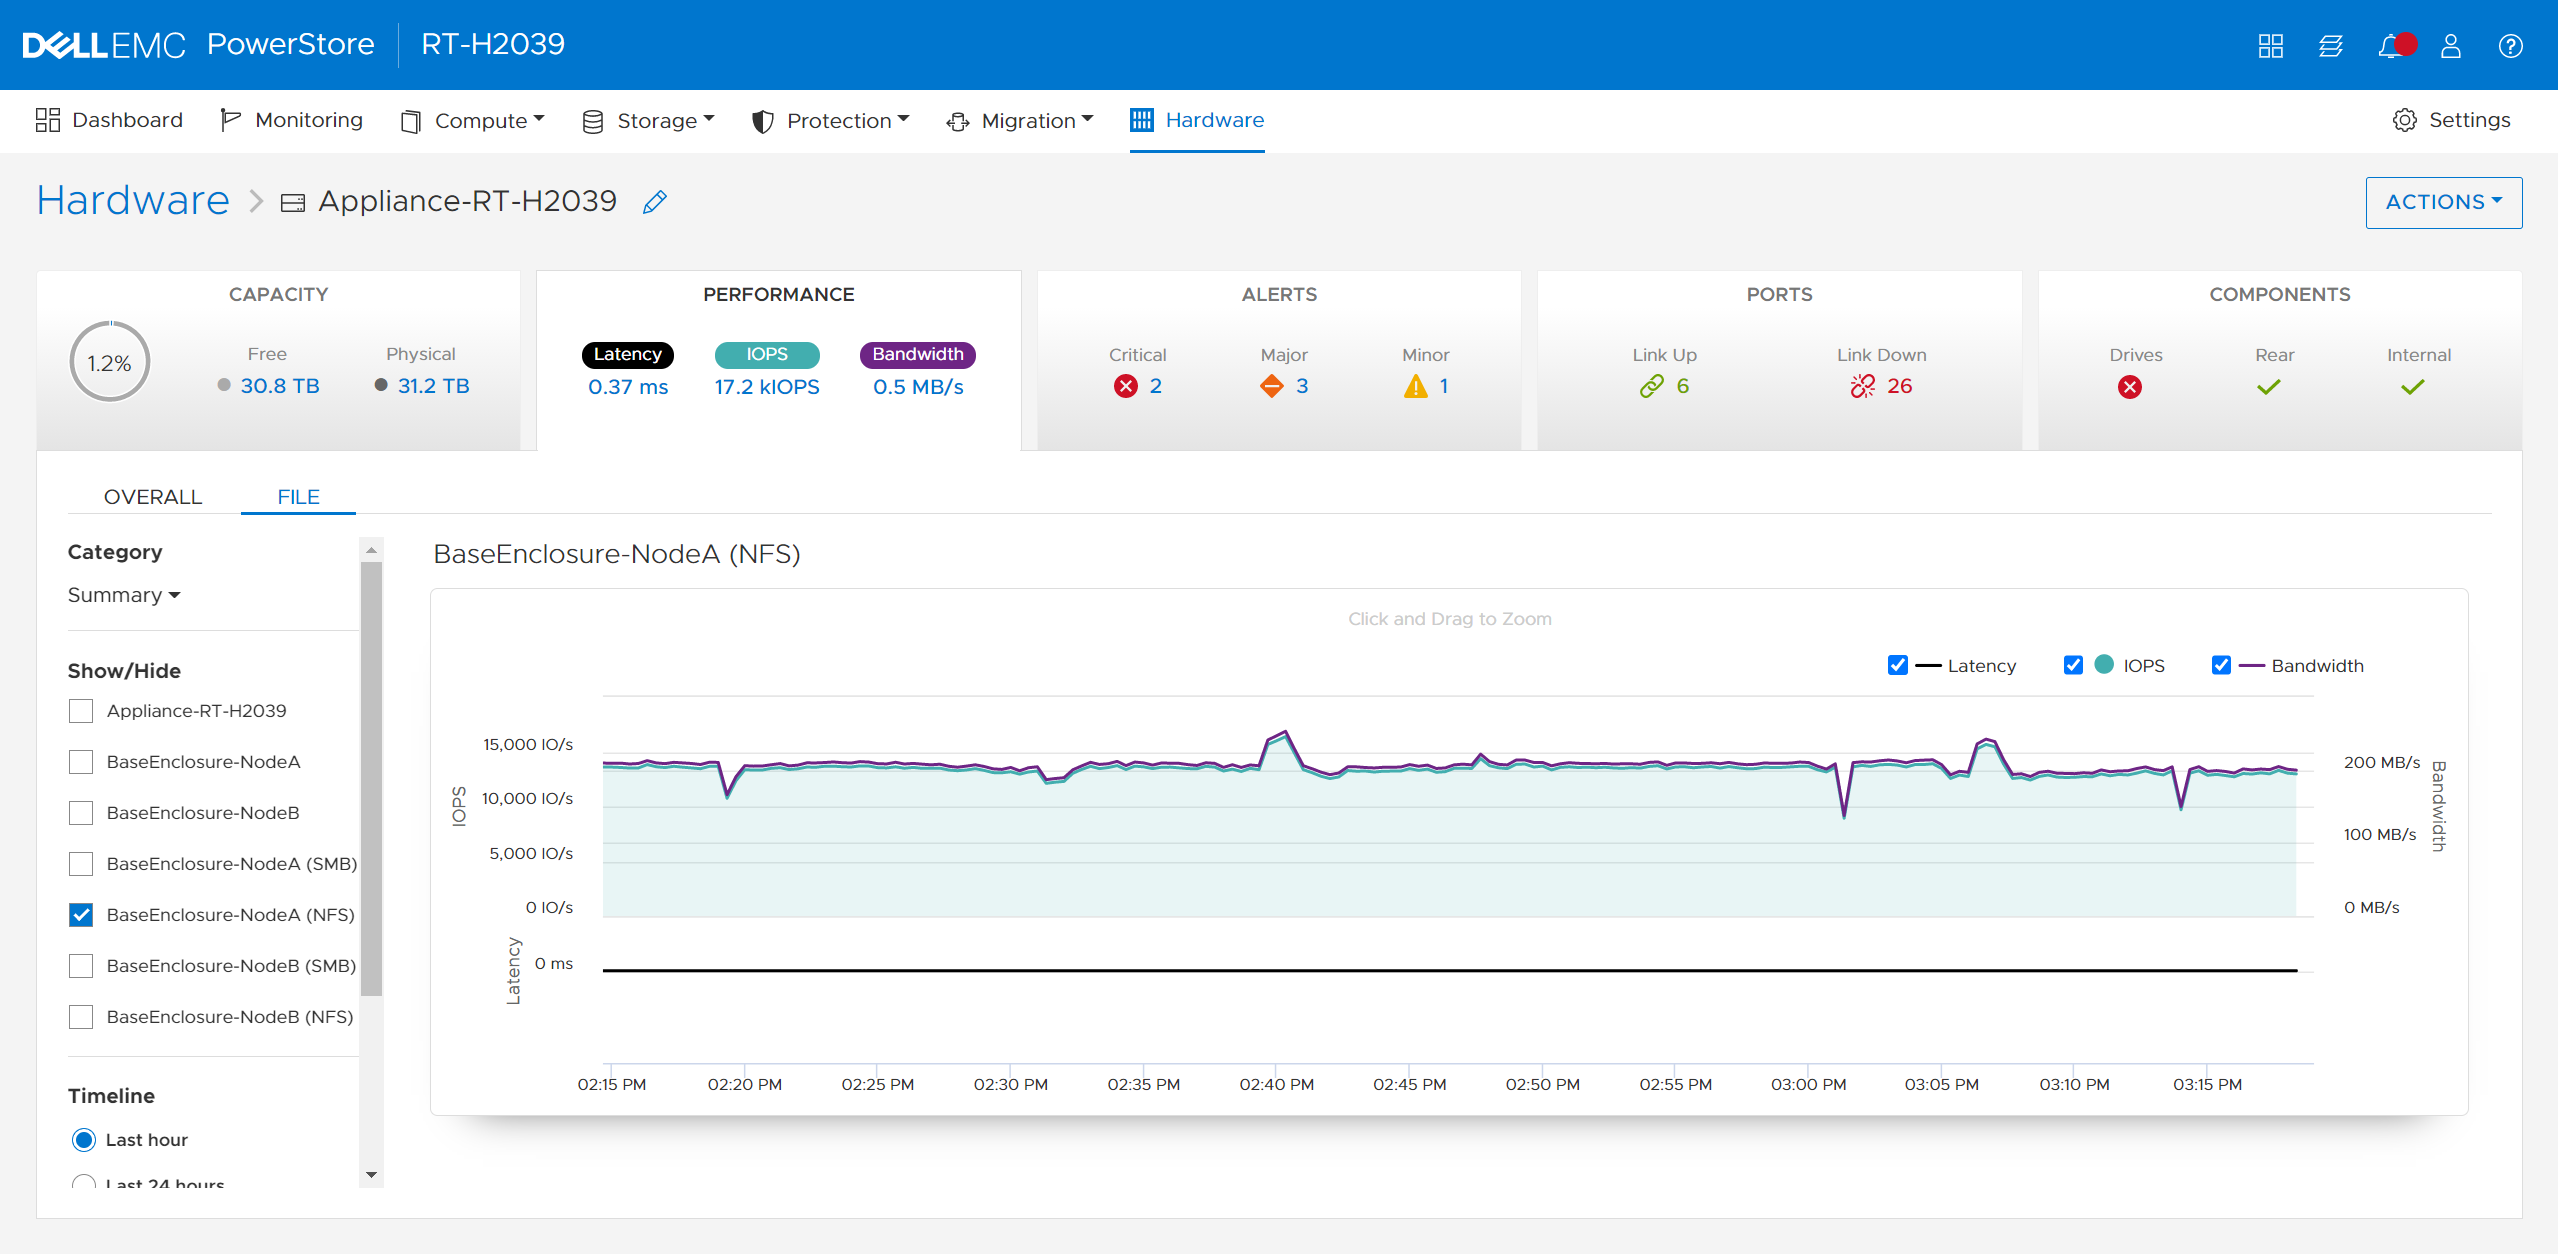
File system performance metrics
Performance metrics are available to view the latency, IOPS, bandwidth, and IO size at the file system level. You can tweak the timeline to view preset timeframes ranging from the last hour to the last 2 years, or drag and zoom in to specific sections of the graph. You can also export the metrics to file types such as PNG, PDF, JPEG, or CSV.
File-specific metrics are also available at the node, cluster, and appliance level. At the node level, SMB and NFS protocol metrics can also be viewed. The available metrics are:
- Read, Write, and Total IOPS
- Read, Write, and Total Bandwidth
- Read, Write, and Average Latency
- Read, Write, and Average IO Size
The following figure shows the file metrics page that displays the NFS protocol metrics on Node A.
Conclusion
Congratulations! You have successfully provisioned a file system, NFS export, SMB share, and accessed it from a host. Now you can write files and folders or run workloads on the file system. We also reviewed how to leverage shrink and extend to update the file system size, and looked at some of the performance metrics so you can monitor your file systems. Stay tuned for the next blog in this series where we’ll take a deeper dive into the SMB protocol.
Resources
Author: Wei Chen, Senior Principal Engineering Technologist