


OneFS WebUI Single Sign-on Management and Troubleshooting

Earlier in this series, we took a look at the architecture of the new OneFS WebUI SSO functionality. Now, we move on to its management and troubleshooting.

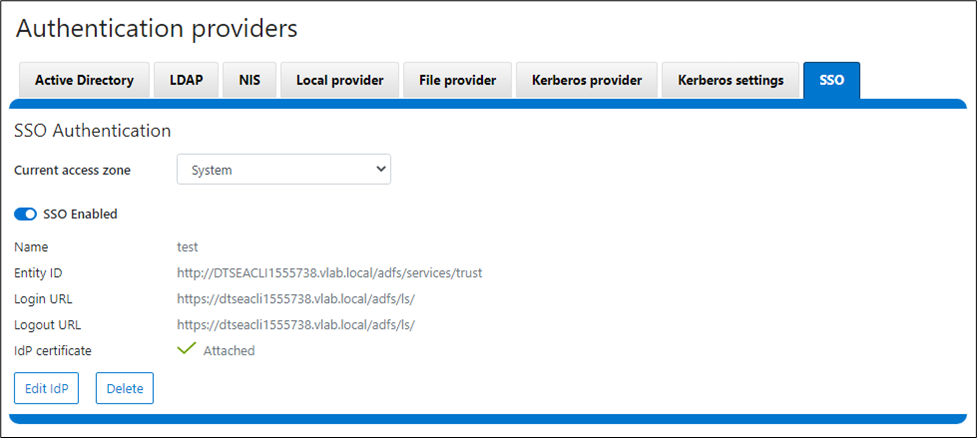
As we saw in the previous article, once the IdP and SP are configured, a cluster admin can enable SSO per access zone using the OneFS WebUI by navigating to Access > Authentication providers > SSO. From here, select the desired access zone and click the ‘Enable SSO’ toggle:

Or from the OneFS CLI using the following syntax:
# isi auth sso settings modify --sso-enabled 1
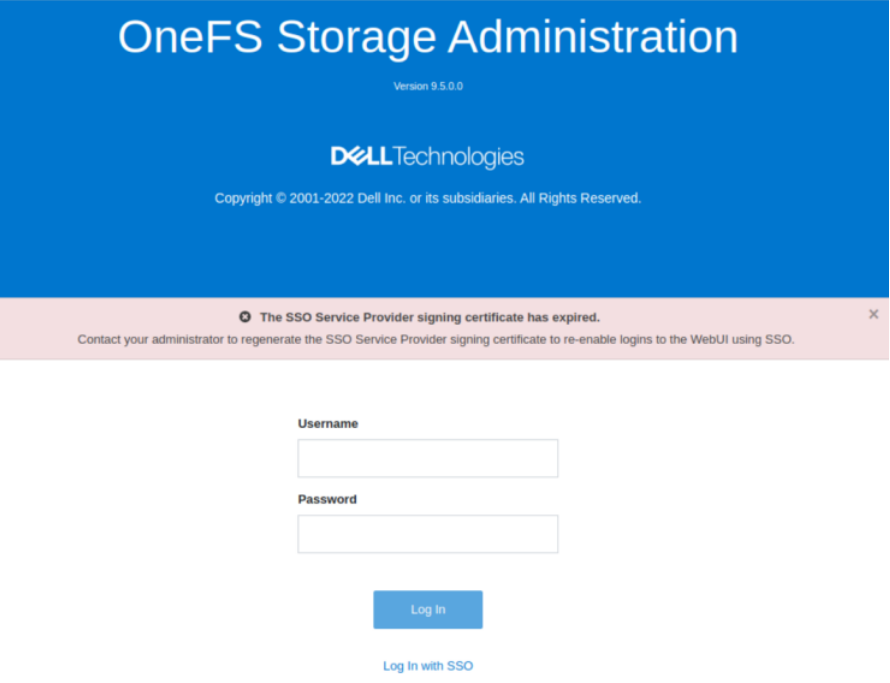
Once complete, the SSO configuration can be verified from a client web browser by browsing to the OneFS login screen. If all is operating correctly, redirection to the ADFS login screen will occur. For example:
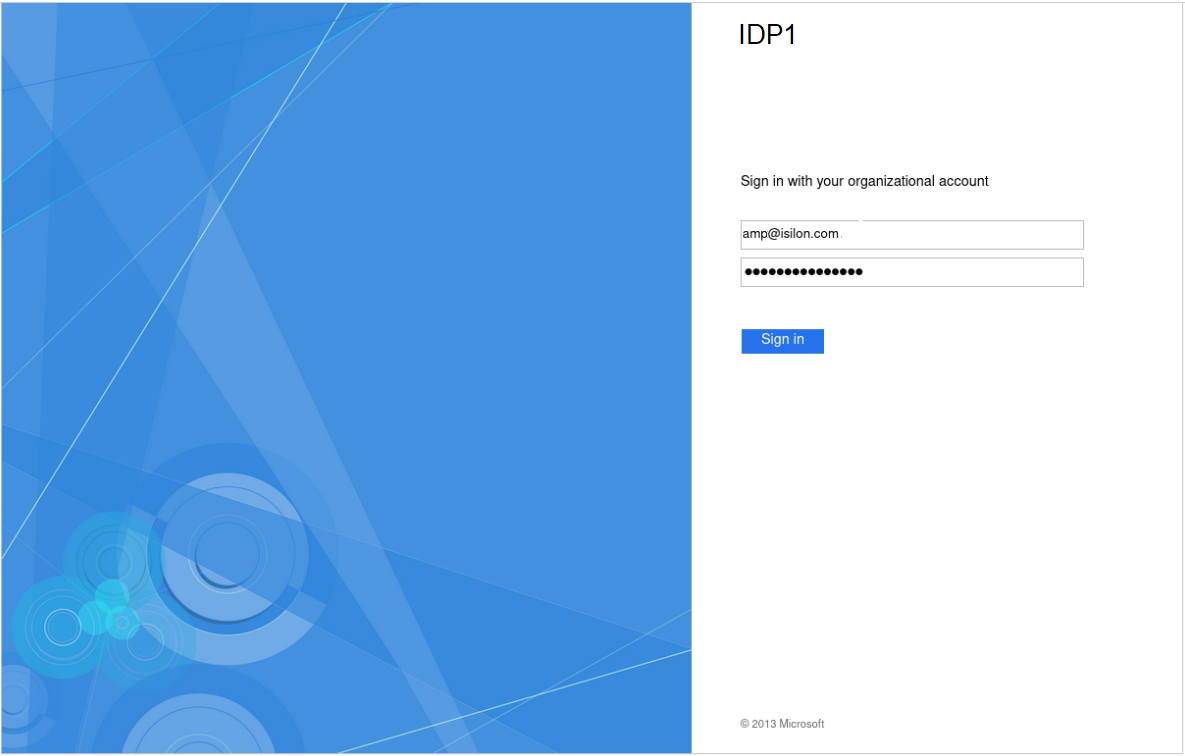
After successful authentication with ADFS, cluster access is granted and the browser session is redirected back to the OneFS WebUI .
In addition to the new SSO WebUI pages, OneFS 9.5 also adds a subcommand to the ‘isi auth’ command set for configuring SSO from the CLI. This new syntax includes:
- isi auth sso idps
- isi auth sso settings
- isi auth sso sp
With these, you can use the following procedure to configure and enable SSO using the OneFS command line.
1. Define the ADFS instance in OneFS.
Enter the following command to create the IdP account:
# isi auth ads create <domain_name> <user> --password=<password> ...
where:
Attribute | Description |
<domain_name> | Fully qualified Active Directory domain name that identifies the ADFS server. For example, idp1.isilon.com. |
<user> | The user account that has permission to join machines to the given domain. |
<password> | The password for <user>. |
2. Next, add the IdP to the pertinent OneFS zone. Note that each of a cluster’s access zone(s) must have an IdP configured for it. The same IdP can be used for all the zones, but each access zone must be configured separately.
# isi zone zones modify --add-auth-providers
For example:
# isi zone zones modify system --add-auth-providers=lsa-activedirectoryprovider:idp1.isilon.com
3. Verify that OneFS can find users in Active Directory.
# isi auth users view idp1.isilon.com\\<username>
In the output, ensure that an email address is displayed. If not, return to Active Directory and assign email addresses to users.
4. Configure the OneFS hostname for SAML SSO.
# isi auth sso sp modify --hostname=<name>
Where <name> is the name that SAML SSO can use to represent the OneFS cluster to ADFS. SAML redirects clients to this hostname.
5. Obtain the ADFS metadata and store it under /ifs on the cluster.
In the following example, an HTTPS GET request is issued using the 'curl' utility to obtain the metadata from the IDP and store it under /ifs on the cluster.
# curl -o /ifs/adfs.xml https://idp1.isilon.com/FederationMetadata/2007-06/ FederationMetadata.xml
6. Create the IdP on OneFS using the ‘metadata-location’ path for the xml file in the previous step.
# isi auth sso idps create idp1.isilon.com --metadata-location="/ifs/adfs.xml"
7. Enable SSO:
# isi auth sso settings modify --sso-enabled=yes -–zone <zone>
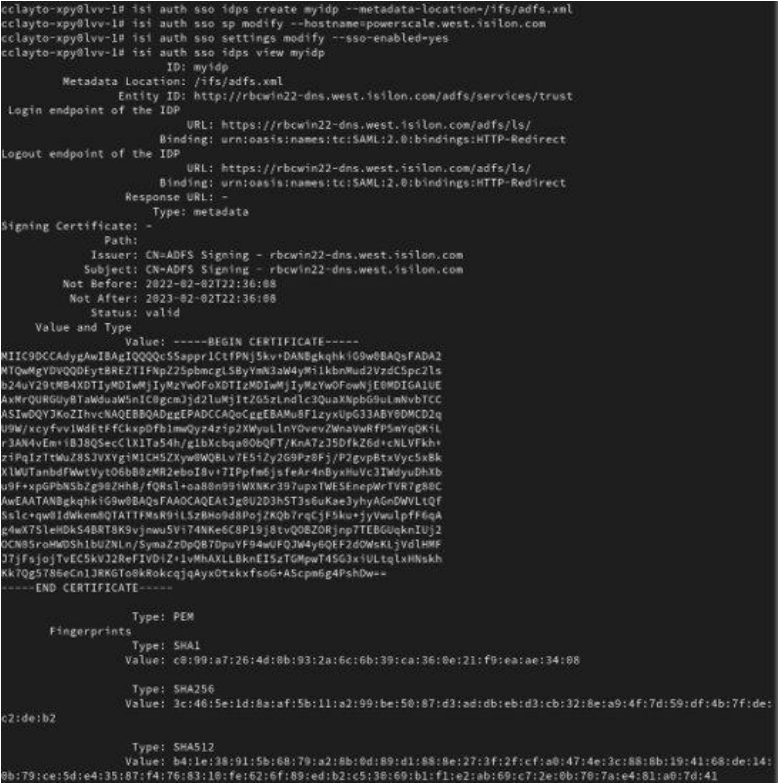
Use the following syntax to view the IdP configuration:
# isi auth sso idps view <idp_ID>
For example:
# isi auth sso idps view idp
ID: idp
Metadata Location: /ifs/adfs.xml
Entity ID: https://dns.isilon.com/adfs/services/trust
Login endpoint of the IDP
URL: https://dns.isilon.com/adfs/ls/
Binding: wrn:oasis:names:tc:SAML:2.0:bidings:HTTP-Redirect
Logout endpoint of the IDP
URL: https://dns.isilon.com/adfs/ls/
Binding: wrn:oasis:names:tc:SAML:2.0:bidings:HTTP-Redirect
Response URL: -
Type: metadata
Signing Certificate: -
        Path:
        Issuer: CN-ADFS Signing – dns.isilon.com
        Subject: CN-ADFS Signing – dns.isilon.com
        Not Before: 2023-02-02T22:22:00
        Not After: 2024-02-02T22:22:00
        Status: valid
Value and Type
        Value: -----BEGIN CERTIFICATE-----
MITC9DCCAdygAwIBAgIQQQQc55appr1CtfPNj5kv+DANBgkqhk1G9w8BAQsFADA2
<snip>
Troubleshooting
If the IdP and/or SP Signing certificate happens to expire, users will be unable to login to the cluster with SSO and an error message will be displayed on the login screen.
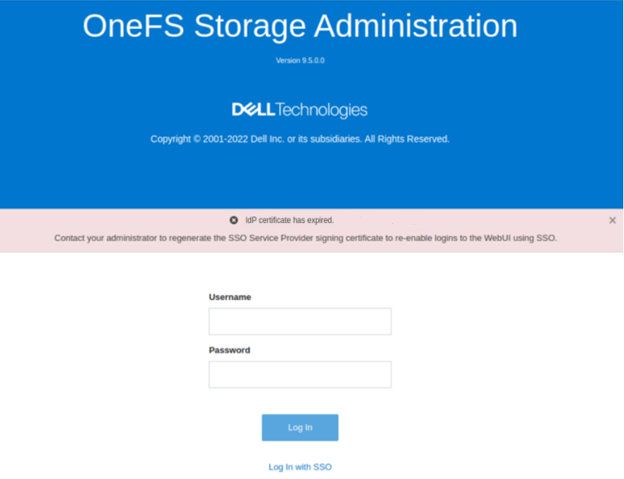
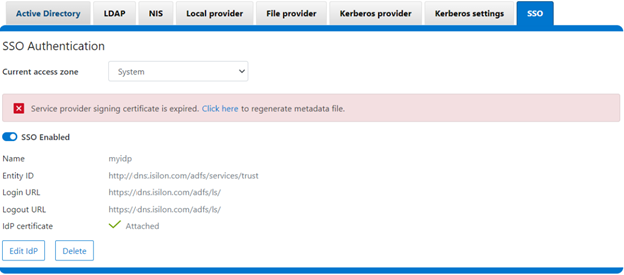
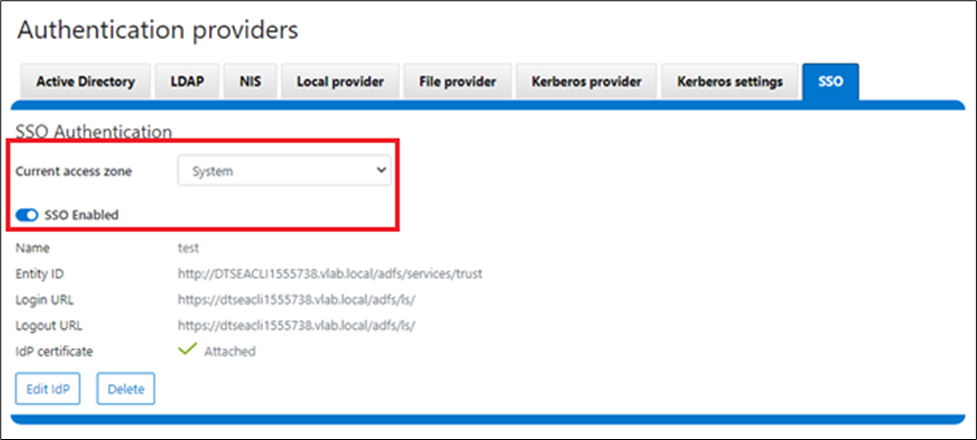
In this example, the IdP certificate has expired, as described in the alert message. When this occurs, a warning is also displayed on the SSO Authentication page, as shown here:
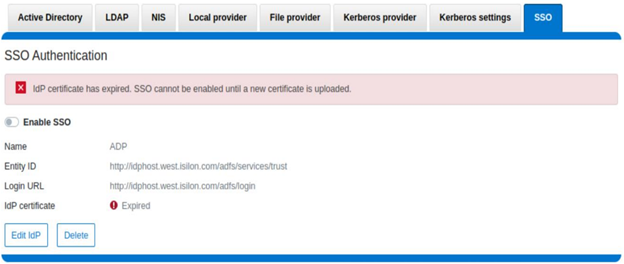
To correct this, download either a new signing certificate from the identity provider or a new metadata file containing the IdP certificate details. When this is complete, you can then update the cluster’s IdP configuration by uploading the XML file or the new certificate.
Similarly, if the SP certificate has expired, the following notification alert is displayed upon attempted login:
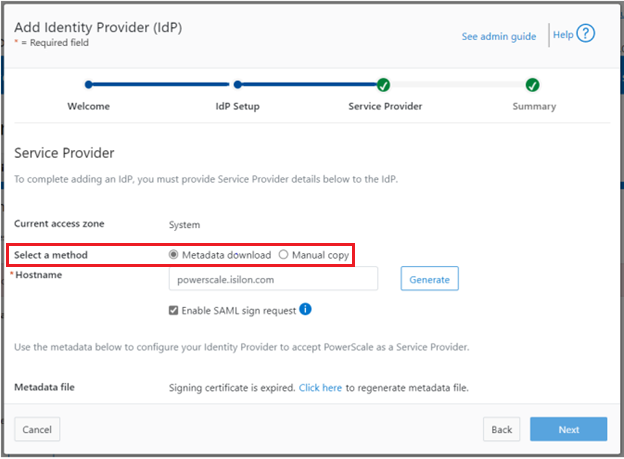
The following error message is also displayed on the WebUI SSO tab, under Access > Authentication providers > SSO, along with a link to regenerate the metadata file:
The expired SP signing key and certificate can also be easily regenerated from the OneFS CLI:
# isi auth sso sp signing-key rekey
This command will delete any existing signing key and certificate and replace them with a newly generated signing key and certificate. Make sure the newly generated certificate is added to the IDP to ensure that the IDP can verify messages sent from the cluster. Are you sure?  (yes/[no]):   yes
# isi auth sso sp signing-key dump
-----BEGIN CERIFICATE-----
MIIE6TCCAtGgAwIBAgIJAP30nSyYUz/cMA0GCSqGSIb3DQEBCwUAMCYxJDAiBgNVBAMMG1Bvd2VyU2NhbGUgU0FNTCBTaWduaWSnIEtleTAeFw0yMjExMTUwMzU0NTFaFw0yMzExMTUwMzU0NTFaMCYxJDAiBgNVBAMMG1Bvd2VyU2NhbGUgU0FNTCBTaWduaWSnIEtleTCCAilwDQYJKoZIhvcNAQEBBQADggIPADCCAgoCggIBAMOOmYJ1aUuxvyH0nbUMurMbQubgtdpVBevy12D3qn+x7rgym8/v50da/4xpMmv/zbE0zJ0IVbWHZedibtQhLZ1qRSY/vBlaztU/nA90XQzXMnckzpcunOTG29SMO3x3Ud4*fqcP4sKhV
<snip>
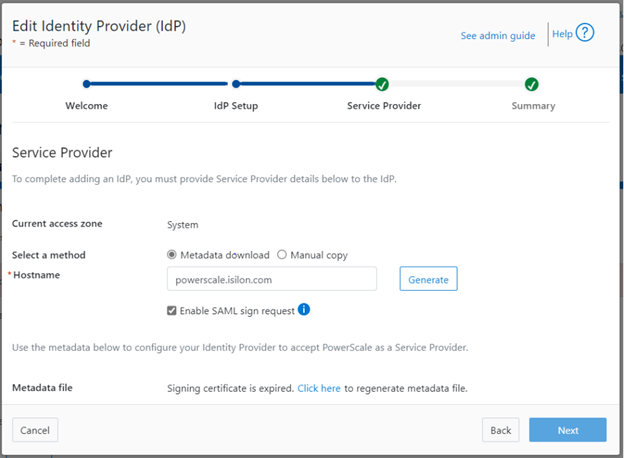
When it is regenerated, either the XML file or certificate can be downloaded, and the cluster configuration updated by either metadata download or manual copy:
Finally, upload the SP details back to the identity provider.
For additional troubleshooting of OneFS SSO and authentication issues, there are some key log files to check. These include:
Log file | Information |
/var/log/isi_saml_d.log | SAML specific log messages logged by isi_saml_d. |
/var/log/apache2/webui_httpd_error.log | WebUI error messages including some SAML errors logged by the WebUI HTTP server. |
/var/log/jwt.log | Errors related to token generation logged by the JWT service. |
/var/log/lsassd.log | General authentication errors logged by the ‘lsassd’ service, such as failing to lookup users by email. |
Author: Nick Trimbee
Related Blog Posts

OneFS WebUI Single Sign-on Configuration and Deployment
Thu, 20 Jul 2023 18:27:32 -0000
|Read Time: 0 minutes
In the first article in this series, we took a look at the architecture of the new OneFS WebUI SSO functionality. Now, we move on to its provisioning and setup.
SSO on PowerScale can be configured through either the OneFS WebUI or CLI. OneFS 9.5 debuts a new dedicated WebUI SSO configuration page under Access > Authentication Providers > SSO. Alternatively, for command line afficionados, the CLI now includes a new isi auth sso command set.
Here is the overall configuration flow:

1. Upgrade to OneFS 9.5

First, ensure the cluster is running OneFS 9.5 or a later release. If upgrading from an earlier OneFS version, note that the SSO service requires this upgrade to be committed prior to configuration and use.
Next, configure an SSO administrator. In OneFS, this account requires at least one of the following privileges:
| Privilege | Description |
|---|---|
ISI_PRIV_LOGIN_PAPI | Required for the admin to use the OneFS WebUI to administer SSO |
ISI_PRIV_LOGIN_SSH | Required for the admin to use the OneFS CLI through SSH to administer SSO |
ISI_PRIV_LOGIN_CONSOLE | Required for the admin to use the OneFS CLI on the serial console to administer SSO |
The user account used for identity provider management should have an associated email address configured.
2. Setup Identity Provider

OneFS SSO activation also requires having a suitable identity provider (IdP), such as ADFS, provisioned and available before setting up OneFS SSO.
ADFS can be configured through either the Windows GUI or command shell, and detailed information on the deployment and configuration of ADFS can be found in the Microsoft Windows Server documentation.
The Windows remote desktop utility (RDP) can be used to provision, connect to, and configure an ADFS server.
- When connected to ADFS, configure a rule defining access. For example, the following command line syntax can be used to create a simple rule that permits all users to log in:
$AuthRules = @"
@RuleTemplate="AllowAllAuthzRule" => issue(Type = "http://schemas.microsoft.com/
authorization/claims/permit", Value="true");
"@
or from the ADFS UI:
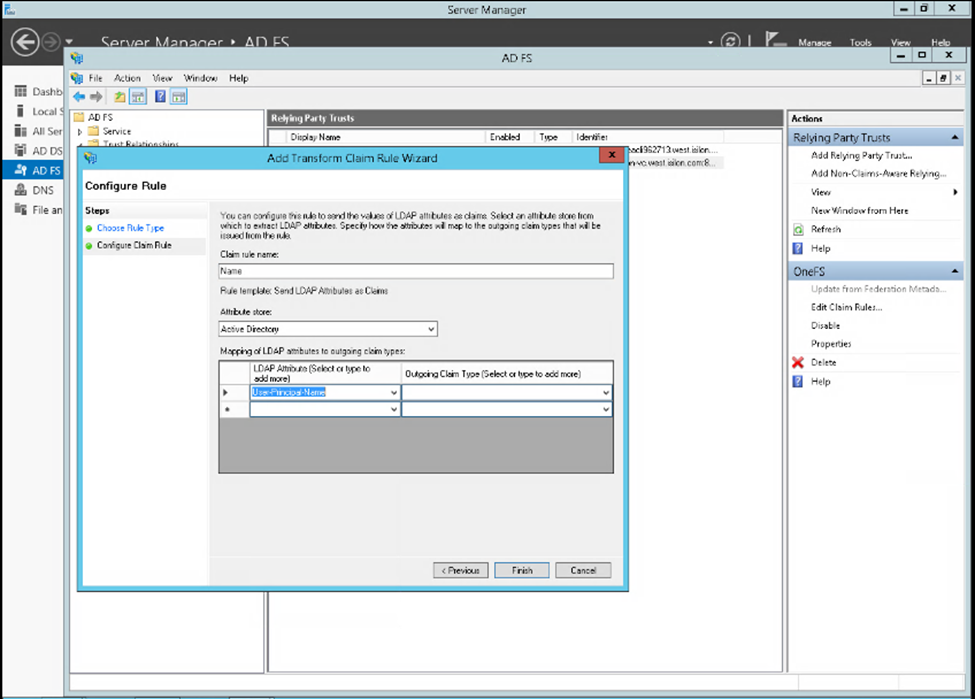
Note that more complex rules can be crafted to meet the particular requirements of an organization. - Create a rule parameter to map the Active Directory user email address to the SAML NameID.
$TransformRules = @" @RuleTemplate = "LdapClaims" @RuleName = "LDAP mail" c:[Type == "http://schemas.microsoft.com/ws/2008/06/identity/claims/ windowsaccountname", Issuer == "AD AUTHORITY"] => issue(store = "Active Directory", types = ("http://schemas.xmlsoap.org/ws/2005/05/identity/claims/ emailaddress"), query = ";mail;{0}", param = c.Value); @RuleTemplate = "MapClaims" @RuleName = "NameID" c:[Type == "http://schemas.xmlsoap.org/ws/2005/05/identity/claims/emailaddress"] => issue(Type = "http://schemas.xmlsoap.org/ws/2005/05/identity/claims/ nameidentifier", Issuer = c. Issuer, OriginalIssuer = c.OriginalIssuer, Value = c.Value, ValueType = c.ValueType, Properties["http://schemas.xmlsoap.org/ws/2005/05/identity / claimproperties/format"] = "urn:oasis:names:tc:SAML:1.1:nameid-format:emailAddress"); "@ - Configure AD to trust the OneFS WebUI certificate.
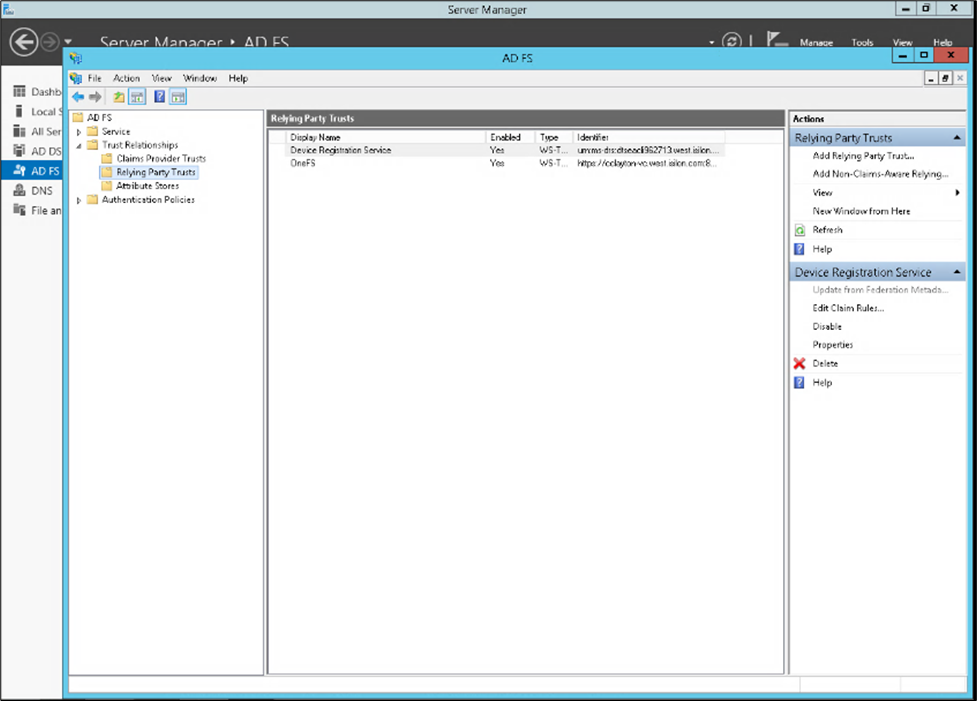
- Create the relying party trust.
Add-AdfsRelyingPartyTrust -Name <cluster-name>\
     -MetadataUrl "https://<cluster-node-
ip>:8080/session/1/saml/metadata" \
     -IssuanceAuthorizationRules $AuthRules -IssuanceTransformRules
$TransformRules
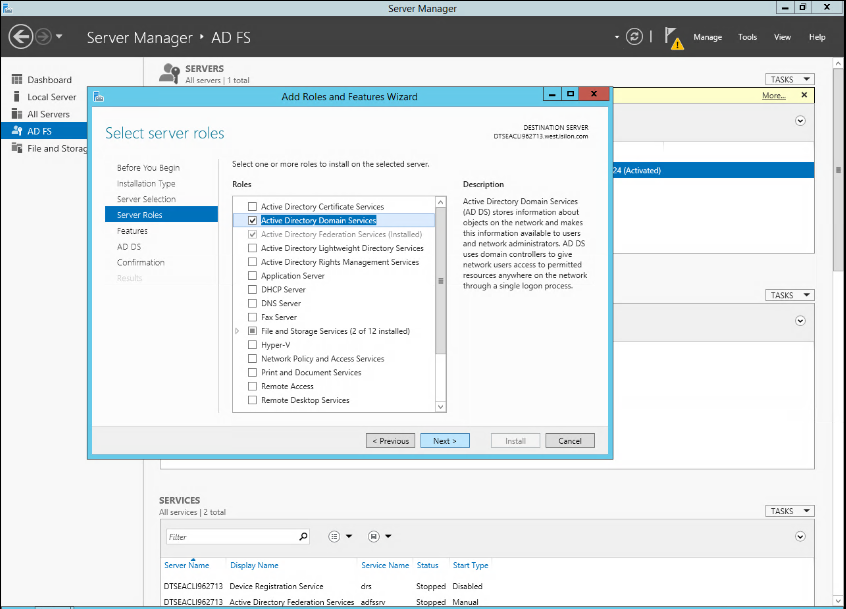
or from Windows Server Manager:
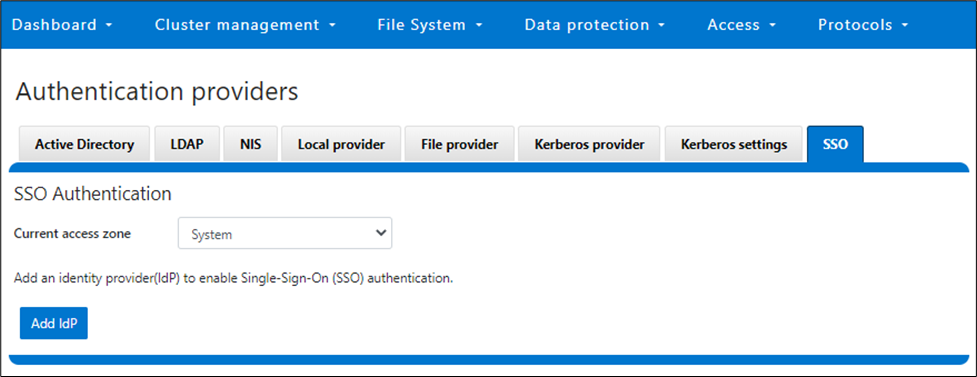
3. Select Access Zone

Because OneFS SSO is zone-aware, the next step involves choosing the access zone to configure. Go to Access > Authentication providers > SSO, select an access zone (that is, the system zone), and click Add IdP.
Note that each of a cluster’s access zone or zones must have an IdP configured for it. The same IdP can be used for all the zones, but each access zone must be configured separately.
4. Add IdP Configuration

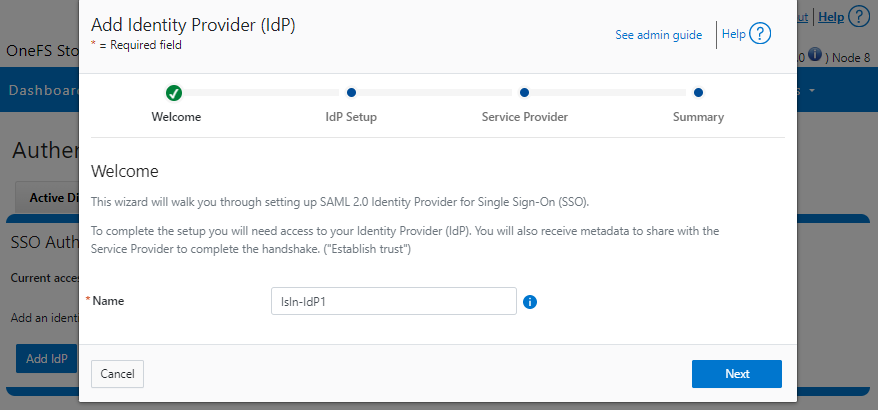
In OneFS 9.5 and later, the WebUI SSO configuration is a wizard-driven, “guided workflow” process involving the following steps:

First, go to Access > Authentication providers > SSO, select an access zone (that is, the system zone), and then click Add IdP.

On the Add Identity Provider page, enter a unique name for the IdP. For example, Isln-IdP1 in this case:
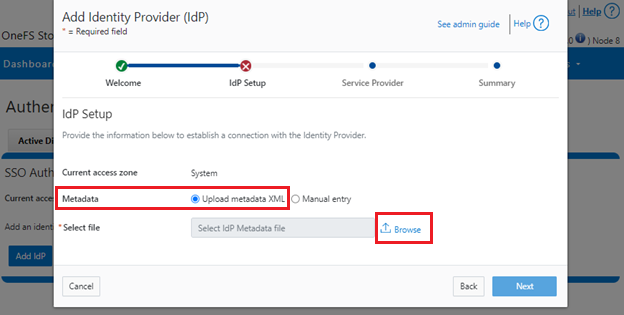
When done, click Next, select the default Upload metadata XML option, and browse to the XML file downloaded from the ADFS system:
Alternatively, if the preference is to enter the information by hand, select Manual entry and complete the configuration form fields:
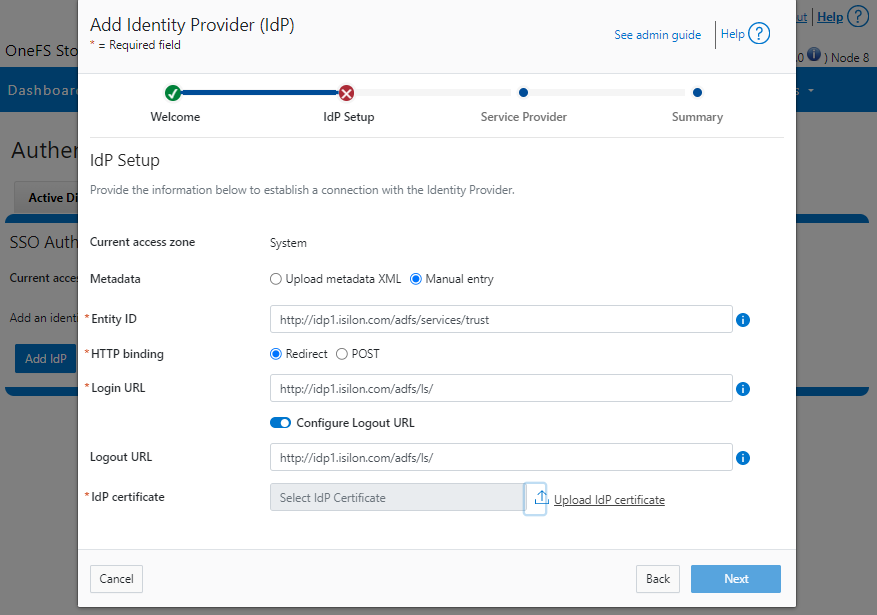
If the manual entry method is selected, you must have the IdP certificate ready to upload. With the manual entry option, the following information is required:
| Field | Description |
|---|---|
Binding | Select POST or Redirect binding. |
Entity ID | Unique identifier of the IdP as configured on the IdP. For example: http://idp1.isilon.com/adfs/services/trust |
Login URL | Log in endpoint for the IdP. For example: http://idp1.isilon.com/adfs/ls/ |
Logout URL | Log out endpoint for the IdP. For example: http://idp1.example.com/adfs/ls/ |
Signing Certificate | Provide the PEM encoded certificate obtained from the IdP. This certificate is required to verify messages from the IdP. |
Upload the IdP certificate:
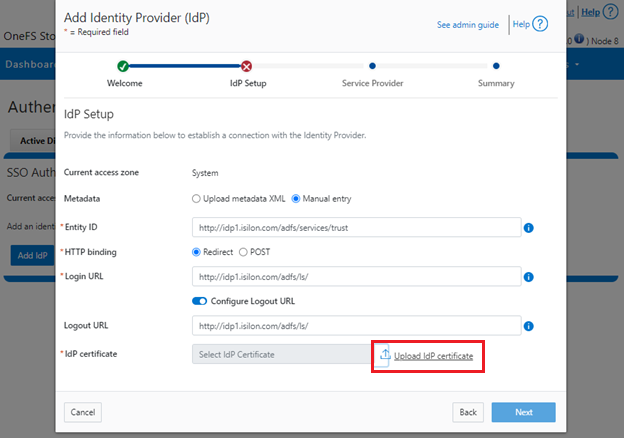
For example:
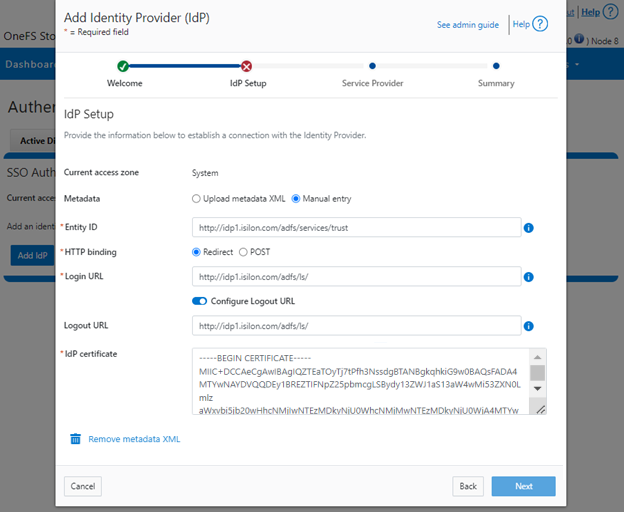
Repeat this step for each access zone in which SSO is to be configured.
When complete, click Next to move on to the service provider configuration step.
5. Configure Service Provider

On the Service Provider page, confirm that the current access zone is carried over from the previous page.

Select Metadata download or Manual copy, depending on the chosen method of entering OneFS details about this service provider (SP) to the IdP.
Provide the hostname or IP address for the SP for the current access zone.
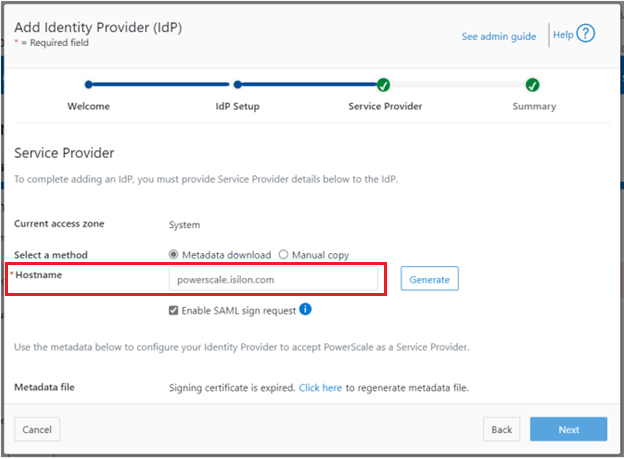
Click Generate to create the information (metadata) about OneFS and this access zone for use in configuring the IdP.
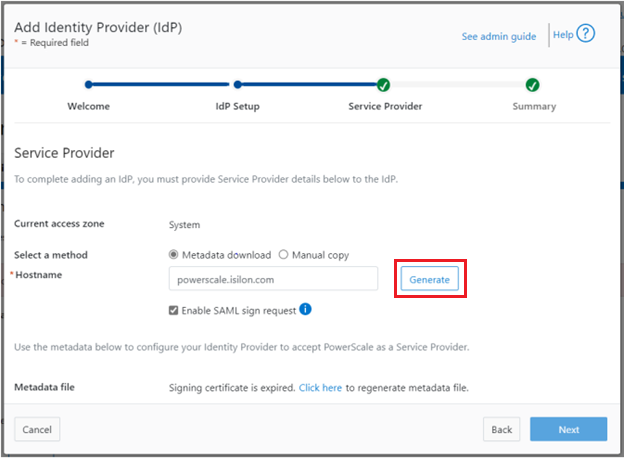
This generated information can now be used to configure the IdP (in this case, Windows ADFS) to accept requests from PowerScale as the SP and its configured access zone.
As shown, the WebUI page provides two methods for obtaining the information:
| Method | Action |
|---|---|
Metadata download | Download the XML file that contains the signing certificate, etc. |
Manual copy | Select Copy Link in the lower half of the form to copy the information to the IdP. |

Next, download the Signing Certificate.
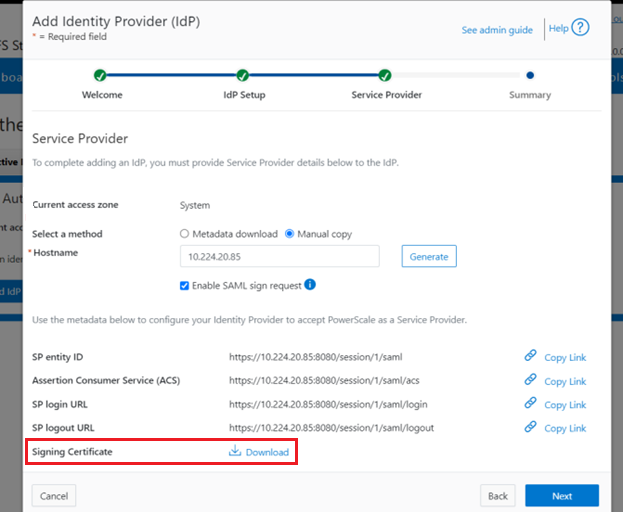
When completed, click Next to finish the configuration.
6. Enable SSO and Verify Operation

Once the IdP and SP are configured, a cluster admin can enable SSO per access zone through the OneFS WebUI by going to Access > Authentication providers > SSO. From here, select the access zone and select the toggle to enable SSO:
Or from the OneFS CLI, use the following syntax:
# isi auth sso settings modify --sso-enabled 1
Author: Nick Trimbee

OneFS WebUI Single Sign-on
Thu, 20 Jul 2023 16:32:13 -0000
|Read Time: 0 minutes
The Security Assertion Markup Language (SAML) is an open standard for sharing security information about identity, authentication, and authorization across different systems. SAML is implemented using the Extensible Markup Language (XML) standard for sharing data. The SAML framework enables single sign-on (SSO), which in turn allows users to log in once, and their login credential can be reused to authenticate with and access other different service providers. It defines several entities including end users, service providers, and identity providers, and is used to manage identity information. For example, the Windows Active Directory Federation Services (ADFS) is one of the ubiquitous identity providers for SAML contexts.
| Entity | Description |
|---|---|
End user | Requires authentication prior to being allowed to use an application. |
Identity provider (IdP) | Performs authentication and passes the user's identity and authorization level to the service provider—for example, ADFS. |
Service provider (SP) | Trusts the identity provider and authorizes the given user to access the requested resource. With SAML 2.0, a PowerScale cluster is a service provider. |
SAML Assertion | XML document that the identity provider sends to the service provider that contains the user authorization. |
OneFS 9.5 introduces SAML-based SSO for the WebUI to provide a more convenient authentication method, in addition to meeting the security compliance requirements for federal and enterprise customers. In OneFS 9.5, the WebUI’s initial login page has been redesigned to support SSO and, when enabled, a new Log in with SSO button is displayed on the login page under the traditional username and password text boxes. For example:

OneFS SSO is also zone-aware in support of multi-tenant cluster configurations. As such, a separate IdP can be configured independently for each OneFS access zone.
Under the hood, OneFS SSO employs the following high-level architecture:
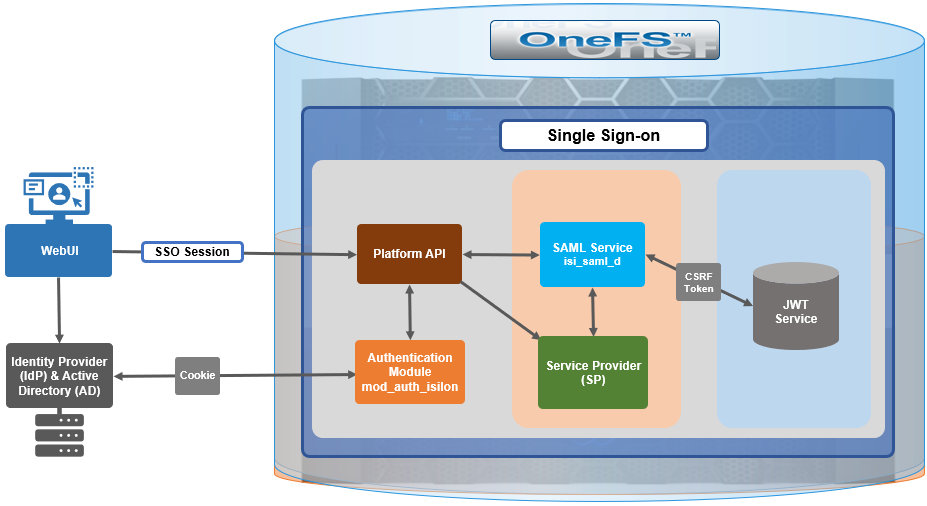
In OneFS 9.5, the SSO operates through HTTP REDIRECT and POST bindings, with the cluster acting as the service provider.
There are three different types of SAML Assertions—authentication, attribute, and authorization decision.
- Authentication assertions prove identification of the user and provide the time the user logged in and what method of authentication they used (that is, Kerberos, two-factor, and so on).
- The attribution assertion passes the SAML attributes to the service provider. SAML attributes are specific pieces of data that provide information about the user.
- An authorization decision assertion states whether the user is authorized to use the service or if the identify provider denied their request due to a password failure or lack of rights to the service.
SAML SSO works by transferring the user’s identity from one place (the identity provider) to another (the service provider). This is done through an exchange of digitally signed XML documents.
A SAML Request, also known as an authentication request, is generated by the service provider to “request” an authentication.
A SAML Response is generated by the identity provider and contains the actual assertion of the authenticated user. In addition, a SAML Response may contain additional information, such as user profile information and group/role information, depending on what the service provider can support. Note that the service provider never directly interacts with the identity provider, with a browser acting as the agent facilitating any redirections.
Because SAML authentication is asynchronous, the service provider does not maintain the state of any authentication requests. As such, when the service provider receives a response from an identity provider, the response must contain all the necessary information.
The general flow is as follows:
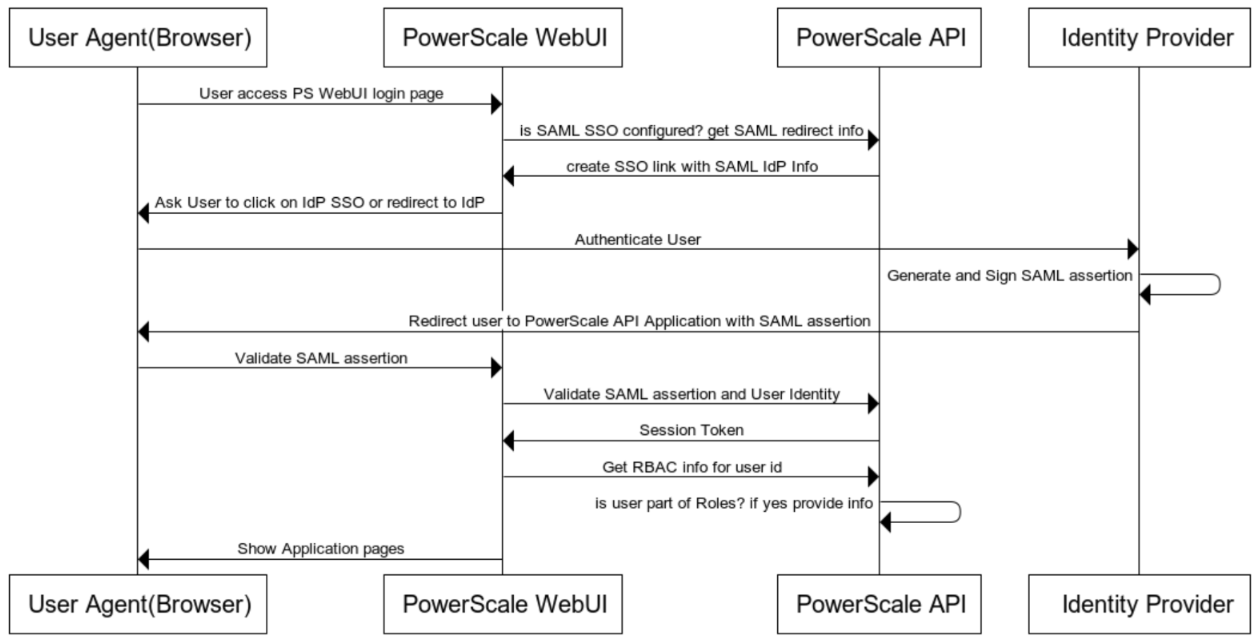
When OneFS redirects a user to the configured IdP for login, it makes an HTTP GET request (SAMLRequest), instructing the IdP that the cluster is attempting to perform a login (SAMLAuthnRequest). When the user successfully authenticates, the IdP responds back to OneFS with an HTTP POST containing an HTML form (SAMLResponse) that indicates whether the login was successful, who logged in, plus any additional claims configured on the IdP.
On receiving the SAMLResponse, OneFS verifies the signature using the public key (X.509 certificate) in to ensure that it really came from its trusted IdP and that none of the contents have been tampered with. OneFS then extracts the identity of the user, along with any other pertinent attributes. At this point, the user is redirected back to the OneFS WebUI dashboard (landing page), as if logged into the site manually.
In the next article in this series, we’ll take a detailed look at the following procedure to deploy SSO on a PowerScale cluster:

Author: Nick Trimbee