Dell Technologies PowerEdge MX 100 GbE solution with external Fabric Switching Engine
The Dell PowerEdge MX platform is advancing its position as the leading high-performance data center infrastructure by introducing a 100 GbE networking solution. This evolved networking architecture not only provides the benefit of 100 GbE speed but also increases the number of MX7000 chassis within a Scalable Fabric. The 100 GbE networking solution brings a new type of architecture, starting with an external Fabric Switching Engine (FSE).
PowerEdge MX 100 GbE solution design example
The diagram shows only one connection on each MX8116n for simplicity. See the port-mapping section in the networking deployment guide here.
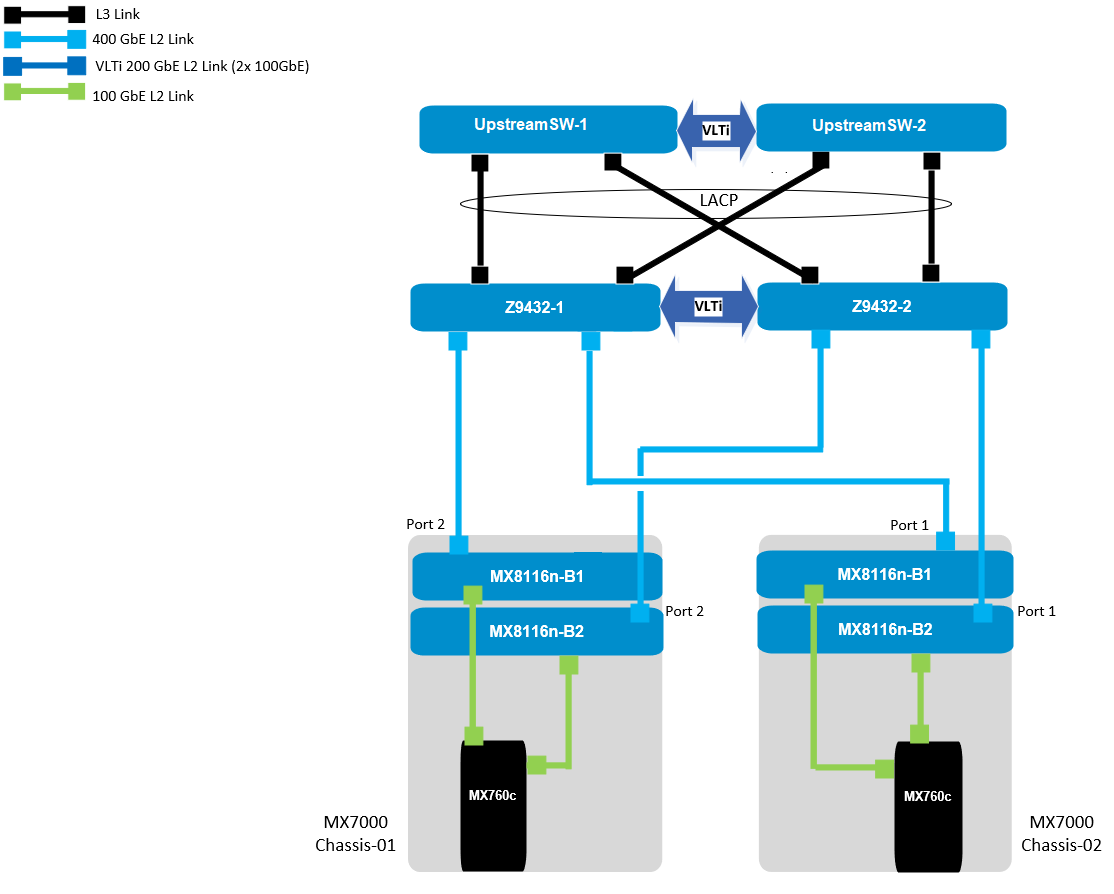
Figure 1. 100 GbE solution example topology
Components for 100 GbE networking solution
The key hardware components for 100 GbE operation within the MX Platform are described below with a minimal description.
Dell Networking MX8116n Fabric Expander Module
The MX8116n FEM includes two QSFP56-DD interfaces, with each interface providing up to 4x 100Gbps connections to the chassis, 8x 100 GbE internal server-facing ports for 100 GbE NICs, and 16x 25 GbE for 25 GbE NICs.
The MX7000 chassis supports up to four MX8116n FEMs in Fabric A and Fabric B.
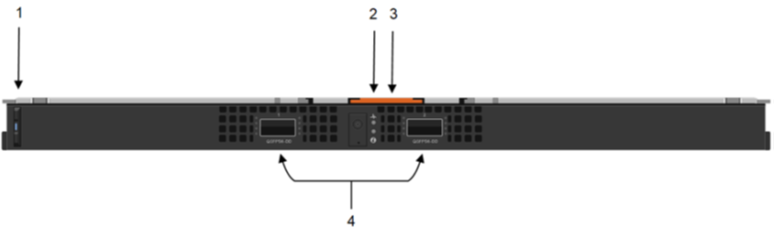
Figure 2. MX8116n FEM
The following MX8116n FEM components are labeled in the preceding figure:
- Express service tag
- Power and indicator LEDs
- Module insertion and removal latch
- Two QSFP56-DD fabric expander ports
Dell PowerEdge MX760c compute sled
- The MX760c is ideal for dense virtualization environments and can serve as a foundation for collaborative workloads.
- Businesses can install up to eight MX760c sleds in a single MX7000 chassis and combine them with compute sleds from different generations.
- Single or dual CPU (up to 56 cores per processor/socket with four x UPI @ 24 GT/s) and 32x DIMM slots DDR5 with eight memory channels.
- 8x E3.S NVMe (Gen5 x4) or 6 x 2.5" SAS/SATA SSDs or 6 x NVMe (Gen4) SSDs and iDRAC9 with lifecycle controller.
Note: The 100 GbE Dual Port Mezzanine card is also available on the MX750c.
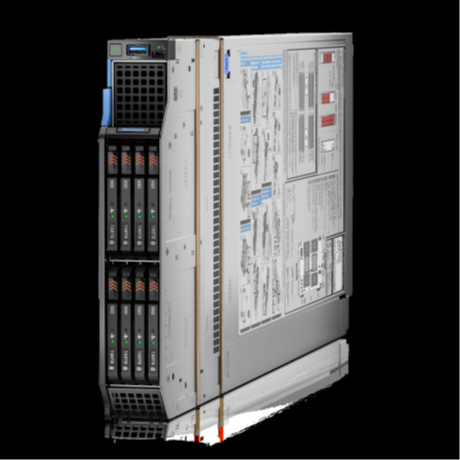
Figure 3. Dell PowerEdge MX760c sled with eight E3.s SSD drives
Dell PowerSwitch Z9432F-ON external Fabric Switching Engine
The Z9432F-ON provides state-of-the-art, high-density 100/400 GbE ports, and a broad range of functionality to meet the growing demands of modern data center environments. Compact and offers an industry-leading density of 32 ports of 400 GbE in QSFP56-DD, 128 ports of 100, or up to 144 ports of 10/25/50 (through breakout) in a 1RU design. Up to 25.6 Tbps non-blocking (full duplex), switching fabric delivers line-rate performance under full load.L2 multipath support using Virtual Link Trunking (VLT) and Routed VLT support. Scalable L2 and L3 Ethernet switching with QoS and a full complement of standards-based IPv4 and IPv6 features, including OSPF and BGP routing support.

Figure 4. Dell PowerSwitch Z9432F-ON
Note: Mixed dual port 100 GbE and quad port 25 GbE mezzanine cards connecting to the same MX8116n are not a supported configuration.
100 GbE deployment options
There are four deployment options for the 100 GbE solution, and every option requires servers with a dual port 100 GbE mezzanine card. You can install the mezzanine card in either mezzanine slot A, B, or both. When you use the Broadcom 575 KR dual port 100 GbE mezzanine card, you should set the Z9432F-ON port-group to unrestricted mode and configure the port mode for 100g-4x.
PowerSwitch CLI example:
port-group 1/1/1
profile unrestricted
port 1/1/1 mode Eth 100g-4x
port 1/1/2 mode Eth 100g-4x
Note: The 100 GbE solution deployment, 14 maximum numbers of chassis are supported in single fabric, and 7 maximum numbers of chassis are supported in dual fabric using the same pair of FSE solution.
Single fabric
In a single fabric deployment, two MX8116n can be installed either in Fabric A or Fabric B, and the corresponding slot of the sled in slot-A or slot-B can have the 100 GbE mezzanine card installed.
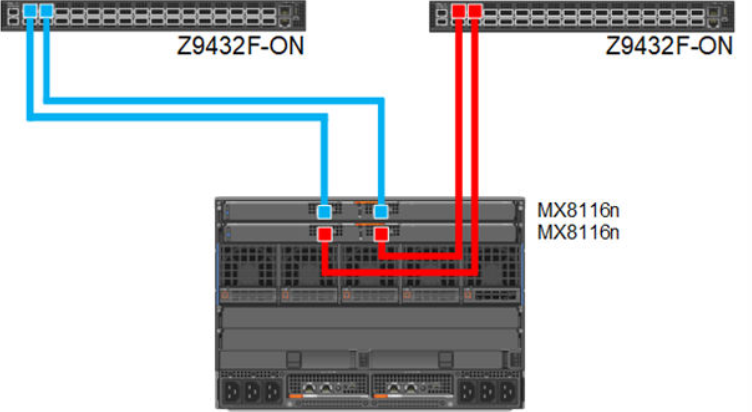
Figure 5. 100 GbE Single Fabric
Dual fabric combined fabrics
In this option, four MX8116n (2x in Fabric A and 2x in Fabric B) can be installed and combined to connect Z9432F-ON external FSE.
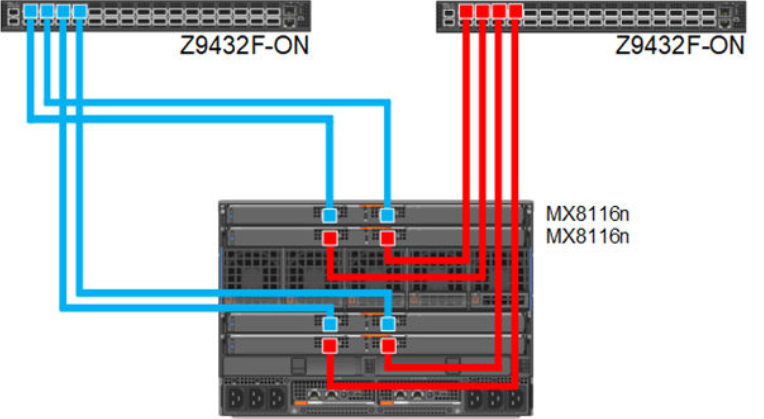
Figure 6. 100 GbE Dual Fabric combined Fabrics
Dual fabric separate fabrics
In this option four, MX8116n (2x in Fabric A and 2x in Fabric B) can be installed and connected to two different networks. In this case, the MX760c server module has two mezzanine cards, with each card connected to a separate network.
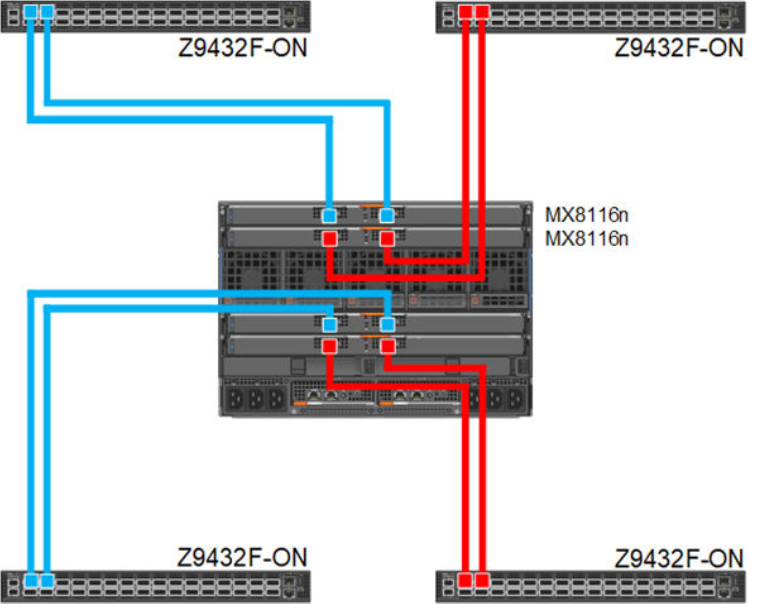
Figure 7. 100 GbE Dual Fabric separate Fabrics
Dual fabric, single MX8116n in each fabric, separate fabrics
In this option two, MX8116n (1x in Fabric A and 1x in Fabric B) can be installed and connected to two different networks. In this case, the MX760c server module has two mezzanine cards, each connected to a separate network.
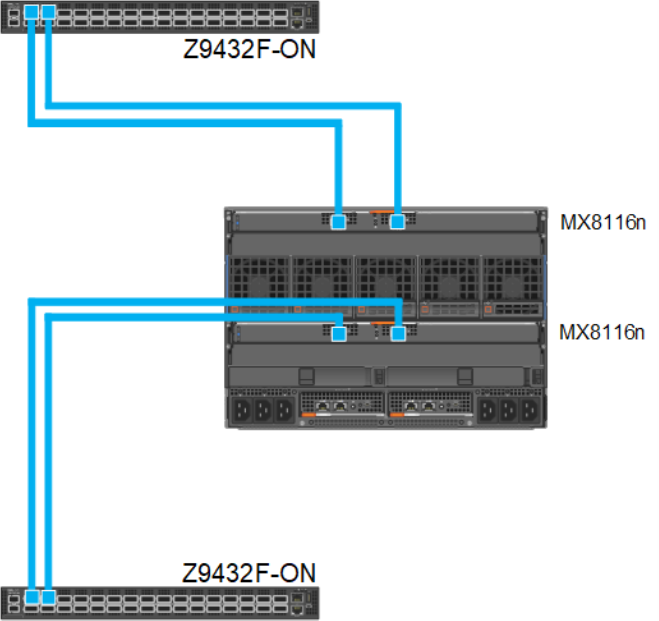
Figure 8. 100 GbE Dual Fabric single FEM in separate Fabrics
References
Dell PowerEdge Networking Deployment Guide
A chapter about 100 GbE solution with external Fabric Switching Engine
Related Blog Posts

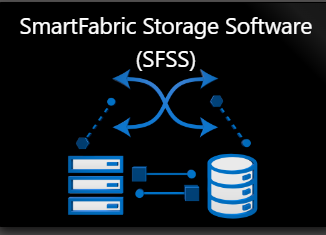
What are the Dell SmartFabric™ Products?
Mon, 26 Jun 2023 14:09:10 -0000
|Read Time: 0 minutes
This blog aims to clarify the range of Dell Technologies’ SmartFabric branded products available today. We are always innovating here at Dell, so look out for more to come!
Here are four solutions that use the SmartFabric brand:
The following table provides links to further documentation, products that are interoperable with the solution, and how an administrator can access the product.
| Product | What does it do? | Related products | User Interface |
1 | SmartFabric OS10 | Operates Dell PowerSwitch switches as the network operating system. OS10 can run in “Full switch mode” or “SmartFabric mode.” | Dell PowerSwitch switches listed in the SmartFabric OS10 Hardware Compatibility List. |
|
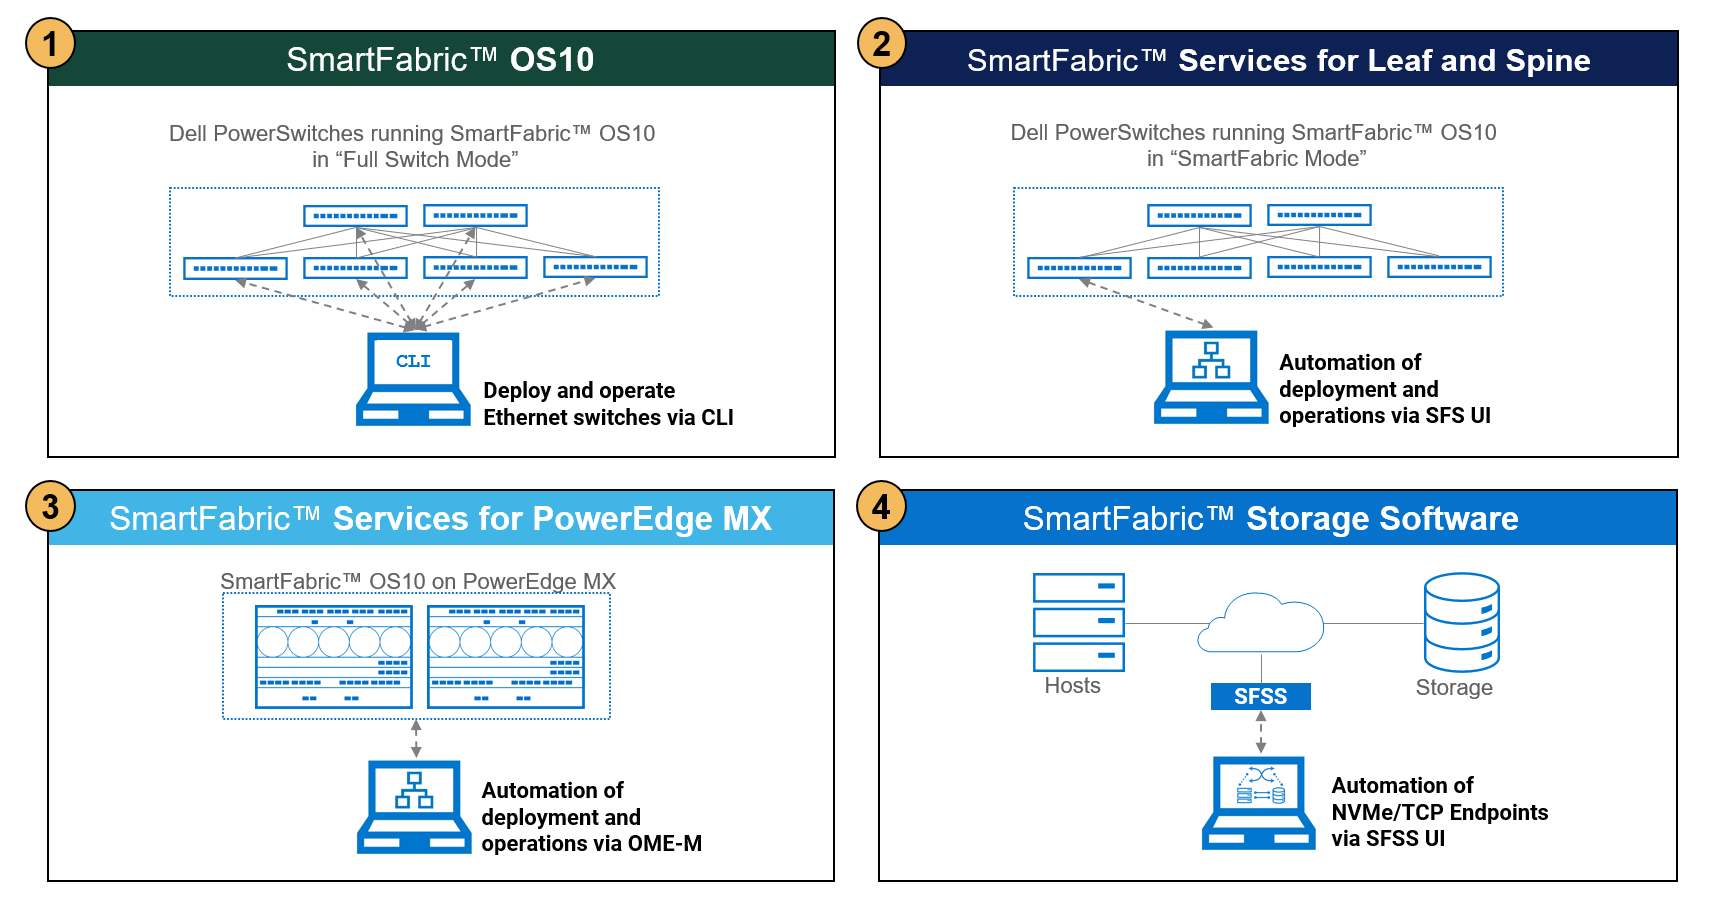
2 | SmartFabric Services (SFS) for Leaf and Spine | Automates configuration of Dell PowerSwitch switches that run SmartFabric OS10 in SmartFabric mode. Applies to SFS on Spine/Leaf and Top of Rack (ToR) switches. | Dell PowerSwitch switches Visit the Networking Support & Interoperability Matrix, and then select this icon:
|
|
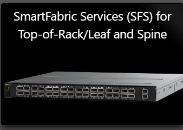
3 | SmartFabric Services (SFS) for PowerEdge MX | Automates configuration of SmartFabric OS10 operating system on the Ethernet switches (IOMs) in the PowerEdge MX Platform. | Dell PowerEdge MX
|
|
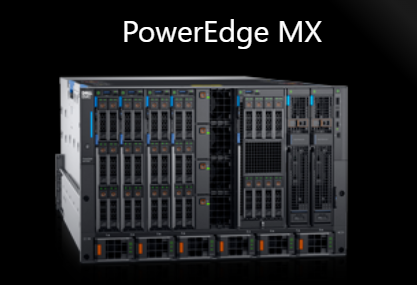
4 | SmartFabric Storage Software (SFSS) | Provides zoning and autodiscovery of hosts and storage in NVMe over TCP SANs. | Server and Storage Operating Systems Visit the Networking Support & Interoperability Matrix, and then select this icon:
|
|
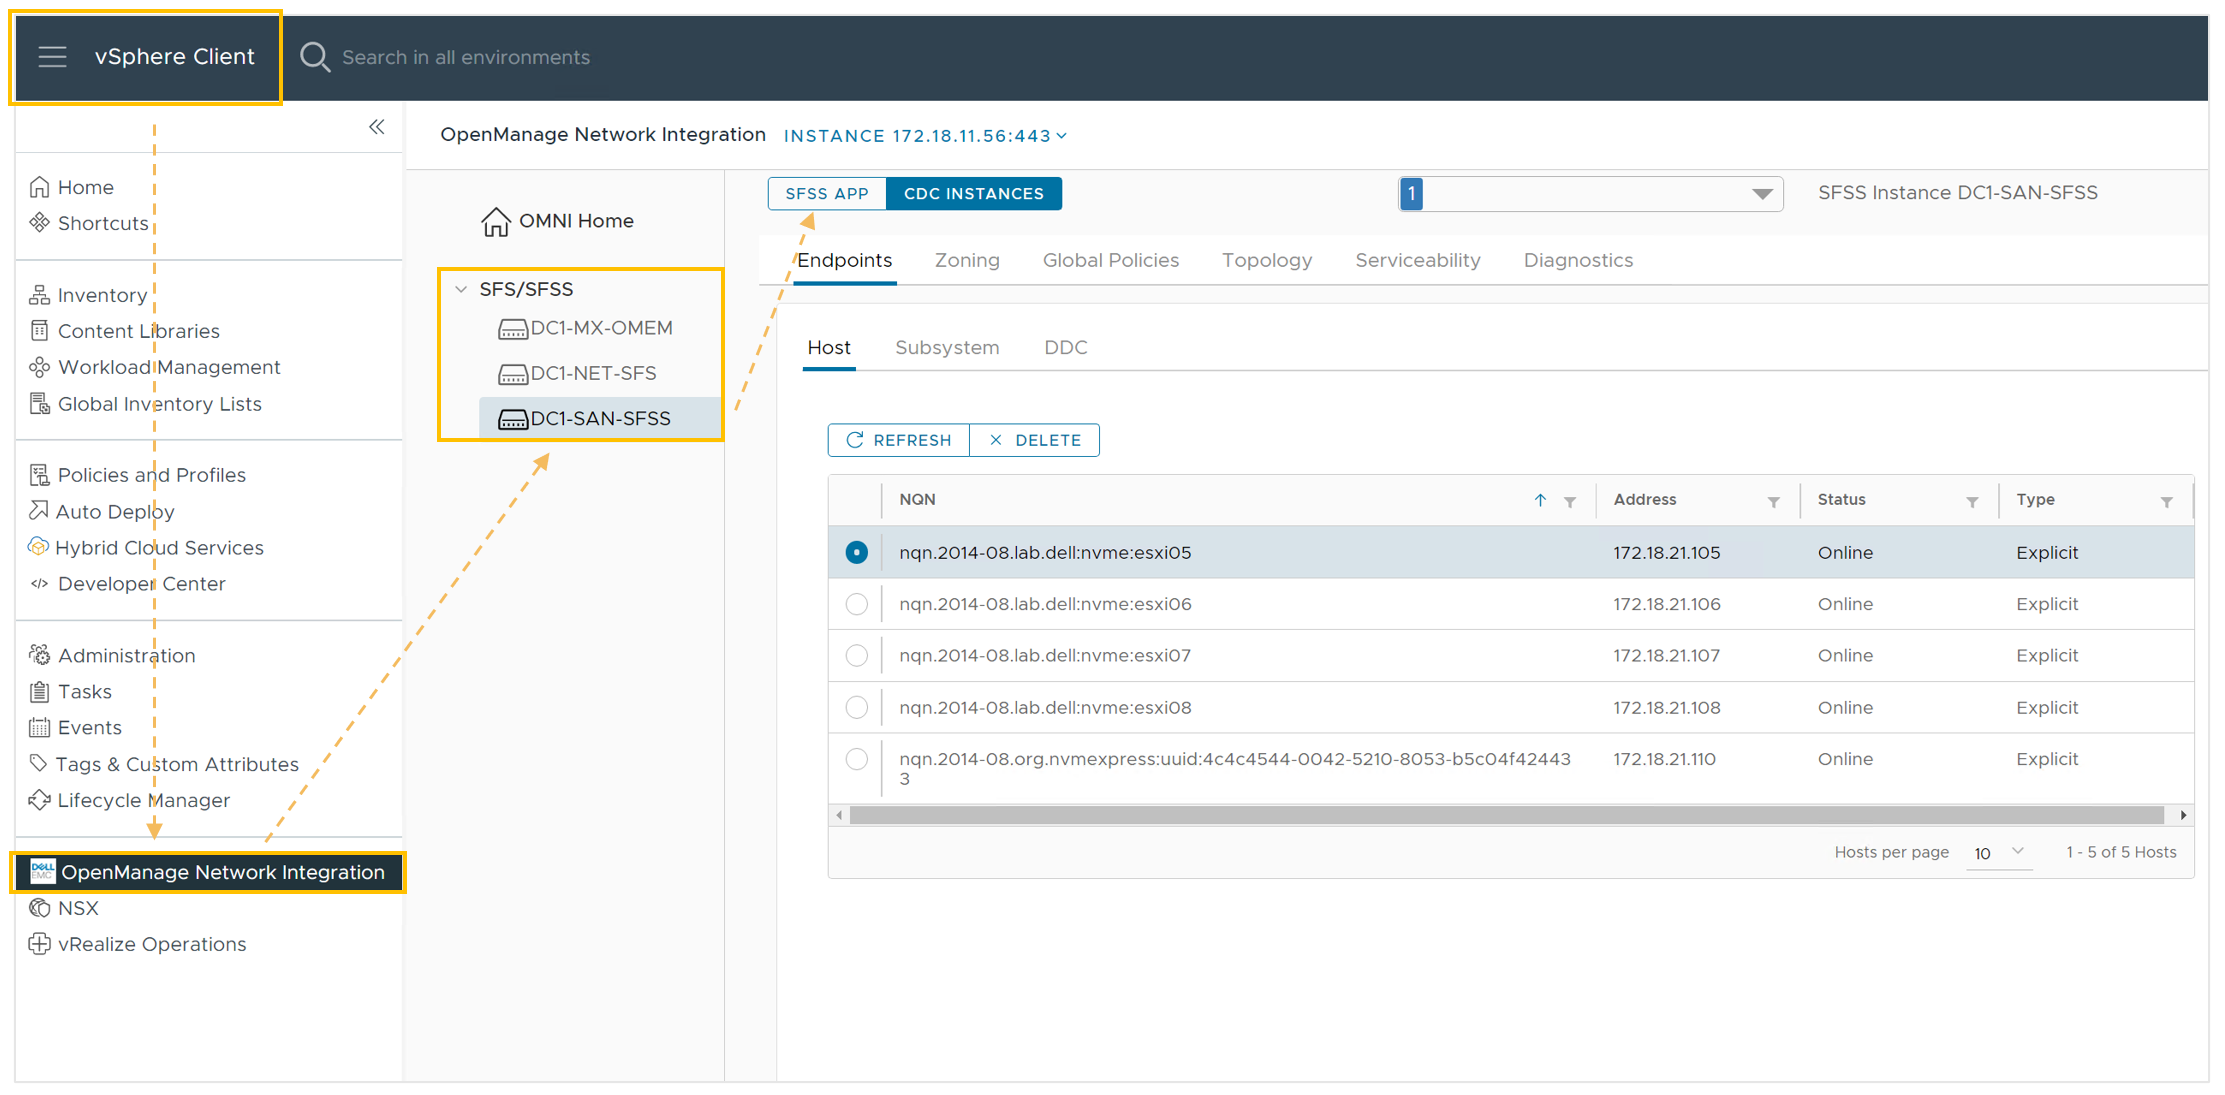
OpenManage Network Integration (OMNI)
OMNI is a vCenter plug-in that brings the user interface of the SmartFabric product into your vCenter UI, making vCenter a single pane of glass.
Here is an example of the OMNI vCenter plug-in facilitating access to a SmartFabric Services instance, and two SmartFabric Storage Software instances:
If you are interested in exploring any of the SmartFabric products further, browse the links above or reach out to Dell Technologies sales team.

Dell Technologies PowerEdge MX Platform: MX IOM Firmware Update Process
Thu, 08 Dec 2022 23:40:12 -0000
|Read Time: 0 minutes
If you are reading this blog, most likely your interest is in how to update the firmware on the Dell Networking MX I/O modules (IOMs). This blog will go through all the necessary steps to update both the Dell OME-Modular application and the networking IOMs for all types of deployments.
Starting with OME-M 2.00.00, a new recommended order for updating the MX chassis and all its components has been documented in Appendix B of the Dell OpenManage Enterprise – Modular Edition Version 2.00.00 for PowerEdge MX7000 Chassis User’s Guide. The new process, called phased update order, is supported for upgrading from OME-M 1.40.xx to OME-M 2.00.00 and later.
Note: If updating to a version prior to OME-M 2.00.00 or updating from a version prior to OME-M 1.40.00, use the update process documented in the section titled Updating firmware for PowerEdge MX solution in the appropriate Dell OpenManage Enterprise – Modular Edition PowerEdge MX7000 Chassis User’s Guide.
This blog will follow the phased update order process. After updating the Networking IOMs, please refer to the MX7000 Chassis User Guide linked above for server update instructions.
The following image shows the update order for all deployment types. In the sections below, the instructions will provide additional information when updating multichassis or using different IOM operating modes.
Note: The update order for versions prior to OME-M 2.00.00 recommended an order of servers, followed by OME-M, and then network IOMs. Although the order is different, the steps to update OME-M and network IOMs remain the same.
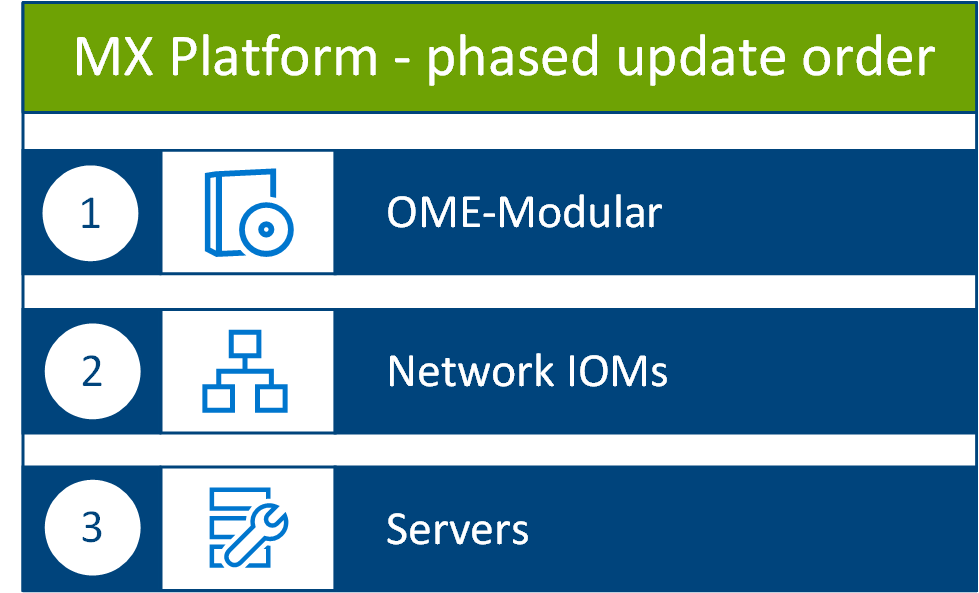 MX Platform phased update order
MX7000 Solution Baseline
All components and devices within the MX chassis are tested as a validated solution stack or firmware baseline. Each release of the OME-Modular software includes an update to the firmware baseline. The MX7000 Chassis User Guide will contain the current baseline for that release and baselines for past OME-M. The details are listed in a table within the Updating firmware for PowerEdge MX section.
The firmware baseline information can also be seen at the Networking Support & Interoperability Matrix.
Firmware location and catalogs
Firmware location
Dell update packages (DUPs): https://www.dell.com/support
OME-M DUPs: https://www.dell.com/support/home/en-us/product-support/product/poweredge-mx7000/drivers
IOM DUPs:
- https://www.dell.com/support/home/en-us/product-support/product/networking-mx9116n/drivers
- https://www.dell.com/support/home/en-us/product-support/product/networking-mx5108n/drivers
Catalogs
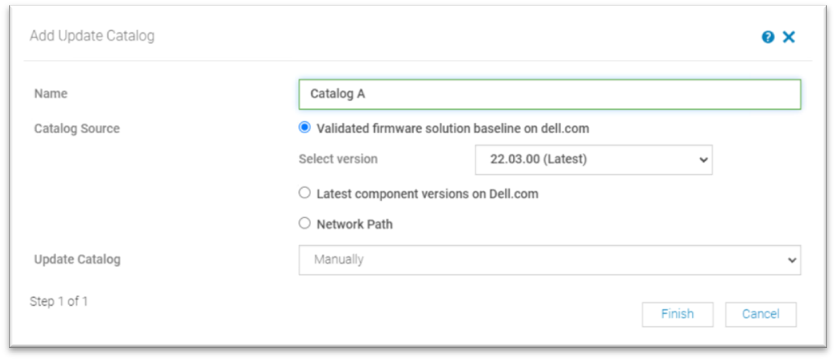
Catalogs are a list of firmware available for the components and devices installed on the chassis. There are three main types of catalogs:
- Validated firmware solution baseline on dell.com
- Latest component versions on Dell.com
- Network Path (Custom catalog from Dell Repository Manger)
The most common catalog method is the Validated firmware solution baseline on dell.com and will ensure you follow the baseline. Catalogs based on baselines are available approximately 30 days after the release of a new OME-M version. This blog focuses on the validated firmware solution baseline.
Catalogs can be added to OME-M through the Configuration > Firmware Compliance section of the OME-M GUI.
Once a catalog is established, it can be used to establish a Firmware Compliance baseline to check compliance to that catalog. Once a compliance check is completed, the compliance report can be used to show components that do not match the catalog. From the compliance report, you can select components to update via the Make Compliant button. This is especially helpful for server components.
For chassis updates with OME-Modular and IOMs, the process described in this blog will start from the Devices view within OME-M.
OME-Modular update process
OME-M resides in the management module. Updating the chassis to the latest OME-M will update all components within the management module.
When updating a single chassis deployment, access the OME-M GUI using the chassis management IP address.
When updating a multi-chassis deployment, access the OME-M GUI of the lead chassis. If you select all the management modules in an MCM group, OME-M updates them in the required order.
Single chassis OME-M update
Follow the below steps to update the desired OME-M release for a single chassis deployment.
- Navigate to the chassis IP address.
- Click the Firmware tab.
 Click the Firmware tab
- Click Update.
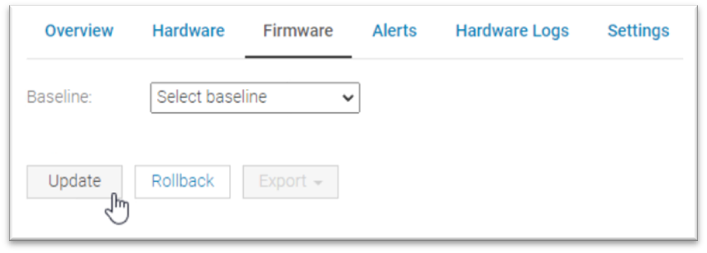 Click Update
- Select the update source. If you have downloaded the DUP package from the Dell support site, choose Individual package and choose the file from your local directory. You can also download the update file directly from the OME-M GUI using the Baseline selection.
- Select both instances of OpenManage Enterprise Modular and click Next.
- Click either Update Now or Schedule Later, depending on your preference.
- Click Finish.
OME-Modular starts a job for the update process. You can monitor the job in the Monitor > Jobs area of the OME-M GUI. - Wait for the job to fully complete. The OME-M GUI will not be reachable for all parts of the upgrade process. Check the job for full completion before starting IOM updates.
Multi-chassis OME-M update
The process for updating multiple chassis is the same as the single chassis. The main difference is to select all of the chassis in the group.
- Navigate to the lead chassis IP address.
- Click Devices > Chassis.
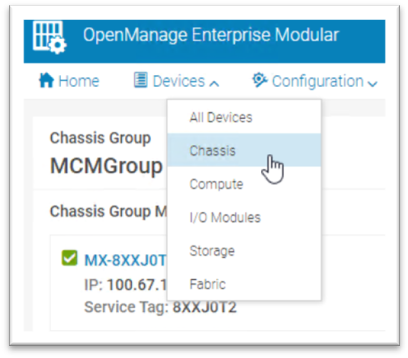 Click Devices > Chassis
 - Select all of the chassis in the group desired for update.
- Click Update.
- Select the update source. If you have downloaded the DUP package from the Dell support site, choose Individual package and choose the file from your local directory. You can also download the update file directly from the OME-M GUI using the Baseline selection.
- Select all instances of OpenManage Enterprise Modular and click Next.
- Click either Update Now or Schedule Later, depending on your preference.
- Click Finish.
OME-Modular starts a job for the update process. You can monitor the job in the Monitor > Jobs area of the OME-M GUI. - Wait for the job to fully complete. The OME-M GUI will not be reachable for all parts of the upgrade process. Check the job for full completion before starting IOM updates.
Networking IOM update process
Once the chassis update process is completed, the IOMs are ready for the update process. The following sections will show the update process using the OME-M GUI and the DUP firmware package.
SmartFabric mode updates
SmartFabric and OME-Modular controls the update process of the IOM pair in SmartFabric mode in the MX deployment. Updating an IOM on a fabric will start the update process for all IOMs in the fabric. OME-M will coordinate the update process to ensure continuity of the fabric, updating each IOM one at a time.
- Navigate to the lead chassis IP address.
- Click Devices > I/O Modules.
- From the list of available IOMs, choose a single IOM in a desired fabric by using the selection box on the left side of the list. Ensure the selection is a MX9116n or MX5108n model. Use the selection box on the left side of the list.
- Click Update directly above the list.
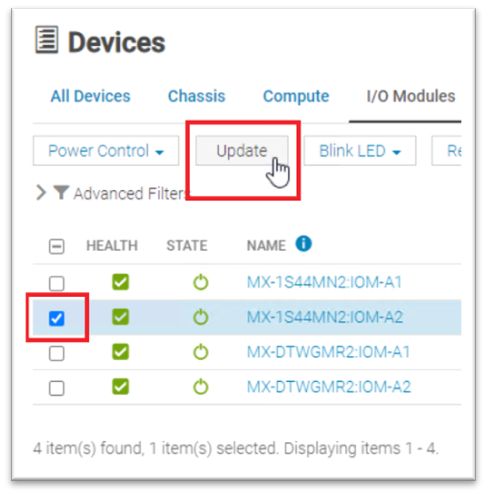 Select a single IOM and click Update
 - Select the update source. If you downloaded the DUP package from the Dell support site, choose Individual package and choose the file from your local directory. You can also download the update file directly from the OME-M GUI using the Baseline selection.
- Select the IOM device again and click Next or Finish.
Note: No servers were included in this update. Disregard the warnings for server options.
From this point, the SmartFabric and OME-M coordinates the upgrade of all IOMs in the SmartFabric. All IOMs will be shown in a single job. To monitor the IOM upgrades, navigate to Monitor > Jobs, select the desired job, and click View Details.
The job is not fully complete until the job messages show completed and the green status checkmark is displayed. This update process can take 2 hours or more to complete. It is common to see the first IOM reboot and then have a long waiting period between status messages. The SmartFabric is performing checks to ensure the databases and configuration are properly established before reloading the second IOM.
If there is another fabric with a second set of IOMs in the chassis or scalable fabric, repeat the above steps for the other fabric.
Full Switch mode updates
IOMs operating in Full Switch mode operate and are configured much like traditional rack switches. However, the MX platform has the OME-Modular GUI to manage the IOMs. Dell Technologies recommends that you use the IOM-Modular GUI to download and initiate the update process, as described in the SmartFabric operation steps above.
In Full Switch mode, you manage the update process and ensure connectivity is maintained throughout the update process. Update only one switch at a time to ensure connectivity is maintained.
For deployments with storage uplinks such as FCoE or FC, Dell Technologies recommends that you verify the active path and maintain storage connectivity throughout the process. If any issues occur in migrating the active storage uplink during the update process, contact Dell Support for assistance.
- Navigate to the lead chassis IP address.
- Click Devices > I/O Modules.
- From the list of available IOMs, choose a single IOM from the desired fabric. Ensure the selection is a MX9116n or MX5108n model. Use the selection box on the left side of the list.
- Click Update directly above the list.
- Select the update source. If you downloaded the DUP package from the Dell support site, choose Individual package and choose the file from your local directory. You can also download the update file directly from the OME-M GUI using the Baseline selection.
- Select the IOM device again and click Next or Finish.
- Wait for the update job to fully complete. To monitor the IOM upgrades, navigate to Monitor > Jobs, select the desired job, and click View Details. The job is not fully complete until the job messages show completed and the green status checkmark is displayed.
- Repeat the update process for the second IOM in steps 2 through 7.
Video
Dell PowerEdge MX7000 Platform firmware update process example: