


Dell PowerScale for Google Cloud New Release Available
Fri, 22 Jul 2022 17:58:28 -0000
|Read Time: 0 minutes
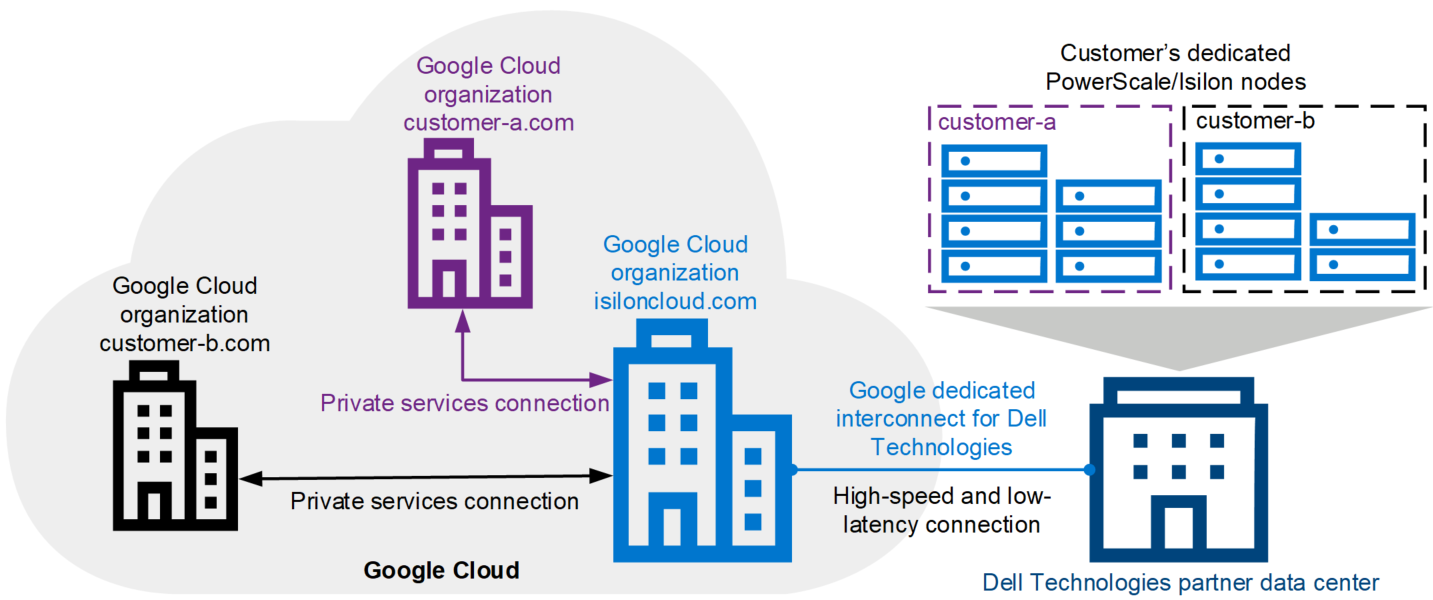
PowerScale for Google Cloud provides the native-cloud experience of file services with high performance. It is a scalable file service that provides high-speed file access over multiple protocols, including SMB, NFS, and HDFS. PowerScale for Google Cloud enables customers to run their cloud workloads on the PowerScale scale-out NAS storage system. The following figure shows the architecture of PowerScale for Google Cloud. The three main parts are the Dell Technologies partner data center, the Dell Technologies Google Cloud organization (isiloncloud.com), and the customer’s Google Cloud organization (for example, customer-a.com and customer-b.com).
PowerScale for Google Cloud: a new release
We proudly released a new version of PowerScale for Google Cloud on July 8, 2022. It provides the following key features and enhancements:
More flexible configuration to choose
In the previous version of PowerScale for Google Cloud, only several pre-defined node tiers were available. With the latest version, you can purchase all PowerScale node types to fit your business needs and accelerate your native-cloud file service experience.
New location available in EMEA region
In the previous version, the supported regions include North America and APJ (Australia and Singapore). We are now adding the EMEA region, which includes London, Frankfurt, Paris, and Warsaw.
Google Cloud VMware Engine (GCVE) Certification
PowerScale for Google Cloud is now certified to support GCVE. GCVE guest VMs can connect to PowerScale for Google Cloud file services to fully leverage PowerScale cluster storage. We’ll be taking a deeper look at the details in blog articles in the next few weeks.
Want to know more about the powerful cloud file service solution? Just click these links:
- PowerScale for Google Cloud Interactive Demo
- PowerScale for Google Cloud white paper
- PowerScale for Google Cloud User Documentation
Resources
Author: Lieven Lin
Related Blog Posts

Setting Up PowerScale for Google Cloud SmartConnect
Wed, 29 Dec 2021 17:48:23 -0000
|Read Time: 0 minutes
In the Dell EMC PowerScale for Google Cloud solution, OneFS uses the cluster service FQDN as its SmartConnect Zone name with a round-robin client-connection balancing policy. The round-robin policy is a default setting and is recommended for most cases in OneFS. (For more details about the OneFS SmartConnect load-balancing policy, see the Load Balancing section of the white paper Dell EMC PowerScale: Network Design Considerations.)
After the cluster is deployed, you must find the OneFS SmartConnect service IP in the clusters page within Google Cloud Console. Then, configure your DNS server to delegate the cluster service FQDN zone to the OneFS Service IP. You need to configure a forwarding rule in Google Cloud DNS which forwards the cluster service FQDN query to the DNS server, and set up a zone delegation on the DNS server that points to the cluster service IP. The following figure shows the DNS query flow by leveraging Google Cloud DNS along with a DNS server in the project.
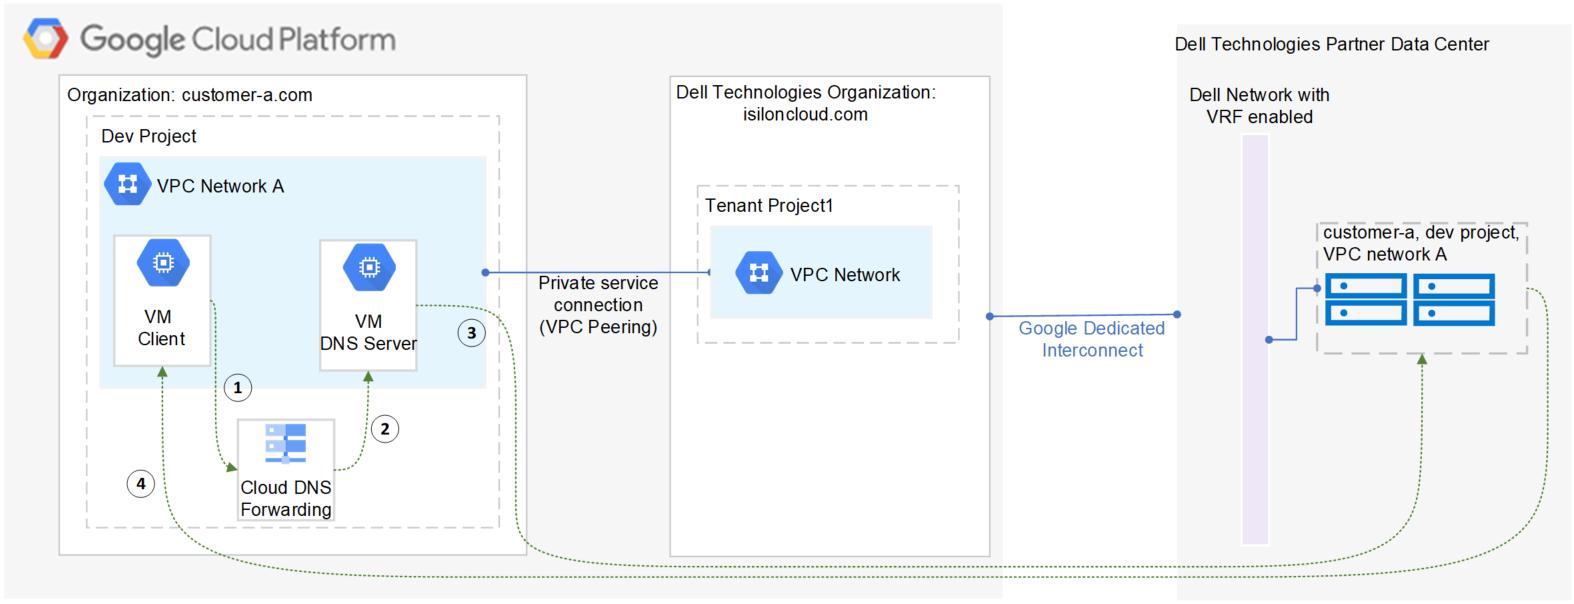
- VM clients send a DNS request for Cluster service FQDN to the Google Cloud DNS service.
- Google Cloud DNS forwards the request to the DNS server.
- The DNS server forwards the request to the cluster service IP. The service IP is responsible for translating the cluster service IP into an available node IP.
- SmartConnect returns a node IP to the client. The client can now access cluster data.
Because Google Cloud DNS cannot communicate with the OneFS cluster directly, we use a DNS server that is located in the authorized VPC network to forward the SmartConnect DNS request to the cluster. You can use either a Windows server or a Linux server. In this blog we use a Windows server to show the detailed steps.
Obtain required cluster information
The following information is required before setting up SmartConnect:
- Cluster service FQDN -- This is the OneFS SmartConnect zone name used by clients.
- Service IP -- This is the OneFS SmartConnect service IP that is responsible for resolving the client DNS request and returning an available node IP to clients.
- Authorized network -- By default, only the machines on an authorized VPC network can access a PowerScale cluster.
To obtain this required information, do the following:
- In the Google Cloud Console navigation menu, click PowerScale and then click Clusters.
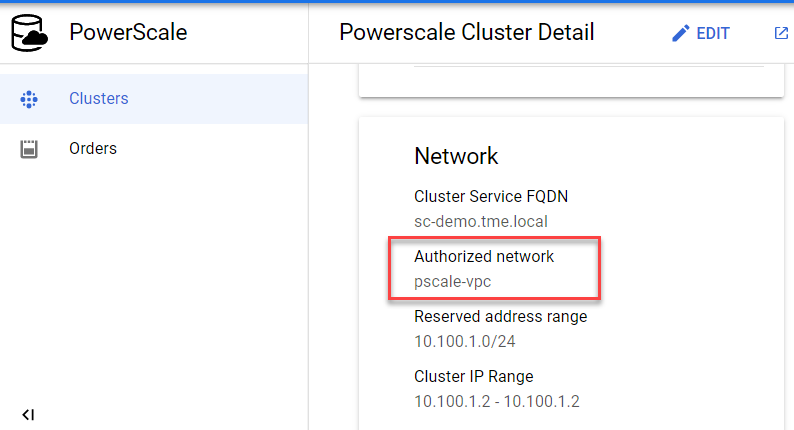
- Find your cluster row, where you can see the cluster service FQDN and service IP:

3. To find the authorized network information, click the name of the cluster. From the PowerScale Cluster Details page, find the authorized network from the Network information, highlighted here:
Set up a DNS server
If you already have an available DNS server that is connected to the cluster authorized network, you can use this existing DNS server and skip Step 1 and Step 2 below.
- In the Google Cloud Console navigation menu, click Compute Engine and then click VM instances. In this example, we are creating a Windows VM instance as a DNS server. Make sure your DNS server is connected to the cluster authorized network.
- Log into the DNS server and install DNS Server Role in the Windows machine. (If you are using a Linux machine, you can use Bind software instead.)
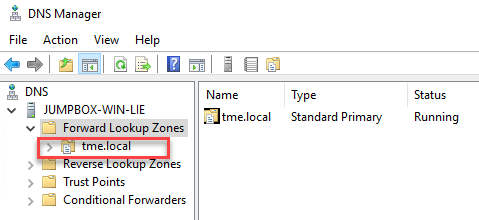
- Create a new DNS zone in the DNS server:
4. Create an (A) record for the cluster service IP. (See the section DNS delegation best practices of the white paper Dell EMC PowerScale: Network Design Considerations for more details.)
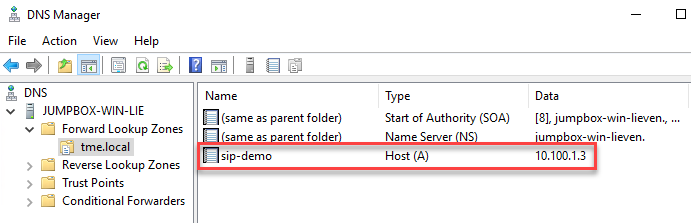
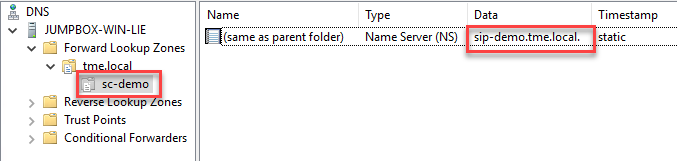
5. Create a new delegation for your cluster service FQDN (sc-demo.tme.local in this example) and point the delegation server to your cluster service IP (A) record created above (sip-demo.tme.local in this example), as shown here:
Configure Cloud DNS and firewall rules
- In the Google Cloud Console navigation menu, click Network services and then click Cloud DNS.
- Click the CREATE ZONE button.
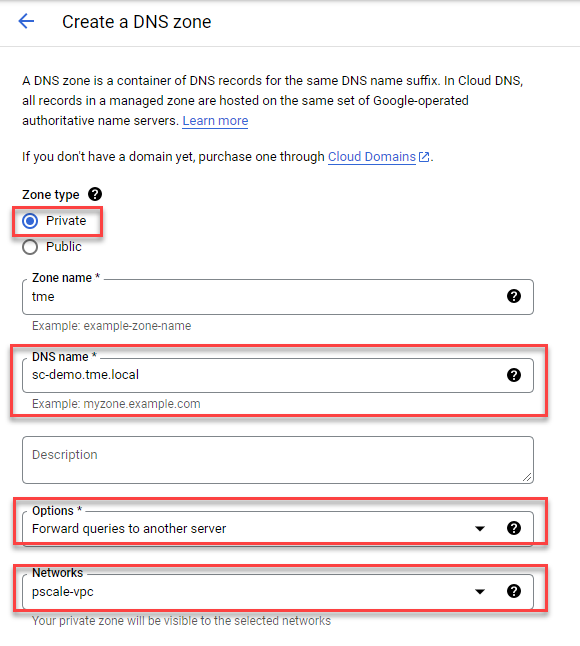
- Choose the Private zone type and enter your Cluster Service FQDN in the DNS name field. Choose Forward queries to another server and your cluster authorized network, as shown here:
4. Obtain the DNS server IP address that you configured in the ‘Set up a DNS server’ step.
5. Point the destination DNS server to your own DNS server IP address, then click the Create button.

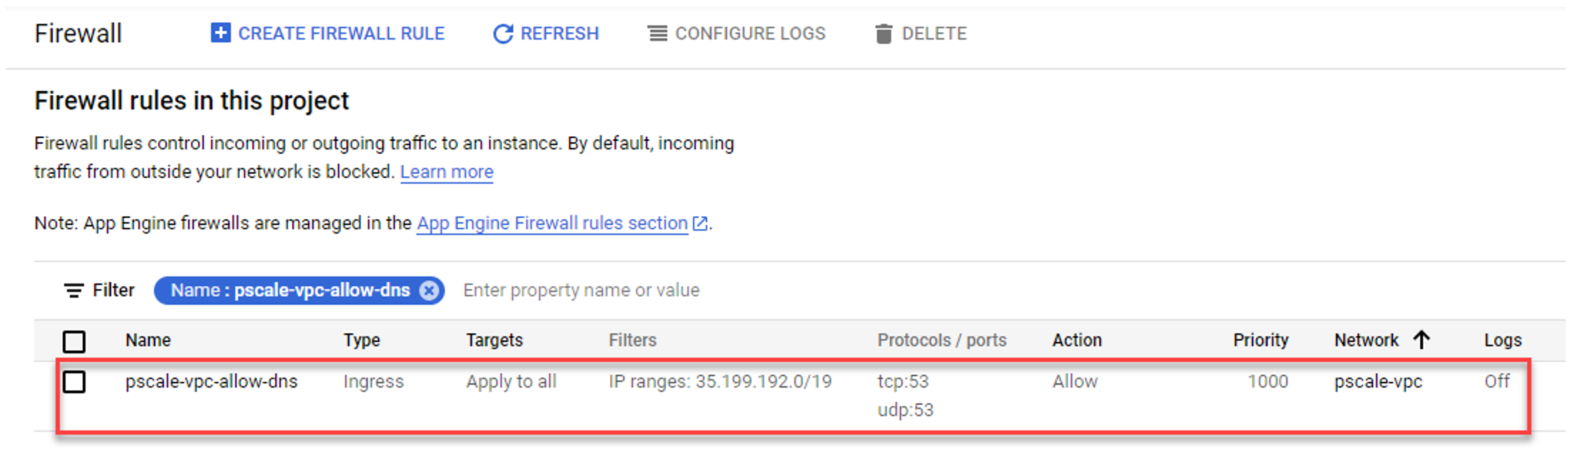
6. Add firewall rules to allow ingress DNS traffic to your DNS server from Cloud DNS. In the Google Cloud Console navigation menu, click VPC network and then click Firewall.
7. Click the CREATE FIREWALL RULE button.
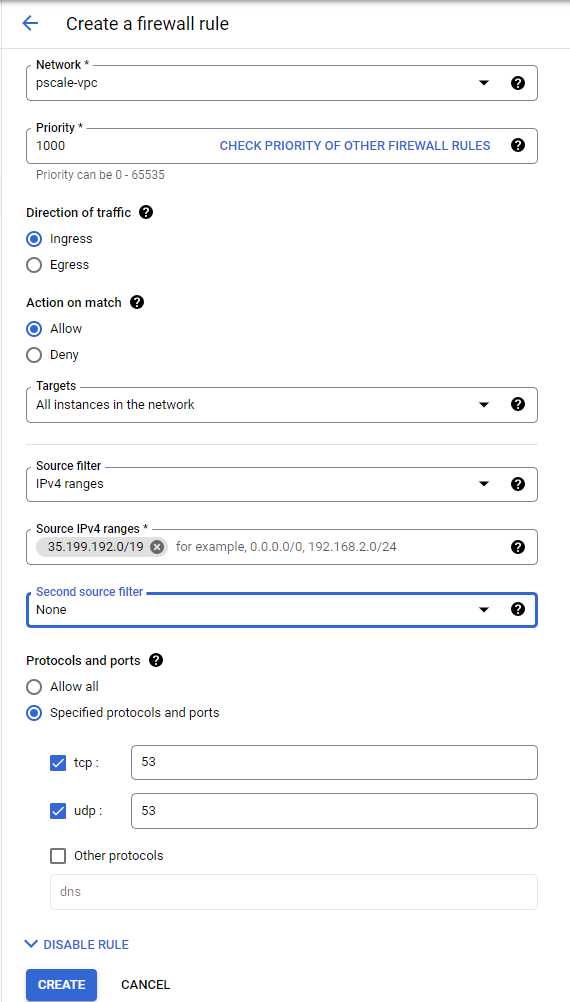
8. Create a new Firewall rule and include the following options:
- In the Network field, make sure the cluster authorized network is selected.
- Source filter: IPv4 ranges
- Source IPv4 ranges: 35.199.192.0/19. This is the IP range Cloud DNS requests will originate from. See Cloud DNS zones overview for more details.
- Protocols and ports: TCP 53 and UDP 53.
See the following example:
4. The resulting firewall rule in Google Cloud will appear as follows:
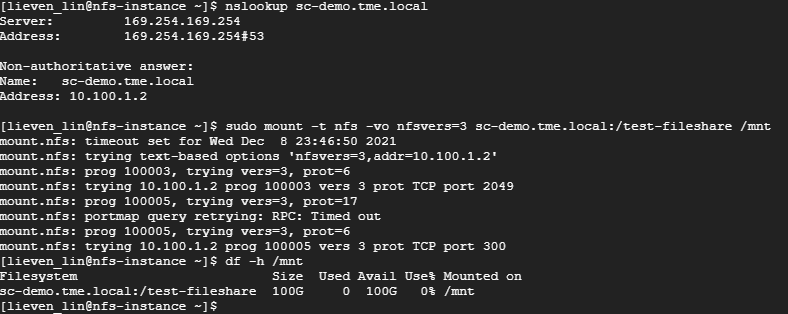
Verify your SmartConnect
- Log into a VM instance that is connected to an authorized network. (This example uses a Linux machine.)
- Resolve the cluster service FQDN via nslookup and mount a file share via NFS.
Conclusion
PowerScale cluster is a distributed file system composed of multiple nodes. We always recommend using the SmartConnect feature to balance the client connections to all cluster nodes. This way, you can maximize PowerScale cluster performance to provide maximum value to your business. Try it now in your Dell EMC PowerScale for Google Cloud solution.
Author: Lieven Lin

OneFS NFS Locking and Reporting – Part 2

Mon, 13 Nov 2023 17:58:49 -0000
|Read Time: 0 minutes
In the previous article in this series, we took a look at the new NFS locks and waiters reporting CLI command set and API endpoints. Next, we turn our attention to some additional context, caveats, and NFSv3 lock removal.
Before the NFS locking enhancements in OneFS 9.5, the legacy CLI commands were somewhat inefficient. Their output also included other advisory domain locks such as SMB, which made the output more difficult to parse. The table below maps the new 9.5 CLI commands (and corresponding handlers) to the old NLM syntax.
Type / Command set | OneFS 9.5 and later | OneFS 9.4 and earlier |
Locks | isi nfs locks | isi nfs nlm locks |
Sessions | isi nfs nlm sessions | isi nfs nlm sessions |
Waiters | isi nfs locks waiters | isi nfs nlm locks waiters |
Note that the isi_classic nfs locks and waiters CLI commands have also been deprecated in OneFS 9.5.
When upgrading to OneFS 9.5 or later from a prior release, the legacy platform API handlers continue to function through and post upgrade. Thus, any legacy scripts and automation are protected from this lock reporting deprecation. Additionally, while the new platform API handlers will work in during a rolling upgrade in mixed-mode, they will only return results for the nodes that have already been upgraded (‘high nodes’).
Be aware that the NFS locking CLI framework does not support partial responses. However, if a node is down or the cluster has a rolling upgrade in progress, the alternative is to query the equivalent platform API endpoint instead.
Performance-wise, on very large busy clusters, there is the possibility that the lock and waiter CLI commands’ output will be sluggish. In such instances, the --timeout flag can be used to increase the command timeout window. Output filtering can also be used to reduce number of locks reported.
When a lock is in a transition state, there is a chance that it may not have/report a version. In these instances, the Version field will be represented as —. For example:
# isi nfs locks list -v
Client: 1/TMECLI1:487722/10.22.10.250
Client ID: 487722351064074
LIN: 4295164422
Path: /ifs/locks/nfsv3/10.22.10.250_1
Lock Type: exclusive
Range: 0, 92233772036854775807
Created: 2023-08-18T08:03:52
Version: -
---------------------------------------------------------------
Total: 1
This behavior should be experienced very infrequently. However, if it is encountered, simply execute the CLI command again, and the lock version should be reported correctly.
When it comes to troubleshooting NFSv3/NLM issues, if an NFSv3 client is consistently experiencing NLM_DENIED or other lock management issues, this is often a result of incorrectly configured firewall rules. For example, take the following packet capture (PCAP) excerpt from an NFSv4 Linux client:
21 08:50:42.173300992 10.22.10.100 → 10.22.10.200 NLM 106 V4 LOCK Reply (Call In 19) NLM_DENIED
Often, the assumption is that only the lockd or statd ports on the server side of the firewall need to be opened and that the client always makes that connection that way. However, this is not the case. Instead, the server will continually respond with a ‘let me get back to you’, then later reconnect to the client. As such, if the firewall blocks access to rcpbind on the client and/or lockd or statd on the client, connection failures will likely occur.
Occasionally, it does become necessary to remove NLM locks and waiters from the cluster. Traditionally, the isi_classic nfs clients rm command was used, however that command has limitations and is fully deprecated in OneFS 9.5 and later. Instead, the preferred method is to use the isi nfs nlm sessions CLI utility in conjunction with various other ancillary OneFS CLI commands to clear problematic locks and waiters.
Note that the isi nfs nlm sessions CLI command, available in all current OneFS version, is Zone-Aware. The output formatting is seen in the output for the client holding the lock as it now shows the Zone ID number at the beginning. For example:
4/tme-linux1/10.22.10.250 This represents:
Zone ID 4 / Client tme-linux1 / IP address of cluster node holding the connection.
A basic procedure to remove NLM locks and waiters from a cluster is as follows:
1. List the NFS locks and search for the pertinent filename.
In OneFS 8.5 and later, the locks list can be filtered using the --path argument.
# isi nfs locks list --path=<path> | grep <filename>
Be aware that the full path must be specified, starting with /ifs. There is no partial matching or substitution for paths in this command set.
For OneFS 9.4 and earlier, the following CLI syntax can be used:
# isi_for_array -sX 'isi nfs nlm locks list | grep <filename>'
2. List the lock waiters associated with the same filename using |grep.
For OneFS 8.5 and later, the waiters list can also be filtered using the --path syntax:
# isi nfs locks waiters –path=<path> | grep <filename>
With OneFS 9.4 and earlier, the following CLI syntax can be used:
# isi_for_array -sX 'isi nfs nlm locks waiters |grep -i <filename>'
3. Confirm the client and logical inode number (LIN) being waited upon.
This can be accomplished by querying the efs.advlock.failover.lock_waiters sysctrl. For example:
# isi_for_array -sX 'sysctl efs.advlock.failover.lock_waiters'

[truncated output]
 ...
 client = { '4/tme-linux1/10.20.10.200’, 0x26593d37370041 }
 ...
resource = 2:df86:0218
Note that for sanity checking, the isi get -L CLI utility can be used to confirm the path of a file from its LIN:
isi get -L <LIN>
4. Remove the unwanted locks which are causing waiters to stack up.
Keep in mind that the isi nfs nlm sessions command syntax is access zone-aware.
List the access zones by their IDs.
# isi zone zones list -v | grep -iE "Zone ID|name"
Once the desired zone ID has been determined, the isi_run -z CLI utility can be used to specify the appropriate zone in which to run the isi nfs nlm sessions commands:
# isi_run -z 4 -l root
Next, the isi nfs nlm sessions delete CLI command will remove the specific lock waiter which is causing the issue. The command syntax requires specifying the client hostname and node IP of the node holding the lock.
# isi nfs nlm sessions delete –-zone <AZ_zone_ID> <hostname> <cluster-ip>
For example:
# isi nfs nlm sessions delete –zone 4 tme-linux1 10.20.10.200
 Are you sure you want to delete all NFSv3 locks associated with client tme-linux1 against cluster IP 10.20.10.100? (yes/[no]): yes
5. Repeat the commands in step 1 to confirm that the desired NLM locks and waiters have been successfully culled.
BEFORE applying the process....
 # isi_for_array -sX 'isi nfs nlm locks list |grep JUN'
 TME-1: 4/tme-linux1/192.168.2.214  /ifs/tmp/TME/sequences/mncr_fabjob_seq_file_27JUN2017
 TME-1: 4/ tme-linux1/192.168.2.214  /ifs/tmp/TME/sequences/mncr_fabjob_seq_file_28JUN2017
 TME-2: 4/ tme-linux1/192.168.2.214  /ifs/tmp/TME/sequences/mncr_fabjob_seq_file_27JUN2017
 TME-2: 4/ tme-linux1/192.168.2.214  /ifs/tmp/TME/sequences/mncr_fabjob_seq_file_28JUN2017
 TME-3: 4/ tme-linux1/192.168.2.214  /ifs/tmp/TME/sequences/mncr_fabjob_seq_file_27JUN2017
 TME-3: 4/ tme-linux1/192.168.2.214  /ifs/tmp/TME/sequences/mncr_fabjob_seq_file_28JUN2017
 TME-4: 4/ tme-linux1/192.168.2.214  /ifs/tmp/TME/sequences/mncr_fabjob_seq_file_27JUN2017
 TME-4: 4/ tme-linux1/192.168.2.214  /ifs/tmp/TME/sequences/mncr_fabjob_seq_file_28JUN2017
 TME-5: 4/ tme-linux1/192.168.2.214  /ifs/tmp/TME/sequences/mncr_fabjob_seq_file_27JUN2017
 TME-5: 4/ tme-linux1/192.168.2.214  /ifs/tmp/TME/sequences/mncr_fabjob_seq_file_28JUN2017
 TME-6: 4/ tme-linux1/192.168.2.214  /ifs/tmp/TME/sequences/mncr_fabjob_seq_file_27JUN2017
 TME-6: 4/ tme-linux1/192.168.2.214  /ifs/tmp/TME/sequences/mncr_fabjob_seq_file_28JUN2017


 # isi_for_array -sX 'isi nfs nlm locks waiters |grep -i JUN'
 TME-1: 4/ tme-linux1/192.168.2.214  /ifs/tmp/TME/sequences/mncr_fabjob_seq_file_28JUN2017
 TME-1: 4/ tme-linux1/192.168.2.214  /ifs/tmp/TME/sequences/mncr_fabjob_seq_file_28JUN2017
 TME-2 exited with status 1
 TME-3 exited with status 1
 TME-4 exited with status 1
 TME-5 exited with status 1
 TME-6 exited with status 1
AFTER...
TME-1# isi nfs nlm sessions delete --hostname= tme-linux1 --cluster-ip=192.168.2.214
 Are you sure you want to delete all NFSv3 locks associated with client tme-linux1 against cluster IP 192.168.2.214? (yes/[no]): yes
 TME-1#
 TME-1#
 TME-1# isi_for_array -sX 'sysctl efs.advlock.failover.locks |grep 2:ce75:0319'
 TME-1 exited with status 1
 TME-2 exited with status 1
 TME-3 exited with status 1
 TME-4 exited with status 1
 TME-5 exited with status 1
 TME-6 exited with status 1
 TME-1#
 TME-1# isi_for_array -sX 'isi nfs nlm locks list |grep -i JUN'
 TME-1 exited with status 1
 TME-2 exited with status 1
 TME-3 exited with status 1
 TME-4 exited with status 1
 TME-5 exited with status 1
 TME-6 exited with status 1
 TME-1#
 TME-1# isi_for_array -sX 'isi nfs nlm locks waiters |grep -i JUN'
 TME-1 exited with status 1
 TME-2 exited with status 1
 TME-3 exited with status 1
 TME-4 exited with status 1
 TME-5 exited with status 1
 TME-6 exited with status 1