


OneFS Restricted Shell—Log Viewing and Recovery

Complementary to the restricted shell itself, which was covered in the previous article in this series, OneFS 9.5 also sees the addition of a new log viewer, plus a recovery shell option.
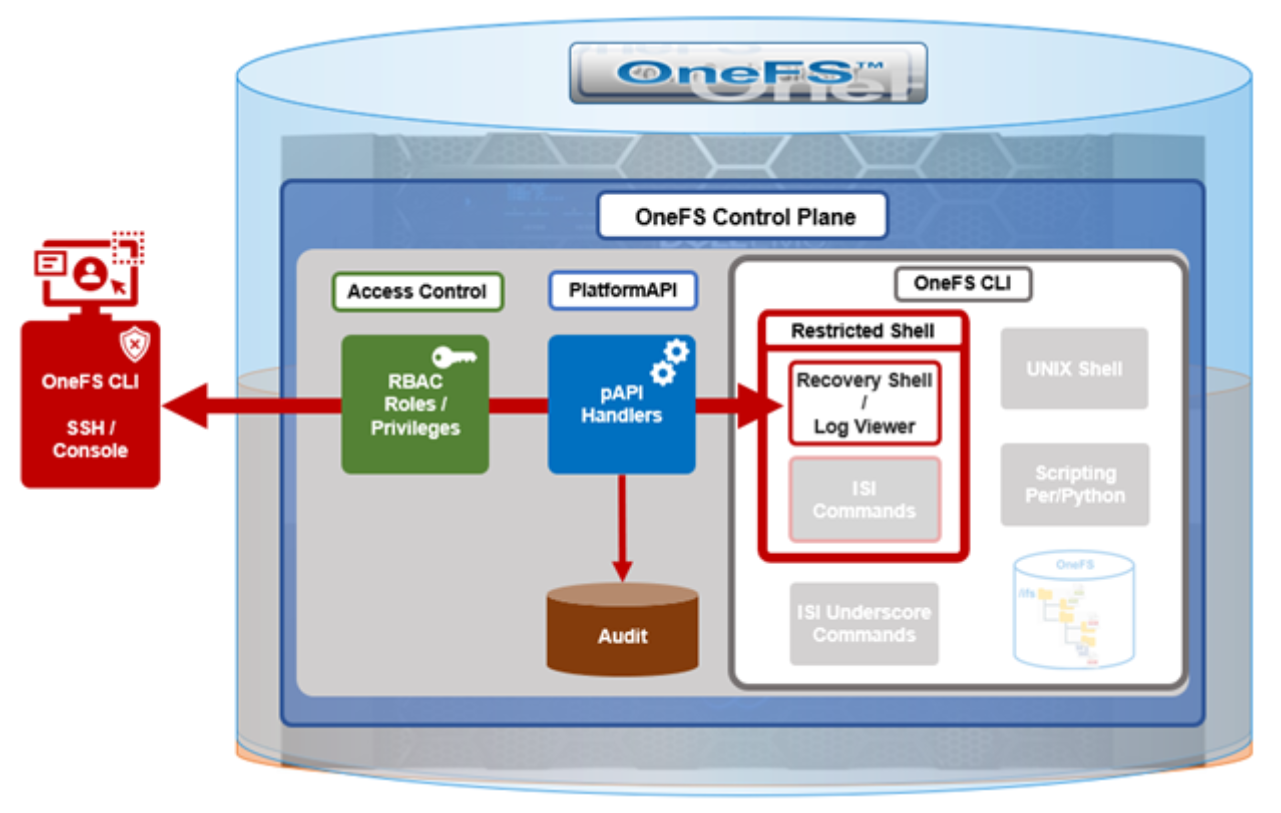
The new isi_log_access CLI utility enables an SSH user to read, page, and query the log files in the /var/log directory. The ability to run this tool is governed by the user’s role being granted the ISI_PRIV_SYS_SUPPORT role-based access control (RBAC) privilege.
OneFS RBAC is used to explicitly limit who has access to the range of cluster configurations and operations. This granular control allows for crafting of administrative roles, which can create and manage the various OneFS core components and data services, isolating each to specific security roles or to admin only, and so on.
In this case, a cluster security administrator selects the access zone, creates a zone-aware role within it, assigns the ISI_PRIV_SYS_SUPPORT privileges for isi_log_access use, and then assigns users to the role.
Note that the integrated OneFS AuditAdmin RBAC role does not contain the ISI_PRIV_SYS_SUPPORT privileges by default. Also, the integrated RBAC roles cannot be reconfigured:
# isi auth roles modify AuditAdmin --add-priv=ISI_PRIV_SYS_SUPPORT
The privileges of built-in role AuditAdmin cannot be modified
Therefore, the ISI_PRIV_SYS_SUPPORT role has to be added to a custom role.
For example, the following CLI syntax adds the user usr_admin_restricted to the rl_ssh role and adds the privilege ISI_PRIV_SYS_SUPPORT to the rl_ssh role:
# isi auth roles modify rl_ssh --add-user=usr_admin_restricted
# isi auth roles modify rl_ssh --add-priv=ISI_PRIV_SYS_SUPPORT
# isi auth roles view rl_ssh
        Name: rl_ssh
 Description: -
     Members: u_ssh_restricted
              u_admin_restricted
  Privileges
              ID: ISI_PRIV_LOGIN_SSH
      Permission: r
             ID: ISI_PRIV_SYS_SUPPORT
      Permission: r
The usr_admin_restricted user could also be added to the AuditAdmin role:
# isi auth roles modify AuditAdmin --add-user=usr_admin_restricted
# isi auth roles view AuditAdmin | grep -i member
     Members: usr_admin_restricted
The isi_log_access tool supports the following command options and arguments:
| Option | Description |
|---|---|
–grep | Match a pattern against the file and display on stdout |
–help | Display the command description and usage message |
–list | List all the files in the /var/log tree |
–less | Display the file on stdout with a pager in secure_mode |
–more | Display the file on stdout with a pager in secure_mode |
–view | Display the file on stdout |
–watch | Display the end of the file and new content as it is written |
–zgrep | Match a pattern against the unzipped file contents and display on stdout |
–zview | Display an unzipped version of the file on stdout |
Here the u_admin_restricted user logs in to the SSH and runs the isi_log_access utility to list the /var/log/messages log file:
# ssh u_admin_restricted@10.246.178.121
 (u_admin_restricted@10.246.178.121)
 Password:
 Last login: Wed May  3 18:02:18 2023 from 10.246.159.107
 Copyright (c) 2001-2023 Dell Inc. or its subsidiaries. All Rights Reserved.
 Copyright (c) 1992-2018 The FreeBSD Project.
 Copyright (c) 1979, 1980, 1983, 1986, 1988, 1989, 1991, 1992, 1993, 1994
         The Regents of the University of California. All rights reserved.
PowerScale OneFS 9.5.0.0
Allowed commands are
         clear ...
         isi ...
         isi_recovery_shell ...
         isi_log_access ...
         exit
         logout
 # isi_log_access –list
 LAST MODIFICATION TIME         SIZE       FILE
 Mon Apr 10 14:22:18 2023       56         alert.log
 Fri May  5 00:30:00 2023       62         all.log
 Fri May  5 00:30:00 2023       99         all.log.0.gz
 Fri May  5 00:00:00 2023       106        all.log.1.gz
 Thu May  4 00:30:00 2023       100        all.log.2.gz
 Thu May  4 00:00:00 2023       107        all.log.3.gz
 Wed May  3 00:30:00 2023       99         all.log.4.gz
 Wed May  3 00:00:00 2023       107        all.log.5.gz
 Tue May  2 00:30:00 2023       100        all.log.6.gz
 Mon Apr 10 14:22:18 2023       56         audit_config.log
 Mon Apr 10 14:22:18 2023       56         audit_protocol.log
 Fri May  5 17:23:53 2023       82064      auth.log
 Sat Apr 22 12:09:31 2023       10750      auth.log.0.gz
 Mon Apr 10 15:31:36 2023       0          bam.log
 Mon Apr 10 14:22:18 2023       56         boxend.log
 Mon Apr 10 14:22:18 2023       56         bwt.log
 Mon Apr 10 14:22:18 2023       56         cloud_interface.log
 Mon Apr 10 14:22:18 2023       56         console.log
 Fri May  5 18:20:32 2023       23769      cron
 Fri May  5 15:30:00 2023       8803       cron.0.gz
 Fri May  5 03:10:00 2023       9013       cron.1.gz
 Thu May  4 15:00:00 2023       8847       cron.2.gz
 Fri May  5 03:01:02 2023       3012       daily.log
 Fri May  5 00:30:00 2023       101        daily.log.0.gz
 Fri May  5 00:00:00 2023       1201       daily.log.1.gz
 Thu May  4 00:30:00 2023       102        daily.log.2.gz
 Thu May  4 00:00:00 2023       1637       daily.log.3.gz
 Wed May  3 00:30:00 2023       101        daily.log.4.gz
 Wed May  3 00:00:00 2023       1200       daily.log.5.gz
 Tue May  2 00:30:00 2023       102        daily.log.6.gz
 Mon Apr 10 14:22:18 2023       56         debug.log
 Tue Apr 11 12:29:37 2023       3694       diskpools.log
 Fri May  5 03:01:00 2023       244566     dmesg.today
 Thu May  4 03:01:00 2023       244662     dmesg.yesterday
 Tue Apr 11 11:49:32 2023       788        drive_purposing.log
 Mon Apr 10 14:22:18 2023       56         ethmixer.log
 Mon Apr 10 14:22:18 2023       56         gssd.log
 Fri May  5 00:00:35 2023       41641      hardening.log
 Mon Apr 10 15:31:05 2023       17996      hardening_engine.log
 Mon Apr 10 14:22:18 2023       56         hdfs.log
 Fri May  5 15:51:28 2023       31359      hw_ata.log
 Fri May  5 15:51:28 2023       56527      hw_da.log
 Mon Apr 10 14:22:18 2023       56         hw_nvd.log
 Mon Apr 10 14:22:18 2023       56         idi.log
In addition to parsing an entire log file with the more and less flags, the isi_log_access utility can also be used to watch (that is, tail) a log. For example, the /var/log/messages log file:
% isi_log_access --watch messages
 2023-05-03T18:00:12.233916-04:00 <1.5> h7001-2(id2) limited[68236]: Called ['/usr/bin/isi_log_access', 'messages'], which returned 2.
 2023-05-03T18:00:23.759198-04:00 <1.5> h7001-2(id2) limited[68236]: Calling ['/usr/bin/isi_log_access'].
 2023-05-03T18:00:23.797928-04:00 <1.5> h7001-2(id2) limited[68236]: Called ['/usr/bin/isi_log_access'], which returned 0.
 2023-05-03T18:00:36.077093-04:00 <1.5> h7001-2(id2) limited[68236]: Calling ['/usr/bin/isi_log_access', '--help'].
 2023-05-03T18:00:36.119688-04:00 <1.5> h7001-2(id2) limited[68236]: Called ['/usr/bin/isi_log_access', '--help'], which returned 0.
 2023-05-03T18:02:14.545070-04:00 <1.5> h7001-2(id2) limited[68236]: Command not in list of allowed commands.
 2023-05-03T18:02:50.384665-04:00 <1.5> h7001-2(id2) limited[68594]: Calling ['/usr/bin/isi_log_access', '--list'].
 2023-05-03T18:02:50.440518-04:00 <1.5> h7001-2(id2) limited[68594]: Called ['/usr/bin/isi_log_access', '--list'], which returned 0.
 2023-05-03T18:03:13.362411-04:00 <1.5> h7001-2(id2) limited[68594]: Command not in list of allowed commands.
 2023-05-03T18:03:52.107538-04:00 <1.5> h7001-2(id2) limited[68738]: Calling ['/usr/bin/isi_log_access', '--watch', 'messages'].
As expected, the last few lines of the messages log file are displayed. These log entries include the command audit entries for the usr_admin_secure user running the isi_log_access utility with both the --help, --list, and --watch arguments.
The isi_log_access utility also allows zipped log files to be read (–zview) or searched (–zgrep) without uncompressing them. For example, to find all the usr_admin entries in the zipped vmlog.0.gz file:
# isi_log_access --zgrep usr_admin vmlog.0.gz
0.0 64468 usr_admin_restricted /usr/local/bin/zsh
    0.0 64346 usr_admin_restricted python /usr/local/restricted_shell/bin/restricted_shell.py (python3.8)
    0.0 64468 usr_admin_restricted /usr/local/bin/zsh
    0.0 64346 usr_admin_restricted python /usr/local/restricted_shell/bin/restricted_shell.py (python3.8)
    0.0 64342 usr_admin_restricted sshd: usr_admin_restricted@pts/3 (sshd)
    0.0 64331 root               sshd: usr_admin_restricted [priv] (sshd)
    0.0 64468 usr_admin_restricted /usr/local/bin/zsh
    0.0 64346 usr_admin_restricted python /usr/local/restricted_shell/bin/restricted_shell.py (python3.8)
    0.0 64342 usr_admin_restricted sshd: u_admin_restricted@pts/3 (sshd)
    0.0 64331 root               sshd: usr_admin_restricted [priv] (sshd)
OneFS recovery shell
The purpose of the recovery shell is to allow a restricted shell user to access a regular UNIX shell and its associated command set, if needed. As such, the recovery shell is primarily designed and intended for reactive cluster recovery operations and other unforeseen support issues. Note that the isi_recovery_shell CLI command can only be run, and the recovery shell entered, from within the restricted shell.
The ISI_PRIV_RECOVERY_SHELL privilege is required for a user to elevate their shell from restricted to recovery. The following syntax can be used to add this privilege to a role, in this case the rl_ssh role:
% isi auth roles modify rl_ssh --add-priv=ISI_PRIV_RECOVERY_SHELL
% isi auth roles view rl_ssh
        Name: rl_ssh
 Description: -
     Members: usr_ssh_restricted
              usr_admin_restricted
  Privileges
              ID: ISI_PRIV_LOGIN_SSH
      Permission: r
             ID: ISI_PRIV_SYS_SUPPORT
      Permission: r
             ID: ISI_PRIV_RECOVERY_SHELL
      Permission: r
However, note that the –-restricted-shell-enabled security parameter must be set to true before a user with the ISI_PRIV_RECOVERY_SHELL privilege can enter the recovery shell. For example:
% isi security settings view | grep -i restr
Restricted shell Enabled: No
% isi security settings modify –restricted-shell-enabled=true
% isi security settings view | grep -i restr
Restricted shell Enabled: Yes
The restricted shell user must enter the cluster’s root password to successfully enter the recovery shell. For example:
% isi_recovery_shell -h
 Description:
         This command is used to enter the Recovery shell i.e. normal zsh shell from the PowerScale Restricted shell. This command is supported only in the PowerScale Restricted shell.
Required Privilege:
         ISI_PRIV_RECOVERY_SHELL
Usage:
         isi_recovery_shell
            [{--help | -h}]
If the root password is entered incorrectly, the following error is displayed:
% isi_recovery_shell
 Enter 'root' credentials to enter the Recovery shell
 Password:
 Invalid credentials.
 isi_recovery_shell: PAM Auth Failed
A successful recovery shell launch is as follows:
$ ssh u_admin_restricted@10.246.178.121
 (u_admin_restricted@10.246.178.121) Password:
 Last login: Thu May  4 17:26:10 2023 from 10.246.159.107
 Copyright (c) 2001-2023 Dell Inc. or its subsidiaries. All Rights Reserved.
 Copyright (c) 1992-2018 The FreeBSD Project.
 Copyright (c) 1979, 1980, 1983, 1986, 1988, 1989, 1991, 1992, 1993, 1994
         The Regents of the University of California. All rights reserved.
PowerScale OneFS 9.5.0.0
Allowed commands are
         clear ...
         isi ...
         isi_recovery_shell ...
         isi_log_access ...
         exit
         logout
% isi_recovery_shell
 Enter 'root' credentials to enter the Recovery shell
 Password:
 %
At this point, regular shell/UNIX commands (including the vi editor) are available again:
% whoami
 u_admin_restricted
% pwd
 /ifs/home/u_admin_restricted
 % top | head -n 10
 last pid: 65044;  load averages:  0.12,  0.24,  0.29  up 24+04:17:23    18:38:39
 118 processes: 1 running, 117 sleeping
 CPU:  0.1% user,  0.0% nice,  0.9% system,  0.1% interrupt, 98.9% idle
 Mem: 233M Active, 19G Inact, 2152K Laundry, 137G Wired, 60G Buf, 13G Free
 Swap:
   PID USERNAME    THR PRI NICE   SIZE    RES STATE    C   TIME    WCPU COMMAND
  3955 root          1 -22  r30    50M    14M select  24 142:28   0.54% isi_drive_d
  5715 root         20  20    0   231M    69M kqread   5  55:53   0.15% isi_stats_d
  3864 root         14  20    0    81M    21M kqread  16 133:02   0.10% isi_mcp
The specifics of the recovery shell (ZSH) for the u_admin_restricted user are reported as follows:
% printenv $SHELL
 _=/usr/bin/printenv
 PAGER=less
 SAVEHIST=2000
 HISTFILE=/ifs/home/u_admin_restricted/.zsh_history
 HISTSIZE=1000
 OLDPWD=/ifs/home/u_admin_restricted
 PWD=/ifs/home/u_admin_restricted
 SHLVL=1
 LOGNAME=u_admin_restricted
 HOME=/ifs/home/u_admin_restricted
 RECOVERY_SHELL=TRUE
 TERM=xterm
 PATH=/sbin:/bin:/usr/sbin:/usr/bin:/usr/local/sbin:/usr/local/bin:/root/bin
Shell logic conditions and scripts can be run. For example:
% while true; do uptime; sleep 5; done
  5:47PM  up 24 days,  3:26, 5 users, load averages: 0.44, 0.38, 0.34
  5:47PM  up 24 days,  3:26, 5 users, load averages: 0.41, 0.38, 0.34
ISI commands can be run, and cluster management tasks can be performed.
% isi hardening list
 Name  Description                       Status
 ---------------------------------------------------
 STIG  Enable all STIG security settings Not Applied
 ---------------------------------------------------
 Total: 1
For example, creating and deleting a snapshot:
% isi snap snap list
 ID Name Path
 ------------
 ------------
 Total: 0
% isi snap snap create /ifs/data
% isi snap snap list
 ID   Name  Path
 --------------------
 2    s2    /ifs/data
 --------------------
 Total: 1
% isi snap snap delete 2
 Are you sure? (yes/[no]): yes
Sysctls can be read and managed:
% sysctl efs.gmp.group
efs.gmp.group: <10539754> (4) :{ 1:0-14, 2:0-12,14,17, 3-4:0-14, smb: 1-4, nfs: 1-4, all_enabled_protocols: 1-4, isi_cbind_d: 1-4, lsass: 1-4, external_connectivity: 1-4 }
The restricted shell can be disabled:
% isi security settings modify --restricted-shell-enabled=false
% isi security settings view | grep -i restr
 Restricted shell Enabled: No
However, the isi underscore (isi_*) commands, such as isi_for_array, are still not permitted to run:
% /usr/bin/isi_for_array -s uptime
 zsh: permission denied: /usr/bin/isi_for_array
% isi_gather_info
 zsh: permission denied: isi_gather_info
% isi_cstats
 isi_cstats: Syscall ifs_prefetch_lin() failed: Operation not permitted
When finished, the user can either end the session entirely with the logout command or quit the recovery shell through exit and return to the restricted shell:
% exit
Allowed commands are
         clear ...
         isi ...
         isi_recovery_shell ...
         isi_log_access ...
         exit
         logout
 %
Author: Nick Trimbee
Related Blog Posts

OneFS and HTTP Security
Mon, 22 Apr 2024 20:35:30 -0000
|Read Time: 0 minutes
To enable granular HTTP security configuration, OneFS provides an option to disable nonessential HTTP components selectively. This can help reduce the overall attack surface of your infrastructure. Disabling a specific component’s service still allows other essential services on the cluster to continue to run unimpeded. In OneFS 9.4 and later, you can disable the following nonessential HTTP services:
Service | Description |
PowerScaleUI | The OneFS WebUI configuration interface. |
Platform-API-External | External access to the OneFS platform API endpoints. |
Rest Access to Namespace (RAN) | REST-ful access by HTTP to a cluster’s /ifs namespace. |
RemoteService | Remote Support and In-Product Activation. |
SWIFT (deprecated) | Deprecated object access to the cluster using the SWIFT protocol. This has been replaced by the S3 protocol in OneFS. |
You can enable or disable each of these services independently, using the CLI or platform API, if you have a user account with the ISI_PRIV_HTTP RBAC privilege.
You can use the isi http services CLI command set to view and modify the nonessential HTTP services:
# isi http services list
ID                     Enabled
------------------------------
Platform-API-External Yes
PowerScaleUI          Yes
RAN                   Yes
RemoteService         Yes
SWIFT                 No
------------------------------
Total: 5
For example, you can easily disable remote HTTP access to the OneFS /ifs namespace as follows:
# isi http services modify RAN --enabled=0
You are about to modify the service RAN. Are you sure? (yes/[no]): yes
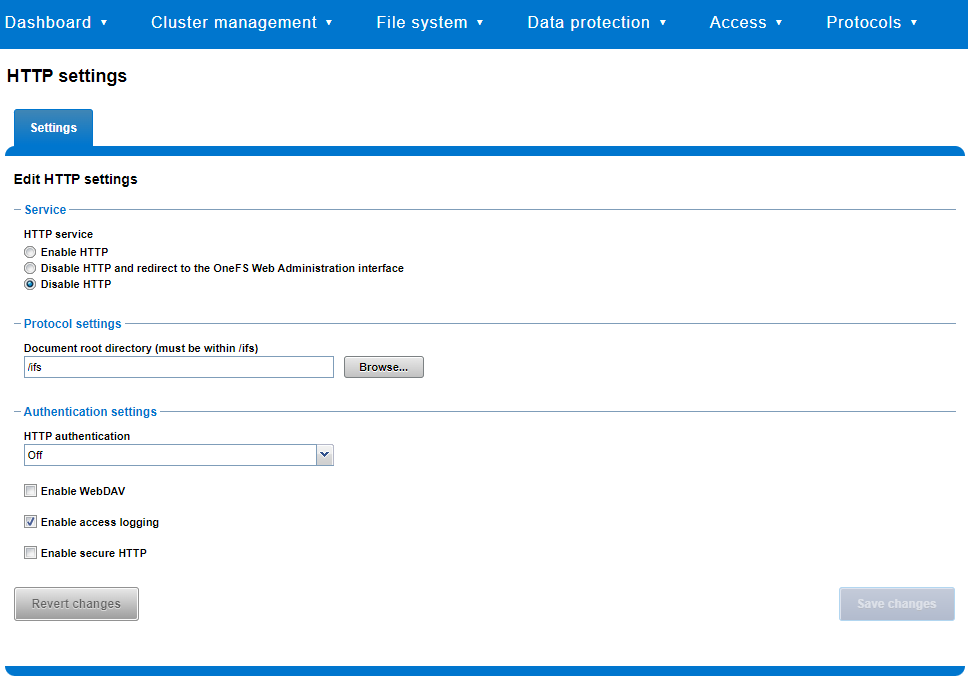
Similarly, you can also use the WebUI to view and edit a subset of the HTTP configuration settings, by navigating to Protocols > HTTP settings:
That said, the implications and impact of disabling each of the services is as follows:
Service | Disabling impacts |
WebUI | The WebUI is completely disabled, and access attempts (default TCP port 8080) are denied with the warning Service Unavailable. Please contact Administrator. If the WebUI is re-enabled, the external platform API service (Platform-API-External) is also started if it is not running. Note that disabling the WebUI does not affect the PlatformAPI service. |
Platform API | External API requests to the cluster are denied, and the WebUI is disabled, because it uses the Platform-API-External service. Note that the Platform-API-Internal service is not impacted if/when the Platform-API-External is disabled, and internal pAPI services continue to function as expected. If the Platform-API-External service is re-enabled, the WebUI will remain inactive until the PowerScaleUI service is also enabled. |
RAN | If RAN is disabled, the WebUI components for File System Explorer and File Browser are also automatically disabled. From the WebUI, attempts to access the OneFS file system explorer (File System > File System Explorer) fail with the warning message Browse is disabled as RAN service is not running. Contact your administrator to enable the service. This same warning also appears when attempting to access any other WebUI components that require directory selection. |
RemoteService | If RemoteService is disabled, the WebUI components for Remote Support and In-Product Activation are disabled. In the WebUI, going to Cluster Management > General Settings and selecting the Remote Support tab displays the message The service required for the feature is disabled. Contact your administrator to enable the service. In the WebUI, going to Cluster Management > Licensing and scrolling to the License Activation section displays the message The service required for the feature is disabled. Contact your administrator to enable the service. |
SWIFT | Deprecated object protocol and disabled by default. |
You can use the CLI command isi http settings view to display the OneFS HTTP configuration:
# isi http settings view
            Access Control: No
      Basic Authentication: No
    WebHDFS Ran HTTPS Port: 8443
                        Dav: No
         Enable Access Log: Yes
                      HTTPS: No
 Integrated Authentication: No
               Server Root: /ifs
                    Service: disabled
           Service Timeout: 8m20s
          Inactive Timeout: 15m
           Session Max Age: 4H
Httpd Controlpath Redirect: No
Similarly, you can manage and change the HTTP configuration using the isi http settings modify CLI command.
For example, to reduce the maximum session age from four to two hours:
# isi http settings view | grep -i age
           Session Max Age: 4H
# isi http settings modify --session-max-age=2H
# isi http settings view | grep -i age
           Session Max Age: 2H
The full set of configuration options for isi http settings includes:
Option | Description |
--access-control <boolean> | Enable Access Control Authentication for the HTTP service. Access Control Authentication requires at least one type of authentication to be enabled. |
--basic-authentication <boolean> | Enable Basic Authentication for the HTTP service. |
--webhdfs-ran-https-port <integer> | Configure Data Services Port for the HTTP service. |
--revert-webhdfs-ran-https-port | Set value to system default for --webhdfs-ran-https-port. |
--dav <boolean> | Comply with Class 1 and 2 of the DAV specification (RFC 2518) for the HTTP service. All DAV clients must go through a single node. DAV compliance is NOT met if you go through SmartConnect, or using 2 or more node IPs. |
--enable-access-log <boolean> | Enable writing to a log when the HTTP server is accessed for the HTTP service. |
--https <boolean> | Enable the HTTPS transport protocol for the HTTP service. |
--https <boolean> | Enable the HTTPS transport protocol for the HTTP service. |
--integrated-authentication <boolean> | Enable Integrated Authentication for the HTTP service. |
--server-root <path> | Document root directory for the HTTP service. Must be within /ifs. |
--service (enabled | disabled | redirect | disabled_basicfile) | Enable/disable the HTTP Service or redirect to WebUI or disabled BasicFileAccess. |
--service-timeout <duration> | The amount of time (in seconds) that the server will wait for certain events before failing a request. A value of 0 indicates that the service timeout value is the Apache default. |
--revert-service-timeout | Set value to system default for --service-timeout. |
--inactive-timeout <duration> | Get the HTTP RequestReadTimeout directive from both the WebUI and the HTTP service. |
--revert-inactive-timeout | Set value to system default for --inactive-timeout. |
--session-max-age <duration> | Get the HTTP SessionMaxAge directive from both WebUI and HTTP service. |
--revert-session-max-age | Set value to system default for --session-max-age. |
--httpd-controlpath-redirect <boolean> | Enable or disable WebUI redirection to the HTTP service. |
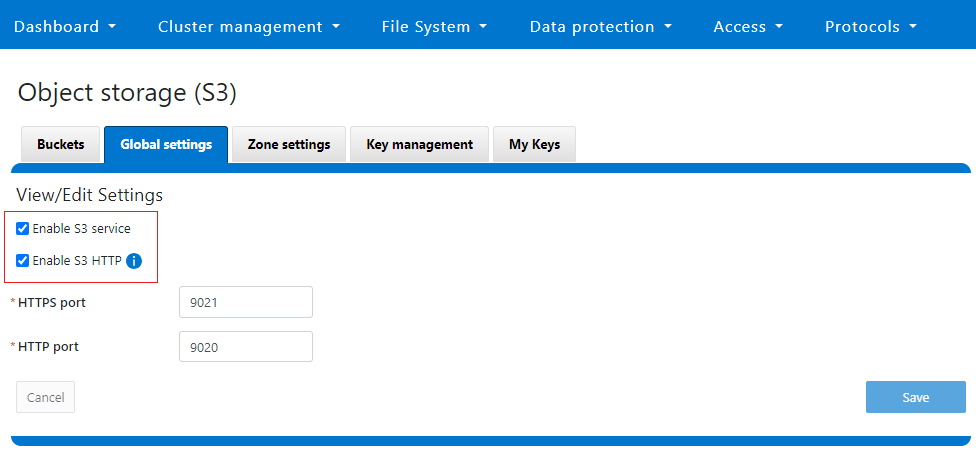
Note that while the OneFS S3 service uses HTTP, it is considered a tier-1 protocol, and as such is managed using its own isi s3 CLI command set and corresponding WebUI area. For example, the following CLI command forces the cluster to only accept encrypted HTTPS/SSL traffic on TCP port 9999 (rather than the default TCP port 9021):
# isi s3 settings global modify --https-only 1 –https-port 9921
# isi s3 settings global view
         HTTP Port: 9020
        HTTPS Port: 9999
        HTTPS only: Yes
S3 Service Enabled: Yes
Additionally, you can entirely disable the S3 service with the following CLI command:
# isi services s3 disable
The service 's3' has been disabled.
Or from the WebUI, under Protocols > S3 > Global settings:
Author: Nick Trimbee

OneFS Key Manager Rekey Support
Mon, 24 Jul 2023 19:16:34 -0000
|Read Time: 0 minutes
The OneFS key manager is a backend service that orchestrates the storage of sensitive information for PowerScale clusters. To satisfy Dell’s Secure Infrastructure Ready requirements and other public and private sector security mandates, the manager provides the ability to replace, or rekey, cryptographic keys.
The quintessential consumer of OneFS key management is data-at-rest encryption (DARE). Protecting sensitive data stored on the cluster with cryptography ensures that it’s guarded against theft, in the event that drives or nodes are removed from a PowerScale cluster. DARE is a requirement for federal and industry regulations, ensuring data is encrypted when it is stored. OneFS has provided DARE solutions for many years through secure encrypted drives (SEDs) and the OneFS key management system.
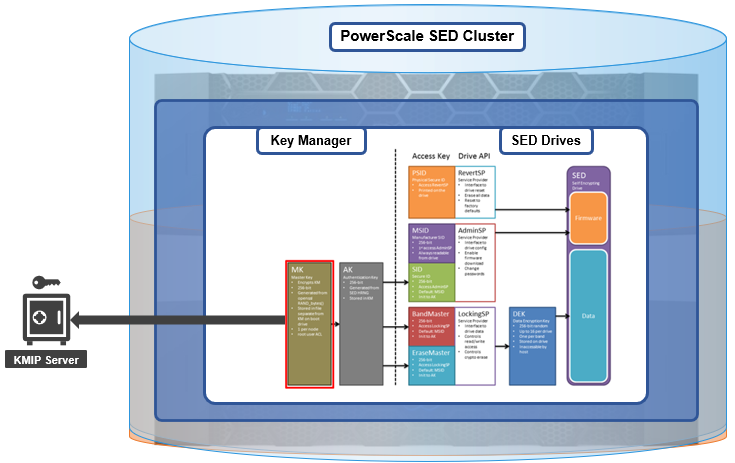
A 256-bit key (MK) encrypts the Key Manager Database (KMDB) for SED and cluster domains. In OneFS 9.2 and later, the MK for SEDs can either be stored off-cluster on a KMIP server or locally on a node (the legacy behavior).
However, there are a variety of other consumers of the OneFS key manager, in addition to DARE. These include services and protocols such as:
| Service | Description |
|---|---|
CELOG | Cluster event log |
CloudPools | Cluster tier to cloud service |
Electronic mail | |
FTP | File transfer protocol |
IPMI | Intelligent platform management interface for remote cluster console access |
JWT | JSON web tokens |
NDMP | Network data management protocol for cluster backups and DR |
Pstore | Active directory and Kerberos password store |
S3 | S3 object protocol |
SyncIQ | Cluster replication service |
SmartSync | OneFS push and pull replication cluster and cloud replication service |
SNMP | Simple network monitoring protocol |
SRS | Old Dell support remote cluster connectivity |
SSO | Single sign-on |
SupportAssist | Remote cluster connectivity to Dell Support |
OneFS 9.5 introduces a number of enhancements to the venerable key manager, including:
- The ability to rekey keystores. Rekey operation will generate a new MK and re-encrypt all entries stored with the new key.
- New CLI commands and WebUI options to perform a rekey operation or schedule key rotation on a time interval.
- New commands to monitor the progress and status of a rekey operation.
As such, OneFS 9.5 now provides the ability to rekey the MK, irrespective of where it is stored.
Note that when you are upgrading from an earlier OneFS release, the new rekey functionality is only available once the OneFS 9.5 upgrade has been committed.
Under the hood, each provider store in the key manager consists of secure backend storage and an MK. Entries are kept in a SQLite database or key-value store. A provider datastore uses its MK to encrypt all its entries within the store.
During the rekey process, the old MK is only deleted after a successful re-encryption with the new MK. If for any reason the process fails, the old MK is available and remains as the current MK. The rekey daemon retries the rekey every 15 minutes if the process fails.
The OneFS rekey process is as follows:

- A new MK is generated, and internal configuration is updated.
- Any entries in the provider store are decrypted and encrypted with the new MK.
- If the prior steps are successful, the previous MK is deleted.
To support the rekey process, the MK in OneFS 9.5 now has an ID associated with it. All entries have a new field referencing the MK ID.
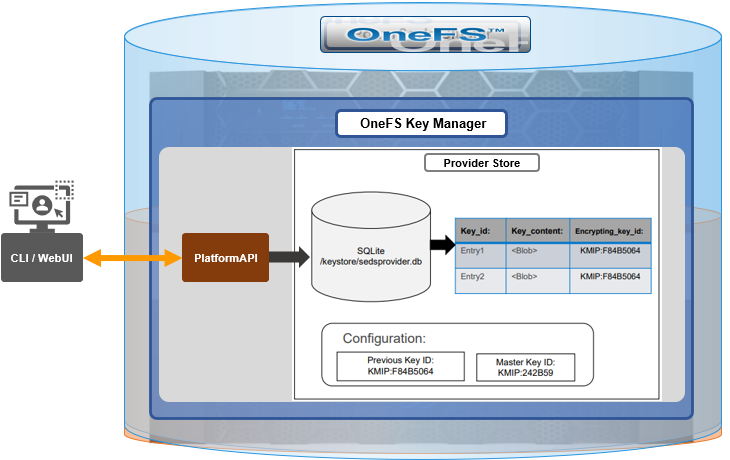
During the rekey operation, there are two MK values with different IDs, and all entries in the database will associate which key they are encrypted by.
In OneFS 9.5, the rekey configuration and management is split between the cluster keys and the SED keys:
| Rekey component | Detail |
|---|---|
SED |
|
Cluster |
|
SED keys rekey

The SED key manager rekey operation can be managed through a DARE cluster’s CLI or WebUI, and it can either be automatically scheduled or run manually on demand. The following CLI syntax can be used to manually initiate a rekey:
# isi keymanager sed rekey start
Alternatively, to schedule a rekey operation, for example, to schedule a key rotation every two months:
# isi keymanager sed rekey modify --key-rotation=2m
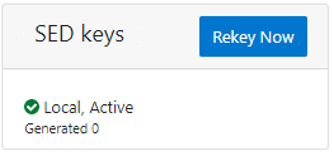
The key manager status for SEDs can be viewed as follows:
# isi keymanager sed status
 Node Status  Location   Remote Key ID  Key Creation Date   Error Info(if any)
-----------------------------------------------------------------------------
1   LOCAL   Local                    1970-01-01T00:00:00
-----------------------------------------------------------------------------
Total: 1
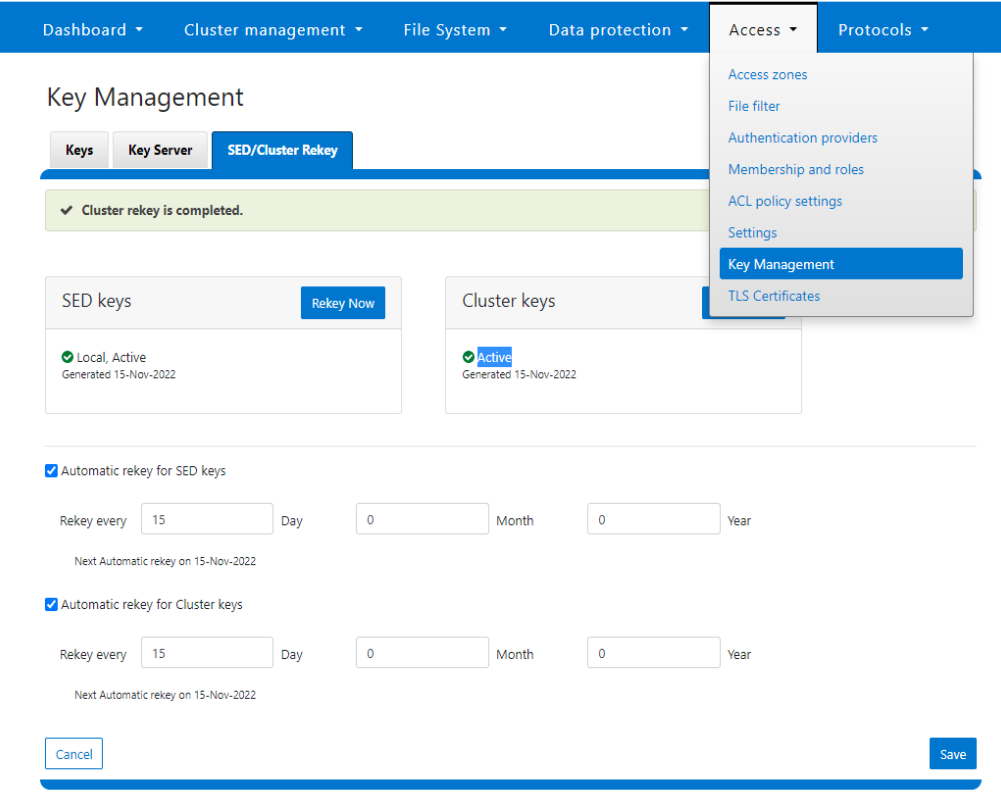
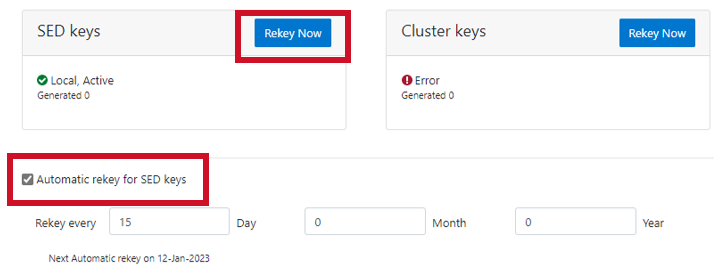
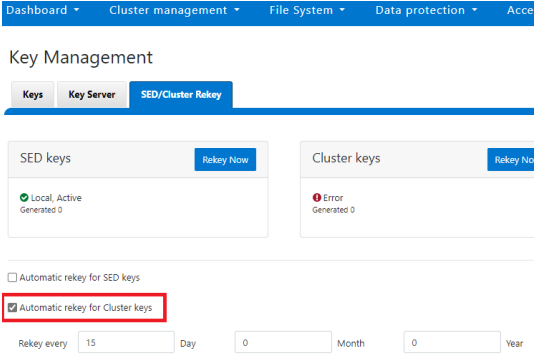
Alternatively, from the WebUI, go to Access > Key Management > SED/Cluster Rekey, select Automatic rekey for SED keys, and configure the rekey frequency:
Note that for SED rekey operations, if a migration from local cluster key management to a KMIP server is in progress, the rekey process will begin once the migration is complete.
Cluster keys rekey

As mentioned previously, OneFS 9.5 also supports the rekey of cluster keystore domains. This cluster rekey operation is available through the CLI and the WebUI and may either be scheduled or run on demand. The available cluster domains can be queried by running the following CLI syntax:
# isi keymanager cluster status
Domain     Status  Key Creation Date   Error Info(if any)
----------------------------------------------------------
CELOG      ACTIVE  2023-04-06T09:19:16
CERTSTORE  ACTIVE  2023-04-06T09:19:16
CLOUDPOOLS ACTIVE   2023-04-06T09:19:16
EMAIL      ACTIVE  2023-04-06T09:19:16
FTP        ACTIVE  2023-04-06T09:19:16
IPMI_MGMT  IN_PROGRESS  2023-04-06T09:19:16
JWT        ACTIVE  2023-04-06T09:19:16
LHOTSE     ACTIVE  2023-04-06T09:19:11
NDMP       ACTIVE  2023-04-06T09:19:16
NETWORK    ACTIVE  2023-04-06T09:19:16
PSTORE     ACTIVE  2023-04-06T09:19:16
RICE       ACTIVE  2023-04-06T09:19:16
S3         ACTIVE  2023-04-06T09:19:16
SIQ        ACTIVE  2023-04-06T09:19:16
SNMP       ACTIVE  2023-04-06T09:19:16
SRS        ACTIVE  2023-04-06T09:19:16
SSO        ACTIVE  2023-04-06T09:19:16
----------------------------------------------------------
Total: 17
The rekey process generates a new key and re-encrypts the entries for the domain. The old key is then deleted.
Performance-wise, the rekey process does consume cluster resources (CPU and disk) as a result of the re-encryption phase, which is fairly write-intensive. As such, a good practice is to perform rekey operations outside of core business hours or during scheduled cluster maintenance windows.
During the rekey process, the old MK is only deleted once a successful re-encryption with the new MK has been confirmed. In the event of a rekey process failure, the old MK is available and remains as the current MK.
A rekey may be requested immediately or may be scheduled with a cadence. The rekey operation is available through the CLI and the WebUI. In the WebUI, go to Access > Key Management > SED/Cluster Rekey.
To start a rekey of the cluster domains immediately, from the CLI run the following syntax:
# isi keymanager cluster rekey start
Are you sure you want to rekey the master passphrase? (yes/[no]):yes
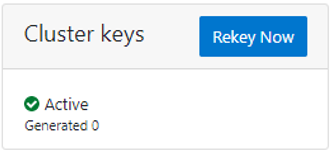
Alternatively, from the WebUI, go to Access under the SED/Cluster Rekey tab, and click Rekey Now next to Cluster keys:

A scheduled rekey of the cluster keys (excluding the SED keys) can be configured from the CLI with the following syntax:
# isi keymanager cluster rekey modify –-key-rotation [YMWDhms]
Specify the frequency of the Key Rotation field as an integer, using Y for years, M for months, W for weeks, D for days, h for hours, m for minutes, and s for seconds. For example, the following command will schedule the cluster rekey operation to run every six weeks:
# isi keymanager cluster rekey view
 Rekey Time: 1970-01-01T00:00:00
 Key Rotation: Never
 # isi keymanager cluster rekey modify --key-rotation 6W
 # isi keymanager cluster rekey view
 Rekey Time: 2023-04-28T18:38:45
 Key Rotation: 6W
The rekey configuration can be easily reverted back to on demand from a schedule as follows:
# isi keymanager cluster rekey modify --key-rotation Never
 # isi keymanager cluster rekey view
 Rekey Time: 2023-04-28T18:38:45
 Key Rotation: Never
Alternatively, from the WebUI, under the SED/Cluster Rekey tab, select the Automatic rekey for Cluster keys checkbox and specify the rekey frequency. For example:
In an event of a rekeying failure, a CELOG KeyManagerRekeyFailed or KeyManagerSedsRekeyFailed event is created. Since SED rekey is a node-local operation, the KeyManagerSedsRekeyFailed event information will also include which node experienced the failure.
Additionally, current cluster rekey status can also be queried with the following CLI command:
# isi keymanager cluster status
Domain     Status  Key Creation Date   Error Info(if any)
----------------------------------------------------------
CELOG      ACTIVE  2023-04-06T09:19:16
CERTSTORE  ACTIVE  2023-04-06T09:19:16
CLOUDPOOLS ACTIVE   2023-04-06T09:19:16
EMAIL      ACTIVE  2023-04-06T09:19:16
FTP        ACTIVE  2023-04-06T09:19:16
IPMI_MGMT  ACTIVE  2023-04-06T09:19:16
JWT        ACTIVE  2023-04-06T09:19:16
LHOTSE     ACTIVE  2023-04-06T09:19:11
NDMP       ACTIVE  2023-04-06T09:19:16
NETWORK    ACTIVE  2023-04-06T09:19:16
PSTORE     ACTIVE  2023-04-06T09:19:16
RICE       ACTIVE  2023-04-06T09:19:16
S3         ACTIVE  2023-04-06T09:19:16
SIQ        ACTIVE  2023-04-06T09:19:16
SNMP       ACTIVE  2023-04-06T09:19:16
SRS        ACTIVE  2023-04-06T09:19:16
SSO        ACTIVE  2023-04-06T09:19:16
----------------------------------------------------------
Total: 17
Or, for SEDs rekey status:
# isi keymanager sed status
 Node Status  Location   Remote Key ID  Key Creation Date   Error Info(if any)
-----------------------------------------------------------------------------
1   LOCAL   Local                    1970-01-01T00:00:00
2   LOCAL   Local                    1970-01-01T00:00:00
3   LOCAL   Local                    1970-01-01T00:00:00
4   LOCAL   Local                    1970-01-01T00:00:00
-----------------------------------------------------------------------------
Total: 4
The rekey process also outputs to the /var/log/isi_km_d.log file, which is a useful source for additional troubleshooting.
If an error in rekey occurs, the previous MK is not deleted, so entries in the provider store can still be created and read as normal. The key manager daemon will retry the rekey operation in the background every 15 minutes until it succeeds.
Author: Nick Trimbee