OneFS In-line Dedupe
Thu, 12 May 2022 14:48:01 -0000
|Read Time: 0 minutes
Among the features and functionality delivered in the new OneFS 9.4 release is the promotion of in-line dedupe to enabled by default, further enhancing PowerScale’s dollar-per-TB economics, rack density and value.
Part of the OneFS data reduction suite, in-line dedupe initially debuted in OneFS 8.2.1. However, it was enabled manually, so many customers simply didn’t use it. But with this enhancement, new clusters running OneFS 9.4 now have in-line dedupe enabled by default.
Cluster configuration | In-line dedupe | In-line compression |
New cluster running OneFS 9.4 | Enabled | Enabled |
New cluster running OneFS 9.3 or earlier | Disabled | Enabled |
Cluster with in-line dedupe enabled that is upgraded to OneFS 9.4 | Enabled | Enabled |
Cluster with in-line dedupe disabled that is upgraded to OneFS 9.4 | Disabled | Enabled |
That said, any clusters that upgrade to 9.4 will not see any change to their current in-line dedupe config during upgrade. Also, there is also no change to the behavior for in-line compression, which remains enabled by default in all OneFS versions from 8.1.3 onwards.
But before we examine the-under-the-hood changes in OneFS 9.4, let’s have a quick dedupe refresher.
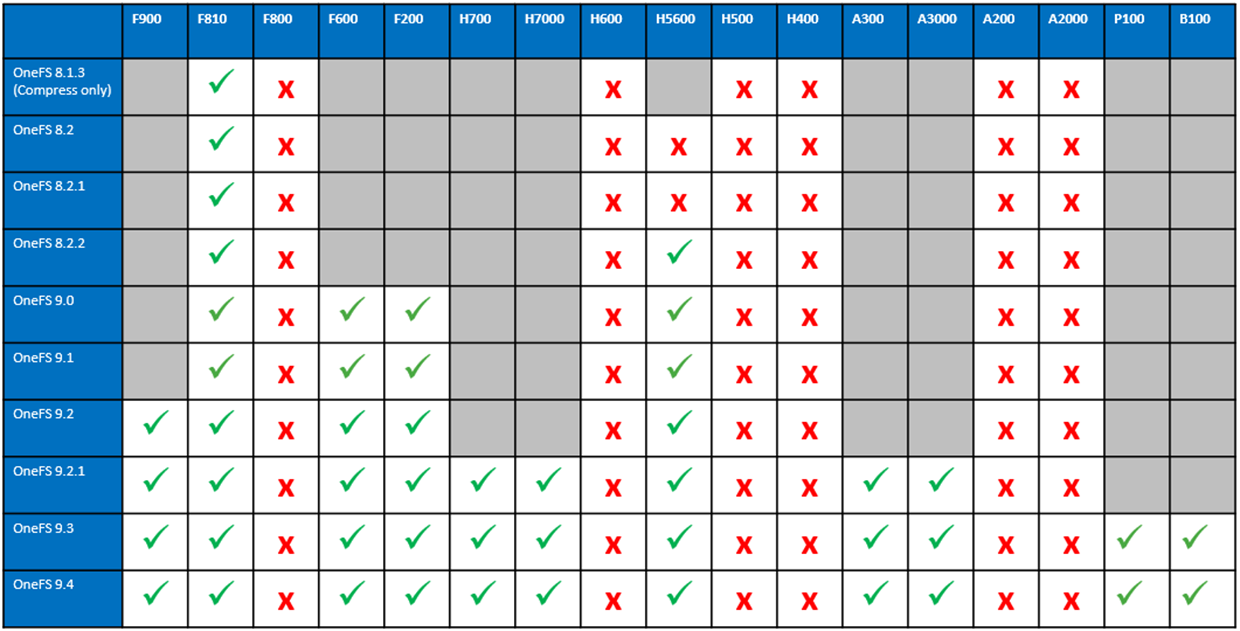
Currently, OneFS in-line data reduction, which encompasses compression, dedupe, and zero block removal, is supported on the F900, F600, and F200 all-flash nodes, plus the F810, H5600, H700/7000, and A300/3000 Gen6.x chassis.
Within the OneFS data reduction pipeline, zero block removal is performed first, followed by dedupe, and then compression. This order allows each phase to reduce the scope of work each subsequent phase.
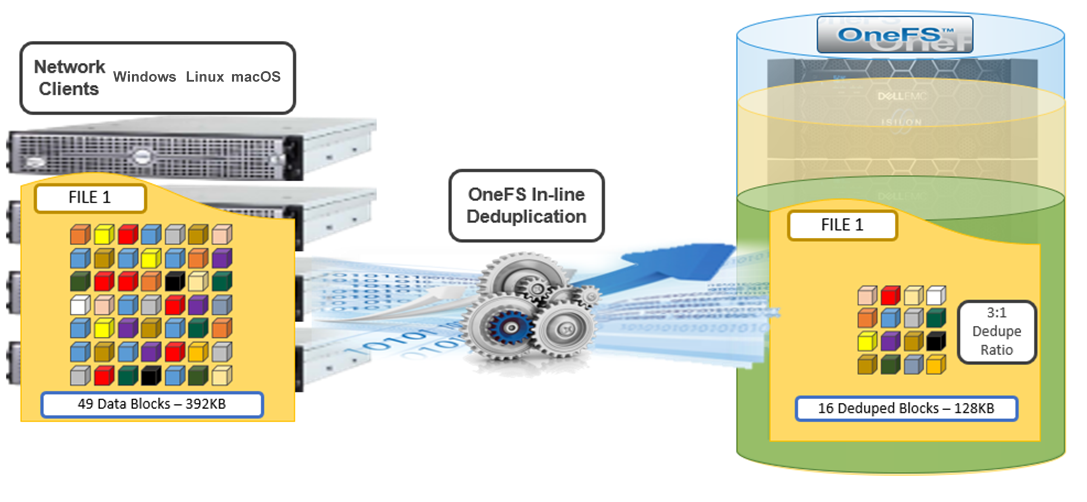
Unlike SmartDedupe, which performs deduplication once data has been written to disk, or post-process, in-line dedupe acts in real time, deduplicating data as is ingested into the cluster. Storage efficiency is achieved by scanning the data for identical blocks as it is received and then eliminating the duplicates.
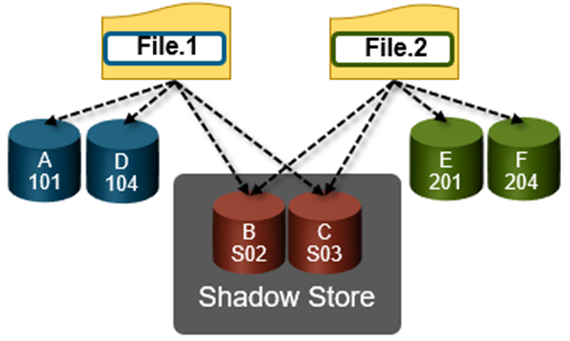
When in-line dedupe discovers a duplicate block, it moves a single copy of the block to a special set of files known as shadow stores. These are file-system containers that allow data to be stored in a sharable manner. As such, files stored under OneFS can contain both physical data and pointers, or references, to shared blocks in shadow stores.
Shadow stores are similar to regular files but are hidden from the file system namespace, so they cannot be accessed through a pathname. A shadow store typically grows to a maximum size of 2 GB, which is around 256 K blocks, and each block can be referenced by 32,000 files. If the reference count limit is reached, a new block is allocated, which may or may not be in the same shadow store. Also, shadow stores do not reference other shadow stores. And snapshots of shadow stores are not permitted because the data contained in shadow stores cannot be overwritten.
When a client writes a file to a node pool configured for in-line dedupe on a cluster, the write operation is divided up into whole 8 KB blocks. Each block is hashed, and its cryptographic ‘fingerprint’ is compared against an in-memory index for a match. At this point, one of the following will happen:
- If a match is discovered with an existing shadow store block, a byte-by-byte comparison is performed. If the comparison is successful, the data is removed from the current write operation and replaced with a shadow reference.
- When a match is found with another LIN, the data is written to a shadow store instead and is replaced with a shadow reference. Next, a work request is generated and queued that includes the location for the new shadow store block, the matching LIN and block, and the data hash. A byte-by-byte data comparison is performed to verify the match and the request is then processed.
- If no match is found, the data is written to the file natively and the hash for the block is added to the in-memory index.
For in-line dedupe to perform on a write operation, the following conditions need to be true:
- In-line dedupe must be globally enabled on the cluster.
- The current operation is writing data (not a truncate or write zero operation).
- The no_dedupe flag is not set on the file.
- The file is not a special file type, such as an alternate data stream (ADS) or an EC (endurant cache) file.
- Write data includes fully overwritten and aligned blocks.
- The write is not part of a rehydrate operation.
- The file has not been packed (containerized) by small file storage efficiency (SFSE).
OneFS in-line dedupe uses the 128-bit CityHash algorithm, which is both fast and cryptographically strong. This contrasts with the OneFS post-process SmartDedupe, which uses SHA-1 hashing.
Each node in a cluster with in-line dedupe enabled has its own in-memory hash index that it compares block fingerprints against. The index lives in system RAM and is allocated using physically contiguous pages and is accessed directly with physical addresses. This avoids the need to traverse virtual memory mappings and does not incur the cost of translation lookaside buffer (TLB) misses, minimizing dedupe performance impact.
The maximum size of the hash index is governed by a pair of sysctl settings, one of which caps the size at 16 GB, and the other which limits the maximum size to 10% of total RAM. The strictest of these two constraints applies. While these settings are configurable, the recommended best practice is to use the default configuration. Any changes to these settings should only be performed under the supervision of Dell support.
Since in-line dedupe and SmartDedupe use different hashing algorithms, the indexes for each are not shared directly. However, the work performed by each dedupe solution can be used by each other. For instance, if SmartDedupe writes data to a shadow store, when those blocks are read, the read-hashing component of in-line dedupe sees those blocks and indexes them.
When a match is found, in-line dedupe performs a byte-by-byte comparison of each block to be shared to avoid the potential for a hash collision. Data is prefetched before the byte-by-byte check and is compared against the L1 cache buffer directly, avoiding unnecessary data copies and adding minimal overhead. Once the matching blocks are compared and verified as identical, they are shared by writing the matching data to a common shadow store and creating references from the original files to this shadow store.
In-line dedupe samples every whole block that is written and handles each block independently, so it can aggressively locate block duplicity. If a contiguous run of matching blocks is detected, in-line dedupe merges the results into regions and processes them efficiently.
In-line dedupe also detects dedupe opportunities from the read path, and blocks are hashed as they are read into L1 cache and inserted into the index. If an existing entry exists for that hash, in-line dedupe knows there is a block-sharing opportunity between the block it just read and the one previously indexed. It combines that information and queues a request to an asynchronous dedupe worker thread. As such, it is possible to deduplicate a data set purely by reading it all. To help mitigate the performance impact, the hashing is performed out-of-band in the prefetch path, rather than in the latency-sensitive read path.
The original in-line dedupe control path design had its limitations, since it did not provide gconfig control settings for the default-disabled in-line dedupe. The previous control-path logic had no gconfig control settings for default-disabled in-line dedupe. But in OneFS 9.4, there are now two separate features that interact together to distinguish between a new cluster or an upgrade to an existing cluster configuration:
For the first feature, upon upgrade to 9.4 on an existing cluster, if there is no in-line dedupe config present, the upgrade explicitly sets it to disabled in gconfig. This has no effect on an existing cluster since it’s already disabled. Similarly, if the upgrading cluster already has an existing in-line dedupe setting in gconfig, OneFS takes no action.
For the other half of the functionality, when booting OneFS 9.4, a node looks in gconfig to see if there’s an in-line dedupe setting. If no config is present, OneFS enables it by default. Therefore, new OneFS 9.4 clusters automatically enable dedupe, and existing clusters retain their legacy setting upon upgrade.
Since the in-line dedupe configuration is binary (either on or off across a cluster), you can easily control it manually through the OneFS command line interface (CLI). As such, the isi dedupe inline settings modify CLI command can either enable or disable dedupe at will—before, during, or after the upgrade. It doesn’t matter.
For example, you can globally disable in-line dedupe and verify it using the following CLI command:
# isi dedupe inline settings viewMode: enabled# isi dedupe inline settings modify –-mode disabled # isi dedupe inline settings view Mode: disabled
Similarly, the following syntax enables in-line dedupe:
# isi dedupe inline settings view Mode: disabled # isi dedupe inline settings modify –-mode enabled # isi dedupe inline settings view Mode: enabled
While there are no visible userspace changes when files are deduplicated, if deduplication has occurred, both the disk usage and the physical blocks metrics reported by the isi get –DD CLI command are reduced. Also, at the bottom of the command’s output, the logical block statistics report the number of shadow blocks. For example:
Metatree logical blocks: zero=260814 shadow=362 ditto=0 prealloc=0 block=2 compressed=0
In-line dedupe can also be paused from the CLI:
# isi dedupe inline settings modify –-mode paused # isi dedupe inline settings view Mode: paused
However, it’s worth noting that this global setting states what you’d like to happen, after which each node attempts to enact the new configuration. However, it can’t guarantee the change, because not all node types support in-line dedupe. For example, the following output is from a heterogenous cluster with an F200 three-node pool supporting in-line dedupe, and an H400 four-node pool not supporting it.
Here, we can see that in-line dedupe is globally enabled on the cluster:
# isi dedupe inline settings view Mode: enabled
However, you can use the isi_for_array isi_inline_dedupe_status command to display the actual setting and state of each node:
# isi dedupe inline settings view Mode: enabled # isi_for_array -s isi_inline_dedupe_status 1: OK Node setting enabled is correct 2: OK Node setting enabled is correct 3: OK Node setting enabled is correct 4: OK Node does not support inline dedupe and current is disabled 5: OK Node does not support inline dedupe and current is disabled 6: OK Node does not support inline dedupe and current is disabled 7: OK Node does not support inline dedupe and current is disabled
Also, any changes to the dedupe configuration are also logged to /var/log/messages, you can find them by grepping for inline_dedupe.
In a nutshell, in-line compression has always been enabled by default since its introduction in OneFS 8.1.3. For new clusters running 9.4 and above, in-line dedupe is on by default. For clusters running 9.3 and earlier, in-line dedupe remains disabled by default. And existing clusters that upgrade to 9.4 will not see any change to their current in-line dedupe config during upgrade.
And here’s the OneFS in-line data reduction platform support matrix for good measure:
Related Blog Posts
A Metadata-based Approach to Tiering in PowerScale OneFS
Wed, 24 Apr 2024 13:12:26 -0000
|Read Time: 0 minutes
OneFS SmartPools provides sophisticated tiering between storage node types. Rules based on file attributes such as last accessed time or creation date can be configured in OneFS to drive transparent motion of data between PowerScale node types. This kind of “set and forget” approach to data tiering is ideal for some industries but not workable for most content creation workflows.
A classic case of how this kind of tiering falls short for media is the real-time nature of video playback. For an extreme example, take an uncompressed 4K image sequence (or even 8K), that might require >1.5GB/s of throughput to play properly. If this media has been tiered down to low performing archive storage and it needs to be used, those files must be migrated back up before they will play. This problem causes delays and confusion all around and makes media storage administrators hesitant to archive anything.
The good news is that the PowerScale OneFS ecosystem has a better way of doing things!
The approach I have taken here is to pull metadata from elsewhere in the workflow and use it to drive on demand tiering in OneFS. How does that work? OneFS supports file extended attributes, which are <key/value> pairs (metadata!) that can be written to the files and directories stored in OneFS. File Policies can be configured in OneFS to move data based on those file extended attributes. And a SmartPoolsTree job can be run on only the path that needs to be moved. All this goodness can be controlled externally by combining the DataIQ API and the OneFS API.
Figure 1: API flow
Note that while I’m focused on combining the DataIQ and OneFS APIs in this post, other API driven tools with OneFS file system visibility could be substituted for DataIQ.
DataIQ
DataIQ is a data indexing and analysis tool. It runs as an external virtual machine and maintains an index of mounted file systems. DataIQ’s file system crawler is efficient, fast, and lightweight, meaning it can be kept up to date with little impact on the storage devices it is indexing.
DataIQ has a concept called “tagging”. Tags in DataIQ apply to directories and provide a mechanism for reporting sets of related data. A tag in DataIQ is an arbitrary <key>/<value> pair. Directories can be tagged in DataIQ in three different ways:
- Autotagging rules:
- Tags are automatically placed in the file system based on regular expressions defined in the Autotagging configuration menu.
- Use of .cntag files:
- Empty files named in the format <key>.<value>.cntag are placed in directories and will be recognized as tags by DataIQ.
- API-based tagging:
- The DataIQ API allows for external tagging of directories.
Tags can be placed throughout a file system and then reported on as a group. For instance, temporary render directories could contain a render.temp.cntag file. Similarly, an external tool could access the DataIQ API and place a <Project/Name> tag on the top-level directory of each project. DataIQ can generate reports on the storage capacity those tags are consuming.
File system extended attributes in OneFS
As I mentioned earlier, OneFS supports file extended attributes. Extended attributes are arbitrary metadata tags in the form of <key/value> pairs that can be applied to files and directories. Extended attributes are not visible in the graphical interface or when accessing files over a share or export. However, the attributes can be accessed using the OneFS CLI with the getexattr and setextattr commands.
Figure 2: File extended attributes
The SmartPools job engine will move data between node pools based on these file attributes. And it is that SmartPools functionality that uses this metadata to perform on demand data tiering.
Crucially, OneFS supports creation of file system extended attributes from an external script using the OneFS REST API. The OneFS API Reference Guide has great information about setting and reading back file system extended attributes.
Figure 3: File policy configuration
Tiering example with Autodesk Shotgrid, DataIQ, and OneFS
Autodesk ShotGrid (formerly Shotgun) is a production resource management tool common in the visual effects and animation industries. ShotGrid is a cloud-based tool that allows for coordination of large production teams. Although it isn’t a storage management tool, its business logic can be useful in deciding what tier of storage a particular set of files should live on. For instance, if a shot tracked in ShotGrid is complete and delivered, the files associated with that shot could be moved to archive.
DataIQ plug-in for Autodesk ShotGrid
The open-source DataIQ plug-in for ShotGrid is available on GitHub here:
Dell DataIQ Autodesk ShotGrid Plugin
This plug-in is proof of concept code to show how the ShotGrid and DataIQ APIs can be combined to tag data in DataIQ based on shot status in ShotGrid. The DataIQ tags are dynamically updated with the current shot status in ShotGrid.
Here is a “shot” in ShotGrid configured with various possible statuses:
Figure 4: ShotGrid status
The following figure of DataIQ shows where the shot status field from ShotGrid has been automatically applied as a tag in DataIQ.
Figure 5: DataIQ tags
Once metadata from ShotGrid has been pulled into DataIQ, that information can be used to drive OneFS SmartPools tiering:
- A user (or system) passes the DataIQ tag <key/values> to the DataIQ API. The DataIQ API returns a list of directories associated with that tag.
- A directory chosen from Step 1 above can be passed back to the DataIQ API to get a listing of all contents by way of the DataIQ file index.
- Those items are passed programmatically to the OneFS API. The <key/value> pair of the original DataIQ tag is written as an extended attribute directly to the targeted files and directories.
- And finally, the SmartPoolsTree job can be run on the parent path chosen in Step 2 above to begin tiering the data immediately.
Using business logic to drive storage tiering
DataIQ and OneFS provide the APIs necessary to drive storage tiering based on business logic. Striking efficiencies can be gained by taking advantage of the metadata that exists in many workflow tools. It is a matter of “connecting the dots”.
The example in this blog uses ShotGrid and DataIQ, however it is easy to imagine that similar metadata-based techniques could be developed using other file system index tools. In the media and entertainment ecosystem, media asset management and production asset management systems immediately come to mind as candidates for this kind of API level integration.
As data volumes increase exponentially, it is unrealistic to keep all files on the highest costing tiers of storage. Various automated storage tiering approaches have been around for years, but for many use cases this automated tiering approach falls short. Bringing together rich metadata and an API driven workflow bridges the gap.
To see the Python required to put this process together, refer to my white paper PowerScale OneFS: A Metadata Driven Approach to On Demand Tiering.
Author: Gregory Shiff, Principal Solutions Architect, Media & Entertainment LinkedIn
OneFS and HTTP Security
Mon, 22 Apr 2024 20:35:30 -0000
|Read Time: 0 minutes
To enable granular HTTP security configuration, OneFS provides an option to disable nonessential HTTP components selectively. This can help reduce the overall attack surface of your infrastructure. Disabling a specific component’s service still allows other essential services on the cluster to continue to run unimpeded. In OneFS 9.4 and later, you can disable the following nonessential HTTP services:
Service | Description |
PowerScaleUI | The OneFS WebUI configuration interface. |
Platform-API-External | External access to the OneFS platform API endpoints. |
Rest Access to Namespace (RAN) | REST-ful access by HTTP to a cluster’s /ifs namespace. |
RemoteService | Remote Support and In-Product Activation. |
SWIFT (deprecated) | Deprecated object access to the cluster using the SWIFT protocol. This has been replaced by the S3 protocol in OneFS. |
You can enable or disable each of these services independently, using the CLI or platform API, if you have a user account with the ISI_PRIV_HTTP RBAC privilege.
You can use the isi http services CLI command set to view and modify the nonessential HTTP services:
# isi http services list ID Enabled ------------------------------ Platform-API-External Yes PowerScaleUI Yes RAN Yes RemoteService Yes SWIFT No ------------------------------ Total: 5
For example, you can easily disable remote HTTP access to the OneFS /ifs namespace as follows:
# isi http services modify RAN --enabled=0
You are about to modify the service RAN. Are you sure? (yes/[no]): yes
Similarly, you can also use the WebUI to view and edit a subset of the HTTP configuration settings, by navigating to Protocols > HTTP settings:
That said, the implications and impact of disabling each of the services is as follows:
Service | Disabling impacts |
WebUI | The WebUI is completely disabled, and access attempts (default TCP port 8080) are denied with the warning Service Unavailable. Please contact Administrator. If the WebUI is re-enabled, the external platform API service (Platform-API-External) is also started if it is not running. Note that disabling the WebUI does not affect the PlatformAPI service. |
Platform API | External API requests to the cluster are denied, and the WebUI is disabled, because it uses the Platform-API-External service. Note that the Platform-API-Internal service is not impacted if/when the Platform-API-External is disabled, and internal pAPI services continue to function as expected. If the Platform-API-External service is re-enabled, the WebUI will remain inactive until the PowerScaleUI service is also enabled. |
RAN | If RAN is disabled, the WebUI components for File System Explorer and File Browser are also automatically disabled. From the WebUI, attempts to access the OneFS file system explorer (File System > File System Explorer) fail with the warning message Browse is disabled as RAN service is not running. Contact your administrator to enable the service. This same warning also appears when attempting to access any other WebUI components that require directory selection. |
RemoteService | If RemoteService is disabled, the WebUI components for Remote Support and In-Product Activation are disabled. In the WebUI, going to Cluster Management > General Settings and selecting the Remote Support tab displays the message The service required for the feature is disabled. Contact your administrator to enable the service. In the WebUI, going to Cluster Management > Licensing and scrolling to the License Activation section displays the message The service required for the feature is disabled. Contact your administrator to enable the service. |
SWIFT | Deprecated object protocol and disabled by default. |
You can use the CLI command isi http settings view to display the OneFS HTTP configuration:
# isi http settings view Access Control: No Basic Authentication: No WebHDFS Ran HTTPS Port: 8443 Dav: No Enable Access Log: Yes HTTPS: No Integrated Authentication: No Server Root: /ifs Service: disabled Service Timeout: 8m20s Inactive Timeout: 15m Session Max Age: 4H Httpd Controlpath Redirect: No
Similarly, you can manage and change the HTTP configuration using the isi http settings modify CLI command.
For example, to reduce the maximum session age from four to two hours:
# isi http settings view | grep -i age Session Max Age: 4H # isi http settings modify --session-max-age=2H # isi http settings view | grep -i age Session Max Age: 2H
The full set of configuration options for isi http settings includes:
Option | Description |
--access-control <boolean> | Enable Access Control Authentication for the HTTP service. Access Control Authentication requires at least one type of authentication to be enabled. |
--basic-authentication <boolean> | Enable Basic Authentication for the HTTP service. |
--webhdfs-ran-https-port <integer> | Configure Data Services Port for the HTTP service. |
--revert-webhdfs-ran-https-port | Set value to system default for --webhdfs-ran-https-port. |
--dav <boolean> | Comply with Class 1 and 2 of the DAV specification (RFC 2518) for the HTTP service. All DAV clients must go through a single node. DAV compliance is NOT met if you go through SmartConnect, or using 2 or more node IPs. |
--enable-access-log <boolean> | Enable writing to a log when the HTTP server is accessed for the HTTP service. |
--https <boolean> | Enable the HTTPS transport protocol for the HTTP service. |
--integrated-authentication <boolean> | Enable Integrated Authentication for the HTTP service. |
--server-root <path> | Document root directory for the HTTP service. Must be within /ifs. |
--service (enabled | disabled | redirect | disabled_basicfile) | Enable/disable the HTTP Service or redirect to WebUI or disabled BasicFileAccess. |
--service-timeout <duration> | The amount of time (in seconds) that the server will wait for certain events before failing a request. A value of 0 indicates that the service timeout value is the Apache default. |
--revert-service-timeout | Set value to system default for --service-timeout. |
--inactive-timeout <duration> | Get the HTTP RequestReadTimeout directive from both the WebUI and the HTTP service. |
--revert-inactive-timeout | Set value to system default for --inactive-timeout. |
--session-max-age <duration> | Get the HTTP SessionMaxAge directive from both WebUI and HTTP service. |
--revert-session-max-age | Set value to system default for --session-max-age. |
--httpd-controlpath-redirect <boolean> | Enable or disable WebUI redirection to the HTTP service. |
Note that while the OneFS S3 service uses HTTP, it is considered a tier-1 protocol, and as such is managed using its own isi s3 CLI command set and corresponding WebUI area. For example, the following CLI command forces the cluster to only accept encrypted HTTPS/SSL traffic on TCP port 9999 (rather than the default TCP port 9021):
# isi s3 settings global modify --https-only 1 –https-port 9921 # isi s3 settings global view HTTP Port: 9020 HTTPS Port: 9999 HTTPS only: Yes S3 Service Enabled: Yes
Additionally, you can entirely disable the S3 service with the following CLI command:
# isi services s3 disable The service 's3' has been disabled.
Or from the WebUI, under Protocols > S3 > Global settings:
Author: Nick Trimbee