


Local Replication with the PowerMax REST API, Working with Clones

PowerMax arrays have several local replication features for administrators to use, depending on their needs. Happily, the PowerMax REST API supports all of these. Dell Technologies also provides them in pre-written Python functions as part of PyU4V (a Python package for managing the PowerMax RESasasT API) and as Ansible modules that support symclone functions. In this blog I provide examples and some background info about clones.
If you are not familiar with REST, you’ll enjoy reading one or both of these articles:
- https://infohub.delltechnologies.com/p/getting-started-with-rest-api-1/
- https://infohub.delltechnologies.com/p/getting-started-with-the-powermax-rest-api-time-for-a-rest/
Full API documentation is available on the developer hub here. Clone operations are under the replication resource of the API, with all endpoints prefixed https://{{base_url}}/ /replication/symmetrix/{symmetrixId}/storagegroup/{storageGroupId}/clone/.
Managing clones with the PowerMaxREST API
With symclone, PowerMax administrators can create cloned images of their data on demand. If you want to study up on symclone and its history with PowerMax and Symmetrix predecessors, see the blog PowerMax Attack of the Clones.
Clone copies tend to be used in environments where the copy data might be made available to a system for an extended period and only refreshed once in a while. This is in stark contrast to snapshots which are taken frequently, typically have shorter retention times, are available for quick restoration of data, and available to present near real-time copies of data that is constantly changing to test and dev environments.
Starting with Unisphere for PowerMax 10.0, one can use the User Interface and API to interact with symclone functionality. This opened the door to new functionality, and automation, that was previously only available through command line options. Let’s explore this functionality and concentrate on the how, and a little of the why.
Creating a clone on PowerMax with REST API
Just like with snapshots and the majority of operations with PowerMax REST API, clones are controlled at a storage group level. Users create a clone of all volumes in a storage group. Storage group operations make it simpler to manage clones because all devices are at the same point in time (using PowerMax Enginuity Continuity Assist Technology (ECA)) when the clone is created.
To create a clone copy of a storage group, perform a POST operation against the source storage group. (The documentation for the Create Clone API call is here.) Here’s a sample POST call:
https://{unisphereip}}:{{port}}/restapi/100/replication/symmetrix/{symmetrixId}/storagegroup/{storageGroupId}/clone/storagegroup
{
  "target_storage_group_name": "target_storagegroup_name",
  "establish_terminate": true,
  "consistent": true
}
The API call and payload shown here create a consistent clone of a source storage group with the clone devices present in the specified target storage group.
The additional parameter establish_terminate set to true signifies to the API to remove the clone relationship as soon as it’s activated. This action is only available on PowerMax arrays running PowerMaxOS 10 or higher.
To perform the same operation in a Python script with PyU4V, the code is simple:
import PyU4V
api = PyU4V.U4VConn(username='smc',password='smc',
                                server_ip='unisphereip', verify=None,
                                array_id='000297600841')
api.clone.create_clone(storage_group_id="REST_TEST",
                        target_storage_group_id="REST_TEST_TGT",
                       establish_terminate=True)
If you want to maintain a relationship between the source and target storage group after activating your clone, you can omit the key or variable establish_terminate and you can create clones with different capabilities. Note that no copying of tracks is done on the array so it can be easier to use this function because code will be shorter (because there are no relationships to track), and the data is available to the host as soon as the clone is created. So there’s no need to wait for any background operations.
Clone and SnapVX better together
Providing developers with copies of data for building applications, to provide business advantages and to deliver user features to customers, is part and parcel of many organizations. However, the security of that data is paramount and often has legal requirements depending on location and industry.
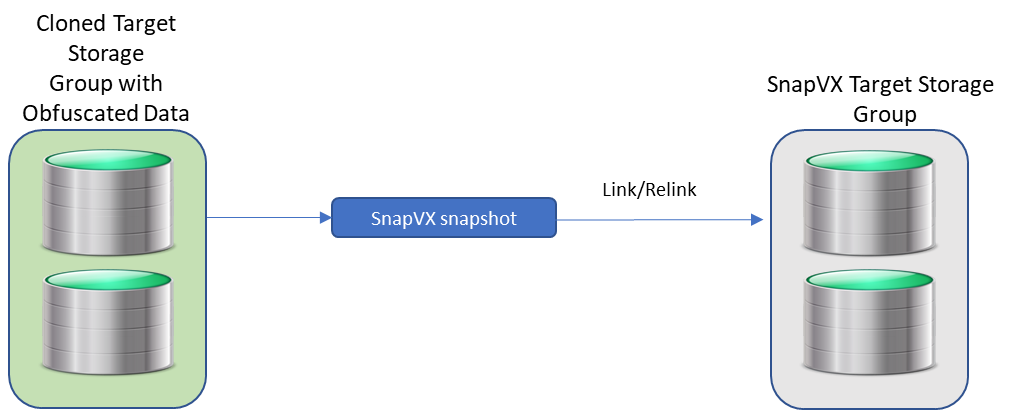
A great way to help in situations like this is to use clone and snap technology together to create a standalone copy of the data that can be mounted to a host for obfuscation. This helps make sure that sensitive information like social security numbers are no longer intelligible. One can then take snapshots from the obfuscated clone and link them to any test or dev servers.
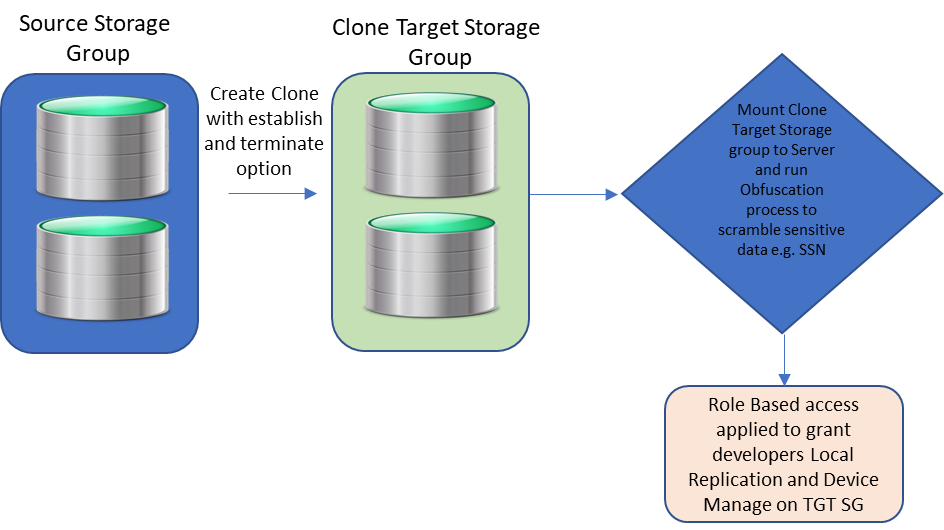
After the sensitive data has been scrambled by the obfuscation process and RBAC applied to the clones, developers with Local Replication rights can refresh their snapshots at will without security concerns about the data they are seeing. They will only be able to run API calls against storage groups for which they have been granted privileges.
Restoring Data from a Clone
From time-to-time you may want to restore data from a clone to the source. If you are using the traditional clone workflow and have not used the establish/terminate options, you can use the modify storage group clone PUT API call, using the API call here with the restore action.
The URI and body are here:
https://{unisphereIP}:8443/univmax/restapi/100/replication/symmetrix/{symmetrixId}/storagegroup/{storageGroupId}/clone/storagegroup/{targetStorageGroupId}
{
  "action": "Restore",
  "restore": {
    "force": "false",
    "star": "false"
  }
}
PyU4V has its own function for the restore action, taking the source and target storage groups names as parameters:
api.clone.restore_clone(
    storage_group_id="mysrc_sg", target_storage_group_id="mytgt_sg"
)
conn.clone.terminate_clone(
    storage_group_id="mysrc_sg", target_storage_group_id="mytgt_sg",
    restored=True)
After the restore, you must terminate the restored session on the source storage group before any additional clone commands can run.
As with any feature, it’s easy to do things when you know how, but as with any technology there are rules which are well documented here. In that document, Table 5 lists the states and allowed actions. (Though this is a command line document, the rules are the same for API and UI operations.)
Hopefully this short blog has given some insight and possibly some inspiration into how to use PowerMax clone technologies with the REST API interfaces.
Watch this space for more about the PowerMax API, and if there are topics that are of interest to you and you would like to read more, send a request to @rawstorage on Twitter and I’ll try to accommodate your request!
Author: Paul Martin
Related Blog Posts

Local Replication with the PowerMax REST API, Working with SnapVX Snapshots
Tue, 13 Jun 2023 16:02:04 -0000
|Read Time: 0 minutes
PowerMax arrays provide feature rich local replication options in SnapVX and clone technologies. The PowerMax REST API supports all of these features, and Dell Technologies provides pre-written Python functions as part of PyU4V -- a Python package for managing the PowerMax REST API as well as Ansible modules that support SnapVX. In this blog I provide examples in native REST calls and in a Python example.
If you are not familiar with REST, you’ll enjoy reading one or both of these blogs:
- https://infohub.delltechnologies.com/p/getting-started-with-rest-api-1
- https://infohub.delltechnologies.com/p/getting-started-with-the-powermax-rest-api-time-for-a-rest
Full API documentation is available on the developer hub here. All REST endpoints for the SnapVX and clone operations are under the replication resource of the API. This means that URI addresses are prefixed with the base URL https://{{base_url}}/{{api_version}}/replication. In addition to SnapVX and clone functionality, it’s also possible to assign snapshot policies to storage groups at the time of creation or when modifying using sloprovisioning resources. Examples appear further ahead in this blog.
Managing SnapVX snapshots with the REST API
SnapVX provides PowerMax administrators with the ability to take point in time snapshots across a collection of devices to create a consistent point in time image of the data in a very space efficient manner. The user can manipulate the snapshots for restore purposes or link them to volumes and present them to hosts using masking views to provide a copy of the snapshot image.
For details about SnapVX functionality, see the white paper Dell PowerMax and VMAX All Flash: TimeFinder SnapVX Local Replication. The PowerMax REST API provides all the functionality of Unisphere for PowerMax with snapshot management, and just like the UI management is orchestrated with the storage group. If you need to manipulate a snapshot for a single volume, you can use the CLI tools or add the volume to its own storage group.
Some points to remember with SnapVX snapshots:
- A SnapVX snapshot is never altered by host access and therefore is always available to the administrator for restore purposes until it is terminated by user action or it expires based on the time to live value (if set).
- Snapshots will only automatically expire when they are unlinked from all target storage groups.
- Snapshots can be set secure at or after creation time. Once set secure, the user cannot terminate the snapshot until the time to live has passed or modify the security of that snapshot except to extend secure time to live.
- When linking snapshots with the API or UI, if the target storage group doesn’t already exist the API will automatically create the storage group with the correct number of devices and size, matching the source device configurations.
- If you add devices to a source storage group, you must add devices to target storage groups. This is not automatic and needs to be planned for. Naming conventions can help simplify this process.
- Although SnapVX snapshots present with both a generation number and snapId, if automating, snapid is preferred because this number is a static reference id.
Creating and identifying SnapVX SnapShots with the REST API
Creating a snapshot is a simple process. A REST API POST call is sent to the management software, directed at the storage group to be snapped, specifying a name for the snapshot along with any optional parameters to be set (for example, you can set the snapshot to be secure or set time to live).
The following is an example POST call and payload for creating a snapshot of a storage group, with a snapshot named REST_SG_snapshot, setting a time to live of 10 days. (Values to be supplied are enclosed in {} signaling substitution required for actual values or variables.)
https://unisphereIP:8443/univmax/restapi/{{api_version}}/replication/symmetrix/{symmetrixId}/storagegroup/{storageGroupId}/snapshot (POST)
Payload
{
  "snapshotName": "REST_SG_snapshot",
  "timeToLive": 10
}
PyU4V has functions for complete control of SnapVX, making the API easier to consume. The following is a simple script to create a snapshot and print the return from the API.
import PyU4V
conn = PyU4V.U4VConn(username='smc', password='smc',
server_ip='unisphereip', port='8443', array_id=None,
verify=False)
#create a snapshot and assign returned information to variable snap_details
snap_details = (conn.replication.create_storage_group_snapshot(
storage_group_id='snapsrc', snap_name='snap4blog', ttl=1, secure=False,
hours=True))
#Get SnapIds for all snapshots for storage group with name snap4blog
all_sg_snaps = (conn.replication.get_storage_group_snapshot_snap_id_list(
storage_group_id='snapsrc', snap_name='snap4blog'))
#print details of snapshot created above
print(snap_details)
#Print only snapid from snap_details
print(snap_details.get('snapid'))
#Print all SnapIds associated with snap4blog snapshot on snapsrc storage group
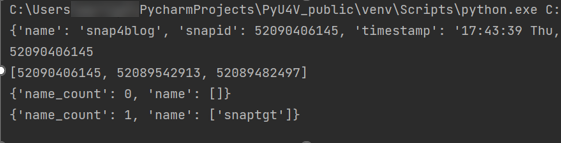
print(all_sg_snaps)The output is shown below.
- The first print statement shows the detailed information for the snapshot just created with details such as timestamp, snapid, and so on.
- The second line prints only the snapid extracted from the JSON using the key ‘snapid’.
- The third line prints the variable ‘all_sg_snaps’ showing all snapshot ids with the name snap4blog associated with the snapsrc storage group.

To make the snapshot data available to a host, you can add some additional REST calls to link to a storage group.
The following script performs these tasks:
- Lists any storage group that has a snapshot linked to it on my test array. There are none to begin with.
- Creates a link to an existing snapshot using the snapid
- Runs the listing again. This time there is data to display showing the linked storage group.
#list any storage group that is being used as a linked target for snapvx
#snapshot
print(conn.common.get_request(
      target_uri=f'/100/replication/symmetrix/'
                 f'000120200287/storagegroup?is_link_target=True',
     resource_type=None))
 #Link a snapshot from ‘snapsrc’ storage group to ‘snaptgt’ storage group,   #this will create snaptgt storage group as it doesn’t exist
#with the name ‘snap4blog’ and snapid matching value in variable set earlier.
conn.replication.modify_storage_group_snapshot_by_snap_id(
      src_storage_grp_id='snapsrc',tgt_storage_grp_id='snaptgt',
     snap_name='snap4blog', snap_id=snap_details.get('snapid'),
     link=True)
 #Print updated list of storage groups used as snap target
print(conn.common.get_request(
     target_uri=f'/100/replication/symmetrix/'
                 f'000120200287/storagegroup?is_link_target=True',0
     resource_type=None))
The following is the output of the functions showing the snaptgt group in the list after the link has been issued.
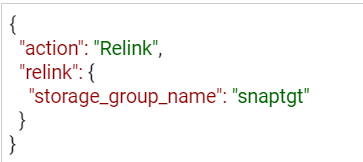
SnapVX lends a lot of flexibility when refreshing test and development environments. The ability to relink the same snapshot (essentially wiping any changes to the target copy while preserving the point in time image) greatly simplifies iterative testing. You can also quickly relink to a different snapshot or unlink to reuse the target volumes for another purpose. To relink a snapshot with PyU4V, simply change the parameter in the modify_storage_group call instead of “link=True” we set “relink=True”.
If you are relinking directly from the API, modify the payload for the PUT call to reflect that the action is relink, as shown here:
https://UnisphereIP:8443/univmax/restapi/100/replication/symmetrix/{symmetrixId}/storagegroup/{storageGroupId}/snapshot/{snapshotId}/snapid/{snapId} (PUT)
When you no longer require your snapshots, don’t forget to terminate or unlink any linked targets to allow for automatic expiration if you’ve set a time to live. All actions use the same URI link, however the REST method will be PUT (with modified payload) or DELETE.
It’s generally a good practice to adopt a friendly naming convention for storage groups that are being used as snapvx targets to make them easy to identify in the UI and API output. Simply adding _TGT to the sg name may be enough, but your naming convention can be whatever works best for your organization.
Snapshot policies
In addition to regular snapshots, SnapVX provides a mechanism for users to assign snapshot policies to storage groups. (More details about snapshot policies are described in the white paper Dell PowerMax and VMAX All Flash: TimeFinder SnapVX Local Replication.) Assigning a snapshot policy means that you will have an automated rotation and preservation of a defined number of snapshots for your storage groups with a clearly defined recovery time objective. Users don’t need to manage the scheduling -- the policy automates all of that and can be assigned when storage groups are created, or at a later time.
Associating snapshot policies to storage groups is available through the POST and PUT calls for creating storage groups. A separate set of API calls is available for managing directly from the Snapshot Policy section of the API documentation.
For Py4V in Python, the code only requires an extra variable on the create and modify functions. The following example will create a snapshot policy (example_policy) that will take a snapshot every 12 minutes, retaining a maximum of 24 snapshots. The second part creates a storage group associated with this policy. Note that there are default policies already created on all arrays that users can use without having to create anything new.
import PyU4V

api = PyU4V.U4VConn(username='smc',password='smc',
                                server_ip='unisphereip', verify=None,
                                array_id='000297600841')
api.snapshot_policy.create_snapshot_policy(
    snapshot_policy_name='example_policy', interval="12 Minutes",
    local_snapshot_policy_snapshot_count=24)

api.provisioning.create_non_empty_storage_group(
    srp_id="SRP_1", storage_group_id="blog_example_sg", num_vols=1,
    vol_size=1, cap_unit="GB",snapshot_policy_ids=["example_policy"],
    service_level="Diamond", workload=None)
Hopefully this blog has given you the basics to working with SnapVX snapshots using REST and Python!
For more information and a list of all functions for SnapVX, see the documentation for PyU4V on readthedocs.io and the REST API documentation on the Dell developer portal here.
In upcoming blogs, I will also be looking at using clone technology with the REST API, and when this is a good alternative to SnapVX depending on your needs. Have fun automating and if you have questions, you can always start a discussion on the PyU4V GitHub -- we are always willing to help!
Author: Paul Martin

PowerProtect Data Manager Deployment Automation – Deploy PowerProtect Data Manager in Minutes
Mon, 18 Sep 2023 22:34:52 -0000
|Read Time: 0 minutes
In the spirit of automating EVERYTHING, this blog will showcase the complete deployment of PowerProtect Data Manager (PPDM).
In the PPDM universe, we have auto-policy creation and ad-hoc VM backup solutions, use-case driven tasks, and so on -- all available in the official PowerProtect Data Manager GitHub repository. And now, I am proud to present to you the complete PPDM deployment automation solution.
Without further ado, let’s get started.
What does the solution do?
The PowerProtect Data Manager automated deployment solution boasts a wide array of functionality, including:
- Automatically provisioning PPDM from OVA
- Automatically deploying and configuring PPDM based on a JSON configuration file
- Adding PowerProtect DD (optional)
- Registering vCenter (optional)
- Registering remote PPDM systems (optional)
- Configuring bi-directional replication between two PPDM systems (optional)
What is the solution?
It’s a Python-based script that operates in conjunction with the PPDM REST API and vCenter.
Here is the list of prerequisites:
- Python 3.x (The script supports every platform Python is supported on)
- Python requests module, which can be installed using pip with the command: “pip install requests” or “python -m pip install requests”
- PowerProtect Data Manager 19.14 and later
- Connectivity from the host running the script to vCenter and PPDM
- PowerProtect Data Manager OVA image located on the host that is running the script
- Ovftool installed on the same host the script is running on
- Connectivity to remote PPDM system from the host running the script (only if the -ppdm parameter is provided)
How do I use the script?
The script accepts one mandatory parameter, -configfile or --config-file, and six optional parameters:
- (1) justova to deploy only the PPDM OVA or (2) skipova to skip OVA deployment
- (3) vc and (4) dd to register vCenter and PowerProtect DD respectively
- (5) ppdm and (6) cross to configure a remote PPDM system and bi-directional communication between the two PPDM systems respectively
- -cross / --bi-directional requires the argument -ppdm / --connect-ppdm to be specified as well
Here is the full script syntax:
# ppdm_deploy.py -h
usage: ppdm_deploy.py [-h] -configfile CONFIGFILE [-skipova] [-justova] [-vc] [-dd] [-ppdm] [-cross]
Script to automate PowerProtect Data Manager deployment
options:
  -h, --help            show this help message and exit
  -configfile CONFIGFILE, --config-file CONFIGFILE
                         Full path to the JSON config file
  -skipova, --skip-ova  Optionally skips OVA deployment
  -justova, --just-ova  Optionally stops after OVA deployment
  -vc, --register-vcenter
                         Optionally registers vCenter in PPDM
  -dd, --add-dd         Optionally adds PowerProtect DD to PPDM
  -ppdm, --connect-ppdm
                         Optionally connects remote PPDM system
  -cross, --bi-directional
                         Optionally configures bi-directional communication between the two PPDM hosts
Use Cases
Let’s look at some common use cases for PPDM deployment:
1. Greenfield deployment of PPDM including registration of PowerProtect DD and vCenter:
# python ppdm_deploy.py -configfile ppdm_prod.json -vc -dd2. PPDM deployment including registration of vCenter and DD as well as a remote PPDM system:
# python ppdm_deploy.py -configfile ppdm_prod.json -vc -dd -ppdm3. Full deployment of two PPDM systems including configuration of the remote PPDM systems for bi-directional communication.
In this case, we would run the script twice in the following manner:
# python ppdm_deploy.py -configfile ppdm_siteA.json -vc -dd -ppdm -cross# python ppdm_deploy.py -configfile ppdm_siteB.json -vc -dd
4. In case of evaluation or test purposes, the script can stop right after the PPDM OVA deployment:
# python ppdm_deploy.py -configfile ppdm_test.json -justova5. In case of PPDM implementation where deployment needs to take place based on an existing PPDM VM or former OVA deployment:
# python ppdm_deploy.py -configfile ppdm_prod.json -skipova
Script output
# python ppdm_deploy.py -configfile ppdm_prod.json -vc -dd -ppdm -cross
-> Provisioning PPDM from OVA
Opening OVA source: C:\Users\idan\Downloads\dellemc-ppdm-sw-19.14.0-20.ova
Opening VI target: vi://idan%40vsphere.local@vcenter.hop.lab.dell.com:443/ProdDC/host/DC_HA1/
Deploying to VI: vi://idan%40vsphere.local@vcenter.hop.lab.dell.com:443/ProdDC/host/DC_HA1/
Transfer Completed
Powering on VM: PPDM_Prod_36
Task Completed
Completed successfully
---> OVA deployment completed successfully
-> Checking connectivity to PPDM
---> PPDM IP 10.0.0.36 is reachable
-> Checking PPDM API readiness
---> PPDM API is unreachable. Retrying
---> PPDM API is unreachable. Retrying
---> PPDM API is unreachable. Retrying
---> PPDM API is unreachable. Retrying
---> PPDM API is unreachable. Retrying
---> PPDM API is available
-> Obtaining PPDM configuration information
---> PPDM is deployment ready
-> Accepting PPDM EULA
---> PPDM EULA accepted
-> Applying license
-> Using Capacity license
-> Applying SMTP settings
-> Configuring encryption
-> Building PPDM deployment configuration
-> Time zone detected: Asia/Jerusalem
-> Name resolution completed successfully
-> Deploying PPDM
---> Deploying configuration 848a68bb-bd8e-4f91-8a63-f23cd079c905
---> Deployment status PROGRESS 2%
---> Deployment status PROGRESS 16%
---> Deployment status PROGRESS 20%
---> Deployment status PROGRESS 28%
---> Deployment status PROGRESS 28%
---> Deployment status PROGRESS 28%
---> Deployment status PROGRESS 32%
---> Deployment status PROGRESS 32%
---> Deployment status PROGRESS 32%
---> Deployment status PROGRESS 32%
---> Deployment status PROGRESS 32%
---> Deployment status PROGRESS 32%
---> Deployment status PROGRESS 32%
---> Deployment status PROGRESS 32%
---> Deployment status PROGRESS 32%
---> Deployment status PROGRESS 32%
---> Deployment status PROGRESS 32%
---> Deployment status PROGRESS 32%
---> Deployment status PROGRESS 36%
---> Deployment status PROGRESS 40%
---> Deployment status PROGRESS 40%
---> Deployment status PROGRESS 48%
---> Deployment status PROGRESS 48%
---> Deployment status PROGRESS 48%
---> Deployment status PROGRESS 48%
---> Deployment status PROGRESS 52%
---> Deployment status PROGRESS 52%
---> Deployment status PROGRESS 52%
---> Deployment status PROGRESS 52%
---> Deployment status PROGRESS 52%
---> Deployment status PROGRESS 56%
---> Deployment status PROGRESS 56%
---> Deployment status PROGRESS 56%
---> Deployment status PROGRESS 60%
---> Deployment status PROGRESS 60%
---> Deployment status PROGRESS 72%
---> Deployment status PROGRESS 76%
---> Deployment status PROGRESS 76%
---> Deployment status PROGRESS 80%
---> Deployment status PROGRESS 88%
---> Deployment status PROGRESS 88%
---> Deployment status PROGRESS 88%
---> Deployment status PROGRESS 88%
---> Deployment status PROGRESS 88%
---> Deployment status PROGRESS 88%
---> Deployment status SUCCESS 100%
-> PPDM deployed successfully
-> Initiating post-install tasks
-> Accepting TELEMETRY EULA
---> TELEMETRY EULA accepted
-> AutoSupport configured successfully
-> vCenter registered successfully
--> Hosting vCenter configured successfully
-> PowerProtect DD registered successfully
-> Connecting peer PPDM host
---> Monitoring activity ID 01941a19-ce75-4227-9057-03f60eb78b38
---> Activity status RUNNING 0%
---> Activity status COMPLETED 100%
---> Peer PPDM registered successfully
-> Configuring bi-directional replication direction
---> Monitoring activity ID 8464f126-4f28-4799-9e25-37fe752d54cf
---> Activity status RUNNING 0%
---> Activity status COMPLETED 100%
---> Peer PPDM registered successfully
-> All tasks have been completed
Where can I find it?
You can find the script and the config file in the official PowerProtect GitHub repository:
https://github.com/dell/powerprotect-data-manager
Resources
Other than the official PPDM repo on GitHub, developer.dell.com provides comprehensive online API documentation, including the PPDM REST API.
How can I get help?
For additional support, you are more than welcome to raise an issue in GitHub or reach out to me by email:
Thanks for reading!
Idan
Author: Idan Kentor