
Blogs
The latest news about Dell PowerMax and VMAX releases and updates

Unisphere for PowerMax Workload Planner
Fri, 15 Mar 2024 21:21:58 -0000
|Read Time: 0 minutes
Workload Planner (WLP) is a FAST component used to display performance metrics to calculate VMAX component utilizations and storage group Service Level Objective compliance. It allows for more informed workload monitoring, using up-stream components (Unisphere GUI and REST API) with respect to current VMAX performance capacity.
WLP is supported on arrays running 5977 and upwards code levels. Each service level and workload type has a response band associated with it. When a storage group (workload) is said to be compliant, it is operating within the associated response time band.
When assessing the compliance of a storage group, Workload Planner calculates its weighted response time for the past 4 hours and the past 2 weeks, and then compares the two values to the maximum response time associated with its given service level. If both calculated values fall within (under) the service level-defined response time band, the compliance state is STABLE. If one of them complies and the other is out of compliance, then the compliance state is MARGINAL. If both are out of compliance, then the compliance state is CRITICAL.
SG SLO compliance
To begin, let’s examine our SG SLO compliance to examine how our SG’s have been performing.
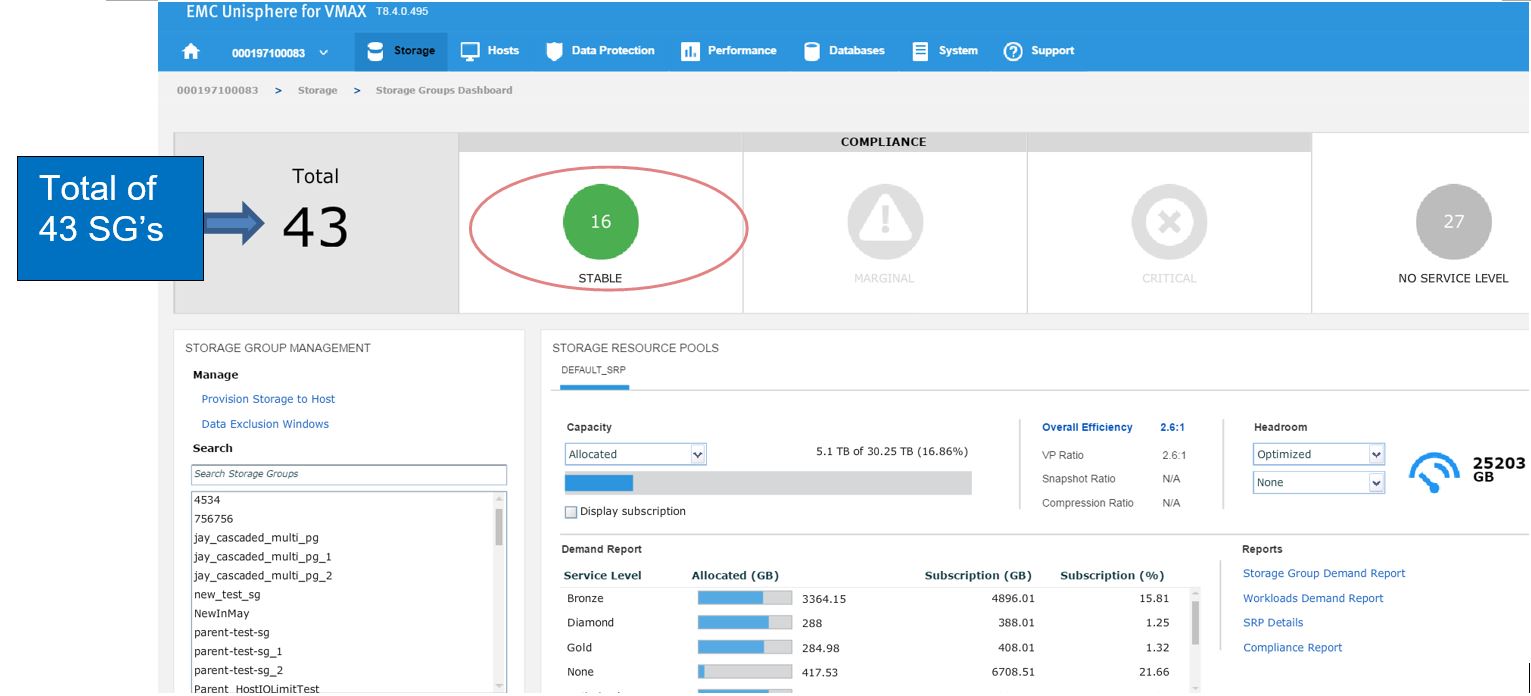 Figure 1. Storage group view
In this example, we have a total of 43 SGs with none being in a marginal or critical state. Let’s click on 16 stable SG’s and review further.
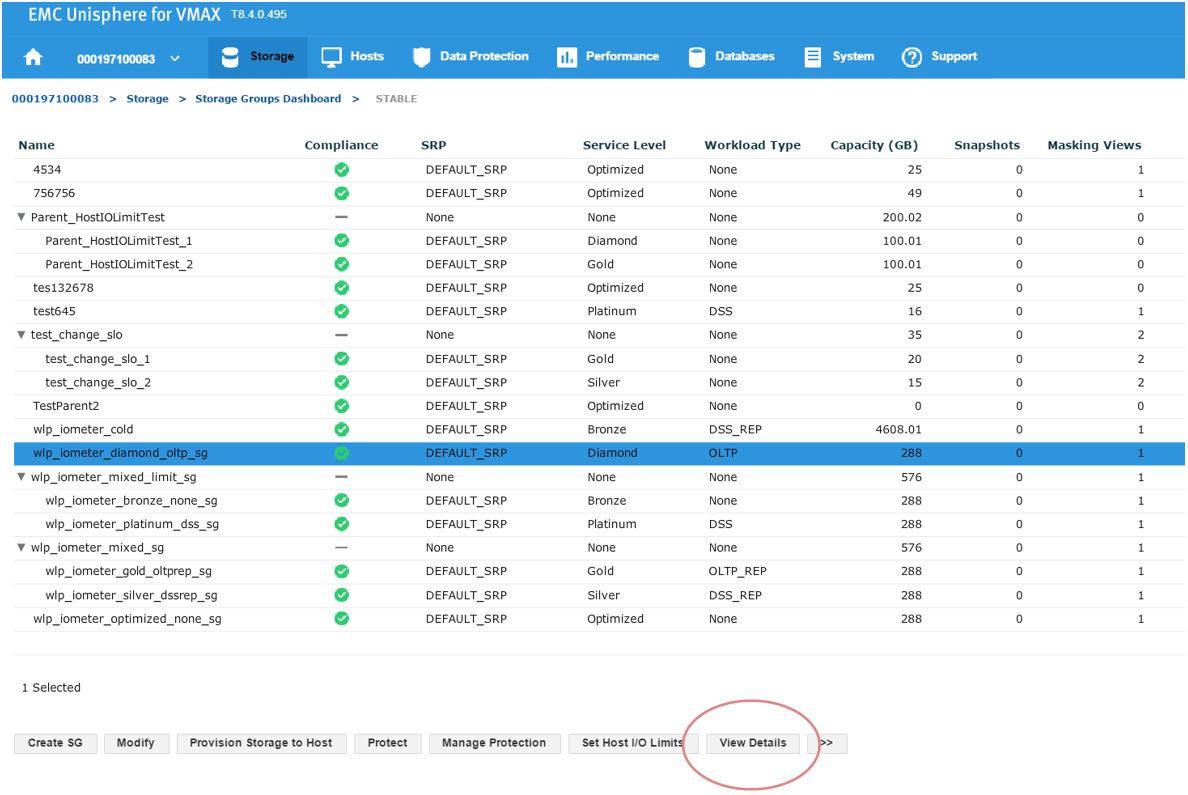
Figure 2. Storage groups drill down view
Here, we have a SG list for the array. In the second column, we see that our sg wlp_iometer_diamond is in a compliant SLO state. Let’s review this SG further by selecting this SG, and then clicking on View Details. This takes us to Details view where we can review the properties of the SG and check its performance on the right-hand side. Here, we want to select Compliance and select the storage tab.
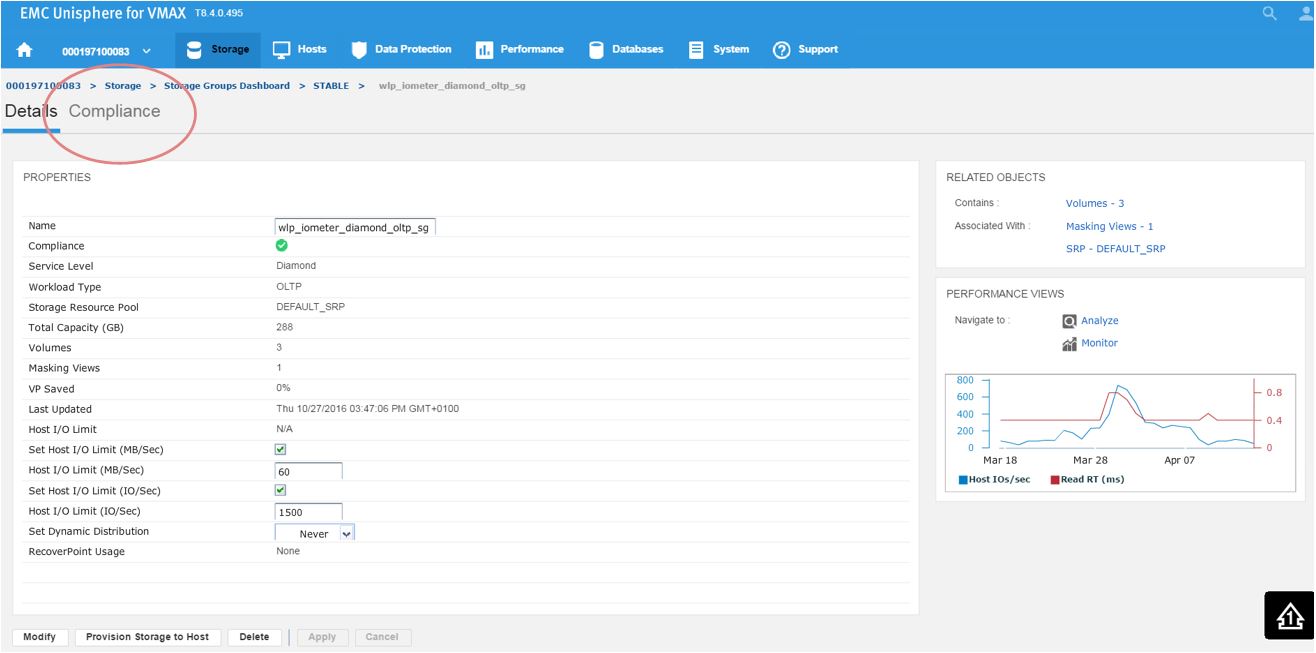
Figure 3. Storage group Details view
Here, we get greater detail on the current compliance state of the SG. We can see that it has a Diamond SLO which is stable. Currently, its capacity trend is flat, however we can also see how our response times over the windows of time. Additionally, we can review how the SG is performing compared to when it was first created.
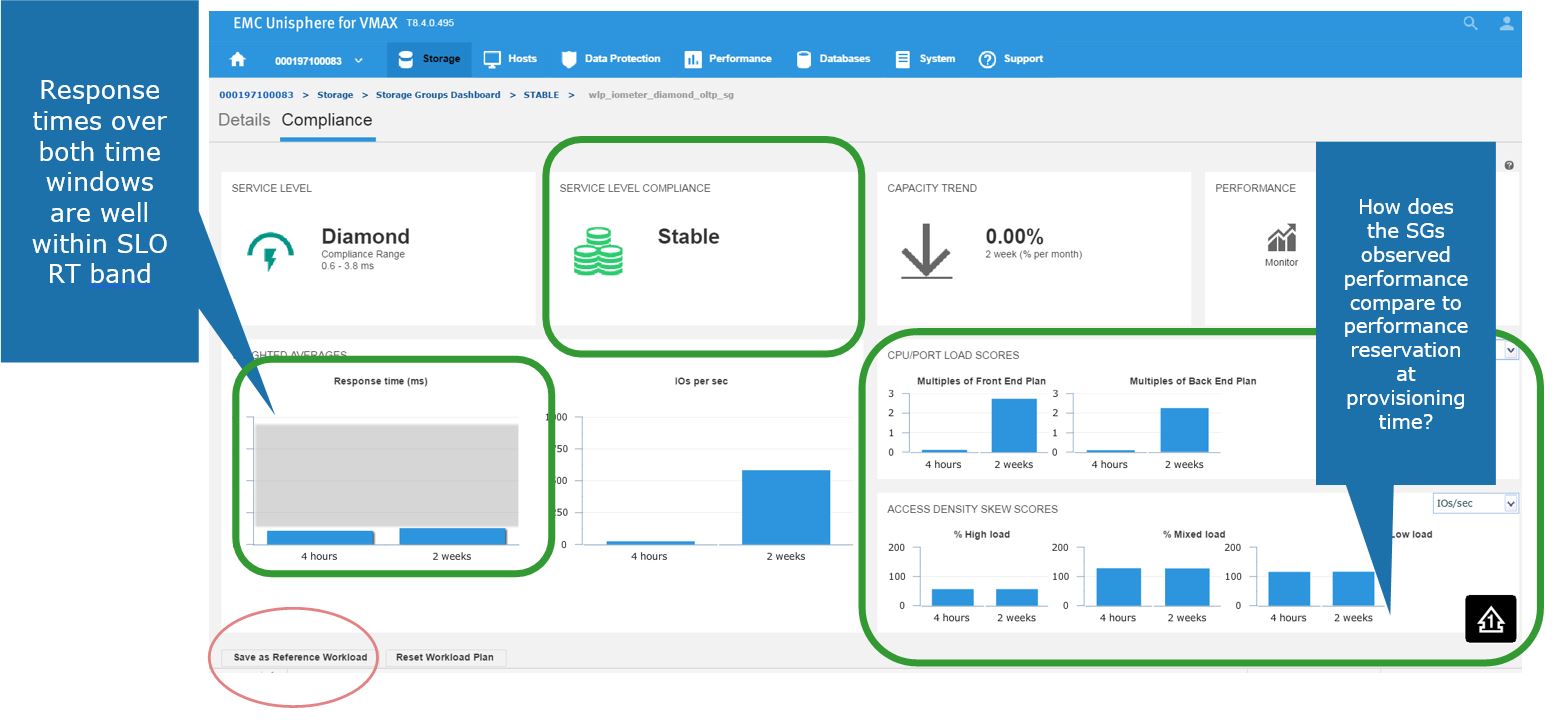
Figure 4. Storage group Compliance view
Saving a favorite reference workload
Here, we also have the ability to save this as a reference workload. For example, this SG is being used for an Oracle database, and we are happy with its performance and configuration since we rolled the application out into production.
Let’s leverage Unisphere to keep this workload for use in the future.
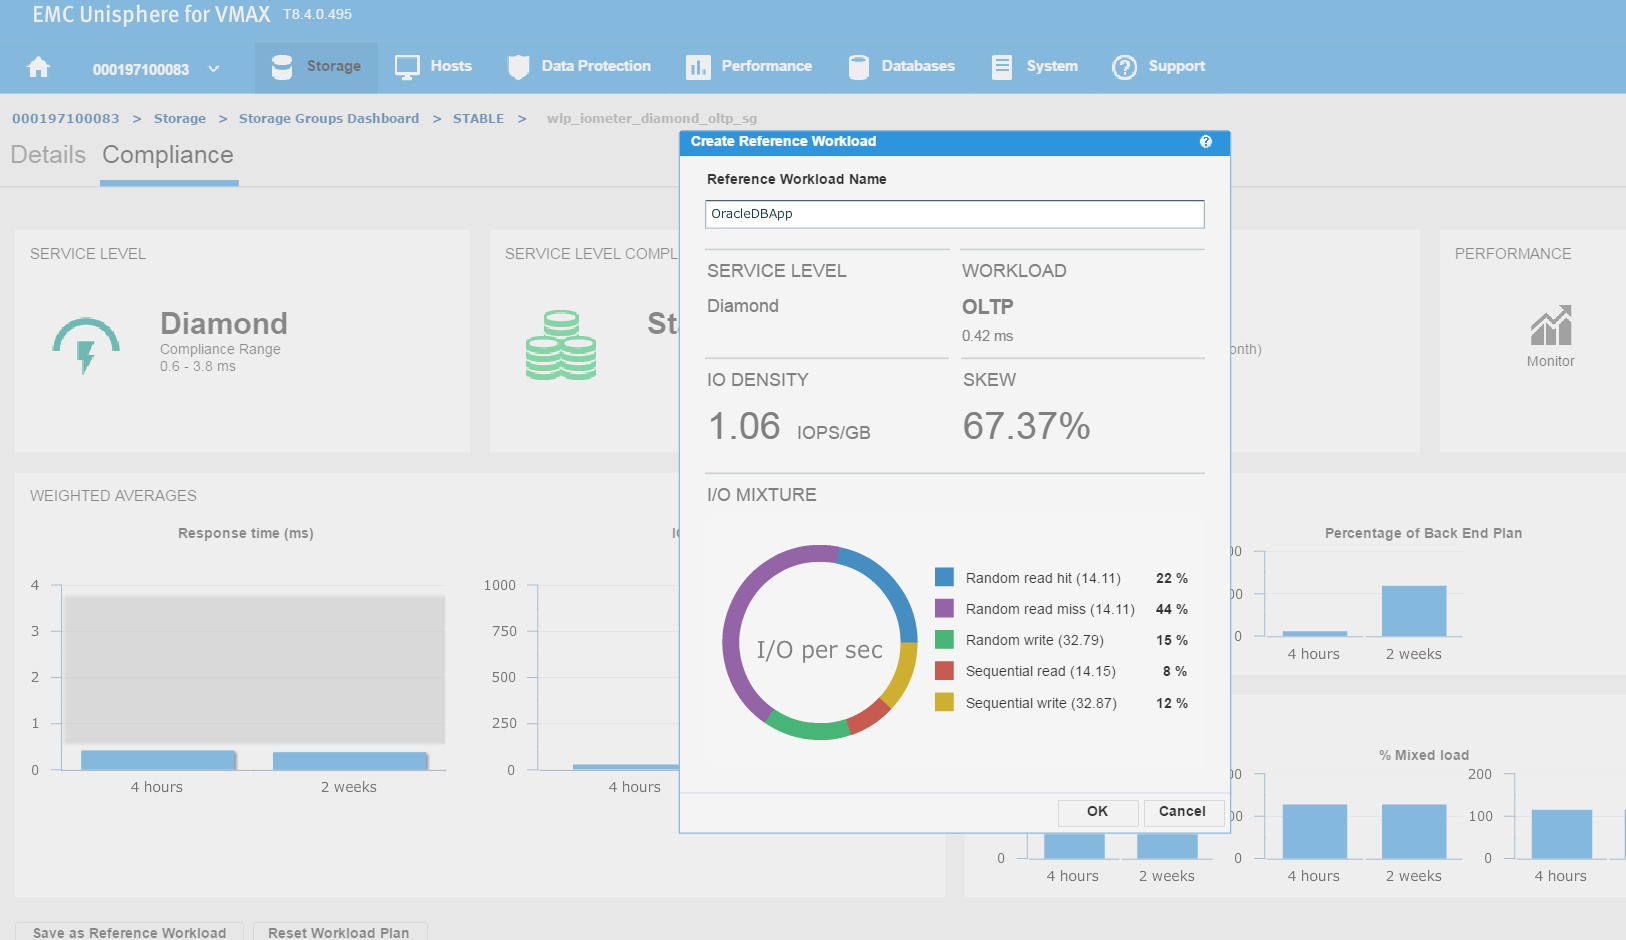
Figure 5. Create reference workload
We have named the workload OracleDBApp, so we can use this as a reference point when we roll out a similar Oracle Application with the breakdown of read and writes in terms of I/O.
Continuing along, let’s first verify that our workload type was saved correctly. To do this, go to Storage > Service Level, and select the Workload Types tab.
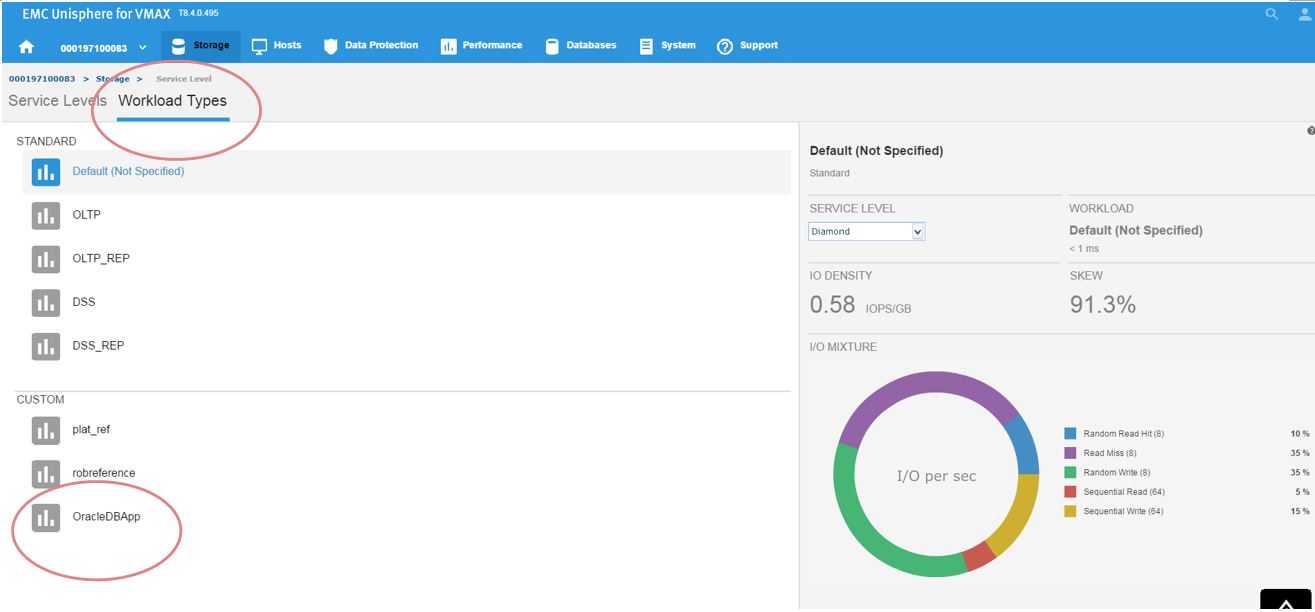
Figure 6. Save workload type
Now, we can see the reference workload we have customized in OracleDBApp. Since we are satisfied with the configuration of this application’s performance, we can leverage this workload type for use in the future when rolling out similar type applications.
Let’s see how we can use this in the provisioning wizard.
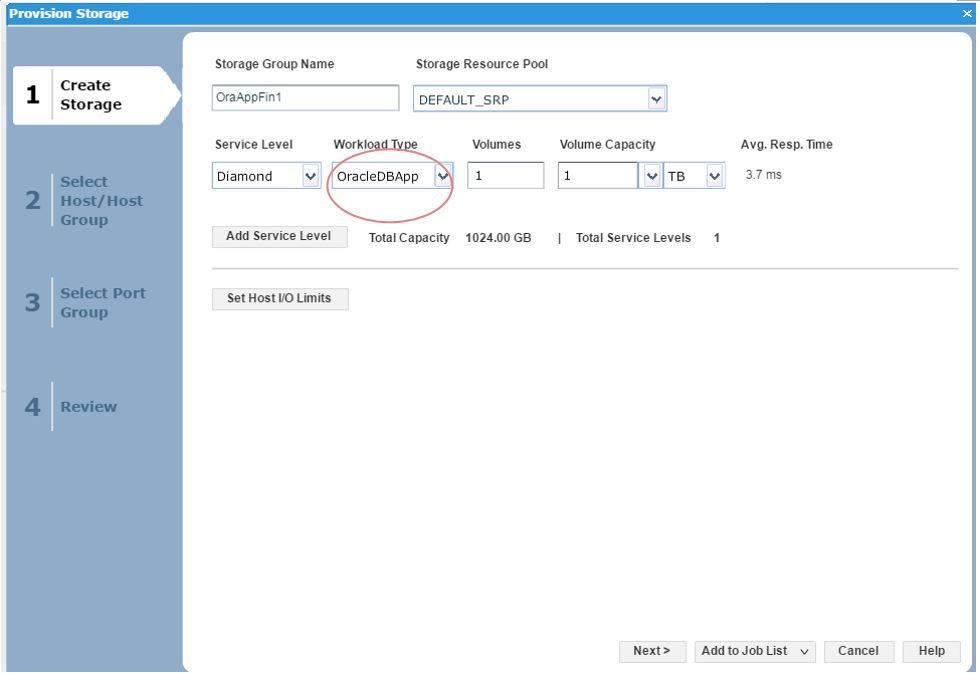
Figure 7. Create storage group view
Here, we can see that as we have received another request from our finance team for a new SG, so we decide to choose the workload type we had previously customized as a reference point and use this for the new SG.
Investigating an SG compliance issue with WLP
Let’s begin with a realistic scenario. One of our application teams contacted us over an issue with an SG, and they wanted us to investigate further to see if it has had any compliance issues in the recent past. Let’s begin with looking at the SG compliance report.
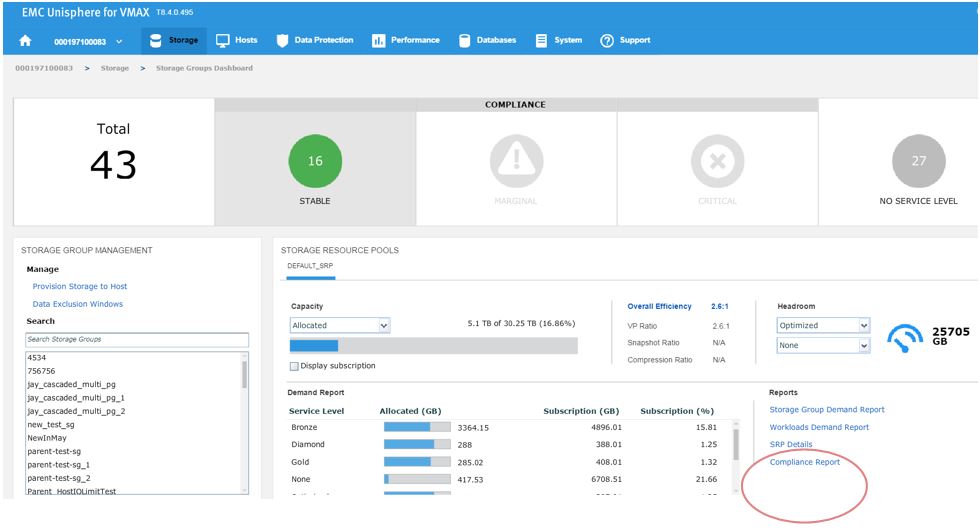
Figure 8. Storage group compliance view 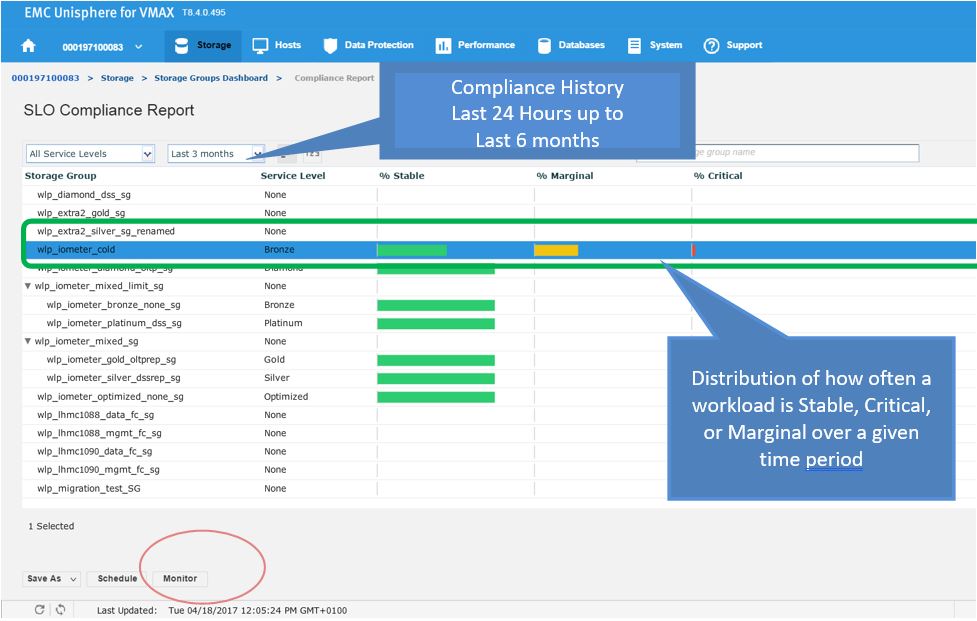
Figure 9. Storage group compliance issue
Here we see for the SG wlp_iometer_cold, we had a compliance issue in the last 3 months, with some being in a marginal state and some being in a critical state. If we select the SG, we have the option of saving the report off for reference or to potentially show to the application owner. We can also select Monitor, which will launch us directly into the Performance section of Unisphere shown in the following figure where we can check specific metrics.
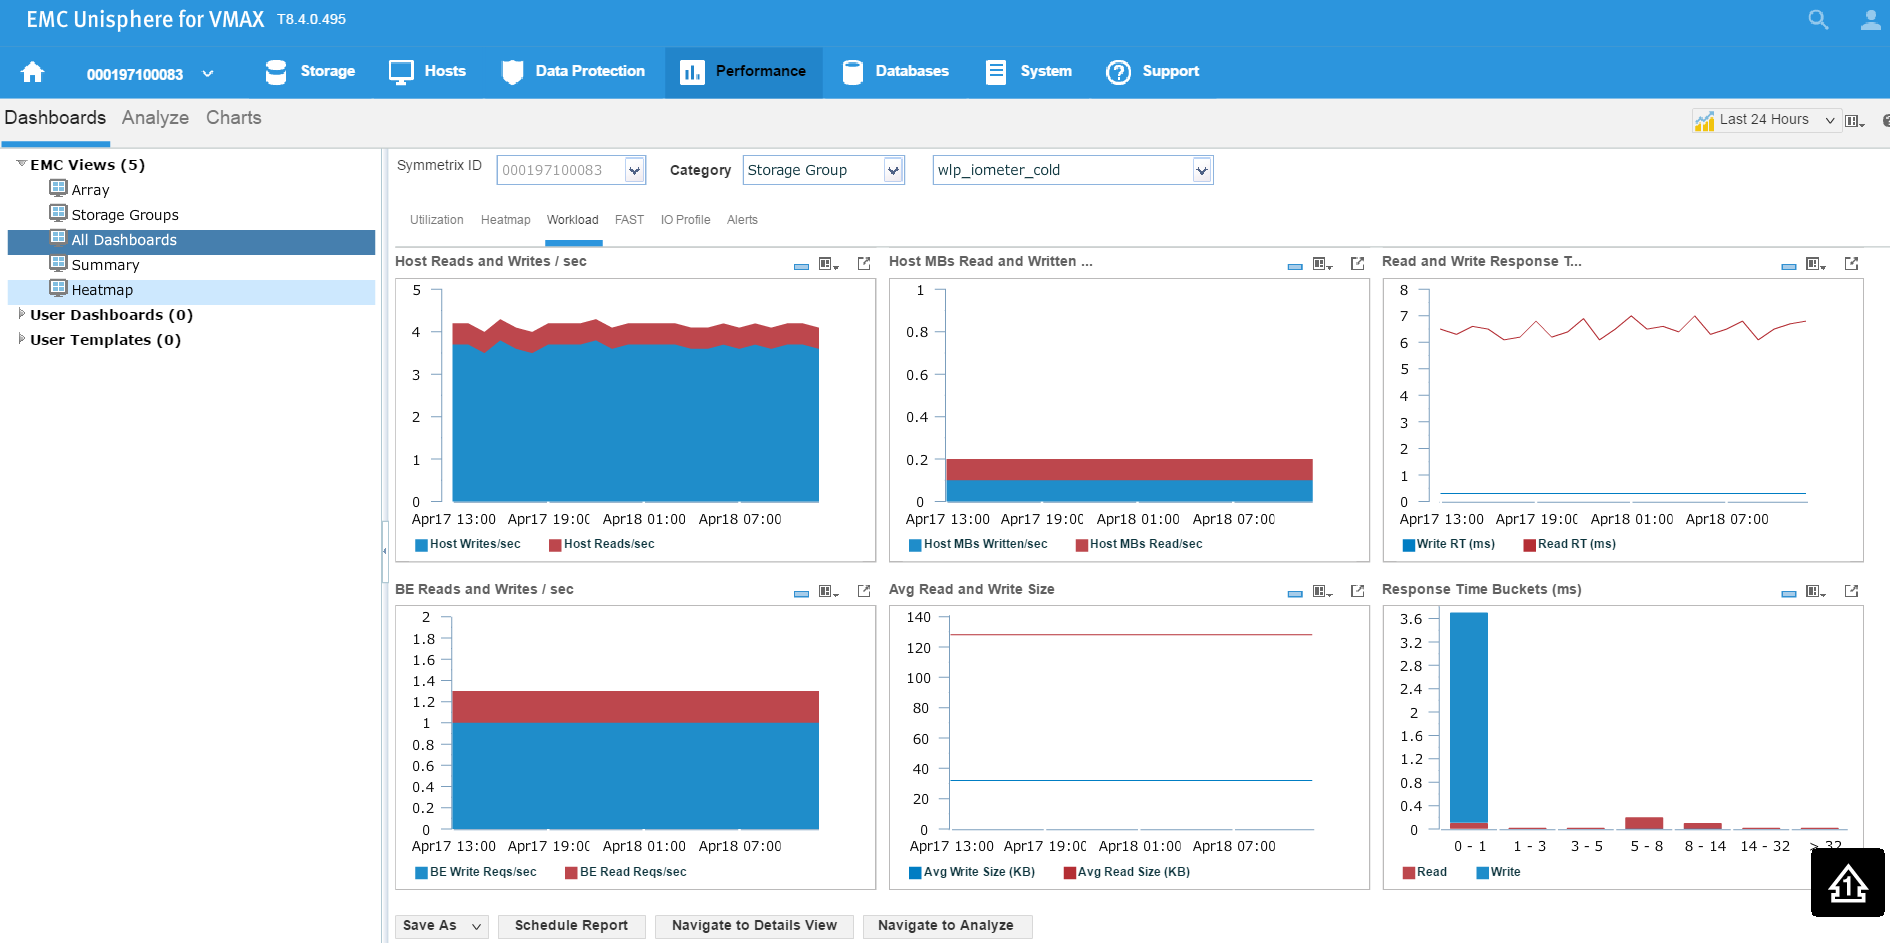
Figure 10. Storage group performance view
Examining headroom for Service Level and Workload Type combinations
In this section, I will be covering how to examine the available headroom for various Service Level and Workload Type combinations. Also, I will show you how to run a suitability check while provisioning more storage to an existing storage group.
The headroom available shows the space available for a certain combination of service level and workload type if all the remaining capacity was on that type. Here, I wanted to show you two examples for different service levels to showcase the calculation change.
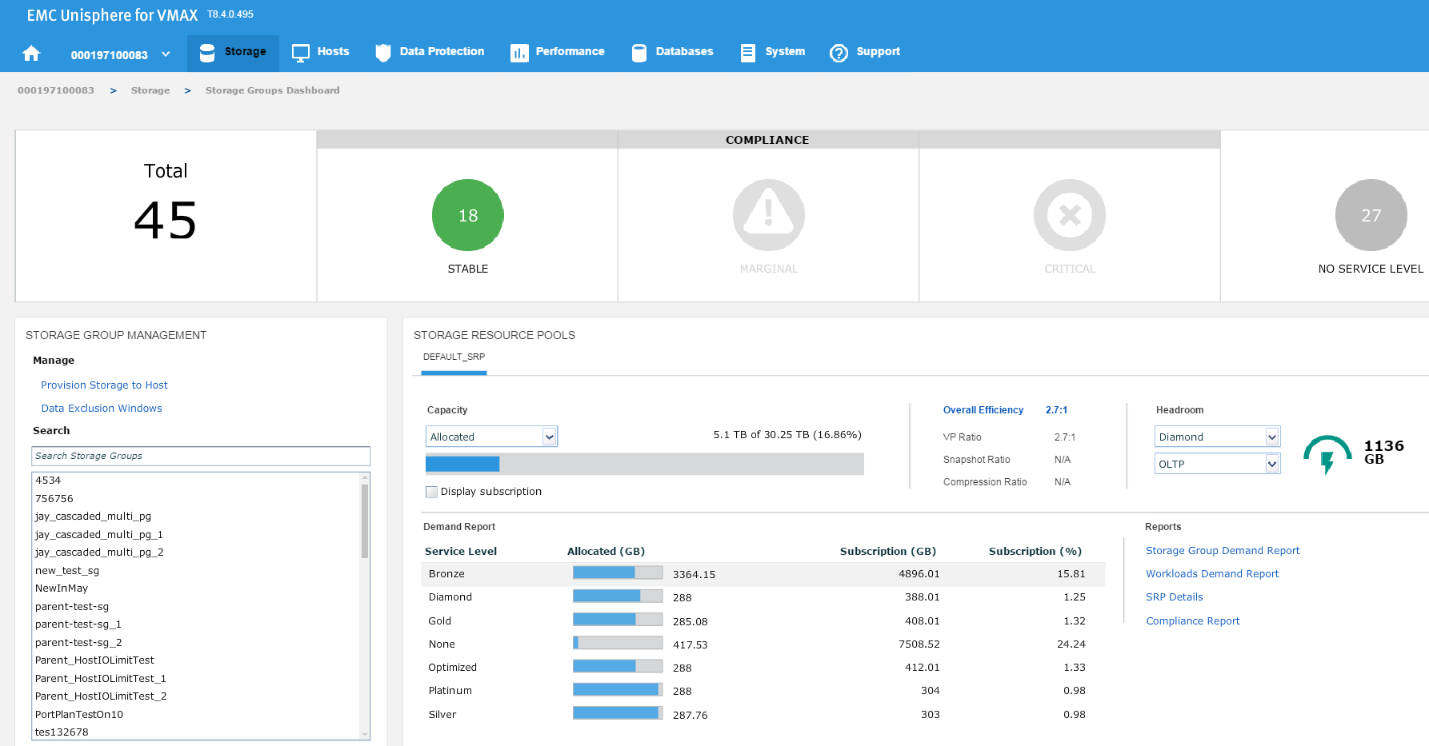
Figure 11. Storage group compliance view
In this example, we have chosen a Diamond SLO and an OLTP workload, which allows us free space of 1136 GB with that combination for that array. Let’s change the parameters, and see what happens.
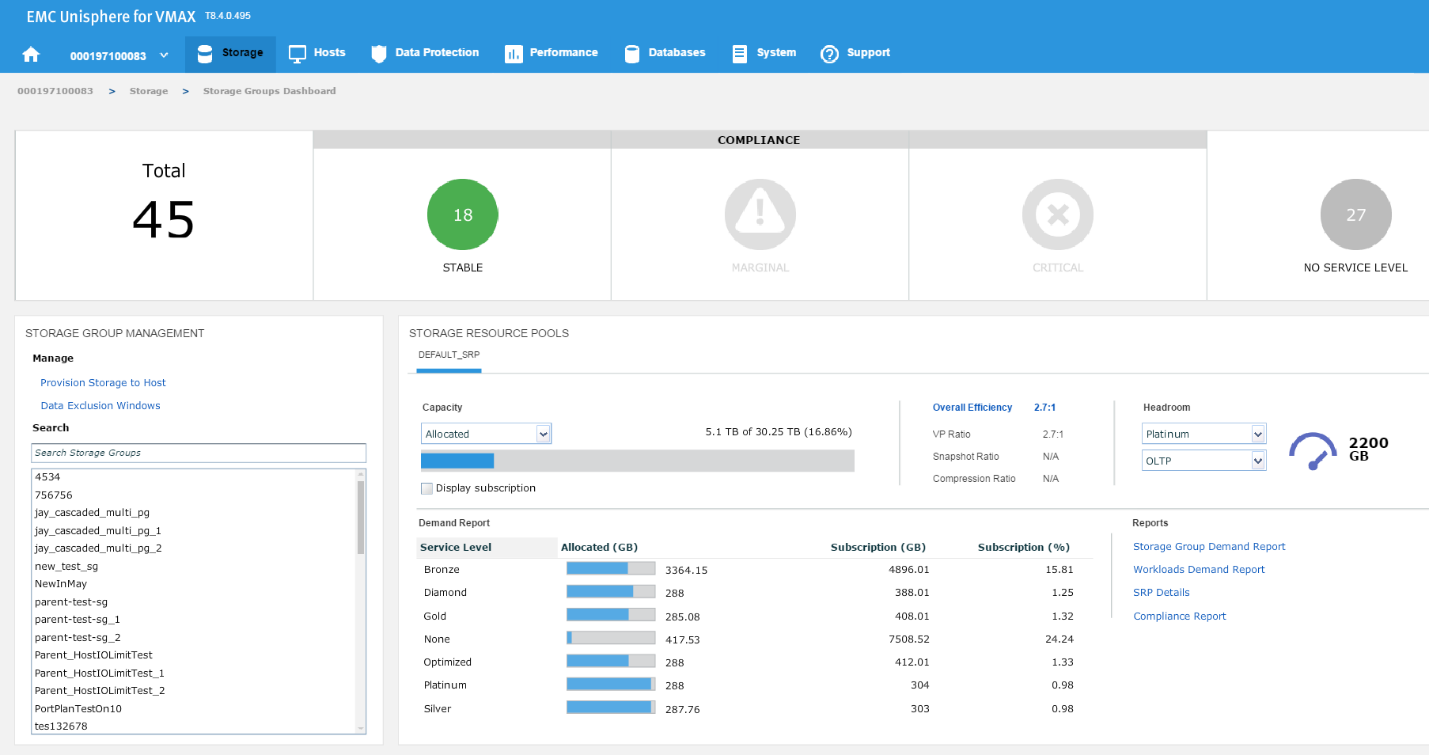
Figure 12. Storage group resource pools view
Now, we have 2200 GB of space available at a platinum level, which is almost double the capacity we had at Diamond level. These can be useful indicators of when we have an array that is nearing capacity as we can gauge which of our most important applications can go on to which SLO so we can maximize the efficiency of our storage.
Expanding the capacity of an existing SG
Now, let’s examine how we can expand the capacity of an existing SG while checking its suitability through the provisioning wizard. Let’s start at the SG list view in the storage group dashboard. We select our SG and then click on View Details.
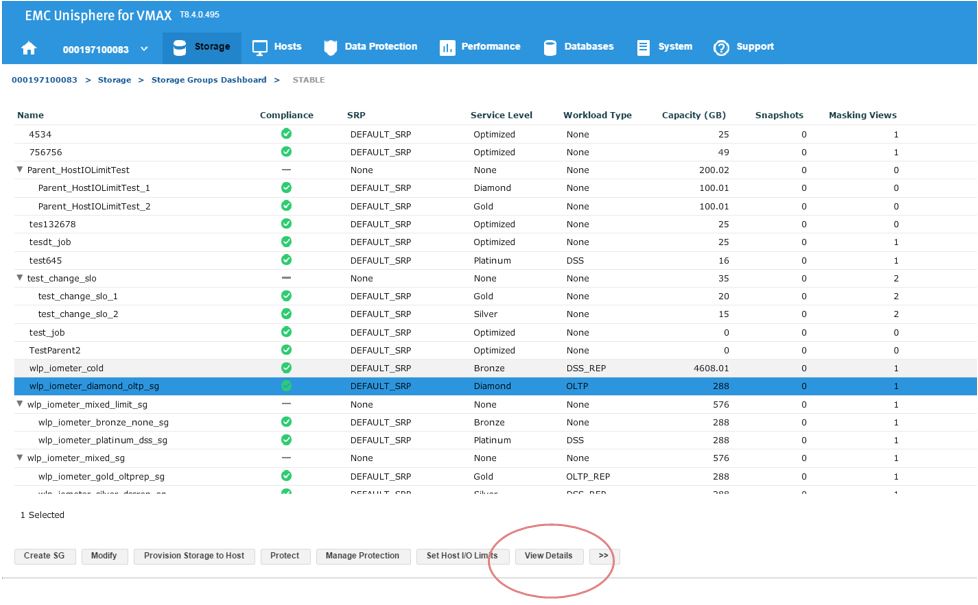
Figure 13. Storage group dashboard view
This will take us to the Details view of the wlp_iometer_diamond SG, which is the SG we want to expand. We then select Modify to start the process.
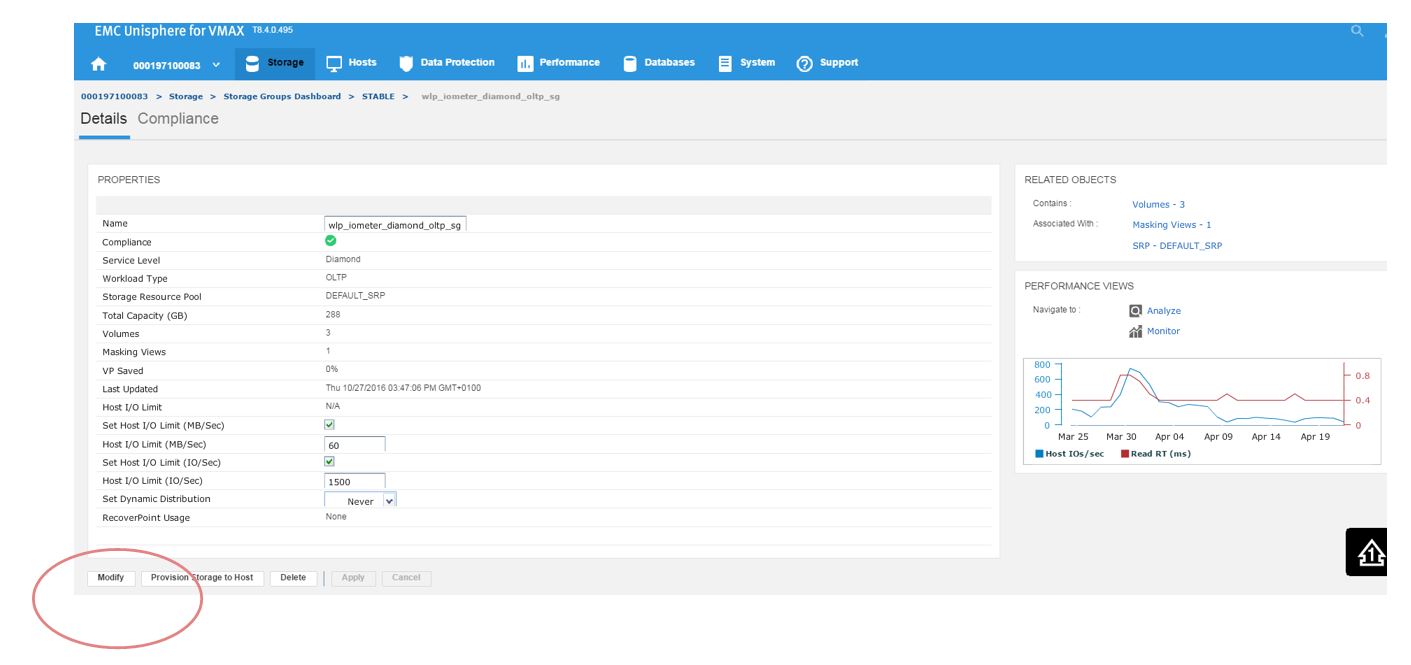
Figure 14. Storage group properties view
This launches the Modify Storage Group wizard shown in the following figure. We have received a request from the application owner that they need additional storage, however we wanted to be sure prior to allocation that they will not breach their SLO compliance nor experience any performance problems.
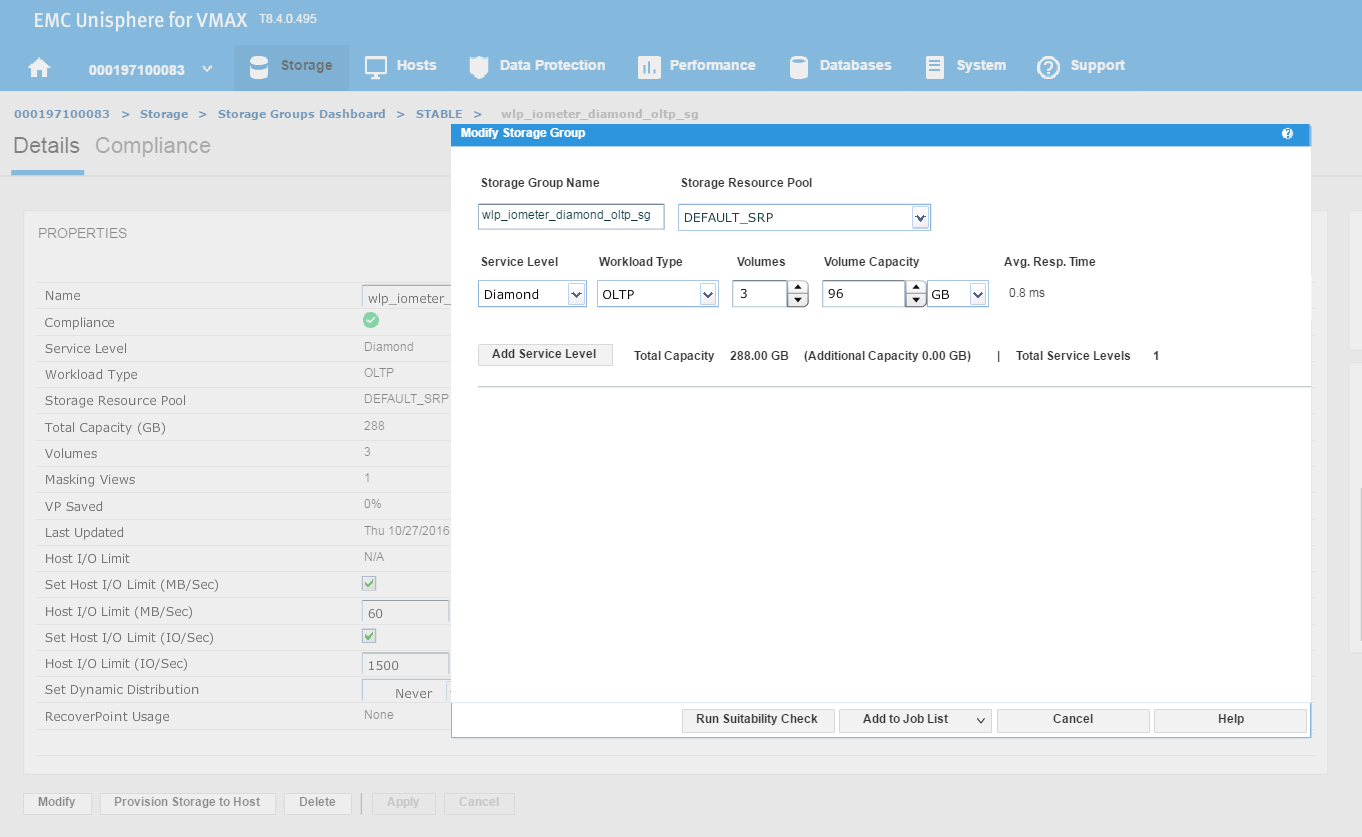
Figure 15. Modify storage group view
We have agreed with the application owners to grant them an additional 96 GB of storage, which will expand their capacity by roughly 25%. This allows us to increase the number of volumes by 1, and then select Run Suitability Check to verify this change won’t affect the performance of the SG adversely.
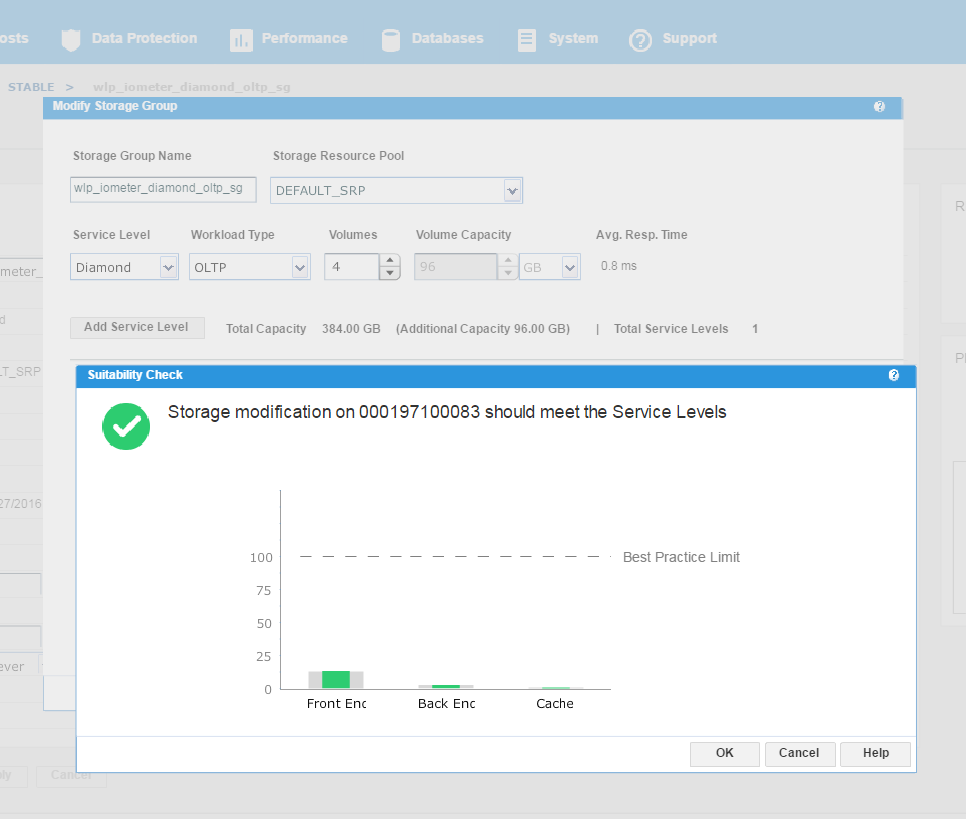
Figure 16. Storage group service levels view
We can see that the check has completed successfully and that increasing the capacity of the SG will not have any adverse effects on its performance. This promotes good housekeeping in terms of the storage array as we prevent poor configurations from being rolled out. At this stage, we can select Run Now and add to the job list to run later.
Data Exclusion Windows
In this section, I will be covering how to manage Data Exclusion Windows. This procedure explains how to manage Data Exclusion windows for calculating headroom and suitability.
Peaks in storage system statistics can occur due to:
- Anomalies or unusual events
- Recurring maintenance during off-hours that fully loads the storage system
Due to the way this data is condensed and used, unexpected headroom and suitability results can occur. There are two ways to improve the handling of these cases:
- One-time exclusion period – When the one-time exclusion period value is set, all statistics before this time are ignored. This helps resolve anomalies or unusual events where a significant one-time peak distorts the results due to reliance on two weeks of data points. This is set system wide for all components.
- Recurring exclusion period – You can select n of 42 buckets to use in admissibility checks. This is set system wide for all components. Recurring exclusion periods are repeating periods of selected weekday or time slot combinations where collected data is ignored for the purpose of compliance and admissibility considerations. The data is still collected and reported, but it is not used in those calculations.
Let’s begin at our usual starting point, the storage group dashboard, by selecting the Data Exclusion Window.
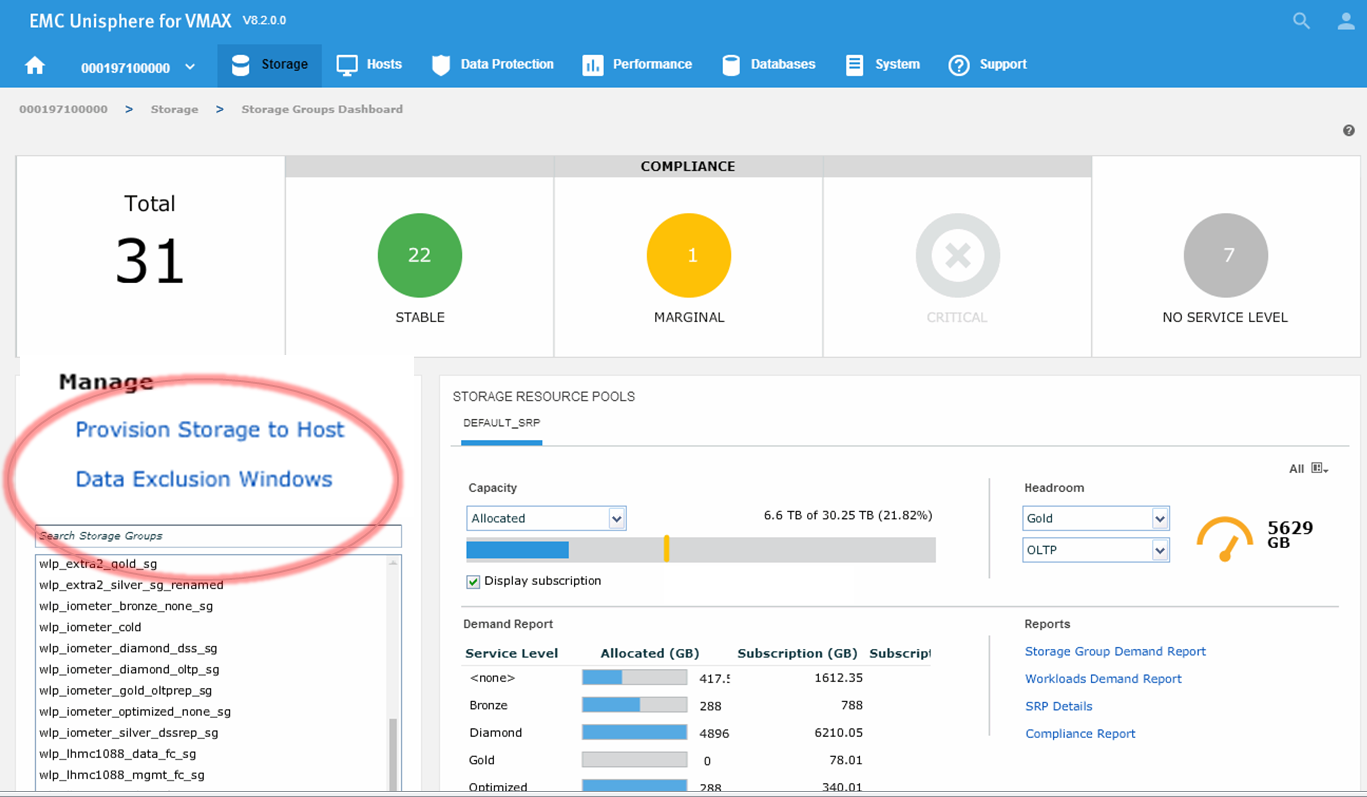
Figure 17. Data Exclusion Windows
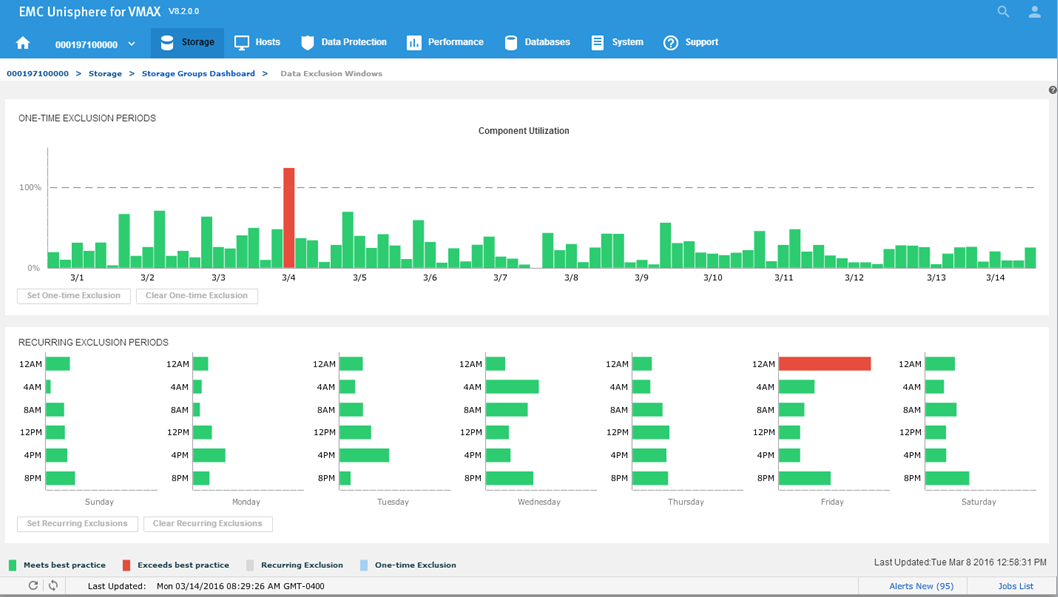
Figure 18. Data Exclusion Windows
All the component utilizations for the prior two-week period are compared, and the greatest (with respect to its individual best-practice limit) is displayed across the top of this display. Each weekly time period, represented by two bars in the top display, is also displayed across the bottom.
Now we will set a one-time exclusion window. When you click on the tallest bar in the top display, all history up to that time is shaded. You can then select Set One-time Exclusion so the bottom display panel is recalculated excluding that time frame.
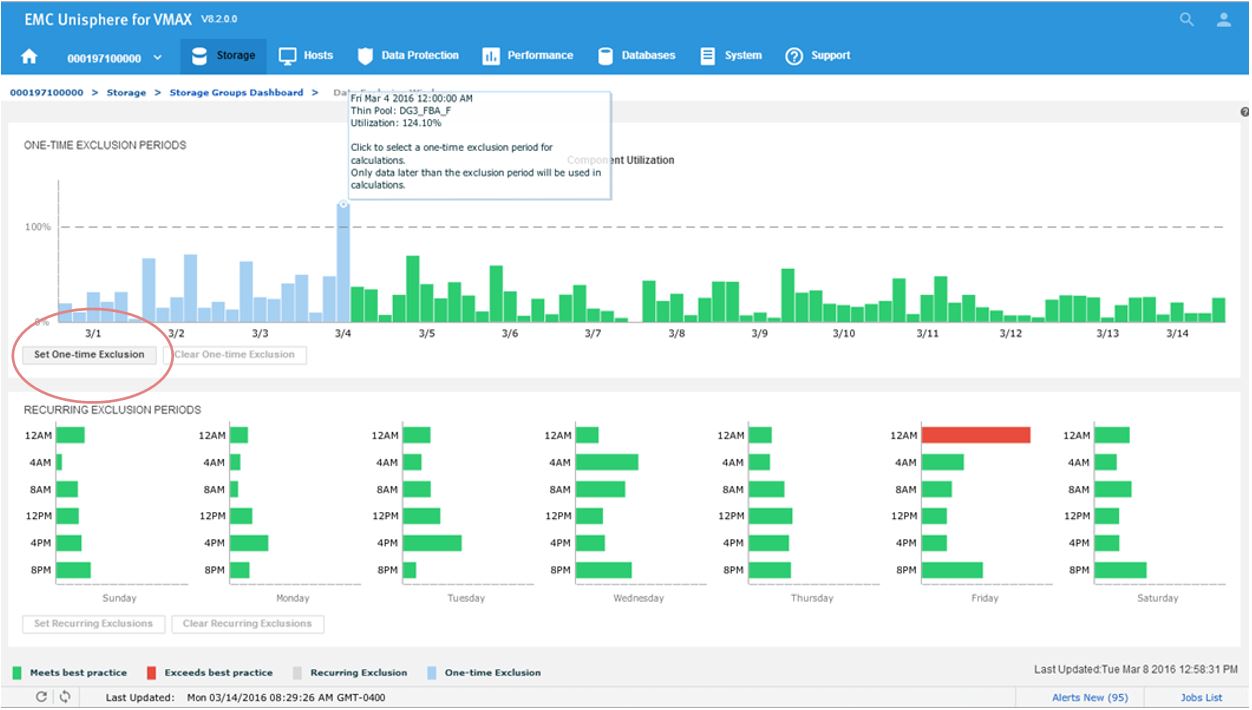
Figure 19. Data Exclusion time window view
After setting the exclusion, you can now see that at 12 a.m, we are green in the bottom panel as we have chosen to ignore that specific timeframe in our calculations.
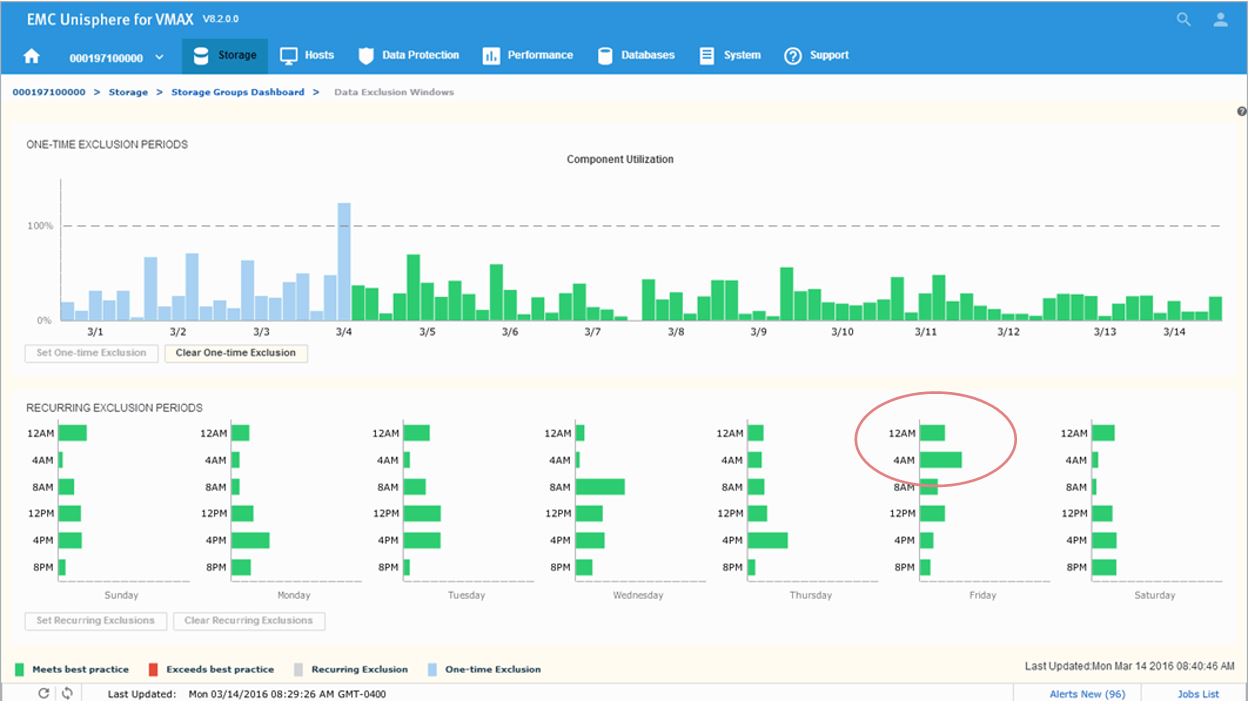
Figure 20. Data Exclusion Windows time view
Next, we will look to set a recurring Exclusion window:
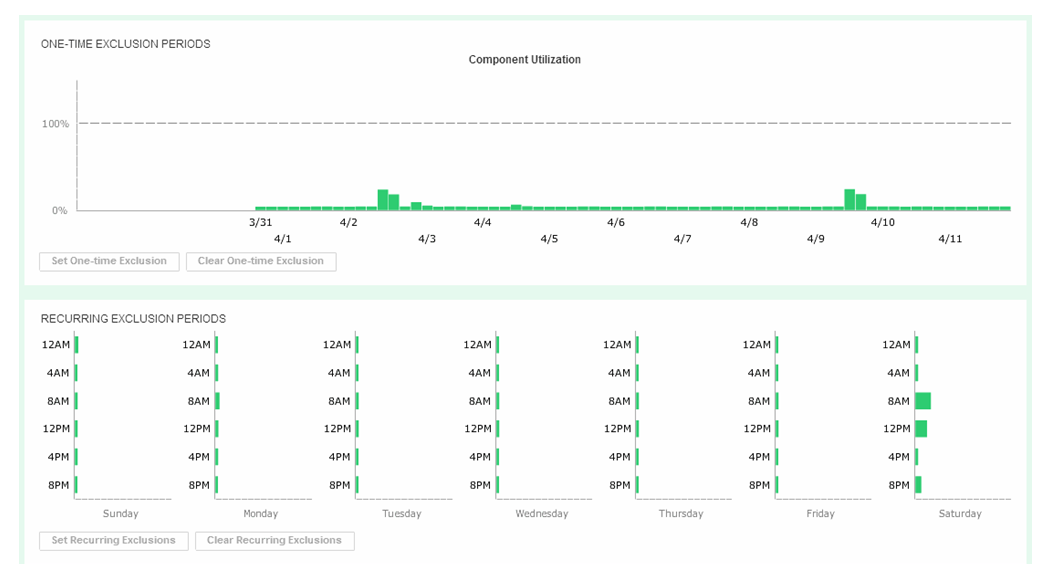
Figure 21. Set recurring Data Exclusion Window
If you click on the bars in the bottom display, their state will toggle, shading themselves and the two corresponding bars in the top display to set any weekly period to be excluded from all suitability and headroom calculations from there on for the future.
FAST Array Advisor
In this section, I will be covering how to leverage FAST Array Advisor to see if you could move workloads between arrays. The FAST Array Advisor wizard determines the performance impact of migrating the workload from one storage system (source) to another storage system (target). If the wizard determines that the target storage system can absorb the added workload, it automatically creates all the necessary auto provisioning groups to duplicate the source workload on the target system.
Let’s pick a suitable SG PF_NDM_2_SG and select the More Options button.
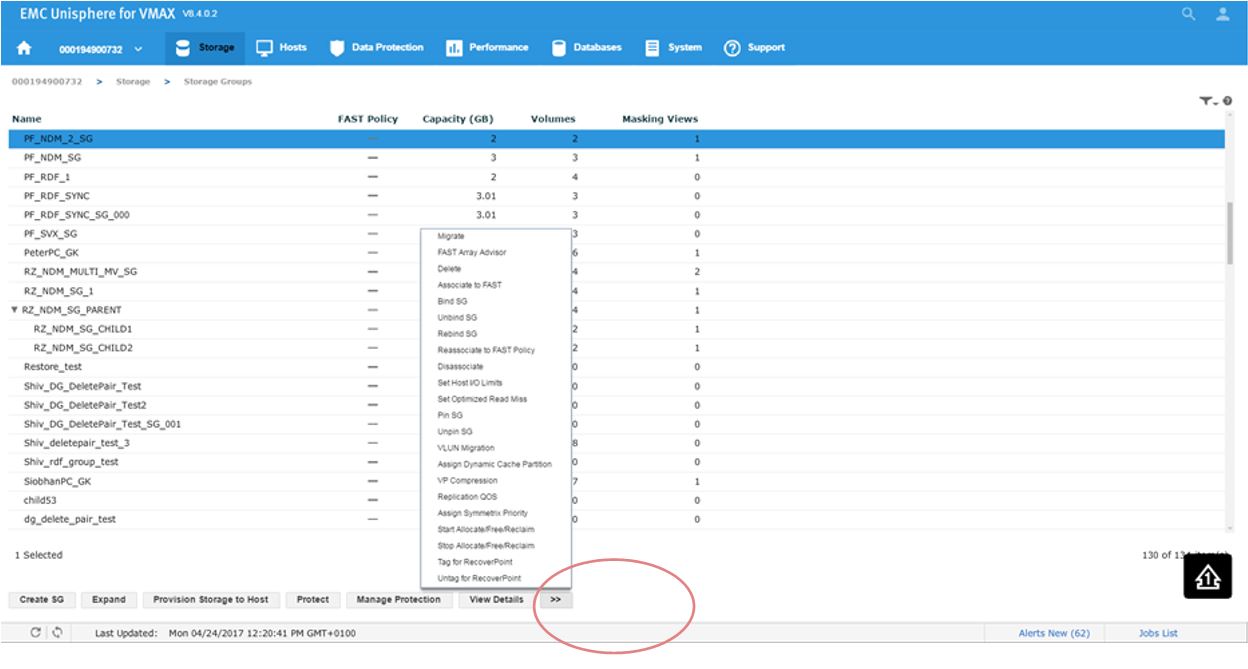
Figure 22. Storage group selection view
This will present us with a series of options. Second from the top, we see FAST Array Advisor, so we select that.
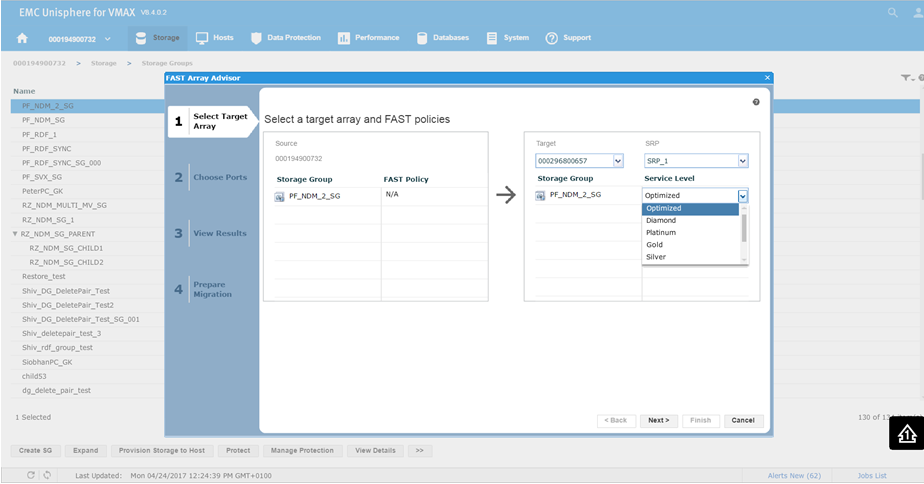
Figure 23. Select target array view
This will bring us the wizard where we select the source and target array. In this example, 0732 is a V1 running 76 code, and we want to look at the possibility of moving it to 0657 which is a V3 running 77 codes. This is viewed in terms of a migration of the SG off the older source array and on the newer target array. You can see that on a V1, we did not have service levels, however we can set them on our V3 array. For this example, we choose a Silver SLO and click Next.
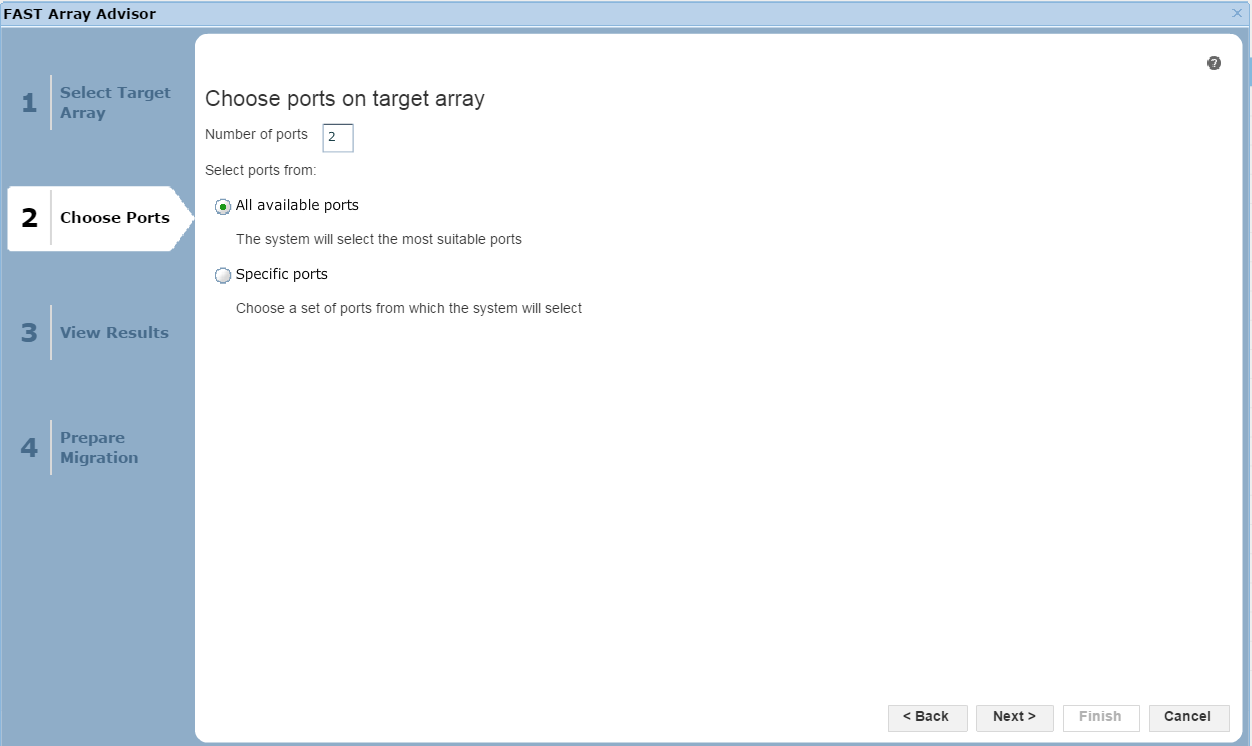
Figure 24. Port selection view
In this section of the wizard, we have the option of allowing Unisphere to choose the most suitable ports based on how busy they are, or we can select specific ports if we like. Click Next to view the results.

Figure 25. Suitability analysis view
Here, we see the results of the potential migration. The front end, the cache utilization, and the RDF impact all look fine. That said, in the back end, we would exceed our Best Practice Limit, so we may suffer from contention and performance issues as a result. It would be up to the individual customer to proceed in these circumstances, however we would recommend adhering to best practices. In this case, let’s select Next to view the final screen of the wizard.
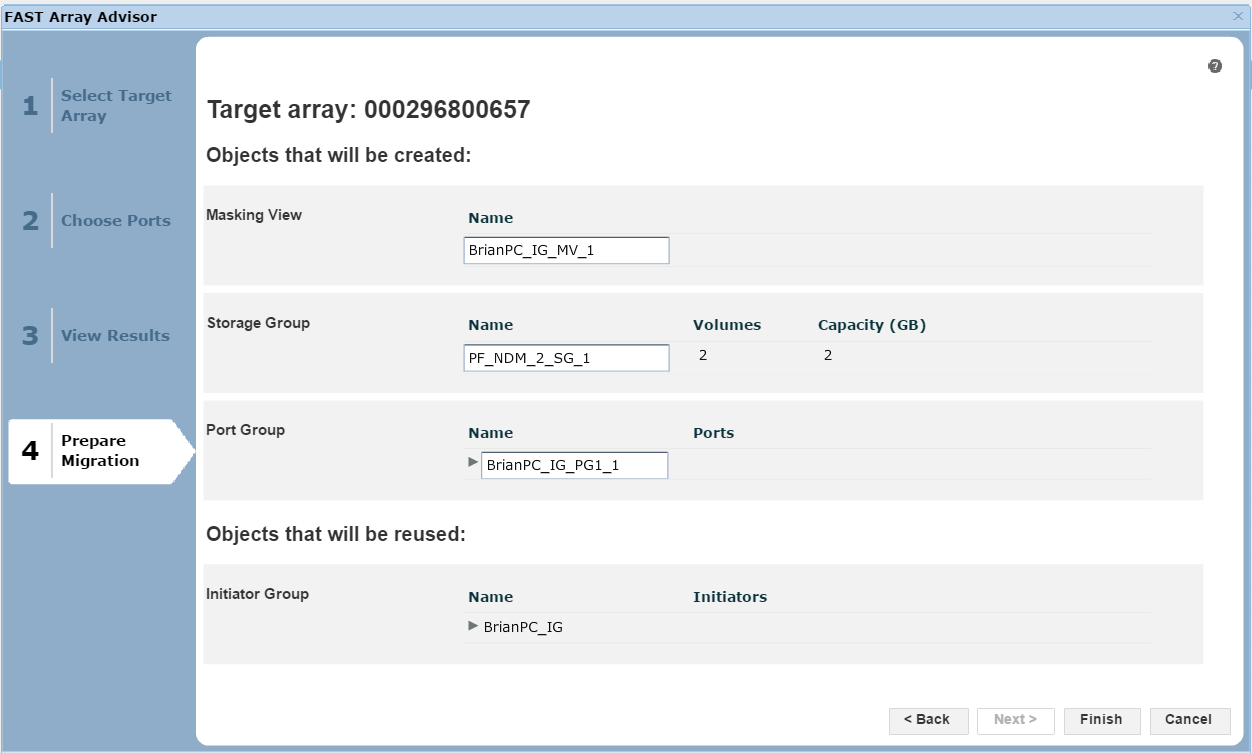
Figure 26. Prepare migration view
Here, we are presented with a summary of the migration if we were to go ahead, listing what objects, such as the masking views, storage groups and port groups, would be created on the target array 0657. At this point, we can click Finish to begin the migration.
Author: Finbarr O’Riordan, ISG Technical Program Manager for Transformation

Elevate your operations: Mastering PowerMax Enhanced API Calls for Peak Efficiency

Wed, 22 Nov 2023 21:06:50 -0000
|Read Time: 0 minutes
Elevate your Operations: Mastering PowerMax Enhanced API Calls for Peak Efficiency
In today's fast-paced digital landscape, businesses rely heavily on APIs (Application Programming Interfaces) to manage and provision their IT environments which includes storage. While APIs are powerful tools, inefficient use can lead to increased server load on management appliances and unsatisfactory user experiences.
With PowerMax APIs new enhanced API calls, developers can: optimize workflows, reduce server load, and boost efficiency by reducing the amount of code needed to maintain and gather information about storage systems.
This article explores the New Enhanced API calls available with Unisphere for PowerMax 10.1 and best practices for working with these calls to create: seamless, responsive, and efficient applications using the PowerMax REST APIs.
In my previous post what’s new in the PowerMax API version 10.1, I summarise these enhancements at a high level. In this post, I will dive deeper into how to use these calls efficiently and provide inspiration where they can replace traditional API calls reducing the amount of code which needs to be maintained and getting the most out of your API calls.
Common challenges driving the need for enhanced API calls
One challenge is gathering detailed data on a large set of array objects with the existing API. It often requires multiple API calls. PowerMax Arrays support tens of thousands of devices and thousands of other objects like storage groups and snapshots. Another challenge is that large data mining often drives a high number of API calls and with multiple Arrays managed by a single server, the number of calls increases further. Taming this scale issue has always been a challenge and this created a need for batching and finding a different way of getting the data collections from the API.
With the newly enhanced API calls, developers can access a deeper level of data in bulk and select subsets or supersets of information filtered to their exact requirements.
With this release, we have introduced enhanced API calls for Performance and Data Collection for Storage Groups and Volumes. These improvements are designed to increase the overall performance of the API when used with the new calls and simplify the developer experience.
Versioning on Enhanced API calls.
The enhanced endpoints use a new URL. The base URL for traditional PowerMax API endpoints is:
https://unipowermax_ip:port/univmax/restapi/{version}
The new enhanced endpoints use:
https://unipowermax_ip:port/univmax/rest/v1
The key difference here is subtle but powerful from a developer perspective. The calls are versioned by attributes accessible. When new APIs become available or new attributes on existing API calls, the developer needs can simply select them via query path on the URL when the management server is at a version that supports them. More on this later.`
Authentication is still the same, API calls use basic authentication, so username and password required.
With that, there are 4 new API calls in the new format.
GET /systems/{id}/performance-categories
GET /systems/{id}/performance-categories/{id}
GET /systems/{id}/volumes
GET /systems/{id}/storage-groups
Enhanced Performance API calls and Usage
The performance related calls are GET calls as opposed to POST calls on the legacy performance calls and require little input from the developer.
Note: these calls work for all arrays supported by Unipshere not just the latest and greatest, but you do need Unisphere 10.1 minimum to take advantage.
https://ipaddress:8443/univmax/rest/v1/systems/{id}/performance-categories (GET)
Returns supported Performance Categories and Valid metrics based on an array model of supplied id/serial number.
https://ipaddress:8443/univmax/rest/v1/systems/{id}/performance-categories/{category} (GET)
Returns latest available diagnostic data for the specified performance category for all Key Performance Indicator Metrics (KPI)
With these enhanced performance calls there are no additional lookup calls needed to find out what components need to be queried, no keys to enter and no timestamps to generate. These reduce the number of calls being made to the system reducing overall load on the management servers and providing information with minimal effort for developers.
Below is an example requesting metrics for Front End Ports, note the call returns metrics for each port ID on the system without having to build any payload.
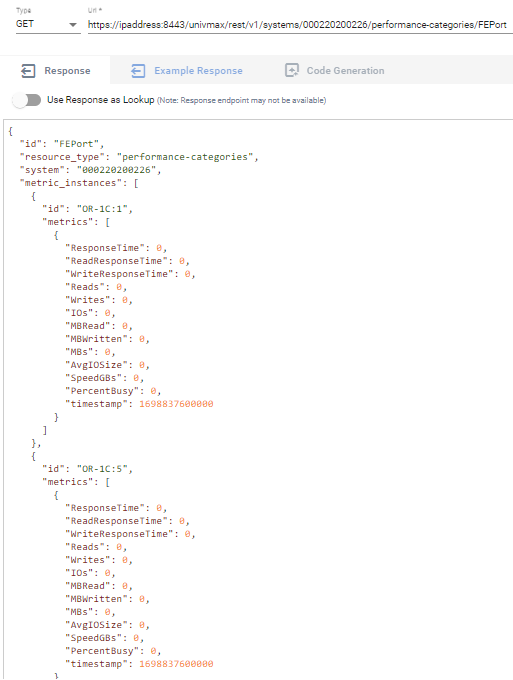
The new enhanced performance calls are ideal for customers building dashboards or exporting to time series databases (for use with tools like Grafana or Splunk as well as general use).
Storage Groups and Volumes Enhanced calls
For customers wishing to gather configuration information there are 2 new enhanced calls to help with this. By default, only the id of queried objects are returned for all objects on the system, however using select and filter options, the responses can be customized to return exactly the information they need in a single API call. With a single call you can get information on all storage groups or volumes on the array along with the specified attributes selected, and optionally filtered to your choice criteria.
https://ipaddress:8443/univmax/rest/v1/systems/{id}/storage-groups (GET)
https://ipaddress:8443/univmax/rest/v1/systems/{id}/volumes (GET)
In the following section I’ll dive into options for selecting and filtering to achieve great things with minimal effort.
Optimizing Data Filtering and Selection for Storage Groups and Volumes
To retrieve large amounts of data on all managed objects on an array with the traditional API calls requires multiple API calls for each object to get detailed level of information. When running against multiple arrays the number of calls increases with the number of managed objects being queried. With the new API calls the select and filter operations enable developers to get the same level or greater of information with just a couple of API calls.
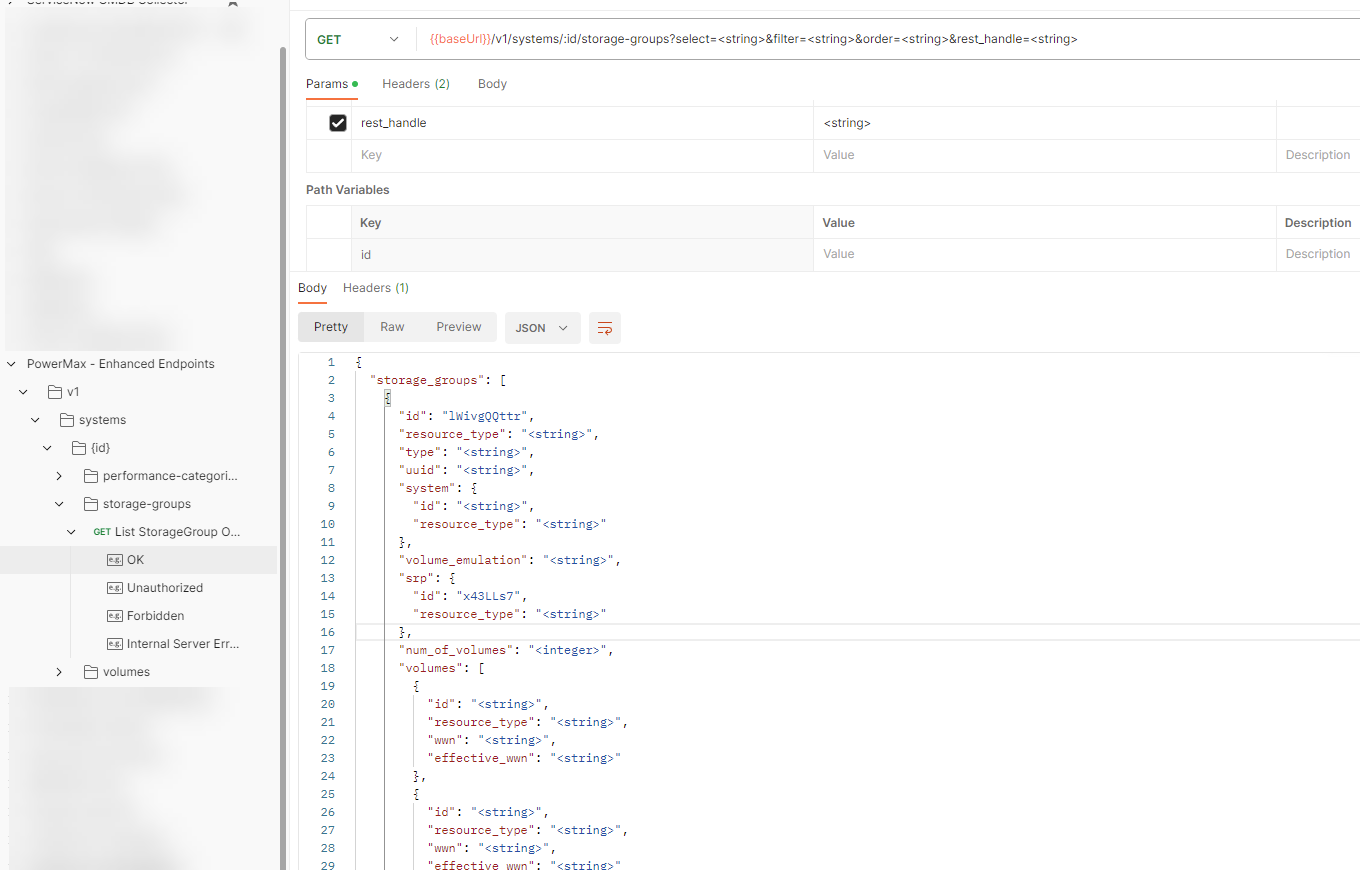
By default, running the GET call for storage-groups will return only the ID of every storage group on the array, this is to minimize the overhead the call will generate. The ID is the identifying object name for every attribute in these new API calls. The Object itself has a lot more optional attributes that are selectable and filterable to customize the return. The optional attributes for filtering and selection are documented in the developer docs here. The documentation is also available as OpenApi.json for easier and programmatic review.
The image below shows a snippet of the list of potential return parameters for the storage-groups get call as seen from the imported JSON in PostMan. The full list of attributes is too large to fit in a screenshot.
Let’s take an example call to build a return payload
- gathers data on all storage groups on a PowerMax array
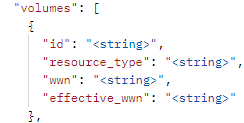
- Select details on storage group capacity, the volume ids contained in the storage group with their effective_wwn
- Restrict the call to only return data only on storage groups with more than one snapshot
- Provide details on each snapshot including expiry data, link status and if it’s a secure snapshot.
To achieve this simply enter: append ?select= to the end of the URL for the API call followed by a comma separated list of attributes.
From the example, return in POSTMAN we can identify the following parameters will give the information
num_of_volumes, cap_gb, num_of_masking_views, masking_views.id, volumes.id, volumes.effective_wwn, volumes.resource_type, snapshots.id, snapshots.name, snapshots.timestamp_ms, snapshots.linked, snapshots.secured, snapshots.expired
Note: some of the attributes are noted with dot notation, this is necessary to select nested attributes so you will need to pay attention to this.
I generally recommend reviewing the JSON output in the examples, it’s easier to decipher for me than reading the tabular online documentation as the indentation makes it easier to identify sub attributes for the dot notation.
If I want to restrict the query only to storage groups that have at least one snapshot, I filter only storage groups with snapshots. To avoid unnecessary returned data,I can append a filter to the URL for the GET call &filter=num_of_snapshots gt 0.
You can also combine multiple filters, adding as many as you need on the URL for any attribute or sub attribute separated by comma. When specifying multiple filters, they are applied in an AND fashion.
Full details on all the operators for filters are documentation here.
After applying the attribute selection criteria and the filters of the API call, the URL look like the following:
https://ipaddress:8443/univmax/rest/v1/systems/000220200226/storage-groups?select=num_of_volumes,cap_gb,num_of_masking_views,masking_views.id,volumes.id,volumes.effective_wwn,volumes.resource_type,snapshots.id,snapshots.name,snapshots.timestamp_ms,snapshots.linked,snapshots.secured,snapshots.expired&filter=num_of_snapshots gt 0
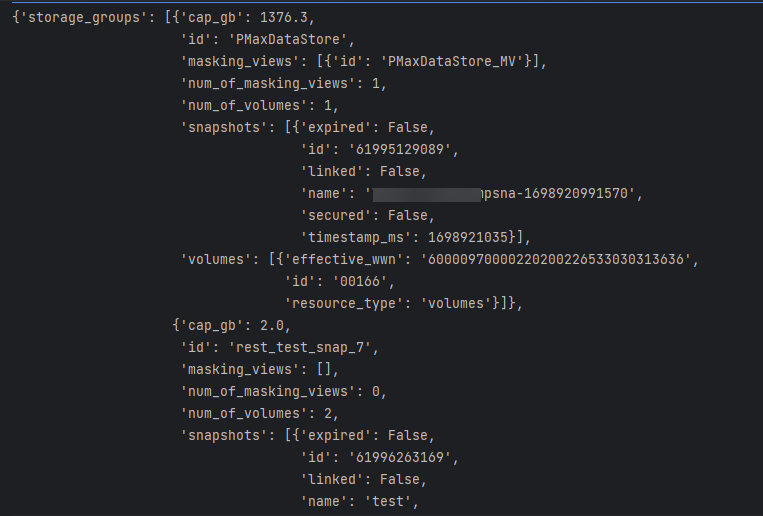
When the call is executed, it returns a single response with the requested data for all storage groups matching the filter criteria. It displays all the selected attributes and sub-attributes. The resultant JSON return is shown below.
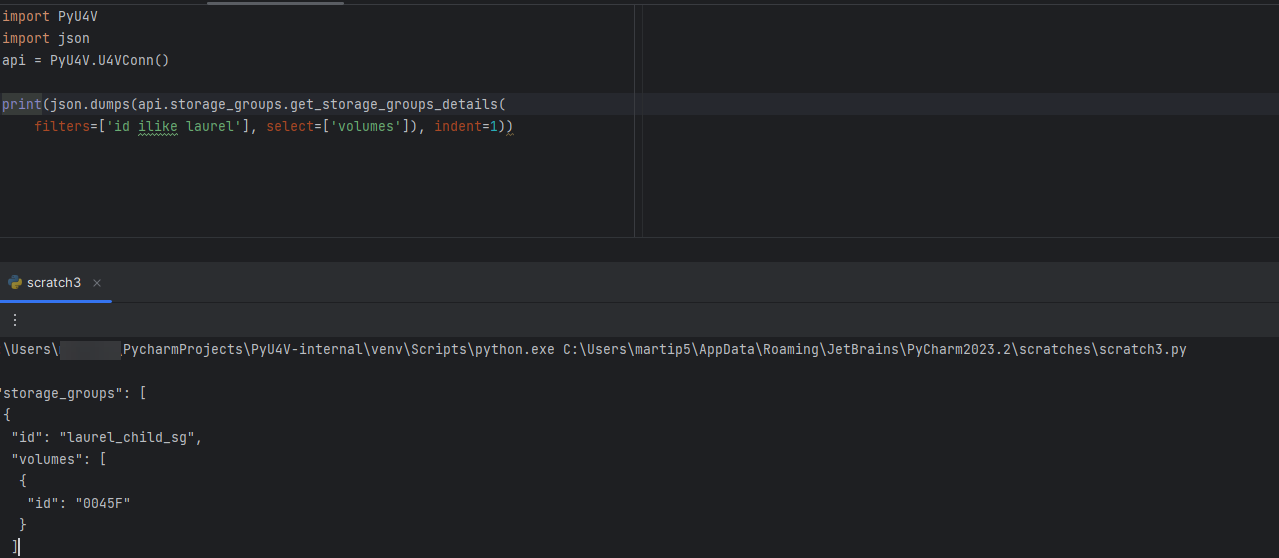
PyU4V our Python SDK for PowerMax API has support for the new enhanced API calls with version 10.1 available from PyPi and is fully documented on ReadTheDocs. New function libraries volumes, storage_groups, and performance_enhanced have been added. Functionality has been added to the volumes and storage_groups modules to return the attributes available for selection in JSON format so that the meta data is easier to access. The same query executed by python script is shown below.
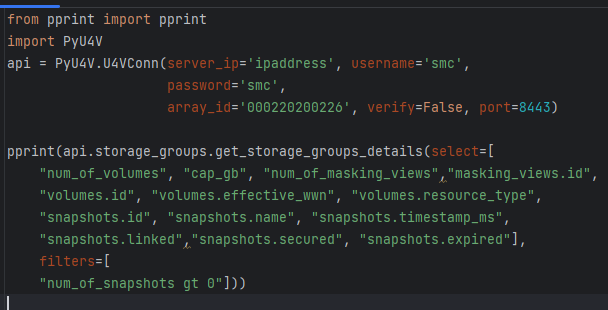
The short Python script is easily readable, executing a single API call to get all this information for all volumes matching the criteria. There are hundreds of attributes available to you for selection and filtering. It’s worth spending a little time up front to define the reports you need and create functions to capture the information in a repeatable way.
Remember if you don’t need information, don’t request it as it will create less load on the management server and the client application. The API is explicit in this way. PyU4V functions for volume and storage group by default will select to return to the top-level attributes for both storage groups and volumes, excluding rdf_infos and snapshot.
In summary, the new enhanced API calls give access to an SQL like interface for selecting, filtering and ordering data on your storage objects via the API, meaning you can effectively design API calls for yourself to give you the data you want and need.
Hopefully this post was informative and gave you some inspiration into how you can reduce the number of API calls needed to get large datasets on your storage groups and volumes for your PowerMax and VMAX arrays.
Check out this space for more about the PowerMax API. If there are topics that are of interest to you and you would like to learn more, send a request to @rawstorage on Twitter, and I’ll try to accommodate your request!
Be sure to provide feedback through your account team for any enhancement requests or start a discussion on https://www.dell.com/community/en/topics/automation. Our product managers will take your requests and bring them to the development team.
Author: Paul Martin

Cyber Intrusion Detection for z Systems (zCID)

Tue, 12 Dec 2023 18:42:09 -0000
|Read Time: 0 minutes
Any cyber security event can have a devastating impact on a company’s financials. Stolen credit cards, identity theft, hacked emails, and so on hurt both the customer and the company’s brand, even going so far as to potentially ruin that company. Data Recovery takes time, but rebuilding customer trust may take even longer.
Dell Technologies has made major investments in a series of continuous security product enhancements to help protect companies and their end users from data loss and/or compromise in the event of an attack. Whether it’s an attack on open systems data or mainframe data, the result of any attack is the same: loss of productivity and concern over theft and exposure of sensitive information.
Ideally, technologies like storage should be able to detect a cyber threat, protect data from the threat, and, in the event of a loss or corruption of data, recover to a known good point. Eight years ago, Dell Technologies developed the first snapshot-based recovery capability for mainframe and open systems data and, as of the latest release of PowerMax in October 2023, has moved into the “intrusion detection” realm of cyber resiliency.
This blog is about a new enhancement to our Mainframe Enabler Software for PowerMax that is designed to provide advanced threat detection for PowerMax mainframe environments.
Mainframe Enabler for intrusion detection
Mainframe Enabler Software (MFE) runs on a z/OS LPAR and is designed to manage PowerMax 2500/8500 and 8000. During discussions about the most recent customer requirements for this release of MFE, it became apparent that customers urgently needed a way to determine whether a cyber event was imminent or occurring. The ask was to send the equivalent of a ‘flare in the sky’ to single-out any atypical behavior in mainframe data access. Upon learning of zCID’s capability within the larger Dell cyber solution, a large mainframe service provider commented “Dell’s innovation around detection of cyber events within PowerMax and CloudIQ is ahead of any other storage provider we talked to”.
Dell Mainframe Solutions development, Product Management, and other organizations within Dell designed a way to enhance MFE to provide awareness of atypical data access behavior. The result of that work was delivered as an enhancement in MFE 10.1.0, released 17 October 2023. This enhancement is known as ‘Cyber Intrusion Detection for z Systems’ or zCID for short.
We will jump into the technical details of zCID; but first, let’s cover the What, Why, and How of this valuable new feature.
What: zCID is a utility that detects atypical data access patterns in mainframe workloads.
Why: To warn PowerMax mainframe customers that atypical access is occurring, and which should be investigated if a cyber intrusion is suspected.
How: zCID monitors the number of unique tracks accessed for mainframe CKD devices and SMS groups within a customer specified time interval. First a baseline of “normal/typical” access is confirmed by the storage administrator. The next step is to create a set of rules for warning statements that will be generated if an anomaly was detected when data was accessed. Next, zCID is started and runs continually in the background. Finally, if an intrusion is suspected, zCID raw data can be converted to a CSV format for detailed analysis.
Technical and install requirements for zCID
The minimum technical requirements for zCID are:
- MFE 10.1.0 with available SCF address space
- PowerMax 8000, 2500, or 8500
- A list of CKD volumes or SMS groups to monitor
Customers must APF-authorize the MFE 10.1.0 LINKLIB dataset and add a STEPLIB DD statement in their zCID batch jobs. (zCID can also run as a started task.)
zCID is delivered in two programs:
- ECTRAARD is the zCID utility program
- ECTREXTR is a zCID program that converts the raw zCID data to a CSV file. This CSV file is intended to be imported into Microsoft Excel for additional analysis and reporting as determined by a storage analyst.
zCID modes of operation and high-level implementation strategy
ECTRAARD can run in “Live Run mode” or “Batch Run mode”. It is important to understand these two modes before deploying zCID:
- Live Run mode: processes data in real time and collects data from the resources you tell zCID to monitor.
- Batch Run mode: takes the output produced in Live Run mode and creates reports about the historical information.
To maximize the benefits of zCID, follow these five-steps:
- Live Run mode will vary from customer to customer. Typically, you would run zCID in Live Run mode to capture access rates for the z/OS resources you are monitoring. Typically, I would start Live Run mode for one week (seven days), then capture a month end batch processing cycle, and ideally, a quarterly and year end closing cycle. With that information, you can calibrate your WARN statements for your highest accessed rate z/OS workloads that zCID is monitoring.
- Run zCID in Live Run mode over a “long” period. View this period of time as an opportunity to collect access rate information for the z/OS resources that zCID is monitoring. In the future, you can use this information to test your warning statements for atypical access rates on monitored z/OS resources.
- Stop Live Run mode at the end of the “long period" so that the datasets zCID was building can be closed.
- Run zCID Batch Mode to create reports, then analyze the results.
- Create warning statements for the atypical access rates for which you want to be notified. To calibrate the warning statements, take the datasets created in Step 2 and run zCID in Batch Run mode. Are zCID warning messages being issued from the warning statements you created?
Calibrate the WARN statements ensures that z/OS SYSLOG, z/OS master console, and z/OS zCID started tasks are not spammed with zCID warning messages. - Restart zCID in Live Run mode with the calibrated warning control statements.
zCID will now actively monitor the z/OS resources you provided and generate an alert every time an atypical access rate occurs!
Summary
Cyber Intrusion Detection for z Systems (zCID) makes Dell PowerMax the industry’s first intrusion detection mechanism for on-array mainframe storage [1]. zCID is a layer of intelligence that detects atypical data access patterns for specified workloads by providing for first-time PowerMax customers insight into their z/OS workloads’ access rates. Customers can then automate the monitoring of those workloads with the goal of detecting cyber events within their mainframe storage infrastructure.
Check out https://infohub.delltechnologies.com/ for more information about zCID and Dell’s PowerMax mainframe solutions.
Author: Justin Bastin, Senior Principal Engineer
[1] Based on Dell's internal analysis comparing PowerMax 2500/8500 cyber detection for mainframe storage to mainstream mainframe competitors. August 2023.

What’s New with Data Mobility and Non-Disruptive Migration with Unisphere 10.1
Tue, 17 Oct 2023 13:52:34 -0000
|Read Time: 0 minutes
Unisphere 10.1 and PowerMax OS 10.1 provide new features for consumers of our Data Mobility suite for array migrations on PowerMax. Data Mobility suite for PowerMax provides customers with a comprehensive set of tools for migrating workloads between Dell VMAX and PowerMax arrays non-disruptively with Non-Disruptively Migration (NDM) also with minimal disruption using Minimally Disruptive Migration (MDM) workflows, both NDM and MDM utilize SRDF technology to provide this functionality. For an in-depth look and walkthrough procedures, check out the white paper on the Info Hub: Dell PowerMax and VMAX: Non-Disruptive and Minimally Disruptive Migration Best Practices and Operational Guide.
With the 10.1 release of Unisphere for PowerMax and PowerMax OS 10.1, two new features provide new options for customers:
- Automatic cleanup of migrated resources on the source array
- Ability to migrate devices that are SRDF Metro supported, replacing one leg of the SRDF Metro configuration
Automatic clean up of the source array
Unisphere 10.1 and Solutions Enabler 10.1 provide a new cleanup operation that can be tagged to the commit of a Non-Disruptive Migration. This functionality helps to eliminate manual cleanup tasks for already migrated components on the source array. This feature is strictly orchestration in the management software stack, so all arrays that support Non-Disruptive Migration can use it.
You can specify the cleanup as part of the commit operation either with Unisphere or the symdm command with solutions enabler. The following figure shows the operation in the Unisphere Data Migration Wizard. (Note: there is no microcode requirement for this operation, It is a feature of the management software version 10.1 rather than of the array operating environment.)
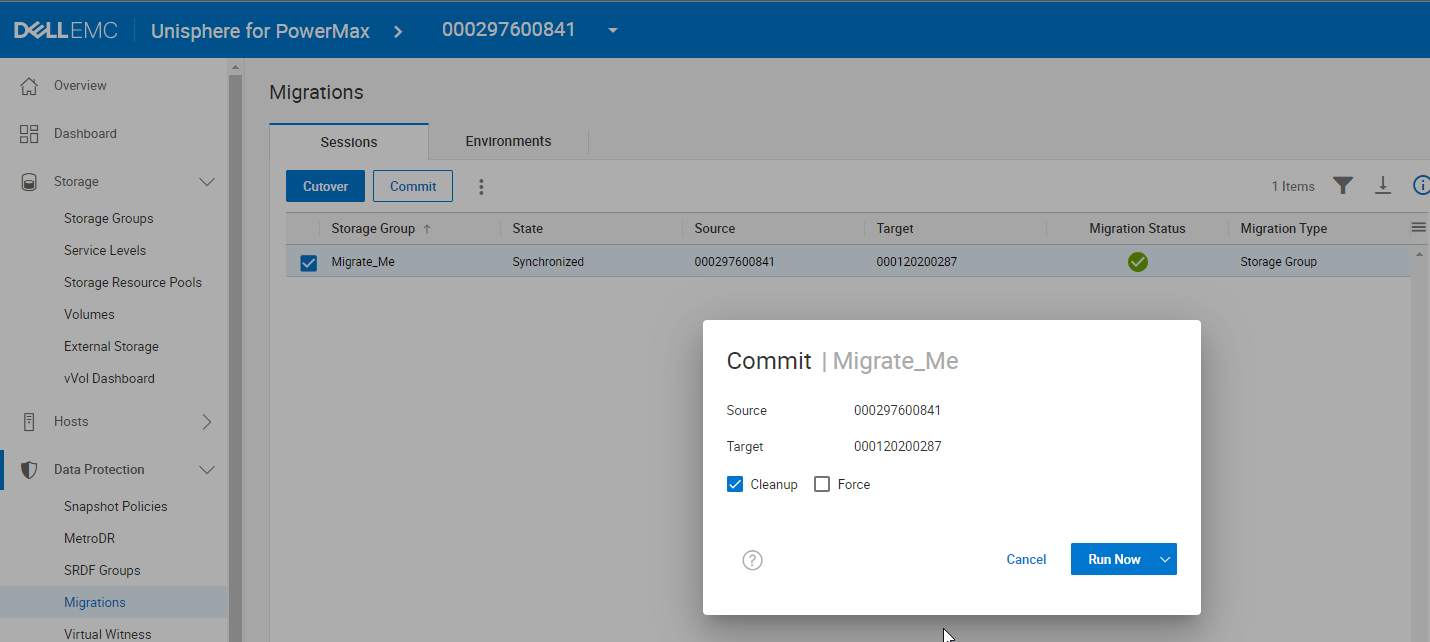
By selecting Cleanup, providing there are no gating factors, when the migration commit completes, the orchestration will delete:
- All snapshots including clone relationships on the devices. It will also unlink any linked snapshots.
- All Storage Groups that were migrated.
- All devices that were migrated.
- All Hosts/Initiator Groups and Port Groups that were migrated if they are not used by other masking views.
- Hosts/Initiator Groups will be removed from any parents before deletion if the parent is not deleted.
Conditions that can block the commit operation with cleanup on the source array are:
- Presence of secure snapshots
- Presence of Snapshot Policies or Cloud Policy snapshots.
- SRDF relationship on the source devices to a Disaster Recovery Array
- If Devices are in Multiple Storage Groups
- If a Migrated Storage Group contains Gatekeeper Devices.
You can also specify the force option to bypass this behavior to allow as many migrated objects as possible to be deleted.
The cleanup operation is intended to reduce any remaining manual steps that have been present following successful migrations of applications between arrays, freeing up resources for reuse and enabling maximum flexibility for workloads running on PowerMax arrays.
Migrating SRDF Metro Protected Devices with NDM
The second new feature removes a restriction on Migrating SRDF Devices. With PowerMax OS 10.1 and Management Software version 10.1 it is now possible for PowerMax storage administrators to migrate devices that are already protected with SRDF Metro.
The workflow for this operation is essentially the same as for a standard migration with Metro based NDM, as described in the previous section. However, because key changes in the microcode on the Target array make this feature possible, it is critical to ensure prior to migration that source and target arrays are running supported microcode to support the features. Any PowerMax 8500/2500 or higher model array involved in the migration must be running PowerMax OS 10.1 (6079.225) or higher. Both source arrays (existing Metro arrays) will need to be on 5978.711.711 minimum plus ePack. For details, see SRDF and NDM Interfamily Connectivity Information Guide for details on ePack and latest compatibility information.
The following figure shows three supported configurations in which source devices are protected with SRDF/Metro.
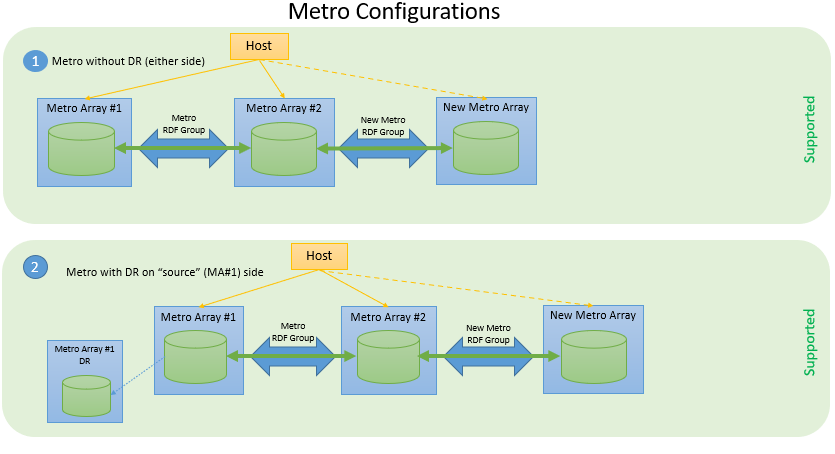
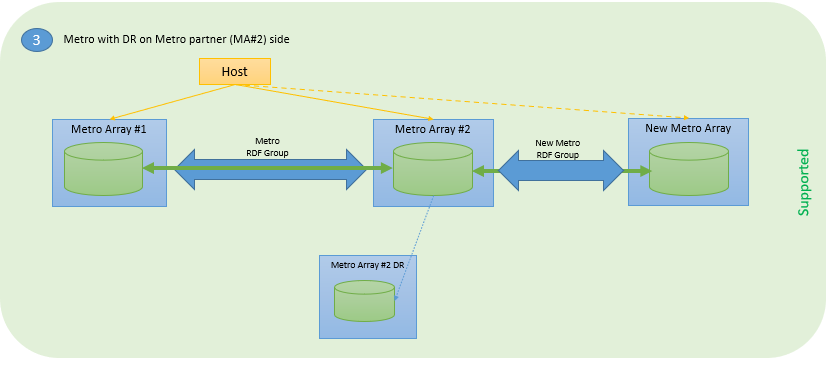
Figure 1. Supported SRDF Metro configurations for application mobility with NDM
The new mobility feature is built on existing NDM and SRDF technologies, using a workflow similar to that for NDM, the same support for easily recovering failed operations, and the same support for easily canceling an ongoing migration.
- Familiar NDM commands: Create, Commit, Cancel, List with SG based unit of migration
- Existing DR will be maintained through migration without interruption
- Supports Metro Sessions in either Witness or Bias mode
- Metro sessions can contain any combination of FBA and iBMI D910 devices
- SRDF/Metro License is required on the target array because SRDF Metro will continue to run following the migration
- iSCSI connectivity is not supported
If you are migrating a Metro Session using a witness, you must configure the witnesses on the target array before performing migrations. Both physical and virtual witnesses are supported on the existing and the new Metro Sessions and the type of witness between the two can be different.
Both of these new features add to the already rich set of migration options and are a direct result of customer enhancement requests. This new functionality will help our PowerMax customers with migration operations and increase productivity and flexibility by reducing cleanup operations and by providing the ability to migrate devices with metro protection.
Author: Paul Martin

RESTing on our Laurels - What’s New with the PowerMax API and Unisphere 10.1
Tue, 17 Oct 2023 13:12:28 -0000
|Read Time: 0 minutes
Unisphere 10.1 has just been released! Although the internal code name was Laurel, we are doing a lot in the API, so we definitely haven’t been RESTing on our laurels!
With this release the Unisphere for PowerMax team focused on what could be done better in the PowerMax API, to make things easier for developers and to reduce the amount of code people must maintain to work with the PowerMax API. Personally, I think they have knocked it out of the park with some new features. These features lay the groundwork for more of the same in the future. As always, there is a full change log for the API published along with updated OpenAPI documents available on https://developer.dell.com. In this blog I provide my own take and highlight some areas that I think will help you as a customer.
Let’s start with the traditional Unisphere for PowerMax API. With this new version of Unisphere there is a new version of the API and simpler versioning referencing throughout the API. For example, the following GET version API call returns the api_version (in this case, 101), and the currently supported API versions with this release (101, 100, and 92). As always, the previous two versions are supported. Here, the supported_api_versions key takes any guesswork out of the equation. If you are using PyU4V, a new version (10.1) is available, which supports all of the new functionality mentioned here.
https://Unisphere:8443/univmax/restapi/version (GET)
{
  "version": "T10.1.0.468",
  "api_version": "101",
  "supported_api_versions": [
    "101",
    "100",
    "92"
  ]
}
I’ll break the other changes down by functional resource so you can skip any that you’re not using:
- Serviceability API calls
- Replication Call Enhancements
- Sloprovisioning Call Enhancements
- System Call Enhancements
- Performance API Call Enhancements
- The All New Enhanced PowerMax API – Bulk API calls
Serviceability API calls
For embedded Unisphere for PowerMax users, when the system is updated to the latest version of Unipshere, a new Serviceability API Resource becomes available.
The new serviceability API calls (as shown in the following figure) give control over the embedded Unisphere, providing access to solutions enabler settings, and Unisphere settings that up until now have only been accessible in the UI, such as:
- Setting up the nethosts file for client/server access from CLI hosts running Solutions Enabler
- Host based access control
- Certificate Management of the Solutions Enabler Guest OS
- And more
Here’s the tree of the Serviceability API resource:
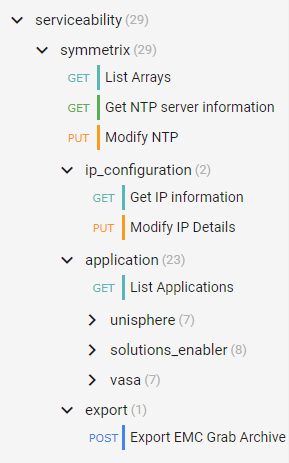
Note: When executing API calls to update the Unisphere application, the server will restart as a result of these changes. You must wait for these to complete before you can issue more API calls. Also, as a reminder, if you are changing the IP address of the Unisphere server you must update your API connection for future calls.
Replication call enhancements
Good news for customers using snapshots and snapshot policies. New replication calls and keys will make the management workflows easier for anyone automating snapshot control and using policies.
An updated API call adds keys for directly associated policies vs inherited policies:
101/replication/symmetrix/{symmetrixId}/storagegroup/{storageGroupId} (GET)In the API, identifying and tracking back linked snapshots has been time consuming in the past. Based on valued customer feedback, our product management and developers have implemented key changes that will help.
The ability to list storage groups that are linked targets has been there for a while, with query parameters in the following GET call:
101/replication/symmetrix/{symmetrixId}/storagegroup?is_link_target=trueHowever, finding out which snapshot was linked, and which source storage group owned that snapshot was a challenge. To make this easier, new keys now appear:
101/replication/symmetrix/{symmetrixId}/storagegroup/{storageGroupId} (GET)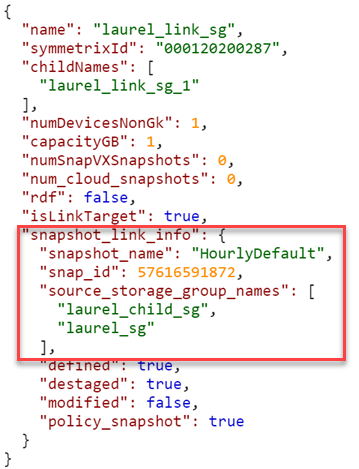
As you can see, the 10.1 API call returns a new key (snapshot_link_info) that includes all the information you need to be able to manipulate the linked snapshots, without having to engineer any trickery yourself.
Sloprovisioning call enhancements
Probably the single biggest change to the Provisioning API calls is the ability to Validate and return a Bad Request when the performance_impact_validation_option is set for sloprovisoning the /maskingview POST call. This gives the developer a way to check, at the time of provisioning, whether a workload is suited to run on the supplied PowerMax serial number. This call uses performance data from the workload planner database and can help create enhanced provisioning workloads with performance and zoning in mind.
The Payload can now accept a new key (performance_impact_validation_option) which can be set to:
- IfRecommended – Run performance impact tests. If no performance capacity threshold is breached, run the requested configuration change.
- Preview – Run performance impact tests and return performance impact scores for the requested operation. Return the input object (with generated fields, if applicable) for relevant follow up API calls.
In addition, the payload has a “portGroupSelection” key that can automatically create a new port group or use an existing port group based. If automatic selection is used, selection can be either UtilizationBased or ZoningBased. (Note: Automatic port selection is only available for Fibre (SCSI FC))
If you choose to use an existing port group, existing port groups are evaluated by the workload planner algorithms examining port groups that are already configured on the system. The algorithm will select the least loaded port group for the provisioning and ignore zoning. Users have the Option to restrict selection to a supplied list of port groups using the API keys. See documentation for details of the various keys.
Note: When using the performance impact selection, you can’t specify an existing storage group because it’s assumed that they are already provisioned. Full documentation for the API call mentioned is here with the supported parameters.
The provisioning API calls include other additions:
- Update POST for Create Masking View, to allow the specifying of a Starting LUN Address. This was a customer enhancement to make it easier to configure boot from SAN.
- Update PUT for Modify SG, to allow the specifying of a Starting LUN Address when adding volumes. .
- Update PUT for Modify SG, to allow terminating snapshots associated with volumes being removed from a SG in a single call. This is very useful because it prevents stranded snapshots from consuming space on the array.
System call enhancements
We have added system calls to enable the refresh of Unisphere. This is useful to customers who are working in a distributed environment and who want to ensure that Unisphere data is up to the second with the latest information. This should be the case, but in the event that there were changes made on a remote system, it could take a minute or so before these are reflected in the object model. The new refresh call has some guardrails, in that you can only run it once every five minutes. If you try to execute too soon, status code 429 will return with message telling you to wait for it to come back:
“Bad or unexpected response from the storage volume backend API: Error POST None resource. The status code received is 429 and the message is {'retry_after_ms': 285417}.”The documentation for this API call (/101/system/symmetrix/{array_serial}/refresh) is here.
Getting information about REST API resources and server utilization was previously only ever available in the user interface. It made sense to make this information available through the REST API because the information pertains to REST. The new GET call to obtain this information (/101/system/management_server_resources) is available, documentation is here.
Along the same lines, we have also added the following calls:
- Change Log Level - /101/system/logging (PUT/GET)
- Configure/Check SNMP Destination - /101/system/snmp (GET/POST/PUT/DELETE)
- Server Cert management - /101/system/snmp/server_cert (POST)
- Configure SNMPv3 with TLS - /101/system/snmp/v3_tls (POST)
- Manage PowerMax Licensing via API
Performance API call enhancements
There is only one minor change in the traditional API for performance with this release. We are adding the ability to register a list of storage groups for real time performance and also bring file metrics for SDNAS onto the Unisphere for PowerMax array for monitoring. The POST call /performance/Array/register has been updated to take new keys, selectedSGs, and a file.
The new payload would look something like this:
{
  "symmetrixId": "01234568779",
  "selectedSGs": "sg1,sg2,sg3",
  "diagnostic": "true",
  "realtime": "true",
  "file": "true"
}
There are some additional changes for mainframe and also Workload Planner which are covered in the changelog documentation. I just want to highlight here what I think most customers will be interested in and give some background.
The all new enhanced PowerMax API – Bulk API calls
I’ve been looking forward to being able to announce some very nice enhancements to the PowerMax API. The API provides new calls with resources accessible under a different Base URI. Rather than https:// {server_ip}:{port}/univmax/restapi/, the new API calls are under https://{server_ip}:{port}/univmax/rest/v1.
The difference between the two entry points will become apparent as you get used to these calls and the versioning will be arguably simpler going forward. Documentation is here.
- GET - /systems/{id}/volumes
- GET - /systems/{id}/storage-groups
- GET - /systems/{id}/performance-categories
- GET - /systems/{id}/performance-categories/{id}
For complete details about these endpoints, see:
- The API documentation marked "POWERMAX - ENHANCED ENDPOINTS"
- The Unisphere for PowerMax 10.1 REST API Changelog
“Ok” I hear you say, “so what’s the big deal?”. Well, these endpoints behave differently from our existing API calls. The provide more information faster so that developers don’t have to maintain a lot of code to get the information they need.
The volumes GET call returns details about every volume on a system in a single call. There is no pagination required and you don’t need to worry about iterators or have to deal with anything fancy. The API just gives you back one big JSON response with all the information you need. This eliminates the need to loop on calls and will dramatically cut down the number of API calls you need to issue to the server.
The same is true for the storage groups calls. With a single call, you can get information on all storage groups on the system, their attributes, and which volumes are in those groups.
But wait, there’s more…
We have implemented a modified form of filtering of the response. You can now filter on all attributes and nested attributes that are returned in the response:
../storage-groups?filter=cap_gb eq 100
../storage-groups?filter=volumes.wwn like 12345678
The available filter options are:
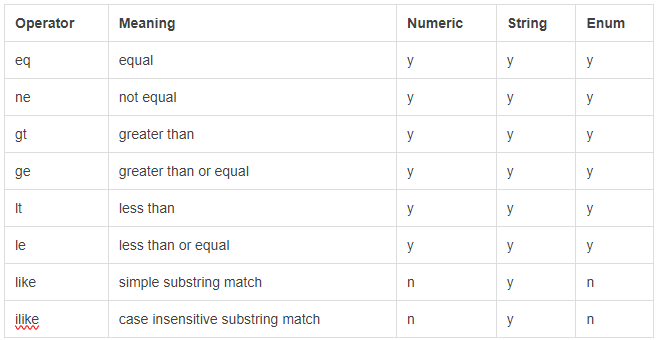 The endpoints require you to “select” the desired attributes instead of returning everything up front. By doing so, you can control how server-intensive each request is by omitting or including only the relevant info:
…/storage-groups?select=cap_gb,uuid,type,num_of_volumes
This returns only the cap_gb,uuid, type and num_of_volumes for each storage group.
This also applies to nested attributes (a full stop is used to define child attributes):
…/storage-groups?select=volumes.wwn,volumes.effective_wwn,snapshots.timestamp_ms
If no attributes are defined in the “select”, only the default values, such as “id”, are returned. The list of attributes that can be selected is available in the documentation here.
Functions are also available for this in PyU4V. Currently multiple filter options are combined in an AND pattern and select can be applied to the data to reduce the output to only what you are interested in. The following is an example of this functionality as executed through PyU4V 10.1:
With this new functionality you can get all details for your volumes and storage groups in two calls per array, reduced from tens of thousands of calls on larger systems.
Enhanced performance metrics with the new Bulk API
In addition to the new GET calls for Volumes and Storage groups, there are new calls for the performance metrics.
The /systems/{id}/performance-categories (GET) call returns a list of performance categories valid for the arrays you are querying.
When you query each category, the API returns the last interval of diagnostic performance data using the new /systems/{id}/performance-categories/{id} GET call. This returns all key performance indicator metrics at the diagnostic level for the category and all instances in that category for the last five minutes.
These new enhanced API calls reduce the amount of code that developers need to write and maintain. The API call is intentionally designed to provide only the latest information. This reduces the amount of code for which developers need to maintain performance data collection for dashboard type tools and data collectors.
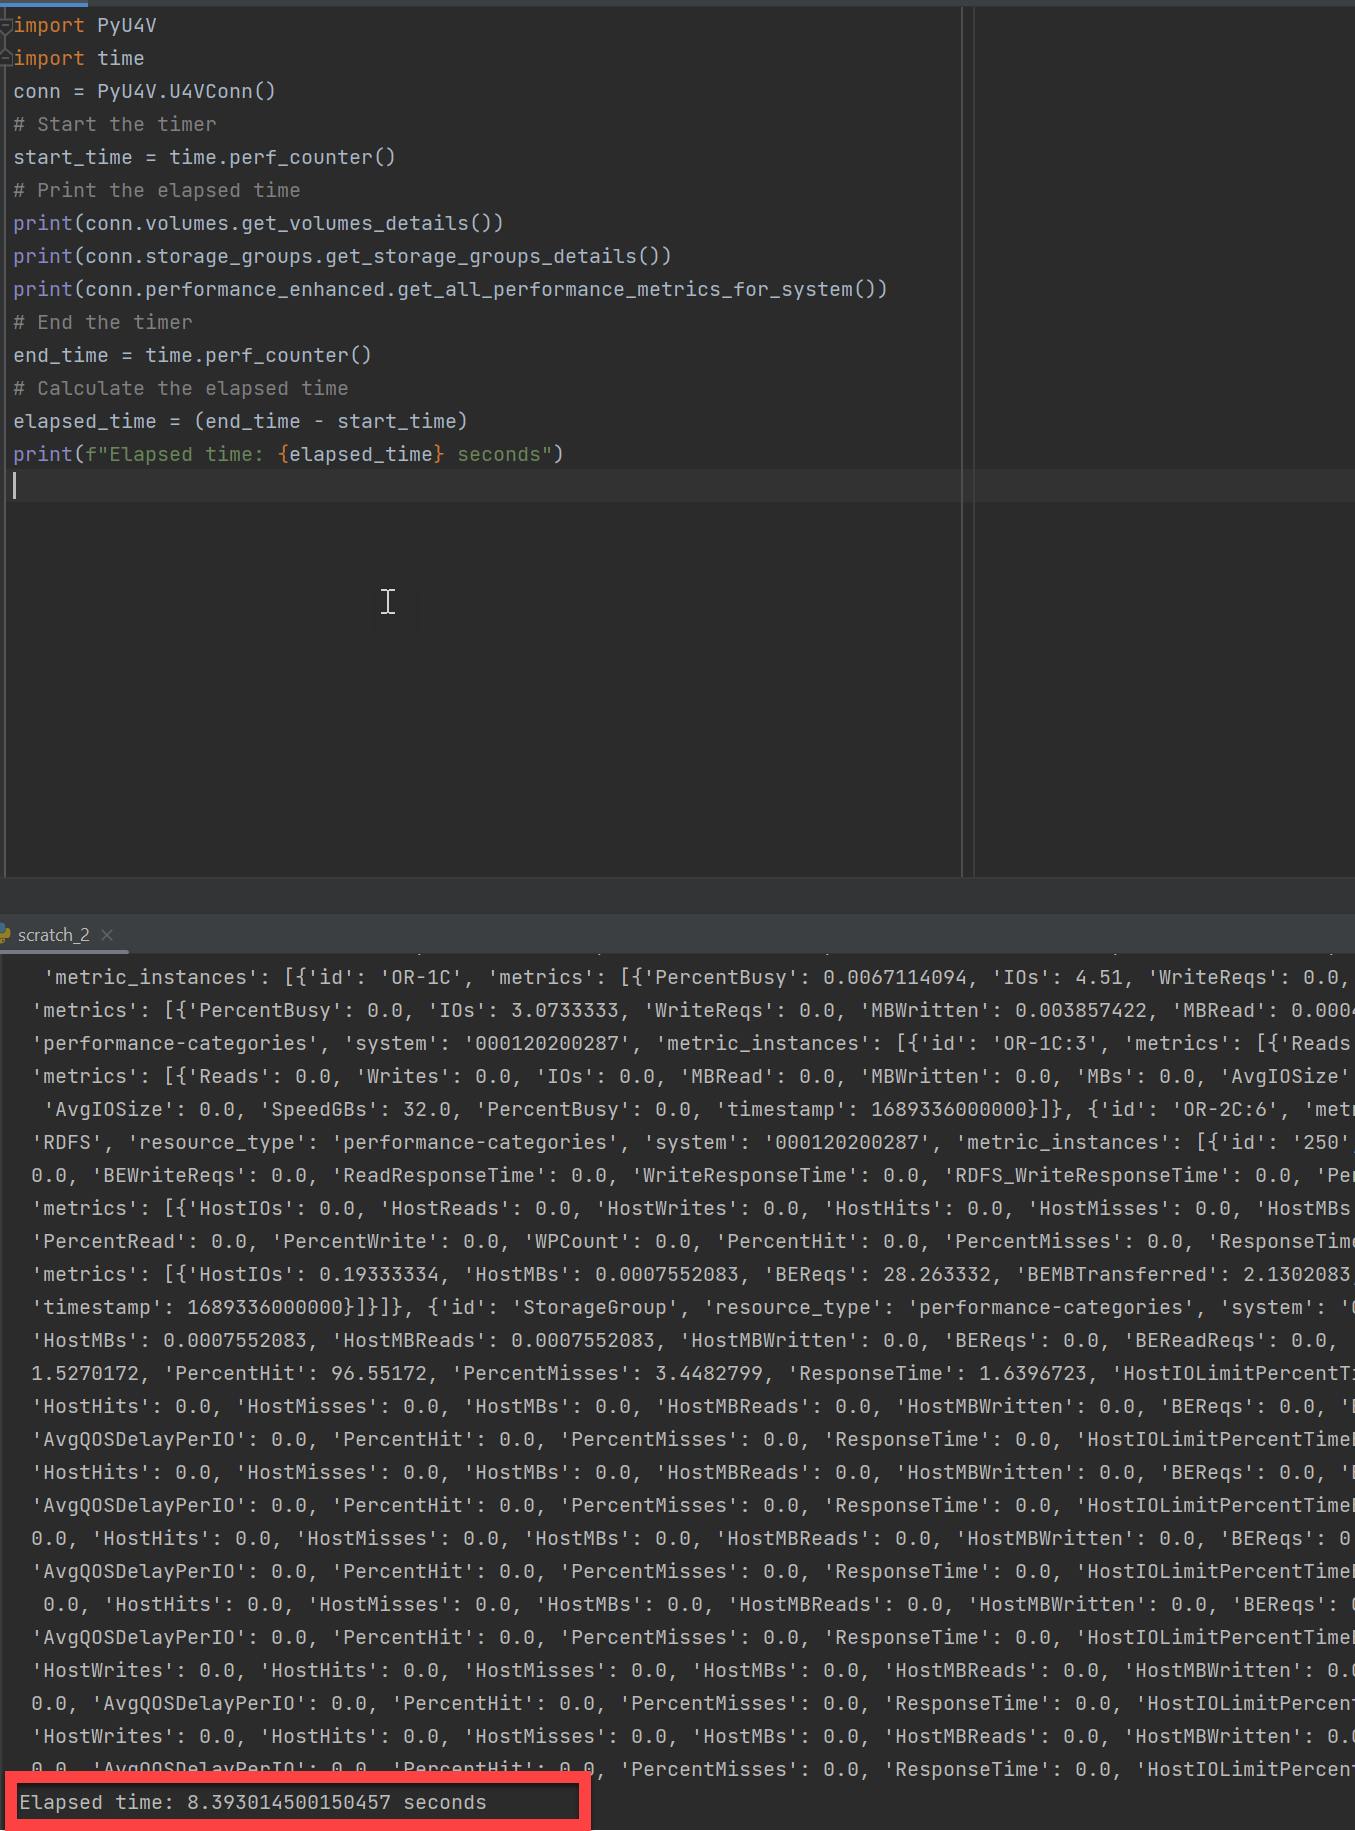
The following example shows a PyU4V script executing a few lines of code to gather all performance stats for every category on every component of a PowerMax array. It’s also gathering details on all volumes and all storage groups using the new Enhanced API calls. On my system, the code takes about eight seconds on average to gather all that information.
To wrap up
Hopefully this blog has provided some insight into the latest changes in the PowerMax REST API. As you can see, our developers have not been RESTing on their laurels!
Watch this space for more about the PowerMax API, and if there are topics that are of interest to you and you would like to learn more, send a request to @rawstorage on Twitter and I’ll try to accommodate your request!
Be sure to provide feedback through your account team for any enhancement requests or start a discussion on https://www.dell.com/community/en/topics/automation. Our product managers will take your requests and bring them to the development team.
Author: Paul Martin

Unreducible Capacity Alerting for PowerMax for Possibly Indicating a Ransomware Attack

Thu, 31 Aug 2023 21:00:21 -0000
|Read Time: 0 minutes
Unreducible Capacity Alerting for PowerMax for Possibly Indicating a Ransomware Attack
With the release of PowerMaxOS 6079.175.0042 and Unisphere 10.0.1 (March 2023), you can now get anomaly detection for your PowerMax storage environment. This blog explores the various ways you can set up capacity anomaly detection for your PowerMax storage environments that could possibly indicate a ransomware attack occurring on your PowerMax.
Unisphere 10.0.1 provides a new performance metric called Unreducible Capacity, which reports on the unreducible capacity in the storage array. With data reduction capabilities enabled by default, this metric monitors your unreducible capacity for a system and Storage Group. To chart the unreducible capacity within a PowerMax environment:
- Log in to Unisphere 10.0.1.
- Select the PowerMax for which you would like to chart unreducible capacity (this assumes that the PowerMax is leveraging DRR capabilities).
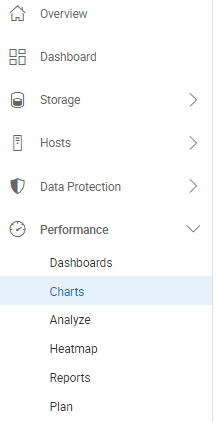
- On the left-hand side of Unisphere, expand the Performance section and select Charts (example shown here).
- Locate the Time Frame section and select a time frame. Please note, the ‘Unreducible Capacity’ metric is selectable with all ‘Diagnostic’ and ‘Historical’ time frames, however the metric is not selectable with the Realtime time frame.
- Under Category, Unreducible Capacity is eligible for System and Storage Group (which is under the System & Hosts category). There are benefits to charting unreducible capacity for system and Storage Groups. The benefits are:
- For System – Gives customers an idea if a massive ransomware attack is occurring across the whole system.
- For Storage Groups – Gives customers a more surgical approach because Storage Groups are typically created on an application-by-application basis. Therefore, customers can chart the unreducible capacity per Storage Group and give an indication if a ransomware attack may be occurring on the application.
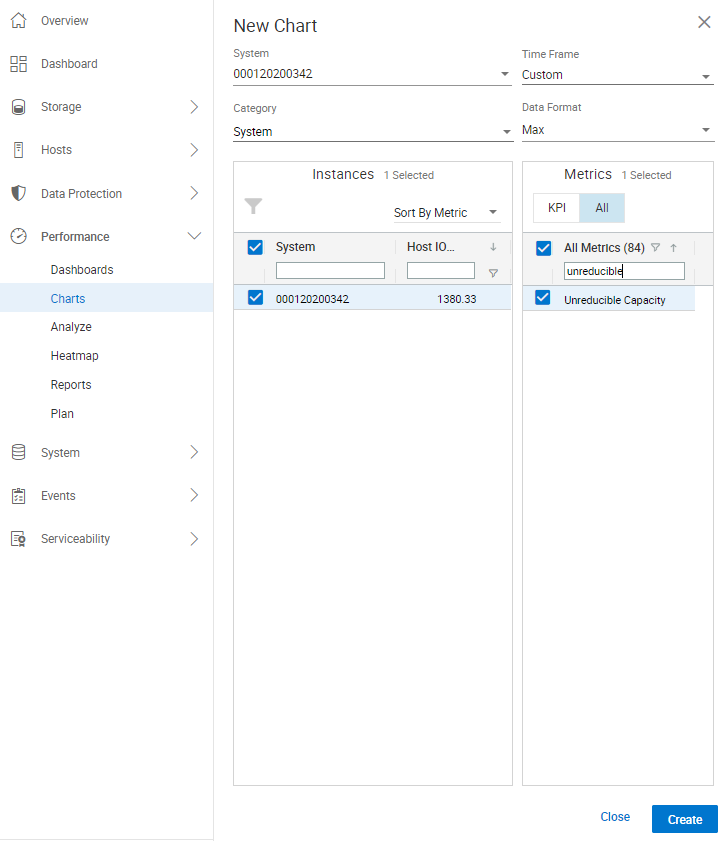
- Change Data Format from the default setting of Avg (for average) to Max.
- If charting the System, check under Instances for the PowerMax array serial number you want to chart.
- Under Metric, select All for all the available metrics.
- In the All Metrics field, enter unreducible and Unreducible Capacity appears. Select Unreducible Capacity, and click Create at the bottom of the screen.
Here is how the screen now appears:
This figure shows how customers can chart the Unreducible Capacity metric in Unisphere. Customers can also set a Performance Threshold and Alert within the Settings section of Unisphere. Doing this enables customers (after monitoring the System and Storage Group for the appropriate thresholds) to set an alert within Unisphere. Unisphere will generate an alert within Unisphere and could email and/or have SNMP send the alert to stakeholders if the thresholds set for Unreducible Capacity are exceeded. To set an alert for Unreducible Capacity:
- Log in to Unisphere.
- Navigate to and select the gear icon in the top right-hand corner of Unisphere. The gear icon is the Settings section for Unisphere for this PowerMax instance.
- On the left-hand side, navigate to the Alerts section and expand it.
- Select the Performance Thresholds and Alerts section. This opens a panel to configure performance thresholds and alerts within Unisphere.
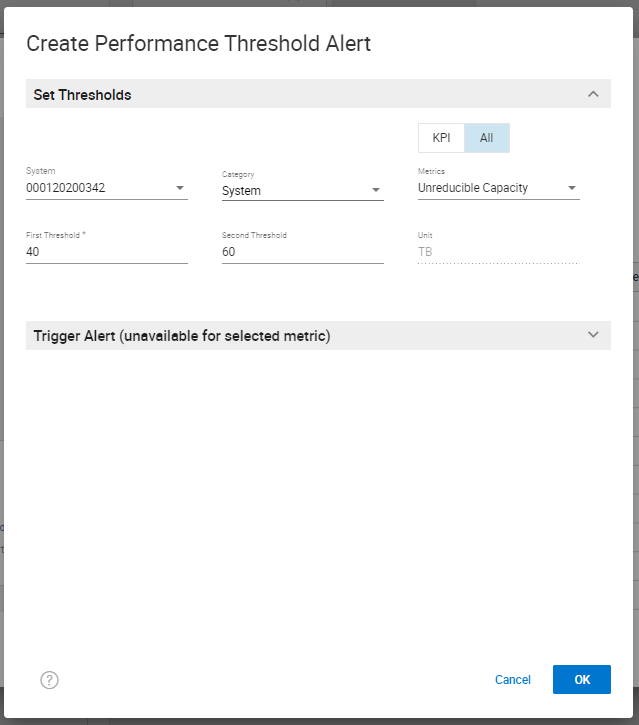
- By default, the category System is selected. To create a threshold for Unreducible Capacity for System:
- Select the Create button.
- On the top right-hand side, select the All setting to view all the Performance Metrics available within Unisphere for the category System.
- The metrics are listed in alphabetical order, so scroll down to the Unreducible Capacity metric and select it.
- Enter a number for First Threshold and a higher number for Second Threshold.
- On the bottom right-hand side, click OK to create a Performance Threshold alert for unreducible capacity being measured against the PowerMax system.
Here is how the information appears with these steps completed:
You can change the Category shown in this screenshot from System to Storage Groups to set a performance threshold alert for an individual storage group. Here is a screenshot of creating a performance threshold and alert for Storage Groups (Note: I selected the radio button Specific to pick specific Storage Groups that I want to monitor and alert on).

If you have SRS enabled on your PowerMax array, you can onboard CloudIQ through Unisphere. CloudIQ is a monitoring and reporting tool for all supported Dell assets that feed data into CloudIQ. With PowerMaxOS 6079.175.0042, you can use CloudIQ for Capacity Anomaly Detection on a PowerMax storage array.
For more information about the technologies mentioned in this blog, see the following resources:
- For Unisphere information, review the Dell Technologies Support page
- PowerMaxOS Release Notes
Authors: Justin Bastin (Senior Principal Engineer) and Richard Pace (Principal Engineering Technologist)

Local Replication with the PowerMax REST API, Working with SnapVX Snapshots
Tue, 13 Jun 2023 16:02:04 -0000
|Read Time: 0 minutes
PowerMax arrays provide feature rich local replication options in SnapVX and clone technologies. The PowerMax REST API supports all of these features, and Dell Technologies provides pre-written Python functions as part of PyU4V -- a Python package for managing the PowerMax REST API as well as Ansible modules that support SnapVX. In this blog I provide examples in native REST calls and in a Python example.
If you are not familiar with REST, you’ll enjoy reading one or both of these blogs:
- https://infohub.delltechnologies.com/p/getting-started-with-rest-api-1
- https://infohub.delltechnologies.com/p/getting-started-with-the-powermax-rest-api-time-for-a-rest
Full API documentation is available on the developer hub here. All REST endpoints for the SnapVX and clone operations are under the replication resource of the API. This means that URI addresses are prefixed with the base URL https://{{base_url}}/{{api_version}}/replication. In addition to SnapVX and clone functionality, it’s also possible to assign snapshot policies to storage groups at the time of creation or when modifying using sloprovisioning resources. Examples appear further ahead in this blog.
Managing SnapVX snapshots with the REST API
SnapVX provides PowerMax administrators with the ability to take point in time snapshots across a collection of devices to create a consistent point in time image of the data in a very space efficient manner. The user can manipulate the snapshots for restore purposes or link them to volumes and present them to hosts using masking views to provide a copy of the snapshot image.
For details about SnapVX functionality, see the white paper Dell PowerMax and VMAX All Flash: TimeFinder SnapVX Local Replication. The PowerMax REST API provides all the functionality of Unisphere for PowerMax with snapshot management, and just like the UI management is orchestrated with the storage group. If you need to manipulate a snapshot for a single volume, you can use the CLI tools or add the volume to its own storage group.
Some points to remember with SnapVX snapshots:
- A SnapVX snapshot is never altered by host access and therefore is always available to the administrator for restore purposes until it is terminated by user action or it expires based on the time to live value (if set).
- Snapshots will only automatically expire when they are unlinked from all target storage groups.
- Snapshots can be set secure at or after creation time. Once set secure, the user cannot terminate the snapshot until the time to live has passed or modify the security of that snapshot except to extend secure time to live.
- When linking snapshots with the API or UI, if the target storage group doesn’t already exist the API will automatically create the storage group with the correct number of devices and size, matching the source device configurations.
- If you add devices to a source storage group, you must add devices to target storage groups. This is not automatic and needs to be planned for. Naming conventions can help simplify this process.
- Although SnapVX snapshots present with both a generation number and snapId, if automating, snapid is preferred because this number is a static reference id.
Creating and identifying SnapVX SnapShots with the REST API
Creating a snapshot is a simple process. A REST API POST call is sent to the management software, directed at the storage group to be snapped, specifying a name for the snapshot along with any optional parameters to be set (for example, you can set the snapshot to be secure or set time to live).
The following is an example POST call and payload for creating a snapshot of a storage group, with a snapshot named REST_SG_snapshot, setting a time to live of 10 days. (Values to be supplied are enclosed in {} signaling substitution required for actual values or variables.)
https://unisphereIP:8443/univmax/restapi/{{api_version}}/replication/symmetrix/{symmetrixId}/storagegroup/{storageGroupId}/snapshot (POST)
Payload
{
  "snapshotName": "REST_SG_snapshot",
  "timeToLive": 10
}
PyU4V has functions for complete control of SnapVX, making the API easier to consume. The following is a simple script to create a snapshot and print the return from the API.
import PyU4V
conn = PyU4V.U4VConn(username='smc', password='smc',
server_ip='unisphereip', port='8443', array_id=None,
verify=False)
#create a snapshot and assign returned information to variable snap_details
snap_details = (conn.replication.create_storage_group_snapshot(
storage_group_id='snapsrc', snap_name='snap4blog', ttl=1, secure=False,
hours=True))
#Get SnapIds for all snapshots for storage group with name snap4blog
all_sg_snaps = (conn.replication.get_storage_group_snapshot_snap_id_list(
storage_group_id='snapsrc', snap_name='snap4blog'))
#print details of snapshot created above
print(snap_details)
#Print only snapid from snap_details
print(snap_details.get('snapid'))
#Print all SnapIds associated with snap4blog snapshot on snapsrc storage group
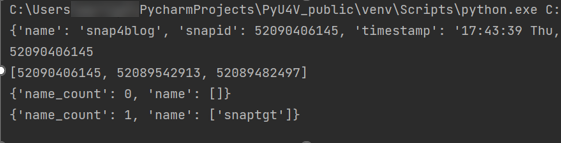
print(all_sg_snaps)The output is shown below.
- The first print statement shows the detailed information for the snapshot just created with details such as timestamp, snapid, and so on.
- The second line prints only the snapid extracted from the JSON using the key ‘snapid’.
- The third line prints the variable ‘all_sg_snaps’ showing all snapshot ids with the name snap4blog associated with the snapsrc storage group.

To make the snapshot data available to a host, you can add some additional REST calls to link to a storage group.
The following script performs these tasks:
- Lists any storage group that has a snapshot linked to it on my test array. There are none to begin with.
- Creates a link to an existing snapshot using the snapid
- Runs the listing again. This time there is data to display showing the linked storage group.
#list any storage group that is being used as a linked target for snapvx
#snapshot
print(conn.common.get_request(
      target_uri=f'/100/replication/symmetrix/'
                 f'000120200287/storagegroup?is_link_target=True',
     resource_type=None))
 #Link a snapshot from ‘snapsrc’ storage group to ‘snaptgt’ storage group,   #this will create snaptgt storage group as it doesn’t exist
#with the name ‘snap4blog’ and snapid matching value in variable set earlier.
conn.replication.modify_storage_group_snapshot_by_snap_id(
      src_storage_grp_id='snapsrc',tgt_storage_grp_id='snaptgt',
     snap_name='snap4blog', snap_id=snap_details.get('snapid'),
     link=True)
 #Print updated list of storage groups used as snap target
print(conn.common.get_request(
     target_uri=f'/100/replication/symmetrix/'
                 f'000120200287/storagegroup?is_link_target=True',0
     resource_type=None))
The following is the output of the functions showing the snaptgt group in the list after the link has been issued.
SnapVX lends a lot of flexibility when refreshing test and development environments. The ability to relink the same snapshot (essentially wiping any changes to the target copy while preserving the point in time image) greatly simplifies iterative testing. You can also quickly relink to a different snapshot or unlink to reuse the target volumes for another purpose. To relink a snapshot with PyU4V, simply change the parameter in the modify_storage_group call instead of “link=True” we set “relink=True”.
If you are relinking directly from the API, modify the payload for the PUT call to reflect that the action is relink, as shown here:
https://UnisphereIP:8443/univmax/restapi/100/replication/symmetrix/{symmetrixId}/storagegroup/{storageGroupId}/snapshot/{snapshotId}/snapid/{snapId} (PUT)
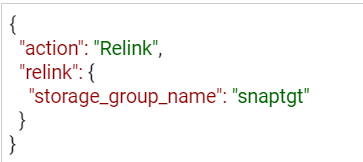
When you no longer require your snapshots, don’t forget to terminate or unlink any linked targets to allow for automatic expiration if you’ve set a time to live. All actions use the same URI link, however the REST method will be PUT (with modified payload) or DELETE.
It’s generally a good practice to adopt a friendly naming convention for storage groups that are being used as snapvx targets to make them easy to identify in the UI and API output. Simply adding _TGT to the sg name may be enough, but your naming convention can be whatever works best for your organization.
Snapshot policies
In addition to regular snapshots, SnapVX provides a mechanism for users to assign snapshot policies to storage groups. (More details about snapshot policies are described in the white paper Dell PowerMax and VMAX All Flash: TimeFinder SnapVX Local Replication.) Assigning a snapshot policy means that you will have an automated rotation and preservation of a defined number of snapshots for your storage groups with a clearly defined recovery time objective. Users don’t need to manage the scheduling -- the policy automates all of that and can be assigned when storage groups are created, or at a later time.
Associating snapshot policies to storage groups is available through the POST and PUT calls for creating storage groups. A separate set of API calls is available for managing directly from the Snapshot Policy section of the API documentation.
For Py4V in Python, the code only requires an extra variable on the create and modify functions. The following example will create a snapshot policy (example_policy) that will take a snapshot every 12 minutes, retaining a maximum of 24 snapshots. The second part creates a storage group associated with this policy. Note that there are default policies already created on all arrays that users can use without having to create anything new.
import PyU4V

api = PyU4V.U4VConn(username='smc',password='smc',
                                server_ip='unisphereip', verify=None,
                                array_id='000297600841')
api.snapshot_policy.create_snapshot_policy(
    snapshot_policy_name='example_policy', interval="12 Minutes",
    local_snapshot_policy_snapshot_count=24)

api.provisioning.create_non_empty_storage_group(
    srp_id="SRP_1", storage_group_id="blog_example_sg", num_vols=1,
    vol_size=1, cap_unit="GB",snapshot_policy_ids=["example_policy"],
    service_level="Diamond", workload=None)
Hopefully this blog has given you the basics to working with SnapVX snapshots using REST and Python!
For more information and a list of all functions for SnapVX, see the documentation for PyU4V on readthedocs.io and the REST API documentation on the Dell developer portal here.
In upcoming blogs, I will also be looking at using clone technology with the REST API, and when this is a good alternative to SnapVX depending on your needs. Have fun automating and if you have questions, you can always start a discussion on the PyU4V GitHub -- we are always willing to help!
Author: Paul Martin

Local Replication with the PowerMax REST API, Working with Clones
Wed, 31 May 2023 19:48:07 -0000
|Read Time: 0 minutes
PowerMax arrays have several local replication features for administrators to use, depending on their needs. Happily, the PowerMax REST API supports all of these. Dell Technologies also provides them in pre-written Python functions as part of PyU4V (a Python package for managing the PowerMax RESasasT API) and as Ansible modules that support symclone functions. In this blog I provide examples and some background info about clones.
If you are not familiar with REST, you’ll enjoy reading one or both of these articles:
- https://infohub.delltechnologies.com/p/getting-started-with-rest-api-1/
- https://infohub.delltechnologies.com/p/getting-started-with-the-powermax-rest-api-time-for-a-rest/
Full API documentation is available on the developer hub here. Clone operations are under the replication resource of the API, with all endpoints prefixed https://{{base_url}}/ /replication/symmetrix/{symmetrixId}/storagegroup/{storageGroupId}/clone/.
Managing clones with the PowerMaxREST API
With symclone, PowerMax administrators can create cloned images of their data on demand. If you want to study up on symclone and its history with PowerMax and Symmetrix predecessors, see the blog PowerMax Attack of the Clones.
Clone copies tend to be used in environments where the copy data might be made available to a system for an extended period and only refreshed once in a while. This is in stark contrast to snapshots which are taken frequently, typically have shorter retention times, are available for quick restoration of data, and available to present near real-time copies of data that is constantly changing to test and dev environments.
Starting with Unisphere for PowerMax 10.0, one can use the User Interface and API to interact with symclone functionality. This opened the door to new functionality, and automation, that was previously only available through command line options. Let’s explore this functionality and concentrate on the how, and a little of the why.
Creating a clone on PowerMax with REST API
Just like with snapshots and the majority of operations with PowerMax REST API, clones are controlled at a storage group level. Users create a clone of all volumes in a storage group. Storage group operations make it simpler to manage clones because all devices are at the same point in time (using PowerMax Enginuity Continuity Assist Technology (ECA)) when the clone is created.
To create a clone copy of a storage group, perform a POST operation against the source storage group. (The documentation for the Create Clone API call is here.) Here’s a sample POST call:
https://{unisphereip}}:{{port}}/restapi/100/replication/symmetrix/{symmetrixId}/storagegroup/{storageGroupId}/clone/storagegroup
{
  "target_storage_group_name": "target_storagegroup_name",
  "establish_terminate": true,
  "consistent": true
}
The API call and payload shown here create a consistent clone of a source storage group with the clone devices present in the specified target storage group.
The additional parameter establish_terminate set to true signifies to the API to remove the clone relationship as soon as it’s activated. This action is only available on PowerMax arrays running PowerMaxOS 10 or higher.
To perform the same operation in a Python script with PyU4V, the code is simple:
import PyU4V
api = PyU4V.U4VConn(username='smc',password='smc',
                                server_ip='unisphereip', verify=None,
                                array_id='000297600841')
api.clone.create_clone(storage_group_id="REST_TEST",
                        target_storage_group_id="REST_TEST_TGT",
                       establish_terminate=True)
If you want to maintain a relationship between the source and target storage group after activating your clone, you can omit the key or variable establish_terminate and you can create clones with different capabilities. Note that no copying of tracks is done on the array so it can be easier to use this function because code will be shorter (because there are no relationships to track), and the data is available to the host as soon as the clone is created. So there’s no need to wait for any background operations.
Clone and SnapVX better together
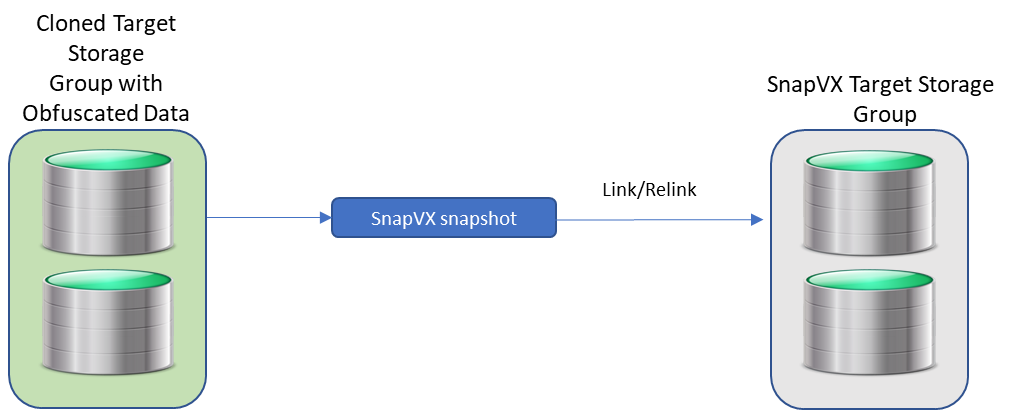
Providing developers with copies of data for building applications, to provide business advantages and to deliver user features to customers, is part and parcel of many organizations. However, the security of that data is paramount and often has legal requirements depending on location and industry.
A great way to help in situations like this is to use clone and snap technology together to create a standalone copy of the data that can be mounted to a host for obfuscation. This helps make sure that sensitive information like social security numbers are no longer intelligible. One can then take snapshots from the obfuscated clone and link them to any test or dev servers.
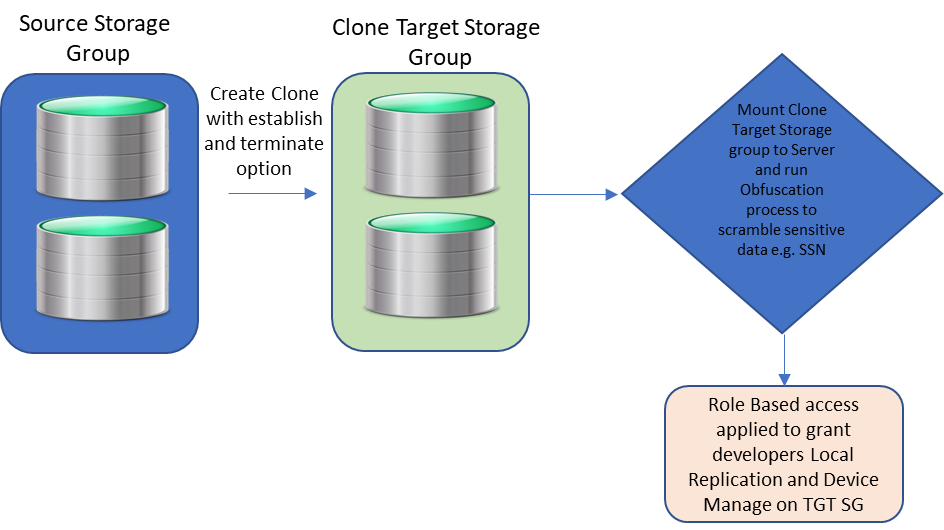
After the sensitive data has been scrambled by the obfuscation process and RBAC applied to the clones, developers with Local Replication rights can refresh their snapshots at will without security concerns about the data they are seeing. They will only be able to run API calls against storage groups for which they have been granted privileges.
Restoring Data from a Clone
From time-to-time you may want to restore data from a clone to the source. If you are using the traditional clone workflow and have not used the establish/terminate options, you can use the modify storage group clone PUT API call, using the API call here with the restore action.
The URI and body are here:
https://{unisphereIP}:8443/univmax/restapi/100/replication/symmetrix/{symmetrixId}/storagegroup/{storageGroupId}/clone/storagegroup/{targetStorageGroupId}
{
  "action": "Restore",
  "restore": {
    "force": "false",
    "star": "false"
  }
}
PyU4V has its own function for the restore action, taking the source and target storage groups names as parameters:
api.clone.restore_clone(
    storage_group_id="mysrc_sg", target_storage_group_id="mytgt_sg"
)
conn.clone.terminate_clone(
    storage_group_id="mysrc_sg", target_storage_group_id="mytgt_sg",
    restored=True)
After the restore, you must terminate the restored session on the source storage group before any additional clone commands can run.
As with any feature, it’s easy to do things when you know how, but as with any technology there are rules which are well documented here. In that document, Table 5 lists the states and allowed actions. (Though this is a command line document, the rules are the same for API and UI operations.)
Hopefully this short blog has given some insight and possibly some inspiration into how to use PowerMax clone technologies with the REST API interfaces.
Watch this space for more about the PowerMax API, and if there are topics that are of interest to you and you would like to read more, send a request to @rawstorage on Twitter and I’ll try to accommodate your request!
Author: Paul Martin

PowerMax 2500 and 8500 Dynamic Fabric—A High-Performance Clustered Architecture for Enterprise Storage
Tue, 18 Apr 2023 16:15:55 -0000
|Read Time: 0 minutes
Introduced in 2022, the PowerMax 2500 and 8500 systems represent the next generation of the PowerMax family. At their core, the PowerMax 2500 and 8500 have a high-performing cluster architecture solely dedicated to processing the vast amounts of storage operations and storage data from modern applications. The four key components of the PowerMax cluster architecture are the compute nodes; the storage Dynamic Media Enclosures (DMEs); the Dynamic Fabric that ties the elements together; and the internal system software, PowerMaxOS 10. The PowerMax 2500 and 8500 cluster architecture provides the following benefits natively without the need for added hardware, software, or licensing:
- High reliability and fault tolerance: All the nodes in the PowerMax can access application I/O and supply resources to process it, making it a true shared everything, active/active system. In case of a node failure, there is no failover operation needed as with active/passive systems. PowerMaxOS 10 will automatically redirect the failed node’s I/O to other nodes. Since no failover is required, there is no need to ever configure a quorum device to guard against issues such as “split brain.”
- Simplicity: All the compute nodes and DMEs in a PowerMax system appear to the user as a single entity. A user does not have to log in to separate individual nodes to manage or configure the PowerMax system. The management of the entire system is performed using the HTML5-based Unisphere for PowerMax UI and/or REST API. These tools provide an easy-to-use interface for management actions and monitoring operations that are crucial to an organization’s needs.
- Fully autonomous operations: PowerMaxOS 10 manages all system resources autonomously—continuously running diagnostics, and scrubbing and moving data within the system for maximum performance and availability 24x7. There is no need to manually configure load balancing between the nodes because PowerMaxOS 10 automatically decides which node will process the incoming I/O data based on locality and resource availability.
- Predicable performance and scalability: As compute requirements increase, you can “scale out” the PowerMax system by adding nodes nondisruptively to supply a predictable linear increase in performance and computing power. As capacity requirements increase, you can “scale up” the system granularly, using single-drive increments. This allows PowerMax to scale based on application requirements rather than system architectural requirements. The architecture also enables holistic software scalability; the PowerMax can support 64K host-presentable devices, more than 65 million snapshots, and 2,048 remote replication groups with other systems.
The compute nodes, DMEs, and PowerMaxOS 10 software supply the foundation for a true active/active, shared everything solution for the demanding requirements of enterprise data centers. The glue that ties all these components together and allows PowerMax to deliver these benefits to customers is the internal Dynamic Fabric.
PowerMax Dynamic Fabric
Both the PowerMax 2500 and 8500 use full end-to-end, internal Non-Volatile Memory Express over Fabrics (NVMe-oF) topologies between the compute nodes and DMEs. These NVMe-oF topologies are referred to as the PowerMax Dynamic Fabric.
Core elements
The Dynamic Fabric turns the compute and backend storage elements into individual independent endpoints on a large internal storage fabric. Each endpoint in this fabric is dual ported, with each port being connected to a physically isolated fabric—Fabric A or Fabric B—for redundancy. These individual compute and storage endpoints can be placed into shared resource pools, disaggregating the storage and compute in the system. In this architecture, all compute node endpoints can access all shared memory in all the other compute nodes using the system’s high-speed RDMA protocol. Further, all compute node endpoints can access all storage endpoints and SSDs in the DMEs using the system’s high-speed NVMe-oF protocol. This access to all shared memory and all storage endpoints and DME SSDs creates a true active/active and share everything system architecture. This system disaggregation decouples the compute and storage so that they can be scaled and provisioned independently of each other to meet application requirements rather than adhering to strict system architecture requirements. To allow for this shared everything decoupled architecture, the Dynamic Fabric provides the system with these key elements:
- Ability to share memory access between the nodes
- High-speed interconnection between cluster components
- End-to-end data consistency checking based on SCSI T10-DIF Protection Information that protects against erroneous data transmission and data corruption
Shared memory
The PowerMax system uses an active/active, share everything architecture. This includes memory content sharing, where each node can access data in another node’s memory. On PowerMax, this is done by using Remote Direct Memory Access (RDMA). RDMA is the ability to read from and write to memory on an external compute node without interrupting the processing of the CPU(s) on that node. RDMA permits high-throughput, low-latency data transfer between the memory of two computing systems, which is essential in high performing clustered computing systems such as PowerMax. Using RDMA, all PowerMax nodes can access the memory content of any other node in the system as if it was its own. The ability for each node to access other nodes’ memory using RDMA turns the total capacity of cache in the PowerMax systems into a truly shared resource pool called PowerMax Global Cache.
High-speed interconnecting fabric
PowerMax RDMA communications are subject to fabric latency, thereby making the PowerMax a Non-Uniform Memory Access (NUMA) system. A key requirement for PowerMax Global Cache (and NUMA systems in general) is that the fabric that transports the internode RDMA communications must be extremely low latency and have high bandwidth. For this reason, PowerMax uses the InfiniBand (IB) protocol as its primary internode fabric. IB is a fabric technology and set of protocols most often seen in high-performance computing (HPC) environments such as Wall Street’s real-time trading and risk analysis applications. It is used in these environments because it natively provides:
- A highly energy-efficient, high-bandwidth, and low-latency fabric: In PowerMax, the IB fabric is run in connected mode, where a single lane can transmit 100 Gbps with MTUs of 2 MB. Larger single-lane data transfer is more efficient than smaller multilane data transfer because more data is transferred using a single clock cycle—consuming far fewer compute resources to transfer data. Studies have shown that when run in connected mode, IB is over 70 percent more energy efficient per byte sent than other RDMA fabric choices such as Ethernet: Evaluating Energy Efficiency of Gigabit Ethernet and Infiniband Software Stacks in Data Centres (IEEE study).
- Scalability: IB can support tens of thousands of fabric endpoints in a flat single-subnet network. Thus, you can scale the PowerMax disaggregated architecture by adding independent compute and storage endpoints into the fabric without having to add more subnets and without incurring additional latency penalties.
- High security: The protocol is implemented in hardware, and the communication attributes are configured centrally in a way that does not enable software applications to gain control over them and maliciously spoof or change those attributes.
- Resiliency: RDMA data transfers can be protected with SCSI T10-DIF Protection Information. This allows detection of data corruption from many sources, and, with the PowerMax redundant architecture, the correct data can always be referenced.
Implementation
Using RDMA and NVMe-oF with an IB fabric architecture, the PowerMax Dynamic Fabric delivers the high levels of performance, scalability, efficiency, and security that enterprise customers require. Implementation of the Dynamic Fabric to achieve these outcomes is different between the PowerMax 2500 and PowerMax 8500.
PowerMax 2500
A PowerMax 2500 can scale up to two node pairs. Each node pair comes with its own direct-attached PCIe DME. A key architectural part of the PowerMax 2500 Dynamic Fabric is the use of PCIe multihost technology. In the case of the PowerMax 2500, PCIe multihost allows both nodes to share each other's internal PCIe IB 100 Gb Host Channel Adapter (HCA), creating a high-speed, switchless fabric between the nodes for low-latency RDMA communication. Data transfer between the nodes and direct-attached PCIe DMEs uses a x32 lane NVMe/PCIe fabric.
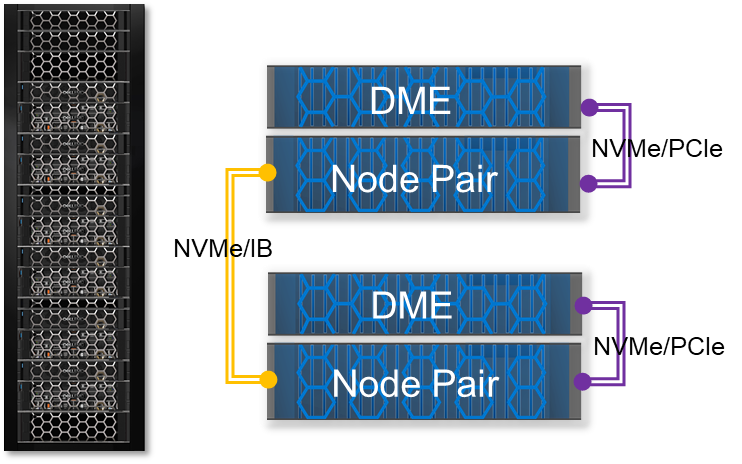
The Dynamic Fabric configuration on the PowerMax 2500 allows the system to deliver performance and scalability in a compact package. It allows for higher levels of efficiency because the PowerMax 2500 can store up to 7x more capacity in half the rack space (over 4 PBe in 5U) compared with the earlier-generation PowerMax 2000. Along with its compact design, the 2500 supports the full complement of rich data services for open systems, mainframe, file, and virtual environments.
PowerMax 8500
The PowerMax 8500 Dynamic Fabric is a fully switched 100 Gbps per lane, NVMe/IB fabric that is used by all RDMA communications and NVMe data transfers. This is different from the PowerMax 2500 where the NVMe data transfers from the node to its PCIe-connected DME use NVMe/PCIe. On the PowerMax 8500, each compute node and storage DME are treated as unique endpoints on the fabric, allowing them to be added into the fabric independently of each other while being able to access all other endpoints. The system nodes and DMEs are fully disaggregated and dynamically connected, allowing the system to scale up compute to eight-node pairs while scaling out storage to eight DMEs—providing over 18 PBe in a single system.
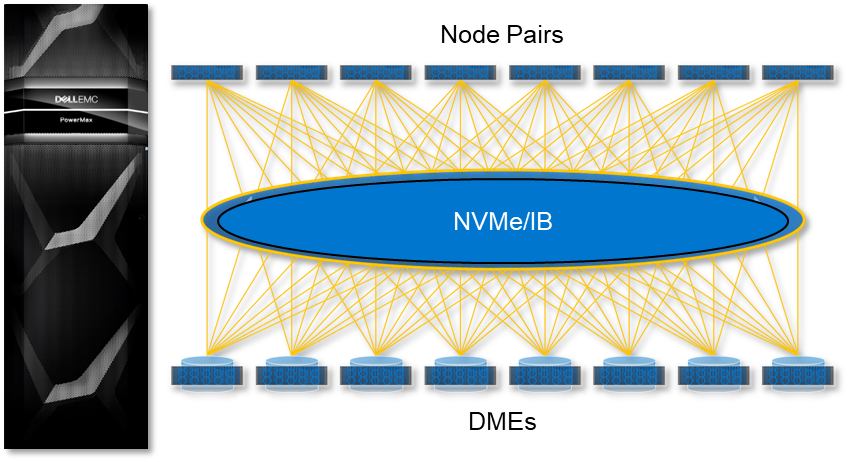
Another difference with the Dynamic Fabric on the PowerMax 8500 is the use of intelligent DMEs. The DMEs connect into the NVMe/IB fabric using dual Link Control Cards (LCCs), each with dual 100 Gb IB ports. Each LCC board has its own NVIDIA BlueField data processing unit (DPU), allowing it to perform critical storage management functions such as fabric offload. The LCCs with their DPUs essentially make each PowerMax 8500 DME a unique active/active, dual-controller NVMe storage subsystem on the fabric.
Conclusion
The Dynamic Fabric is what enables the PowerMax 2500 and 8500 to function as a true active/active, share everything architecture for enterprise storage. With this native architecture, customers can:
- Achieve high levels of fault tolerance and resiliency natively without the need for costly additional hardware and software
- Meet workload requirements with less power and fewer resources
- Scale up and scale out with no manual intervention for load balancing or other backend clustering operations, which are performed automatically by PowerMaxOS
The Dynamic Fabric is the key component that allows for the low-latency, high-bandwidth connections required for RDMA communication between the nodes and for the extensive NVMe data processing and movement between the nodes and DMEs in the system. The Dynamic Fabric is the backbone of the PowerMax 2500 and 8500. It allows the systems to deliver the kind of performance, security, efficiency, and scalability required by the modern data center.
Resources
- The Next-Generation PowerMax Family Overview White Paper
- The PowerMax 2500 and 8500 Specification Sheet
- The PowerMax 2500 and 8500 Data Sheet
- New PowerMax Architecture adds NVIDIA Bluefield DPUs
Author: Jim Salvadore, Senior Principal Engineering Technologist
Email: james.salvadore@dell.com

Announcing Serviceability Improvements for PowerMax Embedded Management
Wed, 05 Apr 2023 16:35:53 -0000
|Read Time: 0 minutes
PowerMax 8500 and 2500 models have been launched Q4 2022 and with it came new management tools: specifically, Unisphere for PowerMax 10.0. The embedded management option is only applicable to the new PowerMax 8500 and 2500 models. If you are managing a VMAX All Flash array or a PowerMax 200/800, you can still use Unisphere for PowerMax 10 in an installed version on a supported operating system. This blog focuses on the features unique to embedded management, specifically around serviceability enhancements.
The vApp management interface has been retired
No, you didn’t read that heading wrong. The vApp interface in Unisphere for PowerMax 10 is no longer needed.
This means that you no longer need to point a browser at a different port and manage two sets of passwords. All the functionality in that second interface is now where it belongs, in the main UI, including:
- IP, DNS, and NTP settings management
- Solutions Enabler settings
- Certificate management
- Service Access for Dell support staff
- Updates to Unisphere versions
- Download log files
Using Unisphere to access serviceability settings
From Unisphere, simply click the local array. The serviceability icon appears in the left panel, as shown here:
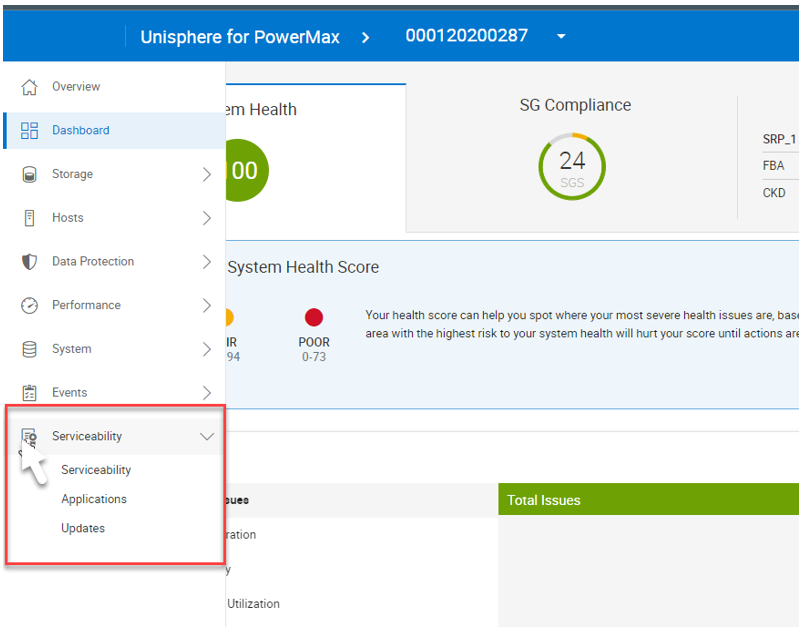
From here you can access and manage that functionality mentioned above:
- IP, DNS, and NTP settings
- Solutions Enabler settings
- Certificates
- Service Access for Dell support staff
- Updates to Unisphere versions
- Download log files
One key item to note: when updating any of the settings under Solutions Enabler Settings, the change is automatically propagated to the standby container. This means that you only need to do this once, such as when configuring client/server access, updating general SYMAPI options, or setting up symavoid.
There are two new options:
1. Service Access – enabling this option allows Dell support to dial into the array and view the Same Unisphere UI that customers see. This is a valuable option for saving time on support calls.
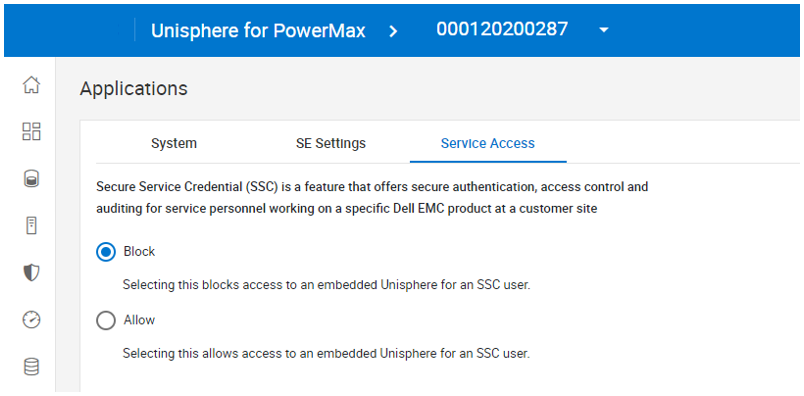
2. Updates – Customers are now in full control of downloading and installing new versions of Unisphere on their embedded management system. (With earlier systems, upgrades were scheduled with code upgrades and patches to the array.) To self upgrade, customers need now only connect an array to the Secure Services Gateway.
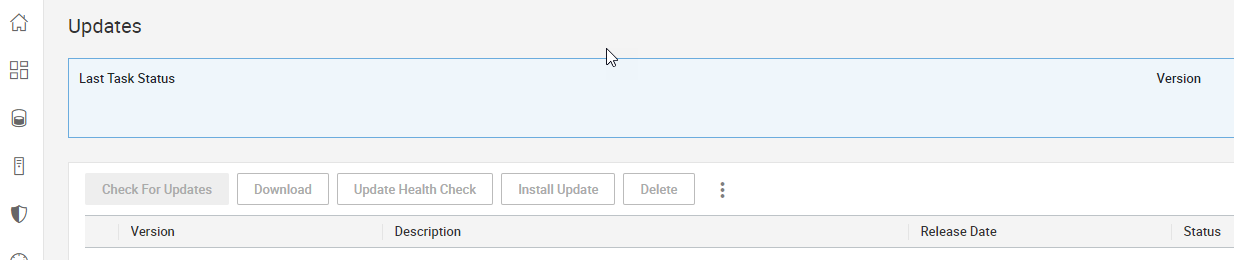
I think customers will agree that consolidating these settings into the main UI makes everything easier. In a future blog post, I’ll show you how to use the new serviceability UI to configure Client Server connectivity, to enable CLI access from a remote client.
Author: Paul Martin

Querying Your PowerMax Devices in z/VM
Tue, 21 Mar 2023 14:26:50 -0000
|Read Time: 0 minutes
If you are running the IBM z/VM hypervisor, you can install, and run, and manage various operating systems on it. When managing PowerMax devices on z/VM (called minidisks), you use a Unit Control Block (UCB) as a virtual device identifier. This is important to know when assigning and working with the devices in z/VM and the guest operating systems.
With PowerMax and VMAX, there are Symmetrix IDs associated with a device. My customers ask how to translate a given UCB on the z/VM hypervisor that deduces the Symmetrix ID. Dell Technologies created a ‘freeware’ program called SYMMQRY that enables you to:
- Run a command on z/VM with the UCB as input
- Use the SYMMQRY command, which provides z/VM with the Symmetrix ID for users of that device
The use case is that a customer who is using Solutions Enabler to execute commands against their PowerMax or VMAX needs the Symmetrix ID to complete the execution. Leveraging the SYMMQRY command on z/VM provides the information needed to get the Symmetrix ID to execute the needed Solutions Enabler command(s). I’ve outlined a process below that explains:
- Notes and hints about the SYMMQRY program
- A summary of the SYMMQRY program
- How to get the command
- Installing the command
- Using the command
Notes and hints about the SYMMQRY program
- This program is considered ‘freeware’ as described in this KB article.
- Although the source indicates that there is an ‘ALL’ option, it currently only works on a single device.
- Because the program is freeware, you have access to the source. If you have someone proficient with assembler, then they can modify it to meet their needs.
Summary
Dell Technologies provides the freeware program SYMMQRY to translate between a UCB and a SYMMID. When unpacking SYMMQRY, you get two files: the source and module files. For more information, see the KB article.
Getting the SYMMQRY program
- Read the KB article.
- In the Attachments section of the article, download the SYMMQRY.VMARC file.
Installing the SYMMQRY program
- If you don’t have VMARC (the IBM utility to unpack VMARC), download VMARC and install it.
- Upload the SYMMQRY.VMARC file to z/VM
- During the FTP process, ensure that the transmission to z/VM is done in BINARY.
- To ensure that you are uploading the SYMMQRY.VMARC file in FIXED format, open a CMS window and use the FTP quote subcommand.
- On the z/VM user where SYMMQRY VMARC is, unpack the file (assuming the file is on my ‘A’ Fm)
- I used ‘VMARC UNPK SYMMQRY VMARC A’
- After unpacking the SYMMQRY VMARC file, you should see the following output:
SYMMQRY ASSEMBLE A1... <bytes in and out information>
SYMMQRY MODULE A1… <bytes in and out information>
The source code file is called SYMMQRY ASSEMBLE. The module file is called SYMMQRY MODULE.
Using the SYMMQRY program
- While in CMS, attach a UCB to the z/VM userid that you want to query.
- Execute the SYMMQRY command against that device.
a. USERID JBASTIN, Device - 7700
q 7700
DASD 7700 CK7700
b. Ready;
att 7700 *
DASD 7700 ATTACHED TO JBASTIN 7700 WITH DEVCTL
c. Ready;
q 7700
DASD 7700 ATTACHED TO JBASTIN 7700 R/W CK7700
d. Ready;
symmqry 7700
DASD RDEV SYMMQRY :CAP(CYL/MB) UCODE SYMM-SER/ALPHA
7700 7700 032E 10017/8514 5978 0001976-00191/AWCTY
Output format
UCB = 7700
RDEV = 7700
SYMMQRY = 032E (this is the SYMMID you requested)
:CAP(CYL/MB) – Capacity information
UCODE: PowerMax Operating System level
SYMM – Symmetrix Serial Number
Alpha – If you look in Unisphere this is the SPLIT ‘Alpha Serial #’. This is just another way to identify the split. Here is a screen shot of what mine is in Unisphere:

In conclusion, the SYMMQRY is a freeware program that offers z/VM you additional insight into your PowerMax/VMAX investment. Customers who are knowledgeable about Assembly language can modify SYMMQRY and customize it for their needs.
Author: Justin Bastin

Introducing Terraform Provider for PowerMax v1.0
Mon, 13 Mar 2023 19:06:05 -0000
|Read Time: 0 minutes
There are a number of tools for managing your Infrastructure as Code, from Basic REST API commands that you can script together in the language of your choice to more sophisticated engine tools like Ansible, Terraform, Chef, SaltStack or Cloud Formation.
Dell already provides comprehensive support for REST API and Ansible Collections for Dell storage arrays and is now releasing providers for Terraform for server and storage products. (A Terraform provider is a plugin that enables Terraform to interact with the vendor API.) Initially Dell will publish providers for PowerMax, PowerStore, and PowerFlex storage on Terraform registry to enable user access to published resources to manage these storage arrays.
Terraform is an open-source infrastructure-as-code software tool created by HashiCorp. In Terraform, users define data center infrastructure using a declarative configuration language known as HashiCorp Configuration Language (HCL), which is relatively simple and similar to YAML. Terraform encourages a declarative style where you write code that describes your desired end state of your configuration, and Terraform figures out how to get to that end state. Terraform is also aware of any state it created in the past as it tracks whether the configuration is a state file stored locally or in version control.
A Terraform configuration is a complete document in the Terraform language that tells Terraform how to manage a given collection of infrastructure. A configuration can consist of multiple files and directories. This blog takes you through a basic configuration with the PowerMax provider.
(Note: Sample code is published on the Dell GitHub page where the Terraform provider is hosted. This first PowerMax provider for Terraform concentrates on storage provisioning operations, creating masking views, and managing the storage volumes for your applications. More features will come online with later releases based on customer feedback.)
Setting up the PowerMax provider for Terraform
Before configuring anything, it is important to note that the Terraform provider will communicate with Unisphere for PowerMax using REST. At a minimum you will need a user account with storage administrator privileges for the arrays that you need to manage.
To start working with Terraform you will need to install Terraform. See Terraform guides for official documentation. In my case, the host was Red Hat so I simply ran
yum install terraform
After you have installed Terraform, you need to set up any third-party providers you will work with. These are located on the Terraform registry (think of it as an Appstore).
To install the PowerMax provider, copy and paste the code snippet from the Use Provider link for your Terraform configuration file. For example:
terraform {
  required_providers {
    powermax = {
      source = "dell/powermax"
      version = "1.0.0-beta"
    }
  }
}
provider "powermax" {
  # Configuration options
}
In my case, I have a flat directory structure with a few files in it. The first file is provider.tf that contains this text shown here.
When the provider file has the required code for the vendor providers, run
terraform init
At this point, the system is set up and ready to run Terraform with PowerMax storage.
Defining PowerMax configurations in Terraform
With Terraform installed and and the provider set up, we now need to explore the other files we’ll need to manage a configuration with Terraform.
All Terraform configurations store configuration in a state file (usually terraform.tfstate). This file keeps track of configuration information about managed objects and is used for the idempotency features of Terraform configurations. The state file can be local to the Terraform host but if you have multiple users, or if you are using automation and CI/CD pipelines to run Terraform, the state file needs to be accessible, place the state file on shared storage. Grant permissions as needed. Here’s what my state file looks like, pointing to a shared storage location on an S3 bucket:
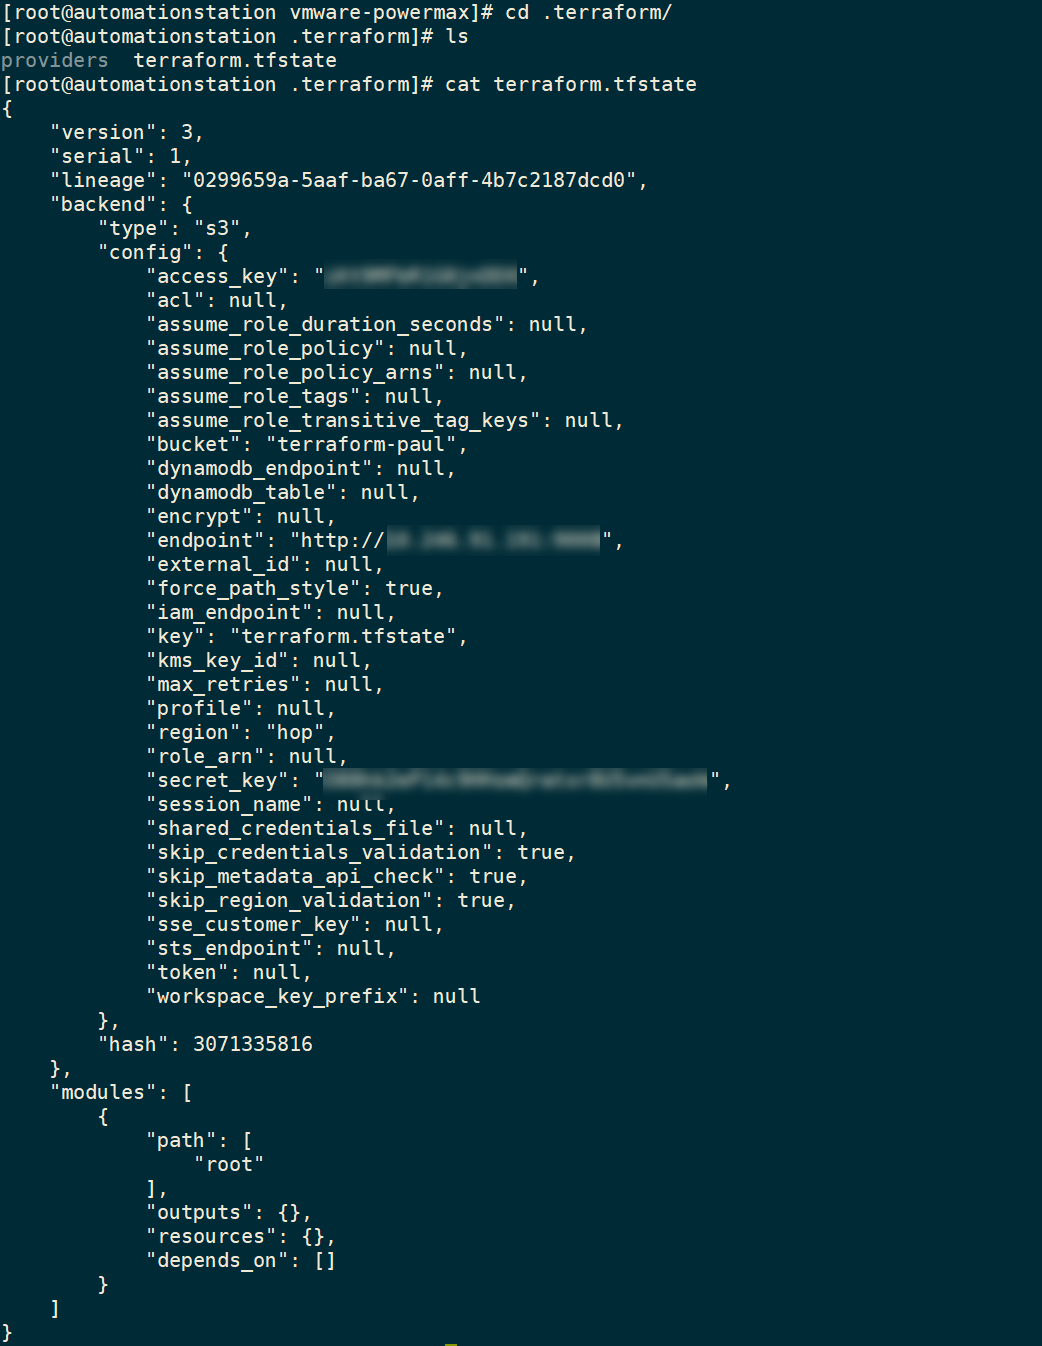
Now that we’ve set up a shared state file, I can create my configurations for managing my PowerMax Storage configurations.
Creating configurations in Terraform for PowerMax
There are three stages to creating a configuration with Terraform:
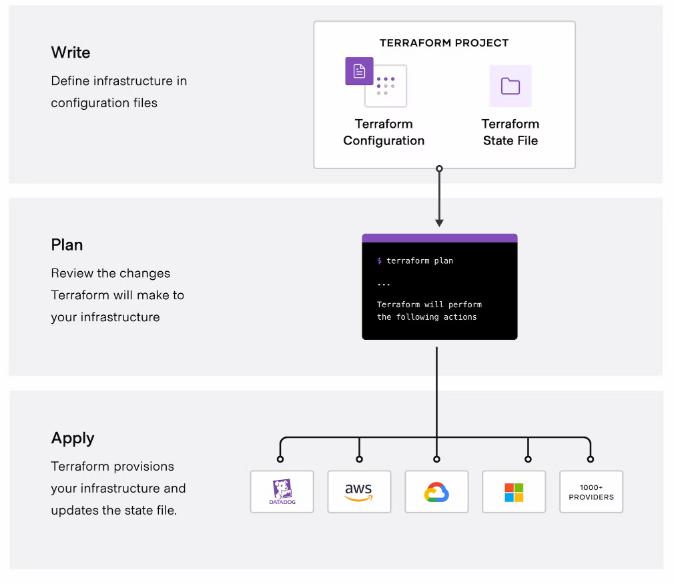
(Image credit https://developer.hashicorp.com/terraform/intro.)
Write the configuration
To write configuration files for PowerMax infrastructure, you can use the sample code snippets for each of the resources, available on the Terraform registry or on the Dell GitHub for the Terraform provider. You can copy and customize the code to meet your requirements.
In the following example configuration, the file defines resources for the storage group, volumes, masking view, port group, host, and host group. The configuration also defines some VMware resources to create a datastore from the newly configured PowerMax device.
resource "powermax_storage_group" "tmevcenter_sg" {
  name          = "tmevcenter_sg"
  srpid         = "SRP_1"
  service_level = "Diamond"
}
resource "powermax_host_group" "BETA_CLUSTER" {
  name       ="BETA_CLUSTER"
  host_flags = {}
  host_ids   = ["DELL52", "DELL55"]
}
resource "powermax_host" "DELL52" {
  name       = "DELL52"
  initiators = [
               "100000109b56a004",
               "100000109b56a007"]
  host_flags = {}
}
resource "powermax_host" "DELL55" {
  name       = "DELL55"
  initiators = [
                 "100000109b56a016",
                "100000109b56a0ca"]
  host_flags = {}
}
resource "powermax_port_group" "tmevcenter_pg" {
  name     = "tmevcenter_pg"
  protocol = "SCSI_FC"
  ports = [
    {
      director_id = "OR-1C"
      port_id     = "0"
    },
    {
      director_id = "OR-2C"
      port_id      = "0"
    },
    {
      director_id = "OR-2C"
      port_id     = "1"
    },
    {
      director_id = "OR-2C"
      port_id     = "1"
    }
  ]
}
resource "powermax_volume" "volume_1" {
  name               = "vcenter_ds_by_terraform_volume_1"
  size               = 20
  cap_unit           = "GB"
  sg_name            = "tmevcenter_sg"
  enable_mobility_id = false
}
resource "powermax_masking_view" "tmevcenter_mv" {
  name           ="tmevcenter_mv"
  storage_group_id = powermax_storage_group.tmevcenter_sg.id
  port_group_id = powermax_port_group.tmevcenter_pg.id
  host_group_id = powermax_host_group.BETA_CLUSTER.id
}
data "vsphere_vmfs_disks" "available" {
  host_system_id = data.vsphere_host.main_esxi_host.id
  rescan         = true
  filter         = "naa"
}
resource "vsphere_vmfs_datastore" "datastore" {
  name           = "terraform-test"
  host_system_id = data.vsphere_host.main_esxi_host.id
  disks = ["naa.${lower(powermax_volume.volume_1.wwn)}"]
}
Plan the configuration
Running the plan command from the configuration directory will output any changes needed on the PowerMax array and vCenter without executing. You can compare the plan against your change requests to ensure that it will produce the expected results.
terraform plan
The following output from the terraform plan command shows objects that will be created by applying the plan outlined in the configuration.
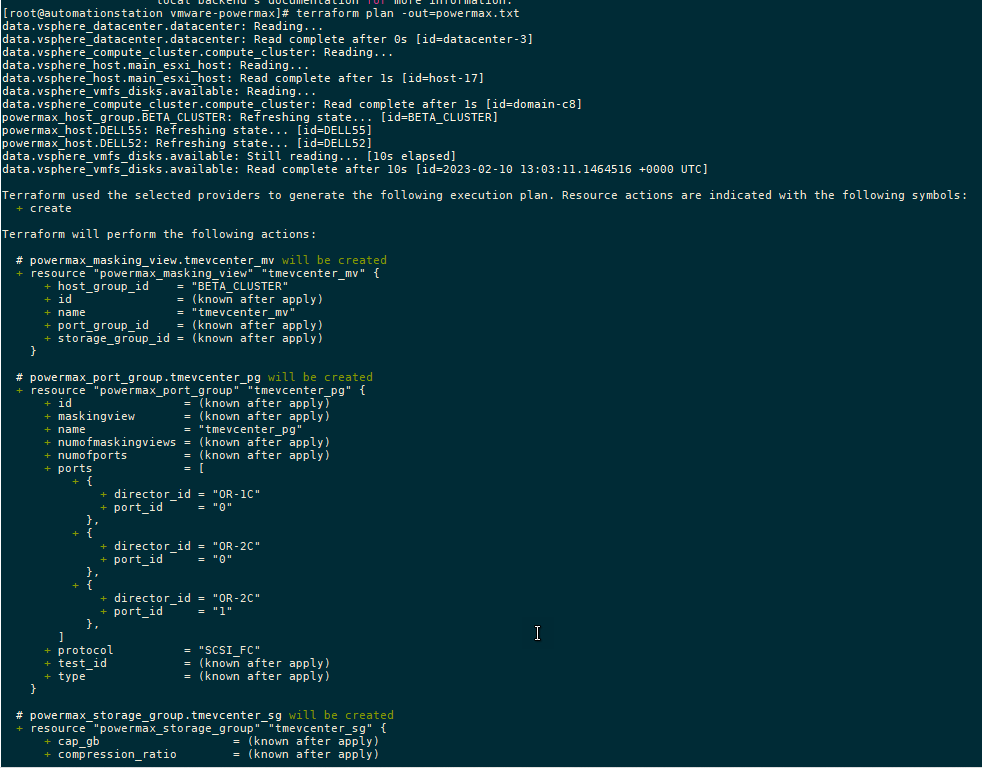
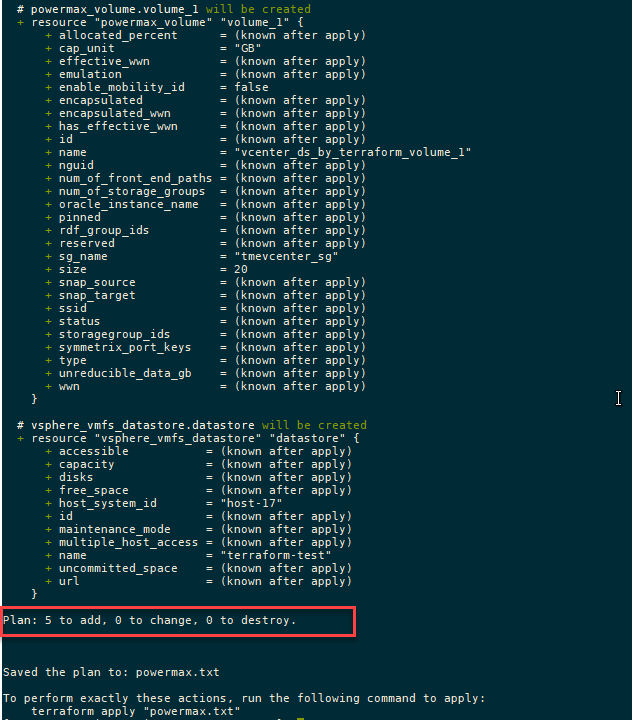
After creating the plan, we get a summary of the output. In this case, Terraform will add five objects and create the datastore, storage group, volumes, port group, and masking view.
A note about working with existing storage objects
If you are working with existing objects, you must import them into the Terraform state file before applying and executing your configuration. To do this, run terraform import command.
For example, to import a host group resource called MY_CLUSTER, specify:
terraform import powermax_host_group.MY_CLUSTER MY_CLUSTER
To view the state of any managed object in your state file, you can check it with the terraform state show command, as shown here:
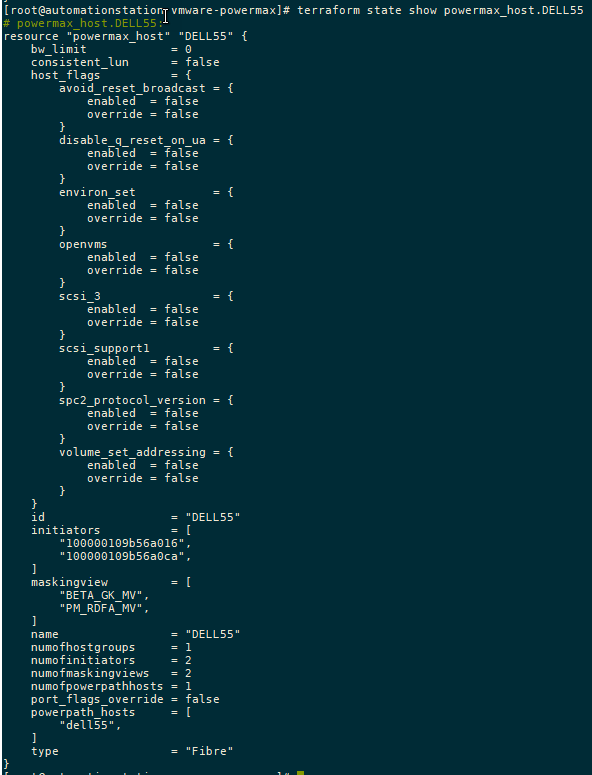
Apply the configuration
Executing the plan with the apply command runs the configuration changes:
terraform apply
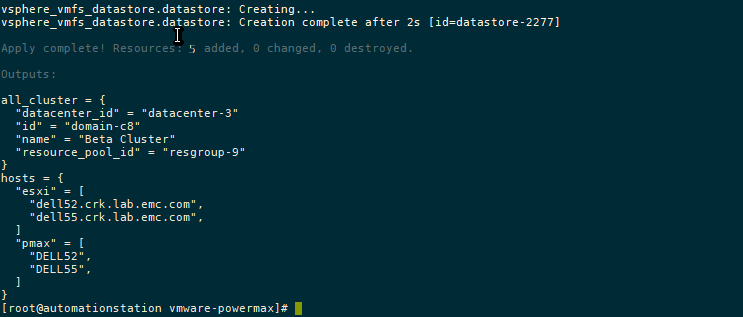
Conclusion
As I mentioned earlier, this is the first installment of the Terraform provider for PowerMax. As you can see, the main functionality is around the provisioning of storage. In future releases we’ll add more functionality.
To provide any feedback, use the issues section on the GitHub. If you are already using Terraform to manage your configuration, the PowerMax provider will no doubt prove useful in assisting your automation journey!
Authors: Paul Martin, Florian Coulombel

Getting Started with the PowerMax REST API: Time for a REST
Mon, 13 Mar 2023 18:24:33 -0000
|Read Time: 0 minutes
So, a few years down the line and over 15,000 views later, I’ve decided to refresh my infamous “Time for a REST” post and put it in a new, permanent location on Info Hub. The original site has been retired, so I’ve rewritten and updated the post here.
This blog post will not teach you Python, and it assumes basic programming skills. I recommend Learn Python the Hard Way—It’s totally free. If you want to dig deeper, the $60 course at RealPython.com is a worthwhile investment in yourself.
This blog post covers some basics on REST. If you want to explore it further, there’s a mountain of information available. You could even ask ChatGPT, which is all the rage at the moment.
I will, however, give a brief overview here. If you already know about REST and just want to know about the PowerMax REST API, you can just skip the next section.
What is REST API?
REST, which stands for Representational State Transfer, is an architectural style of shaping web services. It is not a standard but, rather, a style describing the act of transferring a state of something by its representation. An API s a set of routines, protocols, and tools for building software applications. An API specifies how software components should interact and are used when programming UI components. Basically, REST API gives you a way of interacting with an application without having to know every detail about how the underlying application is implemented.
Why REST? I can think of more than a few reasons, but here are some of my top reasons for using REST:
- Simplicity—REST is based on HTTP protocols. If you know how to use a web browser by entering an address to get information from a website, you already know a little about REST.
- Industry Standard—REST is widely used everywhere. Look at any web application out there —for example, Service Now, Amazon, maps.com, weatherchannel.com, to name but a few —and you’ll probably find that it has a REST API. REST is very lightweight and easy to get started with. Pretty much every enterprise application provides a REST interface and a way to connect and get information to other REST APIs.
- Choice—You’re not stuck with one toolset; you can use any programming language you’re already familiar with to work with REST. This means that you don’t have to retool if you don’t want to; however, there are great tools out there that might persuade you to choose one language over another. Modern languages, like Python for example, are easy to learn and have a ton of resources and packages already written to help.
- Versatility—Providing a REST interface into our products makes it very easy for people to plug in and build on the work that’s already engineered into the system. It also enables other vendors and customers to build tools that interface with the PowerMax REST API and increase options for customers.
This YouTube video gives a great explanation of other REST APIs and some ideas about how to use them: REST API concepts and examples.
REST is really what makes automation possible. The PowerMax REST API enables storage configurations to be dynamic and automated through Infrastructure as Code (IaC) tools such as Ansible, Terraform, Puppet, and so on.
REST is also very useful for reporting and data mining; we have many customers pulling information from the system into tools such as Splunk and Grafana.
Types of REST calls
REST is all about state—getting the states of objects, creating new objects by providing their representative state, and changing the state of an existing object or deleting the object.
Unisphere for PowerMax REST API supports the following types of REST calls:
- GET—Get state information on objects.
- POST—Call to create an object.
- PUT—Make an edit to an object’s state. Typically, you have to do a GET to ensure that you have all the information before you can do a PUT.
- DELETE—Remove object.
For more general information about REST, check out Getting Started with REST API.
Securing your REST API access
Security is always a concern, and working with REST APIs you will need to authenticate. The method might be different, depending on the API, Some APIs will work with tokens, while others will work with username and password (Basic Authentication).
For the PowerMax REST API, each call is verified with Basic Authentication over HTTPS by username and password. With this authentication method, users can have granular roles, and their REST calls can be limited to specific arrays/storage groups and functions. For example, a user could be set up so that the user can only create snapshots for a specific set of storage groups. For more information about role-based access, see the Unisphere for PowerMax API documentation.
What can I do with the PowerMax REST API?
Before we get into making an API call, it’s worth looking at what can be done with the PowerMax REST API. The following figure gives a high-level overview of the main tasks that you can perform. In addition to the components shown, there is a migration API, Workload Planner API, and vVOL API.
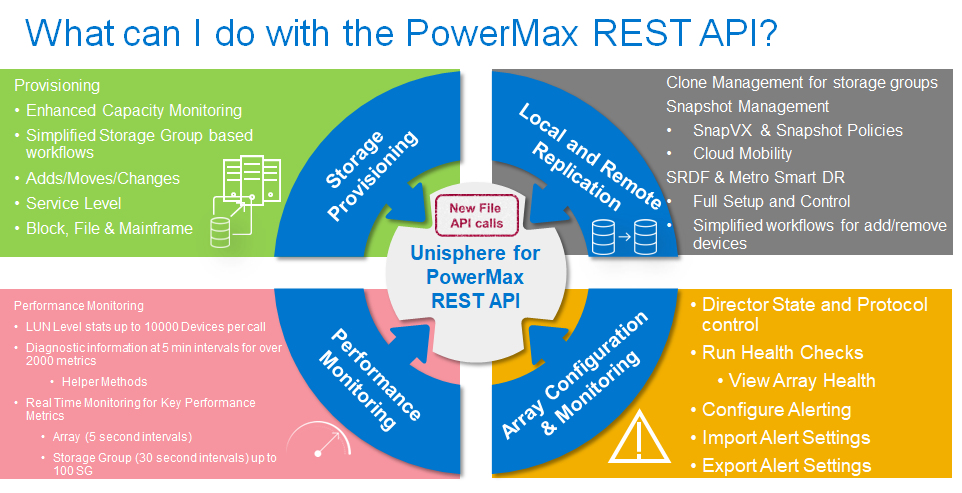
Storage group based control with PowerMax REST API
Unisphere for PowerMax is designed around the concept of the storage group for management of applications. A storage group is a container for a set of devices that are related in some way, usually representative of an application or a tenant with data on the PowerMax array.
Most operations using REST API are built to take advantage of the storage group as a control entity—for example, SnapVX and SRDF. Using a storage group for management reduces the number of objects that storage administrators need to manage. A storage group must exist for masking devices to a host for access through the SAN so that REST can take advantage of this construct.
Some legacy processes might need to be re-worked so that they fit into the storage group operation workflows. Historically, operating systems reacted badly to volumes being removed and re-added; however, modern operating systems are no longer sensitive to these types of changes.
Accessing the PowerMax API documentation and schema
Now that we’ve covered the bare bones of REST and some of what’s possible with the PowerMax REST API, we can look at making an actual REST API call. To make a REST call, you will need to know the structure of the API schema.
All REST API schemas for Dell products are published on https://developer.dell.com. This site provides for unrestricted access to assist developers who might not have access to Dell support materials. From the overview section, the documentation, which includes sample payloads and responses, can be downloaded in an OpenAPI.json file, or you can browse the documentation on the site.
The PowerMax API is organized by functional resource. Each API call is prepended with https://{{ipaddress|hostname}}/univmax/restapi, where ipaddress|hostname is the Unisphere for PowerMax server address managing the array that you want to control or gather information about. This section of the URI is known as the Base URI.
Depending on what you want to do next, you will need to look at the documentation and follow the resource tree. Any active management API call to the PowerMax array will have a version that is specified after the URI, for example: https://{{ipaddress|hostname}}/univmax/restapi/{{API_version}}/sloprovisioning/symmetrix
This API call will find information about what arrays are managed by the Unisphere server.
Making a REST call
A simple GET call using the Client for URL tool cURL looks something like this:
curl --url https://UnipshereIPaddress:8443/univmax/restapi/version --insecure -u username:verysecretpassword
States are transmitted and received in JSON. JSON stands for JavaScript Object Notation. JSON is easily readable, consisting of key value pairs. The key is on the left, and the value is on the right, with : separating key and value.
The response to the GET version API call above is a JSON payload containing the version of Unisphere, the current API version, and a list of supported API versions. Here’s an example:
{
  "version": "T10.0.1.448",
  "api_version": "100",
  "supported_api_versions": [
    "100",
    "92",
    "91"
  ]
}
Making a POST or PUT call either creates or updates an object on the PowerMax array. Unlike a GET call, which is much simpler, you need to send a payload describing the object you want to create or the changes you want to make.
curl -X PUT \
  -H "Content-Type: application/json" \
  -H "Authorization: Basic <base64 encoded username:password>" \
  -d ' {
   "executionOption": "SYNCHRONOUS",
   "storageGroupId": "API_Created_SG",
  "srpId": "SRP_1",
   "sloBasedStorageGroupParam": [
    {
       "volumeAttributes": [
        {
           "capacityUnit": "TB",
           "volume_size": "1",
          "num_of_vols": 2,
           "volumeIdentifier": {
             "volumeIdentifierChoice": "identifier_name",
             "identifier_name": "API_Created_1TB_Volume"
          }
        },
        {
           "capacityUnit": "GB",
           "volume_size": "1",
          "num_of_vols": 2,
           "volumeIdentifier": {
             "volumeIdentifierChoice": "identifier_name",
             "identifier_name": "API_Created_1GB_Volume"
          }
        }
      ]
    }
  ]
}' \
  "https://{{ipaddress|hostname}}/univmax/restapi/100/sloprovisioning/symmetrix/000120200287”
Here's a breakdown of the different parts of the cURL command:'
-X PUT: Specifies that we are using the PUT HTTP method to update a resource.
-H "Content-Type: application/json": Specifies the content type of the request body as JSON.
-H "Authorization: Basic <base64 encoded username:password>": Specifies the authorization header with a base64-encoded string of your PowerMax username and password. Note that this is just an example; you should never expose your username and password in plain text.
-d 'payload': Specifies the JSON payload. In this example, it will create a storage group on array serial 000120200287 with four volumes, two of 1 TB and two of 1 GB.
"https://{{ipaddress|hostname}}/univmax/restapi/100/sloprovisioning/symmetrix/000120200287": Specifies the URL of the resource to create the object.
Building the payload for your POST and PUT calls is generally the toughest part of creating a REST call. The API documentation includes examples that can be copied and pasted with the minimum required keys. Note there are additional keys that can be added to take advantage of more advanced features should your workflows require them.
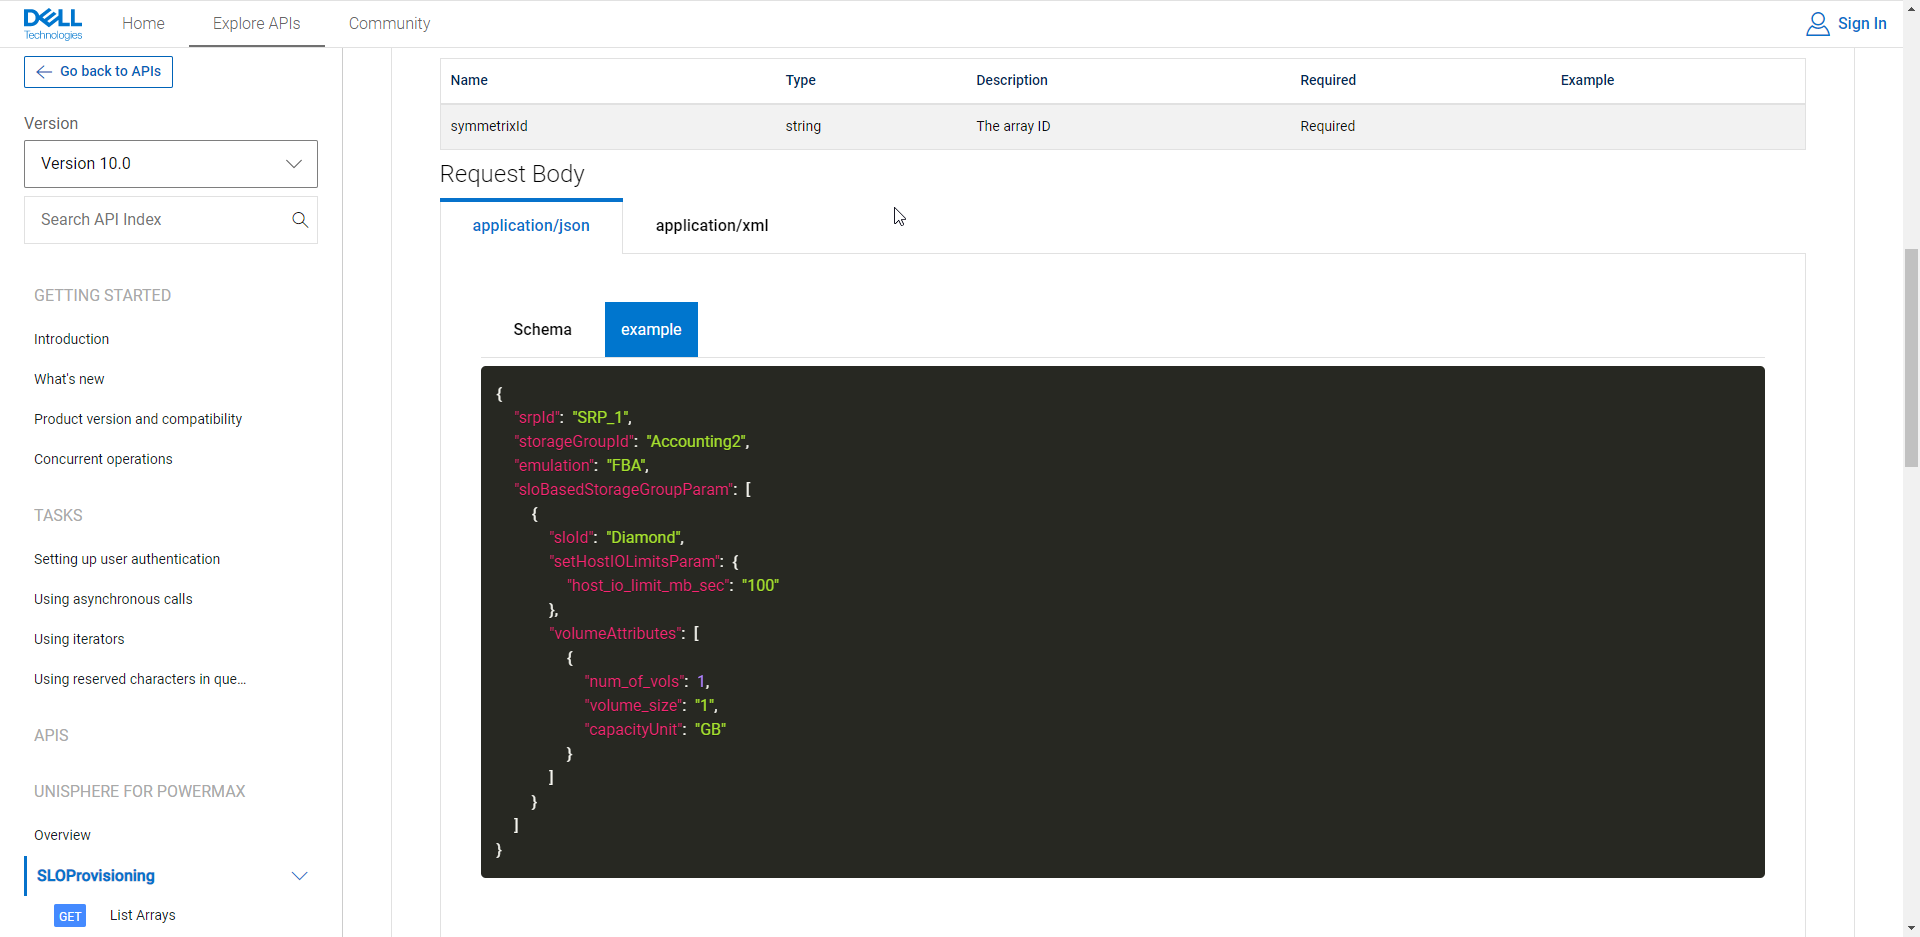
Beyond the basics
At this point, we’ve discussed the structure of API calls and how to create some cURL command, but that’s not really automation, is it?
To truly take advantage of the API, you will want to write some reusable scripts. And that is where we are here to help. The next section introduces you to our Python SDK, which is pre-loaded with pre-written and documented functions covering all the major API functionality, taking your API usage to the next level.
Jump-starting your REST development with PyU4V
If you’re just getting started with the PowerMax REST API, the good news is that there are tools out there to help you. A small team within Dell Engineering has produced a Python SDK library with hundreds of useful functions that can be consumed in Python scripts. The library is fully documented at https://pyu4v.readthedocs.io, and source code is available at https://github.com/dell/PyU4V. There have been many releases at this stage, and download statistics show that it’s heavily utilized.
PyU4V can be installed on a system with Python. Simply enter pip install PyU4V to install the latest.
The version of PyU4V will match the version of Unisphere. You can use older versions of PyU4V to access older versions of endpoints. They will continue to operate and return the same information regardless of the Unisphere version; however, for the latest functionality, you should aim to be on the latest version.
With the PyU4V function library installed, you should be good to start writing your scripts.
PyU4V pre-written functions are organized into function modules. Complete details are on the documentation website:
https://pyu4v.readthedocs.io/en/latest/quick_start.html#pyu4v-unisphere-rest-coverage
You might want to install a good IDE to help you write the code (IDE is integrated Development Environment. It helps with keeping track of variables and autocomplete on method names and variable calls, and so on). I really like pycharm; I’m sure there are others, but this one has served me well.
As with any programming task, we usually start with Hello World!. In this case I’m going to connect you to your Unisphere instance and list the arrays attached.
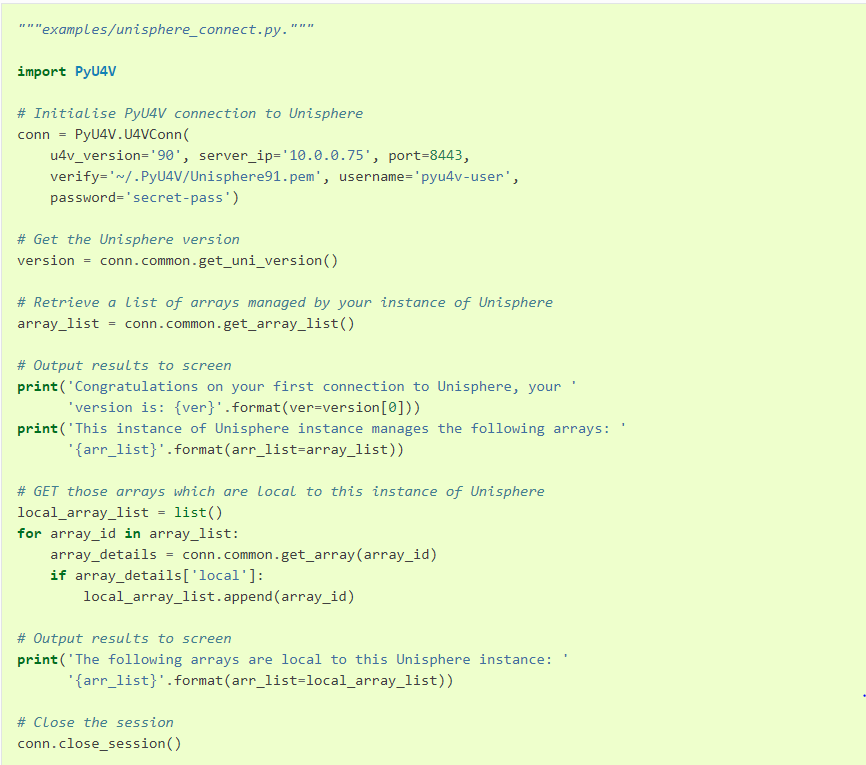
Running the script is as follows:

Other examples are in the programmers’ guide section of the PyU4V documentation; take some time to review them. For any call that is not covered in PyU4V, you can always use the custom methods. I’ll write some more about this in a follow-up post.
This post has been shortened from its original length, hopefully making it easier to consume.
I’ll be posting additional sections on gathering performance stats and working with snapshots in future blogs.

Important Updates in Dell’s Geographically Dispersed Disaster Restart (GDDR)
Tue, 30 Aug 2022 20:53:25 -0000
|Read Time: 0 minutes
Dell Technologies created Geographically Dispersed Disaster Restart (GDDR) to provide mainframe customers a comprehensive business continuity automation product for their Dell PowerMax Storage and Disk Library for mainframe virtual tape environments. GDDR achieves this by reacting to events within your IT environment.
The three functions of automate, react, and monitor (ARM) combine to enable continuous operations across both planned and unplanned outages. GDDR is designed to perform planned data-center site-switch operations and to restart operations following disasters. These incidents can range from the loss of compute capacity or disk-array access, to the total loss of a single data center, or a regional disaster resulting in the loss of dual data centers. GDDR also provides automation to protect data from cyberattack in a separate physical vault array. For more information about GDDR, see the document GDDR (Geographically Dispersed Disaster Restart) for PowerMax 8000 and VMAX ALL FLASH 950F.
Dell’s GDDR 5.3 enhancements
GDDR introduced an exciting new feature in GDDR 5.3 called Cyber Protection Automation (zCPA) which populates a separate physical cyber vault for your mainframe environment. zCPA automates cyber protection copy creation and preservation by using Dell’s Data Protector for z Systems (zDP). zCPA automates the creation and transmission of PowerMax snapshots to a physically separate cyber vault PowerMax array. This provides a protected copy of data that can be used for testing purposes, recovery from a cyber event, or an analytical process to better understand the extent of damage caused by a cyberattack.
The transmission of data to the cyber vault leverages SRDF/Adaptative Copy. To take advantage of zCPA, customers need GDDR 5.3 with the zCPA PTF, Mainframe Enabler 8.5, and a PowerMax at 5978.711.711 or higher.
Unique benefits of GDDR zCPA types
zCPA supports air gapped and non-air gapped physical cyber vaults. Any site in a GDDR topology can be an attached cyber vault array managed by zCPA. To provide customers choice, there are three types of methods for creating zCPA vault arrays. The three zCPA types are defined by the different configuration and operational attributes that dictate how zCPA will function.
zCPA Type 1
- Type 1 is defined as an environment that has no airgap in connectivity between a data center and the cyber vault. The data copied to the cyber vault is initiated when a newly created zDP Snapset is detected. The cyber vault in Type 1 does not have to be a dedicated physical vault and could be another storage array within the production data center. This type is the default for zCPA.
zCPA Type 2
- Type 2 is an air-gapped environment between two storage environments. The data copied to the cyber vault is triggered by SRDF link online operation. GDDR monitors the SRDF Link Operation process to know when SRDF connectivity to the vault has been established and closed it when it has populated the vault.
zCPA Type 3
- Type 3 is an environment that does not provide an airgap solution. The data copied to the cyber vault is triggered by the SCHEDULE or INTERVAL parameter in GDDR.
The airgap support between the production and vault site is optional.
For more information about GDDR’s zCPA with respect to cyber, see the white paper Dell PowerMax: Cyber Security for Mainframe Storage or contact us at mainframe@dell.com.
Resources
- Mainframe Enablers TimeFinder SnapVX and zDP 8.5 Product Guide
- Data Protector for z Systems (zDP) Essentials White Paper
- Dell PowerMax: Cyber Security for Mainframe Storage
- GDDR (Geographically Dispersed Disaster Restart) for PowerMax 8000 and VMAX ALL FLASH 950F
Author: Justin F. Bastin

TimeFinder Updates in PowerMaxOS 10

Thu, 18 Aug 2022 19:48:56 -0000
|Read Time: 0 minutes
The introduction of SnapVX in VMAX3 brought exciting changes in functionality and usability. Snapshots that do not require target volumes to capture a point-in-time, changed how users define snapshot schedules with new possibilities for efficiency and scalability. And in turn, those changes enabled more flexible use of copy volumes, referred to as linked targets.
The TimeFinder changes in PowerMaxOS 10, which runs on PowerMax 2500 and 8500 systems, are equally exciting. The knobs and controls have not changed from the previous version. The improvements are “in the sauce” so to speak, and have come directly from customer and field recommendations over the past few years.
Metadata efficiencies
The metadata for snapshots and deltas, Local Replication Cache, is dramatically more efficient. The internal structures are different from Replication Data Pointers (RDP) in previous PowerMax systems. But from the user perspective, monitoring is no different, with the same usage level and alerts.
Metadata usage for SnapVX linked targets and clones has also been dramatically improved, as it now scales proportionally to the changed data. Previously, the metadata allocation of a linked target or clone would reflect that of the source volume, regardless of changed data.
Target copy mode simplification
Nocopy mode for SnapVX has been considered best practice for several years now because it saves capacity and has proven to provide excellent performance. As such, the copy mode and nocopy mode options for clones and SnapVX linked targets have been removed. All clones and linked targets are space-efficient (nocopy mode) within an SRP. Storage efficiency has been a major focus across the industry for several years. Duplicating volume data within the system contradicts storage efficiency, especially if Data Reduction is enabled on target volumes, which is often the case.
Data will copy and duplicate only to targets that are in a separate Storage Resource Pool (SRP). We are not emphasizing the need for systems with multiple SRPs. Single SRP systems continue to be considered best practice because this configuration provides for optimal performance. Use snaps and clones for logical protection, and use SRDF remote replication for physical protection.
Precopy mode has also been removed because it is a function of copy mode. And the architectural changes since VMAX3 have eliminated the need for precopy mode. The challenges precopy was designed to address no longer exist, so it has been deprecated in PowerMaxOS 10.
Target volume performance
When a target is linked to a SnapVX snapshot, an internal process sets the pointers on the target volume to point to the data. In previous releases, this process is called the define scan. A flag on each link reports when the target has been fully defined.
New and quicker internal functions replace the define scan in PowerMaxOS 10. The define flag is still used to monitor this process, so users can continue to use existing commands and scripts to monitor when the internal operations are complete.
Clones and linked targets also report “copied” when the internal process has completed, regardless of SRP location. Whether data is copied or is only defined, users have a single method to monitor copy states.
Space-efficient snapshot restores
In PowerMaxOS 10, snapshot restores swap pointers to increase the speed of a restore, as compared to previous releases in which data would be copied back to the source volumes.
Deprecation of VP Snap and Mirror
The original TimeFinder option, TF/Mirror, is finally going away. It is a bittersweet move because it was a key building block to where TimeFinder is today. But, other than compatibility with legacy scripts, Mirror has provided no advantages over other TimeFinder options for years.
Business Continuance Volumes (BCVs) remain an option. Using BCVs for clones or SnapVX linked targets may help to identify your copy volumes and report on their capacity without affecting feature functionality.
VP Snap is being deprecated, but it may be more accurate to say that the efficiencies of VP Snap have been applied to Clone. There is no longer a need for VP Snap, and so the command set has been removed
Other clone improvements
Clones have increased from 16 to 256 clones per source volume, and support storage group operations.
Resources
Author: Michael Bresnahan, Technical Marketing Engineer

What’s New in PowerMax REST API 10.0
Fri, 26 Jan 2024 15:14:57 -0000
|Read Time: 0 minutes
Unisphere for PowerMax 10.0 has been released, bringing support for the new PowerMax 2500, and 8500 models, and a host of other improvements in the updated API.
Documentation for all Dell APIs are viewable from https://developer.dell.com. The PowerMax documentation features a “What’s New” section, with links back to the latest REST API change log on our support pages. REST API documentation is linked directly from the UI Help, making it easier to find.
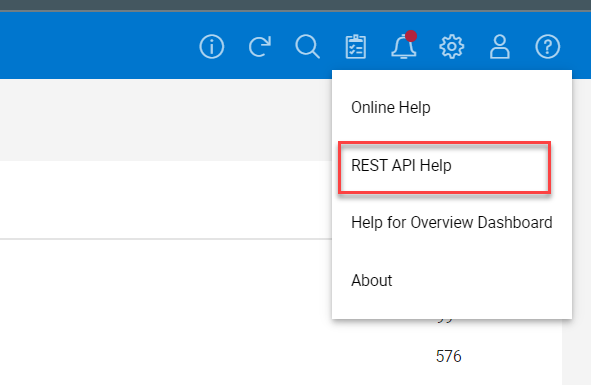
The documentation can also be downloaded in OpenAPI.json format from the overview tab, using the export button as shown.
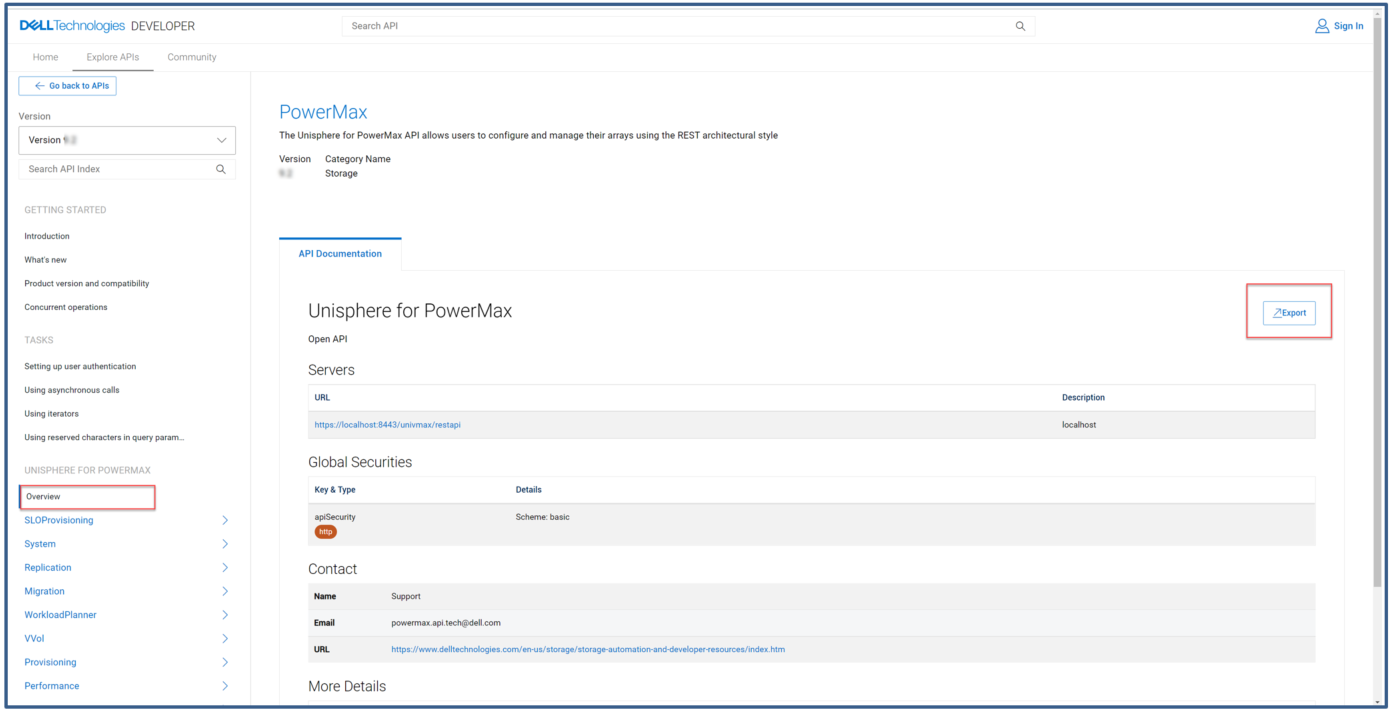
As with previous releases, the new API is accessible under new versioned endpoints:
https://unisphereIP:8443/univmax/restapi/100
Older versions of the API are still available with N-2 versions of the API. This means that you can use version 9.2 or version 9.1 API calls with a server that is running Unisphere 10.0.
A big change is that VMAX 10K/20K/40K arrays are no longer manageable using the 10.0 REST API because Unisphere 10.0 no longer supports them. You’ll notice when looking at the API documentation that the provisioning endpoint no longer exists under the 100 resources. Provisioning tasks on the PowerMax and VMAX3 arrays are still managed through the sloprovisioning endpoints, so this has no impact on the newer model arrays.
Front End Emulation Convergence. “What is that?” I hear you say. On the new platforms we no longer have separate RDF and FA/SE Directors. Instead, we have a single emulation that supports ports that can be enabled for the required function. This is a new director type, the OR, short for Open Systems and Replication. With OR director ports supporting different protocols, we need to apply new filters when listing ports to find out which ones are enabled for which protocol.
https://ipaddress:8443/univmax/restapi/100/sloprovisioning/symmetrix/symmetrixId/port?enabled_protocol=RDF_FC
Another change: when listing ports with sloprovisioning API calls, the calls no longer return internal and back end ports. Because the user can never use these anyway, it’s really just removing noise from the API which in general is a good thing. If you do want to identify any back-end directors and ports on your system, you can use the system level director calls to get this information.
With PowerMax 8500 and 2500 models, creating port groups now requires an additional key that specifies the port group protocol: either SCSI_FC, iSCSI, or NVMe_TCP.
https://ipaddress:8443/univmax/restapi/100/sloprovisioning/symmetrix/000120000322/portgroup
{
  "portGroupId": "finance1_portgroup",
  "port_group_protocol": "SCSI_FC",
  "symmetrixPortKey": [
    {
      "directorId": "OR-1C",
      "portId": "1"
    }
  ]
}
Local replication changes
The replication resource of the API has some notable changes. We’ve introduced new API calls for creating TimeFinder Clones with storage groups. Check out the very good blog Attack of the Clones that details what you can expect with clones. It also covers why we are bringing new features for clone into the new PowerMax 8500 and 2500 arrays, in addition to the SnapVX features we already have in the API. Note that the Clone API calls can be used with existing models of PowerMax and with the new arrays. However, the increased scale and a new “establish_terminate” feature (which creates a clone copy and immediately removes the session when pointers are in place) is only available on arrays running PowerMax OS 10.
Under the hood for replication calls here are some invisible but beneficial changes. In previous releases, REST calls referenced the Unisphere Object model for some information. Now with Unisphere 10.0, the API calls for replication make solutions enabler API calls to ensure that the information returned is always in tandem with the array.
Performance API changes
The performance section of Unisphere has had significant changes, mostly to make it easier to use for new consumers. Our developers have added several helper methods to enable you to list performance categories for your array type.
https://ipaddress:port/univmax/restapi/performance/Array/help/SystemSerial/categories
When you have built your list of categories, you can use the category metrics helper calls to find the list of supported metrics for each category. You can specify a type for All or KPI:
https://ipaddress:8443/univmax/restapi/performance/Array/help/symmetrixId/category/metrics/type
Another big change in our performance metrics is that you can now get device level diagnostic statistics. These can be collected for a range of devices, or a list of storage groups: up to 100 storage groups per query or 10,000 devices per query. Each query is limited to one hour of performance data. These limits are to prevent developers from unwittingly creating very intensive long ranging queries that may impact other API or UI users. Note: This change relies on the Unisphere version only. The array model is not a factor in usage. So if you are running VMAX3 Hybrid or the latest PowerMax, if Unisphere is at 10.0 or higher, you have this functionality available to you in the API.
A sample call and payload is listed below. You can use the volume category with the helper methods above to determine valid categories. As with all performance calls, timestamps are in EPOCH timestamp milliseconds.
https://ipaddress:port/univmax/restapi/performance/Volume/metrics (POST)
{
  "systemId": "0000213456789",
  "volumeStartRange": "00A1",
  "volumeEndRange": "00A5",
  "dataFormat": "Maximum",
  "startDate": 123456468,
  "endDate": 123456465,
  "metrics": [
    "HostMBs",
    "MBRead",
    "MBWritten",
    "IoRate",
    "ResponseTime"
  ]
}
New file API interface for PowerMax
With the new 64 Bit SDNAS Platform integrated with PowerMax File API, we now have a whole new set of endpoints for Day0 to Day2 operations with file objects. The API has more than 200 API calls for file operations. All file operations can now be completed with either the UI or REST, giving 100% coverage of the product. The following figure provides an outline of the API which can be browsed in the online documentation.
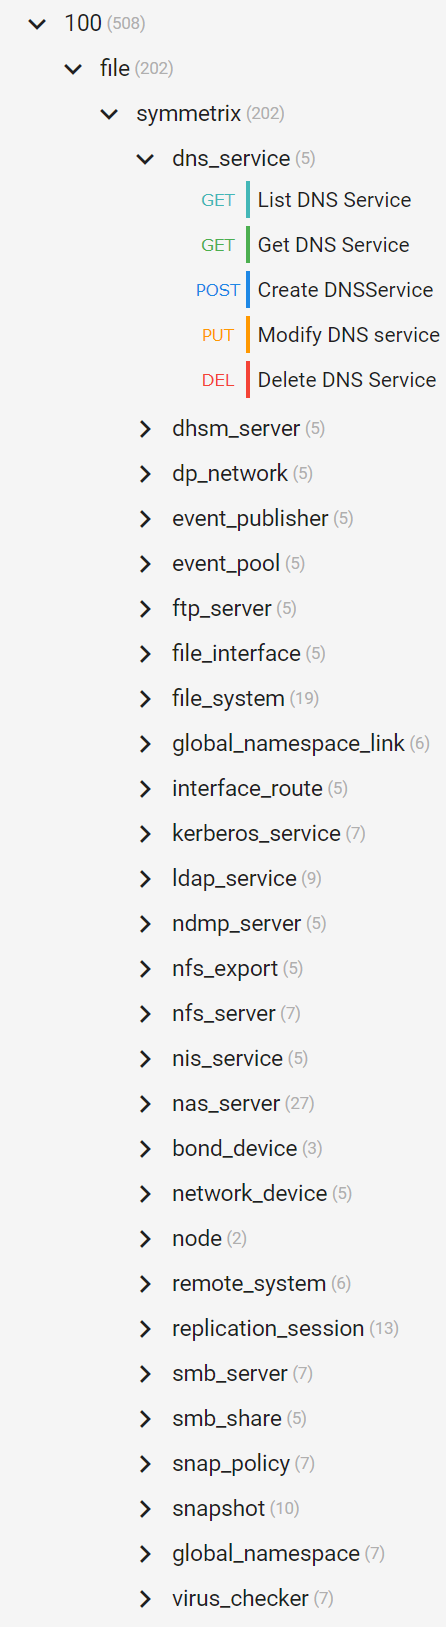
PyU4V – the SDK for PowerMax API
With a new API we are also releasing PyU4V 10.0, which is only compatible with Unisphere 10.0. Because Unisphere is backward compatible with the API, you can still use PyU4V version 9.2.1.6 with Unisphere version 10.0. Any scripts written at previous versions of PyU4V are forward compatible, assuming that you are not using any depreciated functions. (PyU4V has provided warning messages for the last two releases to notify users if their scripts need to be changed for forward compatibility, so we hope there are no issues!)
Ansible support for PowerMax API 10.0
Updated Ansible modules will be released in September with full support for new arrays. In the meantime, you can update any Unisphere server to version 10 and existing Ansible modules will continue to function, providing that your Ansible server has the latest PyU4V version installed (either 9.2.1.6 or 10.0 with Ansible collection for PowerMax <=1.8).
Author: Paul Martin, Senior Principal Technical Marketing Engineer

PowerMax Attack of the Clones
Fri, 22 Jul 2022 20:27:07 -0000
|Read Time: 0 minutes
In typical blog fashion, I tried to come up with a clever title, and this title seemed obvious. But if we are going with a movie title, Back to the Future may be more appropriate.
The announcement of PowerMax 2500 and 8500 arrays include many new features, including in our local replication software suite TimeFinder. Most improvements are transparent to the user interface, including cache and storage efficiency, target volume performance, and consolidate the benefits of the various modes users previously had to choose from. But another key change, and the reason for this blog, is that we are putting renewed focus on a feature that we had planned to deprecate: TimeFinder Clones. Here is the behind-the-scenes story.
When SnapVX was introduced with the VMAX3 platform, we felt it could eventually replace all other TimeFinder options: Mirror, Snap, Clone, and VP Snap. SnapVX immediately replaced TimeFinder/Snap which has never been supported in Solutions Enabler on VMAX3 and later. SnapVX targetless snapshots are lighter on metadata than TimeFinder/Snap ever was, allowing for many more snaps: up to 1,024 per volume and millions per array.
SnapVX snapshots use fewer resources because they do not use target volumes to capture a point-in-time. And snapshots may never need to be accessed. Metadata efficiency was a key driver for developing targetless snaps to begin with. We heard many times from customers that most of their snaps and clones were never directly accessed and were only in place in case data recovery was needed. But those copies consumed volume ids, which in turn consumed metadata, neither of which are infinite resources.
SnapVX targetless snapshots not only save resources, but they also save a ton of time! There is no need to create the copy volumes, groups, and source-target pairs that were traditionally required for snaps and clones. When an array is deployed you can immediately protect an application with a single command, REST call, or UI operation. This capability was a great advancement at the time, and we have enhanced it with improvements and new features such as metadata efficiencies, zDP, and Snapshot Policies.
Host access to a snap or clone is often needed. This brings us to how SnapVX was intended to replace the rest of the TF options.
Host access to a SnapVX targetless snapshot is provided by linking a target volume (or target storage group) to a snapshot. Like a traditional snap or clone, the application host could read from, and write to, a point-in-time image without affecting the source. The intent was for customers to use linked targets to provide copies of the same or different point-in-time to many users for test and development, online backups, and other uses. And the targetless snapshots themselves provide application protection and restore capabilities with no target volume required. Many customers have been using SnapVX this way with great success.
We expected linked targets to allow us to eventually deprecate Clone, Mirror, and VP Snap. However, as has been the story of TimeFinder since it was first developed decades ago, our customers find other ways to use it, and so we adjust accordingly.
While targetless snapshots provide excellent application protection and capability to restore point-in-time data, there is more customer demand to restore modified target data than we had anticipated. Doing so with SnapVX linked targets requires that a new relationship be established between a snapshot of the linked target and the original source volume. While PowerMax data efficiency features avoid a full copy locally in these situations, a full remote copy is required if the original source also has SRDF protection. Clone can differentially restore from a target volume and is an excellent option when this scenario is required for a solution. (The full copy is only required when restoring modified data from a target volume, for example, during failback after running production on linked targets of SRDF R2 snapshots. Restoring a point-in-time from a SnapVX snapshot is differential).
There are times when only a few target volumes are needed for host access. In these situations, it can be easier to “cut out the middleman” and create a Clone instead of creating a snapshot and then linking a target. Targetless snapshots provide many benefits, but they are an entity of their own that need to be managed and will use system resources regardless of a linked target. Management is not a bad thing by any means. Targetless snapshots can be the right tool for the job in many situations. But Clone is another useful tool to have in your toolbox. We have talked with customers who created a targetless snapshot to link a target, and then immediately unlink and terminate the snapshot, and continue working with the (now unlinked) target. This workflow certainly will get the job done. But, in those situations, it can be easier to create a clone.
As SnapVX usage increased across our customers, we recognized that there are still valid uses for Clone. There are plenty of situations when all you need from SnapVX is the targetless snapshots, and plenty of other situations that call for linking a target to a snap. But sometimes you may only need a target volume. We could have built that functionality into SnapVX, for example, if we added an option to allow linking a target directly from the source volumes. But we decided to continue Clone because it allows customers to keep using their existing scripts.
Continuing Clone also saved development time on our end, and we used that time to improve Clone. Enhancements include increased scalability (256 clones per volume, previously 16), storage efficiency like SnapVX linked targets, and the option for Unisphere to create the target volumes during the Clone operation.
We have deprecated Mirror in PowerMax 2500 and 8500. But we are keeping BCV volumes around as an option for customers who want to use them for Clones and SnapVX linked targets. BCVs make it easy to identify your copy volumes and do not change any feature functionality.
VP Snap is also being deprecated. We are applying the data efficiencies of VP Snap to Clone, so there is no need for VP Snap.
Deciding not to deprecate Clone is a change of direction on our part, and that is not always easy to explain, but it is the right thing to do. We are happy to discuss this decision with our customers because it gives them another tool that is best for some jobs. SnapVX and Clone make for a complete TimeFinder solution, and they are not mutually exclusive. Some jobs will benefit from all options. SnapVX snapshots can protect the application, while linked targets provide host-access to point-in-time data, and clones quickly create on-demand, host-accessible copies of the latest application data.
Author: Mike Bresnahan, Senior Principal Technical Marketing Engineer

Multi-factor Authentication with Unisphere for PowerMax
Wed, 29 Mar 2023 12:58:42 -0000
|Read Time: 0 minutes
Protecting your data is what Dell storage arrays do best, but protecting who can control and manage that storage is equally important. Features like multi-factor authentication (MFA) are a must-have for many industry sectors. MFA reduces the potential for bad actors to cause malicious damage to storage configurations, providing additional peace of mind for security concerns on storage platforms.
In Unisphere for PowerMax 10.0, we are introducing MFA for Unisphere for PowerMax. This feature introduces the ability to combine authentication for your LDAP users with additional RSA token validation.
Note: Since the original publication of this blog, MFA for Unisphere for PowerMax has been backported to Unisphere 9.2.3 as well.
MFA works on existing PowerMax arrays and on the new PowerMax 8500 and 2500 models running Unisphere for PowerMax 10.0 or higher. MFA also enforces role-based access policies for users and groups for enhanced security. This blog briefly walks you through the few steps required to set up this feature.
When you use the Unisphere UI to configure MFA, under Users and Groups > Authentication, you will see RSA SecurID®. Before you start, you must configure LDAP-SSL for user authentication and set up your users and groups with the required permissions. (There is no change to this process – for guidance, see the existing documentation or Unisphere online help.)
When LDAP is set up, select RSA SecurID®, and then click Enable to launch the configuration wizard, as shown here.
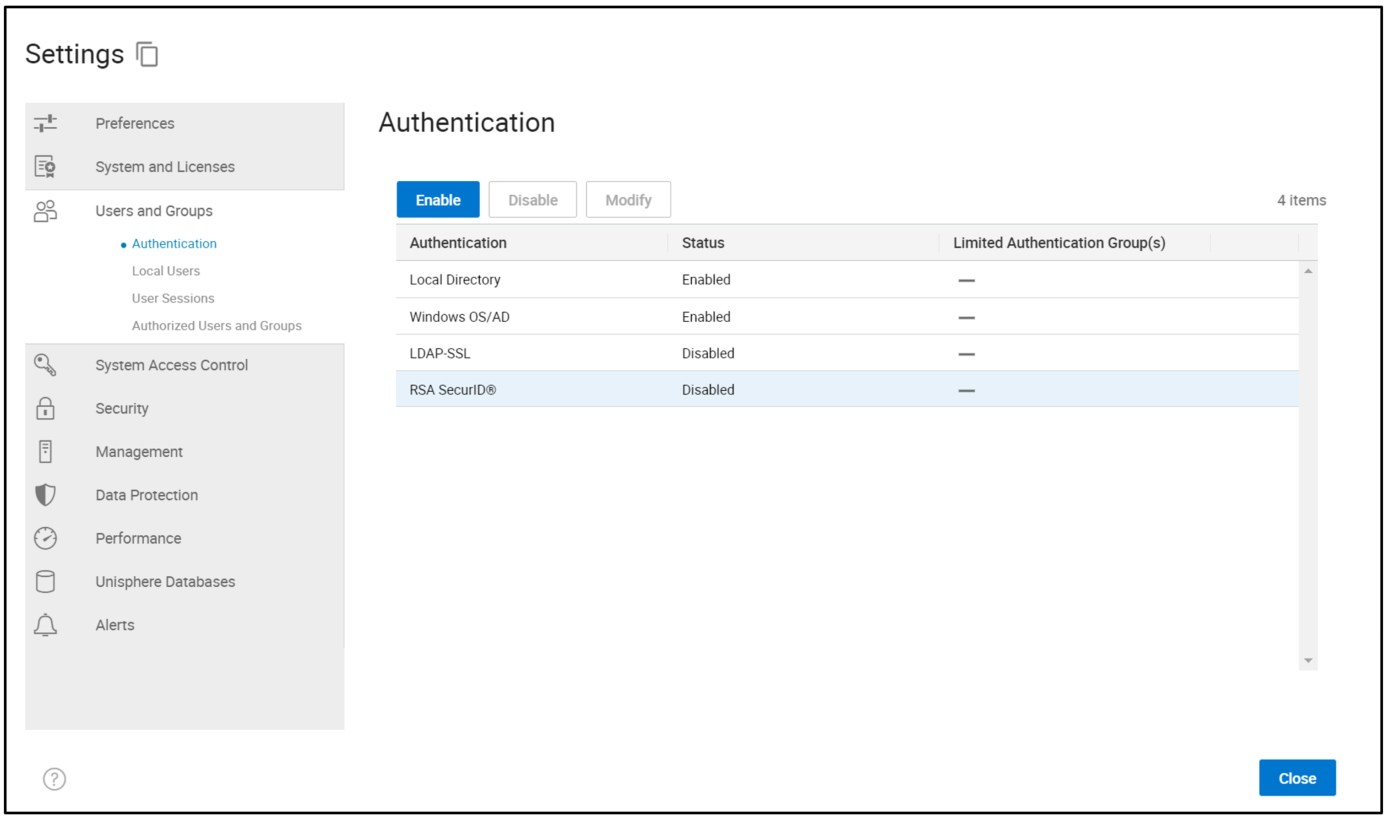
This displays the next screen in the wizard (Enable RSA SecurID®).
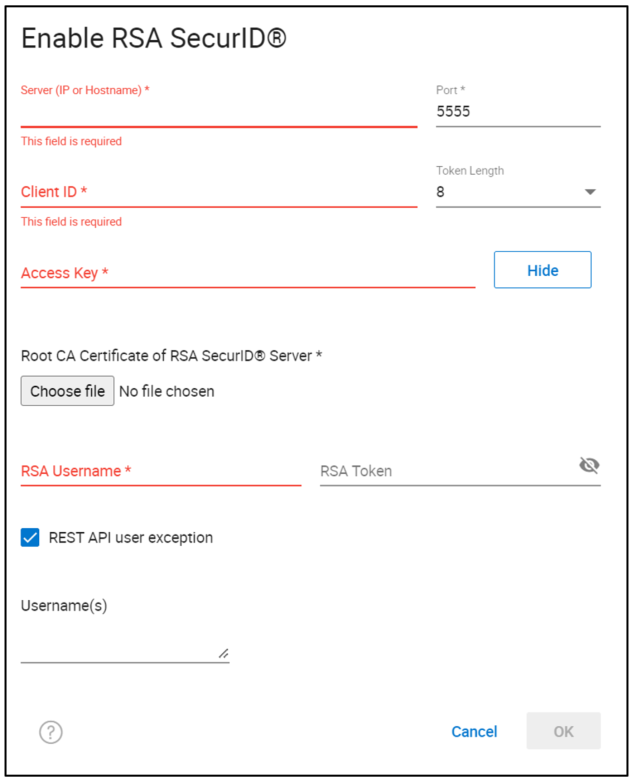
This screen prompts you to provide input for the required fields to configure multi-factor authentication with RSA, specifically:
- The Server name of the RSA server.
- The Port number for the RSA server.
- The Token Length, either 6 or 8 digits, indicating the length of the token that will be generated by your RSA fob or APP.
- Client ID and the Access Key – This information must be provided by the RSA administrator from the RSA Security Console, as shown here.
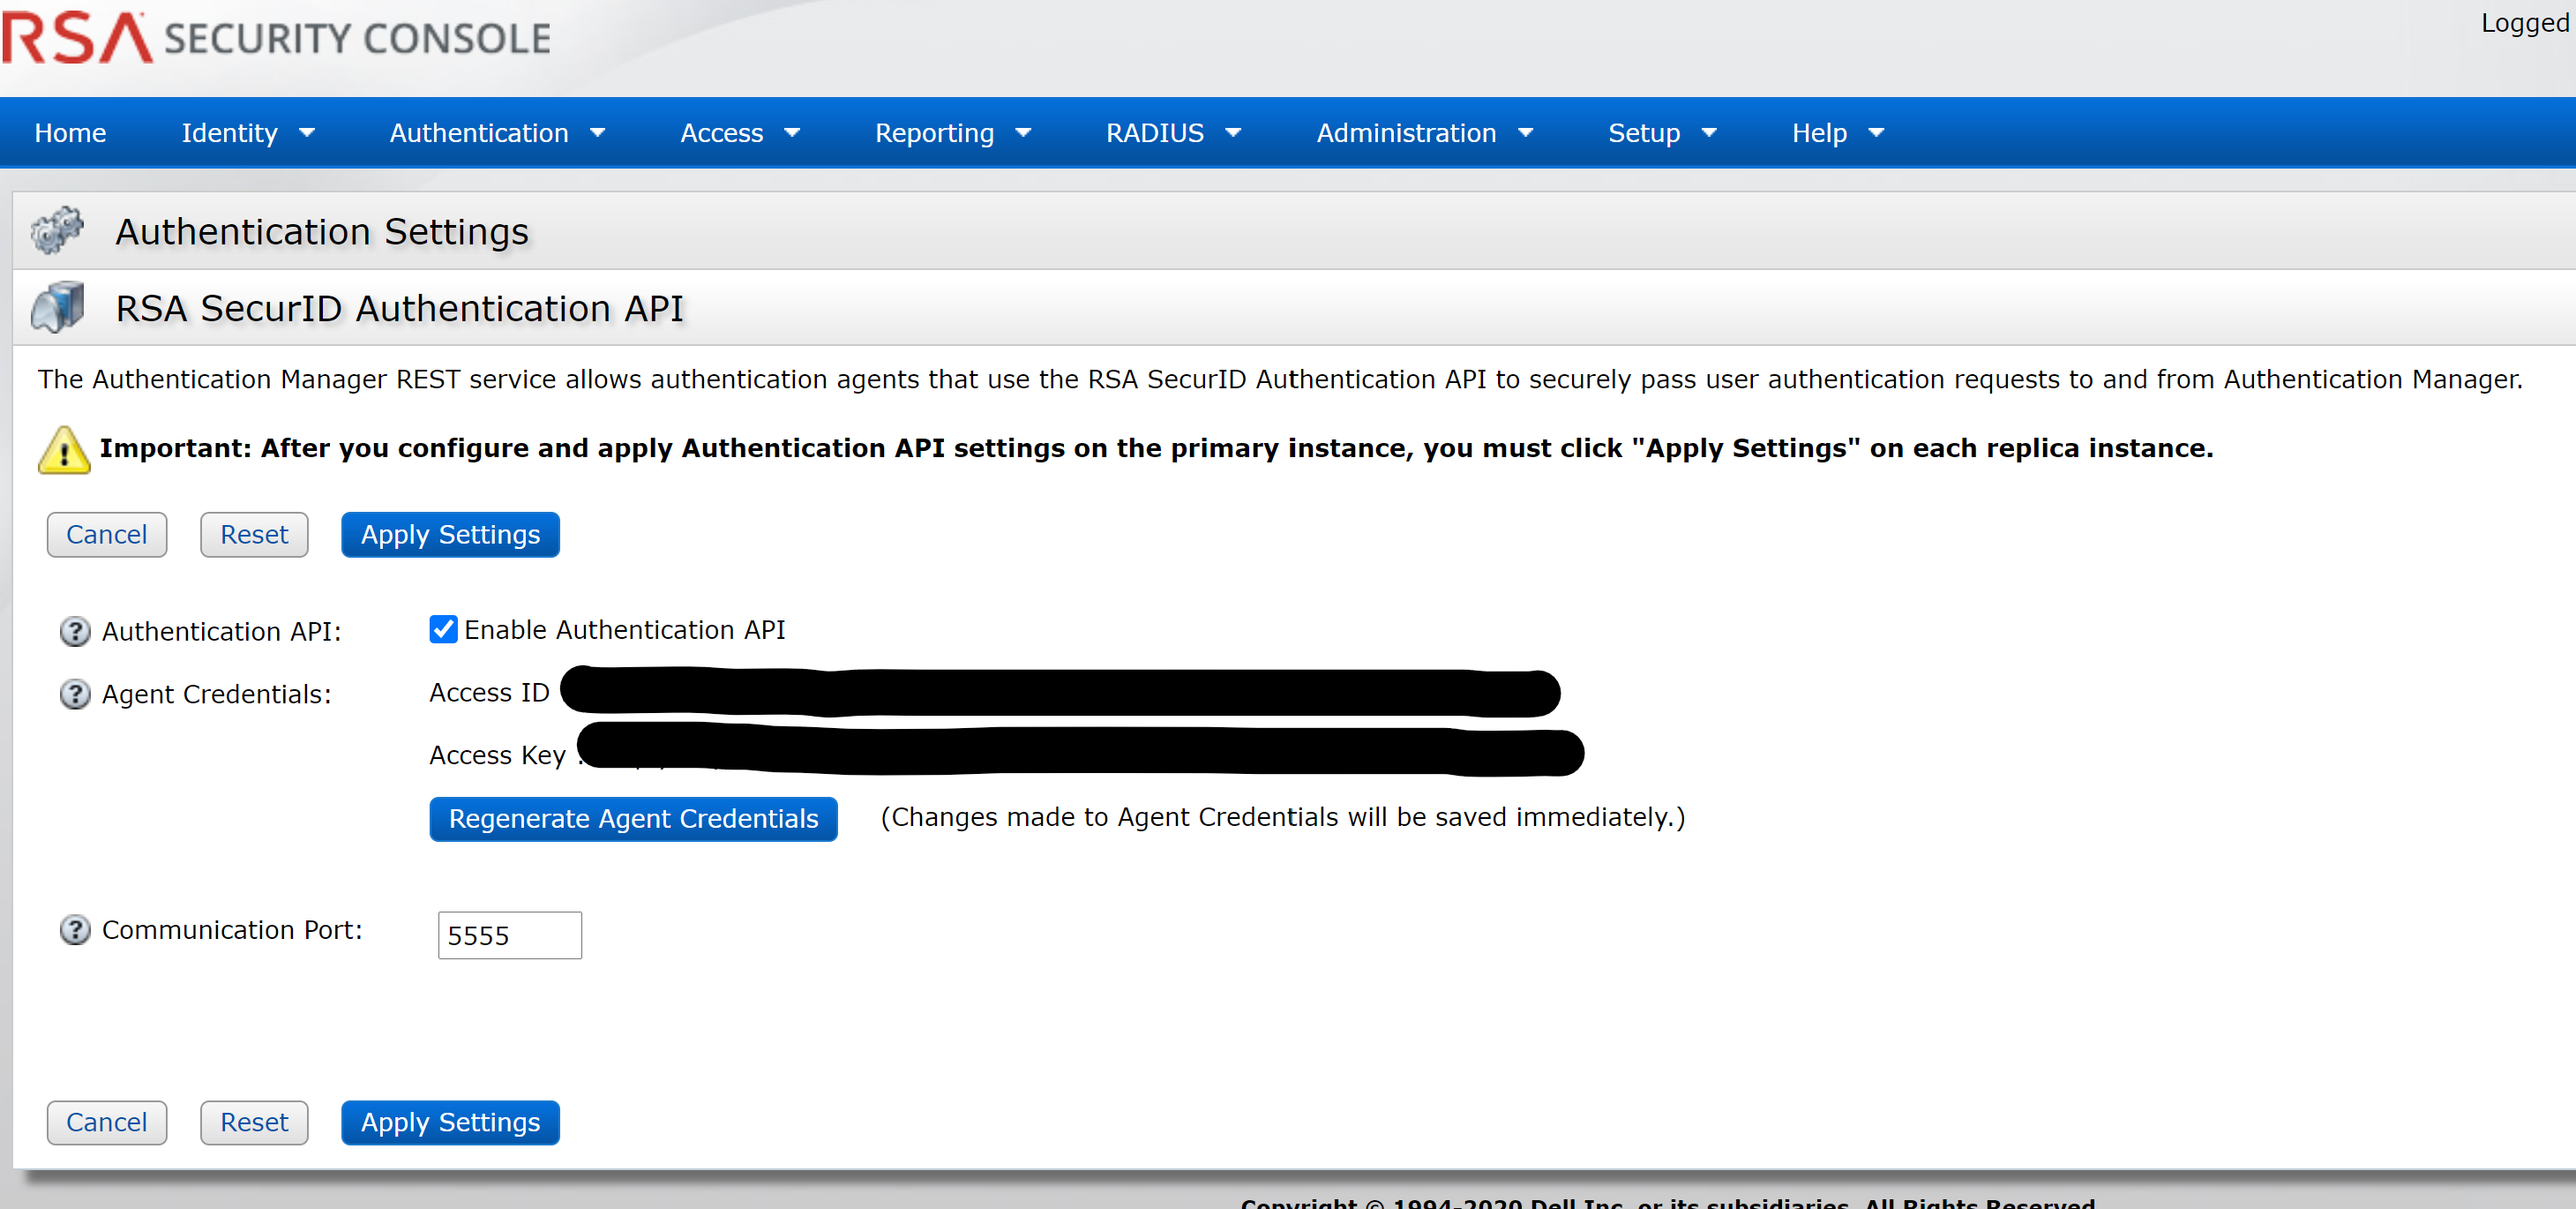
Log into the Security Console and select Home > System Settings > RSA SecurId Authentication API.
The Access ID and Access Key are entered as the Client ID and Access Key, respectively. Because this information is highly sensitive, it will likely require collaboration between teams to enable it.
Back on the Enable RSA SecurID® screen, on the Unisphere server, enter the Root CA Certificate of the RSA controller.
When these fields are configured, you will need an RSA user and token that can initiate the configuration handshake with the RSA server supplied in the config. To validate the connection, the RSA user can be any user. After entering this, click OK and RSA MFA is enabled!
There is an option to omit certain user accounts from MFA, such as for REST API users, where it is not practical to validate RSA tokens on each call. Credentials for these users should be stored in a secure vault with additional authentication for REST applications to obtain and use.
At this point, any user attempting to log in to the Unisphere for PowerMax UI will need to provide their LDAP username and password, prefixed with their six- or eight-digit RSA Token ID, providing additional security through multi-factor authentication with the RSA server and LDAP.
Author: Paul Martin, Senior Principal Technical Marketing Engineer
Twitter: @rawstorage

Mitigating Slow Drain with Per Initiator Bandwidth Limits
Wed, 22 Jun 2022 13:16:04 -0000
|Read Time: 0 minutes
This blog discusses a recently introduced functionality for PowerMax and All Flash arrays as part of the Foxtail release. This new feature allows customers to leverage QoS settings on the PMAX/VMAXAF to reduce or eliminate Slow Drain issues due to servers with slow HBAs. This was introduced in Q2 2019 (OS 5978 Q2 2019 SR 5978.479.479). From a PowerMax or VMAX AF perspective, this can help customers alleviate congestion spreading caused by Slow Drain devices, such as HBAs that have a lower link speed compared to the storage array SLIC. Customers have been burdened by this Slow Drain phenomenon for many years and this issue can lead to severe fabric wide performance degradation.
While there are many definitions and descriptions of Slow Drain, in this blog we define Slow Drain as:
Slow Drain is an FC SAN phenomenon where a single FC end point, due to an inability to accept data from the link at the speed at which it is being sent, causes switch/link buffers and credits to be consumed, resulting in data being “backed up” on the SAN. This causes overall SAN degradation as central components, such as switches, encounter resources that are monopolized by traffic that is destined for the slow drain device, impacting all SAN traffic.
In short, Slow Drain is caused by an end device that is not capable of accepting data at the rate that it is being received.
For example, if an 8 GBs HBA sends a series of large block read requests to a 32Gbs PowerMax front-end Coldspell SLIC, the transition rate will be 32 GBs when the Array starts to send the data back to the host. Since the HBA is only capable of receiving data at 8 GB, there will be congestion at the host end. Too much congestion can lead to congestion spreading, which can affect unrelated server and storage ports to experience performance degradation.
The goal of the Foxtail release is to reduce Slow Drain issues, as they are difficult to prevent and diagnose. It does this through a mechanism where the customer can prevent an end device from becoming a Slow Drain by limiting the amount of data that will be sent to it.
On PowerMax, this can be accomplished by applying a per initiator bandwidth limit. This application limits the amount of data that is sent to the end device (host) at a rate at which it can receive data. We have provided customers the ability to leverage Unisphere or Solutions Enabler QoS settings to keep faster array SLICs from overwhelming slower host HBAs. Figure 1 shows a scenario of congestion spreading caused by Slow Drain devices, which can lead to severe fabric-wide performance degradation.
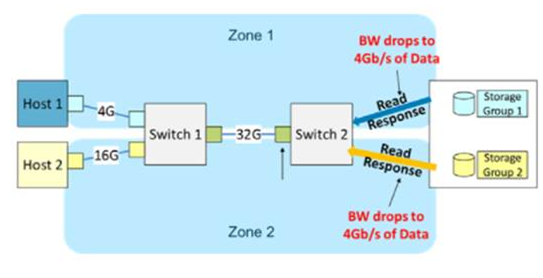
Figure 1: Congestion spreading
Implementing per initiator bandwidth limits
Customers can now configure per initiator bandwidth limits at an Initiator Group (IG) or Host level. The I/O for that Initiator is throttled to a set limit by the PowerMaxOS. This can be configured through Unisphere, REST API, Solutions Enabler (9.1 and above), and Inlines.
Note: The Array must be running PowerMaxOS 5978 Q2 2019 or later.
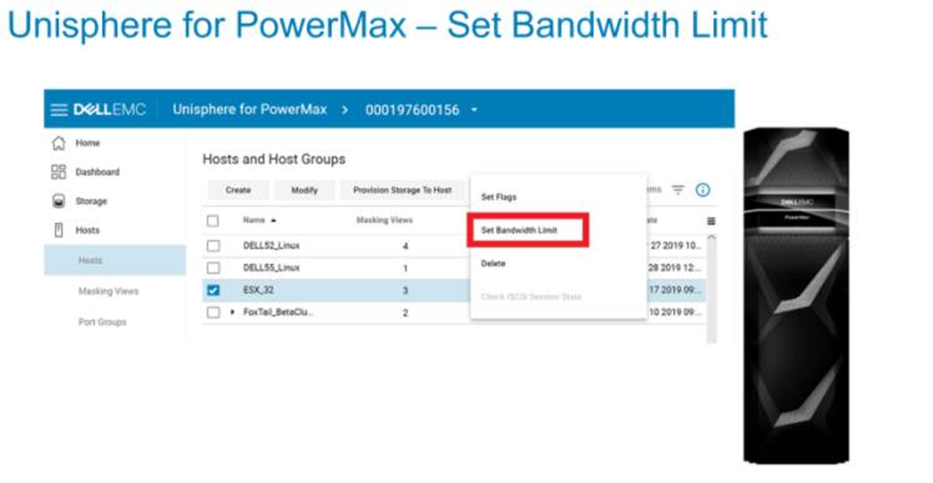
Figure 2: Unisphere for PowerMax 9.1 and higher support
This release also includes a bandwidth limit setting. Users can go to this new menu item by clicking on the “traffic lights” which prompts the set bandwidth limit dialogue to open. The range for the bandwidth limit is between zero and the maximum rate that the Initiators can support (for example, 16,32 GB).
Note: The menu item to bring up the dialogue is only enabled for Fibre (FC) and disabled for ISCSI hosts.
The Bandwidth Limit is set using a value in MB/sec. For example, Figure 3 shows setting the Bandwidth Limit to 800MB/s. The details panel for the Host displays an extra field for the bandwidth limit.
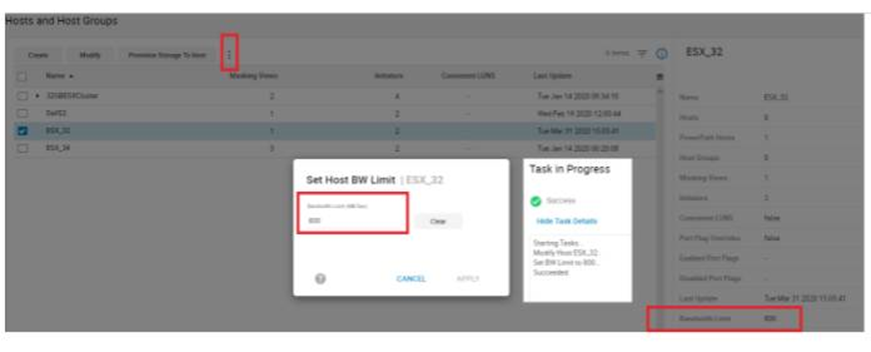 Figure 3: Unisphere Set Host Bandwidth Limit
Slow Drain monitoring
Typically, B2B credit starvation or drops in R_RDYs symptoms of Slow Drain. Writes can take a long time to complete if they are stuck in the queue behind reads, it may also cause the XFER_RDY to be delayed.
The Bandwidth Limit Exceeded seconds metric is available for Solutions Enabler 9.1. In the Performance dashboard, this is the number of seconds that the director port and initiator has run at maximum quota. This metric uses the bw_exceeded_count. The KPI is available under the initiator objects section.
Solutions Enabler 9.1 also features enhanced support setting bandwidth limits at the Initiator Group Level. It allows the user to create an IG with bandwidth limits, set bandwidth limits on an IG, clear bandwidth limits on an IG, Modify the bandwidth limits on an IG, and of course display the IG bandwidth limits
 Figure 4: Solutions Enabler bandwidth limit
REST API Support
REST API can also be used to set bandwidth limits. All communication for REST is HTTPS over IP, and calls authenticated against Unisphere for PowerMax server. REST API supports these four main verbs:
GET
POST
PUT
DELETE
To set the bandwidth limit, we used a REST PUT call, as shown in Figure 6.
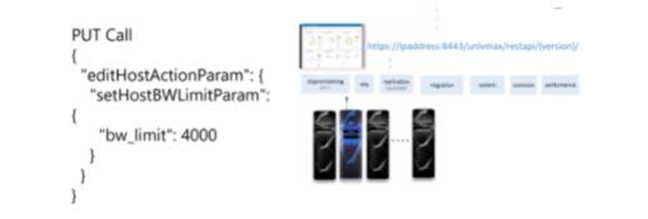 Figure 5: Inlines support
Note: Inlines support is also available with the 8F Utility.
Additional information
The following list provides more information about this release:
- Host I/O limits and Initiator limits can co-exist, one at the SG level and the other at Initiator level.
- PowerMaxOS supports a max of 4096 limits, both host I/O limits and initiator limits share this limit
- When an Initiator connects to multiple directors, the per initiator limit is distributed evenly across the directors
- Limits can be set for child IG (Host) ONLY - not Parent IG (Host Group)
- An Initiator must be in an IG to set a BW limit on it
- The IG must contain an initiator in it to set a BW limit for it
- For PowerMaxOS downgrades (NDDs) if the system has Initiators which have bandwidth limits set, the downgrade will be blocked until the limits are cleared from the config
- Currently, only FC support is offered
Note: The bandwidth limit is set per Initiator and split across directors. Although the limit is applied within the IG/Host group screen within Unisphere for PowerMax, it applies to every initiator in that group. This means that the limit is not aggregate across all the initiators in that group, but individually applied to all of them and split across directors.
Resources
- Unisphere for PowerMax Release Notes (log in required)
- Connectrix Switch Cisco & Brocade Series: Performance issues in a SAN (log in required)
- Congestion Spreading and How to Avoid It
- Slow Drain Knowledge Map
Author Information
Author: Pat Tarrant, Principal Engineering Technologist

Using Snapshot Policies to Mitigate Ransomware Attacks
Tue, 10 May 2022 21:33:41 -0000
|Read Time: 0 minutes
Cyber security remains a priority for organizations. A cyber or ransomware attack occurs every 11 seconds1, causing organizations to continually implement security requirements in order to safeguard mission critical and sensitive data. There is an important need not only to protect this data but have the ability to recover and restore data in the event of a ransomware attack. PowerMax SnapVX Snapshots are a powerful tool to help protect, recover, and restore in the event of a cyber-attack.
SnapVX provides space saving and efficient local replication in PowerMax arrays. SnapVX snapshots are a pointer-based structure that preserves a point-in-time view of a source volume. Snapshots provide the ability to manage consistent point-in-time copies for storage groups. Host accessible target volumes can be linked if a point-in-time snapshot needs to be accessed without affecting the point-in-time of the source.
SnapVX snapshots can be set as secure snaps. Secure snaps are snapshots that cannot be deleted, either accidentally or intentionally. They are retained in resource-limited situations in which conventional snapshots are placed in a failed state to release resources.
SnapVX snapshot users can take advantage of automated scheduling using Snapshot Policies. Snapshot Policies are customizable with rules that specify when to take snapshots, how many to take, how long to keep them, and whether they are standard or secure snaps.
The following is an example snapshot policy dashboard:
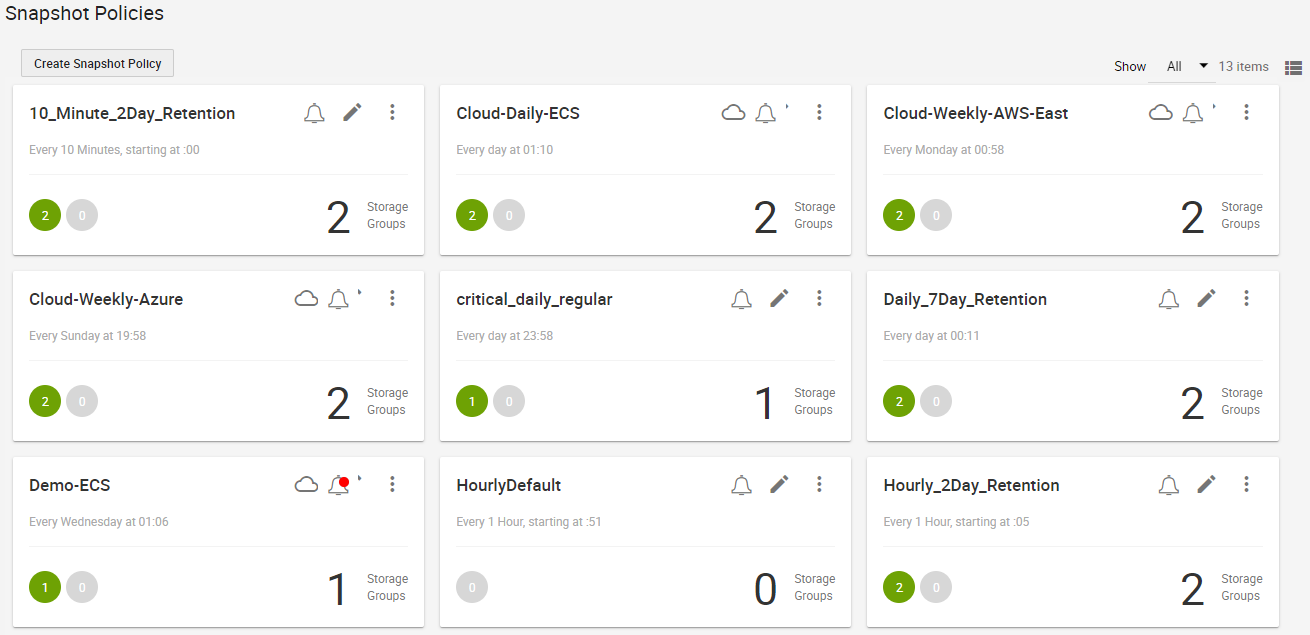
SnapVX snapshots with Snapshot Policies allows for 1024 snapshots per source device and 65 million per PowerMax array. Users can take advantage of the frequency and large snapshot scale in policy-driven snapshots to provide enhanced data resiliency.
Because secure snaps cannot be maliciously or accidentally deleted prior to any planned expiration date, they can be leveraged for organizations to preserve multiple point in time copies that can be recovered from, in the event of a malware or ransomware attack. Snapshot policies can be automated to take secure snaps with a high frequency and a short retention duration for fine granularity, with a lower frequency and longer retention for added security, or a mixture of both. If an attack occurs, the user can review the secure snaps to determine which point in time has the most relevant and up to date copy of data without malware impact. When the precise point in time is identified, restoring critical data can be done almost instantaneously by bringing application data back to the original state prior to any attack.
Secure snaps also provide an additional layer of security in the case of multiple attacks and can be used for forensic work to help determine what happened during the attack and when it originally occurred. With the lower frequency and longer retention period, secure snaps can be used to validate data and data change rate to help identify any suspicious activity.
The following figure provides an example of creating secure snaps with snapshot policies:

Traditional snapshots can be set with a policy to take snapshots at a frequency and retention that works best for the organization. These snapshots can be used for daily business continuity, such as development, operations, and data analytics. They can also assist in any forensic analysis and can be compared against secure snaps to help determine what changed and when it started to change. Unlike secure snaps, traditional snapshots can be deleted or fail in array resource constraint situations. However, the data on an existing snapshot cannot be changed and could be used for additional recovery options.
Both secure and traditional snaps are a power tool for organizations to leverage to help protect and restore data rapidly, to minimize any impact of a malware or ransomware attack. The large scalability of snapshots can be easily managed using Snapshot policies for scheduling frequency and retention time duration to fit any size organization.
The following is an operational example of the frequency, retention, and scale out of the value of SnapVX secure snaps. The numbers are based on an average of 5000 production volumes in a PowerMax array.
- Secure snaps every 10 minutes with a 48-hour retention
- 288 per volume point-in-time copies
- Fine grain protection and recovery
- Secure snaps every 60 minutes with a 7-day retention
- 168 per volume point-in-time copies
- Extended protection and data validation
Total of 2,040,000 secure point-in-time copies
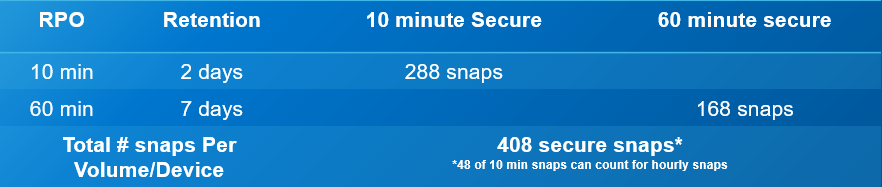
The flexible and scalable features for PowerMax SnapVX traditional and secure snapshots are powerful tools for protecting against ransomware attacks.
Resources
- Dell PowerMax: Cyber Security
- Dell PowerMax: Cyber Security for Mainframe Storage
- Dell PowerMax and VMAX All Flash: TimeFinder SnapVX Local Replication
- Dell PowerMax and VMAX All Flash: Snapshot Policies
1 "Cybercrime To Cost The World $10.5 Trillion Annually By 2025," by Cybercrime Magazine, November 2020.
Author: Richard Pace, PowerMax Engineering Technologist
Twitter: @pace_rich

What’s New with Ansible Collection for PowerMax Version 1.7
Mon, 25 Apr 2022 14:39:01 -0000
|Read Time: 0 minutes
Ansible Modules for Dell PowerMax help automate and orchestrate the configuration and management of Dell PowerMax arrays. Specifically, they are used for managing volumes, storage groups, ports, port groups, host, host groups, masking views, initiators, SRDF links, RDF groups, snapshots, job, snapshot policies, storage pools, role for automatic volume provisioning, and Metro DR environments for PowerMax arrays. The modules use playbooks to list, show, create, delete, and modify each of the entities.
Ansible Modules for Dell PowerMax support the following features:
- Create volumes, storage groups, hosts, host groups, port groups, masking views, Metro DR environments, snapshot policies, and snapshots of a storage group.
- Modify volumes, storage groups, hosts, host groups, Metro DR environments, snapshot policies, initiators and port groups in the array.
- Delete volumes, storage groups, hosts, host groups, port groups, masking views, Metro DR environments, snapshot policies, and snapshots of a storage group.
- Get details of volumes, storage groups, hosts, host groups, port, port groups, masking views, Metro DR environments, Job, RDF groups, snapshot policies, storage pools, initiators, and snapshots of a storage group.
Each quarter we are improving our Ansible collections and modules for our storage platforms. This quarter sees the release of version 1.7 of the Ansible Collection for PowerMax available on GitHub and Ansible Galaxy. This blog highlights a few major changes in Version 1.7, and a few minor ones too. Full release notes are here.
Module name changes
To start off, there have been some naming changes to the Ansible modules. In previous releases, the modules were handed a very long name with dellemc_powermax_<function>. This made sense when modules were installed standalone. However with the advent of collections, if the user followed Ansible best practices and used the Fully Qualified Collection Name (FCQN) when referencing the modules in playbooks, the name became redundant and quite long.
For example, with Ansible collection for PowerMax <=1.6.x, calling the modules in a playbook would look like this:
  tasks:
    - name: Create Storage group
       dellemc.powermax.dellemc_powermax_storagegroup:
        <<: *uni_connection_vars
        sg_name: "{{ sg_name }}"
        service_level: "Diamond"
        state: 'present'
With Ansible Modules for PowerMax 1.7 and higher, the new syntax is shorter:
  tasks:
    - name: Create Storage group
       dellemc.powermax.storagegroup:
        <<: *uni_connection_vars
        sg_name: "{{ sg_name }}"
        service_level: "Diamond"
        state: 'present'
The name changes have been made in such a way that upgrading will not affect your existing playbooks for some time. Redirection has been implemented so that existing playbooks continue to work exactly as before, but you’ll get a warning message if you use the older names, as shown here:

(You won’t see this message if you have turned off deprecation warnings in your ansible.cfg file.)
The warning states that you have two years to update playbooks to use the new naming conventions, so there’s plenty of time!
Another naming change is the dellemc_powermax_gather_facts module. This has been renamed to info, in line with what other vendors are doing, and with current Ansible standards. All existing functionality remains. If the old name is used in a playbook, redirection yields a similar deprecation warning.
New initiator module
PowerMax customers have historically used initiator aliases for host WWNs to make management tasks easier. From the UI, it is easy to see which HBA belongs to which host when listing all initiators. Some of our customers have asked for the ability to set these aliases in the Ansible management suite. The initiator module allows us to do just that.
The new module lets you get initiator details using a WWN or an alias, and to rename the initiator alias using either the alias or the WWN. Some example tasks are shown here:
- name: Get initiator details using initiator WWN
   dellemc.powermax.initiator:
    unispherehost: "{{unispherehost}}"
    universion: "{{universion}}"
    verifycert: "{{verifycert}}"
    user: "{{user}}"
    password: "{{password}}"
    serial_no: "{{serial_no}}"
    initiator_id: 1000000000000001
    state: 'present'

- name: Get initiator details using alias
   dellemc.powermax.initiator:
    unispherehost: "{{unispherehost}}"
    universion: "{{universion}}"
    verifycert: "{{verifycert}}"
    user: "{{user}}"
    password: "{{password}}"
    serial_no: "{{serial_no}}"
    alias: 'test/host_initiator'
    state: 'present'

- name: Rename initiator alias using initiator id
   dellemc.powermax.initiator:
    unispherehost: "{{unispherehost}}"
    universion: "{{universion}}"
    verifycert: "{{verifycert}}"
    user: "{{user}}"
    password: "{{password}}"
    serial_no: "{{serial_no}}"
    initiator_id: 1000000000000001
    new_alias:
      new_node_name: 'test_rename'
      new_port_name: 'host_initiator_rename'
    state: 'present'

- name: Rename initiator alias using alias
   dellemc.powermax.initiator:
    unispherehost: "{{unispherehost}}"
    universion: "{{universion}}"
    verifycert: "{{verifycert}}"
    user: "{{user}}"
    password: "{{password}}"
    serial_no: "{{serial_no}}"
    alias: 'test/host_initiator'
    new_alias:
      new_node_name: 'test_rename'
      new_port_name: 'host_initiator_rename'
    state: 'present'
The host module has also been updated with this release, making it possible for you to modify a host initiator by either WWN or Host Alias, as shown here:
- name: Create host with host_flags
  dellemc.powermax.host:
    unispherehost: "{{unispherehost}}"
    universion: "{{universion}}"
    verifycert: "{{verifycert}}"
    user: "{{user}}"
    password: "{{password}}"
    serial_no: "{{serial_no}}"
    host_name: "VMWARE_HOST1"
    initiators:
      - 1000000000000001
      - 'VMWARE_HOST1/VMHBA1'
    host_type: default
    state: 'present'
    initiator_state: 'present-in-host'
If you run into any issues or need assistance, the GitHub Issues tracking section has been opened to the world. You can also request new features, report problems, seek assistance from the Dell Technologies engineering team here, and see where other customers have commented about their own experiences.
I hope you found this information useful! Check back on our Info Hub site regularly for more updates about our products and services.
Author: Paul Martin, Senior Principal Technical Marketing Engineer
Twitter: @rawstorage

Creating Ansible Execution Environments for Dell Technologies Storage
Mon, 11 Apr 2022 13:52:13 -0000
|Read Time: 0 minutes
Dell Technologies has been providing Ansible Collections via Ansible Galaxy and GitHub for some time. This has greatly simplified the setup of Ansible configurations so that playbooks can be run quickly. However, in some environments the need to be even more dynamic means that even this process can provide challenges. This is where ansible execution environments can help.
Ansible execution environments are self-contained container environments that provide reproducible environments as container images that can be run as needed, keeping configurations to a bare minimum. They also ensure that the storage automation environment and its dependencies can be spun up when needed, knowing that these environments are tested and have no configuration clashes with other automation environments. Here’s a great introduction to the Ansible execution environment.
Creating an execution environment is done in Python with an optional Python package called Ansible-builder that helps users create their own Ansible execution environments packaged as containers. An organization can build up a repository of execution environment images for use with their playbook libraries from multiple different vendors, to reduce complexity and eliminate any dependency clashes. Organizations can even maintain versions of execution environments for their automation for different configurations of the same products, ensuring that what is tested and known to work will always work.
In order to create an execution environment, you will need to create three files:
- execution-environment.yml
- requirements.txt
- environment.yml
The contents and purpose of these files are as follows.
execution-environment.yml
execution-environment.yml – This YAML file describes the setup and dependencies from Ansible Galaxy. It also points to any Python requirements in requirements.txt. Here’s an example of its contents:
# sample execution-environment.yml
---
version: 1
build_arg_defaults:
  EE_BASE_IMAGE: 'quay.io/Ansible/Ansible-runner:latest'
Ansible_config: 'Ansible.cfg'
dependencies:
  galaxy: requirements.yml
  python: requirements.txt
An example of the requirements.yml file is below.
# Sample requirements.yml
collections:
- name: dellemc.powermax
  version: 1.6
requirements.txt
Here is a sample requirements.txt file:
# Sample requirements.txt
PyU4V==9.2.1.4
After the requirements.yml, requirements.txt and execution-environment.yml files have been created, you can go on to create the execution environment container.
To create the container, simply run the command as follows. (Note that the tag can be anything that makes sense in your environment.)
ansible-builder build –tag dellemc_ee_powermax1.6 –container-runtime podman

After the execution environment has been created, run the build command for podman or Docker to create the execution environment container image. You must run this from the context directory that was created by the Ansible-builder command.
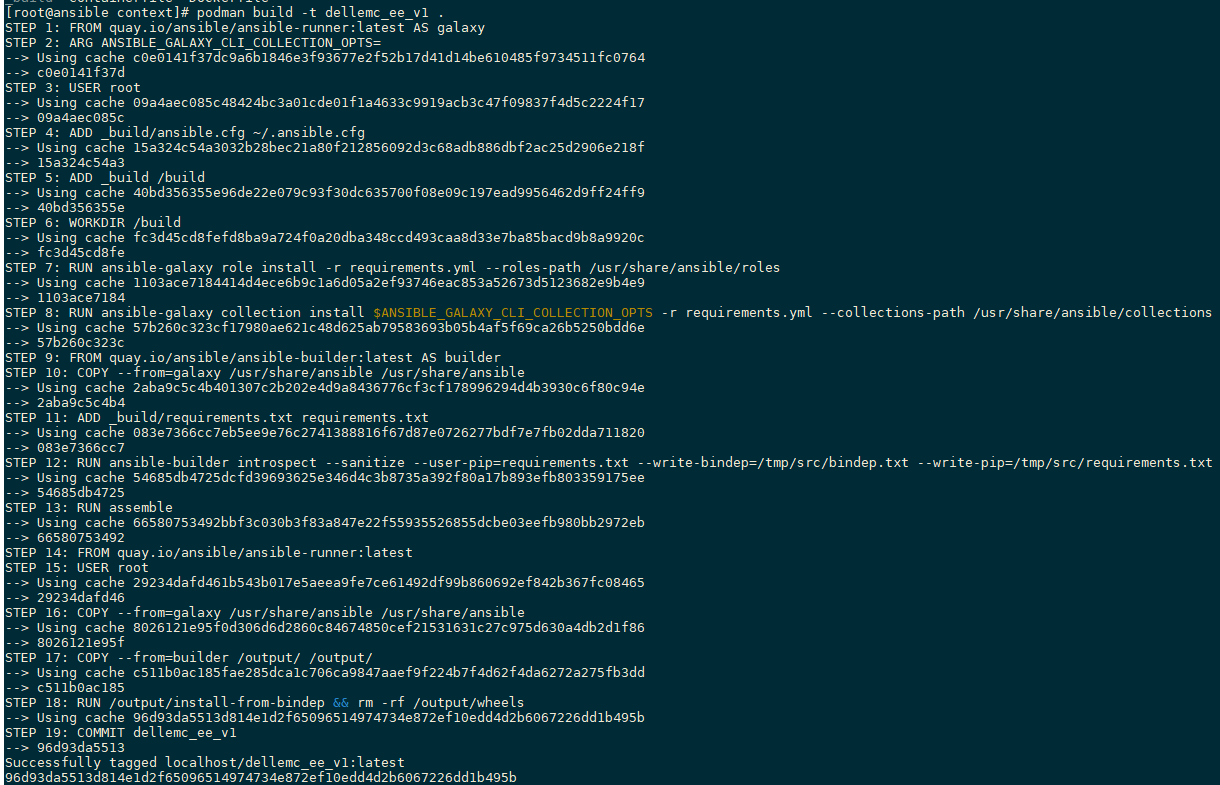
After the image is built and in the local registry, you can run the container and verify that everything is installed as expected.
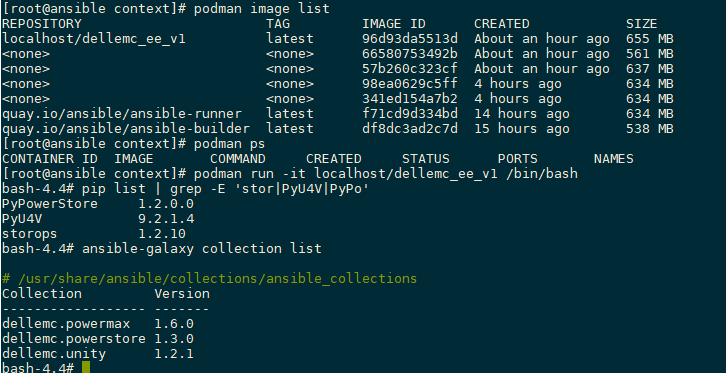
The picture above shows the Ansible execution environment running with an interactive terminal. The pip list command executed in the terminal shows all the Python dependencies installed as expected. The ansible-galaxy list command shows the collections installed.
This environment is ready to execute playbooks or to be distributed to a container registry to be used on demand.
Uploading to a container registry such as quay.io will make the container available to anyone in your organization that requires it or will make it available to tools like Ansible Automation Controller.
To upload to quay.io, follow the steps detailed here.
For additional information about getting started with Ansible, and using Ansible automation controller with Dell Technologies Storage products, see the Dell PowerMax: Ansible Modules Best Practices white paper on the PowerMax Info Hub.
With each new release of Ansible collections, we will publish a copy of the requirements.txt, requirements.yml, and execution-environment.yml files on https://github.com/dell/{{collection_name}}. We hope this will help people streamline the process of creating new execution environments. Users will create their own execution-environment.yml file and build as described, using the processes outlined here.
Author: Paul Martin, Senior Principal Technical Marketing Engineer
Twitter: @rawstorage