


Dell APEX Block Storage: It’s Not Where You Do Cloud, It’s How You Do Cloud

The cloud isn’t just about where you are operating but how you are operating, a paradigm shift for many organizations. That’s where Dell APEX Block Storage comes in.
I’m not going to bore everyone with the history of Dell’s multicloud offerings announced at Dell Tech World and all the different APEX offerings being released. You can read all about those on the Dell APEX InfoHub. Instead, we’ll spend this bit of space talking about how Dell APEX cloud offerings systematically change how you do cloud rather than where you do cloud.
It’s safe to say that most readers here are familiar with the saying “the cloud is just someone else’s computer[s].” I even have a sticker someone gave me at a trade show a few years back with that quote, pictured here. The quote is commonly understood to say that the difference between operating in the cloud and in your own data center is where and whose computer you are using.
Figure 1. Sticker – There is no cloud, it’s just someone else’s computer
This is only a partially accurate statement though. By a show of hands, how many folks reading this would run their workloads the same way on someone else’s computer? You’re probably laughing and--if you work in IT security--potentially yelling at the screen right now. Why? Because it’s someone else’s computer! No one in IT would willingly move their workloads straight from the data center to a random computer and keep things the way they are. Rather, those systems would need to be reworked and reimagined to effectively “do cloud.”
We must approach the cloud as a mindset, not a location, asking “how can this workload be run on any computer — my computer, your computer, some “public” computer — and get the same results regardless?”. After all, it’s just someone else’s computer.
Diving into Dell APEX Block Storage
The Dell APEX offerings aren’t just another cloud, enabling organizations to readily adapt and adopt a cloud mindset for all workloads. For the sake of brevity, we’ll focus on the block storage varieties, Dell APEX Block Storage for AWS and Dell APEX Block Storage for Azure.
Dell APEX Block Storage allows you to consume cloud storage in either Azure or AWS. Both are powerful cloud platforms for enterprise workloads and PaaS offerings that aggregate low-cost cloud storage (just someone else’s storage) from the cloud provider to form cloud environments with enterprise-equivalent storage.
You might be asking, “what is ‘enterprise-equivalent storage?’” The answer may surprise you. Remember earlier when I described the cloud mindset of being able to run workloads anywhere? Adopting that, our workloads should function the same in the enterprise as well as in the cloud, encompassing not only performance (IOs and capacity) but also data resiliency, availability, and consistency across workloads.
But wait, only containerized workloads should run in “the cloud,” and those are already resilient. If a node goes down, just spin up another one. Why are containerized workloads special? Shouldn’t any workload be able to run anywhere, be it a traditional x86 application or a modern containerized app?
That’s why Dell APEX Block Storage is such an integral part of your organization’s cloud journey, enabling you to run any workload in any location and have the same experience. Who doesn’t want choice?
Beyond a consistent approach for consuming storage, the performance of that storage should be uniform across environments as well. Meaning, if you need a given number of IOPS or amount of storage capacity for a workload, they are imperative regardless of if it runs in your data center or on someone else’s computer (AKA the cloud).
The cloud provides many ways to satisfy resource requirements, some easy and some not so easy. If you want that consistent method for managing your data and workloads both on premises and in the cloud, Dell APEX Block storage makes it easy. It can aggregate cloud storage into a consistent, scale-out, software defined block storage service. Dell APEX Block Storage enables you to consume block storage from the cloud the same way you consume it in your own data center.
Deploying APEX Block Storage
Let’s walk through this concept. First, log in to your organization's Dell Premier Account. From the right-hand menu, select the Discover and Deploy option, then click on Available Services. From there, you will see the option, if entitled, to create a new APEX Block Storage instance. That can either be deployed on Amazon AWS or Microsoft Azure, as depicted in figure 2.
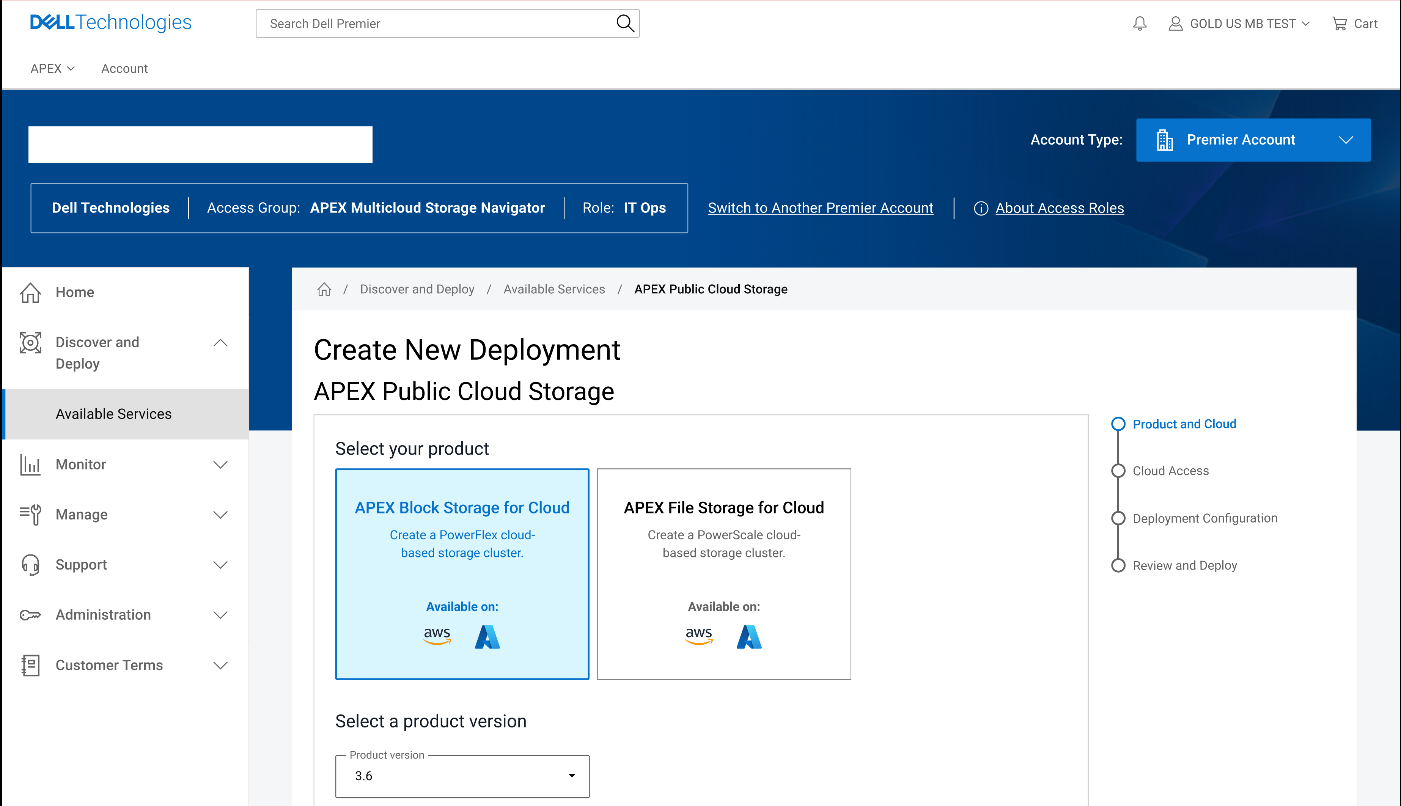
Figure 2. Dell Premier Account with APEX Block Storage capabilities enabled
Once you have completed the wizard, you will see additional instances or VMs in your cloud console of choice. The storage resources of these VMs (or instances) are aggregated to deliver APEX Block Storage that can be easily consumed. This is illustrated in the following figures for both APEX Block Storage for Azure and APEX Block Storage for AWS.
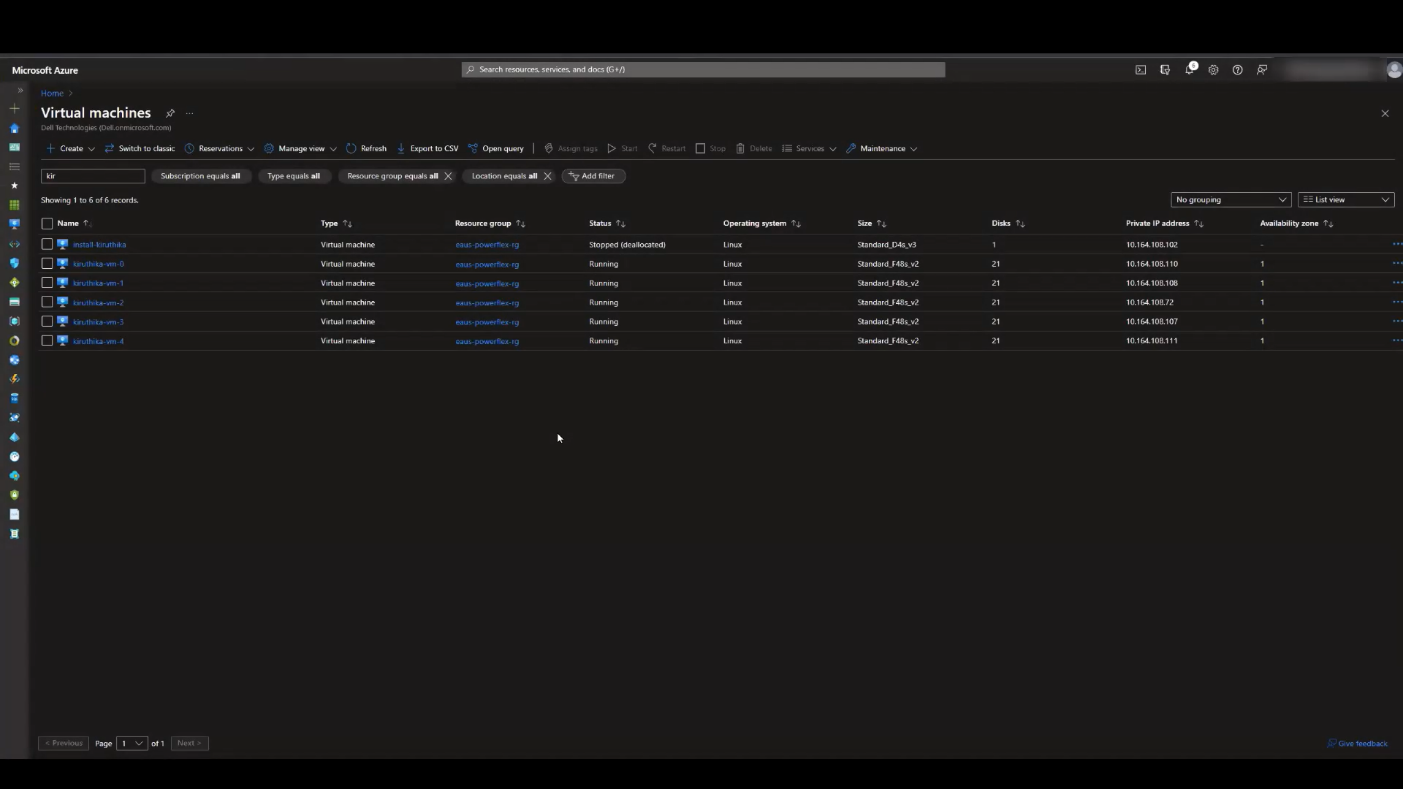
Figure 3. APEX Block Storage for Azure VMs
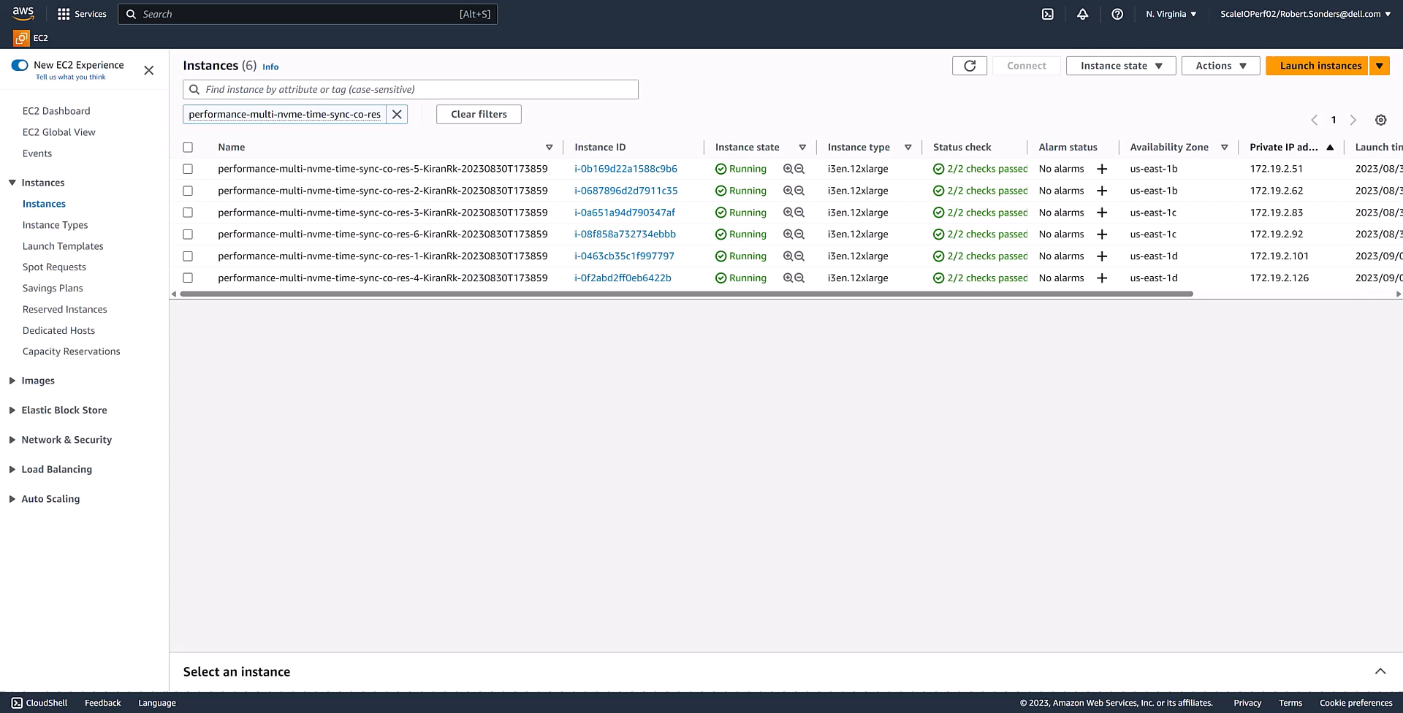
Figure 4. APEX Block Storage for AWS instances
What can APEX Block Storage do for you
The following diagram illustrates this aggregation and shows the relative ease with which storage can be expanded by simply adding an additional VM or instance in the cloud. You might be thinking, “that’s not a big deal, I’ve been doing that in my data center for several years”, and you’d be right. It shouldn’t be a big deal. Expanding storage should be the same, regardless of location.
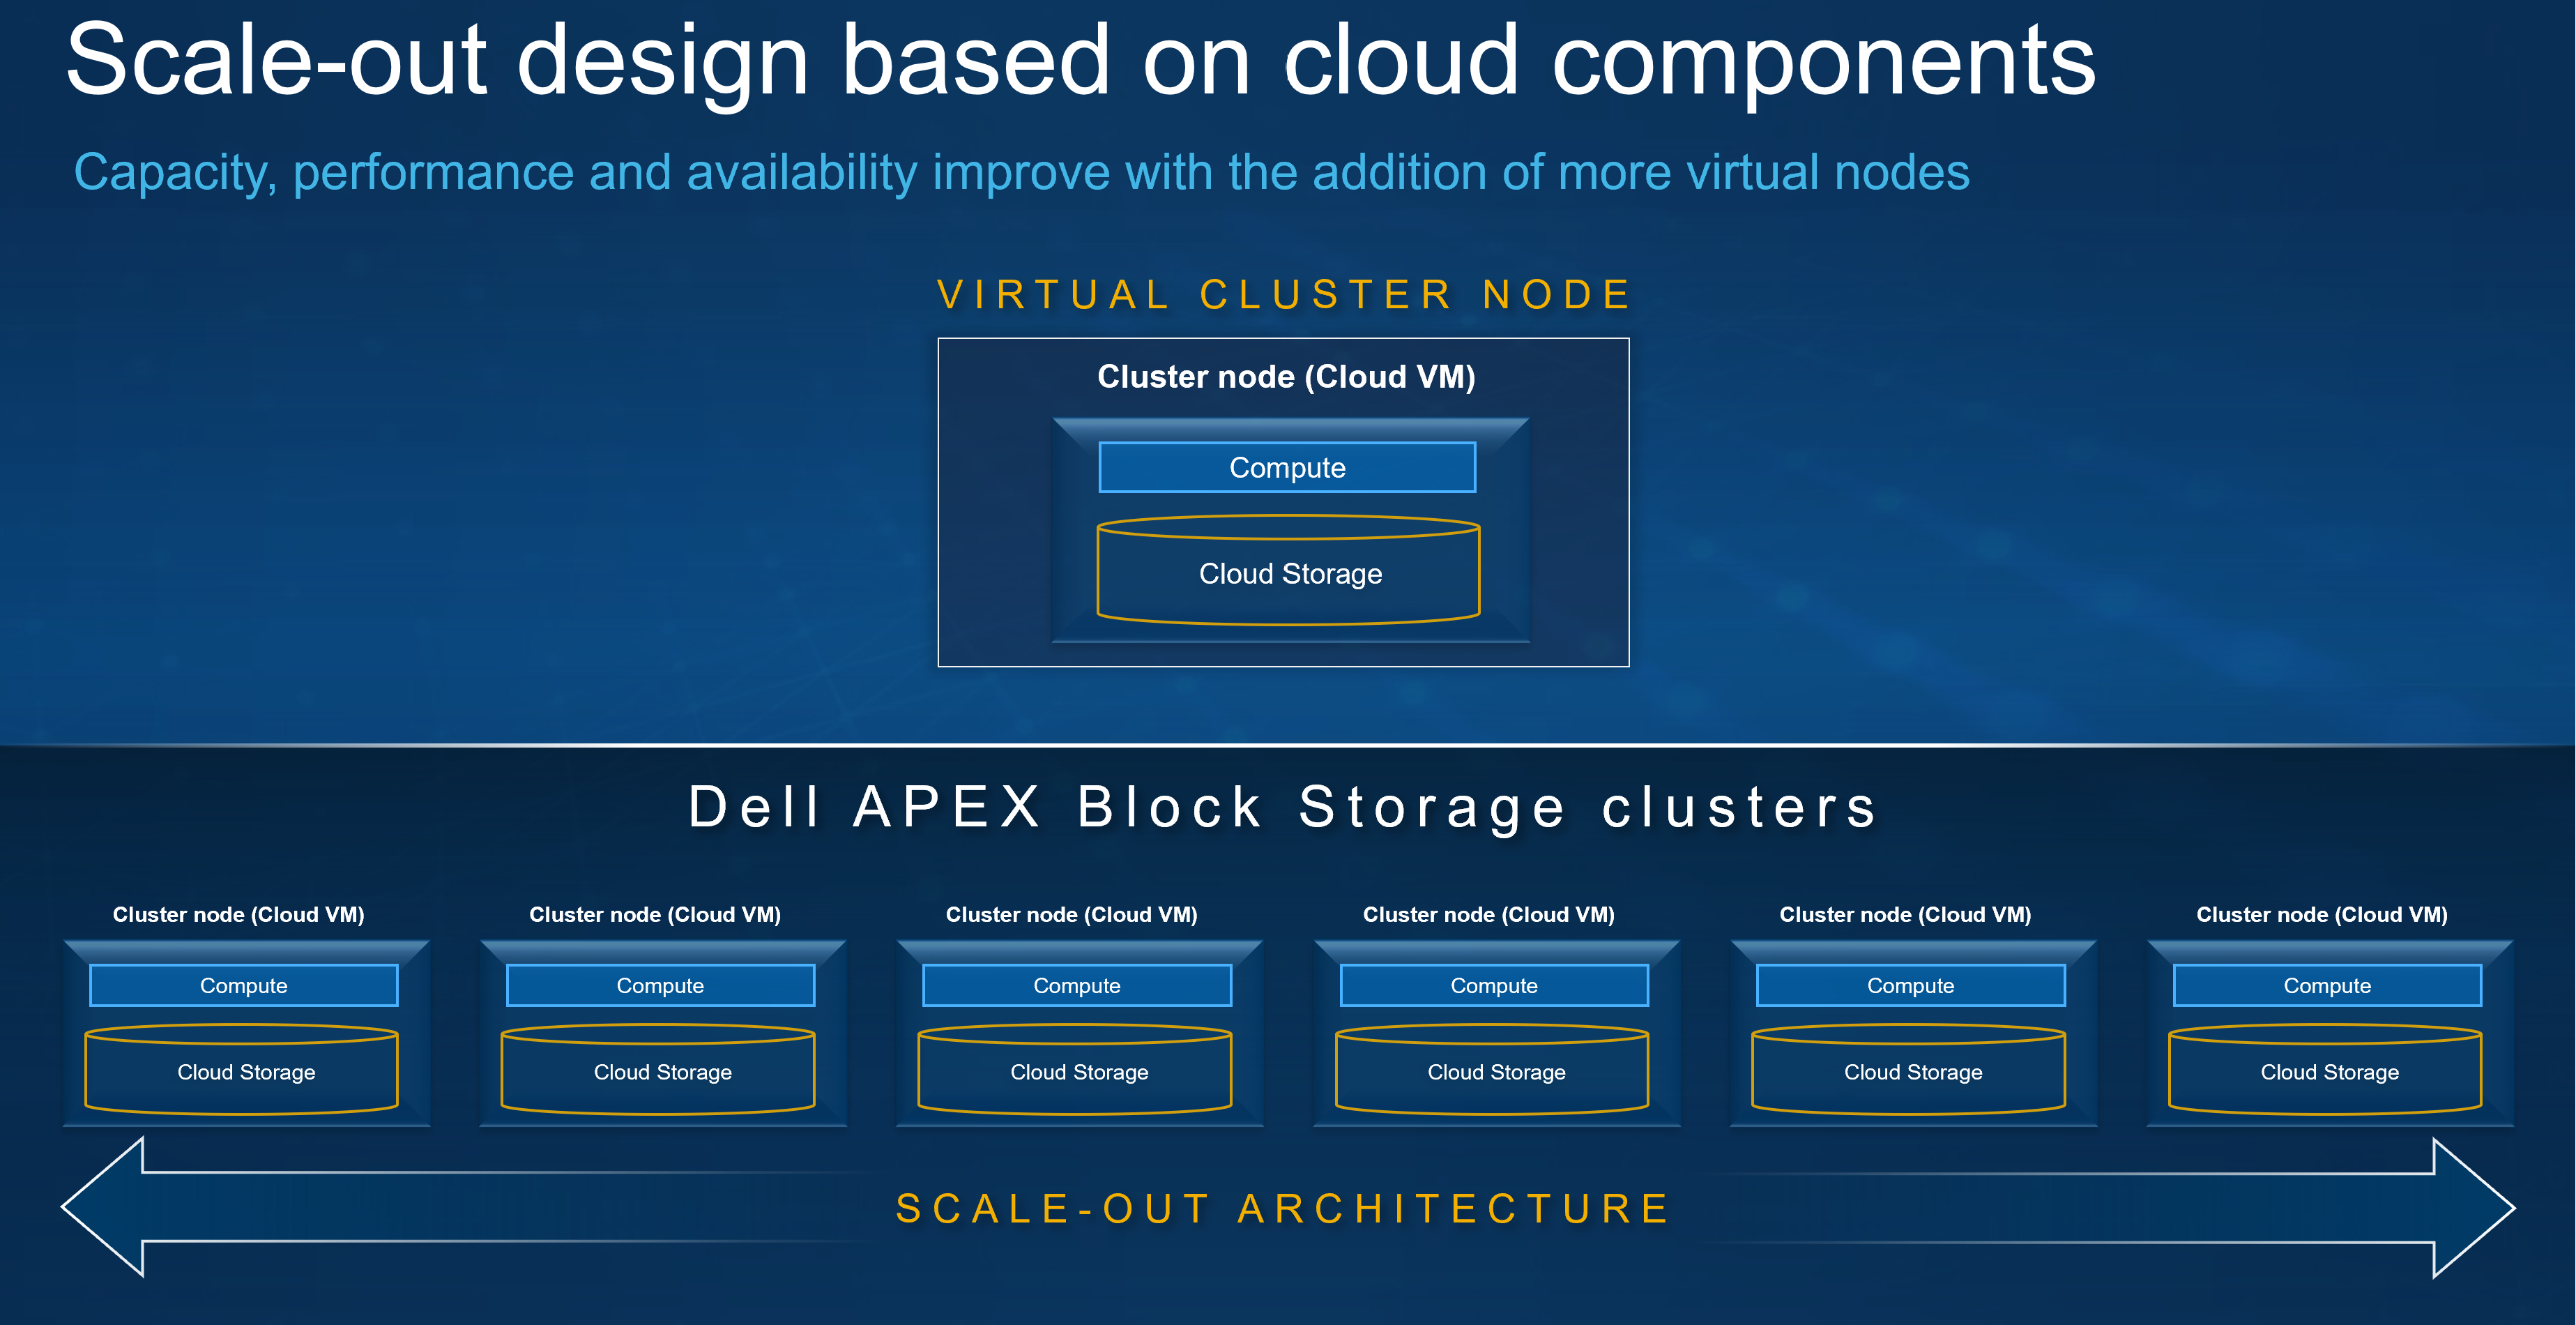
Figure 5. Aggregating storage with Dell APEX Block Storage
Something else that has been happening in the data center forever is thin provisioning. I remember back when I first started in IT how cool it was to have a SAN in the office that could thin provision. That meant I had a SAN with 16 – 500GB drives or about 7TB of usable space, allowing me to allocate terabytes of space to my systems even though I didn’t have the capacity to deliver it. If I ever needed too, I could scale out my capacity to meet the greater demand by adding another shelf to the array. It was awesome and powerful and — for a young IT admin — it sure made life easier. Since then, I’ve always considered thin provisioning when building storage systems, and it’s nice that I can be consistent in my planning wherever my workloads run.
Additionally, Dell APEX Block Storage enables space efficient snapshots in the cloud, helping reduce your space consumption. The reason space efficient snapshots are a big deal is because, instead of making a copy of everything, only the changed bits are recorded. That’s monumental when you’re paying for every IO and byte of space.
Not only do you get space efficient snapshots, you can also have a lot of them. We’re talking 126 snapshots per volume or roughly 32k snapshots per storage pool, unlocking an abundance of capabilities, especially in the cloud. Remember the whole cloud is a mindset thing? Having data center options at your disposal can come in handy regardless of where the operations are taking place.
Snapshots are nice, but they don’t mean a thing if you can’t do something with them — preferably at the same time you are using the rest of the volume. With APEX Block Storage, you can do just that. You can mount the snapshots and read from or write to them like they are another volume in the environment, similar to what you have been doing with storage in the data center for years.
Earlier, I mentioned scaling. In that regard, Dell APEX Block Storage has you covered. Starting with 10TiB of useable capacity and scaling up to 4PiB in the cluster, I can create volumes that are 8GB all the way up to 1PiB, producing massive flexibility for building in the cloud and empowering you to meet the storage needs of your most demanding applications.
As you increase the capacity, rest assured the performance with Dell APEX Block Storage remains linear. As you can see from the following charts for IOPS and throughput, both scale linearly on both reads and writes, meaning you get reliable and consistent performance from the cloud1. This provides the opportunity to apply a cloud mindset at scale, allowing you to focus on optimizing cloud workloads as the cloud infrastructure is ready for them.

Figure 6. Linear IOPS as the number of nodes is increased in the APEX Block Storage environment
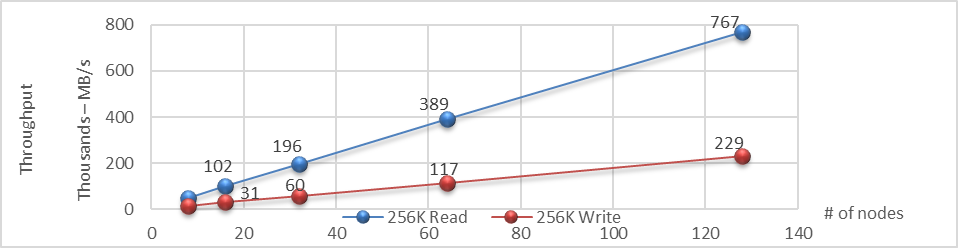
Figure 7. Linear throughput as the number of nodes is increased in the APEX Block Storage environment
Conclusion
Dell APEX Block Storage provides a host of capabilities, including aggregating underlying cloud storage into scalable and unified storage that linearly scales IOPS and throughput as new nodes are provided. We also looked at the availability of Dell APEX Block Storage in both Microsoft Azure and Amazon AWS clouds. Finally, we covered how cloud computing is a frame of mind to incorporate into our designs so our workloads can run in any location we choose.
Of course, the areas we went over just scratch the surface of applying a cloud mindset. After all, as we’ve said before, the cloud is just somebody else’s computer.
If you would like to find out more about how Dell APEX Block Storage can enhance your cloud journey, reach out to your Dell representative.
Resources
Author: Tony Foster, Sr. Principal Technical Marketing Engineer
Twitter: | |
LinkedIn: | |
Personal Blog: | |
Location: | The Land of Oz [-6 GMT] |
1Based on internal testing, March 15th-16th 2021 – Extreme SLAs – Even in the Cloud
Related Blog Posts

APEX Navigator – General Availability

Fri, 01 Dec 2023 15:17:18 -0000
|Read Time: 0 minutes
We are finally at a point in the APEX Navigator journey that we are ready for prime-time general availability! Our highly anticipated release of APEX Navigator is now open and ready for all.
 Ready to fully embrace multicloud storage ecosystems? Then this is the release for you and your company. Enabling a free 90-day evaluation license that applies to Dell licensing only, as well as a common storage platform for block and file (in the near future) across on-premises and major hyperscalers, Dell APEX Navigator is here to bring you multicloud storage ecosystems at their most elegant. The centralized SaaS experience will synthesize your digital transformation across all clouds and all infrastructure services.
Vision, tooling, and commonality are at the core of Dell APEX Navigator, and our engineering teams have been exceptionally busy thinking through the permutations and experiences that a multicloud offering should deliver. With great success, I might add!
The Dell APEX block storage that will be deployed as part of the release has already proven to be the best of its kind in the industry, and our APEX Navigator portal provides the deployment orchestration, day two monitoring, and decommissioning that glues the entire ecosystem together.
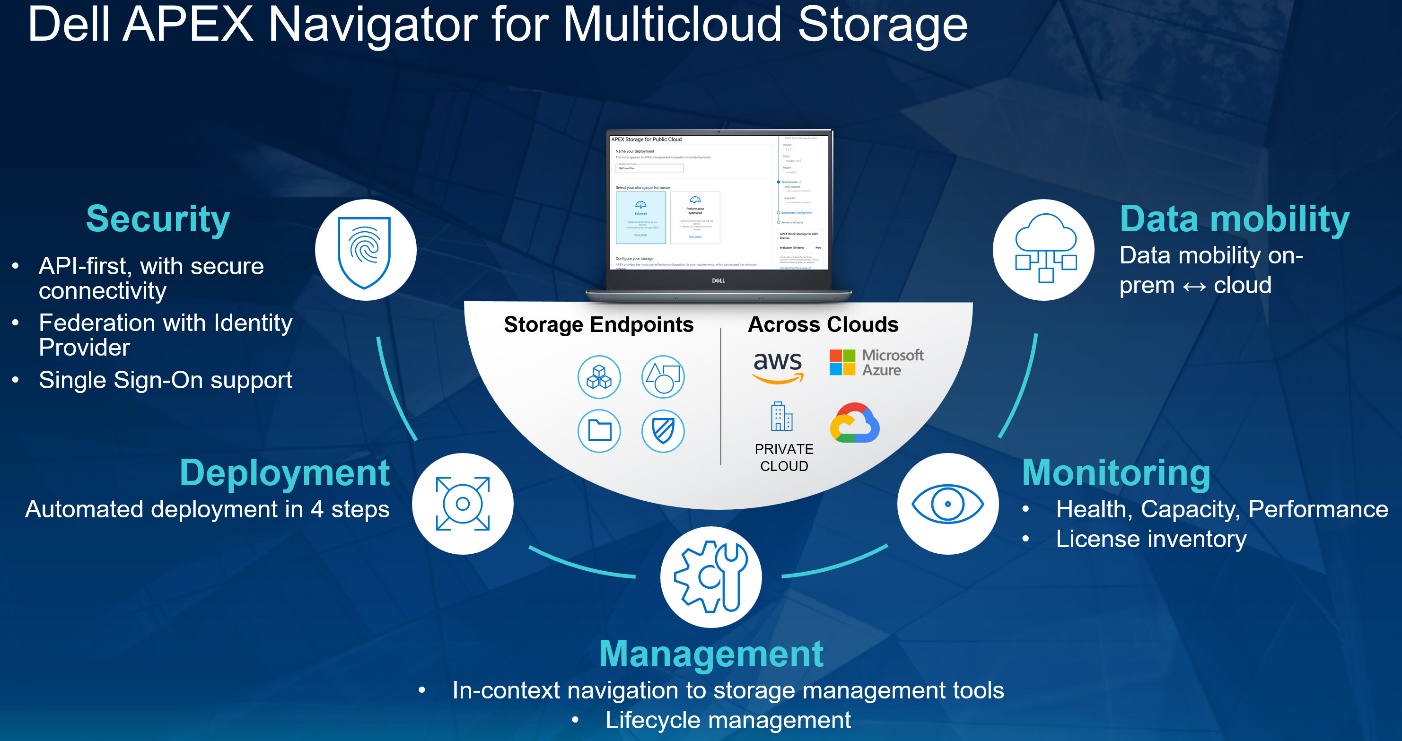
With APEX Navigator for Multicloud Storage, you can:
- Centralize Dell Storage software deployment and lifecycle management across multiple public clouds, including:
- Drive data mobility between on-prem and multiple public clouds to meet shifting cloud strategies
- AWS available at release
- Azure to follow soon
- Integrate with popular automation tools such as Ansible and Terraform as part of our API-first architecture, so you can:
- Accelerate productivity
- Embrace Dell storage software in the public cloud as part of your broader IT strategy
- Take decisive action using intelligent insights and comprehensive monitoring across your entire Dell storage estate with CloudIQ integration to track:
- License inventory
- System health
- Performance
- Capacity
- Accelerate Zero Trust adoption with role-based access control, single-sign on, and federated identity, all incorporating Zero Trust principles for complete control of data
If multicloud use cases are currently on your strategy to-do list (and they should be), the time is now to embrace the innovation Dell is bringing to the space. And we’re just getting warmed up, with our evolution only accelerating.
Don’t miss the APEX Navigator video series to dive deeper into the exciting trajectory we’re on. More video demos are being added frequently, so stay tuned for more!
Resources
Check out the Dell APEX Navigator page for more information.
The following APEX demos and documents provide additional information:
- Full APEX demo playlist
- APEX Block Storage for AWS
- APEX Block Storage for Azure
- Performance Results for Dell APEX Block Storage for AWS
- Performance Results for Dell APEX Block Storage for Azure
Author: Robert F. Sonders, Technical Staff – Engineering Technologist, Multicloud Storage Software
@RobertSonders | |
Blog | https://www.dell.com/en-us/blog/authors/robert-f-sonders/ |
Location | Scottsdale AZ, USA (GMT-7) |

PowerProtect Data Manager – How to Protect AWS EKS (Elastic Kubernetes Service) Workloads?
Thu, 17 Nov 2022 18:03:30 -0000
|Read Time: 0 minutes
PowerProtect Data Manager supports the protection of a multitude of K8s distributions for on-prem as well as in the cloud (see the compatibility matrix). In this blog, I’ll show how to use PowerProtect Data Manager (or PPDM for short) to protect AWS Elastic Kubernetes Service (EKS) workloads.
I’ve been asked many times recently if PPDM supports protection of Amazon EKS workloads, and if so, how the configuration goes. So, I thought it would be good to talk about that in a blog -- so here we are! In essence, the challenging piece (no issues, maybe challenges 😊) is the configuration of the EBS CSI driver, so I’ll cover that extensively in this blog. And because the deployment and configuration of the EBS CSI driver has changed recently, there is all the more reason to get this information out to you.
Deploying PowerProtect Data Manager and PowerProtect DD are both pretty straightforward. You just need to launch the PowerProtect Data Manager installation from the marketplace, answer some network and other questions, and off you go. It creates an AWS CloudFormation stack that deploys all the required services of both PowerProtect Data Manager and PowerProtect DD. PowerProtect DD can be deployed separately or along with PPDM. Naturally, the newly deployed PowerProtect Data Manager can also leverage an existing PowerProtect DD.
Deploying and configuring the EKS cluster and Node groups is rather simple and can be done using the AWS management console, AWS CLI, or eksctl. For more information, the official Amazon EKS documentation is your friend.
It’s important to talk about the tools we need installed for managing Amazon EKS and to deploy and manage the EBS CSI driver:
- kubectl – Probably needs no introduction but it’s a command line tool to work with Kubernetes clusters.
- AWS CLI – A command line tool for working with AWS services. For installation instructions and further info, see Installing or updating the latest version of the AWS CLI.
- eksctl – A command line tool to create and manage EKS clusters. For more info, see Installing or updating eksctl.
Let’s look at some general steps before we go ahead and deploy the EBS CSI driver.
To get started
1. To configure AWS CLI, run the following command:
aws configure
2. List your EKS clusters:
aws eks --region <region-code> list-clusters
3. Configure kubectl to operate against your EKS cluster:
aws eks update-kubeconfig --name <your-eks-cluster-name>
Deploying the External Snapshotter
The final step before we can deploy the EBS CSI driver is to deploy the external snapshotter.
1. To deploy the snapshotter, execute the following commands:
kubectl apply -f https://raw.githubusercontent.com/kubernetes-csi/external-snapshotter/master/client/config/crd/snapshot.storage.k8s.io_volumesnapshotclasses.yaml
kubectl apply -f https://raw.githubusercontent.com/kubernetes-csi/external-snapshotter/master/client/config/crd/snapshot.storage.k8s.io_volumesnapshotcontents.yaml
kubectl apply -f https://raw.githubusercontent.com/kubernetes-csi/external-snapshotter/master/client/config/crd/snapshot.storage.k8s.io_volumesnapshots.yaml
kubectl apply -f https://raw.githubusercontent.com/kubernetes-csi/external-snapshotter/master/deploy/kubernetes/snapshot-controller/rbac-snapshot-controller.yaml
kubectl apply -f https://raw.githubusercontent.com/kubernetes-csi/external-snapshotter/master/deploy/kubernetes/snapshot-controller/setup-snapshot-controller.yaml
2. Make sure the snapshot controller pods are running:
kubectl get pods -n kube-system
EBS CSI Driver Deployment
And now for the main event, the configuration of the EBS CSI driver. There are two ways to go about it – deploying the EKS CSI Driver as an EKS add-on or as a self-managed driver. You can use either the AWS management console or AWS CLI (eksctl) to deploy the EBS CSI Driver add-on. The self-managed driver is installed and operated exclusively using kubectl.
The following procedure represents my thoughts and experience for a quick and comprehensive configuration - there are few ways to climb a mountain as they say. Refer to the documentation for all possible ways.
Option 1: Self-managed EBS CSI Driver
1. Create or use an existing IAM user and map the required policy for the EBS CSI Driver to the user:
a. Create an IAM user:
aws iam create-user --user-name <user-name>
b. Create an IAM policy and record the Policy ARN:
aws iam create-policy --policy-name <policy-name> --policy-document https://raw.githubusercontent.com/
kubernetes-sigs/aws-ebs-csi-driver/master/docs/example-iam-policy.json
c. Attach the policy to the user:
aws iam attach-user-policy --user-name <user-name> --policy-arn <policy-arn>
d. Create an access key and record the AccessKeyId and SecretAccessKey:
aws iam create-access-key --user-name <user-name>
2. Create a secret. Here we’re creating a secret and mapping it to an existing IAM user and its credentials (for example, the access keys recorded in the previous step):
kubectl create secret generic aws-secret --namespace kube-system --from-literal "key_id=<iam-user-access-key-id>" --from-literal "access_key=<iam-user-secret-access-key>"
3. Install the EBS CSI Driver:
kubectl apply -k "github.com/kubernetes-sigs/aws-ebs-csi-driver/deploy/kubernetes/overlays/stable/?ref=release-1.12"
4. Make sure that the ebs-csi-controller and ebs-csi-nodes pods are running:
kubectl get pods -n kube-system
Option 2: EBS CSI Driver Add-on
1. Retrieve the EKS cluster OIDC provider:
aws eks describe-cluster --name <your-eks-cluster-name> --query "cluster.identity.oidc.issuer" --output text
2. Check if the OIDC provider of your cluster is not on the list of current IAM providers:
aws iam list-open-id-connect-providers
3. If the provider is not on the list, associate it by running the following command:
eksctl utils associate-iam-oidc-provider --cluster <your-eks-cluster-name> --approve
4. Create the IAM role. This would also attach the required policy and annotate the EBS CSI driver Service Account on the EKS cluster:
eksctl create iamserviceaccount --name ebs-csi-controller-sa --namespace kube-system --cluster <your-eks-cluster-name> --attach-policy-arn arn:aws:iam::aws:policy/service-role/AmazonEBSCSIDriverPolicy --approve --role-only --role-name <role-name>
5. Make sure that the aws-ebs-csi-driver is not installed:
aws eks list-addons --cluster-name <your-eks-cluster-name>
6. Get the AWS Account ID:
aws sts get-caller-identity --query "Account" --output text
7. Deploy the EBS CSI Driver add-on. Note that it will deploy the default add-on version for your K8s version. Specify the AWS account ID retrieved in the previous step and the IAM role specified in Step 4.
eksctl create addon --name aws-ebs-csi-driver --cluster <your-eks-cluster-name> --service-account-role-arn arn:aws:iam::<your-aws-account-id>:role/<role-name> --force
8. Make sure that the ebs-csi-controller and ebs-csi-nodes pods are running:
kubectl get pods -n kube-system
Storage Class Configuration
1. Create the Volume Snapshot Class YAML file:
cat <<EOF | tee snapclass.yaml
apiVersion: snapshot.storage.k8s.io/v1
kind: VolumeSnapshotClass
metadata:
   name: csi-aws-vsc
driver: ebs.csi.aws.com
deletionPolicy: Delete
EOF
2. Create the Snapshot Class:
kubectl apply -f snapclass.yaml
3. Make sure that the Snapshot Class got created:
kubectl get volumesnapshotclass
4. Create the Storage Class YAML file:
cat <<EOF | tee ebs-sc.yaml
apiVersion: storage.k8s.io/v1
kind: StorageClass
metadata:
   name: ebs-sc
   annotations:
     storageclass.kubernetes.io/is-default-class: "true"
provisioner: ebs.csi.aws.com
volumeBindingMode: WaitForFirstConsumer
EOF
5. Create the Storage Class:
kubectl apply -f ebs-sc.yaml
6. Patch the gp2 storage class to remove the default setting:
kubectl patch storageclass gp2 -p "{\"metadata\": {\"annotations\":{\"storageclass.kubernetes.io/is-default-class\":\"false\"}}}"7. Make sure that the EBS Storage Class got created and that it shows up as the default storage classone:
kubectl get storageclass
Add EKS to PowerProtect Data Manager
Now, for the grand finale – adding our EKS cluster to PPDM. Follow these steps to gather some information and then register EKS to PPDM.
1. Get the K8s cluster control-plane endpoint:
kubectl cluster-info
2. To create a service account on the EKS cluster for PPDM discovery and operations, PPDM RBAC YAML files need to be applied.
a. Retrieve the rbac.tar.gz file from the PPDM appliance at the following location:
/usr/local/brs/lib/cndm/misc/rbac.tar.gz
b. On PPDM 19.12, you can download the archive from the PowerProtect Data Manager UI under System Settings -> Downloads > Kubernetes, or directly using the following URL:
https://<your-ppdm-server>/k8s-binaries-download?filename=/usr/local/brs/lib/cndm/misc/rbac.tar.gz
Note that the link will only work if you’re logged into the PPDM UI. You can also find the archive on PPDM itself, at the following path:
/usr/local/brs/lib/cndm/misc/rbac.tar.gz
c. Extract the archive, navigate to the rbac directory, and apply the two YAML files using the following commands:
kubectl apply -f ppdm-discovery.yaml
kubectl apply -f ppdm-controller-rbac.yaml
d. If you’re using K8s 1.24 or later, then you must manually create the secret for the PPDM discovery storage account:
kubectl apply -f - <<EOF
apiVersion: v1
kind: Secret
type: kubernetes.io/service-account-token
metadata:
   name: ppdm-discovery-serviceaccount-token
   namespace: powerprotect
   annotations:
     kubernetes.io/service-account.name: "ppdm-discovery-serviceaccount"
EOF
e. Retrieve the secret key using the following command:
kubectl describe secret $(kubectl get secret -n powerprotect | awk '/disco/{print $1}') -n powerprotect | awk '/token:/{print $2}'3. Retrieve the EKS cluster root CA:
eksctl get cluster <your-eks-cluster-name> -o yaml | awk '/Cert/{getline; print $2}'Without further ado, let’s navigate to the PowerProtect Data Manager UI and register our EKS cluster as a Kubernetes Asset Source.
4. Navigate to Infrastructure -> Asset Sources.
5. Enable the Kubernetes Asset Source as needed and navigate to the Kubernetes tab.
6. Add the EKS cluster as a Kubernetes Asset Source:
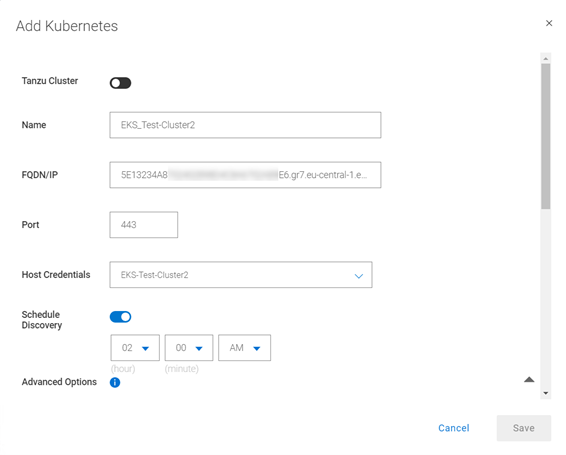
A few other notes:
7. Use the FDQN you retrieved in Step 1. Make sure to remove the https:// prefix.
8. Specify port 443. Make sure to add tcp/443 to the EKS security group (inbound) and the PPDM security group (outbound).
9. Create new credentials with the Service Account Token from Step 2e.
10. Root Certificate:
a. On PPDM versions earlier than 19.12, follow these steps:
- Convert the EKS root CA to BASE64 using the following command:
eksctl get cluster <your-eks-clsuter-name> -o yaml | awk '/Cert/{getline; print $2}' | base64 -d- SSH to the PPDM server using the admin user and save the root CA in BASE64 to a file, say eks-cert.txt. Make sure to include the BEGIN and END CERTIFICATE lines.
- Execute the following command:
ppdmtool -importcert -alias <your-eks-cluster-name> -file eks-cert.txt -t BASE64
b. On PPDM 19.12 and later, click Advanced Options on the same Add Kubernetes screen and scroll down. Specify the root certificate from Step 3.
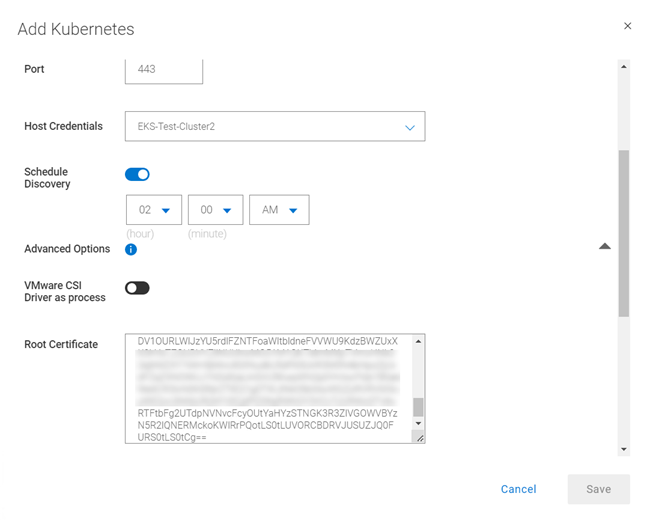
11. Verify the certificate and click Save to register the EKS cluster as a Kubernetes Asset Source.
That’s it, now you can deploy your stateful applications on your EKS cluster and protect their namespaces by creating a new Protection Policy 👍🏻.
Feel free to reach out with any questions or comments.
Thanks for reading,
Idan
Author: Idan Kentor
idan.kentor@dell.com