


Converting Hugging Face Large Language Models to TensorRT-LLM

Introduction
Before getting into this blog proper, I want to take a minute to thank Fabricio Bronzati for his technical help on this topic.
Over the last couple of years, Hugging Face has become the de-facto standard platform to store anything to do with generative AI. From models to datasets to agents, it is all found on Hugging Face.
While NVIDIA graphic cards have been a popular choice to power AI workloads, NVIDIA has spent significant investment in building their software stack to help customers decrease the time to market for their generative AI-back applications. This is where the NVIDIA AI Enterprise software stack comes into play. 2 big components of the NVIDIA AI Enterprise stack are the NeMo framework and the Triton Inference server.
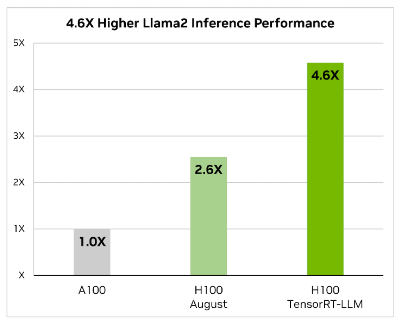
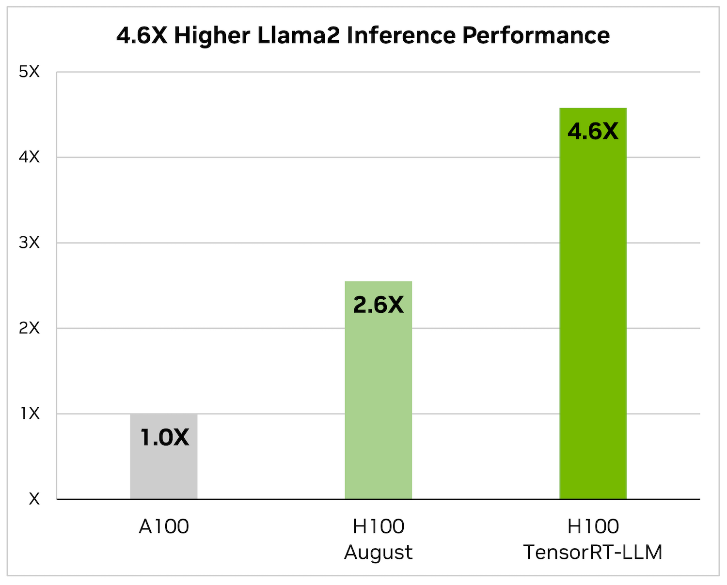
NeMo makes it really easy to spin up an LLM and start interacting with it. The perceived downside of NeMo is that it only supports a small number of LLMs, because it requires the LLM to be in a specific format. For folks looking to run LLMs that are not supported by NeMo, NVIDIA provides a set of scripts and containers to convert the LLMs from the Hugging Face format to the TensorRT, which is the underlying framework for NeMo and the Triton Inference server. According to NVIDIA's website, found here, TensorRT-LLM is an open-source library that accelerates and optimizes inference performance of the latest large language models (LLMs) on the NVIDIA AI platform.
The challenge with TensorRT-LLM is that one can't take a model from Hugging Face and run it directly on TensorRT-LLM. Such a model will need to go through a conversion stage and then it can leverage all the goodness of TensorRT-LLM.
When it comes to optimizing large language models, TensorRT-LLM is the key. It ensures that models not only deliver high performance but also maintain efficiency in various applications.
The library includes optimized kernels, pre- and post-processing steps, and multi-GPU/multi-node communication primitives. These features are specifically designed to enhance performance on NVIDIA GPUs.
The purpose of this blog is to show the steps needed to take a model on Hugging Face and convert it to TensorRT-LLM. Once a model has been converted, it can then be used by the Triton Inference server. TensorRT-LLM doesn't support all models on Hugging Face, so before attempting the conversion, I would check the ever-growing list of supported models on the TensorRT-LLM github page.
Pre-requisites
Before diving into the conversion, let's briefly talk about pre-requisites. There are a lot of steps in the conversion leverage docker, so you need: docker-compose and docker-buildx. You will also be cloning repositories, so you need git . One component of git that is required and is not always installed by default is the support for Large File Storage. So, you need to make sure that git-lfs is installed, because we will need to clone fairly large files (in the multi-GB size) from git, and using git-lfs is the most efficient way of doing it.
Building the TensorRT LLM library
At the time of writing this blog, NVIDIA hasn't yet released a pre-built container with the TensorRT LLM library, so unfortunately, it means that it is incumbent on whomever wants to use it to do so. So, let me show you how to do it.
First thing I need to do is clone the TensorRT LLM library repository:
fbronzati@node002:/aipsf600/project-helix/TensonRT-LLM/v0.8.0$ git clone https://github.com/NVIDIA/TensorRT-LLM.gitCloning into 'TensorRT-LLM'...remote: Enumerating objects: 7888, done.remote: Counting objects: 100% (1696/1696), done.remote: Compressing objects: 100% (626/626), done.remote: Total 7888 (delta 1145), reused 1413 (delta 1061), pack-reused 6192Receiving objects: 100% (7888/7888), 81.67 MiB | 19.02 MiB/s, done.Resolving deltas: 100% (5368/5368), done.Updating files: 100% (1661/1661), done.
Then I need to initialize all the submodules contained in the repository:
fbronzati@node002:/aipsf600/project-helix/TensonRT-LLM/v0.8.0/TensorRT-LLM$ git submodule update --init --recursiveSubmodule '3rdparty/NVTX' (https://github.com/NVIDIA/NVTX.git) registered for path '3rdparty/NVTX'Submodule '3rdparty/cutlass' (https://github.com/NVIDIA/cutlass.git) registered for path '3rdparty/cutlass'Submodule '3rdparty/cxxopts' (https://github.com/jarro2783/cxxopts) registered for path '3rdparty/cxxopts'Submodule '3rdparty/json' (https://github.com/nlohmann/json.git) registered for path '3rdparty/json'Cloning into '/aipsf600/project-helix/TensonRT-LLM/v0.8.0/TensorRT-LLM/3rdparty/NVTX'...Cloning into '/aipsf600/project-helix/TensonRT-LLM/v0.8.0/TensorRT-LLM/3rdparty/cutlass'...Cloning into '/aipsf600/project-helix/TensonRT-LLM/v0.8.0/TensorRT-LLM/3rdparty/cxxopts'...Cloning into '/aipsf600/project-helix/TensonRT-LLM/v0.8.0/TensorRT-LLM/3rdparty/json'...Submodule path '3rdparty/NVTX': checked out 'a1ceb0677f67371ed29a2b1c022794f077db5fe7'Submodule path '3rdparty/cutlass': checked out '39c6a83f231d6db2bc6b9c251e7add77d68cbfb4'Submodule path '3rdparty/cxxopts': checked out 'eb787304d67ec22f7c3a184ee8b4c481d04357fd'Submodule path '3rdparty/json': checked out 'bc889afb4c5bf1c0d8ee29ef35eaaf4c8bef8a5d'
and then I need to initialize git lfs and pull the objects stored in git lfs:
fbronzati@node002:/aipsf600/project-helix/TensonRT-LLM/v0.8.0/TensorRT-LLM$ git lfs installUpdated git hooks.Git LFS initialized.fbronzati@node002:/aipsf600/project-helix/TensonRT-LLM/v0.8.0/TensorRT-LLM$ git lfs pull
At this point, I am now ready to build the docker container that will contain the TensorRT LLM library:
fbronzati@node002:/aipsf600/project-helix/TensonRT-LLM/v0.8.0/TensorRT-LLM$ make -C docker release_buildmake: Entering directory '/aipsf600/project-helix/TensonRT-LLM/v0.8.0/TensorRT-LLM/docker'Building docker image: tensorrt_llm/release:latestDOCKER_BUILDKIT=1 docker build --pull \ --progress auto \ --build-arg BASE_IMAGE=nvcr.io/nvidia/pytorch \ --build-arg BASE_TAG=23.12-py3 \ --build-arg BUILD_WHEEL_ARGS="--clean --trt_root /usr/local/tensorrt --python_bindings --benchmarks" \ --build-arg TORCH_INSTALL_TYPE="skip" \ --build-arg TRT_LLM_VER="0.8.0.dev20240123" \ --build-arg GIT_COMMIT="b57221b764bc579cbb2490154916a871f620e2c4" \ --target release \ --file Dockerfile.multi \ --tag tensorrt_llm/release:latest \
[+] Building 2533.0s (41/41) FINISHED docker:default => [internal] load build definition from Dockerfile.multi 0.0s => => transferring dockerfile: 3.24kB 0.0s => [internal] load .dockerignore 0.0s => => transferring context: 359B 0.0s => [internal] load metadata for nvcr.io/nvidia/pytorch:23.12-py3 1.0s => [auth] nvidia/pytorch:pull,push token for nvcr.io 0.0s => [internal] load build context 44.1s => => transferring context: 579.18MB 44.1s => CACHED [base 1/1] FROM nvcr.io/nvidia/pytorch:23.12-py3@sha256:da3d1b690b9dca1fbf9beb3506120a63479e0cf1dc69c9256055125460eb44f7 0.0s => [devel 1/14] COPY docker/common/install_base.sh install_base.sh 1.1s => [devel 2/14] RUN bash ./install_base.sh && rm install_base.sh 13.7s => [devel 3/14] COPY docker/common/install_cmake.sh install_cmake.sh 0.0s => [devel 4/14] RUN bash ./install_cmake.sh && rm install_cmake.sh 23.0s => [devel 5/14] COPY docker/common/install_ccache.sh install_ccache.sh 0.0s => [devel 6/14] RUN bash ./install_ccache.sh && rm install_ccache.sh 0.5s => [devel 7/14] COPY docker/common/install_tensorrt.sh install_tensorrt.sh 0.0s => [devel 8/14] RUN bash ./install_tensorrt.sh --TRT_VER=${TRT_VER} --CUDA_VER=${CUDA_VER} --CUDNN_VER=${CUDNN_VER} --NCCL_VER=${NCCL_VER} --CUBLAS_VER=${CUBLAS_VER} && 448.3s => [devel 9/14] COPY docker/common/install_polygraphy.sh install_polygraphy.sh 0.0s => [devel 10/14] RUN bash ./install_polygraphy.sh && rm install_polygraphy.sh 3.3s => [devel 11/14] COPY docker/common/install_mpi4py.sh install_mpi4py.sh 0.0s => [devel 12/14] RUN bash ./install_mpi4py.sh && rm install_mpi4py.sh 42.2s => [devel 13/14] COPY docker/common/install_pytorch.sh install_pytorch.sh 0.0s => [devel 14/14] RUN bash ./install_pytorch.sh skip && rm install_pytorch.sh 0.4s => [wheel 1/9] WORKDIR /src/tensorrt_llm 0.0s => [release 1/11] WORKDIR /app/tensorrt_llm 0.0s => [wheel 2/9] COPY benchmarks benchmarks 0.0s => [wheel 3/9] COPY cpp cpp 1.2s => [wheel 4/9] COPY benchmarks benchmarks 0.0s => [wheel 5/9] COPY scripts scripts 0.0s => [wheel 6/9] COPY tensorrt_llm tensorrt_llm 0.0s => [wheel 7/9] COPY 3rdparty 3rdparty 0.8s => [wheel 8/9] COPY setup.py requirements.txt requirements-dev.txt ./ 0.1s => [wheel 9/9] RUN python3 scripts/build_wheel.py --clean --trt_root /usr/local/tensorrt --python_bindings --benchmarks 1858.0s => [release 2/11] COPY --from=wheel /src/tensorrt_llm/build/tensorrt_llm*.whl . 0.2s => [release 3/11] RUN pip install tensorrt_llm*.whl --extra-index-url https://pypi.nvidia.com && rm tensorrt_llm*.whl 43.7s => [release 4/11] COPY README.md ./ 0.0s => [release 5/11] COPY docs docs 0.0s => [release 6/11] COPY cpp/include include 0.0s => [release 7/11] COPY --from=wheel /src/tensorrt_llm/cpp/build/tensorrt_llm/libtensorrt_llm.so /src/tensorrt_llm/cpp/build/tensorrt_llm/libtensorrt_llm_static.a lib/ 0.1s => [release 8/11] RUN ln -sv $(TRT_LLM_NO_LIB_INIT=1 python3 -c "import tensorrt_llm.plugin as tlp; print(tlp.plugin_lib_path())") lib/ && cp -Pv lib/libnvinfer_plugin_tensorrt_llm.so li 1.8s => [release 9/11] COPY --from=wheel /src/tensorrt_llm/cpp/build/benchmarks/bertBenchmark /src/tensorrt_llm/cpp/build/benchmarks/gptManagerBenchmark /src/tensorrt_llm/cpp/build 0.1s => [release 10/11] COPY examples examples 0.1s => [release 11/11] RUN chmod -R a+w examples 0.5s => exporting to image 40.1s => => exporting layers 40.1s => => writing image sha256:a6a65ab955b6fcf240ee19e6601244d9b1b88fd594002586933b9fd9d598c025 0.0s => => naming to docker.io/tensorrt_llm/release:latest 0.0smake: Leaving directory '/aipsf600/project-helix/TensonRT-LLM/v0.8.0/TensorRT-LLM/docker'
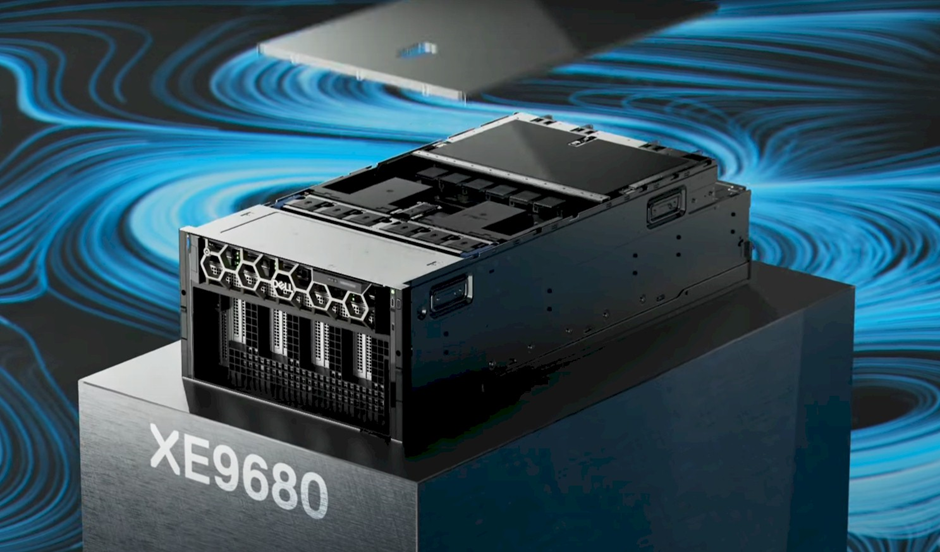
The time it will take to build the container is highly dependent on the resources available on the server you are running the command on. In my case, this was on a PowerEdge XE9680, which is the fastest server in the Dell PowerEdge portfolio.
Downloading model weights
Next, I need to download the weights for the model I am going to be converting to TensorRT. Even though I am doing this in this sequence, this step could have been done prior to cloning the TensorRT LLM repo.
Model weights can be downloaded in 2 different manners:
- Outside of the TensorRT container
- Inside the TensorRT container
The benefit of downloading them outside of the TensorRT container is that they can be reused for multiple conversions, whereas, if they are downloaded inside the container, they can only be used for that single conversion. In my case, I will download them outside of the container as I feel it will be the approach used by most people. This is how to do it:
fbronzati@node002:/aipsf600/project-helix/TensonRT-LLM/v0.8.0/TensorRT-LLM$ cd ..fbronzati@node002:/aipsf600/project-helix/TensonRT-LLM/v0.8.0$ git lfs installGit LFS initialized.fbronzati@node002:/aipsf600/project-helix/TensonRT-LLM/v0.8.0$ git clone https://huggingface.co/meta-llama/Llama-2-70b-chat-hfCloning into ‘Llama-2-70b-chat-hf’...Username for ‘https://huggingface.co’: ******Password for ‘https://bronzafa@huggingface.co’:remote: Enumerating objects: 93, done.remote: Counting objects: 100% (6/6), done.remote: Compressing objects: 100% (6/6), done.remote: Total 93 (delta 1), reused 0 (delta 0), pack-reused 87Unpacking objects: 100% (93/93), 509.43 KiB | 260.00 KiB/s, done.Updating files: 100% (44/44), done.Username for ‘https://huggingface.co’: ******Password for ‘https://bronzafa@huggingface.co’:
Filtering content: 18% (6/32), 6.30 GiB | 2.38 MiB/s
Filtering content: 100% (32/32), 32.96 GiB | 9.20 MiB/s, done.
Depending on your setup, you might see some error messages about files not being copied properly. Those can be safely ignored. One thing worth noting about downloading the weights is that you need to make sure you have lots of local storage as cloning this particular model will need over 500GB. The amount of storage will obviously depend on the size of the model and the model chosen, but definitely something to keep in mind.
Starting the TensorRT container
Now, I am ready to start the TensorRT container. This can be done with the following command:
fbronzati@node002:/aipsf600/project-helix/TensonRT-LLM/v0.8.0/TensorRT-LLM$ make -C docker release_run LOCAL_USER=1make: Entering directory ‘/aipsf600/project-helix/TensonRT-LLM/v0.8.0/TensorRT-LLM/docker’docker build –progress –pull --progress auto –build-arg BASE_IMAGE_WITH_TAG=tensorrt_llm/release:latest –build-arg USER_ID=1003 –build-arg USER_NAME=fbronzati –build-arg GROUP_ID=1001 –build-arg GROUP_NAME=ais –file Dockerfile.user –tag tensorrt_llm/release:latest-fbronzati ..[+] Building 0.5s (6/6) FINISHED docker:default => [internal] load build definition from Dockerfile.user 0.0s => => transferring dockerfile: 531B 0.0s => [internal] load .dockerignore 0.0s => => transferring context: 359B 0.0s => [internal] load metadata for docker.io/tensorrt_llm/release:latest 0.0s => [1/2] FROM docker.io/tensorrt_llm/release:latest 0.1s => [2/2] RUN (getent group 1001 || groupadd –gid 1001 ais) && (getent passwd 1003 || useradd –gid 1001 –uid 1003 –create-home –no-log-init –shell /bin/bash fbronzati) 0.3s => exporting to image 0.0s => => exporting layers 0.0s => => writing image sha256:1149632051753e37204a6342c1859a8a8d9068a163074ca361e55bc52f563cac 0.0s => => naming to docker.io/tensorrt_llm/release:latest-fbronzati 0.0sdocker run –rm -it –ipc=host –ulimit memlock=-1 –ulimit stack=67108864 \ --gpus=all \ --volume /aipsf600/project-helix/TensonRT-LLM/v0.8.0/TensorRT-LLM:/code/tensorrt_llm \ --env “CCACHE_DIR=/code/tensorrt_llm/cpp/.ccache” \ --env “CCACHE_BASEDIR=/code/tensorrt_llm” \ --workdir /app/tensorrt_llm \ --hostname node002-release \ --name tensorrt_llm-release-fbronzati \ --tmpfs /tmp:exec \ tensorrt_llm/release:latest-fbronzati
=============== PyTorch ===============
NVIDIA Release 23.12 (build 76438008)PyTorch Version 2.2.0a0+81ea7a4
Container image Copyright © 2023, NVIDIA CORPORATION & AFFILIATES. All rights reserved.
Copyrig©(c) 2014-2023 Facebook Inc.Copy©ht (c) 2011-2014 Idiap Research Institute (Ronan Collobert)C©right (c) 2012-2014 Deepmind Technologies (Koray Kavukcuoglu©opyright (c) 2011-2012 NEC Laboratories America (Koray Kavukcuo©)Copyright (c) 2011-2013 NYU (Clement F©bet)Copyright (c) 2006-2010 NEC Laboratories America (Ronan Collobert, Leon Bottou, Iain Melvin, Jas©Weston)Copyright (c) 2006 Idiap Research Institute ©my Bengio)Copyright (c) 2001-2004 Idiap Research Institute (Ronan Collobert, Samy Bengio, J©ny Mariethoz)Copyright (c) 2015 Google Inc.Copyright (c) 2015 Yangqing JiaCopyright (c) 2013-2016 The Caffe contributorsAll rights reserved.
Variou©iles include modifications (c) NVIDIA CORPORATION & AFFILIATES. All rights reserved.
This container image and its contents are governed by the NVIDIA Deep Learning Container License.By pulling and using the container, you accept the terms and conditions of this license:https://developer.nvidia.com/ngc/nvidia-deep-learning-container-license
fbronzati@node002-release:/app/tensorrt_llm$
One of the arguments of the command, the LOCAL_USER=1 is required to ensure proper ownership of the files that will be created later. Without that argument, all the newly created files will belong to root thus potentially causing challenges later on.
As you can see in the last line of the previous code block, the shell prompt has changed. Before running the command, it was fbronzati@node002:/aipsf600/project-helix/TensonRT-LLM/v0.8.0/TensorRT-LLM$ and after running the command, it is fbronzati@node002-release:/app/tensorrt_llm$ . That is because, once the command completes, you will be inside the TensorRT container, and everything I will need to do for the conversion going forward will be done from inside that container. This is the reason why we build it in the first place as it allows us to customize the container based on the LLM being converted.
Converting the LLM
Now that I have started the TensorRT container and that I am inside of it, I am ready to convert the LLM from the Huggingface format to the Triton Inference server format.
The conversion process will need to download tokens from Huggingface, so I need to make sure that I am logged into Hugginface. I can do that by running this:
fbronzati@node002-release:/app/tensorrt_llm$ huggingface-cli login --token ******Token will not been saved to git credential helper. Pass `add_to_git_credential=True` if you want to set the git credential as well.Token is valid (permission: read).Your token has been saved to /home/fbronzati/.cache/huggingface/tokenLogin successful
Instead of the ******, you will need to enter your Huggingface API token. You can find it by log in to Hugginface and then go to Settings and then Access Tokens. If your login is successful, you will see the message at the bottom Login successful.
I am now ready to start the process to generate the new TensorRT engines. This process takes the weights we have downloaded earlier and generates the corresponding TensorRT engines. The number of engines created will depend on the number of GPUs available. In my case, I will create 4 TensorRT engines as I have 4 GPUs. One non-obvious advantage of the conversion process is that you can change the number of engines you want for your model. For instance, the initial version of the Llama-2-70b-chat-hf model required 8 GPUs, but through the conversion process, I changed that from 8 to 4.
How long the conversion process takes will totally depend on the hardware that you have, but, generally speaking it will take a while. Here is the command to do it :
fbronzati@node002-release:/app/tensorrt_llm$ python3 examples/llama/build.py \
--model_dir /code/tensorrt_llm/Llama-2-70b-chat-hf/ \
--dtype float16 \
--use_gpt_attention_plugin float16 \
--use_gemm_plugin float16 \
--remove_input_padding \
--use_inflight_batching \
--paged_kv_cache \
--output_dir /code/tensorrt_llm/examples/llama/out \
--world_size 4 \
--tp_size 4 \
--max_batch_size 64fatal: not a git repository (or any of the parent directories): .git[TensorRT-LLM] TensorRT-LLM version: 0.8.0.dev20240123[01/31/2024-13:45:14] [TRT-LLM] [W] remove_input_padding is enabled, while max_num_tokens is not set, setting to max_batch_size*max_input_len.It may not be optimal to set max_num_tokens=max_batch_size*max_input_len when remove_input_padding is enabled, because the number of packed input tokens are very likely to be smaller, we strongly recommend to set max_num_tokens according to your workloads.[01/31/2024-13:45:14] [TRT-LLM] [I] Serially build TensorRT engines.[01/31/2024-13:45:14] [TRT] [I] [MemUsageChange] Init CUDA: CPU +15, GPU +0, now: CPU 141, GPU 529 (MiB)[01/31/2024-13:45:20] [TRT] [I] [MemUsageChange] Init builder kernel library: CPU +4395, GPU +1160, now: CPU 4672, GPU 1689 (MiB)[01/31/2024-13:45:20] [TRT-LLM] [W] Invalid timing cache, using freshly created one[01/31/2024-13:45:20] [TRT-LLM] [I] [MemUsage] Rank 0 Engine build starts - Allocated Memory: Host 4.8372 (GiB) Device 1.6502 (GiB)[01/31/2024-13:45:21] [TRT-LLM] [I] Loading HF LLaMA ... from /code/tensorrt_llm/Llama-2-70b-chat-hf/Loading checkpoint shards: 100%|███████████████████████████████████████████████████████████████████████████████████████████████████████████████████████████████████████| 15/15 [00:00<00:00, 16.67it/s][01/31/2024-13:45:22] [TRT-LLM] [I] Loading weights from HF LLaMA...[01/31/2024-13:45:34] [TRT-LLM] [I] Weights loaded. Total time: 00:00:12[01/31/2024-13:45:34] [TRT-LLM] [I] HF LLaMA loaded. Total time: 00:00:13[01/31/2024-13:45:35] [TRT-LLM] [I] [MemUsage] Rank 0 model weight loaded. - Allocated Memory: Host 103.0895 (GiB) Device 1.6502 (GiB)[01/31/2024-13:45:35] [TRT-LLM] [I] Optimized Generation MHA kernels (XQA) Enabled[01/31/2024-13:45:35] [TRT-LLM] [I] Remove Padding Enabled[01/31/2024-13:45:35] [TRT-LLM] [I] Paged KV Cache Enabled[01/31/2024-13:45:35] [TRT] [W] IElementWiseLayer with inputs LLaMAForCausalLM/vocab_embedding/GATHER_0_output_0 and LLaMAForCausalLM/layers/0/input_layernorm/SHUFFLE_0_output_0: first input has type Half but second input has type Float.[01/31/2024-13:45:35] [TRT] [W] IElementWiseLayer with inputs LLaMAForCausalLM/layers/0/input_layernorm/REDUCE_AVG_0_output_0 and LLaMAForCausalLM/layers/0/input_layernorm/SHUFFLE_1_output_0: first input has type Half but second input has type Float.....[01/31/2024-13:52:56] [TRT] [I] Engine generation completed in 57.4541 seconds.[01/31/2024-13:52:56] [TRT] [I] [MemUsageStats] Peak memory usage of TRT CPU/GPU memory allocators: CPU 1000 MiB, GPU 33268 MiB[01/31/2024-13:52:56] [TRT] [I] [MemUsageChange] TensorRT-managed allocation in building engine: CPU +0, GPU +33268, now: CPU 0, GPU 33268 (MiB)[01/31/2024-13:53:12] [TRT] [I] [MemUsageStats] Peak memory usage during Engine building and serialization: CPU: 141685 MiB[01/31/2024-13:53:12] [TRT-LLM] [I] Total time of building llama_float16_tp4_rank3.engine: 00:01:13[01/31/2024-13:53:13] [TRT] [I] Loaded engine size: 33276 MiB[01/31/2024-13:53:17] [TRT] [I] [MemUsageChange] Init cuBLAS/cuBLASLt: CPU +0, GPU +64, now: CPU 38537, GPU 35111 (MiB)[01/31/2024-13:53:17] [TRT] [I] [MemUsageChange] Init cuDNN: CPU +1, GPU +64, now: CPU 38538, GPU 35175 (MiB)[01/31/2024-13:53:17] [TRT] [W] TensorRT was linked against cuDNN 8.9.6 but loaded cuDNN 8.9.4[01/31/2024-13:53:17] [TRT] [I] [MemUsageChange] TensorRT-managed allocation in engine deserialization: CPU +0, GPU +33267, now: CPU 0, GPU 33267 (MiB)[01/31/2024-13:53:17] [TRT-LLM] [I] Activation memory size: 34464.50 MiB[01/31/2024-13:53:17] [TRT-LLM] [I] Weights memory size: 33276.37 MiB[01/31/2024-13:53:17] [TRT-LLM] [I] Max KV Cache memory size: 12800.00 MiB[01/31/2024-13:53:17] [TRT-LLM] [I] Estimated max memory usage on runtime: 80540.87 MiB[01/31/2024-13:53:17] [TRT-LLM] [I] Serializing engine to /code/tensorrt_llm/examples/llama/out/llama_float16_tp4_rank3.engine...[01/31/2024-13:53:48] [TRT-LLM] [I] Engine serialized. Total time: 00:00:31[01/31/2024-13:53:49] [TRT-LLM] [I] [MemUsage] Rank 3 Engine serialized - Allocated Memory: Host 7.1568 (GiB) Device 1.6736 (GiB)[01/31/2024-13:53:49] [TRT-LLM] [I] Rank 3 Engine build time: 00:02:05 - 125.77239561080933 (sec)[01/31/2024-13:53:49] [TRT] [I] Serialized 59 bytes of code generator cache.[01/31/2024-13:53:49] [TRT] [I] Serialized 242287 bytes of compilation cache.[01/31/2024-13:53:49] [TRT] [I] Serialized 14 timing cache entries[01/31/2024-13:53:49] [TRT-LLM] [I] Timing cache serialized to /code/tensorrt_llm/examples/llama/out/model.cache[01/31/2024-13:53:51] [TRT-LLM] [I] Total time of building all 4 engines: 00:08:36
I have removed redundant output lines, so you can expect your output to be much longer than this. In my command, I have set the output directory to
/code/tensorrt_llm/examples/llama/out, so let's check the content of that directory:
fbronzati@node002-release:/app/tensorrt_llm$ ll /code/tensorrt_llm/examples/llama/out/total 156185008drwxr-xr-x 2 fbronzati ais 250 Jan 31 13:53 ./drwxrwxrwx 3 fbronzati ais 268 Jan 31 13:45 ../-rw-r--r-- 1 fbronzati ais 2188 Jan 31 13:46 config.json-rw-r--r-- 1 fbronzati ais 34892798724 Jan 31 13:47 llama_float16_tp4_rank0.engine-rw-r--r-- 1 fbronzati ais 34892792516 Jan 31 13:49 llama_float16_tp4_rank1.engine-rw-r--r-- 1 fbronzati ais 34892788332 Jan 31 13:51 llama_float16_tp4_rank2.engine-rw-r--r-- 1 fbronzati ais 34892800860 Jan 31 13:53 llama_float16_tp4_rank3.engine-rw-r--r-- 1 fbronzati ais 243969 Jan 31 13:53 model.cache
Sure enough, here are my 4 engine files. What can I do with those though? Those can be leveraged by the NVIDIA Triton Inference server to run inference. Let's take a look at how I can do that.
Now that I have finished the conversion, I can exit the TensorRT container:
fbronzati@node002-release:/app/tensorrt_llm$ exitexitmake: Leaving directory '/aipsf600/project-helix/TensonRT-LLM/v0.8.0/TensorRT-LLM/docker'
Deploying engine files to Triton Inference Server
Because NVIDIA is not offering a version of the Triton Inference Server container with the LLM as a parameter to the container, I will need to build it from scratch so it can leverage the engine files built through the conversion. The process is pretty similar to what I have done with the TensorRT container. From a high level, here is the process:
- Clone the Triton Inference Server backend repository
- Copy the engine files to the cloned repository
- Update some of the configuration parameters for the templates
- Build the Triton Inference Server container
Let's clone the Triton Inference Server backend repository:
fbronzati@node002:/aipsf600/project-helix/TensonRT-LLM/v0.8.0/TensorRT-LLM$ cd ..fbronzati@node002:/aipsf600/project-helix/TensonRT-LLM/v0.8.0$ git clone https://github.com/triton-inference-server/tensorrtllm_backend.gitCloning into 'tensorrtllm_backend'...remote: Enumerating objects: 870, done.remote: Counting objects: 100% (348/348), done.remote: Compressing objects: 100% (165/165), done.remote: Total 870 (delta 229), reused 242 (delta 170), pack-reused 522Receiving objects: 100% (870/870), 387.70 KiB | 973.00 KiB/s, done.Resolving deltas: 100% (439/439), done.
Let's initialize all the 3rd party modules and the support for Large File Storage for git:
fbronzati@node002:/aipsf600/project-helix/TensonRT-LLM/v0.8.0$ cd tensorrtllm_backend/fbronzati@node002:/aipsf600/project-helix/TensonRT-LLM/v0.8.0/tensorrtllm_backend$ git submodule update --init --recursiveSubmodule 'tensorrt_llm' (https://github.com/NVIDIA/TensorRT-LLM.git) registered for path 'tensorrt_llm'Cloning into '/aipsf600/project-helix/TensonRT-LLM/v0.8.0/tensorrtllm_backend/tensorrt_llm'...Submodule path 'tensorrt_llm': checked out 'b57221b764bc579cbb2490154916a871f620e2c4'Submodule '3rdparty/NVTX' (https://github.com/NVIDIA/NVTX.git) registered for path 'tensorrt_llm/3rdparty/NVTX'Submodule '3rdparty/cutlass' (https://github.com/NVIDIA/cutlass.git) registered for path 'tensorrt_llm/3rdparty/cutlass'Submodule '3rdparty/cxxopts' (https://github.com/jarro2783/cxxopts) registered for path 'tensorrt_llm/3rdparty/cxxopts'Submodule '3rdparty/json' (https://github.com/nlohmann/json.git) registered for path 'tensorrt_llm/3rdparty/json'Cloning into '/aipsf600/project-helix/TensonRT-LLM/v0.8.0/tensorrtllm_backend/tensorrt_llm/3rdparty/NVTX'...Cloning into '/aipsf600/project-helix/TensonRT-LLM/v0.8.0/tensorrtllm_backend/tensorrt_llm/3rdparty/cutlass'...Cloning into '/aipsf600/project-helix/TensonRT-LLM/v0.8.0/tensorrtllm_backend/tensorrt_llm/3rdparty/cxxopts'...Cloning into '/aipsf600/project-helix/TensonRT-LLM/v0.8.0/tensorrtllm_backend/tensorrt_llm/3rdparty/json'...Submodule path 'tensorrt_llm/3rdparty/NVTX': checked out 'a1ceb0677f67371ed29a2b1c022794f077db5fe7'Submodule path 'tensorrt_llm/3rdparty/cutlass': checked out '39c6a83f231d6db2bc6b9c251e7add77d68cbfb4'Submodule path 'tensorrt_llm/3rdparty/cxxopts': checked out 'eb787304d67ec22f7c3a184ee8b4c481d04357fd'Submodule path 'tensorrt_llm/3rdparty/json': checked out 'bc889afb4c5bf1c0d8ee29ef35eaaf4c8bef8a5d'
fbronzati@node002:/aipsf600/project-helix/TensonRT-LLM/v0.8.0/tensorrtllm_backend$ git lfs installUpdated git hooks.Git LFS initialized.
fbronzati@node002:/aipsf600/project-helix/TensonRT-LLM/v0.8.0/tensorrtllm_backend$ git lfs pull
I am now ready to copy the engine files to the cloned repository:
fbronzati@node002:/aipsf600/project-helix/TensonRT-LLM/v0.8.0/tensorrtllm_backend$ cp ../TensorRT-LLM/examples/llama/out/* all_models/inflight_batcher_llm/tensorrt_llm/1/
The next step can be done either by manually modifying the config.pbtxt files under various directories or by using the fill_template.py script to write the modifications for us. I am going to use the fill_template.py script, but that is my preference. Let me update those parameters:
fbronzati@node002:/aipsf600/project-helix/TensonRT-LLM/v0.8.0/tensorrtllm_backend$ export HF_LLAMA_MODEL=meta-llama/Llama-2-70b-chat-hf
fbronzati@node002:/aipsf600/project-helix/TensonRT-LLM/v0.8.0/tensorrtllm_backend$ cp all_models/inflight_batcher_llm/ llama_ifb -r
fbronzati@node002:/aipsf600/project-helix/TensonRT-LLM/v0.8.0/tensorrtllm_backend$ python3 tools/fill_template.py -i llama_ifb/preprocessing/config.pbtxt tokenizer_dir:${HF_LLAMA_MODEL},tokenizer_type:llama,triton_max_batch_size:64,preprocessing_instance_count:1
fbronzati@node002:/aipsf600/project-helix/TensonRT-LLM/v0.8.0/tensorrtllm_backend$ python3 tools/fill_template.py -i llama_ifb/postprocessing/config.pbtxt tokenizer_dir:${HF_LLAMA_MODEL},tokenizer_type:llama,triton_max_batch_size:64,postprocessing_instance_count:1
fbronzati@node002:/aipsf600/project-helix/TensonRT-LLM/v0.8.0/tensorrtllm_backend$ python3 tools/fill_template.py -i llama_ifb/tensorrt_llm_bls/config.pbtxt triton_max_batch_size:64,decoupled_mode:False,bls_instance_count:1,accumulate_tokens:False
fbronzati@node002:/aipsf600/project-helix/TensonRT-LLM/v0.8.0/tensorrtllm_backend$ python3 tools/fill_template.py -i llama_ifb/ensemble/config.pbtxt triton_max_batch_size:64
fbronzati@node002:/aipsf600/project-helix/TensonRT-LLM/v0.8.0/tensorrtllm_backend$ python3 tools/fill_template.py -i llama_ifb/tensorrt_llm/config.pbtxt triton_max_batch_size:64,decoupled_mode:False,max_beam_width:1,engine_dir:/llama_ifb/tensorrt_llm/1/,max_tokens_in_paged_kv_cache:2560,max_attention_window_size:2560,kv_cache_free_gpu_mem_fraction:0.5,exclude_input_in_output:True,enable_kv_cache_reuse:False,batching_strategy:inflight_batching,max_queue_delay_microseconds:600
I am now ready to build the Triton Inference Server docker container with my newly converted LLM (this step won't be required after the 24.02 launch):
fbronzati@node002:/aipsf600/project-helix/TensonRT-LLM/v0.8.0/tensorrtllm_backend$ DOCKER_BUILDKIT=1 docker build -t triton_trt_llm -f dockerfile/Dockerfile.trt_llm_backend .[+] Building 2572.9s (33/33) FINISHED docker:default => [internal] load build definition from Dockerfile.trt_llm_backend 0.0s => => transferring dockerfile: 2.45kB 0.0s => [internal] load .dockerignore 0.0s => => transferring context: 2B 0.0s => [internal] load metadata for nvcr.io/nvidia/tritonserver:23.12-py3 0.7s => [internal] load build context 47.6s => => transferring context: 580.29MB 47.6s => [base 1/6] FROM nvcr.io/nvidia/tritonserver:23.12-py3@sha256:363924e9f3b39154bf2075586145b5d15b20f6d695bd7e8de4448c3299064af0 0.0s => CACHED [base 2/6] RUN apt-get update && apt-get install -y --no-install-recommends rapidjson-dev python-is-python3 ccache git-lfs 0.0s => [base 3/6] COPY requirements.txt /tmp/ 2.0s => [base 4/6] RUN pip3 install -r /tmp/requirements.txt --extra-index-url https://pypi.ngc.nvidia.com 28.1s => [base 5/6] RUN apt-get remove --purge -y tensorrt* 1.6s => [base 6/6] RUN pip uninstall -y tensorrt 0.9s => [dev 1/10] COPY tensorrt_llm/docker/common/install_tensorrt.sh /tmp/ 0.0s => [dev 2/10] RUN bash /tmp/install_tensorrt.sh && rm /tmp/install_tensorrt.sh 228.0s => [dev 3/10] COPY tensorrt_llm/docker/common/install_polygraphy.sh /tmp/ 0.0s => [dev 4/10] RUN bash /tmp/install_polygraphy.sh && rm /tmp/install_polygraphy.sh 2.5s => [dev 5/10] COPY tensorrt_llm/docker/common/install_cmake.sh /tmp/ 0.0s => [dev 6/10] RUN bash /tmp/install_cmake.sh && rm /tmp/install_cmake.sh 3.0s => [dev 7/10] COPY tensorrt_llm/docker/common/install_mpi4py.sh /tmp/ 0.0s => [dev 8/10] RUN bash /tmp/install_mpi4py.sh && rm /tmp/install_mpi4py.sh 38.7s => [dev 9/10] COPY tensorrt_llm/docker/common/install_pytorch.sh install_pytorch.sh 0.0s => [dev 10/10] RUN bash ./install_pytorch.sh pypi && rm install_pytorch.sh 96.6s => [trt_llm_builder 1/4] WORKDIR /app 0.0s => [trt_llm_builder 2/4] COPY scripts scripts 0.0s => [trt_llm_builder 3/4] COPY tensorrt_llm tensorrt_llm 3.0s => [trt_llm_builder 4/4] RUN cd tensorrt_llm && python3 scripts/build_wheel.py --trt_root="/usr/local/tensorrt" -i -c && cd .. 1959.1s => [trt_llm_backend_builder 1/3] WORKDIR /app/ 0.0s => [trt_llm_backend_builder 2/3] COPY inflight_batcher_llm inflight_batcher_llm 0.0s => [trt_llm_backend_builder 3/3] RUN cd inflight_batcher_llm && bash scripts/build.sh && cd .. 68.3s => [final 1/5] WORKDIR /app/ 0.0s => [final 2/5] COPY --from=trt_llm_builder /app/tensorrt_llm/build /app/tensorrt_llm/build 0.1s => [final 3/5] RUN cd /app/tensorrt_llm/build && pip3 install *.whl 22.8s => [final 4/5] RUN mkdir /opt/tritonserver/backends/tensorrtllm 0.4s => [final 5/5] COPY --from=trt_llm_backend_builder /app/inflight_batcher_llm/build/libtriton_tensorrtllm.so /opt/tritonserver/backends/tensorrtllm 0.0s => exporting to image 69.3s => => exporting layers 69.3s => => writing image sha256:03f4164551998d04aefa2817ea4ba9f53737874fc3604e284faa8f75bc99180c 0.0s => => naming to docker.io/library/triton_trt_llm
If I check my docker images, I can see that I now have a new image for the Triton Inference server (this step won't be required either after the 24.02 launch as there won't be a need to build a custom Triton Inference Server container anymore):
fbronzati@node002:/aipsf600/project-helix/TensonRT-LLM/v0.8.0/tensorrtllm_backend$ docker imagesREPOSITORY TAG IMAGE ID CREATED SIZEtriton_trt_llm latest 03f416455199 2 hours ago 53.1GB
I can now start the newly created docker container:
fbronzati@node002:/aipsf600/project-helix/TensonRT-LLM/v0.8.0/tensorrtllm_backend$ docker run --rm -it --net host --shm-size=2g --ulimit memlock=-1 --ulimit stack=67108864 --gpus all -v $(pwd)/llama_ifb:/llama_ifb -v $(pwd)/scripts:/opt/scripts triton_trt_llm:latest bash
=============================== Triton Inference Server ===============================
NVIDIA Release 23.12 (build 77457706)Triton Server Version 2.41.0
Copyright (c) 2018-2023, NVIDIA CORPORATION & AFFILIATES. All rights reserved.
Various files include modifications (c) NVIDIA CORPORATION & AFFILIATES. All rights reserved.
This container image and its contents are governed by the NVIDIA Deep Learning Container License.By pulling and using the container, you accept the terms and conditions of this license:https://developer.nvidia.com/ngc/nvidia-deep-learning-container-license
root@node002:/app#
After the launch of version 24.02, the name of the container, which is triton_trt_llm here, will change, so you will need to keep an eye out for the new name. I will update this blog with the changes post-launch.
Once the container is started, I will be again at a shell prompt inside the container. I need to log in to Hugginface again:
root@node002:/app# huggingface-cli login --token ******Token will not been saved to git credential helper. Pass `add_to_git_credential=True` if you want to set the git credential as well.Token is valid (permission: read).Your token has been saved to /root/.cache/huggingface/tokenLogin successful
And I can now run the Triton Inference server:
root@node002:/app# python /opt/scripts/launch_triton_server.py --model_repo /llama_ifb/ --world_size 4root@node002:/app# I0131 16:54:40.234909 135 pinned_memory_manager.cc:241] Pinned memory pool is created at '0x7ffd8c000000' with size 268435456I0131 16:54:40.243088 133 pinned_memory_manager.cc:241] Pinned memory pool is created at '0x7ffd8c000000' with size 268435456I0131 16:54:40.252026 133 cuda_memory_manager.cc:107] CUDA memory pool is created on device 0 with size 67108864I0131 16:54:40.252033 133 cuda_memory_manager.cc:107] CUDA memory pool is created on device 1 with size 67108864I0131 16:54:40.252035 133 cuda_memory_manager.cc:107] CUDA memory pool is created on device 2 with size 67108864I0131 16:54:40.252037 133 cuda_memory_manager.cc:107] CUDA memory pool is created on device 3 with size 67108864I0131 16:54:40.252040 133 cuda_memory_manager.cc:107] CUDA memory pool is created on device 4 with size 67108864I0131 16:54:40.252042 133 cuda_memory_manager.cc:107] CUDA memory pool is created on device 5 with size 67108864I0131 16:54:40.252044 133 cuda_memory_manager.cc:107] CUDA memory pool is created on device 6 with size 67108864I0131 16:54:40.252046 133 cuda_memory_manager.cc:107] CUDA memory pool is created on device 7 with size 67108864.....I0131 16:57:04.101557 132 server.cc:676]+------------------+---------+--------+| Model | Version | Status |+------------------+---------+--------+| ensemble | 1 | READY || postprocessing | 1 | READY || preprocessing | 1 | READY || tensorrt_llm | 1 | READY || tensorrt_llm_bls | 1 | READY |+------------------+---------+--------+
I0131 16:57:04.691252 132 metrics.cc:817] Collecting metrics for GPU 0: NVIDIA H100 80GB HBM3I0131 16:57:04.691303 132 metrics.cc:817] Collecting metrics for GPU 1: NVIDIA H100 80GB HBM3I0131 16:57:04.691315 132 metrics.cc:817] Collecting metrics for GPU 2: NVIDIA H100 80GB HBM3I0131 16:57:04.691325 132 metrics.cc:817] Collecting metrics for GPU 3: NVIDIA H100 80GB HBM3I0131 16:57:04.691335 132 metrics.cc:817] Collecting metrics for GPU 4: NVIDIA H100 80GB HBM3I0131 16:57:04.691342 132 metrics.cc:817] Collecting metrics for GPU 5: NVIDIA H100 80GB HBM3I0131 16:57:04.691350 132 metrics.cc:817] Collecting metrics for GPU 6: NVIDIA H100 80GB HBM3I0131 16:57:04.691358 132 metrics.cc:817] Collecting metrics for GPU 7: NVIDIA H100 80GB HBM3I0131 16:57:04.728148 132 metrics.cc:710] Collecting CPU metricsI0131 16:57:04.728434 132 tritonserver.cc:2483]+----------------------------------+------------------------------------------------------------------------------------------------------------------------------------------------------------------+| Option | Value |+----------------------------------+------------------------------------------------------------------------------------------------------------------------------------------------------------------+| server_id | triton || server_version | 2.41.0 || server_extensions | classification sequence model_repository model_repository(unload_dependents) schedule_policy model_configuration system_shared_memory cuda_shared_memory binary_ || | tensor_data parameters statistics trace logging || model_repository_path[0] | /llama_ifb/ || model_control_mode | MODE_NONE || strict_model_config | 1 || rate_limit | OFF || pinned_memory_pool_byte_size | 268435456 || cuda_memory_pool_byte_size{0} | 67108864 || cuda_memory_pool_byte_size{1} | 67108864 || cuda_memory_pool_byte_size{2} | 67108864 || cuda_memory_pool_byte_size{3} | 67108864 || cuda_memory_pool_byte_size{4} | 67108864 || cuda_memory_pool_byte_size{5} | 67108864 || cuda_memory_pool_byte_size{6} | 67108864 || cuda_memory_pool_byte_size{7} | 67108864 || min_supported_compute_capability | 6.0 || strict_readiness | 1 || exit_timeout | 30 || cache_enabled | 0 |+----------------------------------+------------------------------------------------------------------------------------------------------------------------------------------------------------------+
I0131 16:57:04.738042 132 grpc_server.cc:2495] Started GRPCInferenceService at 0.0.0.0:8001I0131 16:57:04.738303 132 http_server.cc:4619] Started HTTPService at 0.0.0.0:8000I0131 16:57:04.779541 132 http_server.cc:282] Started Metrics Service at 0.0.0.0:8002
Again, I have removed some of the output lines to keep things within a reasonable size. Once the start sequence has completed, I can see that the Triton Inference server is listening on port 8000, so let's test it, right?
Let's ask the LLama 2 model running within the Triton Inference Server what the capital of Texas in the US is:
root@node002:/app# curl -X POST localhost:8000/v2/models/ensemble/generate -d '{"text_input": " <s>[INST] <<SYS>> You are a helpful assistant <</SYS>> What is the capital of Texas?[/INST]","parameters": {"max_tokens": 100,"bad_words":[""],"stop_words":[""],"temperature":0.2,"top_p":0.7}}'
Because I am running the curl command directly from inside the container running the Triton Inference server, I am using localhost as the endpoint. If you are running the curl command from outside of the container, then localhost will need to be replace by the proper hostname. This is the response I got:
{"context_logits":0.0,"cum_log_probs":0.0,"generation_logits":0.0,"model_name":"ensemble","model_version":"1","output_log_probs":[0.0,0.0,0.0,0.0,0.0,0.0,0.0,0.0,0.0,0.0,0.0,0.0,0.0,0.0,0.0,0.0,0.0,0.0],"sequence_end":false,"sequence_id":0,"sequence_start":false,"text_output":" Sure, I'd be happy to help! The capital of Texas is Austin."}
Yay! It works and I got the right answer from the LLM.
Conclusion
If you have reached this point in the blog, thank you for staying with me. Taking a large language model from Huggingface (that is in one of the supported models) and running it in the NVIDIA Triton Inference server allows customers to leverage the automation and simplicity built into the NVIDIA Triton Inference server. All while retaining the flexibility to choose the large language model that best meets their needs. It is almost like have your cake and eat it to.
Until next time, thank you for reading.
Related Blog Posts

Get started building RAG pipelines in your enterprise with Dell Technologies and NVIDIA (Part 1)
Wed, 24 Apr 2024 17:21:42 -0000
|Read Time: 0 minutes
In our previous blog, we showcased running Llama 2 on XE9680 using NVIDIA's LLM Playground (part of the NeMo framework). It is an innovative platform for experimenting with and deploying large language models (LLMs) for various enterprise applications.
The reality is that running straight inference with foundational models in an enterprise context simply does not happen and presents several challenges, such as a lack of domain-specific knowledge, the potential for outdated or incomplete information, and the risk of generating inaccurate or misleading responses.
Retrieval-Augmented Generation (RAG) represents a pivotal innovation within the generative AI space.
RAG combines generative AI foundational models with advanced information retrieval techniques to create interactive systems that are both responsive and deeply informative. Because of their flexibility, RAG can be designed in many different ways. In a blog recently published, David O'Dell showed how RAG can be built from scratch.
This blog also serves as a follow-on companion to the Technical White Paper NVIDIA RAG On Dell available here, which highlights the solution built on Dell Data Center Hardware, K8s, Dell CSI PowerScale for Kubernetes, and NVIDIA AI Enterprise suite. Check out the Technical White Paper to learn more about the solution architectural and logical approach employed.
In this blog, we will show how this new NVIDIA approach provides a more automated way of deploying RAG, which can be leveraged by customers looking at a more standardized approach.
We will take you through the step-by-step instructions for getting up and running with NVIDIA's LLM Playground software so you can experiment with your own RAG pipelines. In future blog posts (once we are familiar with the LLM playground basics), we will start to dig a bit deeper into RAG pipelines so you can achieve further customization and potential implementations of RAG pipelines using NVIDIA's software components.
But first, let's cover the basics.
Building Your Own RAG Pipeline (Getting Started)
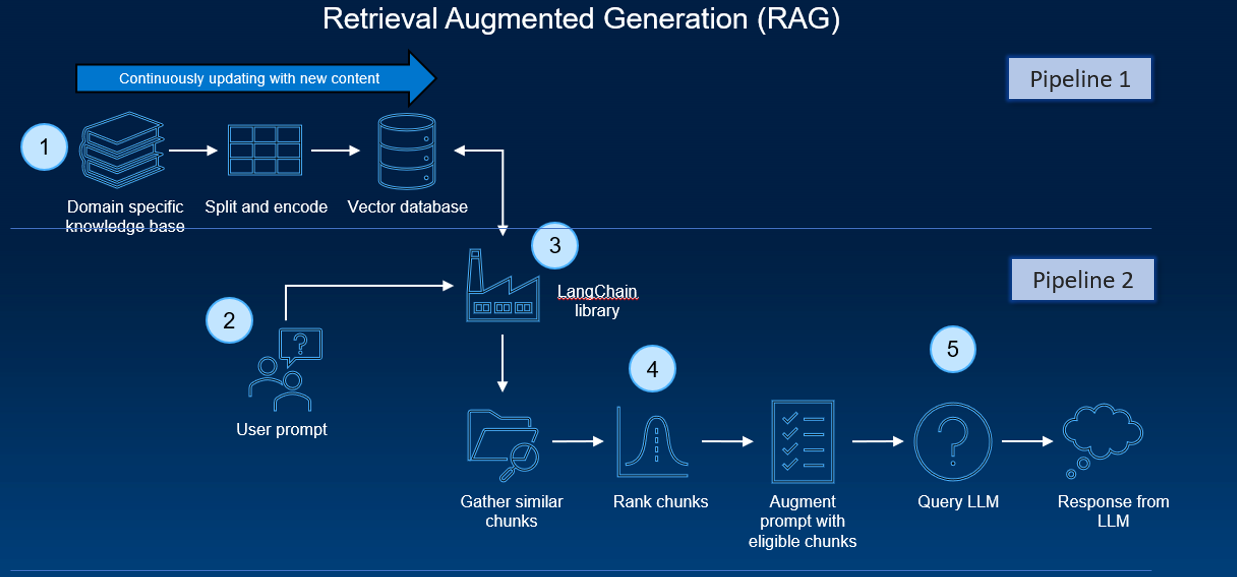
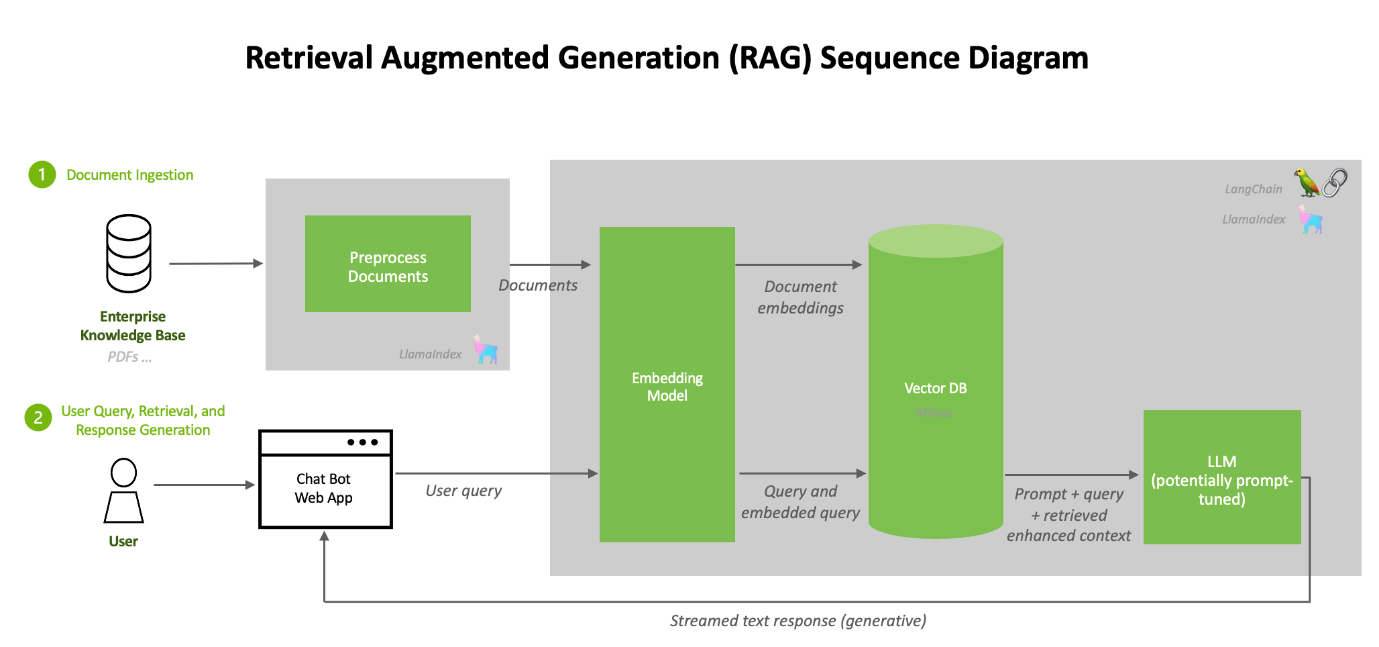
A typical RAG pipeline consists of several phases. The process of document ingestion occurs offline, and when an online query comes in, the retrieval of relevant documents and the generation of a response occurs.
At a high level, the architecture of a RAG system can be distilled down to two pipelines:
- A recurring pipeline of document preprocessing, ingestion, and embedding generation
- An inference pipeline with a user query and response generation
Several software components and tools are typically employed. These components work together to enable the efficient processing and handling of the data, and the actual execution of inferencing tasks.
These software components, in combination with the hardware setup (like GPUs and virtual machines/containers), create an infrastructure for running AI inferencing tasks within a typical RAG pipeline. These tools’ integration allows for processing custom datasets (like PDFs) and generating sophisticated, human-like responses by an AI model.
As previously stated, David O’Dell has provided an extremely useful guide to get a RAG pipeline up and running. One of the key components is the pipeline function.
The pipeline function in Hugging Face’s Transformers library is a high-level API designed to simplify the process of using pre-trained models for various NLP tasks, and it abstracts the complexities of model loading, data pre-processing (like tokenization), inference, and post-processing. The pipeline directly interfaces with the model to perform inference but is more focused on ease-of-use and accessibility rather than scaling and optimizing resource usage. It is as a high-level API that abstracts away much of the complexity involved in setting up and using various transformer-based models.
It’s ideal for quickly implementing NLP tasks, prototyping, and applications where ease of use and simplicity are key.
But is it easy to implement?
Setting up and maintaining RAG pipelines requires considerable technical expertise in AI, machine learning, and system administration. While some components (such as the ‘pipeline function’) have been designed for ease of use, typically, they are not designed to scale.
So, we need robust software that can scale and is easier to use.
NVIDIA's solutions are designed for high performance and scalability which is essential for handling large-scale AI workloads and real-time interactions.
NVIDIA provides extensive documentation, sample Jupyter notebooks, and a sample chatbot web application, which are invaluable for understanding and implementing the RAG pipeline.
The system is optimized for NVIDIA GPUs, ensuring efficient use of some of the most powerful available hardware.
NVIDA’s Approach to Simplify — Building a RAG System with NVIDIA’s Tools:
NVIDIA’s approach is to streamline the RAG pipeline and make it much easier to get up and running.
By offering a suite of optimized tools and pre-built components, NVIDIA has developed an AI workflow for retrieval-augmented generation that includes a sample chatbot and the elements users need to create their own applications with this new method. It simplifies the once daunting task of creating sophisticated AI chatbots, ensuring scalability and high performance.
Getting Started with NVIDIA’s LLM playground
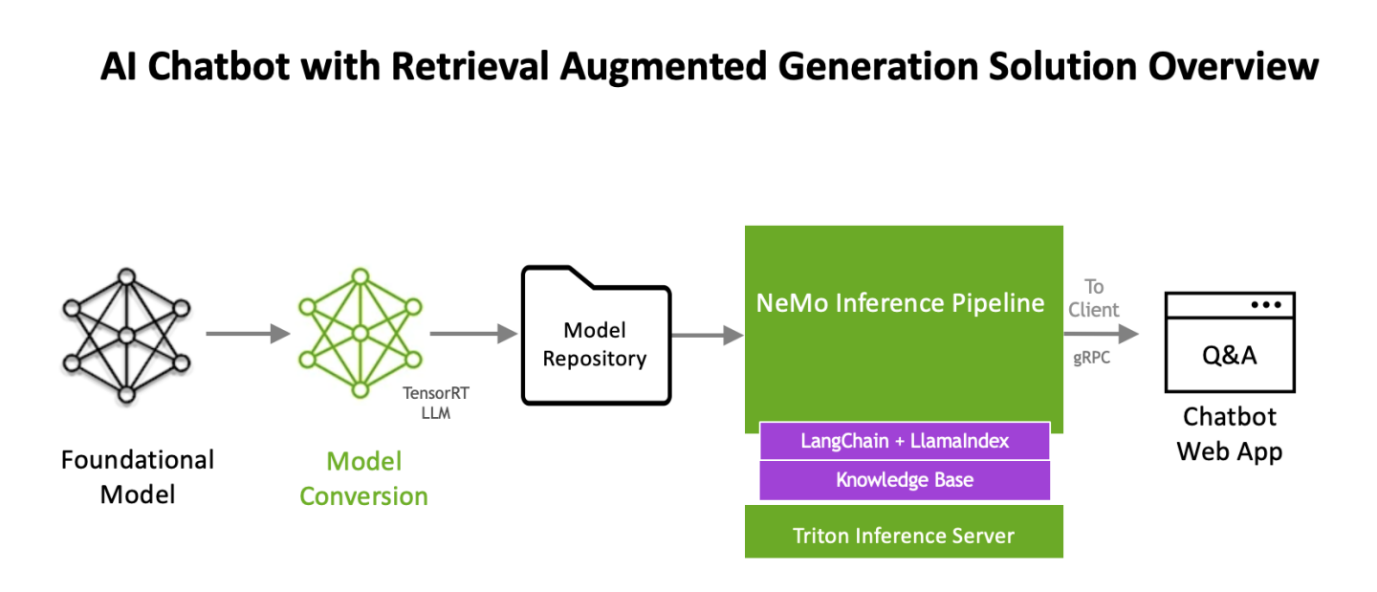
The workflow uses NVIDIA NeMo, a framework for developing and customizing generative AI models, as well as software like NVIDIA Triton Inference Server and NVIDIA TensorRT-LLM for running generative AI models in production.
The software components are all part of NVIDIA AI Enterprise, a software platform that accelerates the development and deployment of production-ready AI with the security, support, and stability businesses need.
Nvidia has published a retrieval augmented generation workflow as an app example at
https://resources.nvidia.com/en-us-generative-ai-chatbot-workflow/knowledge-base-chatbot-technical-brief
Also it maintains a git page with updated information on how to deploy it in Linux Docker, Kubernetes and windows at
https://github.com/NVIDIA/GenerativeAIExamples
Next, we will walk through (at a high level) the procedure to use the NVIDIA AI Enterprise Suite RAG pipeline implementation below.
This procedure is based on the documentation on link https://github.com/NVIDIA/GenerativeAIExamples/tree/v0.2.0/RetrievalAugmentedGeneration
Deployment
The NVIDIA developer guide provides detailed instructions for building a Retrieval Augmented Generation (RAG) chatbot using the Llama2 model on TRT-LLM. It includes prerequisites like NVIDIA GPU, Docker, NVIDIA Container Toolkit, an NGC Account, and Llama2 model weights. The guide covers components like Triton Model Server, Vector DB, API Server, and Jupyter notebooks for development.
Key steps involve setting up these components, uploading documents, and generating answers. The process is designed for enterprise chatbots, emphasizing customization and leveraging NVIDIA’s AI technologies. For complete details and instructions, please refer to the official guide.
Key Software components and Architectural workflow (for getting up and running with LLM playground)
1. Llama2: Llama2 offers advanced language processing capabilities, essential for sophisticated AI chatbot interactions. It will be converted into TensorRT-LLM format.
Remember, we cancannot take a model from HuggingFace and run it directly on TensorRT-LLM. Such a model will need to go through a conversion stage before it can leverage all the goodness of TensorRT-LLM. We recently published a detailed blog on how to do this manually here. However, (fear not) as part of the LLM playground docker compose process, all we need to do is point one of our environment variables to the llama model. It will automatically do the conversion process for us! (steps are outlined in the implementation section of the blog)
2. NVIDIA TensorRT-LLM: When it comes to optimizing large language models, TensorRT-LLM is the key. It ensures that models deliver high performance and maintain efficiency in various applications.
- The library includes optimized kernels, pre- and post-processing steps, and multi-GPU/multi-node communication primitives. These features are specifically designed to enhance performance on NVIDIA GPUs.
 It utilizes tensor parallelism for efficient inference across multiple GPUs and servers, without the need for developer intervention or model changes.
We will be updating our Generative AI in the Enterprise – Inferencing – Design Guide to reflect the new sizing requirements based on TensorRT-LLM
3. LLM-inference-server: NVIDIA Triton Inference Server (container): Deployment of AI models is streamlined with the Triton Inference Server. It supports scalable and flexible model serving, which is essential for handling complex AI workloads. The Triton inference server is responsible for hosting the Llama2 TensorRT-LLM model
Now that we have our optimized foundational model, we need to build up the rest of the RAG workflow.
- Chain-server: langChain and LlamaIndex (container): Required for the RAG pipeline to function. A tool for chaining LLM components together. LangChain is used to connect the various elements like the PDF loader and vector database, facilitating embeddings, which are crucial for the RAG process.
4. Milvus (container): As an AI-focused vector database, Milvus stands out for managing the vast amounts of data required in AI applications. Milvus is an open-source vector database capable of NVIDIA GPU accelerated vector searches.
5. e5-large-v2 (container): Embeddings model designed for text embeddings. When content from the knowledge base is passed to the embedding model (e5-large-v2), it converts the content to vectors (referred to as “embeddings”). These embeddings are stored in the Milvus vector database.
The embedding model like “e5-large-v2” is used twice in a typical RAG (Retrieval-Augmented Generation) workflow, but for slightly different purposes at each step. Here is how it works:
Using the same embedding model for both documents and user queries ensures that the comparisons and similarity calculations are consistent and meaningful, leading to more relevant retrieval results.
We will talk about how “provide context to the language model for response generation” is created in the prompt workflow section, but first, let’s look at how the two embedding workflows work.
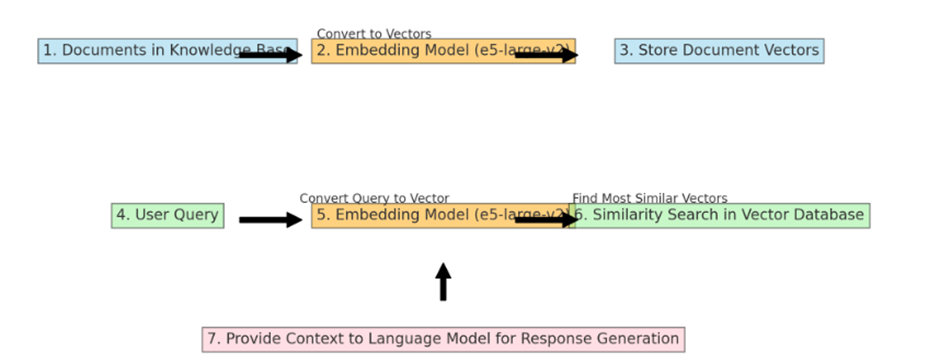
Converting and Storing Document Vectors: First, an embedding model processes the entire collection of documents in the knowledge base. Each document is converted into a vector. These vectors are essentially numerical representations of the documents, capturing their semantic content in a format that computers can efficiently process. Once these vectors are created, they are stored in the Milvus vector database. This is a one-time process, usually done when the knowledge base is initially set up or when it’s updated with new information.
Processing User Queries: The same embedding model is also used to process user queries. When a user submits a query, the embedding model converts this query into a vector, much like it did for the documents. The key is that the query and the documents are converted into vectors in the same vector space, allowing for meaningful comparisons.
Performing Similarity Search: Once the user’s query is converted into a vector, this query vector is used to perform a similarity search in the vector database (which contains the vectors of the documents). The system looks for document vectors most similar to the query vector. Similarity in this context usually means that the vectors are close to each other in the vector space, implying that the content of the documents is semantically related to the user’s query.
Providing Enhanced Context for Response Generation: The documents (or portions of them) corresponding to the most similar vectors are retrieved and provided to the language model as context. This context, along with the user’s original query, helps the language model generate a more informed and accurate response.
6. Container network nvidia-LLM: To allow for communication between containers.
7. Web Front End (LLM-playground container) The web frontend provides a UI on top of the APIs. The LLM-playground container provides a sample chatbot web application. Requests to the chat system are wrapped in FastAPI calls to the Triton Inference Server
Prompt Workflow
Construction of an Augmented Prompt: The next step is constructing a prompt for the foundational Large Language Model (LLM). This prompt typically includes:
- The User’s Original Query: Clearly stating the query or problem.
- Retrieved Context: The relevant information retrieved from the knowledge base. This context is crucial as it provides the LLM with specific information that it might not have been trained on or that might be too recent or detailed for its training data.
- Formatting and Structuring: The prompt must be formatted and structured in a way that makes it clear to the LLM what information is from the query and what information is context from the retrieval. This can involve special tokens or separators.
Length and Complexity Considerations: The augmented prompt can become very large, especially if the retrieved context is extensive. There is a trade-off to be managed here:
Too Little Context: May not provide enough information for the LLM to generate a well-informed response.
Too Much Context: This can overwhelm the LLM or exceed its token limit, leading to truncated inputs or diluted attention across the prompt.
Feeding the Prompt to the LLM: Once the prompt is constructed, it is fed to the foundational LLM. The LLM then processes this prompt, considering both the user’s original query and the context provided.
Response Generation: The LLM generates a response based on the augmented prompt. This response is expected to be more accurate, informative, and contextually relevant than what the LLM could have produced based solely on the original query, thanks to the additional context provided by the retrieval process.
Post-Processing: In some systems, there might be an additional step of post-processing the response, such as refining, shortening, or formatting it to suit the user’s needs better.
Examples augmented prompt: This format helps the language model understand the specific question being asked and the context in which to answer it, leading to a more accurate and relevant response.
[Query]: "What are the latest developments in the treatment of Alzheimer's disease as of 2024?"
[Context - Memoriax Study]: "A groundbreaking study published in 2023 demonstrated the efficacy of a new drug, Memoriax, in slowing the progression of Alzheimer's disease. The drug targets amyloid plaques in the brain."
[Context - FDA Approval]: "The FDA approved a new Alzheimer's treatment in late 2023, involving medication and targeted brain stimulation therapy."
[Context - Lifestyle Research]: "A 2024 study emphasized the role of diet, exercise, and cognitive training in delaying Alzheimer's symptoms."
Please provide an overview of these developments and their implications for Alzheimer's treatment.
XE9680 Implementation
The following components will need to be installed.
- At least one NVIDIA GPU A100 with Llama 2 7B since it requires approximately 38GB of GPU memory, our implementation was developed using using 8x H100 for Llama2 70B on an XE9680
- Our XE9680 server is running Ubuntu 22.04
- NVIDIA driver version 535 or newer.
- Docker, Docker-Compose and Docker-Buildx
Step 1 – Logging in the NVIDIA GPU Cloud
For logging docker on NGC, you need to create a user and an access key. Please refer to the instructions and run the following command:
Docker login nvcr.io
Step 2 – Download Llama2 Chat Model Weights
Llama 2 Chat Model Weights need to be downloaded from Meta or HuggingFace. We downloaded the files on our deployment and stored them on our Dell PowerScale F600. Our servers can access this share with 100Gb Eth connections, allowing us to span multiple experiments simultaneously on different servers. The following is how the folder with Llama 70b model weights will look after download:
fbronzati@node003:~$ ll /aipsf600/project-helix/models/Llama-2-70b-chat-hf/ -h
total 295G
drwxrwxrwx 3 fbronzati ais 2.0K Jan 23 07:20 ./
drwxrwxrwx 9 nobody nogroup 221 Jan 23 07:20 ../
-rw-r—r—1 fbronzati ais 614 Dec 4 12:25 config.json
-rw-r—r—1 fbronzati ais 188 Dec 4 12:25 generation_config.json
drwxr-xr-x 9 fbronzati ais 288 Dec 4 14:04 .git/
-rw-r—r—1 fbronzati ais 1.6K Dec 4 12:25 .gitattributes
-rw-r—r—1 fbronzati ais 6.9K Dec 4 12:25 LICENSE.txt
-rw-r—r—1 fbronzati ais 9.2G Dec 4 12:40 model-00001-of-00015.safetensors
-rw-r—r—1 fbronzati ais 9.2G Dec 4 13:09 model-00002-of-00015.safetensors
-rw-r—r—1 fbronzati ais 9.3G Dec 4 12:30 model-00003-of-00015.safetensors
-rw-r—r—1 fbronzati ais 9.2G Dec 4 13:21 model-00004-of-00015.safetensors
-rw-r—r—1 fbronzati ais 9.2G Dec 4 13:14 model-00005-of-00015.safetensors
-rw-r—r—1 fbronzati ais 9.2G Dec 4 13:12 model-00006-of-00015.safetensors
-rw-r—r—1 fbronzati ais 9.3G Dec 4 12:55 model-00007-of-00015.safetensors
-rw-r—r—1 fbronzati ais 9.2G Dec 4 13:24 model-00008-of-00015.safetensors
-rw-r—r—1 fbronzati ais 9.2G Dec 4 13:00 model-00009-of-00015.safetensors
-rw-r—r—1 fbronzati ais 9.2G Dec 4 13:11 model-00010-of-00015.safetensors
-rw-r—r—1 fbronzati ais 9.3G Dec 4 12:22 model-00011-of-00015.safetensors
-rw-r—r—1 fbronzati ais 9.2G Dec 4 13:17 model-00012-of-00015.safetensors
-rw-r—r—1 fbronzati ais 9.2G Dec 4 13:02 model-00013-of-00015.safetensors
-rw-r—r—1 fbronzati ais 8.9G Dec 4 13:22 model-00014-of-00015.safetensors
-rw-r—r—1 fbronzati ais 501M Dec 4 13:17 model-00015-of-00015.safetensors
-rw-r—r—1 fbronzati ais 7.1K Dec 4 12:25 MODEL_CARD.md
-rw-r—r—1 fbronzati ais 66K Dec 4 12:25 model.safetensors.index.json
-rw-r—r—1 fbronzati ais 9.2G Dec 4 12:52 pytorch_model-00001-of-00015.bin
-rw-r—r—1 fbronzati ais 9.2G Dec 4 12:25 pytorch_model-00002-of-00015.bin
-rw-r—r—1 fbronzati ais 9.3G Dec 4 12:46 pytorch_model-00003-of-00015.bin
-rw-r—r—1 fbronzati ais 9.2G Dec 4 13:07 pytorch_model-00004-of-00015.bin
-rw-r—r—1 fbronzati ais 9.2G Dec 4 12:49 pytorch_model-00005-of-00015.bin
-rw-r—r—1 fbronzati ais 9.2G Dec 4 12:58 pytorch_model-00006-of-00015.bin
-rw-r—r—1 fbronzati ais 9.3G Dec 4 12:34 pytorch_model-00007-of-00015.bin
-rw-r—r—1 fbronzati ais 9.2G Dec 4 13:15 pytorch_model-00008-of-00015.bin
-rw-r—r—1 fbronzati ais 9.2G Dec 4 13:05 pytorch_model-00009-of-00015.bin
-rw-r—r—1 fbronzati ais 9.2G Dec 4 13:08 pytorch_model-00010-of-00015.bin
-rw-r—r—1 fbronzati ais 9.3G Dec 4 12:28 pytorch_model-00011-of-00015.bin
-rw-r—r—1 fbronzati ais 9.2G Dec 4 13:18 pytorch_model-00012-of-00015.bin
-rw-r—r—1 fbronzati ais 9.2G Dec 4 13:04 pytorch_model-00013-of-00015.bin
-rw-r—r—1 fbronzati ais 8.9G Dec 4 13:20 pytorch_model-00014-of-00015.bin
-rw-r—r—1 fbronzati ais 501M Dec 4 13:20 pytorch_model-00015-of-00015.bin
-rw-r—r—1 fbronzati ais 66K Dec 4 12:25 pytorch_model.bin.index.json
-rw-r—r—1 fbronzati ais 9.8K Dec 4 12:25 README.md
-rw-r—r—1 fbronzati ais 1.2M Dec 4 13:20 Responsible-Use-Guide.pdf
-rw-r—r—1 fbronzati ais 414 Dec 4 12:25 special_tokens_map.json
-rw-r—r—1 fbronzati ais 1.6K Dec 4 12:25 tokenizer_config.json
-rw-r—r—1 fbronzati ais 1.8M Dec 4 12:25 tokenizer.json
-rw-r—r—1 fbronzati ais 489K Dec 4 13:20 tokenizer.model
-rw-r--r-- 1 fbronzati ais 4.7K Dec 4 12:25 USE_POLICY.md
Step 3 – Clone GitHub content
We need to create a new working directory and clone the git repo using the following command:
fbronzati@node003:/aipsf600/project-helix/rag$ git clone https://github.com/NVIDIA/GenerativeAIExamples.git
fbronzati@node003:/aipsf600/project-helix/rag$ cd GenerativeAIExamples
fbronzati@node003:/aipsf600/project-helix/rag/GenerativeAIExamples$ git checkout tags/v0.2.0
Step 4 – Set Environment Variables
To deploy the workflow, we use Docker Compose, which allows you to define and manage multi-container applications in a single YAML file. This simplifies the complex task of orchestrating and coordinating various services, making it easier to manage and replicate your application environment.
To adapt the deployment, you need to edit the file compose.env with the information about your environment, information like the folder that you downloaded the model, the name of the model, which GPUs to use, so on, are all included on the file, you will need to use your preferred text editor, following we used vi with the command:
fbronzati@node003:/aipsf600/project-helix/rag/GenerativeAIExamples$ vi deploy/compose/compose.env
Dell XE9680 variables
Below, we provide the variable used to deploy the workflow on the Dell PowerEdge XE9680.
"export MODEL_DIRECTORY="/aipsf600/project-helix/models/Llama-2-70b-chat-hf/" This is where we point to the model we downloaded from hugging face – the model will be automatically converted into tensorR-TLLM format for us as the containers are deployed using helper scripts
fbronzati@node003:/aipsf600/project-helix/rag/GenerativeAIExamples$ cat deploy/compose/compose.env
# full path to the local copy of the model weights
# NOTE: This should be an absolute path and not relative path
export MODEL_DIRECTORY="/aipsf600/project-helix/models/Llama-2-70b-chat-hf/"
# Fill this out if you dont have a GPU. Leave this empty if you have a local GPU
#export AI_PLAYGROUND_API_KEY=""
# flag to enable activation aware quantization for the LLM
# export QUANTIZATION="int4_awq"
# the architecture of the model. eg: llama
export MODEL_ARCHITECTURE="llama"
# the name of the model being used - only for displaying on frontend
export MODEL_NAME="Llama-2-70b-chat-hf"
# [OPTIONAL] the maximum number of input tokens
export MODEL_MAX_INPUT_LENGTH=3000
# [OPTIONAL] the maximum number of output tokens
export MODEL_MAX_OUTPUT_LENGTH=512
# [OPTIONAL] the number of GPUs to make available to the inference server
export INFERENCE_GPU_COUNT="all"
# [OPTIONAL] the base directory inside which all persistent volumes will be created
# export DOCKER_VOLUME_DIRECTORY="."
# [OPTIONAL] the config file for chain server w.r.t. pwd
export APP_CONFIG_FILE=/dev/null
Step 5 – Build and start the containers
As the git repository has large files, we use the git lfs pull command to download the files from the repository:
fbronzati@node003:/aipsf600/project-helix/rag/GenerativeAIExamples$ source deploy/compose/compose.env; docker-compose -f deploy/compose/docker-compose.yaml build
Following, we run the following command to build docker container images:
fbronzati@node003:/aipsf600/project-helix/rag/GenerativeAIExamples$ source deploy/compose/compose.env; docker-compose -f deploy/compose/docker-compose.yaml build
And finally, with a similar command, we deploy the containers:
fbronzati@node003:/aipsf600/project-helix/rag/GenerativeAIExamples$ source deploy/compose/compose.env; docker-compose -f deploy/compose/docker-compose.yaml up -d
WARNING: The AI_PLAYGROUND_API_KEY variable is not set. Defaulting to a blank string.
Creating network "nvidia-LLM" with the default driver
Creating milvus-etcd ... done
Creating milvus-minio ... done
Creating LLM-inference-server ... done
Creating milvus-standalone ... done
Creating evaluation ... done
Creating notebook-server ... done
Creating chain-server ... done
Creating LLM-playground ... done
The deployment will take a few minutes to finish, especially depending on the size of the LLM you are using. In our case, it took about 9 minutes to launch since we used the 70B model:
fbronzati@node003:/aipsf600/project-helix/rag/GenerativeAIExamples$ docker ps -a
CONTAINER ID IMAGE COMMAND CREATED STATUS PORTS NAMES
ae34eac40476 LLM-playground:latest "python3 -m frontend…" 9 minutes ago Up 9 minutes 0.0.0.0:8090->8090/tcp, :::8090->8090/tcp LLM-playground
a9b4996e0113 chain-server:latest "uvicorn RetrievalAu…" 9 minutes ago Up 9 minutes 6006/tcp, 8888/tcp, 0.0.0.0:8082->8082/tcp, :::8082->8082/tcp chain-server
7b617f11d122 evalulation:latest "jupyter lab --allow…" 9 minutes ago Up 9 minutes 0.0.0.0:8889->8889/tcp, :::8889->8889/tcp evaluation
8f0e434b6193 notebook-server:latest "jupyter lab --allow…" 9 minutes ago Up 9 minutes 0.0.0.0:8888->8888/tcp, :::8888->8888/tcp notebook-server
23bddea51c61 milvusdb/milvus:v2.3.1-gpu "/tini -- milvus run…" 9 minutes ago Up 9 minutes (healthy) 0.0.0.0:9091->9091/tcp, :::9091->9091/tcp, 0.0.0.0:19530->19530/tcp, :::19530->19530/tcp milvus-standalone
f1b244f93246 LLM-inference-server:latest "/usr/bin/python3 -m…" 9 minutes ago Up 9 minutes (healthy) 0.0.0.0:8000-8002->8000-8002/tcp, :::8000-8002->8000-8002/tcp LLM-inference-server
89aaa3381cf8 minio/minio:RELEASE.2023-03-20T20-16-18Z "/usr/bin/docker-ent…" 9 minutes ago Up 9 minutes (healthy) 0.0.0.0:9000-9001->9000-9001/tcp, :::9000-9001->9000-9001/tcp milvus-minio
ecec9d808fdc quay.io/coreos/etcd:v3.5.5 "etcd -advertise-cli…" 9 minutes ago Up 9 minutes (healthy) 2379-2380/tcp
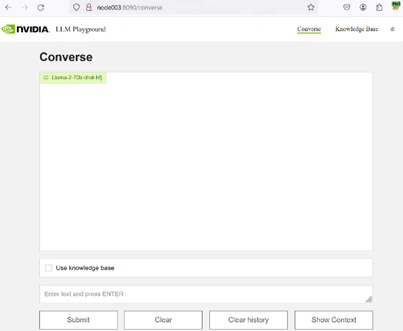
Access the LLM playground
The LLM-playground container provides A sample chatbot web application is provided in the workflow. Requests to the chat system are wrapped in FastAPI calls to the LLM-inference-server container running the Triton inference server with Llama 70B loaded.
Open the web application at http://host-ip:8090.
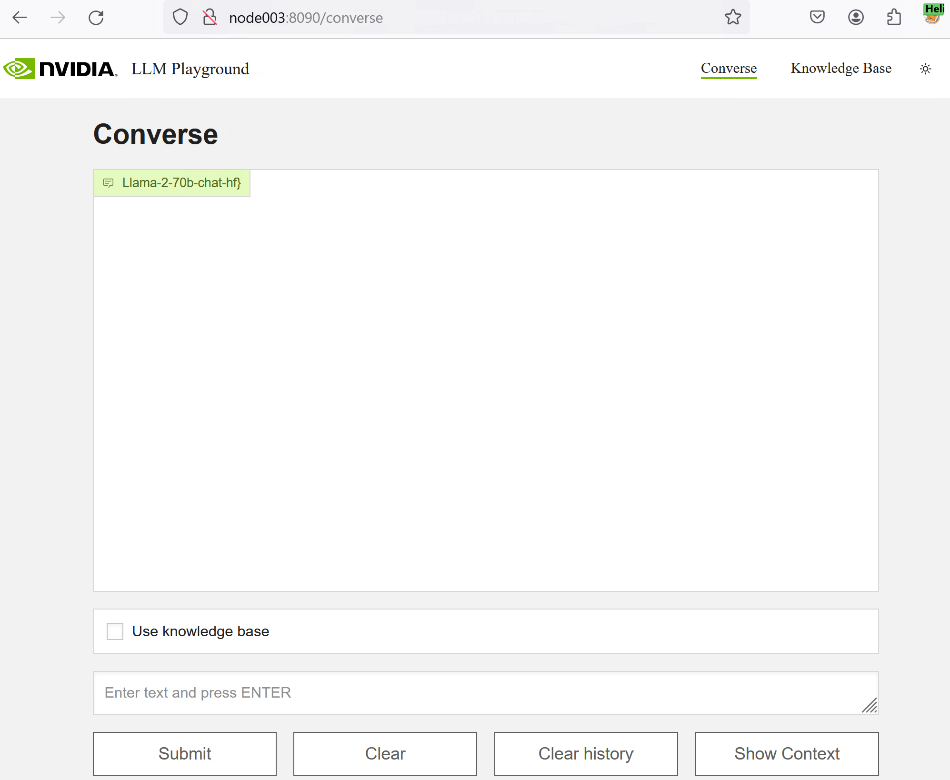
Let's try it out!
Again, we have taken the time to demo Llama2 running on NVIDIA LLM playground on an XE9680 with 8x H100 GPUs. LLM playground is backed by NVIDIA's Triton Inference server (which hosts the llama model).
We hope we have shown you that NVIDIA's LLM Playground, part of the NeMo framework, is an innovative platform for experimenting with and deploying large language models (LLMs) for various enterprise applications. While offering:
- Customization of Pre-Trained LLMs: It allows customization of pre-trained large language models using p-tuning techniques for domain-specific use cases or tasks.
- Experiments with a RAG pipeline

Model Training – Dell Validated Design
Fri, 03 May 2024 16:09:06 -0000
|Read Time: 0 minutes
Introduction
When it comes to large language models (LLMs), there may be fundamental question that everyone looking to leverage foundational models need to answer: should I train my model, or should I customize an existing model?
There can be strong arguments for either. In a previous post, Nomuka Luehr covered some popular customization approaches. In this blog, I will look at the other side of the question: training, and answer the following questions: Why would I train an LLM? What factors should I consider? I’ll also cover the recently announced Generative AI in the Enterprise – Model Training Dell Validated Design - A Scalable and Modular Production Infrastructure for AI Large Language Model Training. This is a collaborative effort between Dell Technologies and NVIDIA, aimed at facilitating high-performance, scalable, and modular solutions for training large language models (LLMs) in enterprise settings (more about that later).
Training pipeline
The data pipelines for training and customization are similar because both processes involve feeding specific datasets through the LLM.
In the case of training, the dataset is typically much larger than for customization, because customization is targeted at a specific domain. Remember, for training a model, the goal is to embed as much knowledge into the model as possible, so the dataset must be large.
This raises the question of the dataset and its accuracy and relevance. Curating and preparing the data are essential processes to avoid biases and misinformation. This step is vital for ensuring the quality and relevance of the data fed into the LLM. It involves meticulously selecting and refining data to minimize biases and misinformation, which if overlooked, could compromise the model's output accuracy and reliability. Data curation is not just about gathering information; it's about ensuring that the model's knowledge base is comprehensive, balanced, and reflects a wide array of perspectives.
When the dataset is curated and prepped, the actual process of training involves a series of steps where the data is fed through the LLM. The model generates outputs based on the input provided, which are then compared against expected results. Discrepancies between the actual and expected outputs lead to adjustments in the model's weights, gradually improving its accuracy through iterative refinement (using supervised learning, unsupervised learning, and so on).
While the overarching principle of this process might seem straightforward, it's anything but simple. Each step involves complex decisions, from selecting the right data and preprocessing it effectively to customizing the model's parameters for optimal performance. Moreover, the training landscape is evolving, with advancements, such as supervised and unsupervised learning, which offer different pathways to model development. Supervised learning, with its reliance on labeled datasets, remains a cornerstone for most LLM training regimes, by providing a structured way to embed knowledge. However, unsupervised learning, which explores data patterns without predefined labels, is gaining traction for its ability to unearth novel insights.
These intricacies highlight the importance of leveraging advanced tools and technologies. Companies like NVIDIA are at the forefront, offering sophisticated software stacks that automate many aspects of the process, and reducing the barriers to entry for those looking to develop or refine LLMs.
Network and storage performance
In the previous section, I touched on the dataset required to train or customize models. While having the right dataset is a critical piece of this process, being able to deliver that dataset fast enough to the GPUs running the model is another critical and yet often overlooked piece. To achieve that, you must consider two components:
- Storage performance
- Network performance
For anyone looking to train a model, having a node-to-node (also known as East-West) network infrastructure based on 100Gbps, or better yet, 400Gbps, is critical, because it ensures sufficient bandwidth and throughput to keep saturated the type of GPUs, such as the NVIDIA H100, required for training.
Because customization datasets are typically smaller than full training datasets, a 100Gbps network can be sufficient, but as with everything in technology, your mileage may vary and proper testing is critical to ensure adequate performance for your needs.
Datasets used to train models are typically very large: in the 100s of GB. For instance, the dataset used to train GPT-4 is said to be over 550GB. With the advance of RDMA over Converged Ethernet (RoCE), GPUs can pull the data directly from storage. And because 100Gbps networks are able to support that load, the bottleneck has moved to the storage.
Because of the nature of large language models, the dataset used to train them is made of unstructured data, such as Sharepoint sites and document repositories, and are therefore most often hosted on network attached storage, such as Dell PowerScale. I am not going to get into further details on the storage part because I’ll be publishing another blog on how to use PowerScale to support model training. But you must make careful considerations when designing the storage to ensure that the storage is able to keep up with the GPUs and the network.
A note about checkpointing
As we previously mentioned, the process of training is iterative. Based on the input provided, the model generates outputs, which are then compared against expected results. Discrepancies between the actual and expected outputs lead to adjustments in the model's weights, gradually improving its accuracy through iterative refinement. This process is repeated across many iterations over the entire training dataset.
A training run (that is, running an entire dataset through a model and updating its weight), is extremely time consuming and resource intensive. According to this blog post, a single training run of ChatGPT-4 costs about $4.6M. Imagine running a few of them in a row, only to have an issue and having to start again. Because of the cost associated with training runs, it is often a good idea to save the weights of the model at an intermediate stage during the run. Should something fail later on, you can load the saved weights and restart from that point. Snapshotting the weights of a model in this way is called checkpointing. The challenge with checkpointing is performance.
A checkpoint is typically stored on an external storage system, so again, storage performance and network performance are critical considerations to offer the proper bandwidth and throughput for checkpointing. For instance, the Llama-2 70B consumes about 129GB of storage. Because each of its checkpoints is the exact same predictable size, they can be saved quickly (to disk) to ensure the proper performance of the training process.
NVIDIA software stack
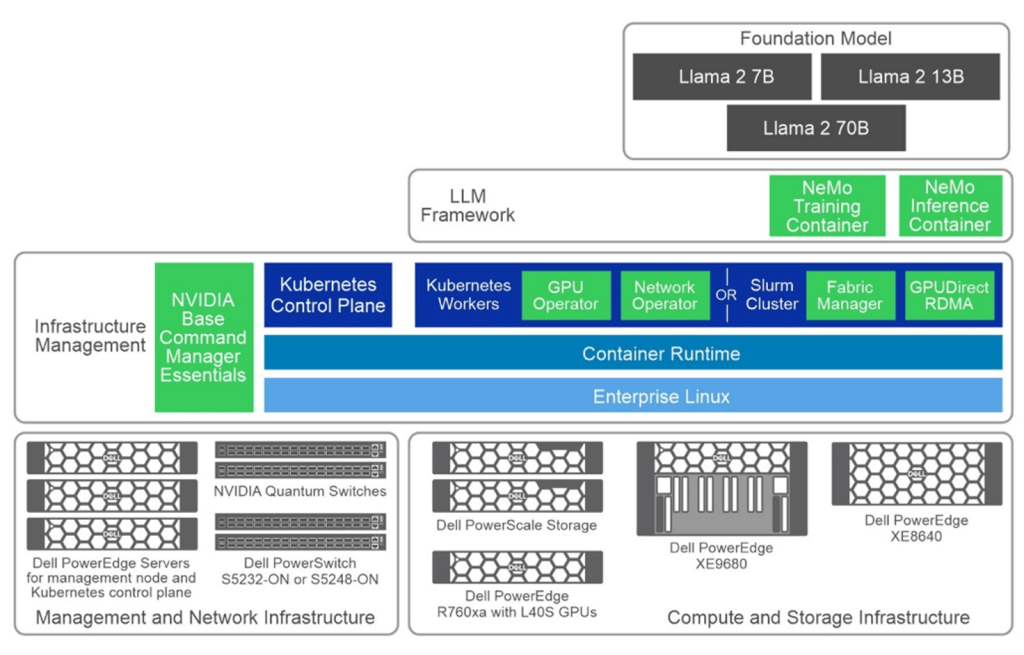
The choice of which framework to use depends on whether you typically lean more towards doing it yourself or buying specific outcomes. The benefit of doing it yourself is ultimate flexibility, sometimes at the expense of time to market, whereas buying an outcome can offer better time to market at the expense of having to choose within a pre-determined set of components. In my case, I have always tended to favor buying outcomes, which is why I want to cover the NVIDIA AI Enterprise (NVAIE) software stack at a high level.
The following figure is a simple layered cake that showcases the various components of the NVAIE, in light green.
The white paper Generative AI in the Enterprise – Model Training Dell Validated Design provides an in-depth exploration of a reference design developed by Dell Technologies in collaboration with NVIDIA. It offers enterprises a robust and scalable framework to train large language models effectively. Whether you're a CTO, AI engineer, or IT executive, this guide addresses the crucial aspects of model training infrastructure, including hardware specifications, software design, and practical validation findings.
Training the Dell Validated Design architecture
The validated architecture aims to give the reader a broad output of model training results. We used two separate configuration types across the compute, network and GPU stack.
There are two 8x PowerEdge XE9680 configurations both with 8x NVIDIA H100 SXM GPUs. The difference between the configurations (again) is the network. The first configuration is equipped with 8x ConnectX-7; the second configuration is equipped with four ConnectX-7 adapters. Both are configured for NDR.
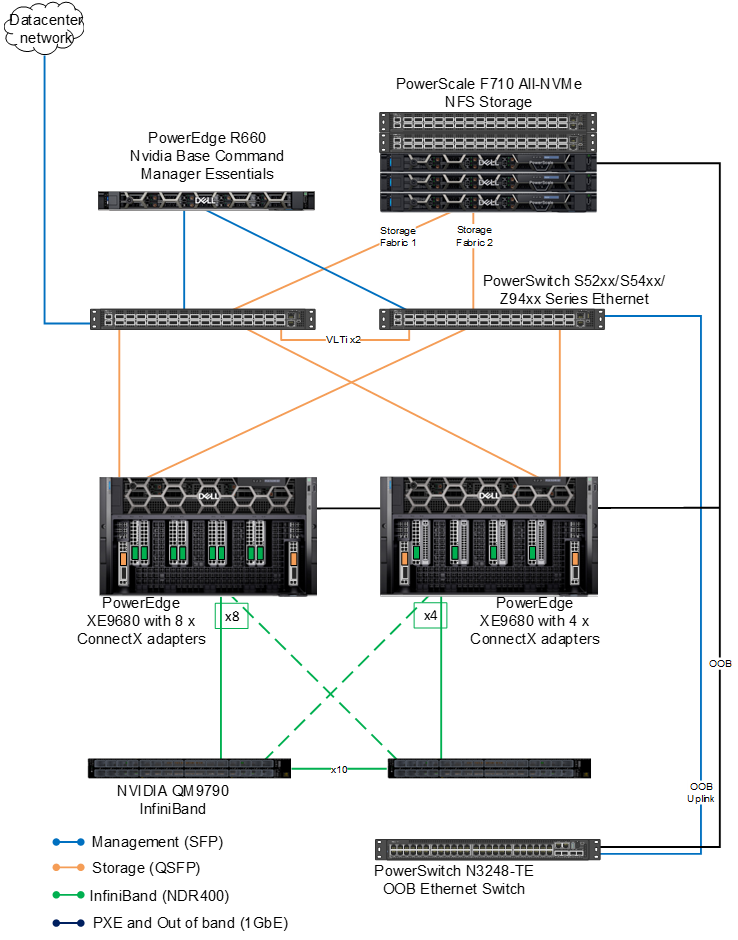
On the storage side, the evolution of PowerScale continues to thrive in the AI domain with the launch of its latest line, including the notable PowerScale F710. This addition embraces Dell PowerEdge 16G servers, heralding a new era in performance capabilities for PowerScale's all-flash nodes. On the software side, the F710 benefits from the enhanced performance features found in the PowerScale OneFS 9.7 update.
Key takeaways
The guide provides training times for the Llama 2 7B and Llama 2 70B models over 500 steps, with variations based on the number of nodes and configurations used.
Why only 500 steps? The decision to train models for a set number of steps (500), rather than to train models for convergence, is practical for validation purposes. It allows for a consistent benchmarking metric across different scenarios and models, to produce a clearer comparison of infrastructure efficiency and model performance in the early stages.
Efficiency of Model Sizing: The choice of 7B and 70B Llama 2 model architectures indicates a strategic approach to balance computational efficiency with potential model performance. Smaller models like the 7B are quicker to train and require fewer resources, making them suitable for preliminary tests and smaller-scale applications. On the other hand, the 70B model, while significantly more resource-intensive, was chosen for its potential to capture more complex patterns and provide more accurate outputs.
Configuration and Resource Optimization: Comparing two hardware configurations provides valuable insights into optimizing resource allocation. While higher-end configurations (Configuration 1 with 8 adapters) offer slightly better performance, you must weigh the marginal gains against the increased costs. This highlights the importance of tailoring the hardware setup to the specific needs and scale of the project, where sometimes, a less maximalist approach (Configuration 2 with 4 adapters) can provide a more balanced cost-to-benefit ratio, especially in smaller setups. Certainly something to think about!
Parallelism Settings: The specific settings for tensor and pipeline parallelism (as covered in the guide), along with batch sizes and sequence lengths, are crucial for training efficiency. These settings impact the training speed and model performance, indicating the need for careful tuning to balance resource use with training effectiveness. The choice of these parameters reflects a strategic approach to managing computational loads and training times.
To close
With the scalable and modular infrastructure designed by Dell Technologies and NVIDIA, you are well-equipped to embark on or enhance your AI initiatives. Leverage this blueprint to drive innovation, refine your operational capabilities, and maintain a competitive edge in harnessing the power of large language models.
Authors: Bertrand Sirodot and Damian Erangey