


Address your Security Challenges with Zero Trust Model on Dell PowerScale

Dell PowerScale, the world’s most secure NAS storage array[1], continues to evolve its already rich security capabilities with the recent introduction of External Key Manager for Data-at-Rest-Encryption, enhancements to the STIG security profile, and support for UEFI Secure Boot across PowerScale platforms.
Our next release of PowerScale OneFS adds new security features that include software-based firewall functionality, multi-factor authentication with support for CAC/PIV, SSO for administrative WebUI, and FIPS-compliant data in flight.
As the PowerScale security feature set continues to advance, meeting the highest level of federal compliance is paramount to support industry and federal security standards. We are excited to announce that our scheduled verification by the Department of Defense Information Network (DISA) for inclusion on the DoD Approved Product List will begin in March 2023. For more information, see the DISA schedule here.
Moreover, OneFS will embrace the move to IPv6-only networks with support for USGv6-r1, a critical network standard applicable to hundreds of federal agencies and to the most security-conscious enterprises, including the DoD. Refreshed Common Criteria certification activities are underway and will provide a highly regarded international and enterprise-focused complement to other standards being supported.
We believe that implementing the zero trust model is the best foundation for building a robust security framework for PowerScale. This model and its principles are discussed below.
Supercharge Dell PowerScale security with the zero trust model
In the age of digital transformation, multiple cloud providers, and remote employees, the confines of the traditional data center are not enough to provide the highest levels of security. In the traditional sense, security was considered placing your devices in an imaginary “bubble.” The thought was that as long as devices were in the protected “bubble,” security was already accounted for through firewalls on the perimeter. However, the age-old concept of an organization’s security depending on the firewall is no longer relevant and is the easiest for a malicious party to attack.

Now that the data center is not confined to an area, the security framework must evolve, transform, and adapt. For example, although firewalls are still critical to network infrastructure, security must surpass just a firewall and security devices.
Why is data security important?
Although this seems like an easy question, it’s essential to understand the value of what is being protected. Traditionally, an organization’s most valuable assets were its infrastructure, including a building and the assets required to produce its goods. However, in the age of Digital Transformation, organizations have realized that the most critical asset is their data.
Why a zero trust model?
Because data is an organization’s most valuable asset, protecting the data is paramount. And how do we protect this data in the modern environment without data center confines? Enter the zero trust model!
Although Forrester Research first defined zero trust architecture in 2010, it has recently received more attention with the ever-changing security environment leading to a focus on cybersecurity. The zero trust architecture is a general model and must be refined for a specific implementation. For example, in September 2019, the National Institute of Standards and Technology (NIST) introduced its concept of Zero Trust Architecture. As a result, the White House has also published an Executive Order on Improving the Nation’s Cybersecurity, including zero trust initiatives.
In a zero trust architecture, all devices must be validated and authenticated. The concept applies to all devices and hosts, ensuring that none are trusted until proven otherwise. In essence, the model adheres to a “never trust, always verify” policy for all devices.
NIST Special Publication 800-207 Zero Trust Architecture states that a zero trust model is architected with the following design tenets:
- All data sources and computing services are considered resources.
- All communication is secured regardless of network location.
- Access to individual enterprise resources is granted on a per session basis.
- Access to resources is determined by dynamic policy—including the observable state of client identity, application/service, and the requesting asset—and may include other behavioral and environmental attributes.
- The enterprise monitors and measures the integrity and security posture of all owned and associated assets.
- All resource authentication and authorization are dynamic and strictly enforced before access is allowed.
- The enterprise collects as much information as possible related to the current state of assets, network infrastructure, and communications and uses it to improve its security posture.

PowerScale OneFS follows the zero trust model
The PowerScale family of scale-out NAS solutions includes all-flash, hybrid, and archive storage nodes that can be deployed across the entire enterprise – from the edge, to core, and the cloud, to handle the most demanding file-based workloads. PowerScale OneFS combines the three layers of storage architecture—file system, volume manager, and data protection—into a scale-out NAS cluster. Dell Technologies follows the NIST Cybersecurity Framework to apply zero trust principles on a PowerScale cluster. The NIST Framework identifies five principles: identify, protect, detect, respond, and recover. Combining the framework from the NIST CSF and the data model provides the basis for the PowerScale zero trust architecture in five key stages, as shown in the following figure.
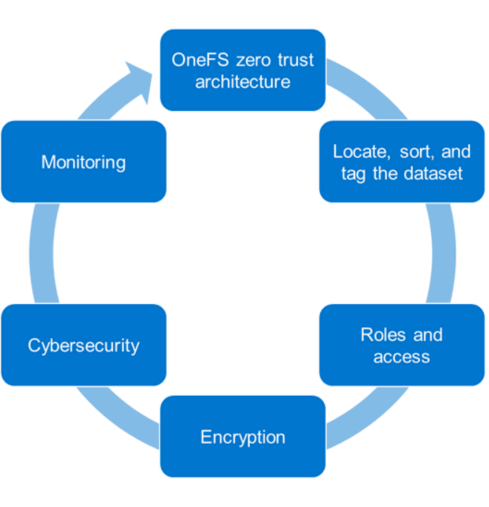
Let’s look at each of these stages and what Dell Technologies tools can be used to implement them.
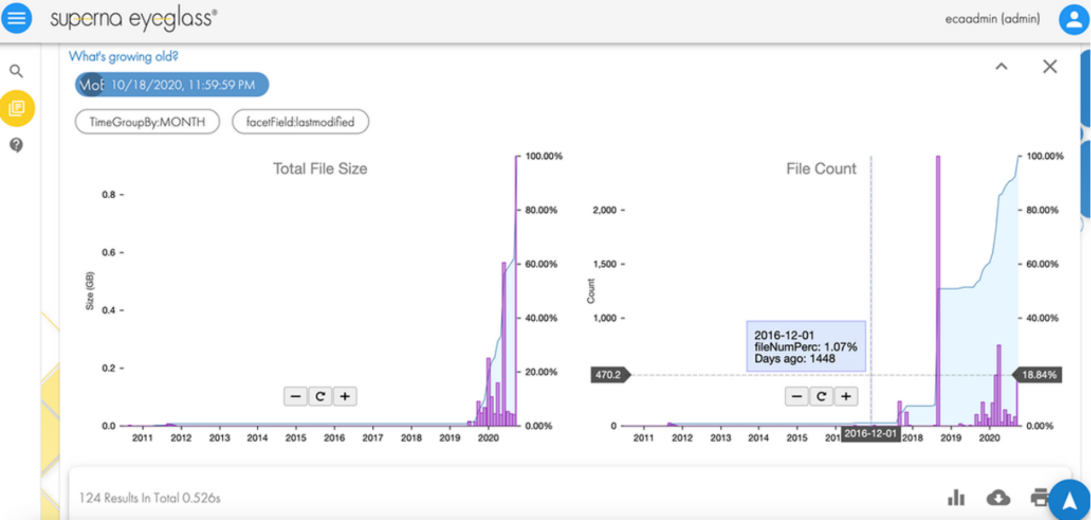
1. Locate, sort, and tag the dataset
To secure an asset, the first step is to identify the asset. In our case, it is data. To secure a dataset, it must first be located, sorted, and tagged to secure it effectively. This can be an onerous process depending on the number of datasets and their size. We recommend using the Superna Eyeglass Search and Recover feature to understand your unstructured data and to provide insights through a single pane of glass, as shown in the following image. For more information, see the Eyeglass Search and Recover Product Overview.
2. Roles and access
Once we know the data we are securing, the next step is to associate roles to the indexed data. The role-specific administrators and users only have access to a subset of the data necessary for their responsibilities. PowerScale OneFS allows system access to be limited to an administrative role through Role-Based Access Control (RBAC). As a best practice, assign only the minimum required privileges to each administrator as a baseline. In the future, more privileges can be added as needed. For more information, see PowerScale OneFS Authentication, Identity Management, and Authorization.
3. Encryption
For the next step in deploying the zero trust model, use encryption to protect the data from theft and man-in-the-middle attacks.
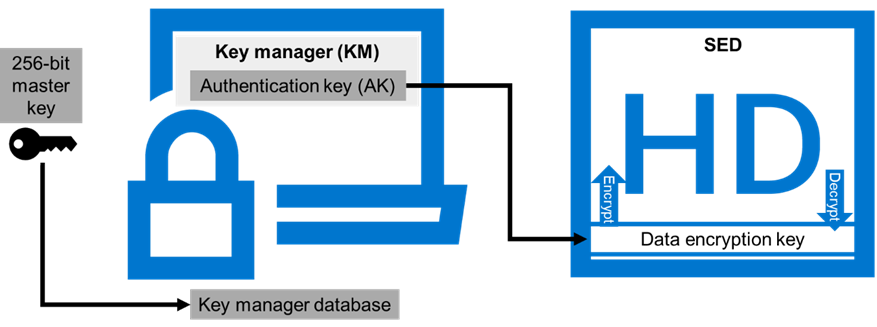
Data at Rest Encryption
PowerScale OneFS provides Data at Rest Encryption (D@RE) using self-encrypting drives (SEDs), allowing data to be encrypted during writes and decrypted during reads with a 256-bit AES encryption key, referred to as the data encryption key (DEK). Further, OneFS wraps the DEK for each SED in an authentication key (AK). Next, the AKs for each drive are placed in a key manager (KM) that is stored securely in an encrypted database, the key manager database (KMDB). Next, the KMDB is encrypted with a 256-bit master key (MK). Finally, the 256-bit master key is stored external to the PowerScale cluster using a key management interoperability protocol (KMIP)-compliant key manager server, as shown in the following figure. For more information, see PowerScale Data at Rest Encryption.
Data in flight encryption
Data in flight is encrypted using SMB3 and NFS v4.1 protocols. SMB encryption can be used by clients that support SMB3 encryption, including Windows Server 2012, 2012 R2, 2016, Windows 10, and 11. Although SMB supports encryption natively, NFS requires additional Kerberos authentication to encrypt data in flight. OneFS Release 9.3.0.0 supports NFS v4.1, allowing Kerberos support to encrypt traffic between the client and the PowerScale cluster.
Once the protocol access is encrypted, the next step is encrypting data replication. OneFS supports over-the-wire, end-to-end encryption for SyncIQ data replication, protecting and securing in-flight data between clusters. For more information about these features, see the following:
- PowerScale: Solution Design and Considerations for SMB Environments
- PowerScale OneFS NFS Design Considerations and Best Practices
- PowerScale SyncIQ: Architecture, Configuration, and Considerations
4. Cybersecurity
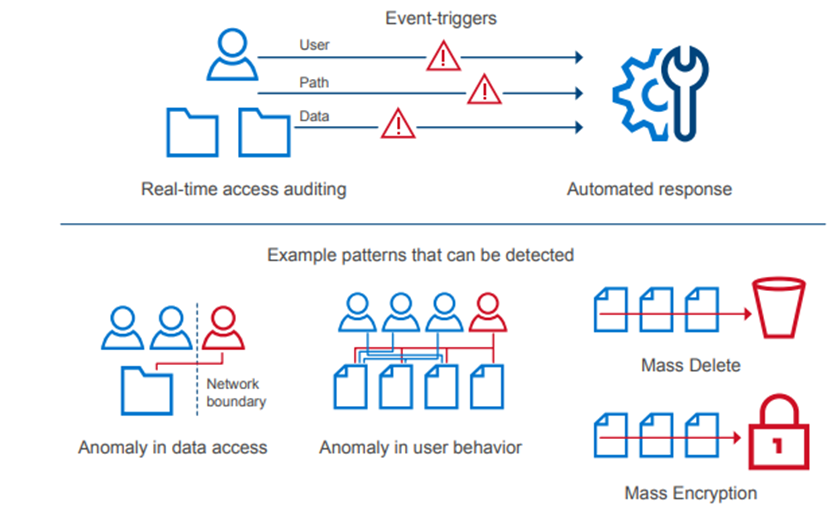
In an environment of ever-increasing cyber threats, cyber protection must be part of any security model. Superna Eyeglass Ransomware Defender for PowerScale provides cyber resiliency. It protects a PowerScale cluster by detecting attack events in real-time and recovering from cyber-attacks. Event triggers create an automated response with real-time access auditing, as shown in the following figure.
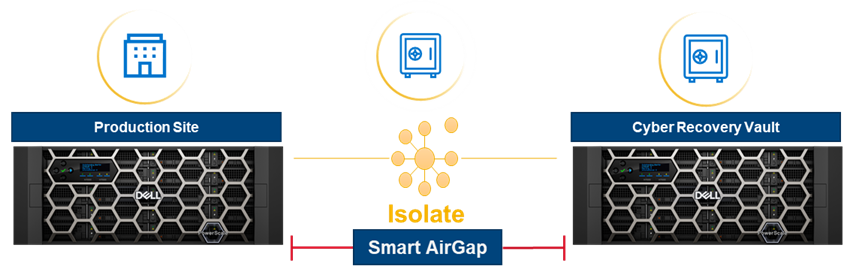
The Enterprise AirGap capability creates an isolated data copy in a cyber vault that is network isolated from the production environment, as shown in the following figure. For more about PowerScale Cyber Protection Solution, check out this comprehensive eBook.
5. Monitoring
Monitoring is a critical component of applying a zero trust model. A PowerScale cluster should constantly be monitored through several tools for insights into cluster performance and tracking anomalies. Monitoring options for a PowerScale cluster include the following:
- Dell CloudIQ for proactive monitoring, machine learning, and predictive analytics.
- Superna Ransomware Defender for protecting a PowerScale cluster by detecting attack events in real-time and recovering from cyber-attacks. It also offers AirGap.
- PowerScale OneFS SDK to create custom applications specific to an organization. Uses the OneFS API to configure, manage, and monitor cluster functionality. The OneFS SDK provides greater visibility into a PowerScale cluster.
Conclusion
This blog introduces implementing the zero trust model on a PowerScale cluster. For additional details and applying a complete zero trust implementation, see the PowerScale Zero Trust Architecture section in the Dell PowerScale OneFS: Security Considerations white paper. You can also explore the other sections in this paper to learn more about all PowerScale security considerations.
Author: Aqib Kazi
[1] Based on Dell analysis comparing cybersecurity software capabilities offered for Dell PowerScale vs competitive products, September 2022.