
Note: Before proceeding, determine an IP address on the External Management VLAN and a hostname for the OMNI VM. Add this information to the DNS server. In this example, the hostname is omni.dell.lab, and the address is 172.18.11.56/24
- In the vSphere Client, power on the OMNI VM and launch the web console for the VM.
- Log in with the default OMNI VM username, admin, and password, admin. The first time you log in, follow the prompts to change the admin password.
- The OMNI Menu displays.
Figure 86. OMNI menu 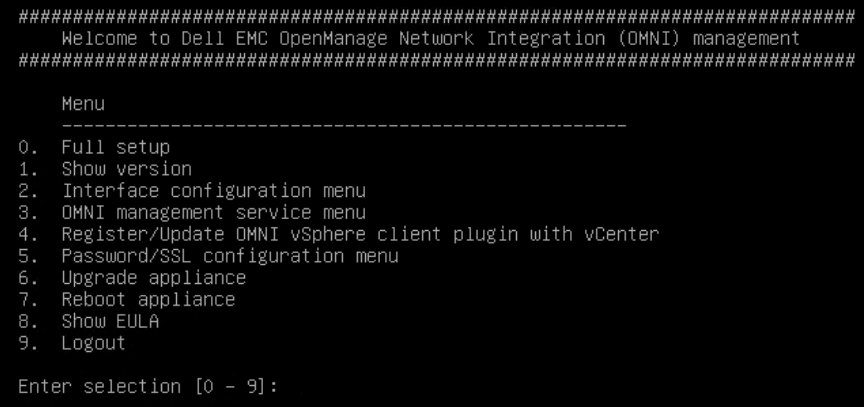
- Select 0. Full setup. The Network Manager terminal user interface (TUI) opens.
Figure 87. Network Manager TUI 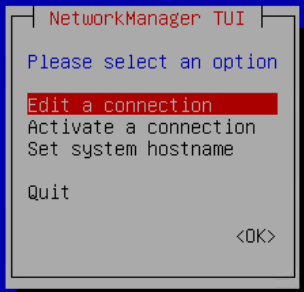 Note: In the TUI, use the Tab and Arrow keys to navigate and the Enter key to select.
 - Select Edit a connection > Wired connection 1.
Figure 88. Wired connection 1 selected 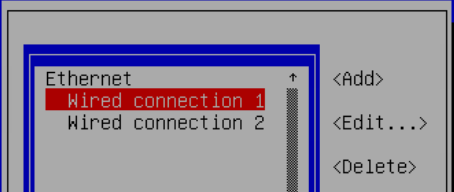
- In the Edit Connection window, make the following settings:
- Change the profile name to external management.Note: The Device field is automatically populated with a MAC address and (ens160).
- Set the IPv4 Configuration to Manual.
- Next to IPv4 Configuration, select Show to expand the additional fields.
- Enter the OMNI VM IP Address/prefix, Gateway, DNS server, and Search domain. The values used for this example are shown in the figure below.Note: The example shown in the figure below is with L2 uplinks, so the DNS server has an IP address on the same network as the OMNI VM, 172.18.11.50 in this example. If L3 uplinks are used, the DNS server will be on a different network. For the L3 uplink examples in this guide, the DNS server IP address is 172.19.11.50.
- Set the IPv6 Configuration to Ignore.
- Change the profile name to external management.
- Default values are used for the remaining settings. When complete, the Edit Connection window appears as shown in the figure below.
Figure 89. External management connection settings 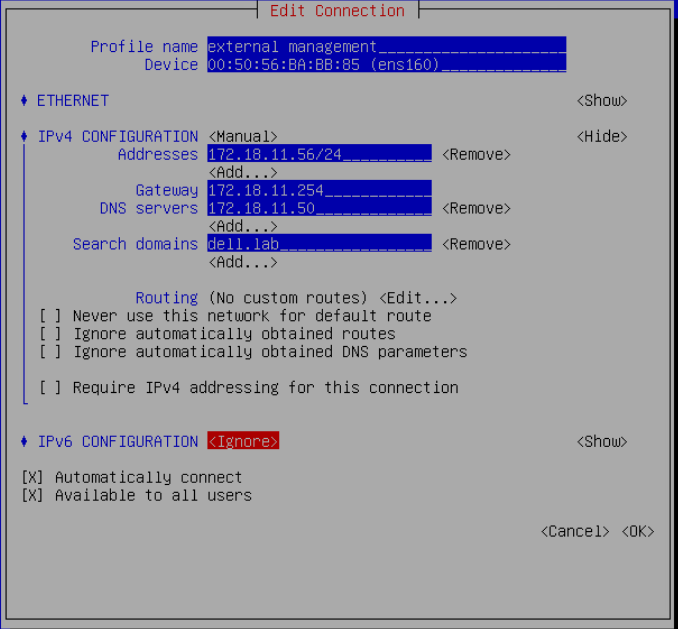
- Select OK. The Ethernet connections list displays.
- Select Wired connection 2.
Figure 90. Wired connection 2 selected 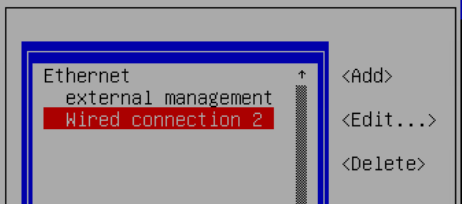
- In the Edit Connection window, make the following settings:
- Change the profile name to internal management.Note: The Device field is automatically populated with a MAC address and (ens192).
- Set IPv4 Configuration to Disabled.
- Set IPv6 Configuration to Link-Local.
- Next to IPv6 Configuration, select Show to expand the IPv6 configuration fields.
- Next to Routing, select Edit > Add.
- Set the Destination/Prefix to fde1:53ba:e9a0:cccc::/64. Leave the remaining values at their default settings.
- Change the profile name to internal management.
- The Edit Connection window displays.
Figure 91. Internal management connection settings 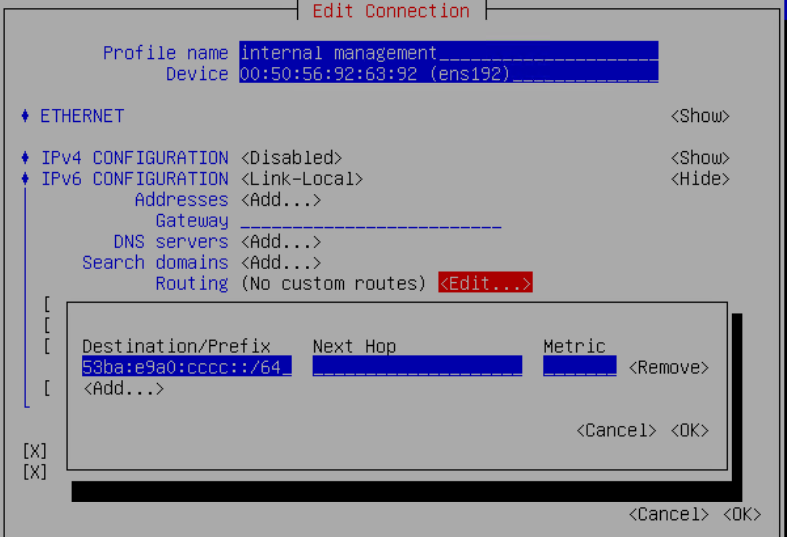 Note: Only part of the Destination/Prefix field is visible on the screen. Be sure it is set to fde1:53ba:e9a0:cccc::/64.
 - Select OK > OK > Back to return to the Network Manager TUI menu.
- On the Network Manager TUI menu, select Activate a connection. The connection activation window displays.
Figure 92. Activate or deactivate connections window 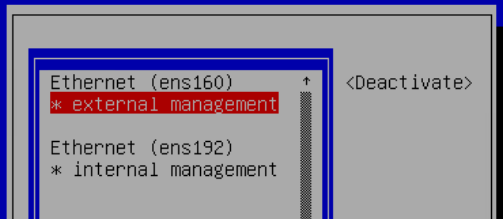 Note: When active, connection names have an asterisk (*) next to them.
 - Deactivate both connections as follows:
- Select external management > Deactivate.
- Select internal management > Deactivate.
- Activate both connections as follows:
- Select external management > Activate.
- Select internal management > Activate.
- Select Back to return to the Network Manager TUI menu.
- On the Network Manager TUI menu, select Set system hostname, as shown.
Figure 93. Set system hostname selected 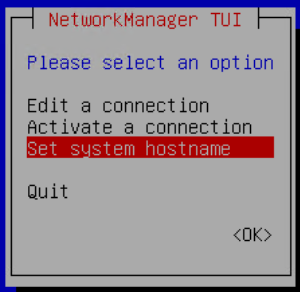
- Change the Hostname from its default setting to the new hostname, omni.dell.lab, as shown in this example.
Figure 94. Set hostname to omni.dell.lab 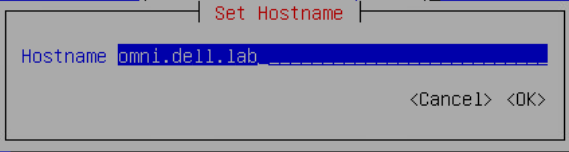
- Click OK > OK > Quit.
- After services are started, the NTP Server IP/Hostname: prompt displays. At the prompt, specify the NTP server, ntp.dell.lab in this example, as shown in the figure below.Note: If an NTP server is not used, press Enter to skip.
- At the Install SSL Certificates from remote server [y]? prompt, enter n.Note: OMNI certificate installation is outside the scope of this guide. Certificates can be imported later by selecting 5. Password/SSL configuration menu from the OMNI Menu. Follow the instructions provided in SmartFabric Services for OpenManage Network Integration User Guide, Release 2.0. The guide is available on the Dell EMC OpenManage Network Integration for VMware vCenter website.
Figure 95. Specify NTP server 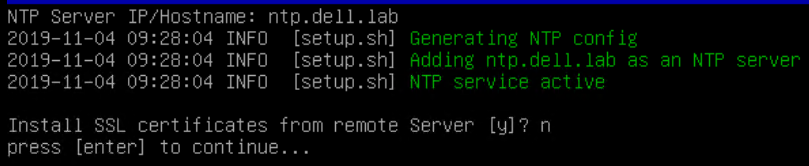
- Press Enter to return to the OMNI menu.
- On the OMNI menu, select 8. Logout.
This completes the OMNI VM console configuration.