
Rules customization
Rules customization
-
In addition to the built-in rules for the analysis engine, customized rules can also be created to provide alerting for other indicators that are important to the organization. To recap - there are two types of rules in Data Protection Advisor: scheduled and event based.
Scheduled rules
Scheduled rules are essentially a report that runs on a given schedule that will alert on each line item returned. If the backup administrator desired, for example, to send an alert every time there is a failed job, they could write a scheduled rule to run every 24 hours to alert on every result in a ‘failed backup job’ report.
The report as shown in Figure 18 is an ‘out of the box report’, however, it can be customized as required:
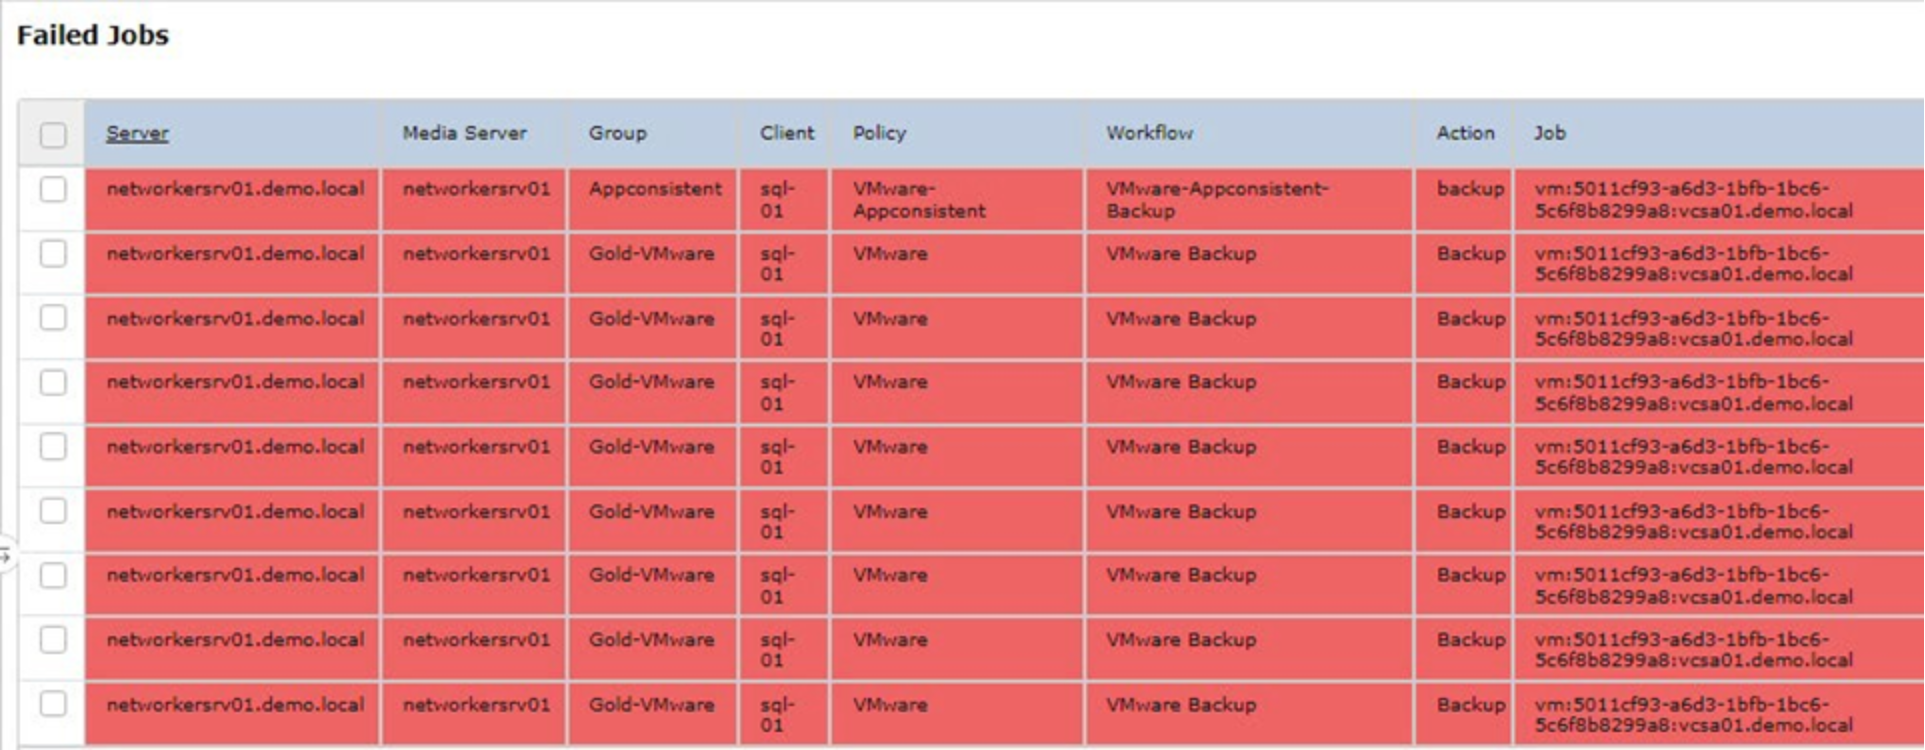
Figure 18. Out of the box report for failed jobs
To create a custom rule, navigate to Custom Rule Templates located under the Analysis Policies as shown in Figure 19.

Figure 19. Custom Rule Template
From the top right of the UI, select the desired category and select the rule type, which can be event based or scheduled. In the example shown in Figure 20, a name of Failed Jobs has been provided for this custom rule, with Data Protection as the category and a run type of Scheduled.
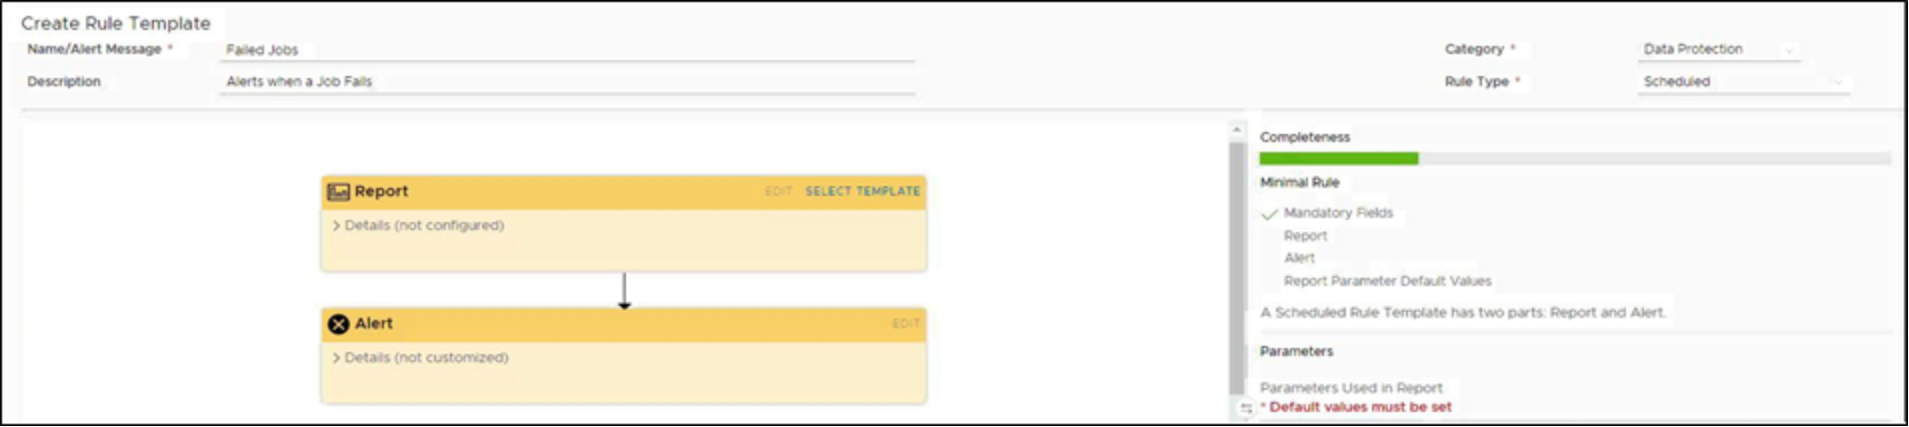
Figure 20. Selecting the category and run type for the customer rule
A report needs to be linked to the custom rule, click Select Template in the Report icon, select the desired report template form the custom or system-based options. In the example shown in Figure 21, the Backup Failed Jobs system report is selected.
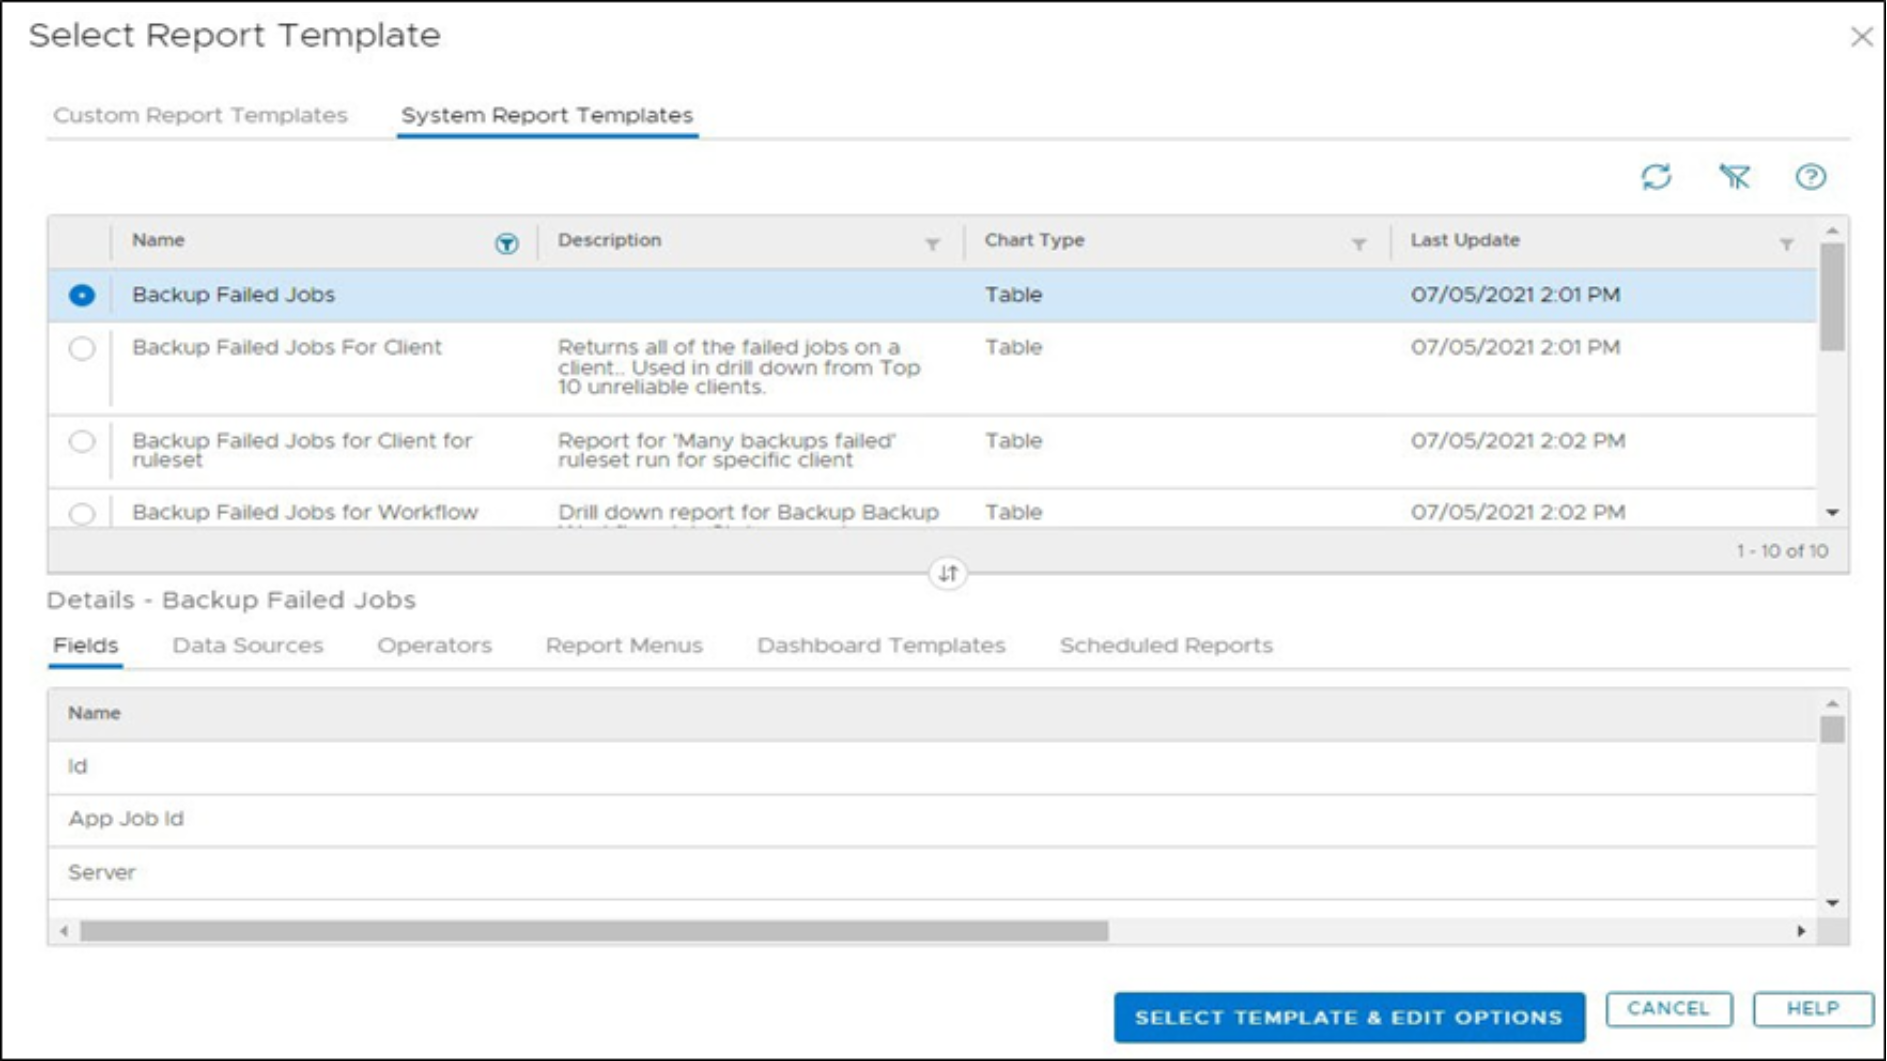
Figure 21. Selecting a report template
With the report selected, several options need to be set and, in this instance, the Number of Alerts is set to Generate one alert for all rows as per Figure 22.
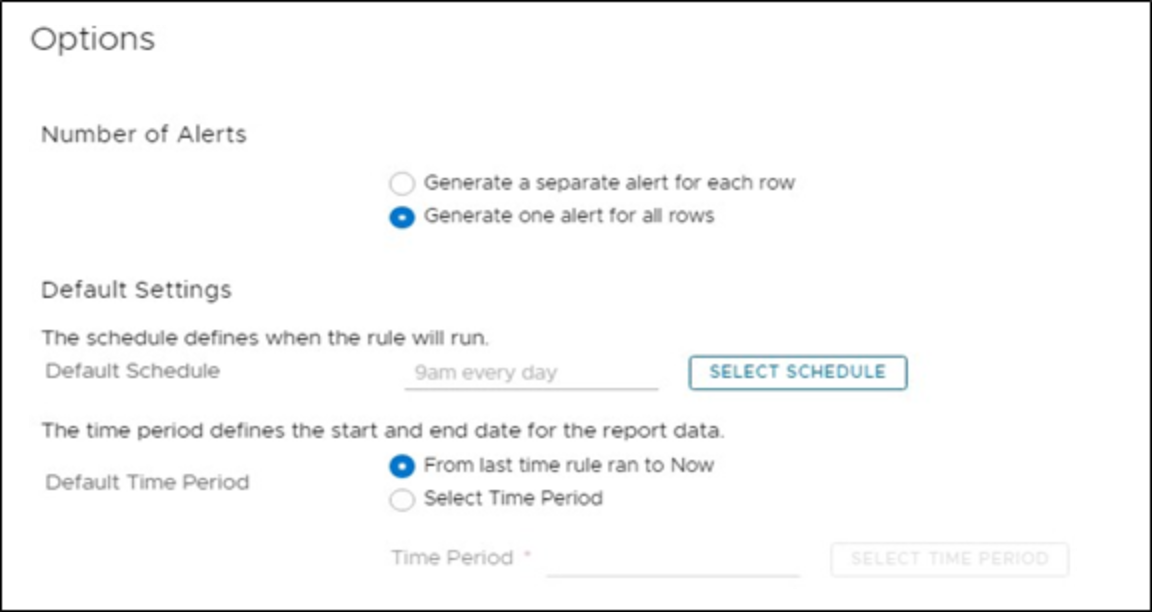
Figure 22. Selecting report options
With this option, it ensures a single alert is provided, especially important if multiple failures can occur. Finally, a time of when this report needs to run and, in this example, the Default Schedule of 9am has been set with the option of From last time rule ran to Now and select OK to save the options.
With the report selected and options set, the final part of configuring a custom rule is to define the alert level.
Select Edit from the Alert icon. By default, the Severity of this alert is set to Critical and appropriate for failed backups and with the severity set, select OK and then Save to save the custom template.
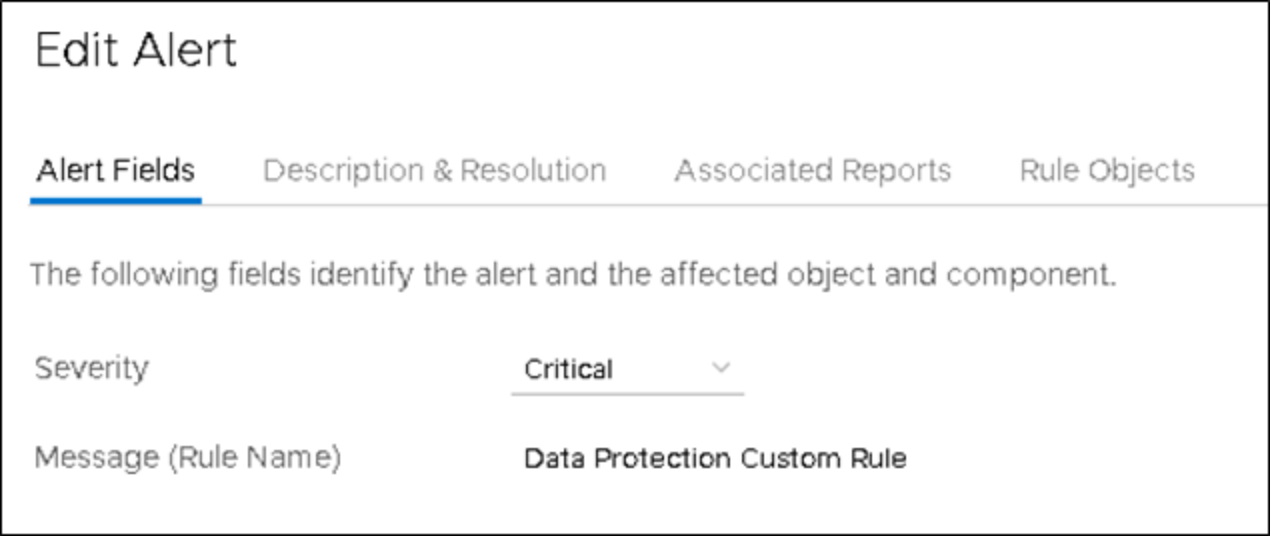
Figure 23. Setting the severity of the alert
As shown in Figure 24, the custom rule template for failed jobs based on a scheduled time is saved and ready to run.

Figure 24. Saved scheduled custom rule for failed jobs
Scheduled based reports are ideal for identifying administrative errors or where a new virtual machine is spun up for a project and not selected as part of a backup policy. In the above example, a scheduled report was used for finding failed jobs. While this can be used, there is a better way to accomplish this task - using event-based rules.
Event based rules
Rather than scheduling a pre-defined time to run a custom rule, event-based rules generate alerts based upon data collected from the Data Protection Advisor agents. When Data Protection Advisor agents send the output of their regular commands to the Data Protection Advisor application server, the information is parsed into the Data Protection Advisor database and as it streams in, is monitored for exceptions as defined by the event-based rules. If a set condition is met, an alert is immediately sent out.
Following on from the failed job scheduled example in section “Scheduled rules”, an event-based rule can be used instead and provides alerting on a much more granular level. When the job monitor request is run by a Data Protection Advisor agent the default time period is set to every 30 minutes and can be configured down to 5-minute intervals. Should a failed job occur, the event-based rule will alert based on the configured job monitor time period.
Any parameter that Data Protection Advisor collects using its agents, those available through data sources and additional fields, can form the basis of custom rules. The custom rule editor allows almost infinite flexibility for monitoring for exceptions in a heterogeneous backup environment. This feature allows administrators to build out a comprehensive set of rules that can detect abnormal changes which may point to an attack in progress.
In this section we will look at creating an event based custom rule for failed jobs. Like the scheduled based customer rule, navigate to Custom Rule Templates located under the Analysis Policies and select the desired category and select the rule type. By default, when Data Protection category is selected, the recommend rule type is event based as shown in the example in Figure 25.
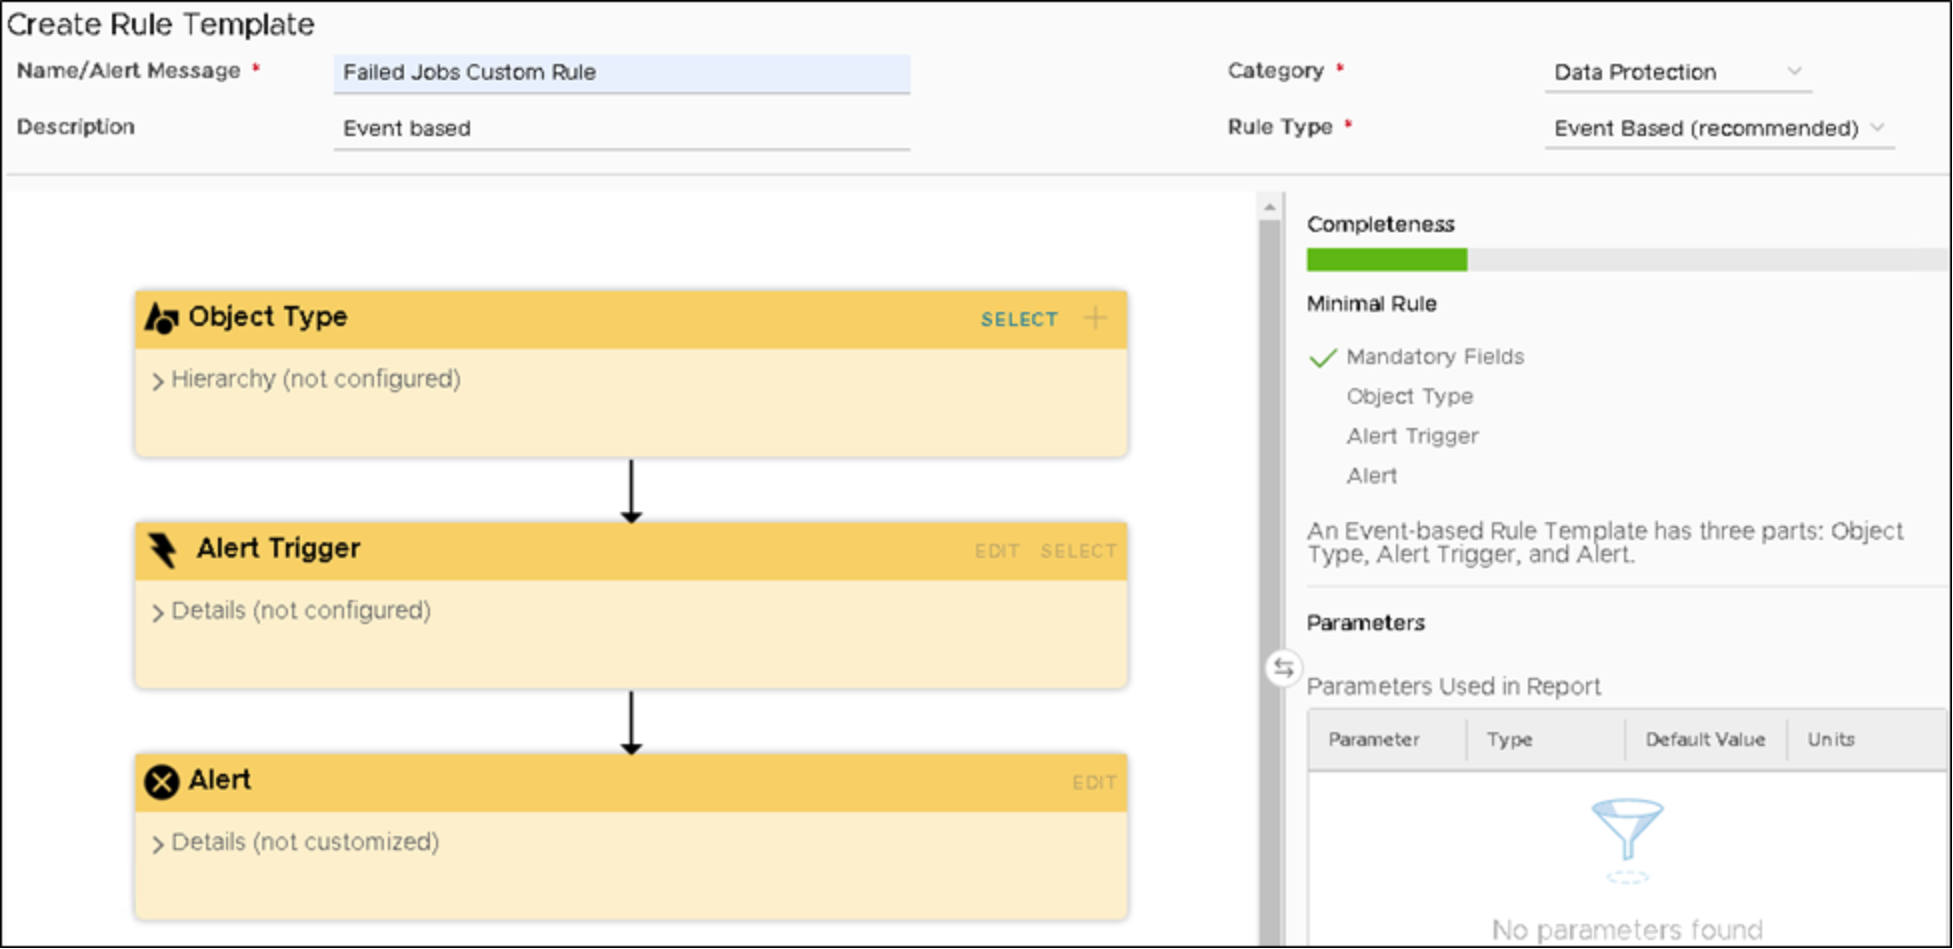
Figure 25. Customer rule with event based for data protection
Unlike scheduled rules, event-based rules have three parameters that must be set:Object Type, Alert Trigger and Alert.
Start by defining the Object Type and to complete this, click Select on the Object Type yellow colored icon where an object tree shows elements that can be monitored by Data Protection Advisor. Information about data protection jobs is in Backup Applications under BackupClient. To filter the available attributes under BackupClient, use the filter option available at the column header.
For the failed jobs example, filter the AttributeName with status and locate BackupJob as shown in Figure 26. Once located, select the attribute and click on Select Object Type.
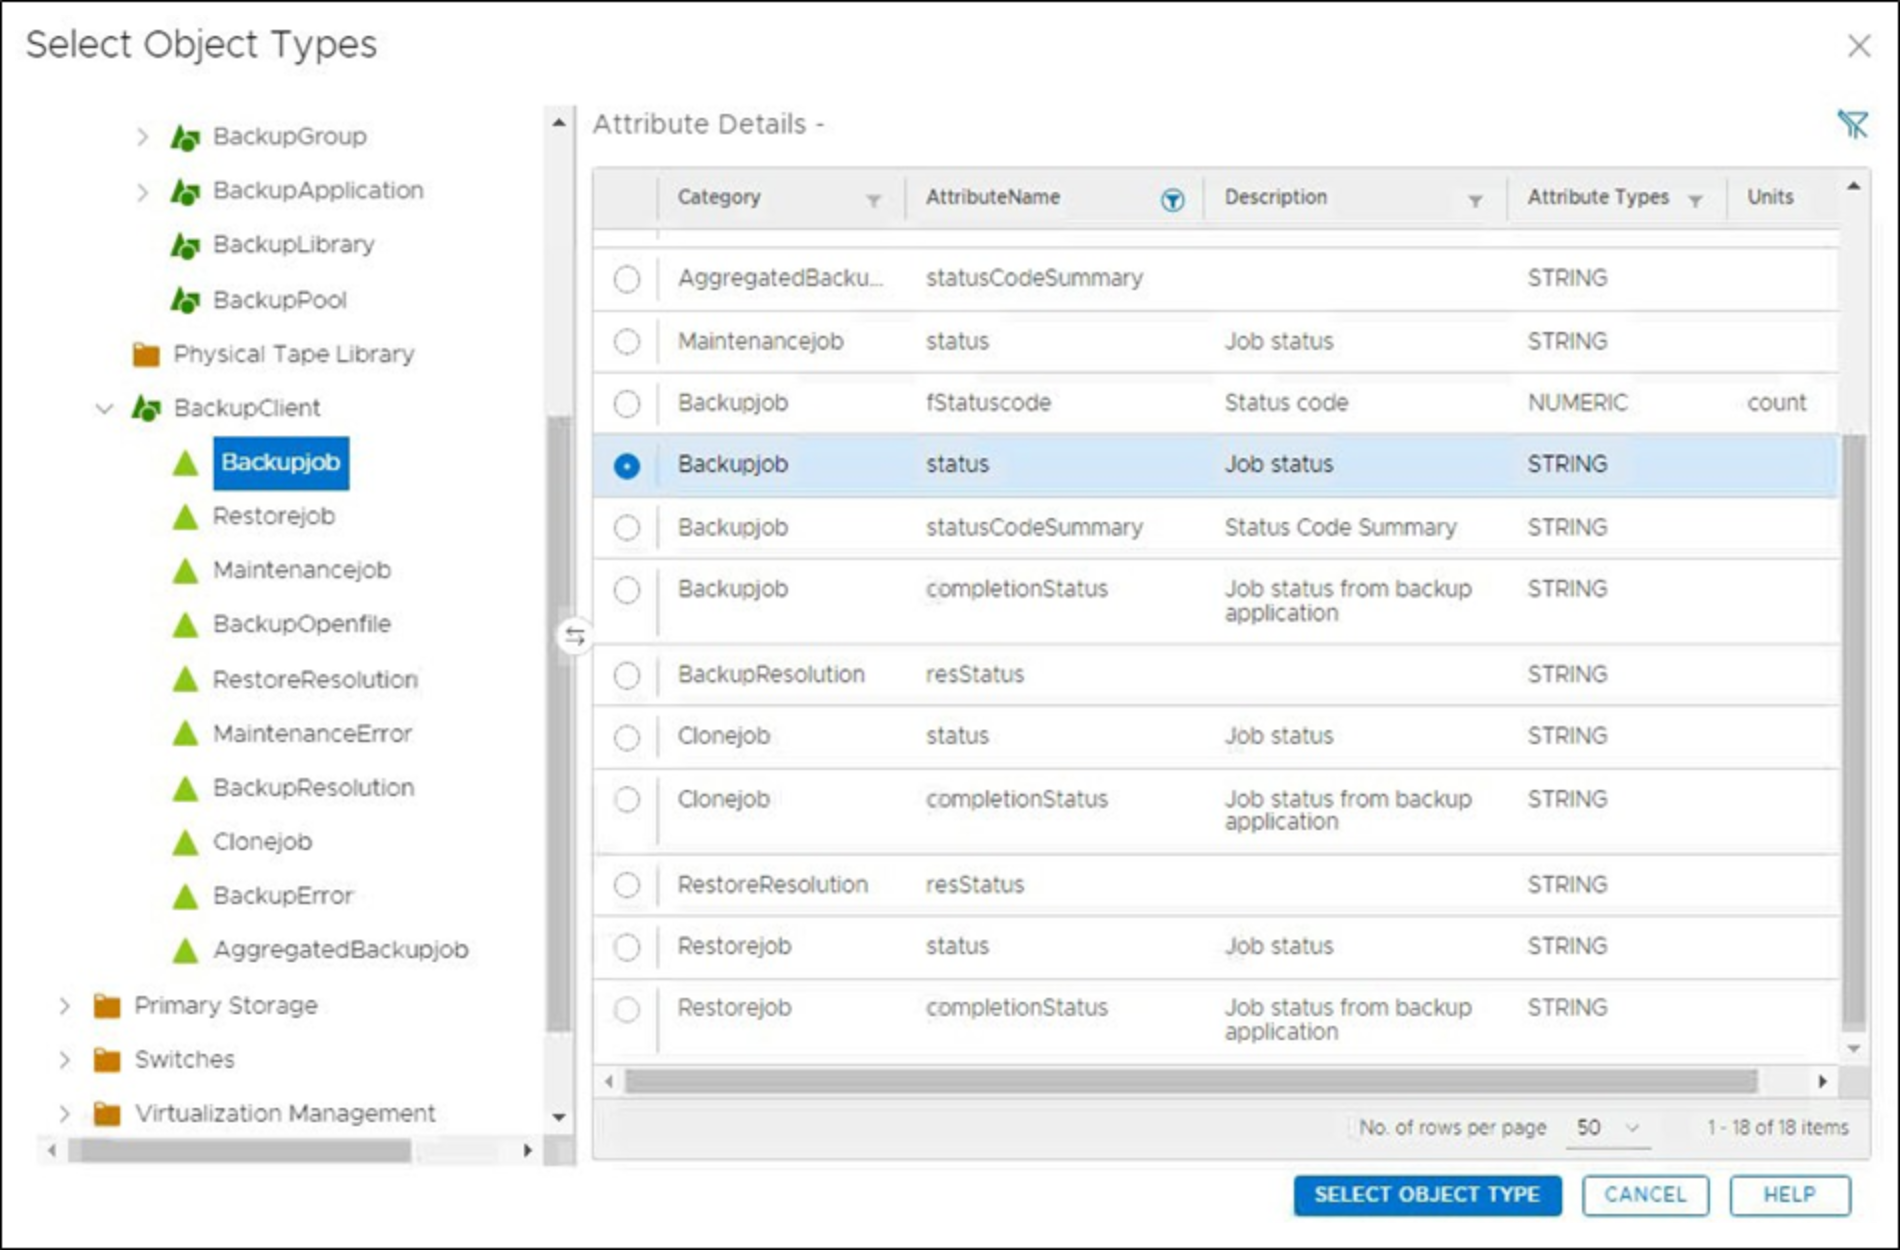
Figure 26. Object type for backup job attributes
With the object type selected, the alert trigger condition must be defined, which is accomplished by clicking Select on the Alert Trigger yellow colored icon. There are numerous triggers available and for the failed job status, the Conditions Filter option is to be selected as shown in Figure 27.
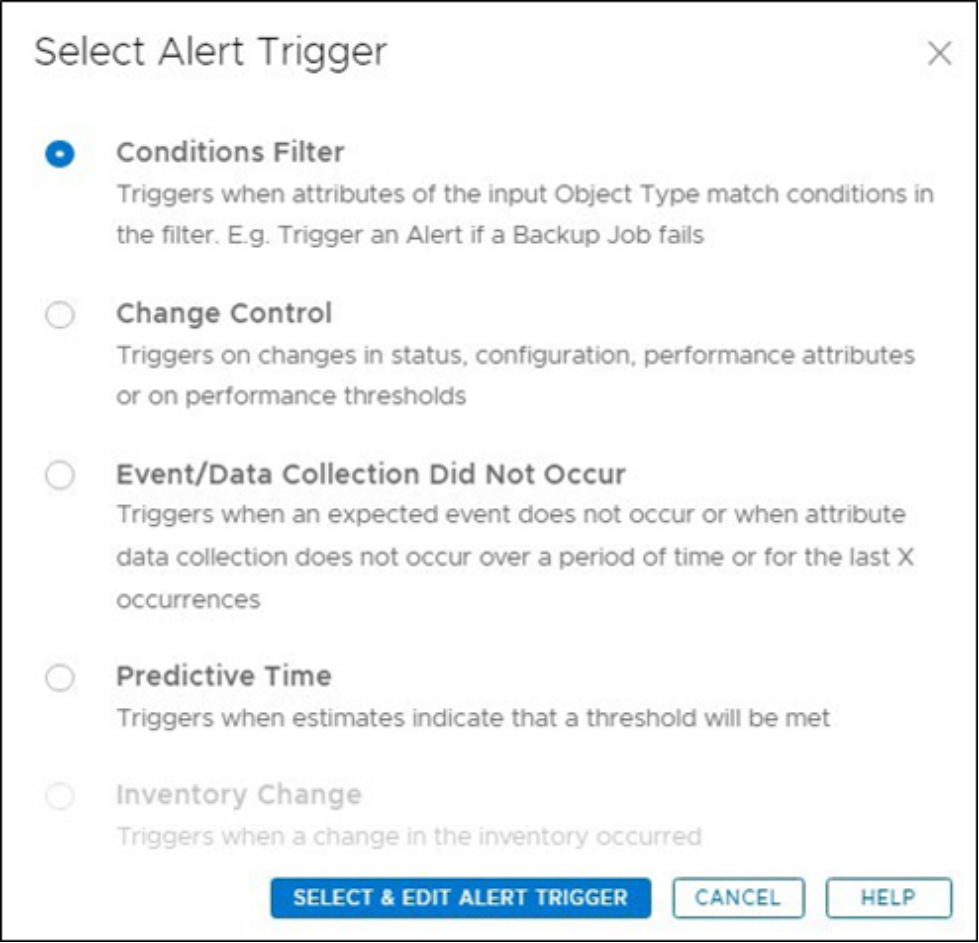
Figure 27. Select the Alert trigger
Add a condition for this filter by clicking Add Condition and browse for the attribute name of Backupjob Status. Use the filtering option on the column header to search for status to limit the available attributes. Set the operator to Is with the value of failed as shown in Figure 28.
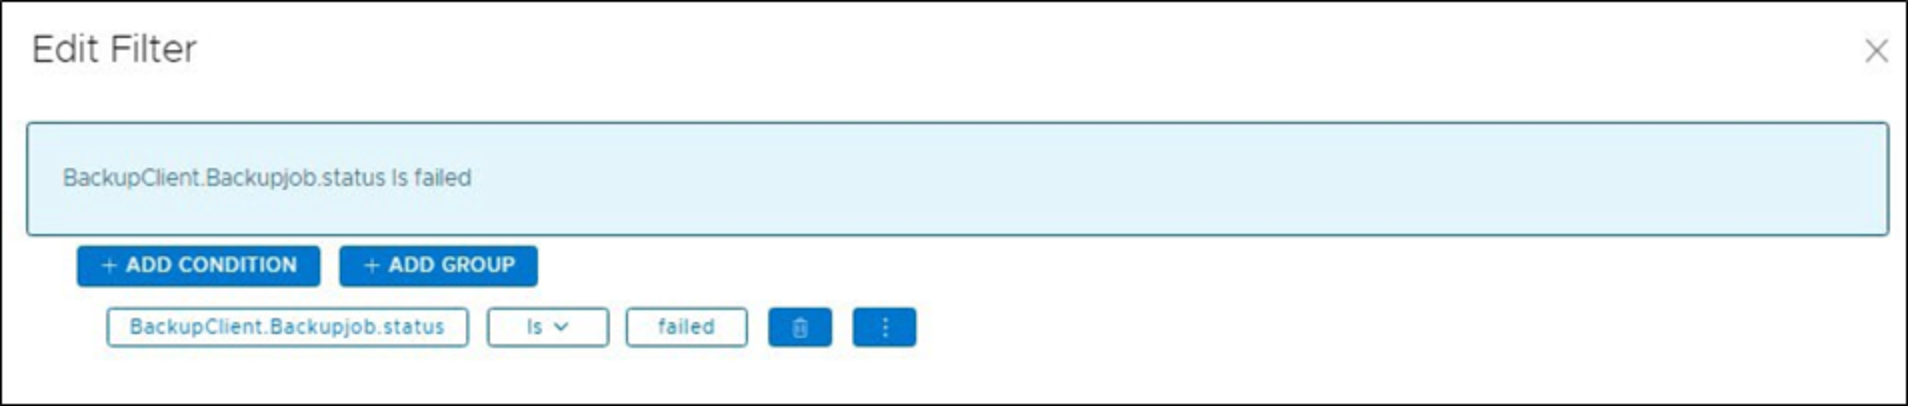
Figure 28. Defining the Alert trigger condition
And lastly, the alert section allows for customization of what is sent out using the ‘actions’ that are associated to the Analysis policy the rule. Select Edit on the Alert yellow colored icon for future customization, for example additional attributes can be added as shown in Figure 29 for enhanced details.
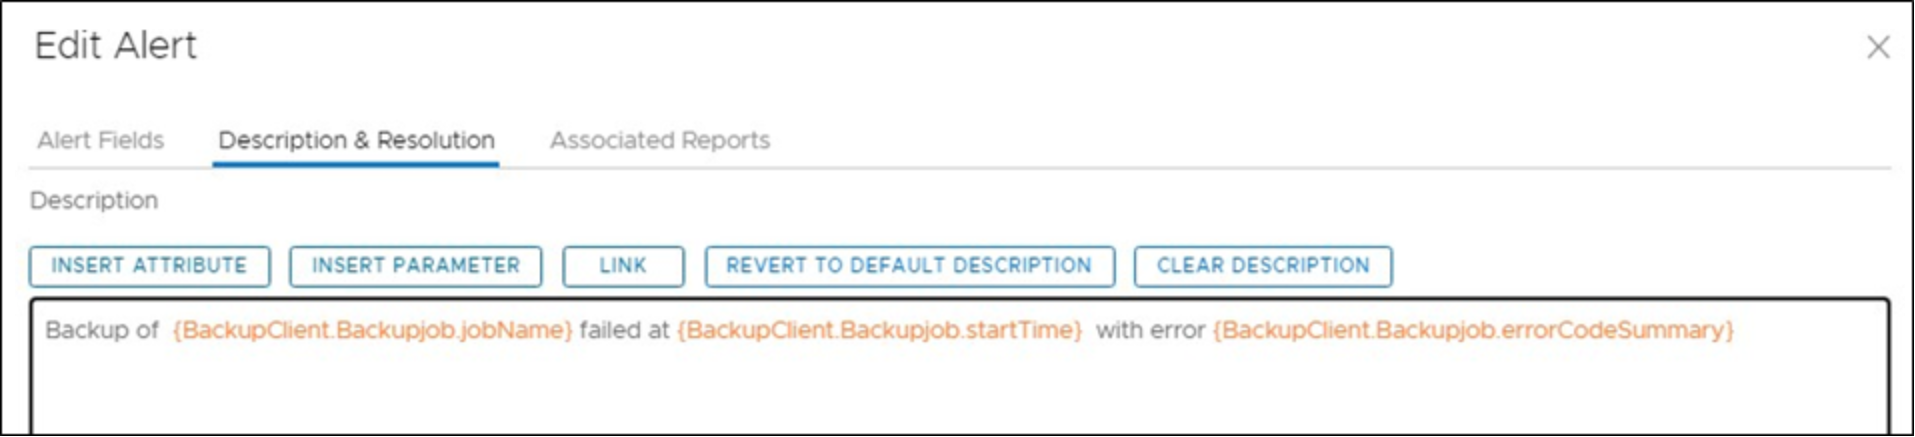
Figure 29. Additional attributes to Alerting section
With this rule built, it can be added to a policy to watch for backup failures as they occur and provide the notification response as defined in that policy.
Customization rule for configuration changes
Attackers are becoming more advanced in their methodologies and once inside a network may change configuration settings to data protection environment leading up to a full-scale attack. For example, an attacker would target the protection storage and many organizations use PowerProtect DD appliances. If a backup administrator has not leverage PowerProtect DD Retention Lock, an attacker could try to remove MTrees (directories storage backup data) from a PowerProtect DD. Or, they could incrementally reduce the maximum retention period of a Governance mode retention lock policy on a given MTree. These may not be noticed in the day-to-day operations of a large environment but can be identified by a custom rule looking for such exceptions.
Let us look at a maximum retention period (maxPeriod) attribute applied by Retention Lock to a MTree. When creating a custom rule looking for changes to the PowerProtect DD, the object related to the maximum retention period needs to be selected and is located under Protection Storage | Data Domain | DataDomainMtree and called maxPeriod in the Attribute column as shown in Figure 30.
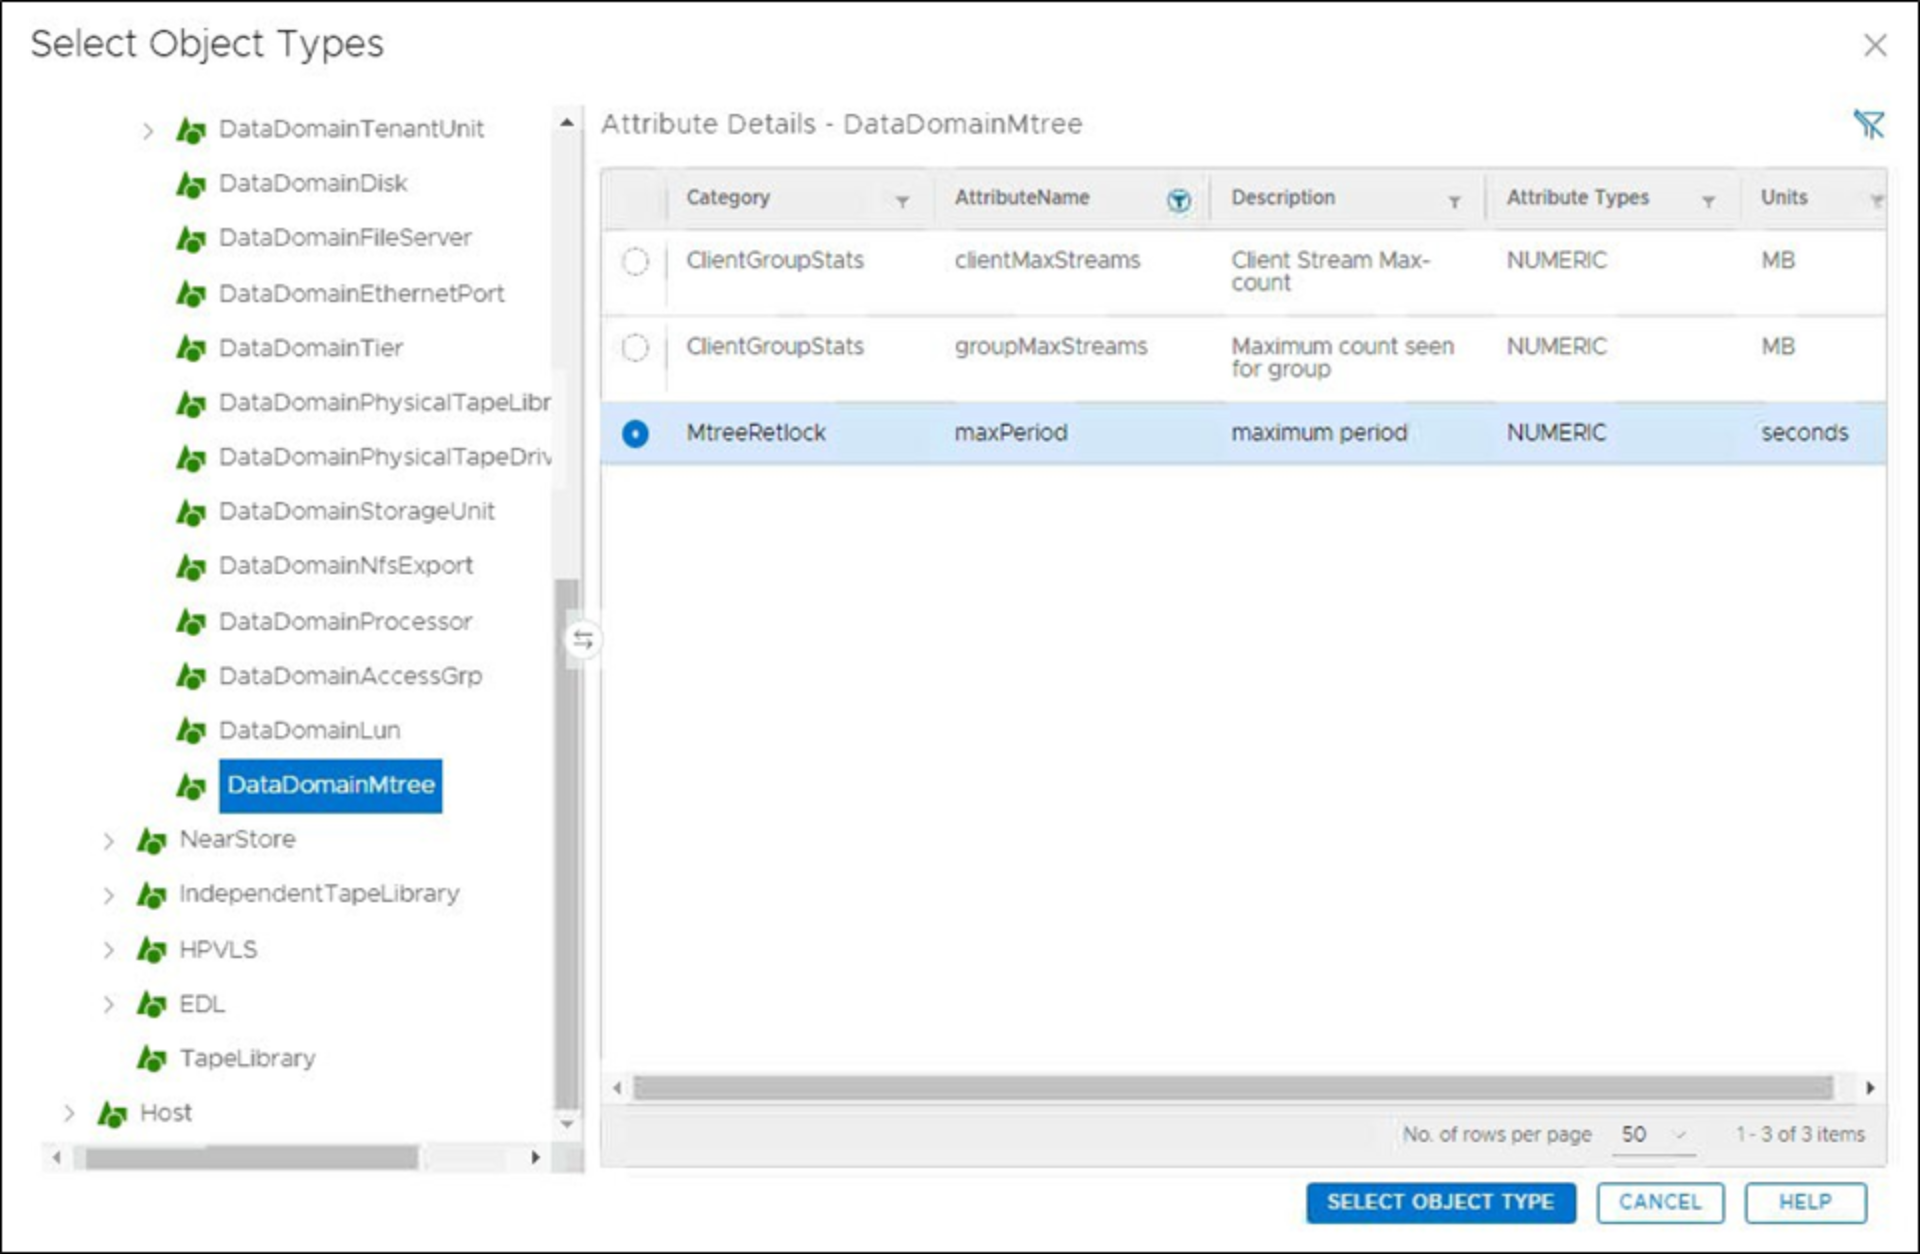
Figure 30. Selecting the maximum retention period for a PowerProtect DD MTree
With the maxPeriod attribute selected, the top and child level hierarchy will be shown as per Figure 31, leaving just the requirement to define the trigger.
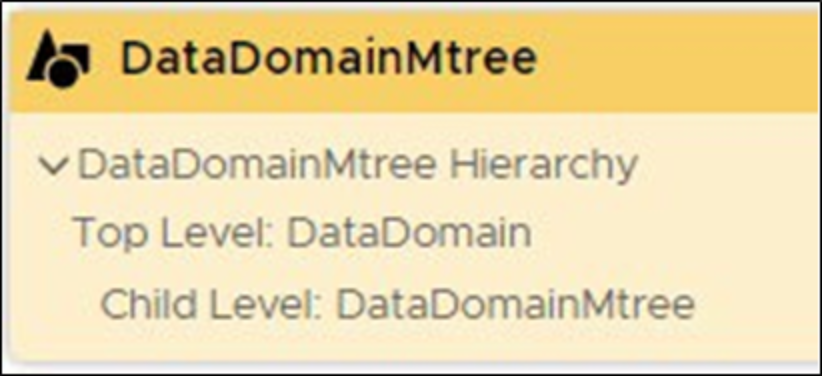
Figure 31. Object Type defined
For example, a MTree with Governance Mode Retention Lock enabled has the maximum retention period (MAX AGE) set to 30 days. Should an attacker slowly reduce this retention setting over a period, it could result in backups not being stored in an immutable manner.
Edit the Alert Trigger by clicking Select and unlike the failed jobs example, a change control trigger must be selected as shown in Figure 32.
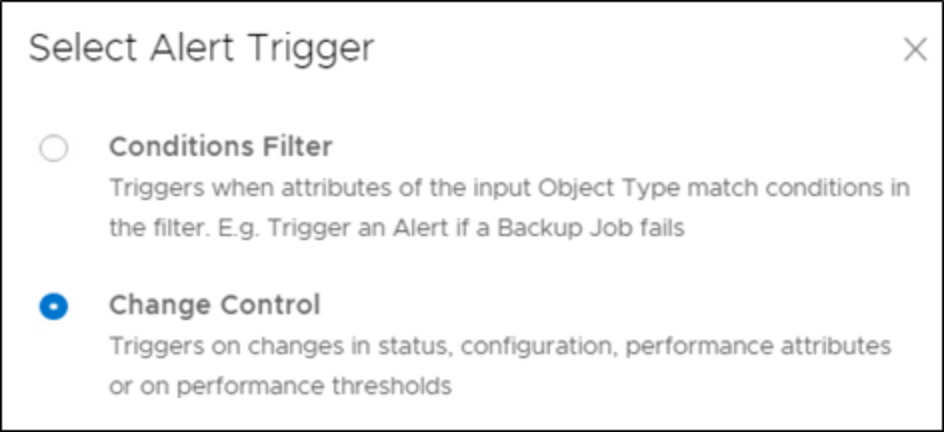
Figure 32. Selecting the Change Control trigger
With the change control trigger set, the attribute that is to be monitored (maxPeriod) must be defined. As shown in Figure 33, select the Category of MtreeRetlock, locate and select maxPeriod from the attribute list, and set the Decrease By to 10%.

Figure 33. Defining the attribute for the Change Control trigger
The third element of the custom rule is to define the alert and in Figure 34, additional attributes like the PowerProtect DD system and MTree names have been inserted into the Description & Resolution tab of the Alert.
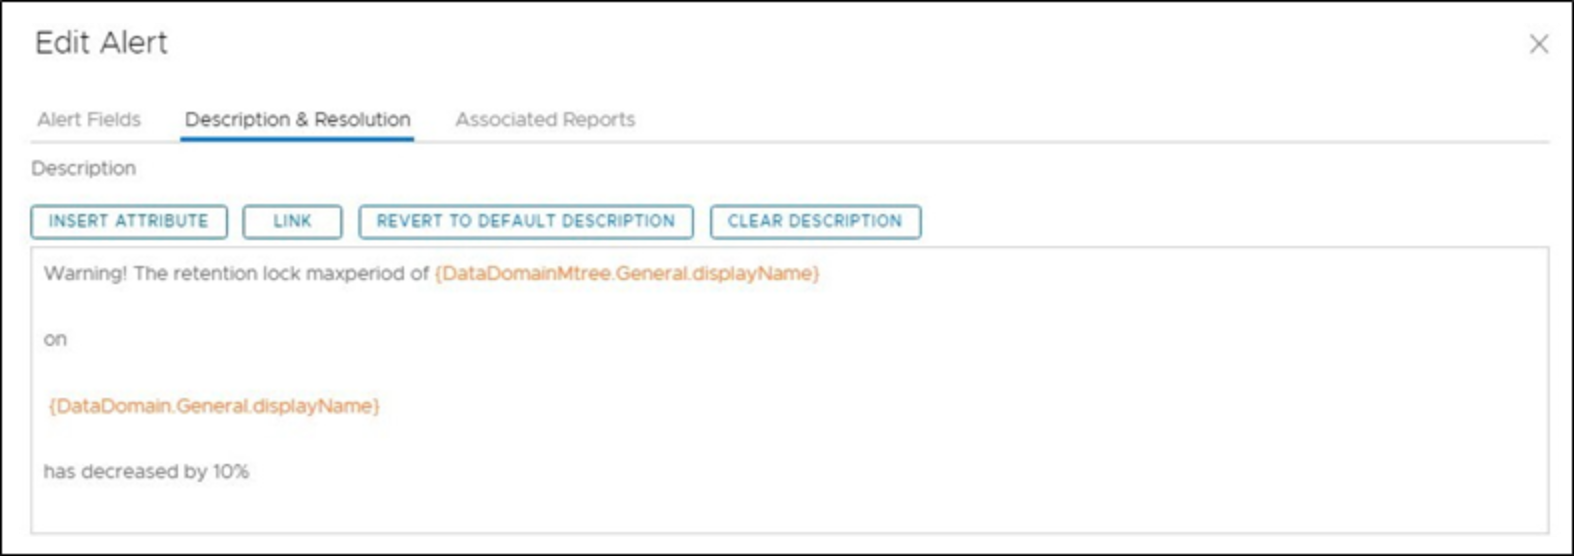
Figure 34. Editing the Alert information for the Custom Rule
With all three elements of the custom rule defined, it can be saved as shown in Figure 35 and applied to an analysis policy where alerts will be issued if this rule is triggered.
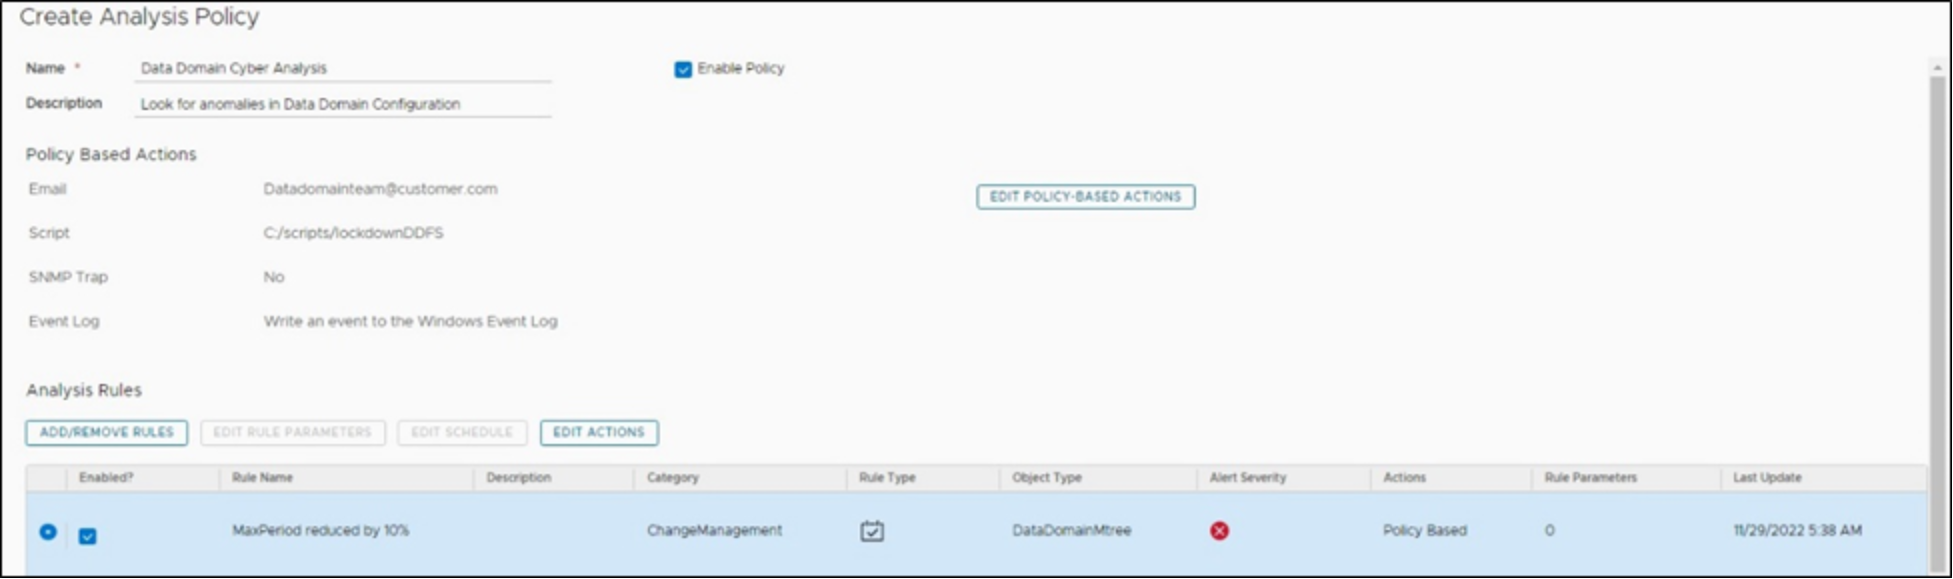
Figure 35. Saved Custom Rule for PowerProtect DD MTree Max retention period reduction by 10%
The flexibility of Data Protection Advisor allows for very particular and detailed rules to be configured to provide alerting on that aligns with the organizations risk that they wish to mitigate.