


OneFS WebUI Single Sign-on Configuration and Deployment

In the first article in this series, we took a look at the architecture of the new OneFS WebUI SSO functionality. Now, we move on to its provisioning and setup.
SSO on PowerScale can be configured through either the OneFS WebUI or CLI. OneFS 9.5 debuts a new dedicated WebUI SSO configuration page under Access > Authentication Providers > SSO. Alternatively, for command line afficionados, the CLI now includes a new isi auth sso command set.
Here is the overall configuration flow:

1. Upgrade to OneFS 9.5

First, ensure the cluster is running OneFS 9.5 or a later release. If upgrading from an earlier OneFS version, note that the SSO service requires this upgrade to be committed prior to configuration and use.
Next, configure an SSO administrator. In OneFS, this account requires at least one of the following privileges:
| Privilege | Description |
|---|---|
ISI_PRIV_LOGIN_PAPI | Required for the admin to use the OneFS WebUI to administer SSO |
ISI_PRIV_LOGIN_SSH | Required for the admin to use the OneFS CLI through SSH to administer SSO |
ISI_PRIV_LOGIN_CONSOLE | Required for the admin to use the OneFS CLI on the serial console to administer SSO |
The user account used for identity provider management should have an associated email address configured.
2. Setup Identity Provider

OneFS SSO activation also requires having a suitable identity provider (IdP), such as ADFS, provisioned and available before setting up OneFS SSO.
ADFS can be configured through either the Windows GUI or command shell, and detailed information on the deployment and configuration of ADFS can be found in the Microsoft Windows Server documentation.
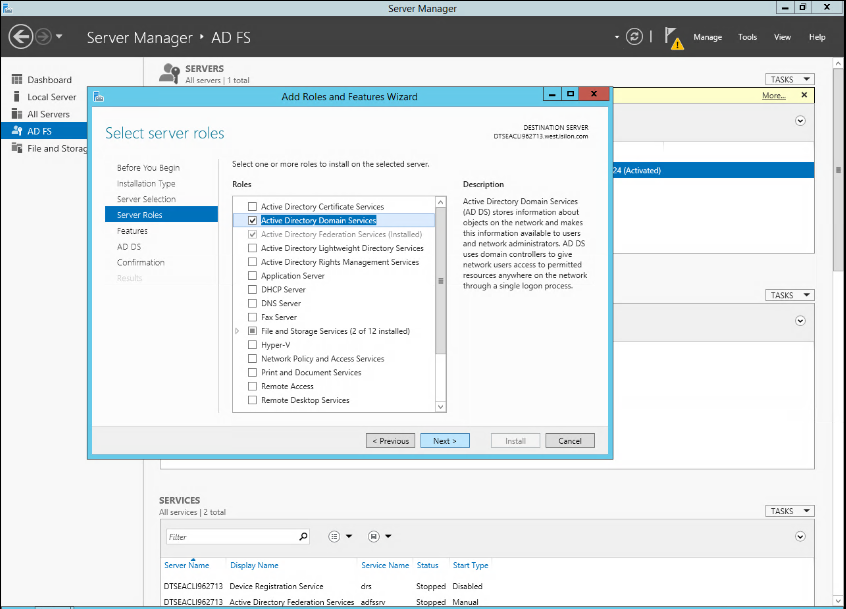
The Windows remote desktop utility (RDP) can be used to provision, connect to, and configure an ADFS server.
- When connected to ADFS, configure a rule defining access. For example, the following command line syntax can be used to create a simple rule that permits all users to log in:
$AuthRules = @"
@RuleTemplate="AllowAllAuthzRule" => issue(Type = "http://schemas.microsoft.com/
authorization/claims/permit", Value="true");
"@
or from the ADFS UI:
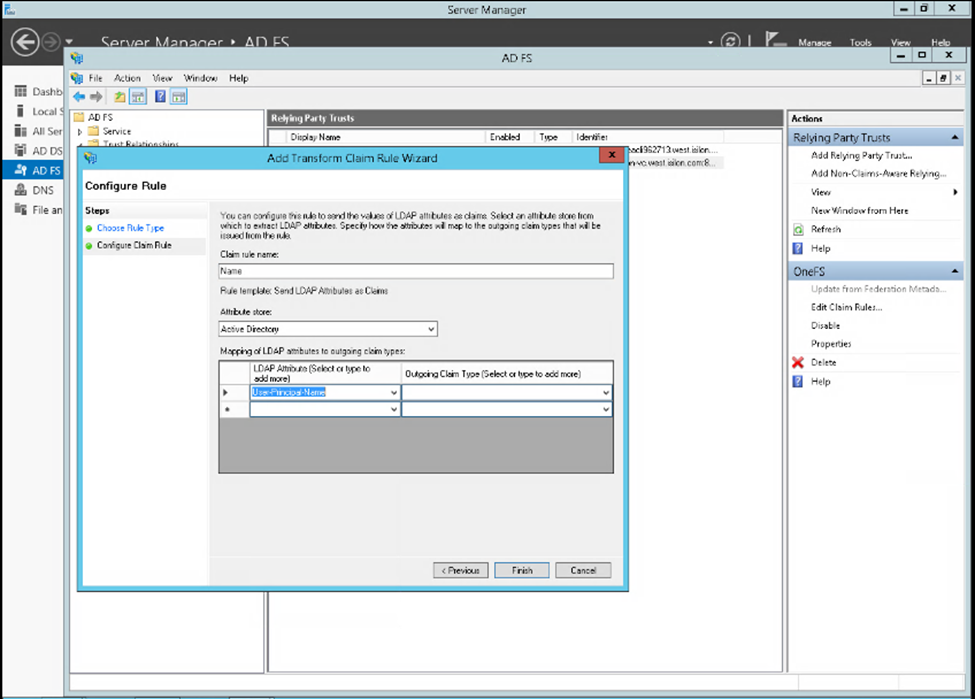
Note that more complex rules can be crafted to meet the particular requirements of an organization. - Create a rule parameter to map the Active Directory user email address to the SAML NameID.
$TransformRules = @" @RuleTemplate = "LdapClaims" @RuleName = "LDAP mail" c:[Type == "http://schemas.microsoft.com/ws/2008/06/identity/claims/ windowsaccountname", Issuer == "AD AUTHORITY"] => issue(store = "Active Directory", types = ("http://schemas.xmlsoap.org/ws/2005/05/identity/claims/ emailaddress"), query = ";mail;{0}", param = c.Value); @RuleTemplate = "MapClaims" @RuleName = "NameID" c:[Type == "http://schemas.xmlsoap.org/ws/2005/05/identity/claims/emailaddress"] => issue(Type = "http://schemas.xmlsoap.org/ws/2005/05/identity/claims/ nameidentifier", Issuer = c. Issuer, OriginalIssuer = c.OriginalIssuer, Value = c.Value, ValueType = c.ValueType, Properties["http://schemas.xmlsoap.org/ws/2005/05/identity / claimproperties/format"] = "urn:oasis:names:tc:SAML:1.1:nameid-format:emailAddress"); "@ - Configure AD to trust the OneFS WebUI certificate.
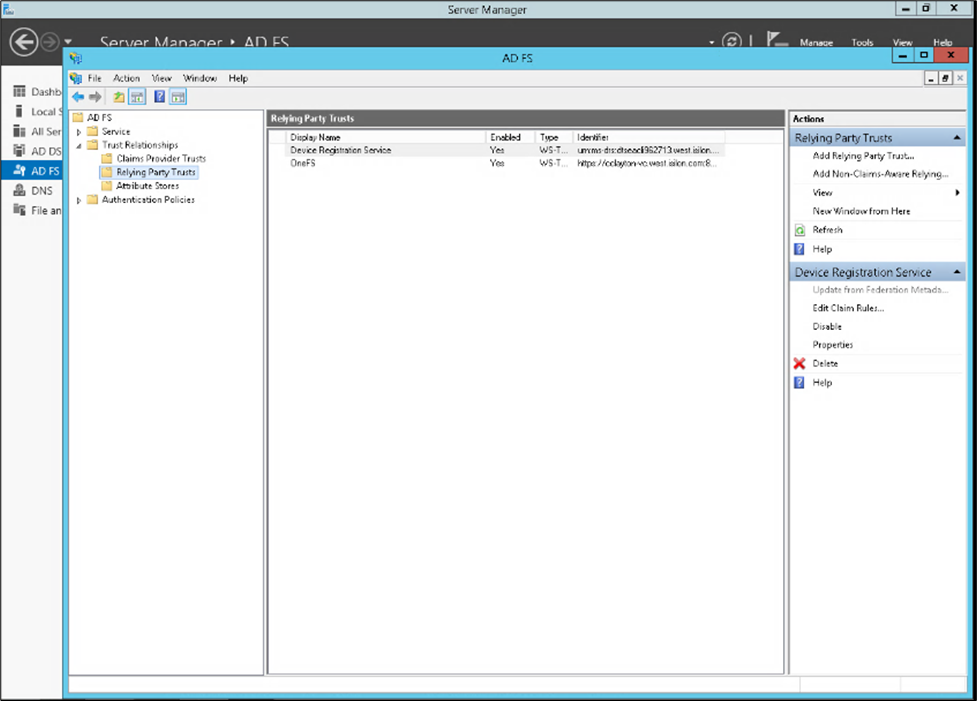
- Create the relying party trust.
Add-AdfsRelyingPartyTrust -Name <cluster-name>\
     -MetadataUrl "https://<cluster-node-
ip>:8080/session/1/saml/metadata" \
     -IssuanceAuthorizationRules $AuthRules -IssuanceTransformRules
$TransformRules
or from Windows Server Manager:
3. Select Access Zone

Because OneFS SSO is zone-aware, the next step involves choosing the access zone to configure. Go to Access > Authentication providers > SSO, select an access zone (that is, the system zone), and click Add IdP.
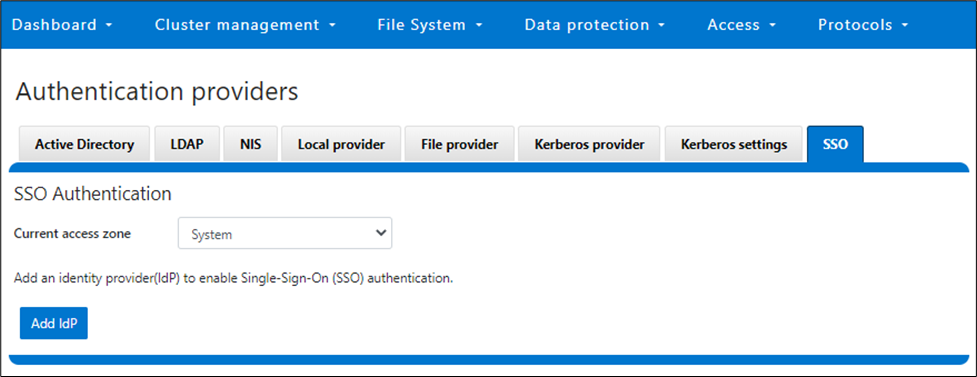
Note that each of a cluster’s access zone or zones must have an IdP configured for it. The same IdP can be used for all the zones, but each access zone must be configured separately.
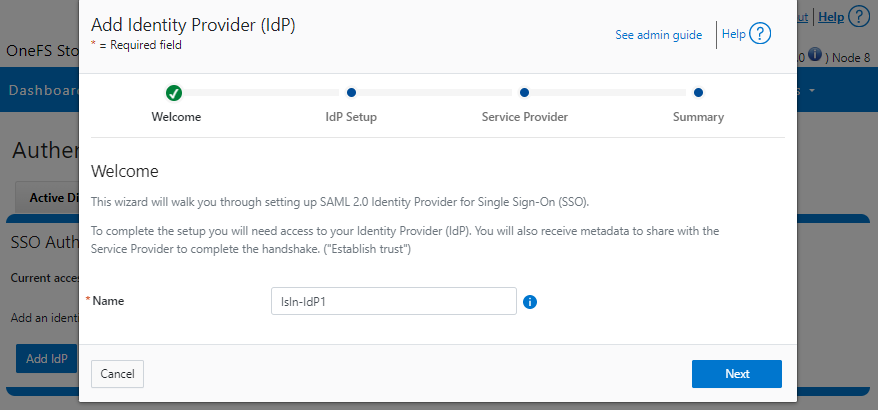
4. Add IdP Configuration

In OneFS 9.5 and later, the WebUI SSO configuration is a wizard-driven, “guided workflow” process involving the following steps:

First, go to Access > Authentication providers > SSO, select an access zone (that is, the system zone), and then click Add IdP.

On the Add Identity Provider page, enter a unique name for the IdP. For example, Isln-IdP1 in this case:
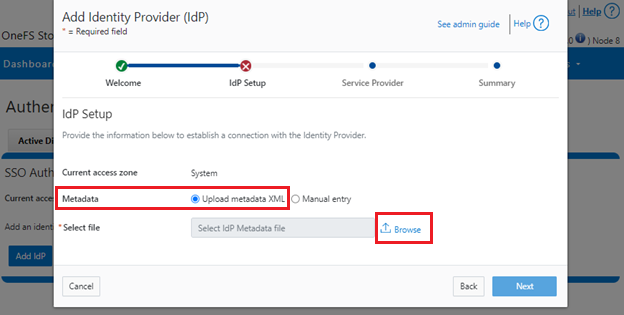
When done, click Next, select the default Upload metadata XML option, and browse to the XML file downloaded from the ADFS system:
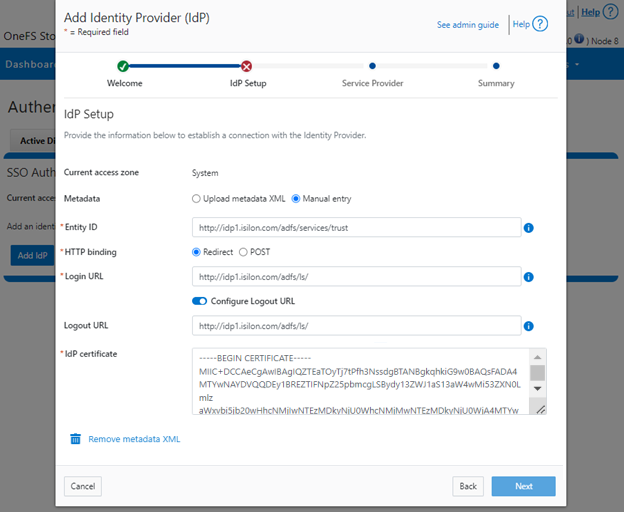
Alternatively, if the preference is to enter the information by hand, select Manual entry and complete the configuration form fields:
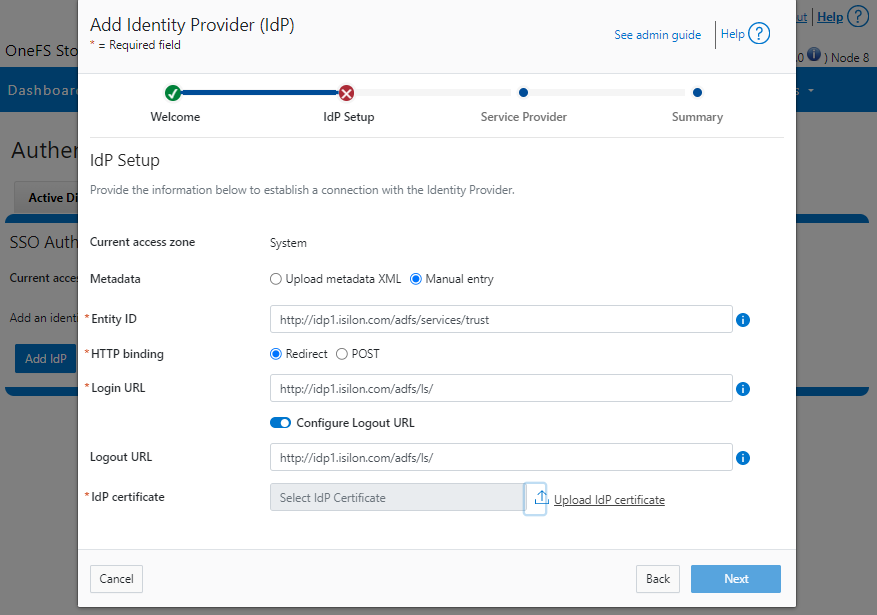
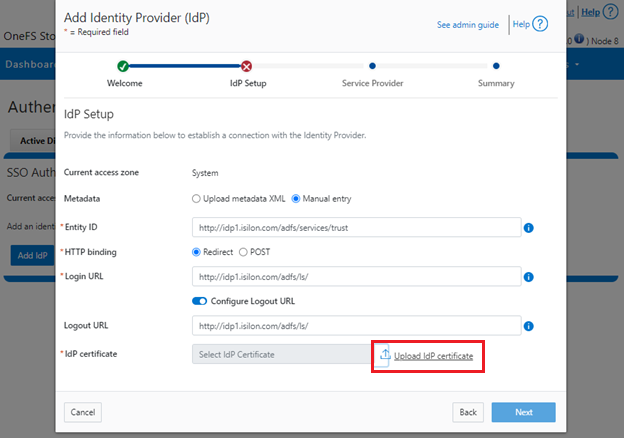
If the manual entry method is selected, you must have the IdP certificate ready to upload. With the manual entry option, the following information is required:
| Field | Description |
|---|---|
Binding | Select POST or Redirect binding. |
Entity ID | Unique identifier of the IdP as configured on the IdP. For example: http://idp1.isilon.com/adfs/services/trust |
Login URL | Log in endpoint for the IdP. For example: http://idp1.isilon.com/adfs/ls/ |
Logout URL | Log out endpoint for the IdP. For example: http://idp1.example.com/adfs/ls/ |
Signing Certificate | Provide the PEM encoded certificate obtained from the IdP. This certificate is required to verify messages from the IdP. |
Upload the IdP certificate:
For example:
Repeat this step for each access zone in which SSO is to be configured.
When complete, click Next to move on to the service provider configuration step.
5. Configure Service Provider

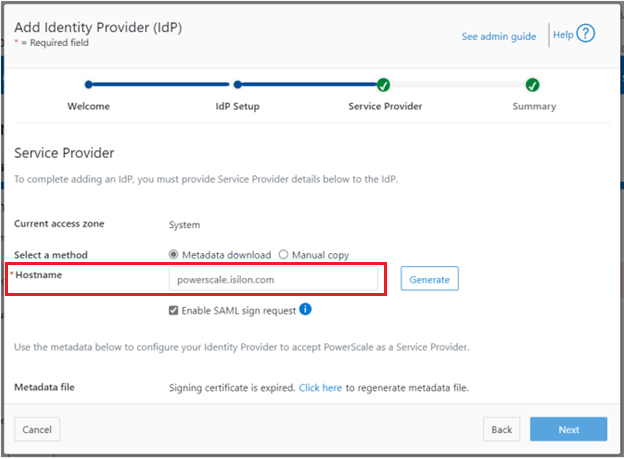
On the Service Provider page, confirm that the current access zone is carried over from the previous page.

Select Metadata download or Manual copy, depending on the chosen method of entering OneFS details about this service provider (SP) to the IdP.
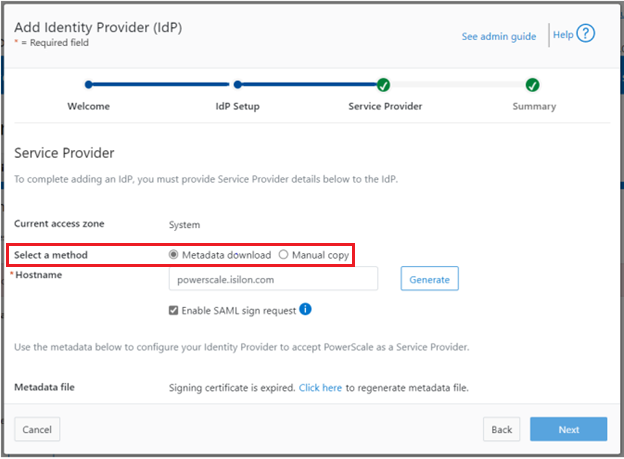
Provide the hostname or IP address for the SP for the current access zone.
Click Generate to create the information (metadata) about OneFS and this access zone for use in configuring the IdP.
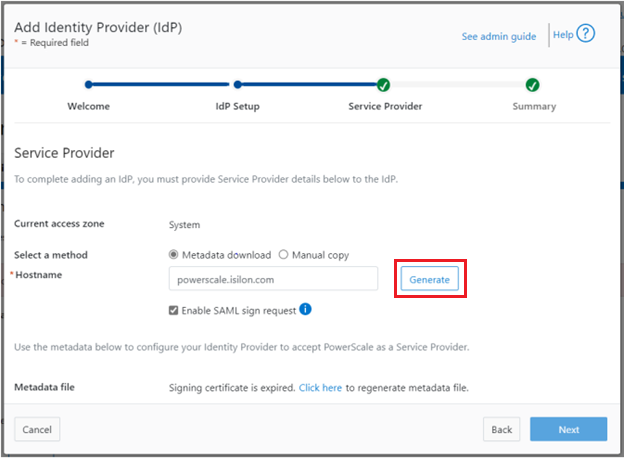
This generated information can now be used to configure the IdP (in this case, Windows ADFS) to accept requests from PowerScale as the SP and its configured access zone.
As shown, the WebUI page provides two methods for obtaining the information:
| Method | Action |
|---|---|
Metadata download | Download the XML file that contains the signing certificate, etc. |
Manual copy | Select Copy Link in the lower half of the form to copy the information to the IdP. |

Next, download the Signing Certificate.
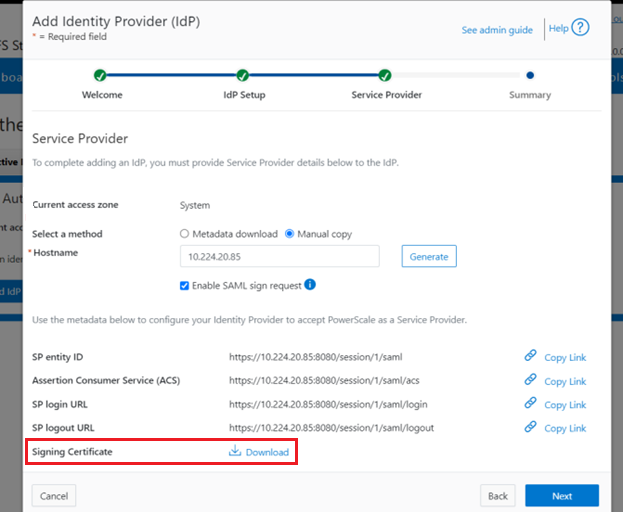
When completed, click Next to finish the configuration.
6. Enable SSO and Verify Operation

Once the IdP and SP are configured, a cluster admin can enable SSO per access zone through the OneFS WebUI by going to Access > Authentication providers > SSO. From here, select the access zone and select the toggle to enable SSO:
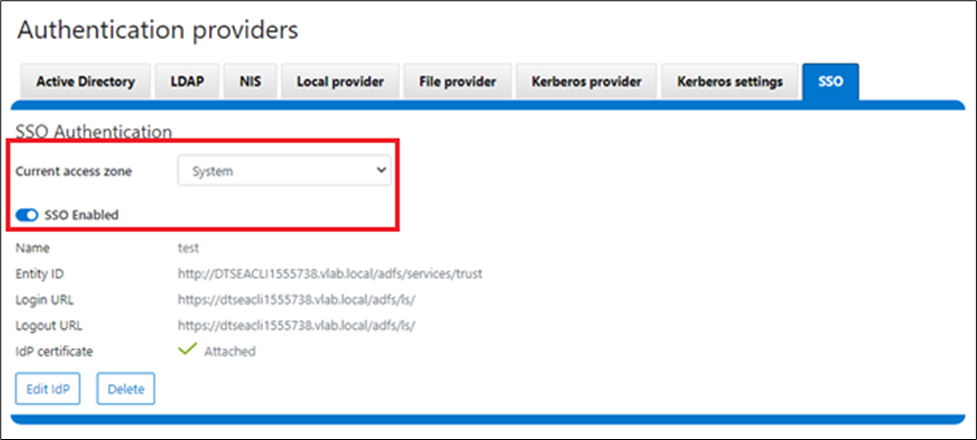
Or from the OneFS CLI, use the following syntax:
# isi auth sso settings modify --sso-enabled 1
Author: Nick Trimbee