


Let’s Talk File (#5) – NFS Protocol Overview

Introduction
A file access protocol enables clients and storage systems to transmit data using a common syntax and defined rules. PowerStore file supports a wide range of protocols including SMB, NFS, FTP, and SFTP.
In our last blog, we discussed a commonly used protocol for file sharing called Server Message Block (SMB). In this blog, we’ll review another commonly used protocol for file sharing called Network File System (NFS). NFS is commonly used for use cases such as departmental shares, databases, VMware NFS datastores, and more.
NFS versions
PowerStore supports NFSv3 through NFSv4.1. NFSv3 is a stateless protocol that includes basic security, requires external locking mechanisms, and UNIX-based mode bits for permissions. NFSv4 is a stateful protocol that enables enhanced security, integrated locking, ACLs for permissions, and adds other enhancements.
In addition, Secure NFS is also supported. Traditionally, NFS is not the most secure protocol, because it trusts the client to authenticate users and build user credentials and send these in clear text over the network. With the introduction of Secure NFS, Kerberos can be used to secure data transmissions through user authentication and data signing through encryption. Kerberos is a well-known strong authentication protocol where a single key distribution center, or KDC, is trusted rather than each individual client. There are three different Secure NFS modes available on PowerStore:
- Kerberos: Use Kerberos for authentication only
- Kerberos With Integrity: Use Kerberos for authentication and include a hash to ensure data integrity
- Kerberos With Encryption: Use Kerberos for authentication, include a hash, and encrypt the data in-flight
NFS configuration
To configure NFS, you must first enable NFS on the NAS server, create a file system, and an NFS export.
The first step to configure an NFS environment is to provision a NAS server. Each NAS server has options to enable NFSv3 and NFSv4 independently. The following figure shows the NFS protocol options in the NAS server provisioning wizard. 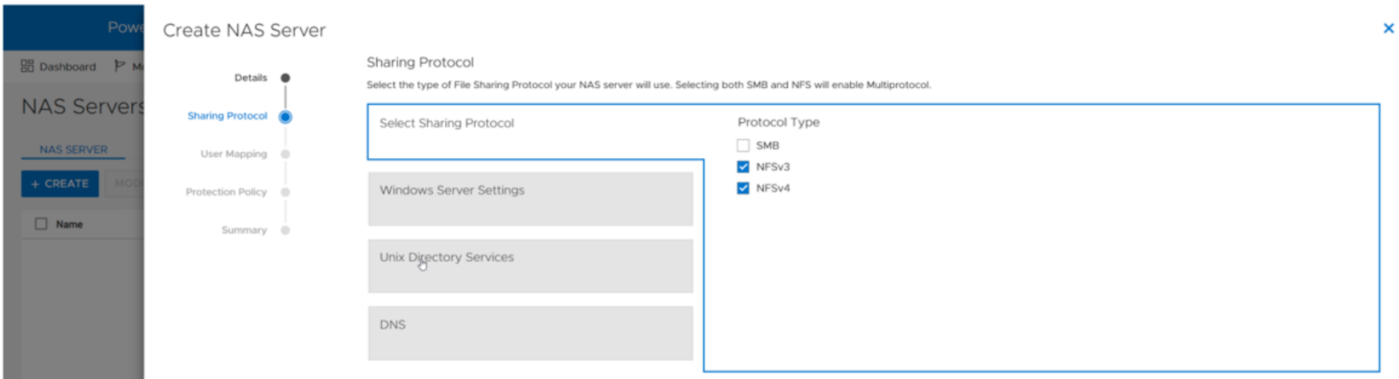
If at least one NFS protocol is enabled, you are then presented with the option to enable a UNIX Directory Service (UDS). The purpose of the UDS is to provide a mechanism to resolve names to IDs and vice versa. This is necessary because the file system tracks users and files using user IDs and group IDs (UIDs and GIDs). These IDs can be resolved to usernames and group names, and these names are displayed to improve usability for humans. The available options for the UDS are:
- Local Files - Individual files that are uploaded to the NAS server to provide name and ID resolution
- Ideal for small or isolated environments
- Quick and easy to configure
- Do not scale well because files need to be uploaded to each NAS server if anything changes
- These share the same syntax as the configuration files that are found in the /etc/ directory on a UNIX host
- A copy of a local file from a host can be re-purposed for the NAS server
- PowerStore also provides a template with the syntax and descriptions
- NIS/LDAP - Services that provide a centralized user directory for name and ID resolution
- Ideal for large environments that require consistent UID/GID mappings across multiple NAS servers
- Requires upfront work for initial deployment
- Scales well and updates can be easily propagated
In addition to the UDS, Secure NFS can also be enabled at this step. All options in this step are optional and can be skipped if they are not required in your environment. The following figure shows the UNIX Directory Services step of the NAS server provisioning wizard.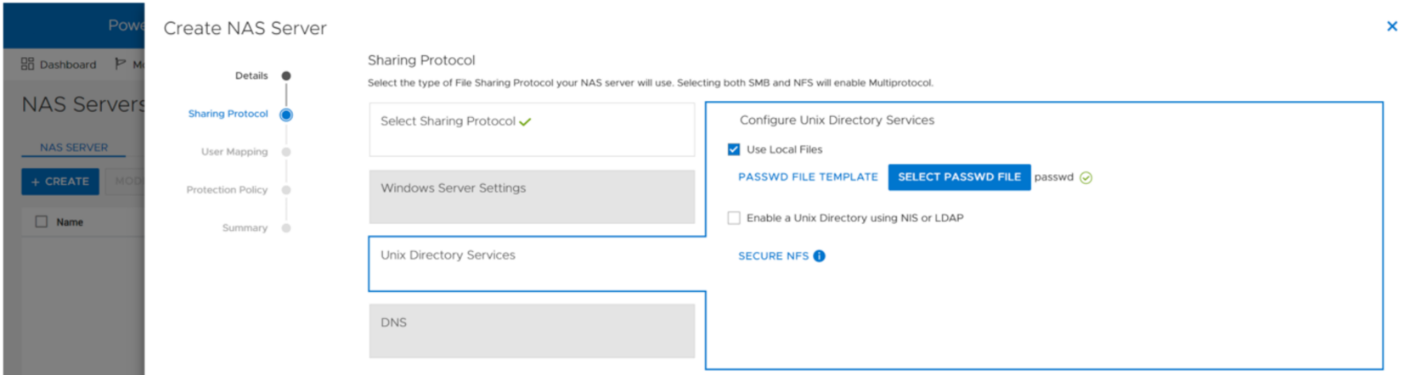
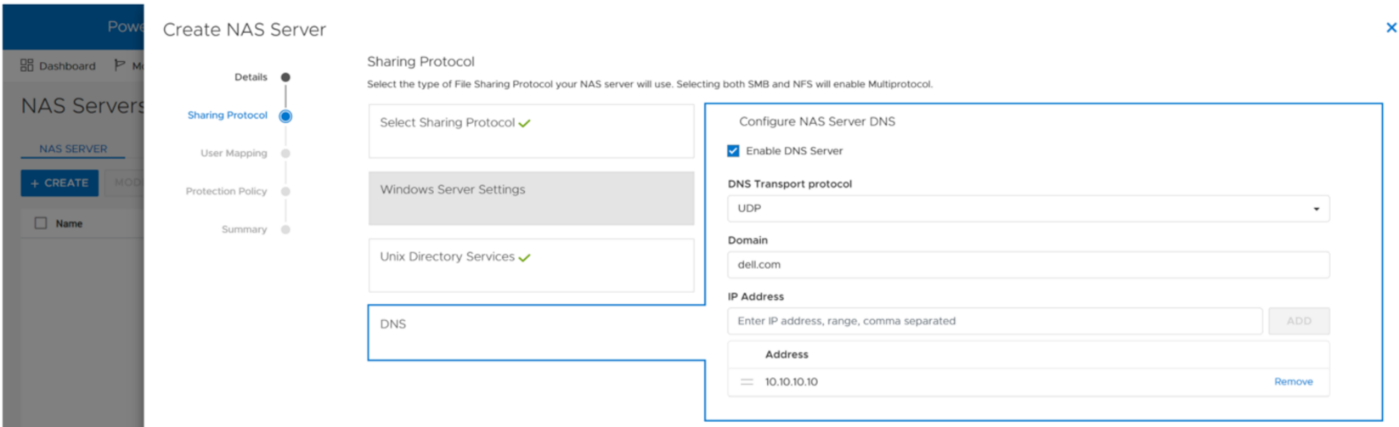
When the UDS is configured, the final step in the wizard prompts you to enable DNS for IP address and name resolution. This step is also optional and can be skipped if DNS is not required in your environment.
Any of the settings that are set during the initial provisioning of the NAS server can also be changed afterwards.
NFS exports
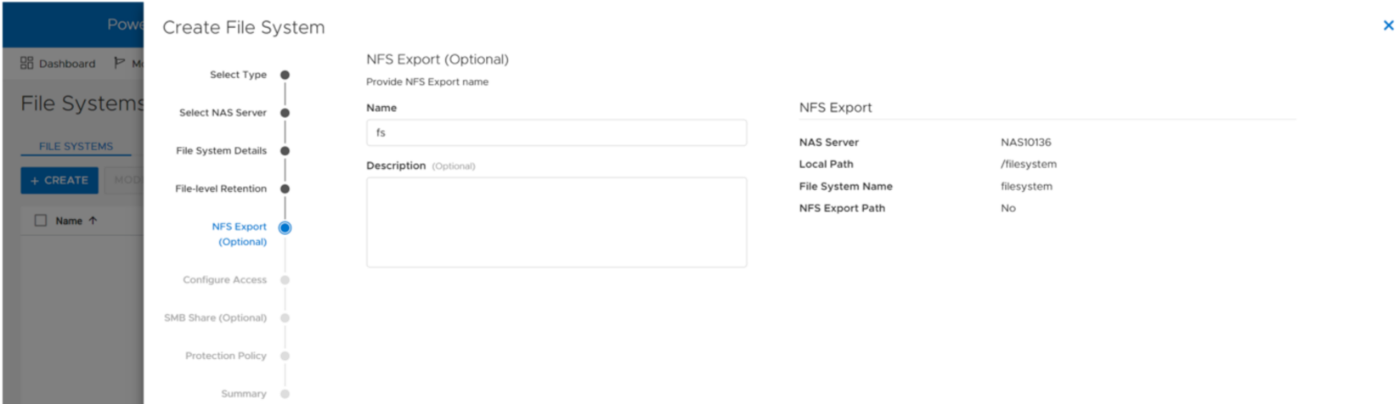
When the NFS-enabled NAS server is configured, you can provision a file system along with a NFS export. The NFS export provides a path that clients can use to mount the file system. The initial NFS export can optionally be created as part of the file system provisioning wizard. Additional NFS exports can also be created on existing file systems, if the path exists.
In the NFS export step of the file system provisioning wizard, the only required field is the name for the export. You can also see the name of the NAS Server, local path, file system name, and NFS export path on the right, as shown in the following figure.
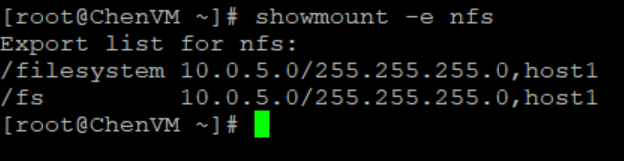
You can re-use the local path as the name of the export or provide a different name. If the provided name is different from the local path, then the name is used to create an NFS alias. An NFS alias is another path that can be used to mount the export that is different from the actual path to the share. For example, if the name is fs and the local path is /filesystem, both can be used to mount the export even though the actual path to the export is /filesystem. After the export is created, you can also see that both paths are valid when running the showmount command to the NAS server interface, as shown in the following figure.
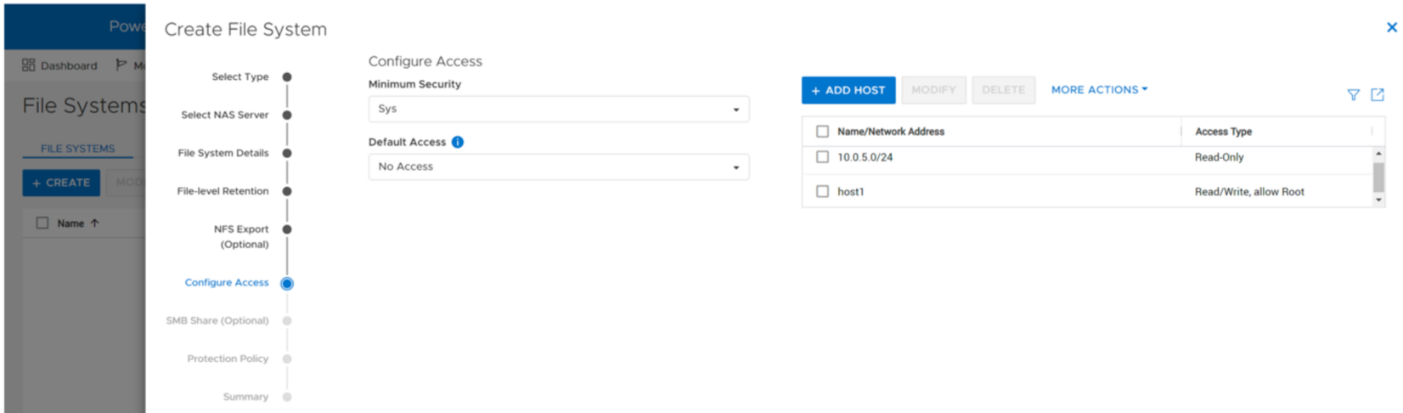
The next step in the wizard allows you to configure the access permissions to the NFS export. The following options are available:
- Minimum Security – The minimum authentication method allowed to access the NFS export. The Kerberos options are only available if Secure NFS is enabled.
- Sys (Default) – User authenticates when logging on to the client, so the client passes the user’s IDs to the NFS server without needing to authenticate directly
- Kerberos – Use Kerberos for authentication only
- Kerberos With Integrity – Use Kerberos for authentication and include a hash to ensure data integrity
- Kerberos With Encryption – Use Kerberos for authentication, include a hash, and encrypt the data in-flight
- Default Access – Determines the access permissions for all hosts that attempt to connect to the NFS export. The available options are:
- No Access (Default)
- Read/Write
- Read-Only
- Read/Write, allow Root
- Read-Only, allow Root
Note: The allow root options are the equivalent to no_root_squash on UNIX systems. This means if the user has root access on the client, they are also granted root access to the NFS export. Allow root is required for some use cases, such as VMware NFS datastores.
- Override List - Hosts that need different access than the default can be configured by adding hostnames, IP addresses, or subnets to the override list with one of the access options listed above.
- Comma-Separated - Multiple entries can also be added simultaneously in a comma-separated format. The following table shows the supported options when configuring NFS host access:
Name | Examples | Notes |
Hostname | host1.dell.com | Hostname should be defined in the local hosts file, NIS, LDAP, or DNS |
IPv4 or IPv6 Address | 10.10.10.10 fd00:c6:a8:1::1 |
|
Subnet | 10.10.10.0/255.255.255.0 | IP address/netmask or IP address/prefix |
- CSV File - Host access can also be configured by uploading a CSV file with a list of hosts and their respective access levels.
- PowerStore Manager provides a template with examples of the formatting and syntax for this file. This template can be downloaded from the system, edited, and then imported.
- When multiple NFS exports that require the same access configuration are configured, the same file can be imported multiple times and across multiple clusters as well.
- When the file is imported, the newly imported hosts are appended to the access list.
The following figure shows the host access configuration on an NFS export.
Mounting an NFS export
When you have created the NFS export, you can mount the NFS export on a client that is configured for access. If you attempt to mount the NFS export from a client that has no access, an access denied error is returned. If you attempt to mount a path that is not a valid NFS export, you will also see an access denied error.
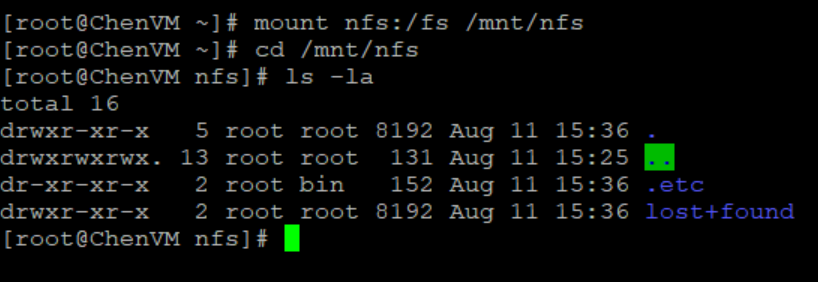
To mount the NFS export, use the mount command. The syntax is:
mount <NFS_Server_Interface>:/<Path_or_Alias> /<Mountpoint>.
For example, mount nfs:/fs /mnt/nfs connects to the interface with the DNS name of nfs, looks for the /fs path or alias, and then mounts it to the /mnt/nfs/ directory on the client.
Depending on the client OS version, the default mount option may vary between NFSv3 and NFSv4. If both are enabled on the NAS server and you want to use a specific version, you should specify it using the -t switch in the mount command.
To confirm that the NFS export is mounted and see the mount options, use the mount command, as shown in the following figure.
When it is mounted, you can simply change directory (cd) into /mnt/nfs to access the data on the NFS export.
Conclusion
Great job! You are now familiar with how to use the NFS protocol for file system access. This enables you to start configuring environments using NFS for many use cases and applications. Stay tuned for the next blog in this series where we’ll review how we can hide the .etc and lost+found directories from the end user.
Resources
Author: Wei Chen, Senior Principal Engineering Technologist