


Let’s Talk File (#2) – PowerStore NAS Servers

Introduction
PowerStore file uses virtualized file servers that are called NAS servers, which are a critical piece of a file environment. In this blog, we will review what NAS servers are, study the NAS server architecture and its benefits, take a quick look at the NAS server settings, and walk through the process to create a new NAS server using PowerStore Manager.
What is a NAS server? A NAS server provides administrators with the ability to specify how PowerStore and its clients should connect, authenticate, and communicate with each other. It contains the configuration, interfaces, and environmental information that is used to facilitate access to the data residing on the file systems. In addition, features such as anti-virus protection, backups, user mappings, and more are also configured on the NAS server.
NAS Server Architecture
PowerStore’s modern NAS server architecture provides many inherent benefits. NAS servers have many responsibilities, including enabling access to file systems, providing data separation, and acting as a basis for multi-tenancy. They are also used as components for load balancing and high availability. This makes it quick and simple to deploy a feature-rich and enterprise-level file solution that meets your business requirements. The image below illustrates the NAS server architecture on PowerStore.
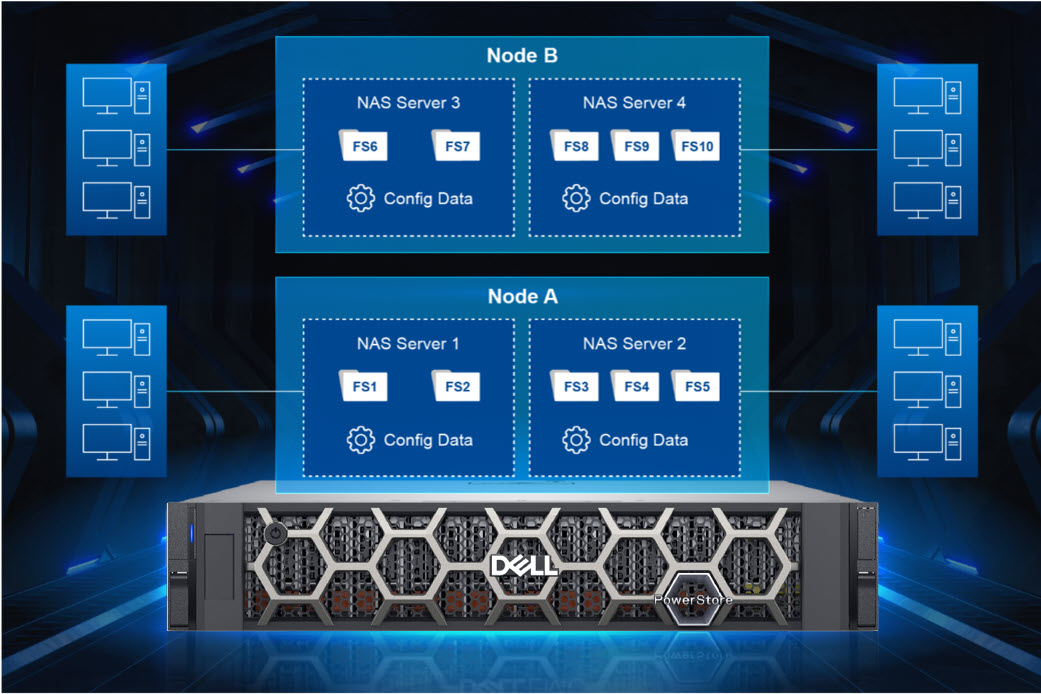
Each NAS server has its own independent configuration, enabling it to be used to enforce multitenancy. This is useful when hosting multiple tenants on a single system, such as for service providers. Each NAS server can be tailored to meet the requirements of each tenant without impacting the other NAS servers on the same appliance.
When creating a file system, the file system is assigned to a NAS server. Each NAS server has its own set of file systems to store file data. Because each NAS server is logically separated from the others, clients that have access to one NAS server do not inherently have access to the file systems on the other NAS servers. To access file systems on a different NAS server, clients must separately authenticate using the methods specified by that NAS server.
Each PowerStore node can host multiple NAS servers and both nodes are actively used to service file IO. New NAS servers are automatically assigned on a round-robin basis across both available nodes. This active/active architecture enables load balancing, provides high availability, and allows both nodes to serve file data simultaneously. If a PowerStore node reboots, NAS servers and their corresponding file systems automatically fail over to the surviving node. NAS servers are also automatically moved to the peer node and back during the upgrade process. After the upgrade completes, the NAS servers return to the node they were assigned to at the beginning of the upgrade.
NAS Server Settings
Let’s do a quick review of some of the items that can be configured on a NAS server. See the following table for a list of items along with a short description of their purpose.
Don’t worry if you’re not familiar with some of these services or terms because they’re not all required. You only need to enable and configure services that you are actively using in your specific environment. We’ll also cover these services in more detail in future blogs in this series.
Name | Description |
Interfaces | IP address, subnet, gateway, and VLAN to access the NAS server |
Access Protocols | Server Message Block (SMB) – Primarily used by Windows clients for SMB shares |
Network File System (NFS) – Primarily used by UNIX and VMware ESXi clients for NFS exports | |
File Transfer Protocol (FTP) – Used by all clients for file transfers | |
SSH File Transfer Protocol (SFTP) - Used by all clients for secure file transfers | |
Lightweight Directory Access Protocol (LDAP) / Network Information Service (NIS) / Local Files | Resolving user IDs and names to each other |
Domain Name System (DNS) | Resolving IP addresses and names to each other |
Anti-virus | Anti-virus servers used to identify and eliminate known viruses before they infect other files |
Network Data Management Protocol (NDMP) | A standard used for backing up file storage |
Kerberos | A distributed authentication service used for Secure NFS |
How to Configure a NAS Server
When deploying a file environment, the first resource you should provision on PowerStore is the NAS server. Now that you understand how they work, let’s go ahead and create one. To do this, open PowerStore Manager and navigate to Storage > NAS Servers. The NAS server creation wizard prompts you for the information displayed in the table below. All of these options can also be modified after creation, if needed.
Name | Description |
Interface Details (Required) |
|
Sharing Protocols (Optional) |
Note: If both SMB and NFS protocols are enabled, multiprotocol access is automatically enabled |
UNIX Directory Services (shown if NFS is enabled) |
|
DNS (Required for AD Joined SMB Servers, but otherwise optional) |
|
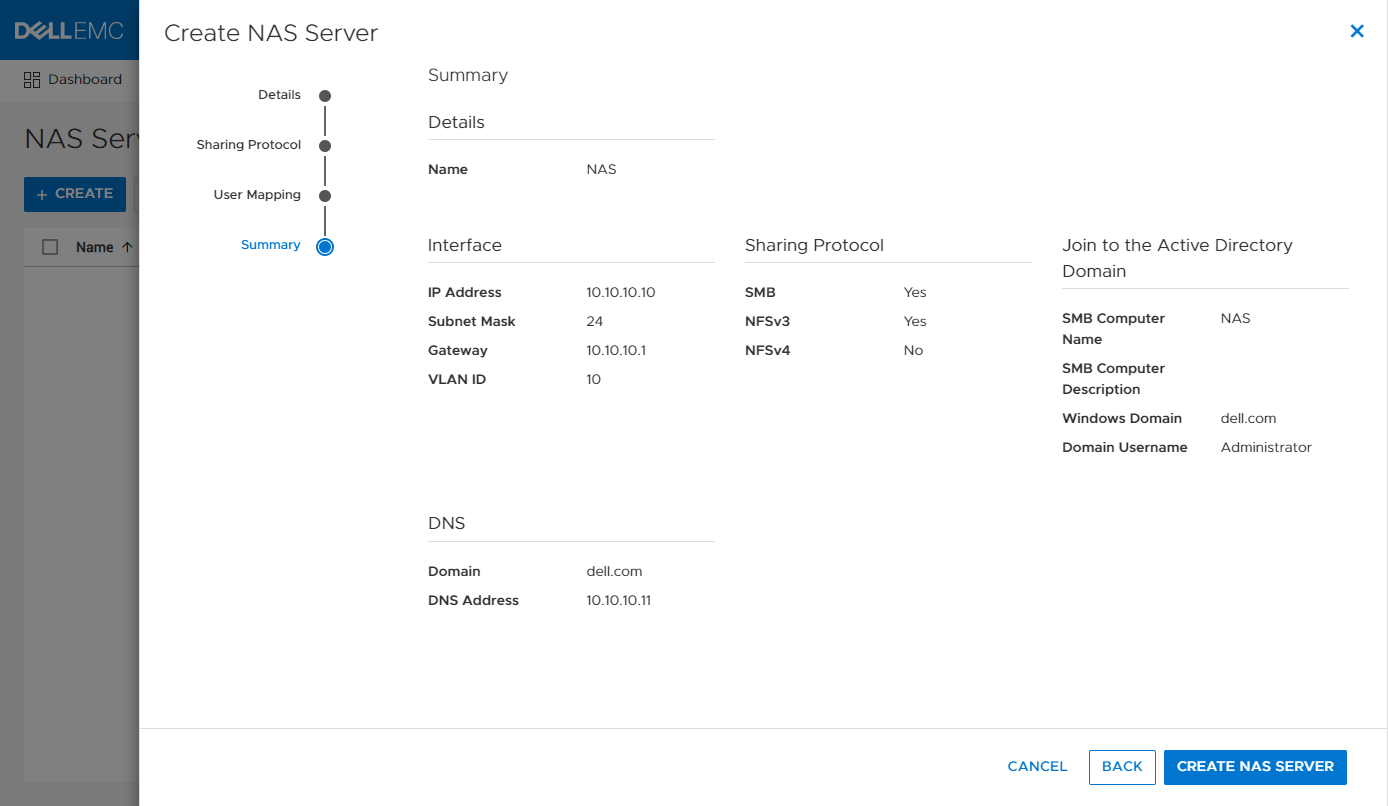
The screenshot below shows an example of the summary page when configuring a new NAS server. In this example, we created an interface, AD-joined SMB Server, NFSv3, and DNS.
If you’re testing file for the first time, you may want to start off with deploying a basic minimum configuration. To do this, all you need to configure is an interface and enable at least one access protocol.
Conclusion
Now that we have our NAS server configured, our clients have a communication path to connect to PowerStore using a file protocol! This is the first major step, but we’re not done yet. Next, we need to provision a file system to store our data and shares or exports to make the file system accessible to clients. Stay tuned for the next blog in this series where we’ll review file system provisioning, management, and monitoring.
Resources
Author: Wei Chen, Senior Principal Engineering Technologist