
Blogs

Q1 2024 Update for Ansible Integrations with Dell Infrastructure

Tue, 02 Apr 2024 14:45:56 -0000
|Read Time: 0 minutes
In this blog post, I am going to cover the new Ansible functionality for the Dell infrastructure portfolio that we released over the past two quarters. Ansible collections are now on a monthly release cadence, and you can bookmark the changelog pages from their respective GitHub pages to get updates as soon as they are available!
PowerScale Ansible collections 2.3 & 2.4
SyncIQ replication workflow support
SyncIQ is the native remote replication engine of PowerScale. Before seeing what is new in the Ansible tasks for SyncIQ, let’s take a look at the existing modules:
- SyncIQPolicy: Used to query, create, and modify replication policies, as well as to start a replication job.
- SyncIQJobs: Used to query, pause, resume, or cancel a replication job. Note that new synciq jobs are started using the synciqpolicy module.
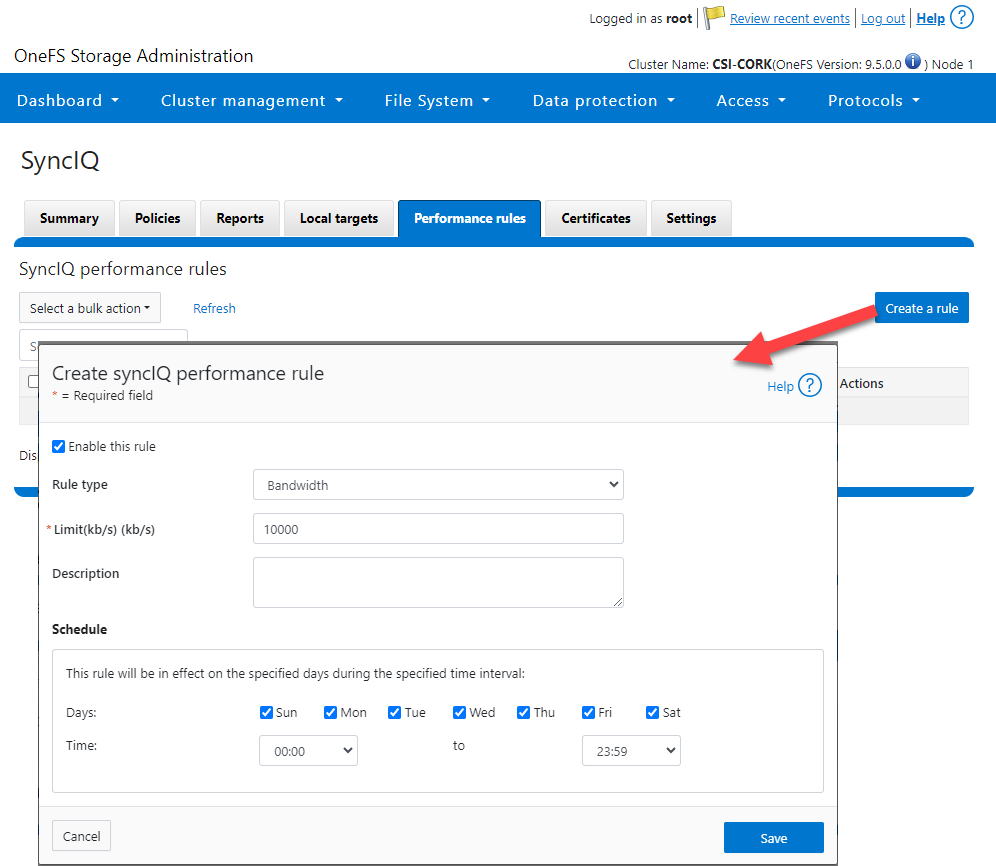
- SyncIQRules: Used to manage the replication performance rules that can be accessed as follows on the OneFS UI:
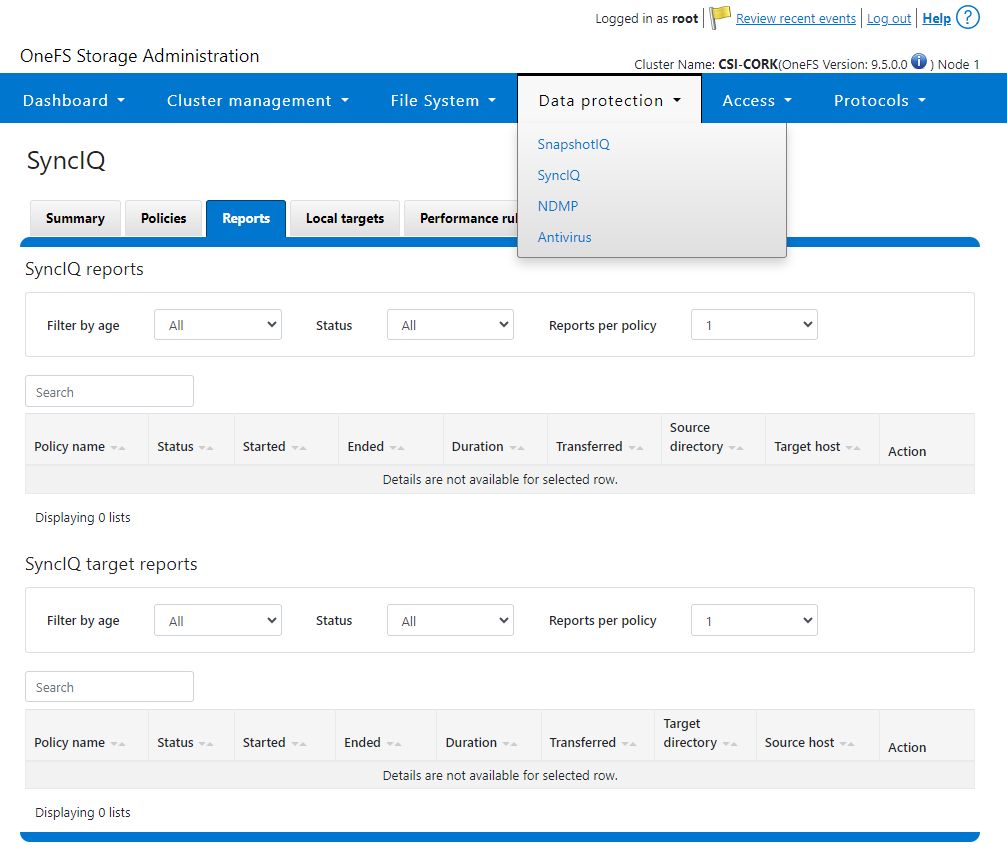
- SyncIQReports and SyncIQTargetReports: Used to manage SyncIQ reports. Following is the corresponding management UI screen where it is done manually:
Following are the new modules introduced to enhance the Ansible automation of SyncIQ workflows:
- SyncIQCertificate (v2.3): Used to manage SyncIQ target cluster certificates on PowerScale. Functionality includes getting, importing, modifying, and deleting target cluster certificates. Here is the OneFS UI for these settings:

- SyncIQ_global_settings (v2.3): Used to configure SyncIQ global settings that are part of the include the following:
Table 1. SyncIQ settings
SyncIQ Setting (datatype) | Description |
bandwidth_reservation_reserve_absolute (int) | The absolute bandwidth reservation for SyncIQ |
bandwidth_reservation_reserve_percentage (int) | The percentage-based bandwidth reservation for SyncIQ |
cluster_certificate_id (str) | The ID of the cluster certificate used for SyncIQ |
encryption_cipher_list (str) | The list of encryption ciphers used for SyncIQ |
encryption_required (bool) | Whether encryption is required or not for SyncIQ |
force_interface (bool) | Whether the force interface is enabled or not for SyncIQ |
max_concurrent_jobs (int) | The maximum number of concurrent jobs for SyncIQ |
ocsp_address (str) | The address of the OCSP server used for SyncIQ certificate validation |
ocsp_issuer_certificate_id (str) | The ID of the issuer certificate used for OCSP validation in SyncIQ |
preferred_rpo_alert (bool) | Whether the preferred RPO alert is enabled or not for SyncIQ |
renegotiation_period (int) | The renegotiation period in seconds for SyncIQ |
report_email (str) | The email address to which SyncIQ reports are sent |
report_max_age (int) | The maximum age in days of reports that are retained by SyncIQ |
report_max_count (int) | The maximum number of reports that are retained by SyncIQ |
restrict_target_network (bool) | Whether to restrict the target network in SyncIQ |
rpo_alerts (bool) | Whether RPO alerts are enabled or not in SyncIQ |
service (str) | Specifies whether the SyncIQ service is currently on, off, or paused |
service_history_max_age (int) | The maximum age in days of service history that is retained by SyncIQ |
service_history_max_count (int) | The maximum number of service history records that are retained by SyncIQ |
source_network (str) | The source network used by SyncIQ |
tw_chkpt_interval (int) | The interval between checkpoints in seconds in SyncIQ |
use_workers_per_node (bool) | Whether to use workers per node in SyncIQ or not |
Additions to Info module
The following information fields have been added to the Info module:
- S3 buckets
- SMB global settings
- Detailed network interfaces
- NTP servers
- Email settings
- Cluster identity (also available in the Settings module)
- Cluster owner (also available in the Settings module)
- SNMP settings
- SynciqGlobalSettings
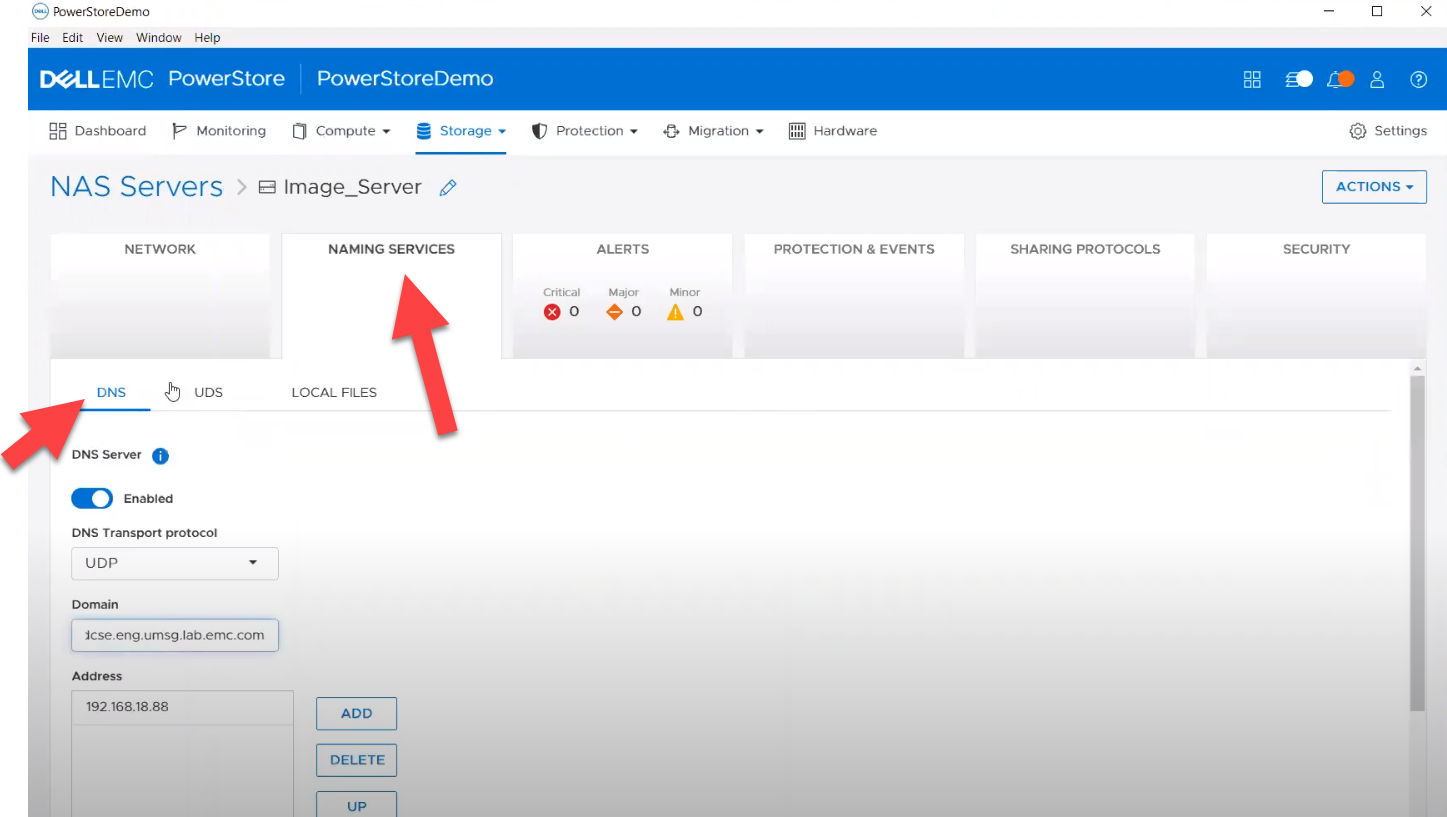
PowerStore Ansible collections 3.1: More NAS configuration
In this release of Ansible collections for PowerStore, new modules have been added to manage the NAS Server protocols like NFS and SMB, as well as to configure a DNS or NIS service running on PowerStore NAS.
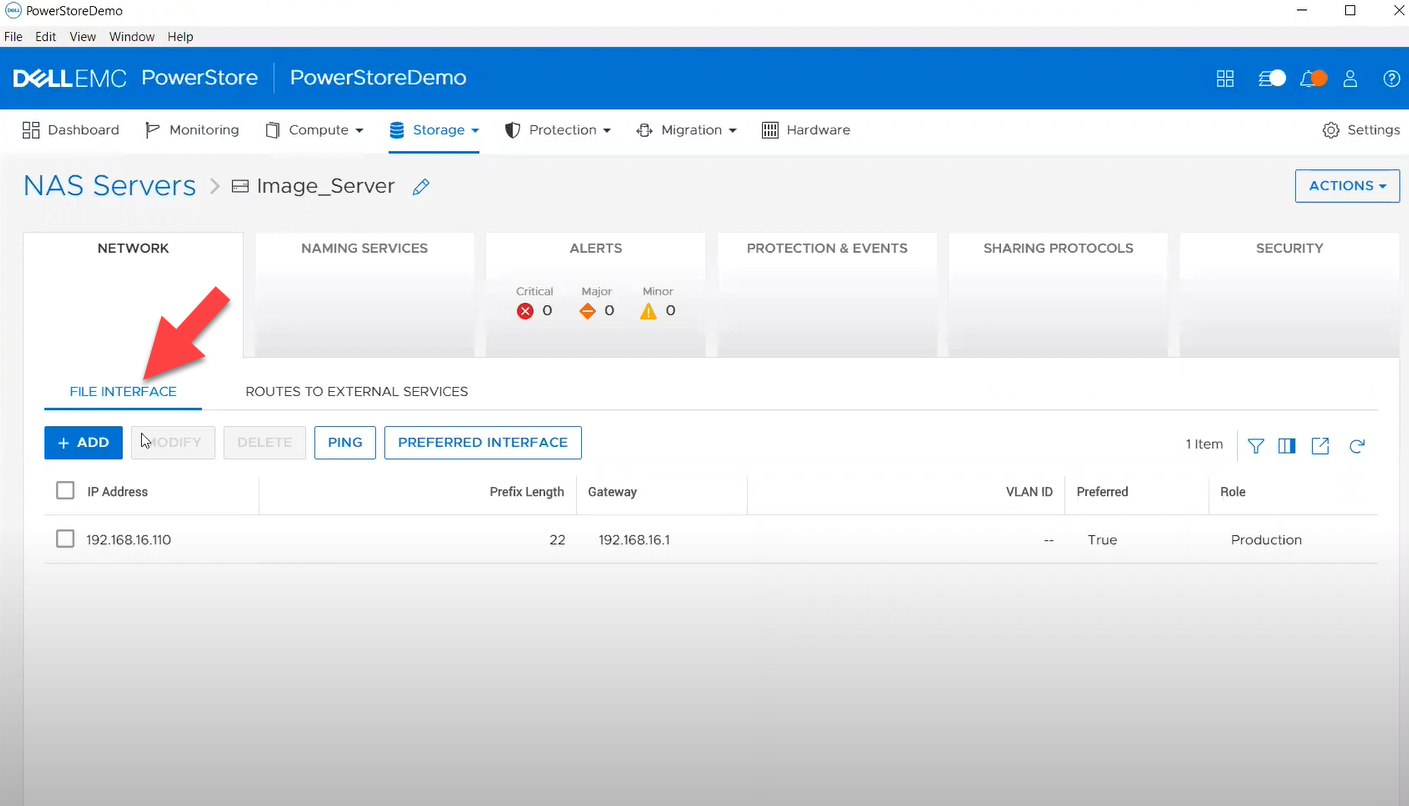
Managing NAS Server interfaces on PowerStore
- file_interface - to enable, query, and modify PowerStore NAS interfaces. Some examples can be found here.
- smb_server - to enable, query, and modify SMB Shares on PowerStore NAS. Some examples can be found here.
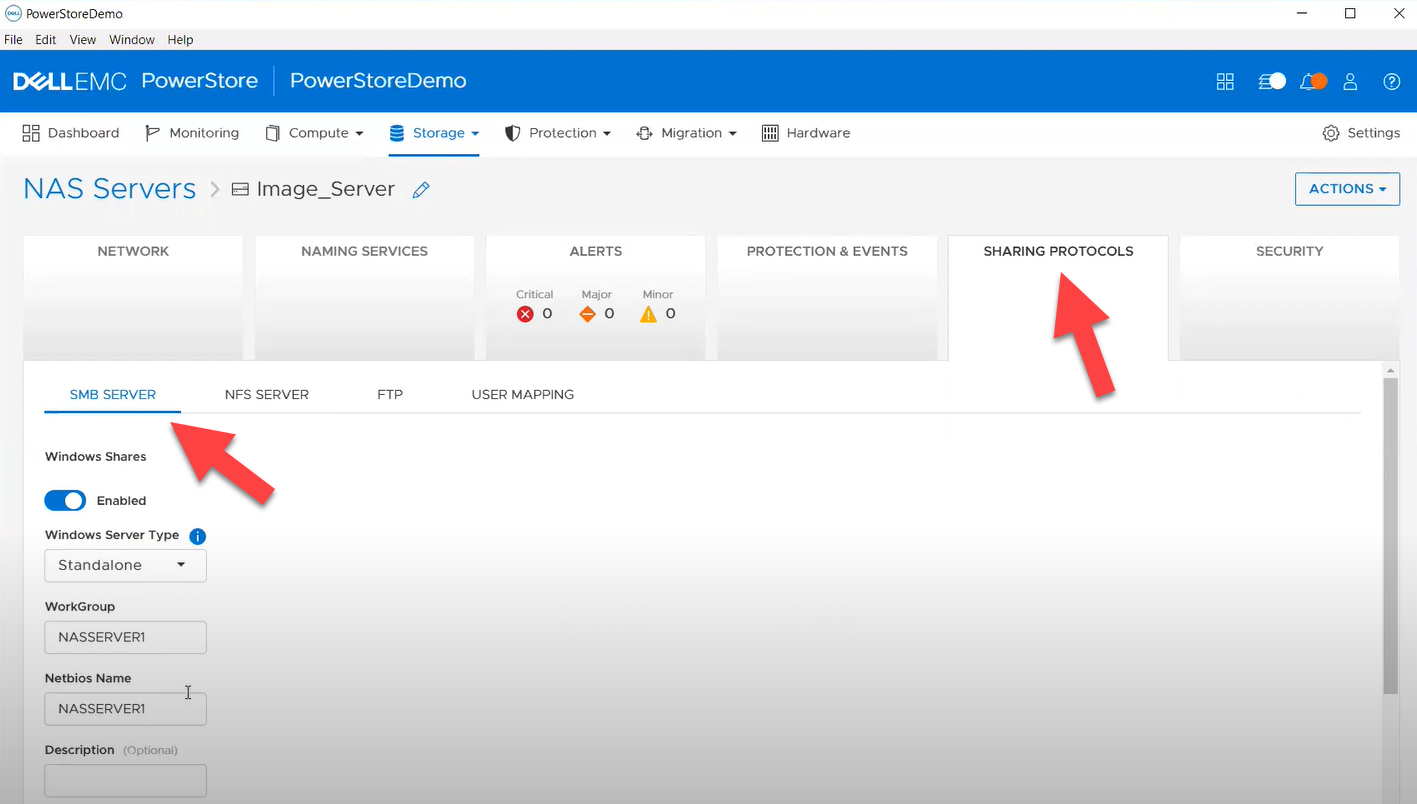
- nfs_server - to enable, query, and modify NFS Server on PowerStore NAS. Some examples can be found here.
Naming services on PowerStore NAS
- file_dns – to enable, query, and modify File DNS on PowerStore NAS. Some examples can be found here.
- file_nis - to enable, query, and modify NIS on PowerStore NAS. Some examples can be found here.
- service_config - manage service config for PowerStore
The Info module is enhanced to list file interfaces, DNS Server, NIS Server, SMB Shares, and NFS exports. Also in this release, support has been added for creating multiple NFS exports with same name but different NAS servers.
PowerFlex Ansible collections 2.0.1 and 2.1: More roles
In releases 1.8 and 1.9 of the PowerFlex collections, new roles have been introduced to install and uninstall various software components of PowerFlex to enable day-1 deployment of a PowerFlex cluster. In the latest 2.0.1 and 2.1 releases, more updates have been made to roles, such as:
- Updated config role to support creation and deletion of protection domains, storage pools, and fault sets
- New role to support installation and uninstallation of Active MQ
- Enhanced SDC role to support installation on ESXi, Rocky Linux, and Windows OS
OpenManage Ansible collections: More power to iDRAC
At the risk of repetition, OpenManage Ansible collections have modules and roles for both OpenManage Enterprise as well as iDRAC/Redfish node interfaces. In the last five months, a plethora of a new functionalities (new modules and roles) have become available, especially for the iDRAC modules in the areas of security and user and license management. Following is a summary of the new features:
V9.1
- redfish_storage_volume now supports iDRAC8.
- dellemc_idrac_storage_module is deprecated and replaced with idrac_storage_volume.
v9.0
- Module idrac_diagnostics is added to run and export diagnostics on iDRAC.
- Role idrac_user is added to manage local users of iDRAC.
v8.7
- New module idrac_license to manage iDRAC licenses. With this module you can import, export, and delete licenses on iDRAC.
- idrac_gather_facts role enhanced to add storage controller details in the role output and provide support for secure boot.
v8.6
- Added support for the environment variables, `OME_USERNAME` and `OME_PASSWORD`, as fallback for credentials for all modules of iDRAC, OME, and Redfish.
- Enhanced both idrac_certificates module and role to support the import and export of `CUSTOMCERTIFICATE`, Added support for import operation of `HTTPS` certificate with the SSL key.
v8.5
- redfish_storage_volume module is enhanced to support reboot options and job tracking operation.
v8.4
- New module idrac_network_attributes to configure the port and partition network attributes on the network interface cards.
Conclusion
Ansible is the most extensively used automation platform for IT Operations, and Dell Technologies provides an exhaustive set of modules and roles to easily deploy and manage server and storage infrastructure on-prem as well as on Cloud. With the monthly release cadence for both storage and server modules, you can get access to our latest feature additions even faster. Enjoy coding your Dell infrastructure!
Author: Parasar Kodati, Engineering Technologist, Dell ISG

Q1 2024 Update for Terraform Integrations with Dell Infrastructure
Tue, 02 Apr 2024 14:45:56 -0000
|Read Time: 0 minutes
This post covers all the new Terraform resources and data sources that have been released in the last two quarters: Q4’23 and Q1 ‘24. You can check out previous releases of Terraform providers here: Q1-2023, Q2-2023, and Q3-2023. I also covered the first release of PowerScale provider here.
Here is a summary of the Dell Terraform Provider versions released over the last two quarters:
- v1.1 and v1.2 of the provider for PowerScale
- v1.3 and v1.4 of the provider for PowerFlex
- v1.3 and v1.4 of the provider for PowerStore
- v1.2 of the Provider for OME
- v1.1 and v1.2 of the Provider for Redfish
PowerScale Provider v1.1 and v1.2
PowerScale received the most number of new Terraform capabilities in the last few months. New resources and corresponding data sources have been under the following workflow categories:
- Data Management
- User and Access Management
- Cluster Management
Data management
Following is the summary for the different resource-datasource pairs introduced to automate operations related to Data management on PowerScale:
Snapshots: CRUD operations for Snapshots
Here's an example of how to create a snapshot resource within a PowerScale storage environment using Terraform:
resource "powerscale_snapshot" "example_snapshot" {
  name        = "example-snapshot"
  filesystem  = powerscale_filesystem.example_fs.id
  description = "Example snapshot description"
  // Add any additional configurations as needed
}- name: Specifies the name of the snapshot to be created.
- filesystem: References the PowerScale filesystem for which the snapshot will be created.
- description: Provides a description for the snapshot.
Here's an example of how to retrieve information about existing snapshots within a PowerScale environment using Terraform:
data "powerscale_snapshot" "existing_snapshot" {
  name = "existing-snapshot"
}

output "snapshot_id" {
  value = data.powerscale_snapshot.existing_snapshot.id
}- name: Specifies the name of the existing snapshot to query.
Snapshot schedules: CRUD operations for Snapshot schedules
Following is an example of how to define a snapshot schedule resource:
resource "powerscale_snapshot_schedule" "example_schedule" {
  name                = "example-schedule"
  filesystem          = powerscale_filesystem.example_fs.id
  snapshot_type       = "weekly"
  retention_policy    = "4 weeks"
  snapshot_start_time = "23:00"
  // Add any additional configurations as needed
}- name: Specifies the name of the snapshot schedule.
- filesystem: References the PowerScale filesystem for which the snapshot schedule will be applied.
- snapshot_type: Specifies the type of snapshot schedule, such as "daily", "weekly", and so on.
- retention_policy: Defines the retention policy for the snapshots created by the schedule.
- snapshot_start_time: Specifies the time at which the snapshot creation process should begin.
Data Source Example:
The following example shows how to retrieve information about existing snapshot schedules within a PowerScale environment using Terraform. The powerscale_snapshot_schedule data source fetches information about the specified snapshot schedule. An output is defined to display the ID of the retrieved snapshot schedule:
data "powerscale_snapshot_schedule" "existing_schedule" {
  name = "existing-schedule"
}

output "schedule_id" {
  value = data.powerscale_snapshot_schedule.existing_schedule.id
}- name: Specifies the name of the existing snapshot schedule to query.
File Pool Policies: CRUD operations for File Pool Policies
File policies in PowerScale help establish policy-based workflows like file placement and tiering of files that match certain criteria. Following is an example of how the new file pool policy resource can be configured:
resource "powerscale_filepool_policy" "example_filepool_policy" {
  name = "filePoolPolicySample"
  is_default_policy = false

  file_matching_pattern = {
    or_criteria = [
      {
        and_criteria = [

          {
            operator = ">"
            type     = "size"
            units    = "B"
            value    = "1073741824"
          },
          {
            operator          = ">"
            type              = "birth_time"
             use_relative_time = true
            value             = "20"
          },
          {
            operator          = ">"
            type              = "metadata_changed_time"
             use_relative_time = false
            value             = "1704742200"
          },
          {
            operator          = "<"
            type              = "accessed_time"
             use_relative_time = true
            value             = "20"
          }
        ]
      },
      {
        and_criteria = [
          {
            operator          = "<"
            type              = "changed_time"
             use_relative_time = false
            value             = "1704820500"
          },
          {
             attribute_exists = false
            field            = "test"
            type             = "custom_attribute"
            value            = ""
          },
          {
            operator = "!="
            type     = "file_type"
            value    = "directory"
          },
          {
             begins_with    = false
            case_sensitive = true
            operator       = "!="
            type           = "path"
            value          = "test"
          },
          {
            case_sensitive = true
            operator       = "!="
            type           = "name"
            value          = "test"
          }
        ]
      }
    ]
  }
  # A list of actions to be taken for matching files. (Update Supported)
  actions = [

    {
       data_access_pattern_action = "concurrency"
      action_type                = "set_data_access_pattern"
    },
    {
       data_storage_policy_action = {
        ssd_strategy = "metadata"
        storagepool  = "anywhere"
      }
      action_type = "apply_data_storage_policy"
    },
    {
       snapshot_storage_policy_action = {
        ssd_strategy = "metadata"
        storagepool  = "anywhere"
      }
      action_type = "apply_snapshot_storage_policy"
    },
    {
       requested_protection_action = "default"
      action_type                 = "set_requested_protection"
    },
    {
       enable_coalescer_action = true
      action_type             = "enable_coalescer"
    },
    {
      enable_packing_action = true,
      action_type           = "enable_packing"
    },
    {
      action_type = "set_cloudpool_policy"
       cloudpool_policy_action = {
         archive_snapshot_files = true
        cache = {
          expiration = 86400
          read_ahead = "partial"
          type       = "cached"
        }
        compression                  = true
        data_retention               = 604800
        encryption                   = true
         full_backup_retention        = 145152000
         incremental_backup_retention = 145152000
        pool                         = "cloudPool_policy"
         writeback_frequency          = 32400
      }
    }
  ]

  description = "filePoolPolicySample description"

  apply_order = 1
}
You can import existing file pool policies using the file pool policy ID:
terraform import powerscale_filepool_policy.example_filepool_policy <policyID>
or by simply referencing the default policy:
terraform import powerscale_filepool_policy.example_filepool_policy is_default_policy=true
The data source can be used to get a handle to a particular file pool policy:
data "powerscale_filepool_policy" "example_filepool_policy" {
  filter {
    # Optional list of names to filter upon
    names = ["filePoolPolicySample", "Default policy"]
  }
}
or to get the complete list of policies including the default policy:
data "powerscale_filepool_policy" "all" {
}
You can then deference into the data structure as needed.
User and Access management
Following is a summary of the different resource-datasource pairs introduced to automate operations related to User and Access management on PowerScale:
LDAP Providers: CRUD operations
To create and manage LDAP providers, you can use the new resource as follows:
resource "powerscale_ldap_provider" "example_ldap_provider" {
  # Required params for creating and updating.
  name = "ldap_provider_test"
  # root of the tree in which to search identities.
  base_dn = "dc=tthe,dc=testLdap,dc=com"
  # Specifies the server URIs. Begin URIs with ldap:// or ldaps://
  server_uris = ["ldap://10.225.108.54"]
}
You can import existing LDAP providers using the provider name:
terraform import powerscale_ldap_provider.example_ldap_provider <ldapProviderName>
and also get a handle using the corresponding data source using a variety of criteria:
data "powerscale_ldap_provider" "example_ldap_provider" {
  filter {
    names = ["ldap_provider_name"]
    # If specified as "effective" or not specified, all fields are returned. If specified as "user", only fields with non-default values are shown. If specified as "default", the original values are returned.
    scope = "effective"
  }
}
ACL Settings: CRUD operations
PowerScale OneFS provides very powerful ACL capabilities, including a single namespace for multi-protocol access and its own internal ACL representation to perform access control. The internal ACL is presented as protocol-specific views of permissions so that NFS exports display POSIX mode bits for NFSv3 and shows ACL for NFSv4 and SMB. Now, we have a new resource to manage the global ACL settings for a given cluster:
resource "powerscale_aclsettings" "example_acl_settings" {
  # Optional fields both for creating and updating
  # Please check the acceptable inputs for each setting in the documentation
  #     access                  = "windows"
  #     calcmode                = "approx"
  #     calcmode_group          = "group_aces"
  #     calcmode_owner          = "owner_aces"
  #     calcmode_traverse       = "ignore"
  #     chmod                   = "merge"
  #     chmod_007               = "default"
  #     chmod_inheritable       = "no"
  #     chown                   = "owner_group_and_acl"
  #     create_over_smb         = "allow"
  #     dos_attr                = "deny_smb"
  #     group_owner_inheritance = "creator"
  #     rwx                     = "retain"
  #     synthetic_denies        = "remove"
  #     utimes                  = "only_owner"
}
Import is supported, and there is corresponding data source for the resource as well.
Smart Quotas: CRUD operations
Following is an example that shows how to define a quota resource:
resource "powerscale_quota" "example_quota" {
  name         = "example-quota"
  filesystem   = powerscale_filesystem.example_fs.id
  size         = "10GB"
  soft_limit   = "8GB"
  hard_limit   = "12GB"
  grace_period = "7d"
  // Add any additional configurations as needed
}- name: Specifies the name of the quota.
- filesystem: References the PowerScale filesystem to associate with the quota.
- size: Sets the size of the quota.
- soft_limit: Defines the soft limit for the quota.
- hard_limit: Defines the hard limit for the quota.
- grace_period: Specifies the grace period for the quota.
Data Source Example:
The following code snippet illustrates how to retrieve information about existing smart quotas within a PowerScale environment using Terraform. The powerscale_quota data source fetches information about the specified quota. An output is defined to display the ID of the retrieved quota:
data "powerscale_quota" "existing_quota" {
  name = "existing-quota"
}

output "quota_id" {
  value = data.powerscale_quota.existing_quota.id
}- name: Specifies the name of the existing smart quota to query.
Cluster management
Groupnet: CRUD operations
Following is an example that shows how to define a GroupNet resource:
resource "powerscale_groupnet" "example_groupnet" {
  name       = "example-groupnet"
  subnet     = powerscale_subnet.example_subnet.id
  gateway    = "192.168.1.1"
  netmask    = "255.255.255.0"
  vlan_id    = 100
  // Add any additional configurations as needed
}- name: Specifies the name of the GroupNet.
- subnet: References the PowerScale subnet to associate with the GroupNet.
- gateway: Specifies the gateway for the GroupNet.
- netmask: Defines the netmask for the GroupNet.
- vlan_id: Specifies the VLAN ID for the GroupNet.
Data Source Example:
The following code snippet illustrates how to retrieve information about existing GroupNets within a PowerScale environment using Terraform. The powerscale_groupnet data source fetches information about the specified GroupNet. An output is defined to display the ID of the retrieved GroupNet:
data "powerscale_groupnet" "existing_groupnet" {
  name = "existing-groupnet"
}

output "groupnet_id" {
  value = data.powerscale_groupnet.existing_groupnet.id
}- name: Specifies the name of the existing GroupNet to query.
Subnet: CRUD operations
Resource Example:
The following code snippet shows how to provision a new subnet:
resource "powerscale_subnet" "example_subnet" {
  name         = "example-subnet"
  ip_range     = "192.168.1.0/24"
  network_mask = 24
  gateway      = "192.168.1.1"
  dns_servers  = ["8.8.8.8", "8.8.4.4"]
  // Add any additional configurations as needed
}- name: Specifies the name of the subnet to be created.
- ip_range: Defines the IP range for the subnet.
- network_mask: Specifies the network mask for the subnet.
- gateway: Specifies the gateway for the subnet.
- dns_servers: Lists the DNS servers associated with the subnet.
Data Source Example:
The powerscale_subnet data source fetches information about the specified subnet. The following code snippet illustrates how to retrieve information about existing subnets within a PowerScale environment. An output block is defined to display the ID of the retrieved subnet:
data "powerscale_subnet" "existing_subnet" {
  name = "existing-subnet"
}

output "subnet_id" {
  value = data.powerscale_subnet.existing_subnet.id
}- name: Specifies the name of the existing subnet to query. The result is stored in the data object called existing_subnet.
Network pool
Following is an example demonstrating how to define a network pool resource:
resource "powerscale_networkpool" "example_network_pool" {
  name       = "example-network-pool"
  subnet     = powerscale_subnet.example_subnet.id
  gateway    = "192.168.1.1"
  netmask    = "255.255.255.0"
  start_addr = "192.168.1.100"
  end_addr   = "192.168.1.200"
  // Add any additional configurations as needed
}- name: Specifies the name of the network pool.
- subnet: References the PowerScale subnet to associate with the network pool.
- gateway: Specifies the gateway for the network pool.
- netmask: Defines the netmask for the network pool.
- start_addr and end_addr: Specify the starting and ending IP addresses for the network pool range.
Data Source Example:
The following code snippet illustrates how to retrieve information about existing network pools. The powerscale_networkpool data source fetches information about the specified network pool. An output is defined to display the ID of the retrieved network pool:
data "powerscale_networkpool" "existing_network_pool" {
  name = "existing-network-pool"
}

output "network_pool_id" {
  value = data.powerscale_networkpool.existing_network_pool.id
}- name: Specifies the name of the existing network pool to query.
SmartPool settings
Here's an example that shows how to configure SmartPool settings within a PowerScale storage environment using Terraform:
resource "powerscale_smartpool_settings" "example_smartpool_settings" {
  name                    = "example-smartpool-settings"
  default_policy          = "balanced"
  compression             = true
  deduplication           = true
  auto_tiering            = true
  auto_tiering_policy     = "performance"
   auto_tiering_frequency  = "weekly"
  // Add any additional configurations as needed
}- name: Specifies the name of the SmartPool settings.
- default_policy: Sets the default policy for SmartPool.
- compression: Enables or disables compression.
- deduplication: Enables or disables deduplication.
- auto_tiering: Enables or disables auto-tiering.
- auto_tiering_policy: Sets the policy for auto-tiering.
- auto_tiering_frequency: Sets the frequency for auto-tiering.
Data Source Example:
The following example shows how to retrieve information about existing SmartPool settings within a PowerScale environment using Terraform. The powerscale_smartpool_settings data source fetches information about the specified SmartPool settings. An output is defined to display the ID of the retrieved SmartPool settings:
data “powerscale_smartpool_settings” “existing_smartpool_settings” {
  name = “existing-smartpool-settings”
}

output “smartpool_settings_id” {
  value = data.powerscale_smartpool_settings.existing_smartpool_settings.id
}- name: Specifies the name of the existing SmartPool settings to query.
New resources
New resources and datasources are also available for the following entities:
- NTP Server
- NTP Settings
- Cluster Email Settings
In addition to the previously mentioned resource-datasource pairs for PowerScale Networking, an option to enable or disable “Source based networking” has been added to the Network settings resource. The corresponding datasources can retrieve this setting on a PowerScale cluster.
PowerFlex Provider v1.3 and v1.4
The following new resources and corresponding datasources have been added to PowerFlex:
Fault Sets: CRUD and Import operations
The following is an example that shows how to define a Fault Set resource within a PowerFlex storage environment using Terraform:
resource "powerflex_fault_set" "example_fault_set" {
  name           = "example-fault-set"
  protection_domain_id = powerflex_protection_domain.example_pd.id
  fault_set_type = "RAID-1"
  // Add any additional configurations as needed
}- name: Specifies the name of the Fault Set.
- protection_domain_id: References the PowerFlex Protection Domain to associate with the Fault Set.
- fault_set_type: Defines the type of Fault Set, such as "RAID-1".
If you would like to bring an existing fault set resource into Terraform state management, you can import it using the fault set id:
terraform import powerflex_fault_set.fs_import_by_id "<id>"
Data Source Example:
The following code snippet illustrates how to retrieve information about existing Fault Sets within a PowerFlex environment using Terraform. The powerflex_fault_set data source fetches information about the specified Fault Set. An output is defined to display the ID of the retrieved Fault Set:
Ldata "powerflex_fault_set" "existing_fault_set" {
  name = "existing-fault-set"
}

output "fault_set_id" {
  value = data.powerflex_fault_set.existing_fault_set.id
}- name: Specifies the name of the existing Fault Set to query.
Snapshot policies: CRUD operations
- Snapshot policy resource – create, update, and delete.
- Snapshot policy data source – to get information of an existing policy.
Two new data sources
- powerflex_node: to get complete information related to a PowerFlex node firmware, hardware, and node health details.
- powerflex_template: this is a massive object that has information categorized into multiple groups within this object.
OME Provider v1.2
Following are the new resources to support Firmware baselining and compliance that have been added to the Dell OME Provider:
- Firmware Catalog
- Firmware Baselines
Firmware Catalog
Here is an example of how the catalog resource can be used to create or update catalogs:
# Resource to manage a new firmware catalog
resource "ome_firmware_catalog" "firmware_catalog_example" {
  # Name of the catalog required
  name = "example_catalog_1"

  # Catalog Update Type required.
  # Sets to Manual or Automatic on schedule catalog updates of the catalog.
  # Defaults to manual.
  catalog_update_type = "Automatic"

  # Share type required.
  # Sets the different types of shares (DELL_ONLINE, NFS, CIFS, HTTP, HTTPS)
  # Defaults to DELL_ONLINE
  share_type = "HTTPS"

  # Catalog file path, required for share types (NFS, CIFS, HTTP, HTTPS)
  # Start directory path without leading '/' and use alphanumeric characters.
  catalog_file_path = "catalogs/example_catalog_1.xml"

  # Share Address required for share types (NFS, CIFS, HTTP, HTTPS)
  # Must be a valid ipv4 (x.x.x.x), ipv6(xxxx:xxxx:xxxx:xxxx:xxxx:xxxx:xxxx:xxxx), or fqdn(example.com)
  # And include the protocol prefix ie (https://)
  share_address = "https://1.2.2.1"

  # Catalog refresh schedule, Required for catalog_update_type Automatic.
  # Sets the frequency of the catalog refresh.
  # Will be ignored if catalog_update_type is set to manual.
  catalog_refresh_schedule = {
    # Sets to (Weekly or Daily)
    cadence = "Weekly"
    # Sets the day of the week (Monday, Tuesday, Wednesday, Thursday, Friday, Saturday, Sunday)
    day_of_the_week = "Wednesday"
    # Sets the hour of the day (1-12)
    time_of_day = "6"
    # Sets (AM or PM)
    am_pm = "PM"
  }

  # Domain optional value for the share (CIFS), for other share types this will be ignored
  domain = "example"

  # Share user required value for the share (CIFS), optional value for the share (HTTPS)
  share_user = "example-user"

  # Share password required value for the share (CIFS), optional value for the share (HTTPS)
  share_password = "example-pass"
}
Existing catalogs can be imported into the Terraform state with the import command:
# terraform import ome_firmware_catalog.cat_1 <id>
terraform import ome_firmware_catalog.cat_1 1
After running the import command, populate the name field in the config file to start managing this resource.
Firmware Baseline
Here is an example that shows how a baseline can be compared to an array of individual devices or device groups:
# Resource to manage a new firmware baseline
resource "ome_firmware_baseline" "firmware_baseline" {
  // Required Fields
  # Name of the catalog
  catalog_name = "tfacc_catalog_dell_online_1"
  # Name of the Baseline
  name = "baselinetest"

  // Only one of the following fields (device_names, group_names , device_service_tags) is required
  # List of the Device names to associate with the firmware baseline.
  device_names = ["10.2.2.1"]

  # List of the Group names to associate with the firmware baseline.
  # group_names = ["HCI Appliances","Hyper-V Servers"]

  # List of the Device service tags to associate with the firmware baseline.
  # device_service_tags = ["HRPB0M3"]

  // Optional Fields
  // This must always be set to true. The size of the DUP files used is 64 bits."
  #is_64_bit = true

  // Filters applicable updates where no reboot is required during create baseline for firmware updates. This field is set to false by default.
   #filter_no_reboot_required = true

  # Description of the firmware baseline
  description = "test baseline"
}
Although the resource supports terraform import, in most cases a new baseline can be created using a Firmware catalog entry.
Following is a list of new data sources and supported operations in Terraform Provider for Dell OME:
- Firmware Repository
- Firmware Baseline Compliance Report
- Firmware Catalog
- Device Compliance Report
RedFish Provider v1.1 and 1.2
Several new resources have been added to the Redfish provider to access and set different iDRAC attribute sets. Following are the details:
Certificate Resource
This is a resource for the import of the ssl certificate to iDRAC based on the input parameter Type. After importing the certificate, the iDRAC will automatically restart. By default, iDRAC comes with a self-signed certificate for its web server. If the user wants to replace with his/her own server certificate (signed by Trusted CA), two kinds of SSL certificates are supported: (1) Server certificate and (2) Custom certificate. Following are the steps to generate these certificates:
- Server Certificate:
- Generate the CSR from iDRAC.
- Create the certificate using CSR and sign with trusted CA.
- The certificate should be signed with hashing algorithm equivalent to sha256
- Custom Certificate:
- An externally created custom certificate which can be imported into the iDRAC.
- Convert the external custom certificate into PKCS#12 format, and it should be encoded via base64. The conversion requires passphrase which should be provided in 'passphrase' attribute.
Boot Order Resource
This Terraform resource is used to configure Boot Order and enable/disable Boot Options of the iDRAC Server. We can read the existing configurations or modify them using this resource.
Boot Source Override Resource
This Terraform resource is used to configure Boot sources of the iDRAC Server. If the state in boot_source_override_enabled is set once or continuous, the value is reset to disabled after the boot_source_override_target actions have completed successfully. Changes to these options do not alter the BIOS persistent boot order configuration.
Manager Reset
This resource is used to reset the manager.
Lifecycle Controller Attributes Resource
This Terraform resource is used to get and set the attributes of the iDRAC Lifecycle Controller.
System Attributes Resource
This Terraform resource is used to configure System Attributes of the iDRAC Server. We can read the existing configurations or modify them using this resource. Import is also supported for this resource to include existing System Attributes in Terraform state.
iDRAC Firmware Update Resource
This Terraform resource is used to update the firmware of the iDRAC Server based on a catalog entry.
Resources
Here are the link sets for key resources for each of the Dell Terraform providers:
- Provider for PowerScale
- Provider for PowerFlex
- Provider for PowerStore
- Provider for Redfish
Author: Parasar Kodati, Engineering Technologist, Dell ISG

Dell OpenManage Enterprise Operations with Ansible Part 3: Compliance, Reporting, and Remediation
Fri, 08 Dec 2023 15:37:49 -0000
|Read Time: 0 minutes
In case you missed it, check out the first post of this series for some background information on the openmanage Ansible collection by Dell and inventory management, as well as the second post to learn more about template-based deployment. In this blog, we’ll take a look at automating compliance and remediation workflows in Dell OpenManage Enterprise (OME) with Ansible.
Compliance baselines
Compliance baselines in OME are reports that show the ‘delta’ or difference between the specified desired configuration and the actual configuration of the various devices in the inventory. The desired configuration is specified as a compliance template, which can be cloned from either a deployment template or a device using the ome_template covered in the deployment section of this series. Following are task examples for creating compliance templates:
- name: Create a compliance template from deploy template
       dellemc.openmanage.ome_template:
        hostname: "{{ hostname }}"
        username: "{{ username }}"
        password: "{{ password }}"
        validate_certs: no
        command: "clone"
        template_name: "email_deploy_template"
        template_view_type: "Compliance"
        attributes:
          Name: "email_compliance_template"
- name: Create a compliance template from reference device
dellemc.openmanage.ome_template:
hostname: "{{ hostname }}"
username: "{{ username }}"
password: "{{ password }}"
validate_certs: no
command: "create"
device_service_tag:
- "SVTG123"
template_view_type: "Compliance"
attributes:
Name: "Configuration Compliance"
Description: "Configuration Compliance Template"
Fqdds: "BIOS"Once we have the template ready, we can create the baseline, which is the main step where OME compares the template configuration to devices. Devices can be specified as a list or a device group. Depending on the number of devices, this step can be time-consuming. The following code uses a device group that has already been created, as shown in part 2 of this OME blog series:
- name: Create a configuration compliance baseline using an existing template
       dellemc.openmanage.ome_configuration_compliance_baseline:
        hostname: "{{ hostname }}"
        username: "{{ username }}"
        password: "{{ password }}"
        validate_certs: no
        command: create
        template_name: "email_compliance_template"
        description: "SNMP Email setting"
        names: "baseline_email"
        device_group_names: demo-group-all
Once the baseline task is run, we can retrieve the results, store them in a variable, and write the contents to a file for further analysis:
- name: Retrieve the compliance report of all of the devices in the specified configuration compliance baseline.
       dellemc.openmanage.ome_configuration_compliance_info:
        hostname: "{{ hostname }}"
        username: "{{ username }}"
        password: "{{ password }}"
        validate_certs: no
        baseline: "baseline_email"
      register: compliance_report
      delegate_to: localhost
- name: store the variable to json
copy:
content: "{{ compliance_report | to_nice_json }}"
dest: "./output-json/compliance_report.json"
delegate_to: localhostOnce the compliance details are stored in a variable, we can always extract details from it, like the list of non-compliant devices shown here:
- name: Extract service tags of devices with highest level compliance status
      set_fact:
         non_compliant_devices: "{{ non_compliant_devices | default([]) + [device.Id] }}"
      loop: "{{ compliance_report.compliance_info }}"
      loop_control:
        loop_var: device
      when: device.ComplianceStatus > 1
      no_log: true
Remediatation
The remediation task brings all devices to a desired template configuration, much like the template deployment job. For remediation, we use the same baseline module with command set to remediate and pass all devices we would like to remediate, as well as the list of devices that are non-compliant:
- name: Remediate a specified non-complaint devices to a configuration compliance baseline using device IDs # noqa: args[module]
       dellemc.openmanage.ome_configuration_compliance_baseline:
        hostname: "{{ hostname }}"
        username: "{{ username }}"
        password: "{{ password }}"
        validate_certs: no
        command: "remediate"
        names: "baseline_email"
        device_ids: "{{ non_compliant_devices }}"
      when: "non_compliant_devices | length > 0"
      delegate_to: localhost
Watch the following video to see in-depth how the different steps of this workflow are run:
Conclusion
To recap, we’ve covered the creation of compliance templates and running baseline checks against your PowerEdge server inventory. We then saw how to retrieve detailed compliance reports and parse them in Ansible for further analysis. Finally, using the OME baseline Ansible, we ran a remediation job to correct any configuration drift in non-compliant devices. Don’t forget to check out the detailed documentation for openmanage Ansible modules including both OME and iDRAC/redfish modules and roles, as well as the complete code examples used here in this GitHub repository.
Author: Parasar Kodati, Engineering Technologist, Dell ISG

Dell OpenManage Enterprise Operations with Ansible Part 2: Templates and Deployment
Mon, 04 Dec 2023 16:30:25 -0000
|Read Time: 0 minutes
In case you missed it, check out the first part of this blog series for some background on the openmanage Ansible collection by Dell. In this post, we’ll take a look at template based deployment in OME driving from Ansible.
Template based deployment
Templates in OME are a great way to define the exact configuration that you would like to replicate on a group of servers. You can collect devices into multiple groups based on the workload profile and apply templates on these groups to achieve identical configurations based on security, performance, and other considerations.
To retrieve template information, you can use the dellemc.openmanage.ome_template_info module to query templates based on a variety of system_query _options. You can pass filter parameters as shown here:
- name: Get filtered template info based on name.
     dellemc.openmanage.ome_template_info:
        hostname: "{{ hostname }}"
        username: "{{ username }}"
        password: "{{ password }}"
        validate_certs: no
         system_query_options:
          filter: "Name eq 'empty_template'"
    register: template_info

  - name: print template info
    debug:
      msg: "{{template_info}}"
Template creation
One way to create a template is by using an existing device configuration. You can also create a template by cloning an existing template and then modifying the parameters as necessary. Following are the Ansible tasks for each respective method:
- name: Create a template from a reference device.
     dellemc.openmanage.ome_template:
      hostname: "{{ hostname }}"
      username: "{{ username }}"
      password: "{{ password }}"
      validate_certs: no
      device_service_tag: "{{device_service_tag}}"
      attributes:
        Name: "{{device_service_tag}}-template"
        Description: "ideal Template description"

  - name: Clone a template
     dellemc.openmanage.ome_template:
        hostname: "{{ hostname }}"
        username: "{{ username }}"
        password: "{{ password }}"
        validate_certs: no
        command: "clone"
        template_name: "empty_template"
        attributes:
          Name: "deploy_clone"
    delegate_to: localhost
Template Attribute list
Very often as part of day-2 operations you may have to change a set of attributes, which can be difficult given that a template is a very detailed object with thousands of parameters. To see what parameters are available to modify in a template, we must get the complete list of parameters using a REST API call. In the following example, we first establish an API connection and then make a call to api/TemplateService/Templates(11)/Views(1)/AttributeViewDetails. We then store this information in a JSON file for further exploration and parsing:
  - name: Get PowerScale API Session Token
    ansible.builtin.uri:
        url: "https://{{ hostname }}/api/SessionService/Sessions"
        method: post
        body_format: json
        validate_certs: false
        status_code: 200,201
        body: |
          {
             "UserName": "{{ username }}",
             "Password": "{{ password }}",
             "SessionType":"API"
          }
    register: api_response
    tags: "api-call"

  - name: Store API auth token
     ansible.builtin.set_fact:
            ome_auth_token: "{{ api_response.x_auth_token }}"
    tags: "api-call"


  - name: Get attribute details
    uri:
       url: "https://{{ hostname }}/api/TemplateService/Templates(11)/Views(1)/AttributeViewDetails"
       validate_certs: false
       method: get
       #body_format: json
       #body: |
        # {"privileges":{{ admin_priv.json.privileges }}}
       headers:
         X-Auth-Token: "{{ ome_auth_token }}"
       status_code: 200,201,204,409
    register: api_output

  - name: Save device_info to a file
    copy:
      content: "{{ api_output | to_nice_json }}"
      dest: "./output-json/api_output.json"
Once we have the JSON file with the complete set of attributes, we can find the exact attribute we want to modify. Given the attribute JSON file can span thousands of lines, we can use a simple python script to run a quick search of the attributes file based on keywords. Here are a few lines that can retrieve all the attributes containing Email:
import json

with open('./output-json/api_output.json') as f:
    data = json.load(f)

for item in data['json']['AttributeGroups'][0]['SubAttributeGroups']:

    if item['DisplayName'].find("Email") >-1:
        print('\n')
        print(item['DisplayName'])
        print('-------------------------')
        for subitem in item['Attributes']:
            print(subitem['DisplayName'])
Once we have the attribute that needs to be modified, we can use the ome_template module with (a) command set to modify and (b) attribute name and value set as follows:
- name: Modify template
     dellemc.openmanage.ome_template:
        hostname: "{{ hostname }}"
        username: "{{ username }}"
        password: "{{ password }}"
        validate_certs: no
        command: "modify"
        template_name: "deploy_clone"
        attributes:
          Attributes:
            - DisplayName: 'iDRAC, RAC Email Alert, EmailAlert 1 Email Alert Address'
              Value: "world123@test.com"
Device grouping and deployment
To apply templates to multiple devices, we can create device groups and then apply the deployment template for the entire group. To add devices to a group, you can create an array of devices. Here, I am passing the entire set of devices that I queried using ome_device_info:
- name: Retrieve basic inventory of all devices.
       dellemc.openmanage.ome_device_info:
        hostname: "{{ hostname }}"
        username: "{{ username }}"
        password: "{{ password }}"
        validate_certs: no
      register: device_info_result

- name: get all service tags
      set_fact:
        service_tags: "{{ service_tags + [item.DeviceServiceTag] }}"
      loop: "{{ device_info_result.device_info.value }}"
      no_log: true

- name: Create a device group
       dellemc.openmanage.ome_groups:
        hostname: "{{ hostname }}"
        username: "{{ username }}"
        password: "{{ password }}"
        validate_certs: no
        name: "demo-group-all"


- name: Add devices to a static device group
       dellemc.openmanage.ome_device_group:
        hostname: "{{ hostname }}"
        username: "{{ username }}"
        password: "{{ password }}"
        validate_certs: no
        name: "demo-group-all"
         device_service_tags: "{{service_tags}}"
Now, we are ready to deploy our template to the device group we created using the same ome_template module but with command set to deploy:
- name: Deploy template on groups
     dellemc.openmanage.ome_template:
        hostname: "{{ hostname }}"
        username: "{{ username }}"
        password: "{{ password }}"
        validate_certs: no
        command: "deploy"
        template_name: "deploy_clone"
        device_group_names:
          - "deploy_group"
You can watch the following video to see in depth how the different steps of the workflow are run:
Conclusion
To recap, we’ve covered how to create templates, query and find the available attributes we can modify, and then modify them in a template, as well as how to group devices and deploy templates to those groups. You can find the code mentioned in this blog on GitHub as part of this Automation examples repo.
Author: Parasar Kodati, Engineering Technologist, Dell ISG

Generative AI Tools for Infrastructure As Code Practitioners
Fri, 01 Dec 2023 15:32:51 -0000
|Read Time: 0 minutes
Today, Infrastructure as code is a mainstream technology used extensively by DevOps and ITOps engineers to manage dynamic IT environments consisting of data, applications, and infrastructure with increasing scale, complexity, and diversity. With a GitOps driven workflow, engineers can bring much needed standardization, security, and operational consistency across diverse environments. While there are a multitude of compelling reasons to embrace IaC, one innovation tips the scales toward a resounding yes, and that is generative AI. When coding assistants were released throughout this year, there was some skepticism around the accuracy of generated code, however this game-changing technology is evolving rapidly and becoming a key enabler for IaC, transforming it from a best practice to an indispensable strategy.
In this blog post, we'll explore some of the specific tools under the GenAI umbrella and how they can help you accelerate your workflows, learning, and even your career! Given how OpenAI has been leading the industry with generative AI tools like ChatGPT, I am going to refer to many of the specific tools from OpenAI. That said, many broad GenAI capabilities are possible with other capable large language models. To learn more, check out this great whitepaper on building general purpose LLM environments by my colleagues at Dell.
Code generation
If I have to choose between a monthly haircut or a generative code assistant subscription, I would choose the latter. Tools like GitHub copilot are becoming indispensable no matter which programming language or framework you use. These tools cut down the time it takes to create the building blocks of code necessary for automating tasks, so elegantly generated that you will not find a single line of generated code without a meaningful comment that your high school English teacher would be proud of. Examples of how this can help are shown in this Ansible for OpenManage Enterprise video.
Code interpretation
Large Language Models or LLMs are capable of interpreting code from a wide variety of programming languages thanks to their extensive training with millions of lines of code. This code interpretation is another huge capability where you can prompt the models with code, often easier than plain English. This can be especially helpful when refactoring code or when engineers are tasked with understanding and improving upon existing automation scripts. Following is a quick example where I generated the Ansible equivalent of good old Shell script using the latest ChatGPT 4 model.
Shell script input to create compressed backup of a folder:
#!/bin/bash

# Set the directory to back up and the backup location
DIRECTORY_TO_BACKUP="/home/user/data"
BACKUP_LOCATION="/backup"
TIMESTAMP=$(date +"%F")
BACKUP_FILE="backup-$TIMESTAMP.tar.gz"

# Create the backup
tar -czf $BACKUP_LOCATION/$BACKUP_FILE $DIRECTORY_TO_BACKUP

# Check if the backup was successful
if [ $? -eq 0 ]; then
  echo "Backup completed successfully."
else
  echo "Backup failed." >&2
fi
Ansible output I got the first time:
---
- name: Create Backup of Directory
  hosts: all
  tasks:
    - name: Create backup file
       ansible.builtin.archive:
        path: /home/user/data
        dest: /backup/backup-{{ ansible_date_time.iso8601_basic_short }}.tar.gz
        format: gz
Output received when I prompted the model for a more structured code block with variables:
---
- name: Create Backup of Directory with Variables
  hosts: all
  vars:
    backup_source: /home/user/data # Define the source directory to back up
    backup_destination: /backup # Define the backup destination directory
    backup_filename: "backup-{{ ansible_date_time.iso8601_basic_short }}.tar.gz" # Backup filename with a timestamp
  tasks:
    - name: Create backup directory if it does not exist
      ansible.builtin.file:
        path: "{{ backup_destination }}"
        state: directory
        mode: '0755'

    - name: Create backup file
      ansible.builtin.archive:
        path: "{{ backup_source }}"
        dest: "{{ backup_destination }}/{{ backup_filename }}"
        format: gz
The latest ChatGPT interface supports attaching files, so you don’t even have to copy-paste code for refactoring. Simply organize the files and attach them to your prompt.
Error analysis and debugging
If you think copy-pasting error messages into Stack Overflow is the best way to debug, think again. LLM-based code interpreter tools can analyze error messages and logs and, in many cases, identify the root causes for frequently occurring issues. This applies to any code, including Ansible playbooks and Terraform modules, where an LLM can swiftly recommend fixes, link to the relevant documentation, or even automate the resolution process in some cases.
Prompt engineering
If you think the term “prompt engineering” is just to make fun of GenAI tools, it’s time for a reframe in perspective. Prompting has become a critical factor in determining the accuracy of responses from LLMs. The more specific and detailed the prompt, the more useable the response. Here are some Infrastructure as code examples:
"I am working on a Terraform project where I need to provision an AWS EC2 instance with specific requirements: it should be of type 't2.micro', within the 'us-east-1' region, and include tags for 'Name' as 'MyInstance' and 'Environment' as 'Development'. Could you provide me with the Terraform code snippet that defines this resource?"
"I need to create an Ansible playbook that performs a common operation: updating all packages on a group of Ubuntu servers. The playbook should be idempotent and only target servers in the 'webservers' group. It must also restart the 'nginx' service only if the updates require a restart. Can you generate the YAML code for this playbook?"
And, if you are on a mission to change the world with Automation, maybe something like this:
"For my automation scripts using Python in a DevOps context, I require a robust error handling strategy that logs errors to a file and sends an email notification when a critical failure occurs. The script is meant to automate the deployment process. Could you provide a Python code sample that demonstrates this error handling? Here is the code: <your python code>"
So, if needed, skip the coffee a few times or a haircut, but please let a code assistant help you.
Your own GPT
Already have a ChatGPT tab in your browser at all times? Already a prompting machine? There is more you can do with GenAI than just ‘plain’ (very interesting how quickly this technology is becoming table stakes and commoditized) code generation.
Thanks to the recently announced GPTs and Assistant API by OpenAI, you can create a tailor-built model that is significantly faster and more precise in responses. You can train GPT models with anything from a policy document to coding guidelines to a sizing calculator for your IT infrastructure and have chat bots use these backend models to answer queries from customers or internal stakeholders. Please note that this does have a cost associated with it depending on the number of clients and usage. Please visit the OpenAI website to check out various plans and pricing. While we won’t go into detail on the topic in this particular blog, let me lay out the key elements that make up a custom GPT:
- Code Interpreter
- Knowledge Retrieval
- Your own functions
Code interpreter
This is not much different from the coding capabilities of ChatGPT or GitHub copilot. In the context of creating custom GPTs, you can basically check this as a required tool. You may ask, “why do you even have to select this foundational feature?” Put simply, it’s because of the pay-for-what-you-use pricing model in which users who don’t need this capability can uncheck it.
Knowledge retrieval
AI-powered knowledge retrieval systems can instantly pull up relevant technical documentation and best practices that are pertinent to the task at hand, whether it's crafting an Ansible playbook or defining resources in Terraform. This immediate access to information accelerates the development process and aids in maintaining industry standards across both platforms. Stay tuned for examples in future blog posts.
Your own functions
If you have already built scripts and routines to compute or make decisions, you can incorporate them into your custom GPT as well. I recently saw an example where an ROI calculator for switching to solar power had been incorporated into a chat bot to help customers visiting their website evaluate the switch to solar. Your GPT can be a sizer tool or a performance benchmarking tool for the end user for which you are building it.
Proprietary and sensitive data
While LLMs are the best thing to happen to programmers in a long time, one should exercise extreme caution when using data that is not publicly available to train AI models. Depending on the use case, extensive guard rails must be put in place when using sensitive data or proprietary data in your prompts or knowledge documents for training. If such guard rails do not exist in your organization, consider championing to create them and be a part of the process of helping your organization achieve a greater degree of maturity in AI adoption.
Dell and AI
Dell has been at the forefront of the GenAI revolution as the leading infrastructure provider for Artificial Intelligence solutions for the enterprise. Check out this insightful talk on Dell AI strategy by CTO John Roese that goes over A-in, AI-on, AI-for and AI-with aspects of Dell’s approach. Following are more resources to learn about infrastructure setup for LLM training and deployment in particular:
- Blog: Dell and Meta Collaborate to Drive Generative AI Innovation
- White Paper: Llama 2: Inferencing on a Single GPU
- Design Guide: Generative AI in the Enterprise – Inferencing
Author: Parasar Kodati, Engineering Technologist, Dell ISG

Dell OpenManage Enterprise Operations with Ansible Part 1: Inventory Management
Tue, 14 Nov 2023 14:36:09 -0000
|Read Time: 0 minutes
The OpenManage collection
Dell OpenManage Enterprise (OME) is a powerful fleet management tool for managing and monitoring Dell PowerEdge server infrastructure. Very recently, Dell announced OME 4.0, complete with a litany of new functionality that my colleague Mark detailed in another blog. Here, we'll explore how to automate inventory management of devices managed by OME using Ansible.
Prerequisites
Before we get started, ensure you have Ansible and Python installed on your system. Additionally, you will need to install Dell’s openmanage Ansible collection from Ansible Galaxy using the following command:
ansible-galaxy collection install dellemc.openmanage
The source code and examples for the openmanage collection can be found on GitHub as well. Note that this collection includes modules and roles for iDRAC/Redfish interfaces as well as modules for OpenManage Enterprise with complete fleet management workflows. In this blog, we will look at examples from the OME modules within the collection.
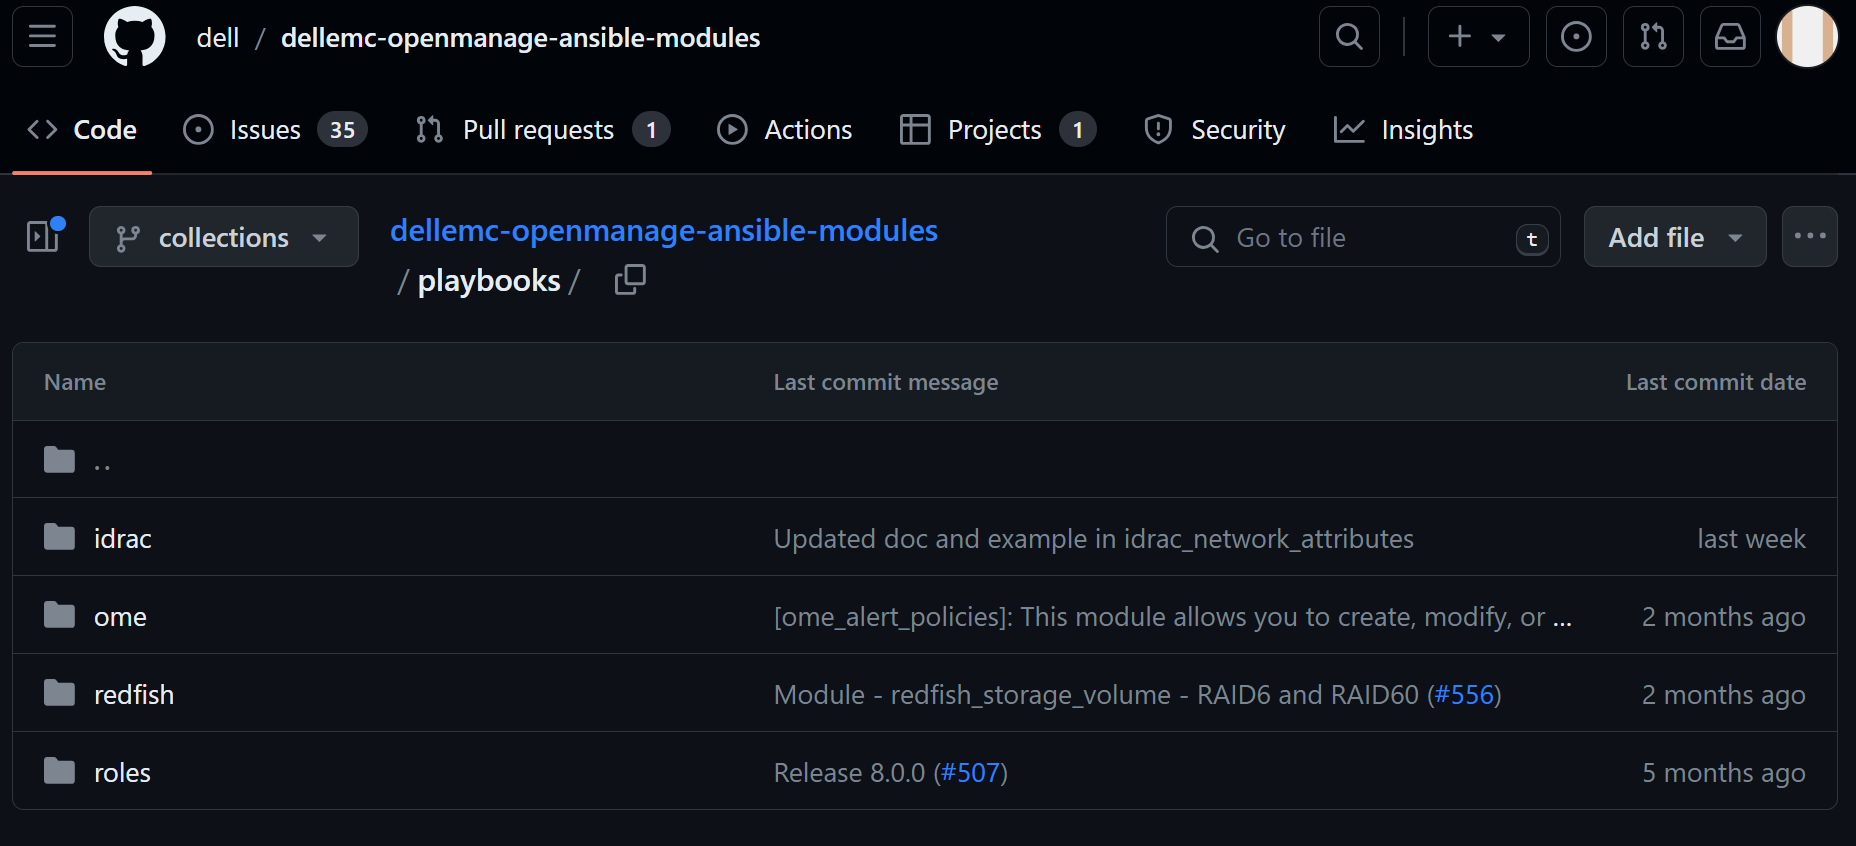
Figure 1. Dell openmanage ansible modules on GitHub
Inventory management workflows
Inventory management typically involves gathering details like the different devices under management, their health information, and so on. The dellemc.openmanage.ome_device_info is the optimal module for collecting the most information. Let’s dig into some tasks to get this information.
Retrieve basic inventory
This task retrieves basic inventory information for all devices managed by OME:
   - name: Retrieve basic inventory of all devices
      dellemc.openmanage.ome_device_info:
       hostname: "{{ hostname }}"
       username: "{{ username }}"
       password: "{{ password }}"
       validate_certs: no
     register: device_info_result
Once we have the output of this captured in a variable like device_info_result, we can drill down into the object to retrieve data like the number of servers and their service tags and print such information using the debug task:
   - name: Device count
     debug:
       msg: "Number of devices: {{ device_info_result.device_info.value | length }}"
- name: get all service tags
set_fact:
service_tags: "{{ service_tags + [item.DeviceServiceTag] }}"
loop: "{{ device_info_result.device_info.value }}"
no_log: true - name: List service tags of devices
debug:
msg: "{{ service_tags }}"Note that device_info_result is a huge object. To view all the information that is available to extract, write the contents of the variable to a JSON file:
   - name: Save device_info to a file
     copy:
       content: "{{ device_info_result | to_nice_json }}"
       dest: "./output-json/device_info_result.json"
Subsystem health
Subsystem health information is another body of information that is extremely granular. This information is not part of the default module task. To get this data, we need to explicitly set the fact_subsystem option to subsystem_health. Following is the task to retrieve subsystem health information for devices identified by their service tags. We pass the entire array of service tags to get all the information at once:
   - name: Retrieve subsystem health of specified devices identified by service tags.
      dellemc.openmanage.ome_device_info:
       hostname: "{{ hostname }}"
       username: "{{ username }}"
       password: "{{ password }}"
       validate_certs: no
       fact_subset: "subsystem_health"
        system_query_options:
          device_service_tag: "{{ service_tags }}"
     register: health_info_result
Using the register directive, we loaded the subsystem health information into the variable health_info_result. Once again, we recommend writing this information to a JSON file using the following code in order to see the level of granularity that you can extract:
   - name: Save device health info to a file
     copy:
       content: "{{ health_info_result | to_nice_json }}"
       dest: "./output-json/health_info_result.json"
To identify device health issues, we loop through all the devices with the service_tags variable and check if there are any faults reported for each device. When faults are found, we store the fault information into a dictionary variable, shown as the inventory_issues variable in the following code. The dictionary variable has three fields: service tag, fault summary, and the fault list. Note that the fault list itself is an array containing all the faults for the device:
   - name: Gather information for devices with issues
     set_fact:
       inventory_issues: >
         {{
          inventory_issues  +
           [{
           'service_tag': item,
           'fault_summary': health_info_result['device_info']['device_service_tag'][service_tags[index]]['value'] | json_query('[?FaultSummaryList].FaultSummaryList[]'),
           'fault_list': health_info_result['device_info']['device_service_tag'][service_tags[index]]['value'] | json_query('[?FaultList].FaultList[]')
           }]
         }}
     loop: "{{ service_tags }}"
     when: " (health_info_result['device_info']['device_service_tag'][service_tags[index]]['value'] | json_query('[?FaultList].FaultList[]') | length) > 0"
     loop_control:
       index_var: index
     no_log: true
In the next task, we loop through the devices with issues and gather more detailed fault information for each. The tasks to perform this extraction are included in an external task file named device_issues.yml which is run for every member of the inventory_issues dictionary. Note that we are passing device_item and device_index as variables for each iteration of device_issues.yml:
   - name: Gather fault details
     include_tasks: device_issues.yml
     vars:
       device_item: "{{ item }}"
       device_index: "{{ index }}"
     loop: "{{ inventory_issues }}"
     loop_control:
       index_var: index
     no_log: true
Within the device_issues.yml, we first initialize a dictionary variable that can gather information about the faults for the device. The variable captures the subsystem, fault message, and the recommended action:
- name: Initialize specifics structure
  set_fact:
    current_device:
      {
        'service_tag': '',
        'subsystem': [],
        'Faults': [],
         'Recommendations':[]
      }
We loop through all the faults for the device and populate the objects of the dictionary variable:
- name: Assign fault specifics
  set_fact:
    current_device:
      service_tag: "{{ device_item.service_tag }}"
      Faults: "{{ current_device.Faults + [fault.Message] }}"
      Recommendations: "{{ current_device.Recommendations + [fault.RecommendedAction] }}"
  loop: "{{ device_item.fault_list }}"
  loop_control:
     loop_var: fault
  when: device_item.fault_list is defined
  no_log: true
We then append to a global variable that is aggregating the information for all the devices:
- name: Append current device to all_faults
  set_fact:
    fault_details: "{{ fault_details + [current_device] }}"
Back to the main YML script, once we have all the information captured in fault_details, we can print the information we need to store to a file:
    - name: Print fault details
      debug:
        msg: "Fault details: {{ item.Faults }}"
      loop: "{{ fault_details }}"
      loop_control:
        label: "{{ item.service_tag }}"
- name: Print recommendations
debug:
msg: "Recommended actions: {{ item.Recommendations }}"
loop: "{{ fault_details }}"
loop_control:
label: "{{ item.service_tag }}"Check out the following video to see how the different steps of the workflow are run:
Conclusion
To recap, we looked at the various information gathering tasks within inventory management of a large PowerEdge server footprint. Note that I used health information objects to demonstrate how to drill down to find the information you need, however you can do this with any fact subset that can retrieved using the dellemc.openmanage.ome_device_info module. You can find the code from this blog on GitHub as part of this Automation examples repo.
Author: Parasar Kodati, Engineering Technologist, Dell ISG

Bringing Efficiency to Dell Business with RabbitMQ Messaging Self-Service

Mon, 23 Oct 2023 16:07:34 -0000
|Read Time: 0 minutes
RabbitMQ messaging platform is widely used in Dell Digital to connect various distributed heterogeneous applications at scale. It provides a common platform to exchange messages between producing applications and consuming applications.
Providing a ready-to-use, production-grade RabbitMQ messaging platform to application developers requires wiring up various services from multiple departments across Dell Digital. Traditionally, to avail a RabbitMQ platform, an application developer triggers the process by submitting a ticket to the messaging platform team, and a series of manual processes kicks off for services (such as VM provisioning, RabbitMQ setup, load balancer, security configuration, and monitoring). Each of these touchpoint interfaces could again have an internal dependency on other systems to fulfill their service. Each of these service interfaces must maintain the requester/developer information as part of the fulfillment service to the respective datastore. If there are any challenges to understanding the request from the requester, it might end up with lengthy email conversations to record the fulfillment process. Overall, the ticket-based approach to delivering a service to end users is not only inefficient but also time-consuming. The entire flow of activities can take an estimated 3 to 4 weeks to complete. The ability to fulfill the service quickly and seamlessly becomes indispensable for a large organization like Dell with a developer workforce of about 4000.
So, how did we streamline the fulfillment process flow?
The answer is implementing a smart workflow. With a charter to provide Platform as a Service (PaaS) for RabbitMQ, once a request is accepted, the messaging team owns the entire process chain.
Transforming such a manually intensive process flow into a fully automated self-service solution is not only exhilarating but also a modernization journey in to provide an exceptional user experience. The RabbitMQ cloud self-service provisioning portal is a unified and integrated solution that enables data center resources, installs required software, and configures various features to provide a ready-to-use RabbitMQ messaging platform. It provides a complete end-to-end solution, delivering a seamless experience to developers. There is no dependency on any team to avail service, resulting in less friction and thus improving overall efficiencies, including cost and time savings.
We followed the Saga architecture pattern to manage this complex process flow across heterogeneous distributed systems while maintaining data consistency. We broke down the process into multiple stages, with each stage that is further divided into smaller manageable steps. Each stage corresponds to a call to a service-providing system performed in a coordinated manner to complete the whole process. These stages are designed to be idempotent, meaning they can be safely retried if a failure occurs. This is especially important in distributed systems where the processing time of different services or processes may vary. This approach allows asynchronous processing allowing greater concurrency and performance.
What do we provide to our customers?
We offer developers self-service access to on-demand enterprise-ready RabbitMQ clusters hosted on a VM or in a private cloud curated with a predefined service catalog. The service catalog enlists essential service features including the price that is associated with each item. We standardized the landscape of the service provisioning by the size of the cluster, hosting platform, platform capacity, and high availability. Users browse the catalog, learn about the service offering from the description, and launch it all on their own. The key Service Level Objective (SLO) for the RabbitMQ self-service is offering a scalable, resilient RabbitMQ platform through an intuitive portal with the availability of support documentation, accessibility to technical support channels, adherence to organizational security with data protection, and access controls.
What is our business value stream?
- Autonomy - Enable developers to provision and deprovision platforms at any time at their own pace by moving the control to the hands of the developers. They can focus on their core business implementation without worrying about resource availability. They can plan their business releases in a more deterministic manner. This autonomy helps increase developer productivity.
- 24/7 availability – RabbitMQ self-service operates around the clock regardless of any business hours. Developers and users can access this service from any time zone with uninterrupted access.
- Visibility – Real-time visibility and tracking of the service delivery progress.
- Stability – Improve stability and reduce manual errors with automation.
- Cost and time saving – Self-service significantly reduces operational costs by reducing manual work and provides significant time savings for both the application team and the RabbitMQ service owner. No more lengthy email exchanges, no need to continuously monitor ticket status, no need to wait for multiple platform owners to complete their tasks, no integration bottleneck, and no manual errors to revert. Thanks to these simplifications, the entire fulfillment process can be completed within 1.5 hours for “RabbitMQ platform hosting on VM” and within 10 minutes for “RabbitMQ platform hosting in Kubernetes container”. Previously, these processes would have required 3+ weeks.
How do we measure service quality?
We built observability by collecting various data points ranging from infrastructure, RabbitMQ platform, and applications. We created a dashboard with a bird’s eye view and an to examine the details separated by category. These details include platform uptime, latency, throughput, usage, platform growth, historical health, infrastructure usage, and I/O metrics to name a few. We have a proactive alerting mechanism to identify any potential issues before they create a major impact on the business.
The Dell self-service cloud portal has an integrated reporting feature that provides insight into key performance indicators across the entire self-service management spectrum, including RabbitMQ service. These KPIs include self-service failure rate, self-service adoption rate, platform provisioning time, and so on.
We continuously monitor and measure these metrics to uncover opportunity areas, service effectiveness, service quality, and customer satisfaction rates. The objective is to offer services to developers more effectively leading to increased efficiency and a better self-sustained Dell Digital ecosystem.
About the Author: Gitanjali Sahoo
Gitanjali Sahoo is the Senior Manager of the Application Messaging Platform under Cloud Platform Service. She led several automation implementations and PaaS capabilities to operate efficiently while sustaining the growth of the platform. In her current role, her core focus is delivering highly available, scalable, robust messaging platforms enabling PaaS capability and providing a seamless experience for Dell application teams.

Q3 2023: New and Updated Terraform Providers for Dell Infrastructure
Mon, 02 Oct 2023 12:49:02 -0000
|Read Time: 0 minutes
We just concluded three quarters of Terraform provider development for Dell infrastructure, and we have some exciting updates to existing providers as well as two brand new providers for PowerScale and PowerEdge node (Redfish-interface) workflows! You can check out the first two releases of Terraform providers here: Q1-2023 and Q2-2023.
We are excited to announce the following new features for the Terraform integrations for Dell infrastructure:
- NEW provider! v1.0 of the provider for PowerScale
- v1.2 of the provider for PowerFlex
- v1.0 of the provider for PowerMax
- NEW provider! v1.0 Terraform Provider for Redfish v1.0.0
- v1.1 Terraform Provider for OME
Terraform Provider for PowerScale v1.0
The first version of the PowerScale provider has a lot of net new capabilities in the form of new resources and data sources. Add to that a set of examples and utilities for AWS deployment, there is enough great material to have its own blog post. Please see this post--Introducing Terraform Provider for Dell PowerScale--all the details.
Terraform Provider for PowerFlex v1.2: it’s all about day-1 deployment
Day-1 deployment refers to the initial provisioning and configuration of hardware and software resources before any production workloads are deployed. A successful Day-1 deployment sets the foundation for the entire infrastructure's performance, scalability, and reliability. However, Day-1 deployment can be complex and time-consuming, often involving manual tasks, potential errors, and delays. This is where automation and the Dell PowerFlex Terraform Provider come into play.
Dell PowerFlex is the software defined leader of the storage industry, providing the foundational technology of Dell’s multicloud infrastructure as well as APEX Cloud Platforms variants for OpenShift and Azure. PowerFlex was the first platform in Dell’s ISG portfolio to have a Terraform provider. In the latest v1.2 release, the provider leapt forward in day-1 deployment operations of a PowerFlex cluster, now providing:
- New resource and data source for Cluster
- New resource and data source for MDM Cluster
- New resource and data source for User Management
- New data source for vTree (PowerFlex Volume Tree)
Now we’ll get into the details pertaining to these new features.
New resource and data source for Cluster
The cluster resource and data source are at the heart of day-1 deployment as well as ongoing cluster expansion and management. Cluster resource can be used to deploy or destroy 3- or 5-node clusters. Please refer the more detailed PowerFlex deployment guide here. The resource deploys all the foundational components of the PowerFlex architecture:
- Storage Data Client (SDC) -- consumes storage from the PowerFlex appliance
- Storage Data Server (SDS) -- contributes node storage to PowerFlex appliance
- Metadata Manager (MDM) -- manages the storage blocks and tracks data location across the system
- Storage Data Replication (SDR) -- enables native asynchronous replication on PowerFlex nodes
Following are the key elements of this resource:
- cluster for Cluster Installation Details
- lia_password for Lia Password
- mdm_password for MDM Password
- allow_non_secure_communication_with_lia to allow Non-Secure Communication With Lia
- allow_non_secure_communication_with_mdm to Allow Non-Secure Communication With MDM
- disable_non_mgmt_components_auth to Disable Non Mgmt Components Auth
- storage_pools for Storage Pool Details
- mdm_list for Cluster MDM Details
- protection_domains for Cluster Protection Domain Details
- sdc_list for Cluster SDC Details
- sdr_list for Cluster SDR Details
- sds_list for Cluster SDS Details
You can destroy a cluster but cannot update it. You can also import an existing cluster using the following command:
terraform import "powerflex_cluster.resource_block_name" "MDM_IP,MDM_Password,LIA_Password"You can find example of a complete cluster resource definition here.
New resource and data source for MDM Setup
Out of the core architecture components of PowerFlex, we already have resources for SDC and SDS. The MDM resource is for the ongoing management of the MDM cluster and has the following key parameters for the Primary, Secondary, Tie-breaker, and Standby nodes:
- Node ID
- Node name
- Node port
- IPs of the MDM type
- The management IPs for the MDM node type
- While the Standby MDM is optional, it does require the role parameter to be setup to one of [‘Manager’, ‘TieBreaker’]
You can find multiple examples of using MDM cluster resource here.
New resource and data source for User Management
With the User resource, you can perform all Create, Read, Update, and Delete (CRUD) operations as well as import existing users that are part of a PowerFlex cluster.
To import users, you can use any one of the following import formats:
terraform import powerflex_user.resource_block_name “<id>”or
terraform import powerflex_user.resource_block_name “id:<id>”or by username
terraform import powerflex_user.resource_block_name “name:<user_name>”New data source for vTree (PowerFlex Volume Tree)
Wouldn’t it be great to get all the storage details in one shot? The vTree data source is a comprehensive collection of the required storage volumes and their respective snapshot trees that can be queried using an array of the volume ids, volume names, or the vTree ids themselves. The data source returns vTree migration information as well.
You can find examples of specifying the query details for vTree data source here.
Terraform Provider for PowerMax v1.0
The PowerMax provider went through two beta versions, and we now have the official v1.0. While it’s a small release for the PowerMax provider, there is no arguing the importance of creating, scheduling, and managing snapshots on the World’s most secure mission-critical storage for demanding enterprise applications[1].
Following are the new PowerMax resources and data sources for this release:
- CRUD operations for snapshots-- including support for Secure snapshots.
- Here are examples of the new resource and data source.
- CRUD operations for snapshot policies-- ensure operational SLAs and data protection and retention compliance.
- Here are examples of the new resource and data source.
- CRUD operations for port group objects-- enable end-to-end provisioning workflow automation in Terraform with the existing resources for storage groups, host groups, and masking views.
- Here are examples of how to use the new resource and the data source for port groups.
New Terraform Provider for PowerEdge nodes (Redfish interface)
In addition to the comprehensive fleet management capabilities of OpenManage Enterprise UI, REST API, Ansible collections, and Terraform Provider, Dell has an extensive programmable interface at the node level with the iDRAC interface, Redfish-compliant API, and Ansible collections.
We are also introducing a Terraform provider called redfish to manage individual servers:
terraform {
  required_providers {
    redfish = {
      version = "1.0.0"
      source  = "registry.terraform.io/dell/redfish"
    }
  }
}
With this introduction, we now have the complete programmatic interface matrix for PowerEdge server management:
| OpenManage Enterprise | iDRAC/RedFish |
REST API | ✔ | ✔ |
Ansible collections | ✔ | ✔ |
Terraform Providers | ✔ | ✔ |
With the new Terraform Provider for Redfish interface for Dell PowerEdge servers, you can automate and manage server power cycles, iDRAC attributes, BIOS attributes, virtual media, storage volumes, user support, and firmware updates on individual servers. This release adds support for these functionalities and is the first major release of the Redfish provider.
The following resources and data resources are available to get and set the attributes related to the particular attribute groups:
- Power management resource
- iDRAC Attributes resource
- BIOS resource
- Storage Volume resource
- Virtual Media resource
- User account resource
- Simple Update resource
- In addition to the data source corresponding to the attribute groups, two new data sources for Firmware Inventory and System Boot have also been added. Here you can find the examples of all the data sources for the Redfish provider.
Terraform Provider for OME v1.1
In this release of the Terraform Provider for OpenManage Enterprise (OME), multiple resource have been added for device management and security. Following is a list of resources in Terraform provider for Dell OME:
Device discovery and management
New resources under device discovery and management:
- New Discovery resource for automated discovery of devices to be managed.
- New Devices resource to maintain the state of individual devices that are under OME management. Removing the device from the state will take the device out of OME management. The release includes the corresponding data source for devices.
- New Device Action resource.
- New Static Group resource to group devices for easier deployment and compliance.
Security
- New Application CSR resource for Certificate Signing Requests.
- New Application Certificate resource for providing authentication certificate.
- New User resource for performing CRUD operations for OME users.
- New OME Appliance Network resource.
Check out the corresponding data sources for these resources for more information.
Resources
Here are the link sets for key resources for each of the Dell Terraform providers:
- v1.0 of the provider for PowerScale
- v1.0 of the provider for PowerMax
- v1.2 of the provider for PowerFlex
- v1.1 of the provider for PowerStore
- Terraform Provider for Redfish v1.0.0
- Terraform Provider for OME v1.1
[1] Based on Dell internal analysis of cybersecurity capabilities of Dell PowerMax versus cybersecurity capabilities of competitive mainstream arrays supporting open systems and mainframe storage, April 2023
Author: Parasar Kodati, Engineering Technologist, Dell ISG

Introducing Terraform Provider for Dell PowerScale
Mon, 02 Oct 2023 12:47:27 -0000
|Read Time: 0 minutes
PowerScale is industry’s leading scale-out NAS platform, so extensively deployed that very soon we’ll be talking about Zetabytes of deployment. With one of the most extensive REST API libraries including management and data services, PowerScale has the second largest number of Ansible module downloads in Dell infrastructure, second only to openmanage collection. With its availability on AWS, the time for Terraform provider for PowerScale has arrived.
As part of the Terraform provider Q3-release, we are proud to introduce the new provider for Dell PowerScale! Additionally, now that PowerScale is available on AWS, I am thrilled to tell you about the new set of Terraform utilities and examples aimed to simplify PowerScale deployment on AWS.
Let’s dive right in.
Resources and data sources of PowerScale Provider
Here is how to initialize PowerScale provider and specify details of your OneFS instance:
terraform {
   required_providers {
    powerscale = {
      source = "registry.terraform.io/dell/powerscale"
    }
  }
}

provider "powerscale" {
  username = var.username
  password = var.password
  endpoint = var.endpoint
  insecure = var.insecure
}
In the very first release of PowerScale provider, we are introducing resources and data sources for entities related to:
- User and access management
- Data management
- Cluster management
User and access management
In this release of the provider, there are four sets of resources and data sources for user and access management:
AccessZone
AccessZones establish clear boundaries within a PowerScale cluster, delineating access for the purposes of multi-tenancy or multi-protocol support. They govern the permission or restriction of entry into specific regions of the cluster. Additionally, at the Access Zone level, authentication providers are set up and configured. Here is how you can manage Access Zones as resources and get information about them using the corresponding data source.
Users
The Users resource and data source roughly correspond to the Users REST API resource of PowerScale.
User groups
The User groups resource and data source roughly correspond to the Groups REST API resource of PowerScale.
Active Directory
The Active Directory resource and data source roughly correspond to the ADS Providers REST API resource of PowerScale.
Data Management
For data management, we are introducing resources and data sources for File System, NFS Exports, and SMB Shares in this release.
File system
NFS exports
SMB shares
Cluster Management
This datasource is used to query the existing cluster from PowerScale array. The information fetched from this data source can be used for getting the details, including config, identity, nodes, internal_networks and acs.
Day-1 Deployment on AWS
PowerScale on AWS offers customers an extremely performant and secure NAS platform for data intensive workloads on the cloud. There are many AWS Terraform modules to configure access management (IAM) and networking (VPC, Security Groups etc.) that can easily be modified to deploy a PowerScale cluster. Very soon, we will update this post to include a video explaining the steps to deploy and expand a PowerScale cluster on AWS. Please stay tuned!
Conclusion
In the data era that is defined by Artificial Intelligence, Infrastructure as code is an essential approach to manage highly scalable storage platforms like Dell PowerScale both on-prem and on cloud. With the availability of Terraform provider, PowerScale now has every modern programmable interface so that you have the choice and flexibility to adopt any one or a combination of these tools for scalable deployment and management. I will leave you with this fully loaded support matrix:
Automation platform | PowerScale support |
Ansible | ✔ |
Terraform | ✔ |
Python | ✔ |
PowerShell | ✔ |
REST API | ✔ |
ISI CLI | ✔ |
Resources
v1.0 of the provider for PowerScale
Author: Parasar Kodati, Engineering Technologist, Dell ISG

Q3 2023: Updated Ansible Collections for Dell Portfolio
Fri, 29 Sep 2023 17:33:34 -0000
|Read Time: 0 minutes
The Ansible collection release schedule for the storage platforms is now monthly--just like the openmanage collection--so starting this quarter, I will roll up the features we released for storage modules for the past three months of the quarter. Over the past quarter, we made major enhancements to Ansible collections for PowerScale and PowerFlex.
Roll out PowerFlex with Roles!
We introduced Ansible Roles for the openmanage Ansible collection to gather and package multiple steps into a single small Ansible code block. In release v1.8 and 1.9 of Ansible Collections for PowerFlex, we are introducing roles for PowerFlex, targeting day-1 deployment as well as ongoing day-2 cluster expansion and management. This is a huge milestone for PowerFlex deployment automation.
Here is a complete list of the different roles and the tasks available under each role:
Role | Workflows |
SDC | |
SDS | |
MDM | |
Tie Breaker (TB) | |
Gateway | |
SDR | |
WebUI | |
PowerScale Common | This role has installation tasks on a node and is common to all the components like SDC, SDS, MDM, and LIA on various Linux distributions. All other roles call upon these tasks with the appropriate Ansible environment variable. The vars folder of this role also has dependency installations for different Linux distros. |
My favorite roles are installation-related, where the role task reduces the Ansible code required to automate by an order of magnitude. For example, this MDM installation role automates 140 lines of Ansible automation:
- name: "Install and configure powerflex mdm"
     ansible.builtin.import_role:
       name: "powerflex_mdm"
     vars:
       powerflex_common_file_install_location: "/opt/scaleio/rpm"
       powerflex_mdm_password: password
       powerflex_mdm_state: present
Other tasks under the role have a similar definition. And following the Ansible module pattern, just flipping the powerflex_mdm_state parameter to absent uninstalls MDM. For the sake of completion, we provided separate tasks for configure and uninstall as part of every role.
Complete PowerFlex deployment
Now here is where all the roles come together. A complete PowerFlex install playbook looks remarkably elegant like this:
---
---
- name: "Install PowerFlex Common"
   hosts: all
   roles:
     - powerflex_common

- name: Install and configure PowerFlex MDM
   hosts: mdm
   roles:
     - powerflex_mdm

- name: Install and configure PowerFlex gateway
   hosts: gateway
   roles:
     - powerflex_gateway

- name: Install and configure PowerFlex TB
   hosts: tb
   vars_files:
     - vars_files/connection.yml
   roles:
     - powerflex_tb

- name: Install and configure PowerFlex Web UI
   hosts: webui
   vars_files:
     - vars_files/connection.yml
   roles:
     - powerflex_webui

- name: Install and configure PowerFlex SDC
   hosts: sdc
   vars_files:
     - vars_files/connection.yml
   roles:
     - powerflex_sdc

- name: Install and configure PowerFlex LIA
   hosts: lia
   vars_files:
     - vars_files/connection.yml
   roles:
     - powerflex_lia

- name: Install and configure PowerFlex SDS
   hosts: sds
   vars_files:
     - vars_files/connection.yml
   roles:
     - powerflex_sds

- name: Install PowerFlex SDR
   hosts: sdr
   roles:
     - powerflex_sdr
You can define your inventory based on the exact PowerFlex node setup:
node0 ansible_host=10.1.1.1 ansible_port=22 ansible_ssh_pass=password ansible_user=root
node1 ansible_host=10.x.x.x ansible_port=22 ansible_ssh_pass=password ansible_user=root
node2 ansible_host=10.x.x.y ansible_port=22 ansible_ssh_pass=password ansible_user=root

[mdm]
node0
node1

[tb]
node2

[sdc]
node2

[lia]
node0
node1
node2

[sds]
node0
node1
node2Note: You can change the defaults of each of the component installations as well update the corresponding /defaults/main.yml, which looks like this for SDC:
---
powerflex_sdc_driver_sync_repo_address: 'ftp://ftp.emc.com/'
powerflex_sdc_driver_sync_repo_user: 'QNzgdxXix'
powerflex_sdc_driver_sync_repo_password: 'Aw3wFAwAq3'
powerflex_sdc_driver_sync_repo_local_dir: '/bin/emc/scaleio/scini_sync/driver_cache/'
powerflex_sdc_driver_sync_user_private_rsa_key_src: ''
powerflex_sdc_driver_sync_user_private_rsa_key_dest: '/bin/emc/scaleio/scini_sync/scini_key'
powerflex_sdc_driver_sync_repo_public_rsa_key_src: ''
powerflex_sdc_driver_sync_repo_public_rsa_key_dest: '/bin/emc/scaleio/scini_sync/scini_repo_key.pub'
powerflex_sdc_driver_sync_module_sigcheck: 1
powerflex_sdc_driver_sync_emc_public_gpg_key_src: ../../../files/RPM-GPG-KEY-powerflex_2.0.*.0
powerflex_sdc_driver_sync_emc_public_gpg_key_dest: '/bin/emc/scaleio/scini_sync/emc_key.pub'
powerflex_sdc_driver_sync_sync_pattern: .*
powerflex_sdc_state: present
powerflex_sdc_name: sdc_test
powerflex_sdc_performance_profile: Compact
file_glob_name: sdc
i_am_sure: 1
powerflex_role_environment:
Please look at the structure of this repo folder to setup your Ansible project so that you don’t miss the different levels of variables for example. I personally can’t wait to redeploy my PowerFlex lab setup both on-prem and on AWS with these roles. I will consider sharing any insights of that in a separate blog.
Ansible collection for PowerScale v2.0, 2.1, and 2.2
Following are the enhancements for Ansible Collection for PowerScale v2.0, 2.1, and 2.2:
- PowerScale is known for its extensive multi-protocol support, and S3 protocol enables use cases like application access to object storage with S3 API and as a data protection target. The new s3_bucket Ansible module now allows you to do CRUD operations for S3 buckets on PowerScale. You can find examples here.
- New modules for more granular NFS settings:
- Nfs_default_settings
- Nfs_global_settings
- Nfs_zone_settings
- The Info module has also been updated to fetch with the above NFS settings.
- map_root and map_non_root in the existing NFS Export (nfs) module for root and non-root access of the share. New examples added to the NFS modules examples.
- Enhanced AccessZone module with:
- Ability to reorder Access Zone Auth providers using the priority parameter of the auth_providers field elements, as shown in the following example:
        auth_providers:
          - provider_name: "System"
            provider_type: "file"
            priority: 2
          - provider_name: "ansildap"
            provider_type: "ldap"
priority: 1- AD module
- The ADS module for Active Directory integration is updated to support Service Principal Names (SPN). An SPN is a unique identifier for a service instance in a network, typically used within Windows environments and associated with the Kerberos authentication protocol. Learn more about SPNs here.
- Adding an SPN from AD looks like this:
- name: Add an SPN
       dellemc.powerscale.ads:
        onefs_host: "{{ onefs_host }}"
        api_user: "{{ api_user }}"
        api_password: "{{ api_password }}"
        verify_ssl: "{{ verify_ssl }}"
        domain_name: "{{ domain_name }}"
        spns:
          - spn: "HOST/test1"
state: "{{ state_present }}"- As you would expect, state: absent will remove the SPN. There is also a command parameter that takes two values: check and fix.
- Network Pool module
- The SmartConnect feature of PowerScale OneFS simplifies network configuration of a PowerScale cluster by enabling intelligent client connection load-balancing and failover capabilities. Learn more here.
- The Network Pool module has been updated to support specifying SmartConnect Zone aliases (DNS names). Here is an example:
- name: Network pool Operations on PowerScale
  hosts: localhost
  connection: local
  vars:
    onefs_host: '10.**.**.**'
    verify_ssl: false
    api_user: 'user'
    api_password: 'Password'
    state_present: 'present'
    state_absent: 'absent'
    access_zone: 'System'
    access_zone_modify: "test"
    groupnet_name: 'groupnet0'
    subnet_name: 'subnet0'
    description: "pool Created by Ansible"
    new_pool_name: "rename_Test_pool_1"
     additional_pool_params_mod:
      ranges:
        - low: "10.**.**.176"
          high: "10.**.**.178"
      range_state: "add"
      ifaces:
        - iface: "ext-1"
          lnn: 1
        - iface: "ext-2"
          lnn: 1
      iface_state: "add"
      static_routes:
        - gateway: "10.**.**.**"
          prefixlen: 21
          subnet: "10.**.**.**"
    sc_params_mod:
      sc_dns_zone: "10.**.**.169"
      sc_connect_policy: "round_robin"
      sc_failover_policy: "round_robin"
      rebalance_policy: "auto"
      alloc_method: "static"
       sc_auto_unsuspend_delay: 0
      sc_ttl: 0
      aggregation_mode: "roundrobin"
      sc_dns_zone_aliases:
        - "Test"
Ansible collection for PowerStore v2.1
This release of Ansible collections for PowerStore brings updates to two modules to manage and operate NAS on PowerStore:
- Filesystem - support for clone, refresh and restore. Example tasks can be found here.
- NAS server - support for creation and deletion. You can find examples of various Ansible tasks using the module here.
Ansible collection for OpenManage Enterprise
Here are the features that have become available over the last three monthly releases of the Ansible Collections for OpenManage Enterprise.
V8.1
- Support for subject alternative names while generating certificate signing requests on OME.
- Create a user on iDRAC using custom privileges.
- Create a firmware baseline on OME with the filter option of no reboot required.
- Retrieve all server items in the output for ome_device_info.
- Enhancement to add detailed job information for ome_discovery and ome_job_info.
V8.2
- redfish_firmware and ome_firmware_catalog module is enhanced to support IPv6 address.
- Module to support firmware rollback of server components.
- Support for retrieving alert policies, actions, categories, and message id information of alert policies for OME and OME Modular.
- ome_diagnostics module is enhanced to update changed flag status in response.
V8.3
- Module to manage OME alert policies.
- Support for RAID6 and RAID60 for module redfish_storage_volume.
- Support for reboot type options for module ome_firmware.
Conclusion
Ansible is the most extensively used automation platform for IT Operations, and Dell provides an exhaustive set of modules and roles to easily deploy and manage server and storage infrastructure on-prem as well as on Cloud. With the monthly release cadence for both storage and server modules, you can get access to our latest feature additions even faster. Enjoy coding your Dell infrastructure!
Author: Parasar Kodati, Engineering Technologist, Dell ISG

New and Updated Terraform Providers for Dell Infrastructure in Q2 2023 Release
Thu, 29 Jun 2023 12:35:34 -0000
|Read Time: 0 minutes
Last quarter we announced the first release of Terraform providers for Dell infrastructure. Now Terraform providers are also part of the Q2 release cadence of Dell infrastructure as code (IaC) integrations. We are excited to announce the following new features for the Terraform integrations for Dell infrastructure:
- v1.0 of the provider for OpenManage Enterprise
- v1.0 of the provider for PowerMax
- v1.1 of the provider for PowerFlex
- v1.1 of the provider for PowerStore
Terraform provider for OpenManage Enterprise v1.0
OpenManage Enterprise simplifies large-scale PowerEdge infrastructure management. You can define templates to manage the configuration of different groups of servers based on the workloads running on them. You can also create baseline versions for things like firmware and immediately get a report of noncompliance with the baseline. Now, as the scale of deployment increases—for example, in edge use cases—the configuration management can itself becomes arduous. This is where Terraform can manage the state of all the configurations and baselines in OpenManage Enterprise and deploy these for the server inventory as well.
The following resources and data sources are available in v1.0 of the OpenManage Enterprise provider:
Resources:
- Configuration baseline resource
- Configuration compliance resource
- Template resource
- Deployment resource
Data sources:
- Baseline compliance data source
- Group device data source
- Template data source
- VLAN network data source
Here are some examples of how to use OpenManage Enterprise resources and data sources to create and manage objects, and query from the objects:
Creating baselines
- Create baseline using service tags:
resource "ome_configuration_baseline" "baseline_name" {
   baseline_name      = "Baseline Name"
   device_servicetags = ["MXL1234", "MXL1235"]
}- Create baseline using device IDs:
resource "ome_configuration_baseline" "baseline1" {
   baseline_name   = "baseline1"
  ref_template_id = 745
  device_ids      = [10001, 10002]
  description     = "baseline description"
}- Create baseline using device service tag with daily notification scheduled:
resource "ome_configuration_baseline" "baseline2" {
   baseline_name      = "baseline2"
   ref_template_id    = 745
   device_servicetags = ["MXL1234", "MXL1235"]
  description        = "baseline description"
  schedule           = true
   notify_on_schedule = true
   email_addresses    = ["test@testmail.com"]
  cron               = "0 30 11 * * ? *"
   output_format      = "csv"
}- Create baseline using device IDs with daily notification on status changing to noncompliant:
Resource “ome_configuration_baseline” “baseline3” {
   baseline_name   = “baseline3”
  ref_template_id = 745
  device_ids      = [10001, 10002]
  description     = “baseline description”
  schedule        = true
  email_addresses = [“test@testmail.com”]
   output_format   = “pdf”
}
Compliance against baseline
- Remediate baseline for the specified target devices:
resource "ome_configuration_compliance" "remeditation0" {
  baseline_name = "baseline_name"
  target_devices = [
    {
       device_service_tag = "MX12345"
       compliance_status  = "Compliant"
    }
  ]
}- Remediate baseline for the specified target devices with scheduling:
resource "ome_configuration_compliance" "remeditation1" {
  baseline_name = "baseline_name"
  target_devices = [
    {
       device_service_tag = "MX12345"
       compliance_status  = "Compliant"
    }
  ]
  run_later = true
  cron      = "0 00 11 14 02 ? 2032"
}
Template creation and management
- Create a template with reference device id:
resource "ome_template" "template_1" {
  name         = "template_1"
  refdevice_id = 10001
}- Create a template with reference device servicetag:
resource "ome_template" "template_2" {
  name                 = "template_2"
   refdevice_servicetag = "MXL1234"
}- Create a template with fqdds as NIC:
resource "ome_template" "template_3" {
  name         = "template_3"
  refdevice_id = 10001
  fqdds        = "NIC"
}
Data source examples
- Fetch the main data source objects:
# Get configuration compliance report for a baseline
data "ome_configuration_report_info" "cr" {
  baseline_name = "BaselineName"
}

# Get Deviceid's and servicetags of all devices that belong to a specified list of groups
data "ome_groupdevices_info" "gd" {
   device_group_names = ["WINDOWS"]
}

# get the template details
data "ome_template_info" "data-template-1" {
  name = "template_1"
}

# get details of all the vlan networks
data "ome_vlannetworks_info" "data-vlans" {
}
The following set of examples uses locals heavily. Locals in Terraform is a way to assign a name to an expression, allowing it to be used multiple times within a module without repeating it. These named expressions are evaluated once and can then be referenced multiple times in other parts of a module configuration. This makes your configurations easier to read and maintain. Check out the Local Values topic in the HashiCorp documentation to learn more.
Let us continue with the examples:
- Get VLAN and template objects:
data "ome_vlannetworks_info" "vlans" {
}

data "ome_template_info" "template_data" {
  name = "template_4"
}- Fetch VLAN network ID from VLAN name for updating VLAN template attributes:
locals {
  vlan_network_map = { for vlan_network in data.ome_vlannetworks_info.vlans.vlan_networks : vlan_network.name => vlan_network.vlan_id }
}- Modify the attributes required for updating a template for assigning identity pool:
locals {
  attributes_value = tomap({
    "iDRAC,IO Identity Optimization,IOIDOpt 1 Initiator Persistence Policy" : "WarmReset, ColdReset, ACPowerLoss"
    "iDRAC,IO Identity Optimization,IOIDOpt 1 Storage Target Persistence Policy" : "WarmReset, ColdReset, ACPowerLoss"
    "iDRAC,IO Identity Optimization,IOIDOpt 1 Virtual Address Persistence Policy Auxiliary Powered" : "WarmReset, ColdReset, ACPowerLoss"
    "iDRAC,IO Identity Optimization,IOIDOpt 1 Virtual Address Persistence Policy Non Auxiliary Powered" : "WarmReset, ColdReset, ACPowerLoss"
    "iDRAC,IO Identity Optimization,IOIDOpt 1 IOIDOpt Enable" : "Enabled"

  })
   attributes_is_ignored = tomap({
    "iDRAC,IO Identity Optimization,IOIDOpt 1 Initiator Persistence Policy" : false
    "iDRAC,IO Identity Optimization,IOIDOpt 1 Storage Target Persistence Policy" : false
    "iDRAC,IO Identity Optimization,IOIDOpt 1 Virtual Address Persistence Policy Auxiliary Powered" : false
    "iDRAC,IO Identity Optimization,IOIDOpt 1 Virtual Address Persistence Policy Non Auxiliary Powered" : false
    "iDRAC,IO Identity Optimization,IOIDOpt 1 IOIDOpt Enable" : false

  })

   template_attributes = data.ome_template_info.template_data.attributes != null ? [
    for attr in data.ome_template_info.template_data.attributes : tomap({
      attribute_id = attr.attribute_id
       is_ignored   = lookup(local.attributes_is_ignored, attr.display_name, attr.is_ignored)
      display_name = attr.display_name
      value        = lookup(local.attributes_value, attr.display_name, attr.value)
  })] : null
}- Create a template in a resource and uncomment the lines as shown here to update the template to attach the identity pool and VLAN:
resource "ome_template" "template_4" {
  name                 = "template_4"
   refdevice_servicetag = "MXL1234"
  # attributes = local.template_attributes
  # identity_pool_name   = "IO1"
  # vlan = {
  #     propogate_vlan     = true
  #     bonding_technology = "NoTeaming"
  #     vlan_attributes = [
  #       {
  #         untagged_network = lookup(local.vlan_network_map, "VLAN1", 0)
  #         tagged_networks  = [0]
  #         is_nic_bonded    = false
  #         port             = 1
  #         nic_identifier   = "NIC in Mezzanine 1A"
  #       },
  #       {
  #         untagged_network = 0
  #         tagged_networks  = [lookup(local.vlan_network_map, "VLAN1", 0), lookup(local.vlan_network_map, "VLAN2", 0), lookup(local.vlan_network_map, "VLAN3", 0)]
  #         is_nic_bonded    = false
  #         port             = 1
  #         nic_identifier   = "NIC in Mezzanine 1B"
  #       },
  #     ]
  #   }
}- Modify the attributes required for updating a template using attribute IDs:
# get the template details
data "ome_template_info" "template_data1" {
  name = "template_5"
}

locals {
  attributes_map = tomap({
    2740260 : "One Way"
    2743100 : "Disabled"
  })

   template_attributes = data.ome_template_info.template_data1.attributes != null ? [
    for attr in data.ome_template_info.template_data1.attributes : tomap({
      attribute_id = attr.attribute_id
       is_ignored   = attr.is_ignored
      display_name = attr.display_name
      value        = lookup(local.attributes_map, attr.attribute_id, attr.value)
  })] : null
}- Create a template and update the attributes of the template:
# attributes are only updatable and is not applicable during create operation.
# attributes existing list can be fetched from a template with a datasource - ome_template_info as defined above.
# modified attributes list should be passed to update the attributes for a template
resource "ome_template" "template_5" {
  name                 = "template_5"
   refdevice_servicetag = "MXL1234"
  attributes           = local.template_attributes
}- Create multiple templates with template names and reference devices:
resource "ome_template" "templates" {
  count                = length(var.ome_template_names)
  name                 = var.ome_template_names[count.index]
   refdevice_servicetag = var.ome_template_servicetags[count.index]
}- Clone a deploy template to create compliance template:
resource "ome_template" "template_6" {
  name             = "template_6"
  reftemplate_name = "template_5"
  view_type        = "Compliance"
}- Create a deployment template from an XML:
resource "ome_template" "template_7" {
  name    = "template_7"
  content = file("../testdata/test_acc_template.xml")
}- Create a compliance template from an XML:
resource "ome_template" "template_8" {
  name      = "template_8"
  content   = file("../testdata/test_acc_template.xml")
  view_type = "Compliance"
}
Flexible and granular deployment of templates
- Deploy template using device service tags:
resource "ome_deployment" "deploy-template-1" {
   template_name      = "deploy-template-1"
   device_servicetags = ["MXL1234", "MXL1235"]
  job_retry_count    = 30
   sleep_interval     = 10
}- Deploy template using device IDs:
resource "ome_deployment" "deploy-template-2" {
  template_name = "deploy-template-2"
  device_ids    = [10001, 10002]
}- Get device IDs or service tags from a specified list of groups:
data "ome_groupdevices_info" "gd" {
   device_group_names = ["WINDOWS"]
}- Deploy template for group by fetching the device IDs using data sources:
resource "ome_deployment" "deploy-template-3" {
  template_name = "deploy-template-3"
  device_ids    = data.ome_groupdevices_info.gd.device_ids
}- Deploy template using device service tags with schedule:
resource "ome_deployment" "deploy-template-4" {
   template_name      = "deploy-template-4"
   device_servicetags = ["MXL1234"]
  run_later          = true
  cron               = "0 45 12 19 10 ? 2022"
}- Deploy template using device IDs and deploy device attributes:
resource "ome_deployment" "deploy-template-5" {
  template_name = "deploy-template-5"
  device_ids    = [10001, 10002]
  device_attributes = [
    {
       device_servicetags = ["MXL12345", "MXL23456"]
      attributes = [
        {
           attribute_id = 1197967
           display_name = "ServerTopology 1 Aisle Name"
           value        = "aisle updated value"
           is_ignored   = false
        }
      ]
    }
  ]
}- Deploy template using device IDs and boot to network ISO:
resource "ome_deployment" "deploy-template-6" {
  template_name = "deploy-template-6"
  device_ids    = [10001, 10002]
   boot_to_network_iso = {
    boot_to_network = true
    share_type      = "CIFS"
     iso_timeout     = 240
    iso_path        = "/cifsshare/unattended/unattended_rocky8.6.iso"
    share_detail = {
      ip_address = "192.168.0.2"
      share_name = ""
      work_group = ""
      user       = "username"
      password   = "password"
    }
  }
  job_retry_count = 30
}- Deploy template using device IDs by changing the job_retry_count and sleep_interval, and ignore the same during updates:
resource "ome_deployment" "deploy-template-7" {
   device_servicetags = ["MXL1234"]
   job_retry_count    = 30
   sleep_interval     = 10

  lifecycle {
    ignore_changes = [
       job_retry_count,
      sleep_interval
    ]
  }
}- Deploy template using device service tags and group names:
resource "ome_deployment" "deploy-template-8" {
  template_id        = 614
   device_servicetags = concat(data.ome_groupdevices_info.gd.device_servicetags, ["MXL1235"])
}
Terraform provider for PowerMax v1.0
My colleagues Paul and Florian did a great blog post on the Terraform provider for PowerMax when we announced the beta release last quarter. I am adding the details of the provider for the sake of completion here:
PowerMax resources
- PowerMax storage group:
resource "powermax_storagegroup" "test" {
  name   = "terraform_sg"
  srp_id = "SRP_1"
  slo    = "Gold"
  host_io_limit = {
     host_io_limit_io_sec = "1000"
    host_io_limit_mb_sec = "1000"
     dynamic_distribution = "Never"
  }
  volume_ids = ["0008F"]
}- PowerMax host:
resource "powermax_host" "host_1" {
  name      = "host_1"
  initiator = ["10000000c9fc4b7e"]
  host_flags = {
    volume_set_addressing = {
      override = true
      enabled  = true
    }
    openvms = {
      override = true
      enabled  = false
    }
  }
}- PowerMax host group:
 resource "powermax_hostgroup" "test_host_group" {
  # Optional
  host_flags = {
     avoid_reset_broadcast = {
      enabled  = true
      override = true
    }
  }
  host_ids = ["testHost"]
  name     = "host_group"
}- PowerMax port group:
resource "powermax_portgroup" "portgroup_1" {
  name     = "tfacc_pg_test_1"
  protocol = "SCSI_FC"
  ports = [
    {
      director_id = "OR-1C"
      port_id     = "0"
    }
  ]
}- PowerMax masking view:
 resource "powermax_maskingview" "test" {
  name             = "terraform_mv"
  storage_group_id = "terraform_sg"
  host_id          = "terraform_host"
   host_group_id    = ""
   port_group_id    = "terraform_pg"
}
PowerMax data sources
- Storage group with dot operations:
data "powermax_storagegroup" "test" {
  filter {
    names = ["esa_sg572"]
  }
}

output "storagegroup_data" {
  value = data.powermax_storagegroup.test
}

data "powermax_storagegroup" "testall" {
}

output "storagegroup_data_all" {
  value = data.powermax_storagegroup.testall
}- PowerMax host data source with dot operations to query the information needed:
data "powermax_host" "HostDsAll" {
}

data "powermax_host" "HostDsFiltered" {
  filter {
    # Optional list of IDs to filter
    names = [
       "Host124",
       "Host173",
    ]
  }
}

output "hostDsResultAll" {
  value = data.powermax_host.HostDsAll
}

output "hostDsResult" {
  value = data.powermax_host.HostDsFiltered
}- Host group data source:
data "powermax_hostgroup" "all" {}

output "all" {
  value = data.powermax_hostgroup.all
}

# List a specific hostgroup
data "powermax_hostgroup" "groups" {
  filter {
    names = ["host_group_example_1", "host_group_example_2"]
  }
}

output "groups" {
  value = data.powermax_hostgroup.groups
}- Port groups data source and dot operations to output information:
# List fibre portgroups.
data "powermax_portgroups" "fibreportgroups" {
  # Optional filter to list specified Portgroups names and/or type
  filter {
    # type for which portgroups to be listed  - fibre or iscsi
    type = "fibre"
    # Optional list of IDs to filter
    names = [
       "tfacc_test1_fibre",
       #"test2_fibre",
    ]
  }
}

data "powermax_portgroups" "scsiportgroups" {
  filter {
    type = "iscsi"
    # Optional filter to list specified Portgroups Names
  }
}

# List all portgroups.
data "powermax_portgroups" "allportgroups" {
  #filter {
  # Optional list of IDs to filter
  #names = [
  #  "test1",
  #  "test2",
  #]
  #}
}
output "fibreportgroups" {
  value = data.powermax_portgroups.fibreportgroups
}

output "scsiportgroups" {
  value = data.powermax_portgroups.scsiportgroups
}

output "allportgroups" {
  value = data.powermax_portgroups.allportgroups.port_groups
}- Masking view data source and dot operations to output information:
# List a specific maskingView
data "powermax_maskingview" "maskingViewFilter" {
  filter {
    names = ["terraform_mv_1", "terraform_mv_2"]
  }
}

output "maskingViewFilterResult" {
  value = data.powermax_maskingview.maskingViewFilter.masking_views
}

# List all maskingviews
data "powermax_maskingview" "allMaskingViews" {}

output "allMaskingViewsResult" {
  value = data.powermax_maskingview.allMaskingViews.masking_views
}
Terraform provider for PowerStore v1.1.0
In PowerStore v1.1, the following new resources and data sources are being introduced.
New resources for PowerStore
- Volume group resource:
resource "powerstore_volumegroup" "terraform-provider-test1" {
  # (resource arguments)
  description               = "Creating Volume Group"
  name                      = "test_volume_group"
   is_write_order_consistent = "false"
   protection_policy_id      = "01b8521d-26f5-479f-ac7d-3d8666097094"
  volume_ids                = ["140bb395-1d85-49ae-bde8-35070383bd92"]
}- Host resource:
resource "powerstore_host" "test" {
  name              = "new-host1"
  os_type           = "Linux"
  description       = "Creating host"
  host_connectivity = "Local_Only"
  initiators        = [{ port_name = "iqn.1994-05.com.redhat:88cb605"}]
}- Host group resource:
resource "powerstore_hostgroup" "test" {
  name        = "test_hostgroup"
  description = "Creating host group"
  host_ids    = ["42c60954-ea71-4b50-b172-63880cd48f99"]
}- Volume snapshot resource:
resource "powerstore_volume_snapshot" "test" {
  name                  = "test_snap"
  description           = "powerstore volume snapshot"
  volume_id             = "01d88dea-7d71-4a1b-abd6-be07f94aecd9"
   performance_policy_id = "default_medium"
   expiration_timestamp  = "2023-05-06T09:01:47Z"
}- Volume group snapshot resource:
resource "powerstore_volumegroup_snapshot" "test" {
  name                 = "test_snap"
  volume_group_id      = "075aeb23-c782-4cce-9372-5a2e31dc5138"
   expiration_timestamp = "2023-05-06T09:01:47Z"
}
New data sources for PowerStore
- Volume group data source:
data "powerstore_volumegroup" "test1" {
  name = "test_volume_group1"
}

output "volumeGroupResult" {
  value = data.powerstore_volumegroup.test1.volume_groups
}- Host data source:
data "powerstore_host" "test1" {
  name = "tf_host"
}

output "hostResult" {
  value = data.powerstore_host.test1.hosts
}- Host group data source:
data "powerstore_hostgroup" "test1" {
  name = "test_hostgroup1"
}

output "hostGroupResult" {
  value = data.powerstore_hostgroup.test1.host_groups
}- Volume snapshot data source:
data "powerstore_volume_snapshot" "test1" {
  name = "test_snap"
  #id = "adeeef05-aa68-4c17-b2d0-12c4a8e69176"
}

output "volumeSnapshotResult" {
  value = data.powerstore_volume_snapshot.test1.volumes
}- Volume group snapshot data source:
data "powerstore_volumegroup_snapshot" "test1" {
#  name = "test_volumegroup_snap"
}

output "volumeGroupSnapshotResult" {
  value = data.powerstore_volumegroup_snapshot.test1.volume_groups
}- Snapshot rule data source:
data "powerstore_snapshotrule" "test1" {
  name = "test_snapshotrule_1"
}

output "snapshotRule" {
  value = data.powerstore_snapshotrule.test1.snapshot_rules
}- Protection policy data source:
data "powerstore_protectionpolicy" "test1" {
  name = "terraform_protection_policy_2"
}

output "policyResult" {
  value = data.powerstore_protectionpolicy.test1.policies
}
Terraform provider for PowerFlex v1.1.0
We announced the very first provider for Dell PowerFlex last quarter, and here we have the next version with new functionality. In this release, we are introducing new resources and data sources to support the following activities:
- Create and manage SDCs
- Create and manage protection domains
- Create and manage storage pools
- Create and manage devices
Following are the details of the new resources and corresponding data sources.
Host mapping with PowerFlex SDCs
Storage Data Client (SDC) is the PowerFlex host-side software component that can be deployed on Windows, Linux, IBM AIX, ESXi, and other operating systems. In this release of the PowerFlex provider, a new resource is introduced to map multiple volumes to a single SDC. Here is an example of volumes being mapped using their ID or name:
resource "powerflex_sdc_volumes_mapping" "mapping-test" {
  id = "e3ce1fb600000001"
  volume_list = [
    {
      volume_id        = "edb2059700000002"
      limit_iops       = 140
      limit_bw_in_mbps = 19
      access_mode      = "ReadOnly"
    },
    {
      volume_name      = "terraform-vol"
      access_mode      = "ReadWrite"
      limit_iops       = 120
      limit_bw_in_mbps = 25
    }
  ]
}
To unmap all the volumes mapped to SDC, the following configuration can be used:
resource "powerflex_sdc_volumes_mapping" "mapping-test" {
  id          = "e3ce1fb600000001"
  volume_list = []
}
Data sources for storage data client and server components:
- PowerFlex SDC data source:
data "powerflex_sdc" "selected" {
  #id = "e3ce1fb500000000"
  name = "sdc_01"
}

# # Returns all sdcs matching criteria
output "allsdcresult" {
  value = data.powerflex_sdc.selected
}- PowerFlex SDS data source:
data "powerflex_sds" "example2" {
  # require field is either of protection_domain_name or protection_domain_id
   protection_domain_name = "domain1"
  # protection_domain_id = "202a046600000000"
  sds_names = ["SDS_01_MOD", "sds_1", "node4"]
  # sds_ids = ["6adfec1000000000", "6ae14ba900000006", "6ad58bd200000002"]
}

output "allsdcresult" {
  value = data.powerflex_sds.example2
}
PowerFlex protection domain resource and data source
Here is the resource definition of the protection domain:
resource "powerflex_protection_domain" "pd" {
  # required parameters  ======

  name = "domain_1"
  # optional parameters  ======
  active = true

  # SDS IOPS throttling
  # overall_io_network_throttling_in_kbps must be greater than the rest of the parameters
  # 0 indicates unlimited IOPS
   protected_maintenance_mode_network_throttling_in_kbps = 10 * 1024
   rebuild_network_throttling_in_kbps                    = 10 * 1024
   rebalance_network_throttling_in_kbps                  = 10 * 1024
   vtree_migration_network_throttling_in_kbps            = 10 * 1024
   overall_io_network_throttling_in_kbps                 = 20 * 1024

  # Fine granularity metadata caching
  fgl_metadata_cache_enabled      = true
   fgl_default_metadata_cache_size = 1024

  # Read Flash cache
  rf_cache_enabled          = true
  rf_cache_operational_mode = "ReadAndWrite"
   rf_cache_page_size_kb     = 16
   rf_cache_max_io_size_kb   = 32
}
All this information for an existing protection domain can be stored with the corresponding datastore, and information can be queried using the dot operator:
data "powerflex_protection_domain" "pd" {
  name = "domain1"
  # id = "202a046600000000"
}

output "inputPdID" {
  value = data.powerflex_protection_domain.pd.id
}

output "inputPdName" {
  value = data.powerflex_protection_domain.pd.name
}

output "pdResult" {
  value = data.powerflex_protection_domain.pd.protection_domains
}
PowerFlex storage pool resource and data source
Storage resources in PowerFlex are grouped into these storage pools based on certain attributes such as performance characteristics, types of disks used, and so on. Here is the resource definition of the storage pool resource:
resource "powerflex_storage_pool" "sp" {
  name = "storagepool3"
  #protection_domain_id = "202a046600000000"
  protection_domain_name = "domain1"
  media_type             = "HDD"
  use_rmcache            = false
  use_rfcache            = true
   #replication_journal_capacity = 34
   capacity_alert_high_threshold                               = 66
   capacity_alert_critical_threshold                           = 77
  zero_padding_enabled                                        = false
   protected_maintenance_mode_io_priority_policy               = "favorAppIos"
  protected_maintenance_mode_num_of_concurrent_ios_per_device = 7
   protected_maintenance_mode_bw_limit_per_device_in_kbps      = 1028
  rebalance_enabled                                           = false
   rebalance_io_priority_policy                                = "favorAppIos"
   rebalance_num_of_concurrent_ios_per_device                  = 7
   rebalance_bw_limit_per_device_in_kbps                       = 1032
   vtree_migration_io_priority_policy                          = "favorAppIos"
  vtree_migration_num_of_concurrent_ios_per_device            = 7
   vtree_migration_bw_limit_per_device_in_kbps                 = 1030
  spare_percentage                                            = 66
   rm_cache_write_handling_mode                                = "Passthrough"
  rebuild_enabled                                             = true
   rebuild_rebalance_parallelism                               = 5
  fragmentation                                               = false
}
And the corresponding data source to get this information from existing storage pools is as follows:
data "powerflex_storage_pool" "example" {
  //protection_domain_name = "domain1"
  protection_domain_id = "202a046600000000"
  //storage_pool_ids = ["c98ec35000000002", "c98e26e500000000"]
  storage_pool_names = ["pool2", "pool1"]
}


output "allsdcresult" {
  value = data.powerflex_storage_pool.example.storage_pools
}
Author: Parasar Kodati

Q2 2023 Release for Ansible Integrations with Dell Infrastructure
Thu, 29 Jun 2023 11:21:49 -0000
|Read Time: 0 minutes
Thanks to the quarterly release cadence of infrastructure as code integrations for Dell infrastructure, we have a great set of enhancements and improved functionality as part of the Q2 release. The Q2 release is all about data protection and data security. Data services that come with the ISG storage portfolio deliver huge value in terms of built-in data protection, security, and recovery mechanisms. This blog provides a summary of what’s new in the Ansible collections for Dell infrastructure:
Ansible Modules for PowerStore v2.0.0
- A new module to manage Storage Containers. More in the subsection below.
- An easier way to get replication_session details. The replication_session module is updated to use a new replication_group parameter, which can take either the name or ID of the group to get replication session details.
Support for PowerStore Storage Containers
Storage Containers is a logical group of vVol on PowerStore. Learn more here. In v2.0 of Ansible Collections for PowerStore, we are introducing a new module to create and manage the Storage Containers from within Ansible. Let’s start with the list of parameters for the Storage Container task:
Parameter name | Type | Description |
storage_container_id | string | Unique identifier of the storage container. Mutually exclusive with storage_container_name |
storage_container_name | string | Name of the storage container. Mutually exclusive with storage_container_id. Mandatory for creating a storage container. |
new_name | string | The new name of the storage container |
quota | int | The total number of bytes that can be provisioned/reserved against this storage container. |
quota_unit | string | Unit of the quota |
storage_protocol | string | The type of Storage Container.
|
high_water_mark | int | This is the percentage of the quota that can be consumed before an alert is raised. |
force_delete | bool | This option overrides the error and allows the deletion to continue in case there are any vVols associated with the storage container. |
state | string | The state of the storage container after execution of the task. Choices: ['present', 'absent'] |
storage_container_destination_state | str | The state of the storage container destination after execution of the task. Required while deleting the storage container destination. Choices: [present, absent] |
storage_container_destination | dict | Dict container remote system and remote storage container. |
remote_system
remote_address
user
password
validate_certs
port
timeout
remote_storage_container | str | The name/id of the remote system |
str | The IP address of the remote array | |
str | Username for the remote array | |
str | Password for the remote array | |
bool | Whether or not to verify the SSL certificate | |
int | Port of the remote array (443) | |
int | Time after which the connection will get terminated (120) | |
str | The unique name/id of the destination storage container on the remote array |
Here are some YAML snippet examples to use the new module:
Task | Example |
Get a storage container | - name: Get details of a storage container Let me call this snippet <basic-sc-details> for reference
|
Create a new storage container | <basic-sc-details> quota: 10
|
Delete a storage container | <basic-sc-details> state: 'absent' |
Create a storage container destination | <basic-sc-details> storage_container_destination: "Destination_container" |
Ansible Modules for PowerFlex v1.7.0
- A new module to create and manage snapshot policies
- An enhanced replication_consistency_group module to orchestrate workflows, such as failover and failback, that are essential for disaster recovery.
- An enhanced SDC module to assign a performance profile and option to remove an SDC altogether.
Create and manage snapshot policies
If you want to refresh your knowledge here is a great resource to learn all about snapshots and snapshot policy setup on PowerFlex. In this version of Ansible collections for PowerFlex, we are introducing a new module for snapshot policy setup and management from within Ansible.
Here are the parameters for the snapshot policy task in Ansible:
Parameter name | Type | Description |
snapshot_policy_id | str | Unique identifier of the snapshot policy |
snapshot_policy_name | str | Name of the snapshot policy |
new_name | str | The new name of the snapshot policy |
access_mode | str | Defines the access for all snapshots created with this snapshot policy |
secure_snapshots | bool | Defines whether the snapshots created from this snapshot policy will be secure and not editable or removable before the retention period is complete |
auto_snapshot_creation_cadence
-- time -- unit | dict -- int -- str | The auto snapshot creation cadence of the snapshot policy. |
num_of_retained_snapshots_per_level | list | The number of snapshots per retention level. There are one to six levels, and the first level has the most frequent snapshots. |
source_volume
-- id
-- name
-- auto_snap_removal_action -- detach_locked_auto_snapshots -- state | list of dict -- str -- str
-- bool
-- str | The source volume details to be added or removed.
-- Whether to detach the locked auto snapshots during the removal of the source volume. -- State of the source volume: |
pause | bool | Whether to pause or resume the snapshot policy |
state | str | State of the snapshot policy after execution of the task |
And some examples of how the task can be configured in a playbook:
Get details of a snapshot policy | - name: Get snapshot policy details using name Let me call the above code block <basic-policy-details> for reference |
Create a policy | <basic-policy-details> |
Delete a policy | <basic-policy-details> state: "absent" |
Add source volumes to a policy | <basic-policy-details> source_volume: |
Remove source volumes from a policy | <basic-policy-details> source_volume: |
Pause/resume a snapshot policy | <basic-policy-details> pause: True //False to resume |
Failover and failback workflows for consistency groups
Today Ansible collections for PowerFlex already has the replication consistency group module to create and manage consistency groups, and to create snapshots of these consistency groups. Now we are also adding workflows that are essential for disaster recovery. Here is what the playbook tasks look like for various DR tasks:
Task | Syntax |
Code block: <Access details and name of consistency group> | gateway_host: "{{gateway_host}}" |
Failover the RCG | - name: Failover the RCG rcg_state: 'failover' |
Restore the RCG | - name: Restore the RCG |
Switch over the RCG | - name: Switch over the RCG rcg_state: 'switchover' |
Synchronization of the RCG | - name: Synchronization of the RCG rcg_state: 'sync' |
Reverse the direction of replication for the RCG | - name: Reverse the direction of replication for the RCG rcg_state: 'reverse' |
Force switch over the RCG | - name: Force switch over the RCG rcg_state: 'switchover' force: true |
Ansible Modules for PowerScale v2.0.0
This release for Ansible Collections for PowerScale has enhancements related to the theme of identity and access management which is fundamental to the security posture of a system. We are introducing a new module, user_mappings which corresponds to the user mappings feature of OneFS.
New module for user_mappings
Let’s see some examples of creating and managing user_mappings:
Common code block: <user-mapping-access> | dellemc.powerscale.user_mapping_rules: onefs_host: "{{onefs_host}}" verify_ssl: "{{verify_ssl}}" api_user: "{{api_user}}" api_password: "{{api_password}}" |
Get user mapping rules of a certain order | - name: Create a user mapping rule <user-mapping-access> Order: 1 |
Create a mapping rule | - name: Create a user mapping rule <user-mapping-access> operator: "insert" options: break_on_match: false group: true groups: true user: true user1: user: "test_user" user2: user: "ans_user" state: 'present' |
Delete a rule | <user-mapping-access> Order: 1 state: "absent" |
As part of this effort the Info module also has been updated to get all the user mapping rules and LDAPs configured with OneFS:
- name: Get list of user mapping rules
   <user-mapping-access>
    gather_subset:
       -user_mapping_rules
- name: Get list of ldap of the PowerScale cluster
  <user-mapping-access>
    gather_subset:
      -ldap
Filesystem and NFS module enhancements
The Filesystem module continues the theme of access control and now allows you to pass a new value called ‘wellknown’ for the Trustee type when setting Access Control for the file system. This option provides access to all users. Here is an example:
- name: Create a Filesystem
      filesystem:
        onefs_host: "{{onefs_host}}"
        api_user: "{{api_user}}"
        api_password: "{{api_password}}"
        verify_ssl: "{{verify_ssl}}"
        path: "{{acl_test_fs}}"
        access_zone: "{{access_zone_acl}}"
        access_control_rights:
          access_rights: "{{access_rights_dir_gen_all}}"
          access_type: "{{access_type_allow}}"
          inherit_flags: "{{inherit_flags_object_inherit}}"
          trustee:
            name: 'everyone'
            type: "wellknown"
        access_control_rights_state: "{{access_control_rights_state_add}}"
        quota:
          container: True
        owner:
          name: '{{acl_local_user}}'
          provider_type: 'local'
        state: "present"
The NFS module now can handle the case of unresolvable hosts in terms of ignoring or erroring out with a new parameter called ignore_unresolvable_hosts that can be set to True (ignores) or False (errors out).
Ansible Modules for Dell Unity v1.7.0
V1.7 of Ansible collections for Dell Unity follow the theme of data protection as well. We are introducing a new module for data replication and recovery workflows that are key to disaster recovery. The new replication_session module allows you to manage data replication sessions between two Dell Unity storage arrays. You can also use the module to initiate DR workflows such as failover and failback. Let’s see some examples:
Common code block to access a replication session: <unity-replication-session> | dellemc.unity.replication_session: unispherehost: "{{unispherehost}}" username: "{{username}}" password: "{{password}}" validate_certs: "{{validate_certs}}" name: "{{session_name}}" |
Pause and resume a replication session | - name: Pause (or resume) a relication session <unity-replication session> Pause: True //(False to resume) |
Failover the source to target for a session | - name: Failover a replication session <unity-replication-session> failover_with_sync: True force: True |
Failback the current session (that is in a failover state) to go back to the original source and target replication sessions | - name: Failback to original replication session <unity-replication-session> failback: True force_full_copy: True |
Sync the target with the source | - name: Sync a replication session <unity-replication-session> failover_with_sync: True sync: True |
Delete or suspend a replication session | - name: Failover a replication session <unity-replication-session> state: “absent” |
Ansible Modules for PowerEdge (iDRAC and OME)
When it comes to PowerEdge servers, the openmanage Ansible collection is updated every month! In my Q1 release blog post, I covered till v7.3. If you noticed, we started talking about Roles! To make the iDRAC tasks easy to manage and execute, we started grouping iDRAC tasks into appropriate Ansible Roles. Since v7.3, three (number of months in a quarter!) more releases happened, each one adding new Roles to the mix. For a roll up of features in the last three months, here are the details:
New roles in v7.4, v7.5, and v7.6:
- dellemc.openmanage.idrac_certificate - Role to manage the iDRAC certificates - generate CSR, import/export certificates, and reset configuration - for PowerEdge servers.
- dellemc.openmanage.idrac_gather_facts - Role to gather facts from the iDRAC Server.
- dellemc.openmanage.idrac_import_server_config_profile - Role to import iDRAC Server Configuration Profile (SCP).
- dellemc.openmanage.idrac_os_deployment - Role to deploy the specified operating system and version on the servers.
- dellemc.openmanage.idrac_server_powerstate - Role to manage the different power states of the specified device.
- dellemc.openmanage.idrac_firmware - Firmware update from a repository on a network share (CIFS, NFS, HTTP, HTTPS, FTP).
- dellemc.openmanage.redfish_firmware - Update a component firmware using the image file available on the local or remote system.
- dellemc.openmanage.redfish_storage_volume - Role to manage the storage volume configuration.
- dellemc.openmanage.idrac_attributes - Role to configure iDRAC attributes.
- dellemc.openmanage.idrac_bios - Role to modify BIOS attributes, clear pending BIOS attributes, and reset the BIOS to default settings.
- dellemc.openmanage.idrac_reset - Role to reset and restart iDRAC (iDRAC8 and iDRAC9 only) for Dell PowerEdge servers.
- dellemc.openmanage.idrac_storage_controller - Role to configure the physical disk, virtual disk, and storage controller settings on iDRAC9 based PowerEdge servers.
OME module enhancements
- Plugin OME inventory enhanced to support the environment variables for the input parameters.
- ome_template module enhanced to include job tracking.
Other enhancements
- redfish_firmware module is enhanced to include job tracking.
- Updated the idrac_gather_facts role to use jinja template filters.
Author: Parasar Kodati

Dell at KubeCon Europe 2023
Fri, 14 Apr 2023 16:56:09 -0000
|Read Time: 0 minutes
Ever wondered why KubeCon happens twice a year? I think it has to do with the pace at which things are changing in the cloud-native world. Every six months it is amazing to see the number of new CNCF projects graduating (crossing the chasm!), the number of enterprises deploying containerized production workloads, and just how the DevOps ecosystem is evolving within the Kubernetes space. Four years ago, Dell started sponsoring KubeCon at the 2019 KubeCon in San Diego. Ever since, Dell has been a sponsor of this event even through the virtual editions during the pandemic. Next week, KubeCon is happening in Amsterdam!
First things first: Dell + Canonical community appreciation event (big party 😊): Register here.
Today the innovation engine at Dell Technologies is firing on all cylinders to deliver an infrastructure stack that suits Kubernetes deployments of any scale with extensive support for DevOps-centric workflows, particularly in the context of Kubernetes workloads. Customers can deploy and consume infrastructure for cloud-native applications anywhere they like with management ease and scalable performance. Let us see some key elements of how we are doing it with recent updates in the space.
Software-defined storage, unbounded
Scale is an essential element of cloud-native architecture, and software-defined storage is an ideal choice that allows incremental addition of capacity. There are a lot of software-defined storage solutions in the market including open source alternatives like Ceph. However, not all software-defined solutions are the same. Dell PowerFlex is an industry-leading solution that offers scalability of 1,000s of nodes with submillisecond latency and comes with all the integrations for a modern ops-driven workflow. In particular, I invite you to explore the Red Hat OpenShift validated solution for container workloads. We have a ton of resources all organized here for you to get into every detail of the architecture and the value it delivers. Also check out this great proof-of-concept deployment of Kubernetes as a service that has multicloud integration by our illustrious IaC Avengers team.
Advanced data services, CSM
Let’s dive to the kubectl level. Developers and DevOps teams building for Kubernetes want to make sure storage is well integrated into the Kubernetes layer. CSI and storage classes are table stakes. Dell Container Storage Modules (CSMs) are open-sourced data services that deliver value to business-critical Kubernetes deployments. CSM modules deliver great value along multiple dimensions:
- Delivering advanced storage data services of Dell platforms like data encryption and remote replication to enable migration and DR workflows. Here is the latest demo with PowerFlex.
- Integration with Kubernetes-native tools like Velero for app mobility and Prometheus for logging and observability. Here is an Observability module demo.
- Storage management across multiple Kubernetes clusters with the Authorization module. Watch this demo video.
- Resiliency against complete node failures with intelligent detection and failover. And here is a recent demo of how this works.
And, since the last KubeCon, we have added multiple features to make these modules work even better for you. Check out what’s new in CSM 1.5 and the latest CSM 1.6 release.
Infrastructure as Code (IaC): New Terraform integrations
What I love about IaC is that it brings cloud-like operational simplicity to any large-scale infrastructure deployment. We are super excited about the latest IaC integration that we recently launched for Dell infrastructure: Terraform providers. Check out what came out in version 1, and I am sure we will share many more updates in this space for the rest of the year. If you are someone in the infrastructure space, you might be interested in this brief history of infrastructure of code evolution.
Data protection
Backup and DR are boring until $!#? happens. This is where kube admins and DevOps engineers can collaborate with IT teams to get on the same page about the SLA requirements and implement the required data protection and recovery strategies. Built for any workload, any cloud, and any persona (aka IT Generalist), Dell PowerProtect Data Manager is an essential part of going mainstream with Kubernetes deployments. Check out this white paper that gives you a great start with Kubernetes data protection. In the same spirit, I hope you will find this series of blog posts on Amazon’s EKS Anywhere reference architecture and the thorough coverage of data protection and DR scenarios very enlightening.
Dell booth at KubeCon!
We would love to chat with you about all these things and anything Kubernetes-related at KubeCon. We have some great demos and new hands-on labs set up at the Dell booth. You can find us at the P14 booth:
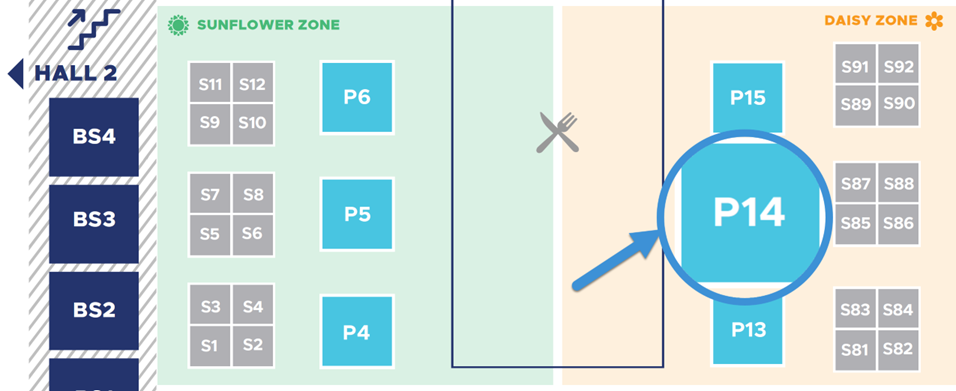

Announcing Ansible modules for Q1 2023 release
Wed, 21 Jun 2023 13:10:27 -0000
|Read Time: 0 minutes
At the beginning of the year, I blogged about all the new Ansible integration features that were released in 2022 across the Dell infrastructure portfolio. As we add new functionality and make REST API enhancements to the different storage and server products of the portfolio, we add support for select features to the corresponding Ansible modules a few months down the line. For the storage portfolio, this happens every month, and for OpenManage modules for PowerEdge server line, the Ansible updates happen every month. So here I am here again with the Q1 release of the various Ansible plug-ins for the portfolio. In this set of releases, PowerStore tops the list with the greatest number of enhancements. Let’s look at each product to cover the main highlights of the release. If you really want to grok the workings of the Ansible module, the Python libraries for the storage and server platforms are also available. You can easily find them with a simple keyword search like this search on GitHub.
PowerStore
Version: 1.9
What’s new:
The main highlight for this release is around vVols and storage container support.
- Support for vVols
- Info module: List all vVol IDs and names if no specific vVol name or ID is specified
- Info module: List vVol details, including mapped hosts and host groups, for a specific vVol specified using ID or name
- Host and Host_group modules: List vVol details for a host or host group if applicable
- Support for vCenter
- List vCenter and associated details in Info module
- Add or delete a vCenter
- Modify vCenter settings
- Modify storage container
- Rename the storage container
- Enable/disable storage container capacity quota
- Specify container quota size or high-water mark values
- Change storage protocols—iSCSI, FC, or NVMe-oF
- Volume module: Support for application type in the Volume module. Here are the choices for quick reference:
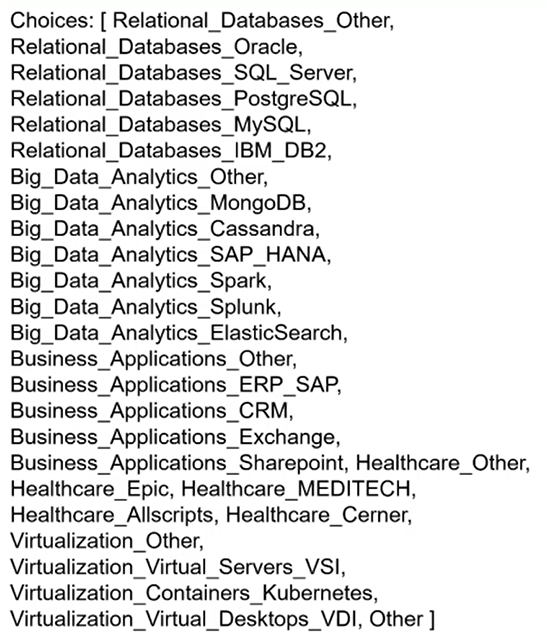
- Filesystem module: Added support for configuring the following file system attributes while creating or modifying a file system. Note that you must be on PowerStore 3.0 or later to access these attributes:
- config_type:
- General—General-purpose use-case file system
- VMware-—VMware datastore-purpose use-case file system
- is_async_MTime_enabled:
- true—Asynchronous MTIME is enabled on the file system
- false—Asynchronous MTIME is disabled on the file system
- file_events_publishing_mode
- File retention attributes
- host_io_size—Applicable for VMware config file systems
- config_type:
GitHub release history: https://github.com/dell/ansible-powerstore/blob/main/CHANGELOG.rst
PowerScale
Version: 1.9
What’s new:
- User module: Support for changing user password
- User module: Support for creating a user and group with both name and ID (uid or gid)
- SMB module: support for finding and closing SMB open files
- Synciqpolicy module: Improved error handling for scenarios where no SyncIQ policy is returned
GitHub release history: https://github.com/dell/ansible- powerscale/blob/main/CHANGELOG.rst
Unity
Version: 1.6
What’s new:
- Ability to add a host from the Host List to NFS Export in the same way as in Unisphere UI or uemcli
- Filesystem module: Support for synchronous replication for filesystem module
- Volume module: Support for enabling and disabling advanced deduplication
GitHub release history: https://github.com/dell/ansible-unity/blob/main/CHANGELOG.rst
OpenManage
Did you know that under the OpenManage Ansible plug-in set we have two entirely different types of Ansible modules? Going by the name, you would expect Ansible modules to manage configurations with OpenManage Enterprise artifacts like templates, baselines, compliance reporting, and so on. But the same OpenManage plug-in also includes Ansible modules to directly manage the iDRAC endpoints of your server fleet so that users can manage the server inventory directly with more granularity within Ansible. I hope most readers already know about this. Okay, so here is what’s new in this comprehensive plug-in (see this previous blog post for key integration highlights of v7.1 of the Ansible plug-in for OpenManage). Here is the GitHub page where you can view the complete release history for OpenManage.
Version: 7.2
What’s new:
- New module dellemc.openmanage.ome_profile_info: To retrieve profiles with attribute details
- New module dellemc.openmanage.ome_template_network_vlan_info: To retrieve network configuration of template
- idrac_redfish_storage_controller module: Enhanced to configure controller attributes and online capacity expansion
- ome_domian_user_groups module: Added ability to import the LDAP directory groups
- ome_inventory module: Now supports inventory retrieval of system and plug-in groups of OpenManage Enterprise
- ome_profile_info module: Added ability to retrieve profiles with attributes on OpenManage Enterprise or OpenManage Enterprise Modular
- ome_template_network_vlan_info: Added ability to retrieve the network configuration of a template on OpenManage Enterprise or OpenManage Enterprise Modular
Version: 7.3
What’s new:
- dellemc.openmanage.idrac_export_server_config_profile: Role to export iDRAC Server Configuration Profile (SCP)
- idrac_server_config_profile: Enhanced to support proxy settings, import buffer, include in export, and ignore certificate warning
GitHub release history: https://github.com/dell/dellemc-openmanage-ansible-modules/releases
OK, that’s not all for Dell-Ansible integrations for Q1. Stay tuned for some major developments coming soon.

Journey to Infrastructure as Code
Thu, 23 Mar 2023 14:32:49 -0000
|Read Time: 0 minutes
Infrastructure as code (IaC) has become a key enabler of today’s highly automated software deployment processes. In this blog, let’s see how today’s fast growing IaC paradigms evolved from traditional programming.
On the surface IaC might just imply using coding languages to provision, configure, and manage infrastructure components. While the code in IaC itself looks very different, it is the way code works to manage the infrastructure that is more important. In this blog, let’s first look at how storage automation evolved over the last two decades to keep up with changing programming language preferences and modern architectural paradigms. And then more importantly differentiate and appreciate modern day declarative configurations and state management.
First came the CLI
The command line interface (CLI) was the first step to faster workflows for admins of almost any IT infrastructure or electronic machinery in general. In fact, a lot of early electronic interfaces for “high tech” machinery in 80s and 90s were available only as commands. There were multiple reasons for this. The range of functionality and the scope of use for general computer controlled machinery was pretty limited. The engineers who developed the interfaces were more often domain experts than software engineers, but they still had the responsibility of today’s full stack developers, so naturally the user experience revolved more around their own preferences. Nevertheless, because the range of functionality was well covered by the command set, the interfaces left very little to be desired in terms of operating the infrastructure.
By the time storage arrays became common in enterprise IT in the mid-90s (good read: brief history of EMC), the ‘storage admin’ role evolved. The UNIX heavy workflows of admins meant a solid CLI was the need of the hour, especially for power users managing large scale, mission critical data storage systems. The erstwhile (and nostalgic to admins of the era) SYMCLI of the legendary Symmetrix platform is a great example of storage management simplicity. In fact, the compactness of symcli of the legendary Symmetrix platform easily beats any of today’s scripting languages. It was so popular that it had to be continued for the modern day PowerMax architecture, just to provide the same user experience. Here is what a storage group snapshot command looks like:
symsnapvx -sid ### -nop -sg mydb_sg establish -name daily_snap -ttl -delta 3
Then came scripts (more graphical than GUI!)
In the 90s, when graphical user interfaces became the norm for personal computers, enterprise software still was lagging personal computing interfaces in usability, a trend that persists even today. For a storage admin who was managing large scale systems, the command line was (and is today) still preferred.

While it is counterintuitive, many times for a complex, multi-step workflow, code blocks make the workflow more readable than documenting steps in the form of GUI snapshots, mouse clicks, and menu selections.
Although typing and executing commands was inherently faster than mouse driven graphical user interfaces, the main advantage is that commands can be combined into a repeatable workflow. In fact, the first form of IT automation was the ability to execute a sequence of steps using something like a shell script or Perl. (Here's some proof that this was used as late as 2013. Old habits die hard, especially when they work!) A script of commands was also a great way to document workflows, enforce best practices, and avoid manual errors - all the things that were essential when your business depended on the data operations on the storage system. Scripting itself evolved as more programming features appeared, such as variables, conditional flow, and looping.
Software started eating the world, RESTfully
REST APIs are easily one of the most decisive architectural elements that enabled software to eat the world. Like many web-scale technologies, it also cascaded to everyday applications as an essential design pattern. Storage interfaces quickly evolved from legacy CLI driven interfaces to a REST API server, with its functionality served with well-organized and easily discoverable API end-points. This also meant that developers started building all kinds of middleware to plug infrastructure into complex DevOps and ITOps environments, and self-service environments for developers to consume infrastructure. In fact, today GUIs and CLIs for storage systems use the same REST API that is offered to developers. Purpose built libraries in popular programming environments were also API consumers. Let’s look at a couple of examples.

Python phenomenon
No other programming language has stayed as relevant as Python has, thanks to the vibrant community that has made it applicable to a wide range of domains. For many years in a row, Python was at the top of the chart in Stack Overflow surveys as the most popular language developers either were already using or planning to. With the run-away success of PyU4V library for PowerMax, Dell invested in building API-bound functionality in Python to bring infrastructure closer to the developer. You can find Python libraries for Dell PowerStore, PowerFlex, and PowerScale storage systems on GitHub.
Have you checked out PowerShell recently?
Of late, PowerShell by Microsoft has been less about “shell” and more about power! How so? Very well-defined command structure, a large ecosystem of third-party modules, and (yes) cross-platform support across Windows, Linux, and Mac - AND cross-cloud support! This PowerShell overview documentation for Google Cloud says it all. Once again, Dell and our wonderful community has been at work to develop PowerShell modules for Dell infrastructure. Here are some of the useful modules available in the PowerShell Gallery: PowerStore, PowerMax, OpenManage.
Finally: infrastructure as code
For infrastructure management, even with the decades of programming glory from COBOL, to Perl, to Python, code was still used to directly call infrastructure functions that were exposed as API calls, and it was easier to use commands that wrapped the API calls. There was nothing domain-centric about the programming languages that made infrastructure management more intuitive. None of the various programming constructs like variables and control flows were any different for infrastructure management. You had to think like a programmer and bring the IT infrastructure domain into the variables, conditionals, and loops. The time for infrastructure-domain-driven tools has been long due and it has finally come!
Ansible
Ansible, first released in 2013, was a great benefit in programming for the infrastructure domain. Ansible introduced constructs that map directly with the infrastructure setup and state (configuration): groups of tasks (organized into plays and playbooks) that need to be executed on a group of hosts that are defined by their “role” in the setup. You can define something as powerful and scalable like “Install this security path on all the hosts of this type (by role)”. It also has many desirable features such as
- Not requiring an agent
- The principle of idempotency, which ensures task execution subject to the actual configuration state that the code intends to achieve
- Templating to reuse playbooks
The Ansible ecosystem quickly grew so strong that you could launch any application with any infrastructure on any-prem/cloud. As the go-to-market lead for the early Ansible modules, I can say that Dell went all in on Ansible to cover every configurable piece of software and hardware infrastructure we made. (See links to all sixteen integrations here.) And here are a couple of good videos to see Ansible in action for Dell storage infrastructure: PowerScale example, PowerMax example.
Also, Ansible integrations from other ITOps platforms like ServiceNow help reuse existing workflow automation with minimal effort. Check out this PowerStore example.
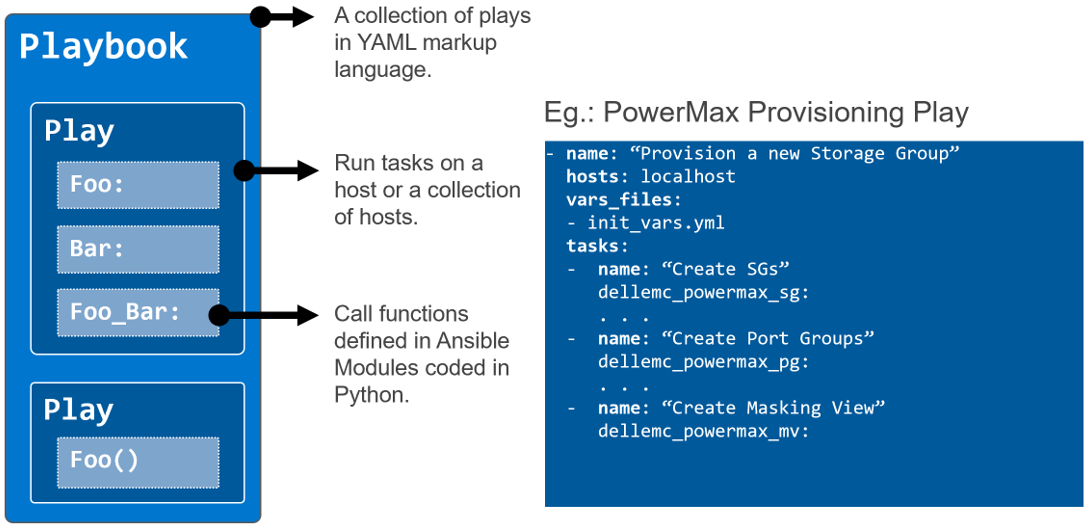
Terraform
Terraform by HashiCorp is another powerful IaC platform. It makes further in-roads into infrastructure configuration by introducing the concept of resources and the tight binding they have with the actual infrastructure components. Idempotency is implemented even more tightly. It’s multi-cloud ready and provides templating. It differs the most from other similar platforms in that it is purely “declarative” (declares the end state or configuration that the code aims to achieve) than “imperative” (just a sequence of commands/instructions to run). This means that the admin can focus on the various configuration elements and their state. It has to be noted that the execution order is less intuitive and therefore requires the user to enforce dependencies between different component configurations using “depends on” statements within resources. For example, to spin up a workload and associated storage, admins may need the storage provisioning step to be completed first before the host mapping happens.
And what does Dell have with Terraform?…We just announced the availability of version 1.0 of Terraform providers for PowerFlex and PowerStore platforms, and tech previews of providers for PowerMax and OpenManage Enterprise. I invite you to learn all about it and go through the demos here.
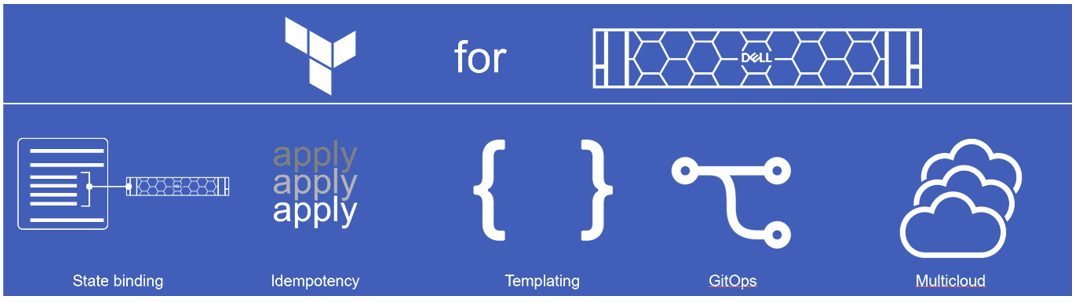
Author: Parasar Kodati

Announcing Terraform Providers for Dell Infrastructure
Mon, 20 Mar 2023 14:03:34 -0000
|Read Time: 0 minutes
HashiCorp’s Terraform enables DevOps organizations to provision, configure and modify infrastructure using human-readable configuration files or plans written in HashiCorp Configuration Language (HCL). Information required to configure various infrastructure components are provided within pre-built Terraform providers so that the end user can easily discover the infrastructure properties that can be used to effect configuration changes. The configuration files can be versioned, reused, and shared, enabling more consistent workflows for managing infrastructure. These configurations, when executed, change the state of the infrastructure to bring it to the desired state. The idempotency feature of Terraform ensures that only the necessary changes are made to the infrastructure to reach the desired state even when the same configuration is run multiple times, thereby avoiding unwanted drift of infrastructure state.
Today we are announcing the availability of the following Terraform providers for the Dell infrastructure portfolio:
- Version 1.0 of Terraform provider for PowerFlex
- Version 1.0 of Terraform provider for PowerStore
- Tech preview (beta) of Terraform provider for PowerMax
- Tech preview (beta) of Terraform provider for Open Manage Enterprise
Anatomy of a Terraform project
Code in Terraform files is organized as distinct code blocks and is declarative in style to declare the various components of infrastructure. This is very much in contrast with a sequence of steps to be executed in a typical imperative style programming or scripting language. In the simplest of terms, a declarative approach provides the end state or result rather than the step-by- step process. Here are the main elements used as building blocks to define various infrastructure components in a Terraform project:
- Provider: A provider is a plug-in that enables Terraform to interact with a particular type of infrastructure. For example, different Dell storage platforms like PowerFlex, PowerStore, and PowerMax have their own providers. Similarly, providers exist for all major environments like VMware, Kubernetes, and major public cloud services. Each provider has its own set of resources, data sources, and configuration options. Providers are defined in the provider block of Terraform configuration files.
- Resource: A resource is an object that represents an infrastructure component that needs to be created, modified, or deleted. In the case of storage platforms, the resources are volumes, volume groups, snapshots, and so on. More generally, resources can be virtual machines, Kubernetes nodes, databases, load balancers, or any other infrastructure component. Resources are defined in the resource block of Terraform configuration files. Each resource type has a specific set of configuration options that can be used to customize the resource. The table in the next section shows the resources that come with Terraform providers for Dell infrastructure products.
- Data source: A data source is an object that allows Terraform to retrieve information about an existing resource that has been created outside of Terraform. Data sources can be used to query information about resources that already exist in the infrastructure or have been created by a Terraform project. This is like the gather information section of Ansible playbooks. Data sources are defined in the data block of Terraform configuration files. The table in the next section shows the data sources that come with Terraform providers for Dell infrastructure products.
- Module: A module is a self-contained collection of Terraform resources, data sources, and variables that can be used across multiple Terraform projects. Modules make it easy to reference and reuse different infrastructure classes while making the project more modular and readable. Modules are defined in the module block of Terraform configuration files.
- Output: An output is a value that is generated by Terraform after the resources have been created. Outputs can be used to retrieve information about resources that were created during the Terraform run. Outputs are defined in the output block of Terraform configuration files.
These elements are organized into different .tf files in a way that is suitable for the project. However, as a norm, Terraform projects are organized with the following files in the project root directory or a module directory:
- main.tf: This file contains the main configuration for the resources to be created. It is the entry point for Terraform to process and execute the desired state for the infrastructure. This file includes the definition of the resources to be created and the configuration parameters to be used for each resource.
- versions.tf: All the required provider definitions for the project or module are organized into the versions.tf file. In addition to specifying the version of the provider, the file also specifies authentication details, endpoint URLs, and other provider-specific configuration details.
- variables.tf: As the name suggests, this file contains the declaration of input variables that are used throughout the Terraform project. Input variables allow users to dynamically configure the Terraform resources at runtime, without changing the code. This file also defines the default values, types, and descriptions for the input variables.
- outputs.tf: This file contains the definition of output values that are generated after the Terraform resources have been created. Output values can be used to provide useful information to the user or to pass on to other Terraform projects.
Terraform provider details
Following are the details of the resources and data sources that come with the different providers for Dell infrastructure:
| Resources | Data sources | |
|---|---|---|
PowerFlex |
|
|
PowerStore |
|
|
PowerMax |
|
|
OpenManage Enterprise |
|
|
Demos
We invite you to check out the following videos to get started!

For the Year 2022: Ansible Integration Enhancements for the Dell Infrastructure Solutions Portfolio
Wed, 01 Feb 2023 17:58:33 -0000
|Read Time: 0 minutes
The Dell infrastructure portfolio spans the entire hybrid cloud, from storage to compute to networking, and all the software functionality to deploy, manage, and monitor different application stacks from traditional databases to containerized applications deployed on Kubernetes. When it comes to integrating the infrastructure portfolio with 3rd party IT Operations platforms, Ansible is at the top of the list in terms of expanding the scope and depth of integration.
Here is a summary of the enhancements we made to the various Ansible modules across the Dell portfolio in 2022:
- Ansible plugin for PowerStore had four different releases (1.5,1.6,1.7, and 1.8) with the following capabilities:
- New modules:
- dellemc.powerstore.ldap_account – To manage LDAP account on Dell PowerStore
- dellemc.powerstore.ldap_domain - To manage LDAP domain on Dell PowerStore
- dellemc.powerstore.dns - To manage DNS on Dell PowerStore
- dellemc.powerstore.email - To manage email on Dell PowerStore
- dellemc.powerstore.ntp - To manage NTP on Dell PowerStore
- dellemc.powerstore.remote_support – To manage remote support to get the details, modify the attributes, verify the connection. and send a test alert
- dellemc.powerstore.remote_support_contact – To manage remote support contact on Dell PowerStore
- dellemc.powerstore.smtp_config – To manage SMTP config
- Added support for the host connectivity option to host and host group
- Added support for cluster creation and validating cluster creation attributes
- Data operations:
- Added support to clone, refresh, and restore a volume
- Added support to configure/remove the metro relationship for a volume
- Added support to modify the role of replication sessions
- Added support to clone, refresh, and restore a volume group
- File system:
- Added support to associate/disassociate a protection policy to/from a NAS server
- Added support to handle filesystem and NAS server replication sessions
- Ansible execution:
- Added an execution environment manifest file to support building an execution environment with Ansible Builder
- Enabled check_mode support for Info modules
- Updated modules to adhere to Ansible community guidelines
- The Info module is enhanced to list DNS servers, email notification destinations, NTP servers, remote support configuration, remote support contacts and SMTP configuration, LDAP domain, and LDAP accounts.
- Visit this GitHub page to go through release history: https://github.com/dell/ansible-powerstore/blob/main/CHANGELOG.rst
- New modules:
- Ansible plugin for PowerFlex had four different releases (1.2, 1.3, 1.4, and 1.5) with the following capabilities:
- New modules:
- dellemc.powerflex.replication_consistency_group – To manage replication consistency groups on Dell PowerFlex
- dellemc.powerflex.mdm_cluster – To manage a MDM cluster on Dell PowerFlex
- dellemc.powerflex.protection_domain – To manage a Protection Domain on Dell PowerFlex
- The info module is enhanced to support listing the replication consistency groups, volumes, and storage pools with the statistics data.
- Storage management:
- The storage pool module is enhanced to get the details with the statistics data.
- The volume module is enhanced to get the details with the statistics data.
- Ansible execution:
- Added an execution environment manifest file to support building an execution environment with Ansible Builder
- Enabled check_mode support for the Info module
- Updated modules to adhere to Ansible community guidelines
- Visit this GitHub page to go through release history: https://github.com/dell/ansible-powerflex/blob/main/CHANGELOG.rst
- New modules:
- The Ansible plugin for PowerMax had four different releases (1.7, 1.8, 2.0 and 2.1) with the following capabilities:
- New module: dellemc.powermax.initiator – To manage initiators
- Host operations:
- Added support of case insensitivity of the host WWN to the host, and to the masking view module.
- Enhanced the host module to add or remove initiators to or from the host using an alias.
- Data operations:
- Enhanced storage group module to support
- Moving volumes to destination storage groups.
- Making volume name an optional parameter while adding a new volume to a storage group.
- Setting host I/O limits for existing storage groups and added the ability to force move devices between storage groups with SRDF protection.
- Enhanced volume module to support
- A cylinders option to specify size while creating a LUN, and added the ability to create volumes with identifier_name and volume_id.
- Renaming volumes that were created without a name.
- Enhanced the RDF group module to get volume pair information for an SRDF group.
- Enhanced storage group module to support
- Added an execution environment manifest file to support building an execution environment with Ansible Builder
- Added rotating file handler for log files
- Enhanced the info module to list the initiators, get volume details and masking view connection information
- Enhanced the verifycert parameter in all modules to support file paths for custom certificate location.
- Some things renamed:
- Names of previously released modules have been changed from dellemc_powermax_<module name> to <module name>
- The Gatherfacts module is renamed to Info
- Renamed metro DR module input parameters
- Visit this GitHub page to go through release history: https://github.com/dell/ansible-powermax/blob/main/CHANGELOG.rst
- Ansible plugin for PowerScale had four different releases (1.5,1.6,1.7 and 1.8) with the following capabilities:
- New modules:
- dellemc.powerscale.nfs_alias – To manage NFS aliases on a PowerScale
- dellemc.powerscale.filepoolpolicy – To manage the file pool policy on PowerScale
- dellemc.powerscale.storagepooltier – To manage storage pool tiers on PowerScale
- dellemc.powerscale.networksettings – To manage Network settings on PowerScale
- dellemc.powerscale.smartpoolsettings – To manage Smartpool settings on PowerScale
- Security support:
- Support for security flavors while creating and modifying NFS export.
- Access Zone, SMB, SmartQuota, User and Group modules are enhanced to support the NIS authentication provider.
- The Filesystem module is enhanced to support ACL and container parameters.
- The ADS module is enhanced to support the machine_account and organizational_unit parameters while creating an ADS provider.
- File management:
- The Info module is enhanced to support the listing of NFS aliases.
- Support to create and modify additional parameters of an SMB share in the SMB module.
- Support for recursive force deletion of filesystem directories.
- Ansible execution
- Added an execution environment manifest file to support building an execution environment with Ansible Builder.
- Check mode is supported for the Info, Filepool Policy, and Storagepool Tier modules.
- Added rotating file handlers for log files.
- Removal of the dellemc_powerscale prefix from all module names.
- Other module enhancements:
- The SyncIQ Policy module is enhanced to support accelerated_failback and restrict_target_network of a policy.
- The Info module is enhanced to support NodePools and Storagepool Tiers Subsets.
- The SmartQuota module is enhanced to support container parameter and float values for Quota Parameters.
- Visit this GitHub page to go through release history: https://github.com/dell/ansible- powerscale/blob/main/CHANGELOG.rst
- New modules:
- The Ansible plugin for Dell OpenManage had 13 releases this year, some of which were major releases. Here is a brief summary:
- v7.1: Support for retrieving smart fabric and smart fabric uplink information, support for IPv6 addresses for OMSDK dependent iDRAC modules, and OpenManage Enterprise inventory plugin.
- v7.0: Rebranded from Dell EMC to Dell, enhanced the idrac_firmware module to support proxy, and added support to retrieve iDRAC local user details.
- v6.3: Support for the LockVirtualDisk operation and to configure Remote File Share settings using the idrac_virtual_media module.
- v6.2: Added clear pending BIOS attributes, reset BIOS to default settings, and configured BIOS attributes using Redfish enhancements for idrac_bios.
- v6.1: Support for device-specific operations on OpenManage Enterprise and configuring boot settings on iDRAC.
- v6.0: Added collection metadata for creating execution environments, deprecation of share parameters, and support for configuring iDRAC attributes using the idrac_attributes module.
- v5.5: Support to generate certificate signing request, import, and export certificates on iDRAC.
- v5.4: Enhanced the idrac_server_config_profile module to support export, import, and preview of the SCP configuration using Redfish and added support for check mode.
- v5.3: Added check mode support for redfish_storage_volume, idempotency for the ome_smart_fabric_uplink module, and support for debug logs added to ome_diagnostics
- V5.2: Support to configure console preferences on OpenManage Enterprise.
- V5.1: Support for OpenManage Enterprise Modular server interface management.
- V5.0.1: Support to provide custom or organizational CA signed certificates for SSL validation from the environment variable.
- 5.0: HTTPS SSL support for all modules and quick deploy settings.
- Visit this GitHub page to go through release history: https://github.com/dell/dellemc-openmanage-ansible-modules/releases.
For all Ansible projects you can track the progress, contribute, or report issues on individual repositories.
You can also join our DevOps and Automation community at: https://www.dell.com/community/Automation/bd-p/Automation.
Happy New Year and happy upgrades!
Authors: Parasar Kodati and Florian Coulombel

PowerStore REST API: Using Filtering to Fine Tune Your Queries

Thu, 26 Jan 2023 17:40:56 -0000
|Read Time: 0 minutes
The PowerStore REST API provides a powerful way to manage a PowerStore cluster, mainly when using one’s own scripts [3] or automation tools.
In some areas of PowerStore, almost all of its functionality is available when using the REST API – and sometimes even more when the required attributes are unavailable in the PowerStore Manager GUI.
A great place to start learning more about the REST API is the integrated SwaggerUI [2] which provides online documentation with test functionality on your system. SwaggerUI uses an OpenAPI definition. Some 3rd party tools can leverage the same OpenAPI definition, and can be downloaded from SwaggerUI. SwaggerUI is available on all PowerStore models and types by using https://<PowerStore>/swaggerui in your preferred browser.
When working with the PowerStore REST API it’s not always obvious how to query some attributes. For example, it’s easy to filter for a specific volume name to get id, size, and type of a volume or volumes when using “*” as wildcard:
To query for all volumes with “Test” somewhere in its name, we could use
name=like.*Test*
as the query string:
% curl -k -s -u user:pass -X GET "https://powerstore.lab/api/rest/volume?select=id,name,size,type&name=like.*Test*" | jq .
[
  {
    "id": "a6fa6b1c-2cf6-4959-a632-f8405abc10ed",
    "name": "TestVolume",
    "size": 107374182400,
    "type": "Primary"
  }
]
In that example, although we know that there are multiple snapshots for a particular volume, the REST API query that uses the parent volume name does not show the related snapshots. It’s because snapshots must not have the name of the parent volume in their name. From PowerStore Manager we know that this volume has three snapshots, but their names do not relate to the volume name: 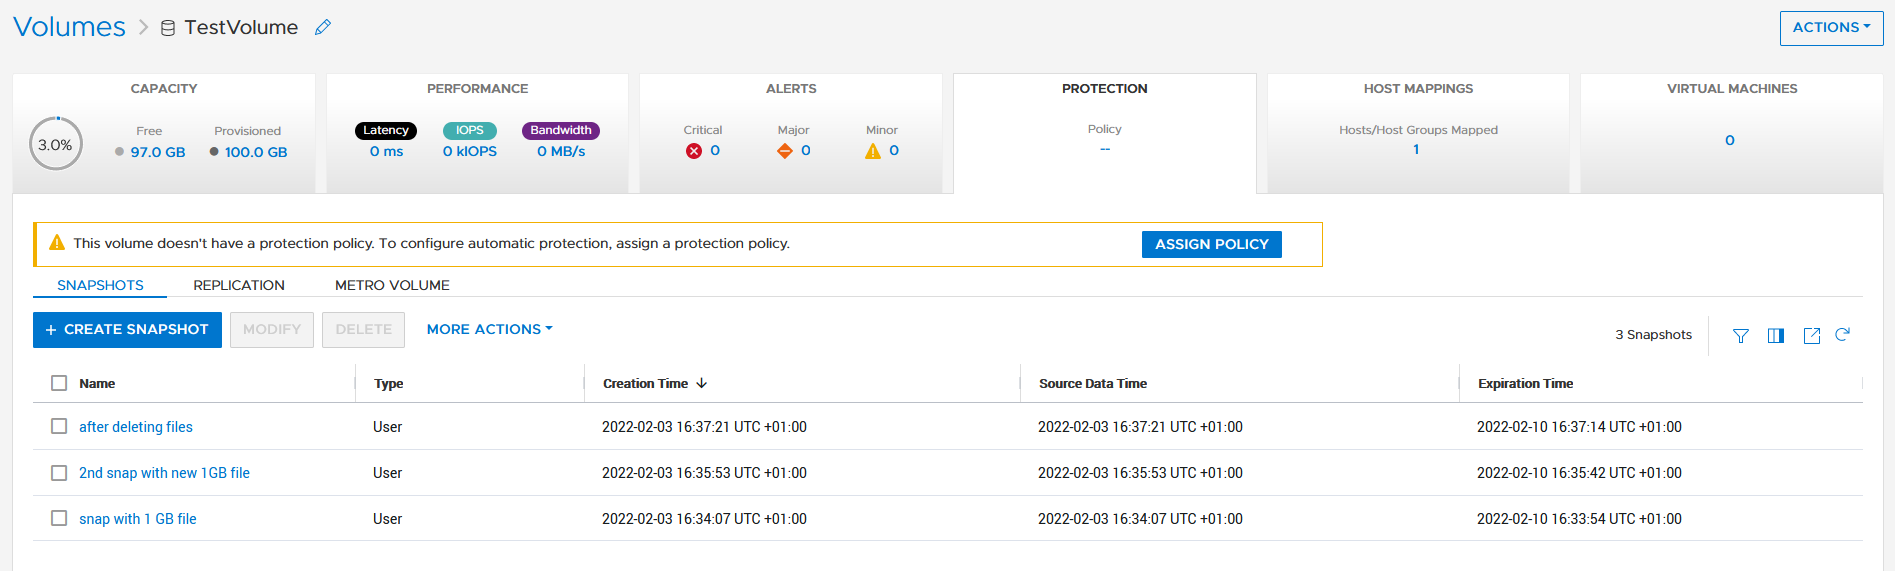
How is it possible to get the same output with a REST API query? We know that everything in PowerStore is managed with IDs, and the API description in SwaggerUI shows that a volume could have an attribute parent_id underneath the protection_data section.
All volumes with a protection_data->>parent_id that is equal to the ID of our “TestVolume” show the related snapshots for the TestVolume. The key for the query is the following syntax for the underlying attributes:
protection_data->>parent_id=eq.a6fa6b1c-2cf6-4959-a632-f8405abc10ed
The resulting curl command to query for the snapshot volumes shows the same syntax to select “creator_type” from a nested resource:
% curl -k -s -u user:pass -X GET 'https://powerstore/api/rest/volume?select=id,name,protection_data->>creator_type,creation_timestamp&protection_data->>parent_id=eq.a6fa6b1c-2cf6-4959-a632-f8405abc10ed' | jq .
[
  {
    "id": "051ef888-a815-4be7-a2fb-a39c20ee5e43",
    "name": "2nd snap with new 1GB file",
     "creator_type": "User",
"creation_timestamp": "2022-02-03T15:35:53.920133+00:00"
},
{
"id": "23a26cb6-a806-48e9-9525-a2fb8acf2fcf",
"name": "snap with 1 GB file",
"creator_type": "User",
"creation_timestamp": "2022-02-03T15:34:07.891755+00:00"
},
{
"id": "ef30b14e-daf8-4ef8-8079-70de6ebdb628",
"name": "after deleting files",
"creator_type": "User",
"creation_timestamp": "2022-02-03T15:37:21.189443+00:00"
}
]Resources
For more white papers, blogs, and other resources about PowerStore, please visit our PowerStore Info Hub.
Related resources to this blog on the Info Hub:
- For a general PowerStore Manager overview, see Dell PowerStore Manager Overview
- To learn more about volumes and volume families: PowerStore: Snapshots and Thin Clones
- An alternative to REST API: What is PowerStoreCLI Filtering?
For some great video resources referenced in this blog, see:
- [1] Dell PowerStore REST API Part 1 - Introduction
- [2] Dell PowerStore REST API Part 2 - PowerStore SwaggerUI
- [3] Dell PowerStore REST API Part 3 - Python script example
See also this PowerStore product documentation:
Author: Robert Weilhammer, Principal Engineering Technologist

Infrastructure as Code with VxRail Made Easier with Ansible Modules for Dell VxRail
Thu, 26 Jan 2023 17:32:42 -0000
|Read Time: 0 minutes
Many customers are looking at Infrastructure as Code (IaC) as a better way to automate their IT environment, which is especially relevant for those adopting DevOps. However, not many customers are aware of the capability of accelerating IaC implementation with VxRail, which we have offered for some time already—Ansible Modules for Dell VxRail.
What is it? It's the Ansible collection of modules, developed and maintained by Dell, that uses the VxRail API to automate VxRail operations from Ansible.
By the way, if you're new to the VxRail API, first watch the introductory whiteboard video available on YouTube.
Ansible Modules for Dell VxRail are well-suited for IaC use cases. They are written in such a way that all requests are idempotent and hence fault-tolerant. This means that the result of a successfully performed request is independent of the number of times it is run.
Besides that, instead of just providing a wrapper for individual API functions, we automated holistic workflows (for instance, cluster deployment, cluster expansion, LCM upgrade, and so on), so customers don't have to figure out how to monitor the operation of the asynchronous VxRail API functions. These modules provide rich functionality and are maintained by Dell; this means we're introducing new functionality over time. They are already mature—we recently released version 1.4.
Finally, we are also reducing the risk for customers willing to adopt the Ansible modules in their environment, thanks to the community support model, which allows you to interact with the global community of experts. From the implementation point of view, the architecture and end-user experience are similar to the modules we provide for Dell storage systems.
Getting Started
Ansible Modules for Dell VxRail are available publicly from the standard code repositories: Ansible Galaxy and GitHub. You don't need a Dell Support account to download and start using them.
Requirements
The requirements for the specific version are documented in the "Prerequisites" section of the description/README file.
In general, you need a Linux-based server with the supported Ansible and Python versions. Before installing the modules, you have to install a corresponding, lightweight Python SDK library named "VxRail Ansible Utility," which is responsible for the low-level communication with the VxRail API. You must also meet the minimum version requirements for the VxRail HCI System Software on the VxRail cluster.
This is a summary of requirements for the latest available version (1.4.0) at the time of writing this blog:
Ansible Modules for Dell VxRail | VxRail HCI System Software version | Python version | Python library (VxRail Ansible Utility) version | Ansible version |
1.4.0 | 7.0.400 | 3.7.x | 1.4.0 | 2.9 and 2.10 |
Installation
You can install the SDK library by using git and pip commands. For example:
git clone https://github.com/dell/ansible-vxrail-utility.git

cd ansible-vxrail-utility/
pip install .
Then you can install the collection of modules with this command:
ansible-galaxy collection install dellemc.vxrail:1.4.0
Testing
After the successful installation, we're ready to test the modules and communication between the Ansible automation server and VxRail API.
I recommend performing that check with a simple module (and corresponding API function) such as dellemc_vxrail_getsysteminfo, using GET /system to retrieve VxRail System Information.
Let's have a look at this example (you can find the source code on GitHub):
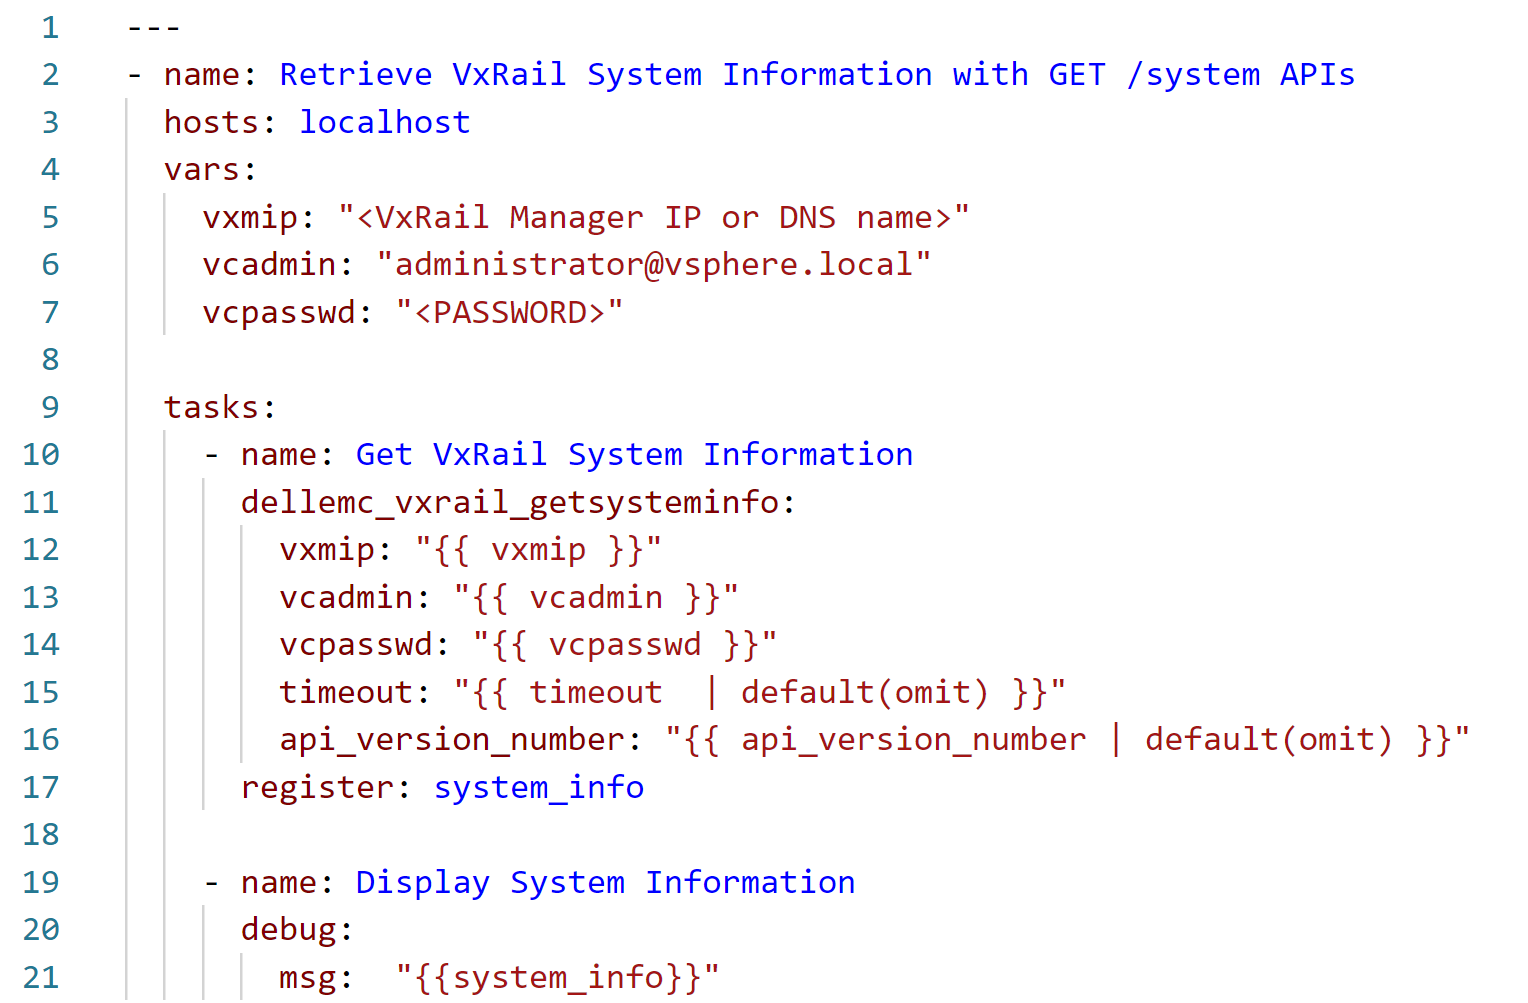
Note that this playbook is run on a local Ansible server (localhost), which communicates with the VxRail API running on the VxRail Manager appliance using the SDK library. In the vars section, , we need to provide, at a minimum, the authentication to VxRail Manager for calling the corresponding API function. We could move these variable definitions to a separate file and include the file in the playbook with vars_files. We could also store sensitive information, such as passwords, in an encrypted file using the Ansible vault feature. However, for the simplicity of this example, we are not using this option.
After running this playbook, we should see output similar to the following example (in this case, this is the output from the older version of the module):
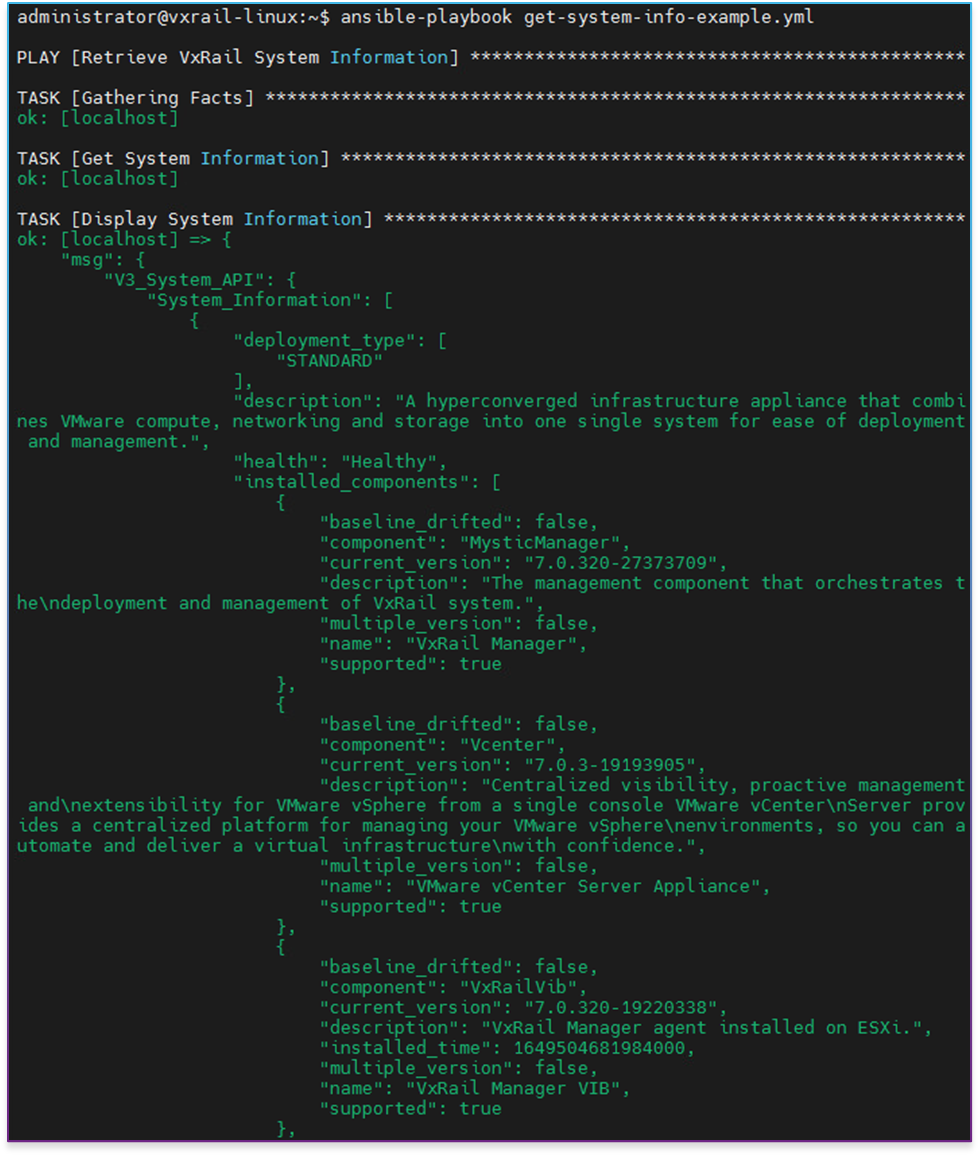
Cluster expansion example
Now let's have a look at a bit more sophisticated, yet still easy-to-understand, example. A typical operation that many VxRail customers face at some point is cluster expansion. Let's see how to perform this operation with Ansible (the source code is available on GitHub):
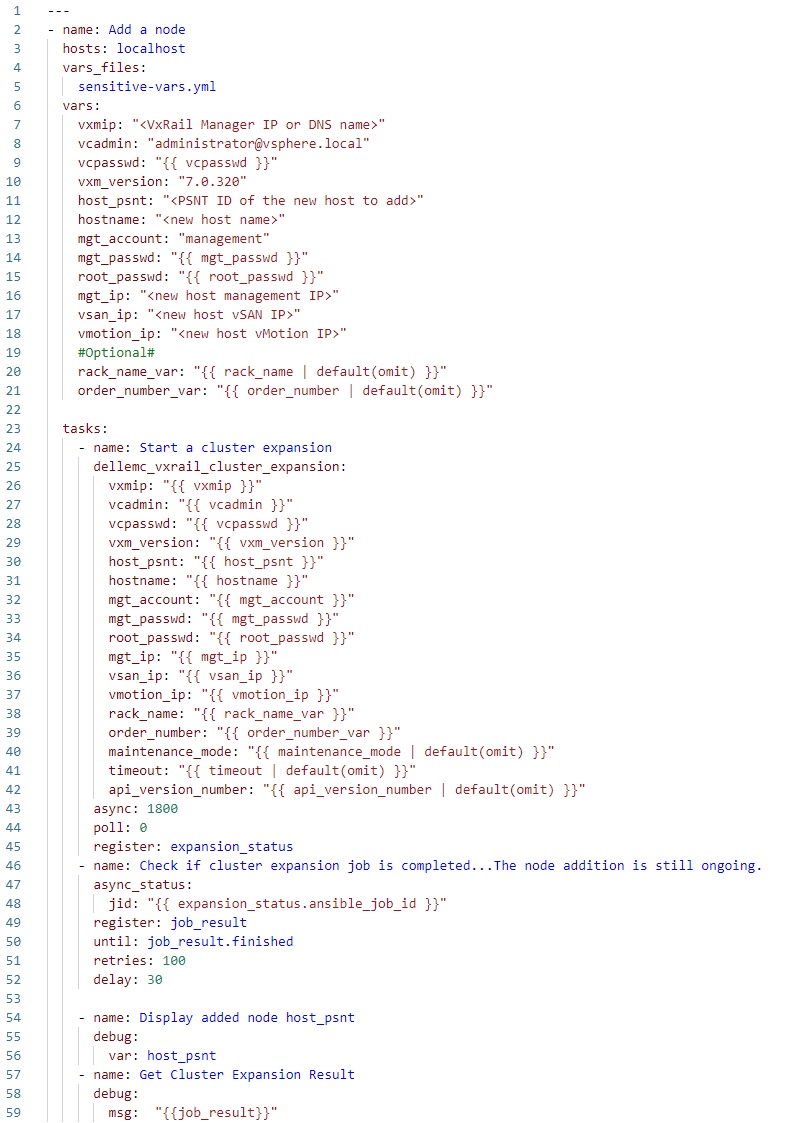
In this case, I've exported the definitions of the sensitive variables, such as vcpasswd, mgt_passwd, and root_passwd, into a separate, encrypted Ansible vault file, sensitive-vars.yml, to follow the best practice of not storing them in the clear text directly in playbooks.
As you can expect, besides the authentication, we need now to provide more parameters—configuration of the newly added host—defined in the vars section. We select the new host from the pool of available hosts, using the PSNT identifier (host_psnt variable).
This is an example of an operation performed by an asynchronous API function. Cluster expansion is not something that is completed immediately but takes minutes. Therefore, the progress of the expansion is monitored in a loop until it finishes or the number of retries is passed. If you communicated with the VxRail API directly by using the URI module from your playbook, you would have to take care of such monitoring logic on your own; here, you can use the example we provide.
You can watch the operation of the cluster expansion Ansible playbook with my commentary in this demo:
Getting help
The primary source of information about the Ansible Modules for Dell VxRail is the documentation available on GitHub. There you'll find all the necessary details on all currently available modules, a quick description, supported endpoints (VxRail API functions used), required and optional parameters, return values, and location of the log file (modules have built-in logging feature to simplify troubleshooting— logs are written in the /tmp directory on the Ansible automation server). The GitHub documentation also contains multiple samples showing how to use the modules, which you can easily clone and adjust as needed to the specifics of your VxRail environment.
There's also built-in documentation for the modules, accessible with the ansible-doc command.
Finally, the Dell Automation Community is a public discussion forum where you can post your questions and ask for help as needed.
Conclusion
I hope you now understand the Ansible Modules for Dell VxRail and how to get started. Let me quickly recap the value proposition for our customers. The modules are well-suited for IaC use cases, thanks to automating holistic workflows and idempotency. They are maintained by Dell and supported by the Dell Automation Community, which reduces risk. These modules are much easier to use than the alternative of accessing the VxRail API on your own. We provide many examples that can be adjusted to the specifics of the customer’s environment.
Resources
To learn more, see these resources:
- On-demand recording of the recent Tech Exchange Live session: "Infrastructure as Code with VxRail," where I dive a bit deeper into the Ansible Modules for VxRail, and my colleague Steffen from VMware discusses the basics of Terraform integration with VxRail.
- Ansible Modules for Dell VxRail on GitHub, which is the central code repository for the modules. It also contains complete product documentation and examples.
- Try the new VxRail API Hands-on-Lab available in the Dell Technologies Demo Center, which we introduced at Dell Technologies World earlier this year. Module 3: Cluster Expansion or Scaling Out allows you to get hands-on experience with the modules without the need to have access to a VxRail system. Your Dell account team can help you access the lab.
The following links provide additional information:
- YouTube video: Ansible Modules for Dell VxRail
- Dell Automation Community
- YouTube video: Level up your HCI automation with VxRail API
- Blog: VxRail API—Updated List of Useful Public Resources
Author: Karol Boguniewicz, Senior Principal Engineering Technologist, VxRail Technical Marketing
Twitter: @cl0udguide