


Journey to Infrastructure as Code

Infrastructure as code (IaC) has become a key enabler of today’s highly automated software deployment processes. In this blog, let’s see how today’s fast growing IaC paradigms evolved from traditional programming.
On the surface IaC might just imply using coding languages to provision, configure, and manage infrastructure components. While the code in IaC itself looks very different, it is the way code works to manage the infrastructure that is more important. In this blog, let’s first look at how storage automation evolved over the last two decades to keep up with changing programming language preferences and modern architectural paradigms. And then more importantly differentiate and appreciate modern day declarative configurations and state management.
First came the CLI
The command line interface (CLI) was the first step to faster workflows for admins of almost any IT infrastructure or electronic machinery in general. In fact, a lot of early electronic interfaces for “high tech” machinery in 80s and 90s were available only as commands. There were multiple reasons for this. The range of functionality and the scope of use for general computer controlled machinery was pretty limited. The engineers who developed the interfaces were more often domain experts than software engineers, but they still had the responsibility of today’s full stack developers, so naturally the user experience revolved more around their own preferences. Nevertheless, because the range of functionality was well covered by the command set, the interfaces left very little to be desired in terms of operating the infrastructure.
By the time storage arrays became common in enterprise IT in the mid-90s (good read: brief history of EMC), the ‘storage admin’ role evolved. The UNIX heavy workflows of admins meant a solid CLI was the need of the hour, especially for power users managing large scale, mission critical data storage systems. The erstwhile (and nostalgic to admins of the era) SYMCLI of the legendary Symmetrix platform is a great example of storage management simplicity. In fact, the compactness of symcli of the legendary Symmetrix platform easily beats any of today’s scripting languages. It was so popular that it had to be continued for the modern day PowerMax architecture, just to provide the same user experience. Here is what a storage group snapshot command looks like:
symsnapvx -sid ### -nop -sg mydb_sg establish -name daily_snap -ttl -delta 3
Then came scripts (more graphical than GUI!)
In the 90s, when graphical user interfaces became the norm for personal computers, enterprise software still was lagging personal computing interfaces in usability, a trend that persists even today. For a storage admin who was managing large scale systems, the command line was (and is today) still preferred.

While it is counterintuitive, many times for a complex, multi-step workflow, code blocks make the workflow more readable than documenting steps in the form of GUI snapshots, mouse clicks, and menu selections.
Although typing and executing commands was inherently faster than mouse driven graphical user interfaces, the main advantage is that commands can be combined into a repeatable workflow. In fact, the first form of IT automation was the ability to execute a sequence of steps using something like a shell script or Perl. (Here's some proof that this was used as late as 2013. Old habits die hard, especially when they work!) A script of commands was also a great way to document workflows, enforce best practices, and avoid manual errors - all the things that were essential when your business depended on the data operations on the storage system. Scripting itself evolved as more programming features appeared, such as variables, conditional flow, and looping.
Software started eating the world, RESTfully
REST APIs are easily one of the most decisive architectural elements that enabled software to eat the world. Like many web-scale technologies, it also cascaded to everyday applications as an essential design pattern. Storage interfaces quickly evolved from legacy CLI driven interfaces to a REST API server, with its functionality served with well-organized and easily discoverable API end-points. This also meant that developers started building all kinds of middleware to plug infrastructure into complex DevOps and ITOps environments, and self-service environments for developers to consume infrastructure. In fact, today GUIs and CLIs for storage systems use the same REST API that is offered to developers. Purpose built libraries in popular programming environments were also API consumers. Let’s look at a couple of examples.

Python phenomenon
No other programming language has stayed as relevant as Python has, thanks to the vibrant community that has made it applicable to a wide range of domains. For many years in a row, Python was at the top of the chart in Stack Overflow surveys as the most popular language developers either were already using or planning to. With the run-away success of PyU4V library for PowerMax, Dell invested in building API-bound functionality in Python to bring infrastructure closer to the developer. You can find Python libraries for Dell PowerStore, PowerFlex, and PowerScale storage systems on GitHub.
Have you checked out PowerShell recently?
Of late, PowerShell by Microsoft has been less about “shell” and more about power! How so? Very well-defined command structure, a large ecosystem of third-party modules, and (yes) cross-platform support across Windows, Linux, and Mac - AND cross-cloud support! This PowerShell overview documentation for Google Cloud says it all. Once again, Dell and our wonderful community has been at work to develop PowerShell modules for Dell infrastructure. Here are some of the useful modules available in the PowerShell Gallery: PowerStore, PowerMax, OpenManage.
Finally: infrastructure as code
For infrastructure management, even with the decades of programming glory from COBOL, to Perl, to Python, code was still used to directly call infrastructure functions that were exposed as API calls, and it was easier to use commands that wrapped the API calls. There was nothing domain-centric about the programming languages that made infrastructure management more intuitive. None of the various programming constructs like variables and control flows were any different for infrastructure management. You had to think like a programmer and bring the IT infrastructure domain into the variables, conditionals, and loops. The time for infrastructure-domain-driven tools has been long due and it has finally come!
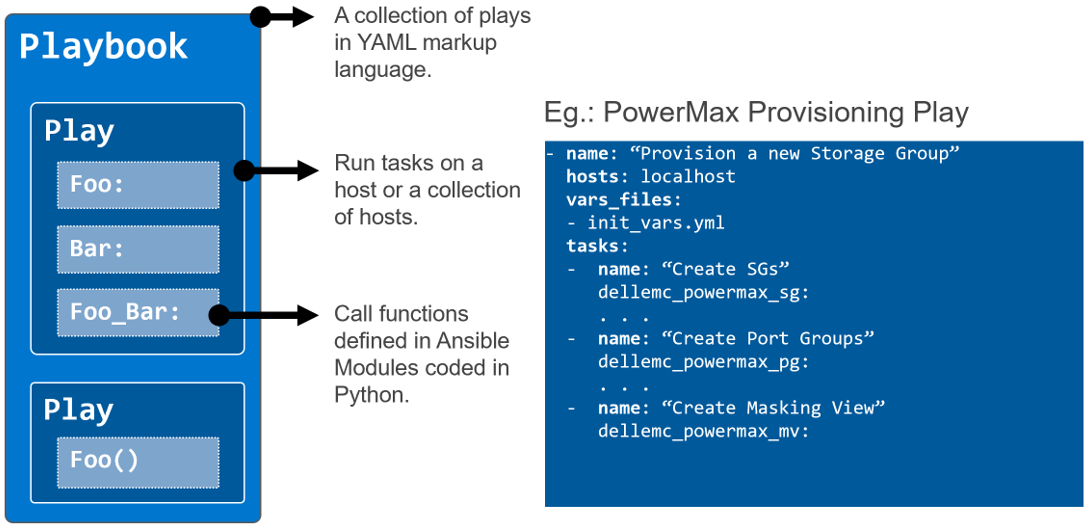
Ansible
Ansible, first released in 2013, was a great benefit in programming for the infrastructure domain. Ansible introduced constructs that map directly with the infrastructure setup and state (configuration): groups of tasks (organized into plays and playbooks) that need to be executed on a group of hosts that are defined by their “role” in the setup. You can define something as powerful and scalable like “Install this security path on all the hosts of this type (by role)”. It also has many desirable features such as
- Not requiring an agent
- The principle of idempotency, which ensures task execution subject to the actual configuration state that the code intends to achieve
- Templating to reuse playbooks
The Ansible ecosystem quickly grew so strong that you could launch any application with any infrastructure on any-prem/cloud. As the go-to-market lead for the early Ansible modules, I can say that Dell went all in on Ansible to cover every configurable piece of software and hardware infrastructure we made. (See links to all sixteen integrations here.) And here are a couple of good videos to see Ansible in action for Dell storage infrastructure: PowerScale example, PowerMax example.
Also, Ansible integrations from other ITOps platforms like ServiceNow help reuse existing workflow automation with minimal effort. Check out this PowerStore example.
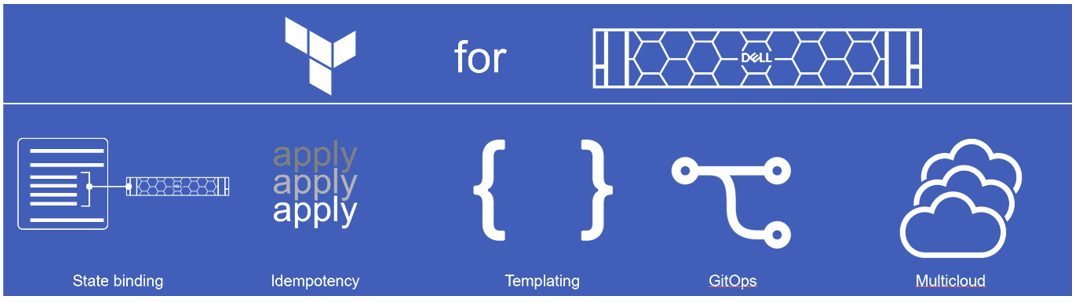
Terraform
Terraform by HashiCorp is another powerful IaC platform. It makes further in-roads into infrastructure configuration by introducing the concept of resources and the tight binding they have with the actual infrastructure components. Idempotency is implemented even more tightly. It’s multi-cloud ready and provides templating. It differs the most from other similar platforms in that it is purely “declarative” (declares the end state or configuration that the code aims to achieve) than “imperative” (just a sequence of commands/instructions to run). This means that the admin can focus on the various configuration elements and their state. It has to be noted that the execution order is less intuitive and therefore requires the user to enforce dependencies between different component configurations using “depends on” statements within resources. For example, to spin up a workload and associated storage, admins may need the storage provisioning step to be completed first before the host mapping happens.
And what does Dell have with Terraform?…We just announced the availability of version 1.0 of Terraform providers for PowerFlex and PowerStore platforms, and tech previews of providers for PowerMax and OpenManage Enterprise. I invite you to learn all about it and go through the demos here.
Author: Parasar Kodati
Related Blog Posts

Generative AI Tools for Infrastructure As Code Practitioners
Fri, 01 Dec 2023 15:32:51 -0000
|Read Time: 0 minutes
Today, Infrastructure as code is a mainstream technology used extensively by DevOps and ITOps engineers to manage dynamic IT environments consisting of data, applications, and infrastructure with increasing scale, complexity, and diversity. With a GitOps driven workflow, engineers can bring much needed standardization, security, and operational consistency across diverse environments. While there are a multitude of compelling reasons to embrace IaC, one innovation tips the scales toward a resounding yes, and that is generative AI. When coding assistants were released throughout this year, there was some skepticism around the accuracy of generated code, however this game-changing technology is evolving rapidly and becoming a key enabler for IaC, transforming it from a best practice to an indispensable strategy.
In this blog post, we'll explore some of the specific tools under the GenAI umbrella and how they can help you accelerate your workflows, learning, and even your career! Given how OpenAI has been leading the industry with generative AI tools like ChatGPT, I am going to refer to many of the specific tools from OpenAI. That said, many broad GenAI capabilities are possible with other capable large language models. To learn more, check out this great whitepaper on building general purpose LLM environments by my colleagues at Dell.
Code generation
If I have to choose between a monthly haircut or a generative code assistant subscription, I would choose the latter. Tools like GitHub copilot are becoming indispensable no matter which programming language or framework you use. These tools cut down the time it takes to create the building blocks of code necessary for automating tasks, so elegantly generated that you will not find a single line of generated code without a meaningful comment that your high school English teacher would be proud of. Examples of how this can help are shown in this Ansible for OpenManage Enterprise video.
Code interpretation
Large Language Models or LLMs are capable of interpreting code from a wide variety of programming languages thanks to their extensive training with millions of lines of code. This code interpretation is another huge capability where you can prompt the models with code, often easier than plain English. This can be especially helpful when refactoring code or when engineers are tasked with understanding and improving upon existing automation scripts. Following is a quick example where I generated the Ansible equivalent of good old Shell script using the latest ChatGPT 4 model.
Shell script input to create compressed backup of a folder:
#!/bin/bash

# Set the directory to back up and the backup location
DIRECTORY_TO_BACKUP="/home/user/data"
BACKUP_LOCATION="/backup"
TIMESTAMP=$(date +"%F")
BACKUP_FILE="backup-$TIMESTAMP.tar.gz"

# Create the backup
tar -czf $BACKUP_LOCATION/$BACKUP_FILE $DIRECTORY_TO_BACKUP

# Check if the backup was successful
if [ $? -eq 0 ]; then
  echo "Backup completed successfully."
else
  echo "Backup failed." >&2
fi
Ansible output I got the first time:
---
- name: Create Backup of Directory
  hosts: all
  tasks:
    - name: Create backup file
       ansible.builtin.archive:
        path: /home/user/data
        dest: /backup/backup-{{ ansible_date_time.iso8601_basic_short }}.tar.gz
        format: gz
Output received when I prompted the model for a more structured code block with variables:
---
- name: Create Backup of Directory with Variables
  hosts: all
  vars:
    backup_source: /home/user/data # Define the source directory to back up
    backup_destination: /backup # Define the backup destination directory
    backup_filename: "backup-{{ ansible_date_time.iso8601_basic_short }}.tar.gz" # Backup filename with a timestamp
  tasks:
    - name: Create backup directory if it does not exist
      ansible.builtin.file:
        path: "{{ backup_destination }}"
        state: directory
        mode: '0755'

    - name: Create backup file
      ansible.builtin.archive:
        path: "{{ backup_source }}"
        dest: "{{ backup_destination }}/{{ backup_filename }}"
        format: gz
The latest ChatGPT interface supports attaching files, so you don’t even have to copy-paste code for refactoring. Simply organize the files and attach them to your prompt.
Error analysis and debugging
If you think copy-pasting error messages into Stack Overflow is the best way to debug, think again. LLM-based code interpreter tools can analyze error messages and logs and, in many cases, identify the root causes for frequently occurring issues. This applies to any code, including Ansible playbooks and Terraform modules, where an LLM can swiftly recommend fixes, link to the relevant documentation, or even automate the resolution process in some cases.
Prompt engineering
If you think the term “prompt engineering” is just to make fun of GenAI tools, it’s time for a reframe in perspective. Prompting has become a critical factor in determining the accuracy of responses from LLMs. The more specific and detailed the prompt, the more useable the response. Here are some Infrastructure as code examples:
"I am working on a Terraform project where I need to provision an AWS EC2 instance with specific requirements: it should be of type 't2.micro', within the 'us-east-1' region, and include tags for 'Name' as 'MyInstance' and 'Environment' as 'Development'. Could you provide me with the Terraform code snippet that defines this resource?"
"I need to create an Ansible playbook that performs a common operation: updating all packages on a group of Ubuntu servers. The playbook should be idempotent and only target servers in the 'webservers' group. It must also restart the 'nginx' service only if the updates require a restart. Can you generate the YAML code for this playbook?"
And, if you are on a mission to change the world with Automation, maybe something like this:
"For my automation scripts using Python in a DevOps context, I require a robust error handling strategy that logs errors to a file and sends an email notification when a critical failure occurs. The script is meant to automate the deployment process. Could you provide a Python code sample that demonstrates this error handling? Here is the code: <your python code>"
So, if needed, skip the coffee a few times or a haircut, but please let a code assistant help you.
Your own GPT
Already have a ChatGPT tab in your browser at all times? Already a prompting machine? There is more you can do with GenAI than just ‘plain’ (very interesting how quickly this technology is becoming table stakes and commoditized) code generation.
Thanks to the recently announced GPTs and Assistant API by OpenAI, you can create a tailor-built model that is significantly faster and more precise in responses. You can train GPT models with anything from a policy document to coding guidelines to a sizing calculator for your IT infrastructure and have chat bots use these backend models to answer queries from customers or internal stakeholders. Please note that this does have a cost associated with it depending on the number of clients and usage. Please visit the OpenAI website to check out various plans and pricing. While we won’t go into detail on the topic in this particular blog, let me lay out the key elements that make up a custom GPT:
- Code Interpreter
- Knowledge Retrieval
- Your own functions
Code interpreter
This is not much different from the coding capabilities of ChatGPT or GitHub copilot. In the context of creating custom GPTs, you can basically check this as a required tool. You may ask, “why do you even have to select this foundational feature?” Put simply, it’s because of the pay-for-what-you-use pricing model in which users who don’t need this capability can uncheck it.
Knowledge retrieval
AI-powered knowledge retrieval systems can instantly pull up relevant technical documentation and best practices that are pertinent to the task at hand, whether it's crafting an Ansible playbook or defining resources in Terraform. This immediate access to information accelerates the development process and aids in maintaining industry standards across both platforms. Stay tuned for examples in future blog posts.
Your own functions
If you have already built scripts and routines to compute or make decisions, you can incorporate them into your custom GPT as well. I recently saw an example where an ROI calculator for switching to solar power had been incorporated into a chat bot to help customers visiting their website evaluate the switch to solar. Your GPT can be a sizer tool or a performance benchmarking tool for the end user for which you are building it.
Proprietary and sensitive data
While LLMs are the best thing to happen to programmers in a long time, one should exercise extreme caution when using data that is not publicly available to train AI models. Depending on the use case, extensive guard rails must be put in place when using sensitive data or proprietary data in your prompts or knowledge documents for training. If such guard rails do not exist in your organization, consider championing to create them and be a part of the process of helping your organization achieve a greater degree of maturity in AI adoption.
Dell and AI
Dell has been at the forefront of the GenAI revolution as the leading infrastructure provider for Artificial Intelligence solutions for the enterprise. Check out this insightful talk on Dell AI strategy by CTO John Roese that goes over A-in, AI-on, AI-for and AI-with aspects of Dell’s approach. Following are more resources to learn about infrastructure setup for LLM training and deployment in particular:
- Blog: Dell and Meta Collaborate to Drive Generative AI Innovation
- White Paper: Llama 2: Inferencing on a Single GPU
- Design Guide: Generative AI in the Enterprise – Inferencing
Author: Parasar Kodati, Engineering Technologist, Dell ISG

New and Updated Terraform Providers for Dell Infrastructure in Q2 2023 Release
Thu, 29 Jun 2023 12:35:34 -0000
|Read Time: 0 minutes
Last quarter we announced the first release of Terraform providers for Dell infrastructure. Now Terraform providers are also part of the Q2 release cadence of Dell infrastructure as code (IaC) integrations. We are excited to announce the following new features for the Terraform integrations for Dell infrastructure:
- v1.0 of the provider for OpenManage Enterprise
- v1.0 of the provider for PowerMax
- v1.1 of the provider for PowerFlex
- v1.1 of the provider for PowerStore
Terraform provider for OpenManage Enterprise v1.0
OpenManage Enterprise simplifies large-scale PowerEdge infrastructure management. You can define templates to manage the configuration of different groups of servers based on the workloads running on them. You can also create baseline versions for things like firmware and immediately get a report of noncompliance with the baseline. Now, as the scale of deployment increases—for example, in edge use cases—the configuration management can itself becomes arduous. This is where Terraform can manage the state of all the configurations and baselines in OpenManage Enterprise and deploy these for the server inventory as well.
The following resources and data sources are available in v1.0 of the OpenManage Enterprise provider:
Resources:
- Configuration baseline resource
- Configuration compliance resource
- Template resource
- Deployment resource
Data sources:
- Baseline compliance data source
- Group device data source
- Template data source
- VLAN network data source
Here are some examples of how to use OpenManage Enterprise resources and data sources to create and manage objects, and query from the objects:
Creating baselines
- Create baseline using service tags:
resource "ome_configuration_baseline" "baseline_name" {
   baseline_name      = "Baseline Name"
   device_servicetags = ["MXL1234", "MXL1235"]
}- Create baseline using device IDs:
resource "ome_configuration_baseline" "baseline1" {
   baseline_name   = "baseline1"
  ref_template_id = 745
  device_ids      = [10001, 10002]
  description     = "baseline description"
}- Create baseline using device service tag with daily notification scheduled:
resource "ome_configuration_baseline" "baseline2" {
   baseline_name      = "baseline2"
   ref_template_id    = 745
   device_servicetags = ["MXL1234", "MXL1235"]
  description        = "baseline description"
  schedule           = true
   notify_on_schedule = true
   email_addresses    = ["test@testmail.com"]
  cron               = "0 30 11 * * ? *"
   output_format      = "csv"
}- Create baseline using device IDs with daily notification on status changing to noncompliant:
Resource “ome_configuration_baseline” “baseline3” {
   baseline_name   = “baseline3”
  ref_template_id = 745
  device_ids      = [10001, 10002]
  description     = “baseline description”
  schedule        = true
  email_addresses = [“test@testmail.com”]
   output_format   = “pdf”
}
Compliance against baseline
- Remediate baseline for the specified target devices:
resource "ome_configuration_compliance" "remeditation0" {
  baseline_name = "baseline_name"
  target_devices = [
    {
       device_service_tag = "MX12345"
       compliance_status  = "Compliant"
    }
  ]
}- Remediate baseline for the specified target devices with scheduling:
resource "ome_configuration_compliance" "remeditation1" {
  baseline_name = "baseline_name"
  target_devices = [
    {
       device_service_tag = "MX12345"
       compliance_status  = "Compliant"
    }
  ]
  run_later = true
  cron      = "0 00 11 14 02 ? 2032"
}
Template creation and management
- Create a template with reference device id:
resource "ome_template" "template_1" {
  name         = "template_1"
  refdevice_id = 10001
}- Create a template with reference device servicetag:
resource "ome_template" "template_2" {
  name                 = "template_2"
   refdevice_servicetag = "MXL1234"
}- Create a template with fqdds as NIC:
resource "ome_template" "template_3" {
  name         = "template_3"
  refdevice_id = 10001
  fqdds        = "NIC"
}
Data source examples
- Fetch the main data source objects:
# Get configuration compliance report for a baseline
data "ome_configuration_report_info" "cr" {
  baseline_name = "BaselineName"
}

# Get Deviceid's and servicetags of all devices that belong to a specified list of groups
data "ome_groupdevices_info" "gd" {
   device_group_names = ["WINDOWS"]
}

# get the template details
data "ome_template_info" "data-template-1" {
  name = "template_1"
}

# get details of all the vlan networks
data "ome_vlannetworks_info" "data-vlans" {
}
The following set of examples uses locals heavily. Locals in Terraform is a way to assign a name to an expression, allowing it to be used multiple times within a module without repeating it. These named expressions are evaluated once and can then be referenced multiple times in other parts of a module configuration. This makes your configurations easier to read and maintain. Check out the Local Values topic in the HashiCorp documentation to learn more.
Let us continue with the examples:
- Get VLAN and template objects:
data "ome_vlannetworks_info" "vlans" {
}

data "ome_template_info" "template_data" {
  name = "template_4"
}- Fetch VLAN network ID from VLAN name for updating VLAN template attributes:
locals {
  vlan_network_map = { for vlan_network in data.ome_vlannetworks_info.vlans.vlan_networks : vlan_network.name => vlan_network.vlan_id }
}- Modify the attributes required for updating a template for assigning identity pool:
locals {
  attributes_value = tomap({
    "iDRAC,IO Identity Optimization,IOIDOpt 1 Initiator Persistence Policy" : "WarmReset, ColdReset, ACPowerLoss"
    "iDRAC,IO Identity Optimization,IOIDOpt 1 Storage Target Persistence Policy" : "WarmReset, ColdReset, ACPowerLoss"
    "iDRAC,IO Identity Optimization,IOIDOpt 1 Virtual Address Persistence Policy Auxiliary Powered" : "WarmReset, ColdReset, ACPowerLoss"
    "iDRAC,IO Identity Optimization,IOIDOpt 1 Virtual Address Persistence Policy Non Auxiliary Powered" : "WarmReset, ColdReset, ACPowerLoss"
    "iDRAC,IO Identity Optimization,IOIDOpt 1 IOIDOpt Enable" : "Enabled"

  })
   attributes_is_ignored = tomap({
    "iDRAC,IO Identity Optimization,IOIDOpt 1 Initiator Persistence Policy" : false
    "iDRAC,IO Identity Optimization,IOIDOpt 1 Storage Target Persistence Policy" : false
    "iDRAC,IO Identity Optimization,IOIDOpt 1 Virtual Address Persistence Policy Auxiliary Powered" : false
    "iDRAC,IO Identity Optimization,IOIDOpt 1 Virtual Address Persistence Policy Non Auxiliary Powered" : false
    "iDRAC,IO Identity Optimization,IOIDOpt 1 IOIDOpt Enable" : false

  })

   template_attributes = data.ome_template_info.template_data.attributes != null ? [
    for attr in data.ome_template_info.template_data.attributes : tomap({
      attribute_id = attr.attribute_id
       is_ignored   = lookup(local.attributes_is_ignored, attr.display_name, attr.is_ignored)
      display_name = attr.display_name
      value        = lookup(local.attributes_value, attr.display_name, attr.value)
  })] : null
}- Create a template in a resource and uncomment the lines as shown here to update the template to attach the identity pool and VLAN:
resource "ome_template" "template_4" {
  name                 = "template_4"
   refdevice_servicetag = "MXL1234"
  # attributes = local.template_attributes
  # identity_pool_name   = "IO1"
  # vlan = {
  #     propogate_vlan     = true
  #     bonding_technology = "NoTeaming"
  #     vlan_attributes = [
  #       {
  #         untagged_network = lookup(local.vlan_network_map, "VLAN1", 0)
  #         tagged_networks  = [0]
  #         is_nic_bonded    = false
  #         port             = 1
  #         nic_identifier   = "NIC in Mezzanine 1A"
  #       },
  #       {
  #         untagged_network = 0
  #         tagged_networks  = [lookup(local.vlan_network_map, "VLAN1", 0), lookup(local.vlan_network_map, "VLAN2", 0), lookup(local.vlan_network_map, "VLAN3", 0)]
  #         is_nic_bonded    = false
  #         port             = 1
  #         nic_identifier   = "NIC in Mezzanine 1B"
  #       },
  #     ]
  #   }
}- Modify the attributes required for updating a template using attribute IDs:
# get the template details
data "ome_template_info" "template_data1" {
  name = "template_5"
}

locals {
  attributes_map = tomap({
    2740260 : "One Way"
    2743100 : "Disabled"
  })

   template_attributes = data.ome_template_info.template_data1.attributes != null ? [
    for attr in data.ome_template_info.template_data1.attributes : tomap({
      attribute_id = attr.attribute_id
       is_ignored   = attr.is_ignored
      display_name = attr.display_name
      value        = lookup(local.attributes_map, attr.attribute_id, attr.value)
  })] : null
}- Create a template and update the attributes of the template:
# attributes are only updatable and is not applicable during create operation.
# attributes existing list can be fetched from a template with a datasource - ome_template_info as defined above.
# modified attributes list should be passed to update the attributes for a template
resource "ome_template" "template_5" {
  name                 = "template_5"
   refdevice_servicetag = "MXL1234"
  attributes           = local.template_attributes
}- Create multiple templates with template names and reference devices:
resource "ome_template" "templates" {
  count                = length(var.ome_template_names)
  name                 = var.ome_template_names[count.index]
   refdevice_servicetag = var.ome_template_servicetags[count.index]
}- Clone a deploy template to create compliance template:
resource "ome_template" "template_6" {
  name             = "template_6"
  reftemplate_name = "template_5"
  view_type        = "Compliance"
}- Create a deployment template from an XML:
resource "ome_template" "template_7" {
  name    = "template_7"
  content = file("../testdata/test_acc_template.xml")
}- Create a compliance template from an XML:
resource "ome_template" "template_8" {
  name      = "template_8"
  content   = file("../testdata/test_acc_template.xml")
  view_type = "Compliance"
}
Flexible and granular deployment of templates
- Deploy template using device service tags:
resource "ome_deployment" "deploy-template-1" {
   template_name      = "deploy-template-1"
   device_servicetags = ["MXL1234", "MXL1235"]
  job_retry_count    = 30
   sleep_interval     = 10
}- Deploy template using device IDs:
resource "ome_deployment" "deploy-template-2" {
  template_name = "deploy-template-2"
  device_ids    = [10001, 10002]
}- Get device IDs or service tags from a specified list of groups:
data "ome_groupdevices_info" "gd" {
   device_group_names = ["WINDOWS"]
}- Deploy template for group by fetching the device IDs using data sources:
resource "ome_deployment" "deploy-template-3" {
  template_name = "deploy-template-3"
  device_ids    = data.ome_groupdevices_info.gd.device_ids
}- Deploy template using device service tags with schedule:
resource "ome_deployment" "deploy-template-4" {
   template_name      = "deploy-template-4"
   device_servicetags = ["MXL1234"]
  run_later          = true
  cron               = "0 45 12 19 10 ? 2022"
}- Deploy template using device IDs and deploy device attributes:
resource "ome_deployment" "deploy-template-5" {
  template_name = "deploy-template-5"
  device_ids    = [10001, 10002]
  device_attributes = [
    {
       device_servicetags = ["MXL12345", "MXL23456"]
      attributes = [
        {
           attribute_id = 1197967
           display_name = "ServerTopology 1 Aisle Name"
           value        = "aisle updated value"
           is_ignored   = false
        }
      ]
    }
  ]
}- Deploy template using device IDs and boot to network ISO:
resource "ome_deployment" "deploy-template-6" {
  template_name = "deploy-template-6"
  device_ids    = [10001, 10002]
   boot_to_network_iso = {
    boot_to_network = true
    share_type      = "CIFS"
     iso_timeout     = 240
    iso_path        = "/cifsshare/unattended/unattended_rocky8.6.iso"
    share_detail = {
      ip_address = "192.168.0.2"
      share_name = ""
      work_group = ""
      user       = "username"
      password   = "password"
    }
  }
  job_retry_count = 30
}- Deploy template using device IDs by changing the job_retry_count and sleep_interval, and ignore the same during updates:
resource "ome_deployment" "deploy-template-7" {
   device_servicetags = ["MXL1234"]
   job_retry_count    = 30
   sleep_interval     = 10

  lifecycle {
    ignore_changes = [
       job_retry_count,
      sleep_interval
    ]
  }
}- Deploy template using device service tags and group names:
resource "ome_deployment" "deploy-template-8" {
  template_id        = 614
   device_servicetags = concat(data.ome_groupdevices_info.gd.device_servicetags, ["MXL1235"])
}
Terraform provider for PowerMax v1.0
My colleagues Paul and Florian did a great blog post on the Terraform provider for PowerMax when we announced the beta release last quarter. I am adding the details of the provider for the sake of completion here:
PowerMax resources
- PowerMax storage group:
resource "powermax_storagegroup" "test" {
  name   = "terraform_sg"
  srp_id = "SRP_1"
  slo    = "Gold"
  host_io_limit = {
     host_io_limit_io_sec = "1000"
    host_io_limit_mb_sec = "1000"
     dynamic_distribution = "Never"
  }
  volume_ids = ["0008F"]
}- PowerMax host:
resource "powermax_host" "host_1" {
  name      = "host_1"
  initiator = ["10000000c9fc4b7e"]
  host_flags = {
    volume_set_addressing = {
      override = true
      enabled  = true
    }
    openvms = {
      override = true
      enabled  = false
    }
  }
}- PowerMax host group:
 resource "powermax_hostgroup" "test_host_group" {
  # Optional
  host_flags = {
     avoid_reset_broadcast = {
      enabled  = true
      override = true
    }
  }
  host_ids = ["testHost"]
  name     = "host_group"
}- PowerMax port group:
resource "powermax_portgroup" "portgroup_1" {
  name     = "tfacc_pg_test_1"
  protocol = "SCSI_FC"
  ports = [
    {
      director_id = "OR-1C"
      port_id     = "0"
    }
  ]
}- PowerMax masking view:
 resource "powermax_maskingview" "test" {
  name             = "terraform_mv"
  storage_group_id = "terraform_sg"
  host_id          = "terraform_host"
   host_group_id    = ""
   port_group_id    = "terraform_pg"
}
PowerMax data sources
- Storage group with dot operations:
data "powermax_storagegroup" "test" {
  filter {
    names = ["esa_sg572"]
  }
}

output "storagegroup_data" {
  value = data.powermax_storagegroup.test
}

data "powermax_storagegroup" "testall" {
}

output "storagegroup_data_all" {
  value = data.powermax_storagegroup.testall
}- PowerMax host data source with dot operations to query the information needed:
data "powermax_host" "HostDsAll" {
}

data "powermax_host" "HostDsFiltered" {
  filter {
    # Optional list of IDs to filter
    names = [
       "Host124",
       "Host173",
    ]
  }
}

output "hostDsResultAll" {
  value = data.powermax_host.HostDsAll
}

output "hostDsResult" {
  value = data.powermax_host.HostDsFiltered
}- Host group data source:
data "powermax_hostgroup" "all" {}

output "all" {
  value = data.powermax_hostgroup.all
}

# List a specific hostgroup
data "powermax_hostgroup" "groups" {
  filter {
    names = ["host_group_example_1", "host_group_example_2"]
  }
}

output "groups" {
  value = data.powermax_hostgroup.groups
}- Port groups data source and dot operations to output information:
# List fibre portgroups.
data "powermax_portgroups" "fibreportgroups" {
  # Optional filter to list specified Portgroups names and/or type
  filter {
    # type for which portgroups to be listed  - fibre or iscsi
    type = "fibre"
    # Optional list of IDs to filter
    names = [
       "tfacc_test1_fibre",
       #"test2_fibre",
    ]
  }
}

data "powermax_portgroups" "scsiportgroups" {
  filter {
    type = "iscsi"
    # Optional filter to list specified Portgroups Names
  }
}

# List all portgroups.
data "powermax_portgroups" "allportgroups" {
  #filter {
  # Optional list of IDs to filter
  #names = [
  #  "test1",
  #  "test2",
  #]
  #}
}
output "fibreportgroups" {
  value = data.powermax_portgroups.fibreportgroups
}

output "scsiportgroups" {
  value = data.powermax_portgroups.scsiportgroups
}

output "allportgroups" {
  value = data.powermax_portgroups.allportgroups.port_groups
}- Masking view data source and dot operations to output information:
# List a specific maskingView
data "powermax_maskingview" "maskingViewFilter" {
  filter {
    names = ["terraform_mv_1", "terraform_mv_2"]
  }
}

output "maskingViewFilterResult" {
  value = data.powermax_maskingview.maskingViewFilter.masking_views
}

# List all maskingviews
data "powermax_maskingview" "allMaskingViews" {}

output "allMaskingViewsResult" {
  value = data.powermax_maskingview.allMaskingViews.masking_views
}
Terraform provider for PowerStore v1.1.0
In PowerStore v1.1, the following new resources and data sources are being introduced.
New resources for PowerStore
- Volume group resource:
resource "powerstore_volumegroup" "terraform-provider-test1" {
  # (resource arguments)
  description               = "Creating Volume Group"
  name                      = "test_volume_group"
   is_write_order_consistent = "false"
   protection_policy_id      = "01b8521d-26f5-479f-ac7d-3d8666097094"
  volume_ids                = ["140bb395-1d85-49ae-bde8-35070383bd92"]
}- Host resource:
resource "powerstore_host" "test" {
  name              = "new-host1"
  os_type           = "Linux"
  description       = "Creating host"
  host_connectivity = "Local_Only"
  initiators        = [{ port_name = "iqn.1994-05.com.redhat:88cb605"}]
}- Host group resource:
resource "powerstore_hostgroup" "test" {
  name        = "test_hostgroup"
  description = "Creating host group"
  host_ids    = ["42c60954-ea71-4b50-b172-63880cd48f99"]
}- Volume snapshot resource:
resource "powerstore_volume_snapshot" "test" {
  name                  = "test_snap"
  description           = "powerstore volume snapshot"
  volume_id             = "01d88dea-7d71-4a1b-abd6-be07f94aecd9"
   performance_policy_id = "default_medium"
   expiration_timestamp  = "2023-05-06T09:01:47Z"
}- Volume group snapshot resource:
resource "powerstore_volumegroup_snapshot" "test" {
  name                 = "test_snap"
  volume_group_id      = "075aeb23-c782-4cce-9372-5a2e31dc5138"
   expiration_timestamp = "2023-05-06T09:01:47Z"
}
New data sources for PowerStore
- Volume group data source:
data "powerstore_volumegroup" "test1" {
  name = "test_volume_group1"
}

output "volumeGroupResult" {
  value = data.powerstore_volumegroup.test1.volume_groups
}- Host data source:
data "powerstore_host" "test1" {
  name = "tf_host"
}

output "hostResult" {
  value = data.powerstore_host.test1.hosts
}- Host group data source:
data "powerstore_hostgroup" "test1" {
  name = "test_hostgroup1"
}

output "hostGroupResult" {
  value = data.powerstore_hostgroup.test1.host_groups
}- Volume snapshot data source:
data "powerstore_volume_snapshot" "test1" {
  name = "test_snap"
  #id = "adeeef05-aa68-4c17-b2d0-12c4a8e69176"
}

output "volumeSnapshotResult" {
  value = data.powerstore_volume_snapshot.test1.volumes
}- Volume group snapshot data source:
data "powerstore_volumegroup_snapshot" "test1" {
#  name = "test_volumegroup_snap"
}

output "volumeGroupSnapshotResult" {
  value = data.powerstore_volumegroup_snapshot.test1.volume_groups
}- Snapshot rule data source:
data "powerstore_snapshotrule" "test1" {
  name = "test_snapshotrule_1"
}

output "snapshotRule" {
  value = data.powerstore_snapshotrule.test1.snapshot_rules
}- Protection policy data source:
data "powerstore_protectionpolicy" "test1" {
  name = "terraform_protection_policy_2"
}

output "policyResult" {
  value = data.powerstore_protectionpolicy.test1.policies
}
Terraform provider for PowerFlex v1.1.0
We announced the very first provider for Dell PowerFlex last quarter, and here we have the next version with new functionality. In this release, we are introducing new resources and data sources to support the following activities:
- Create and manage SDCs
- Create and manage protection domains
- Create and manage storage pools
- Create and manage devices
Following are the details of the new resources and corresponding data sources.
Host mapping with PowerFlex SDCs
Storage Data Client (SDC) is the PowerFlex host-side software component that can be deployed on Windows, Linux, IBM AIX, ESXi, and other operating systems. In this release of the PowerFlex provider, a new resource is introduced to map multiple volumes to a single SDC. Here is an example of volumes being mapped using their ID or name:
resource "powerflex_sdc_volumes_mapping" "mapping-test" {
  id = "e3ce1fb600000001"
  volume_list = [
    {
      volume_id        = "edb2059700000002"
      limit_iops       = 140
      limit_bw_in_mbps = 19
      access_mode      = "ReadOnly"
    },
    {
      volume_name      = "terraform-vol"
      access_mode      = "ReadWrite"
      limit_iops       = 120
      limit_bw_in_mbps = 25
    }
  ]
}
To unmap all the volumes mapped to SDC, the following configuration can be used:
resource "powerflex_sdc_volumes_mapping" "mapping-test" {
  id          = "e3ce1fb600000001"
  volume_list = []
}
Data sources for storage data client and server components:
- PowerFlex SDC data source:
data "powerflex_sdc" "selected" {
  #id = "e3ce1fb500000000"
  name = "sdc_01"
}

# # Returns all sdcs matching criteria
output "allsdcresult" {
  value = data.powerflex_sdc.selected
}- PowerFlex SDS data source:
data "powerflex_sds" "example2" {
  # require field is either of protection_domain_name or protection_domain_id
   protection_domain_name = "domain1"
  # protection_domain_id = "202a046600000000"
  sds_names = ["SDS_01_MOD", "sds_1", "node4"]
  # sds_ids = ["6adfec1000000000", "6ae14ba900000006", "6ad58bd200000002"]
}

output "allsdcresult" {
  value = data.powerflex_sds.example2
}
PowerFlex protection domain resource and data source
Here is the resource definition of the protection domain:
resource "powerflex_protection_domain" "pd" {
  # required parameters  ======

  name = "domain_1"
  # optional parameters  ======
  active = true

  # SDS IOPS throttling
  # overall_io_network_throttling_in_kbps must be greater than the rest of the parameters
  # 0 indicates unlimited IOPS
   protected_maintenance_mode_network_throttling_in_kbps = 10 * 1024
   rebuild_network_throttling_in_kbps                    = 10 * 1024
   rebalance_network_throttling_in_kbps                  = 10 * 1024
   vtree_migration_network_throttling_in_kbps            = 10 * 1024
   overall_io_network_throttling_in_kbps                 = 20 * 1024

  # Fine granularity metadata caching
  fgl_metadata_cache_enabled      = true
   fgl_default_metadata_cache_size = 1024

  # Read Flash cache
  rf_cache_enabled          = true
  rf_cache_operational_mode = "ReadAndWrite"
   rf_cache_page_size_kb     = 16
   rf_cache_max_io_size_kb   = 32
}
All this information for an existing protection domain can be stored with the corresponding datastore, and information can be queried using the dot operator:
data "powerflex_protection_domain" "pd" {
  name = "domain1"
  # id = "202a046600000000"
}

output "inputPdID" {
  value = data.powerflex_protection_domain.pd.id
}

output "inputPdName" {
  value = data.powerflex_protection_domain.pd.name
}

output "pdResult" {
  value = data.powerflex_protection_domain.pd.protection_domains
}
PowerFlex storage pool resource and data source
Storage resources in PowerFlex are grouped into these storage pools based on certain attributes such as performance characteristics, types of disks used, and so on. Here is the resource definition of the storage pool resource:
resource "powerflex_storage_pool" "sp" {
  name = "storagepool3"
  #protection_domain_id = "202a046600000000"
  protection_domain_name = "domain1"
  media_type             = "HDD"
  use_rmcache            = false
  use_rfcache            = true
   #replication_journal_capacity = 34
   capacity_alert_high_threshold                               = 66
   capacity_alert_critical_threshold                           = 77
  zero_padding_enabled                                        = false
   protected_maintenance_mode_io_priority_policy               = "favorAppIos"
  protected_maintenance_mode_num_of_concurrent_ios_per_device = 7
   protected_maintenance_mode_bw_limit_per_device_in_kbps      = 1028
  rebalance_enabled                                           = false
   rebalance_io_priority_policy                                = "favorAppIos"
   rebalance_num_of_concurrent_ios_per_device                  = 7
   rebalance_bw_limit_per_device_in_kbps                       = 1032
   vtree_migration_io_priority_policy                          = "favorAppIos"
  vtree_migration_num_of_concurrent_ios_per_device            = 7
   vtree_migration_bw_limit_per_device_in_kbps                 = 1030
  spare_percentage                                            = 66
   rm_cache_write_handling_mode                                = "Passthrough"
  rebuild_enabled                                             = true
   rebuild_rebalance_parallelism                               = 5
  fragmentation                                               = false
}
And the corresponding data source to get this information from existing storage pools is as follows:
data "powerflex_storage_pool" "example" {
  //protection_domain_name = "domain1"
  protection_domain_id = "202a046600000000"
  //storage_pool_ids = ["c98ec35000000002", "c98e26e500000000"]
  storage_pool_names = ["pool2", "pool1"]
}


output "allsdcresult" {
  value = data.powerflex_storage_pool.example.storage_pools
}
Author: Parasar Kodati