


Dell Technologies VEP4600 BMC/IPMI Feature Introduction
Mon, 17 Oct 2022 14:52:26 -0000
|Read Time: 0 minutes
VEP4600 system includes a BMC (Baseboard Management Controller) controller to provide out of band (OOB) hardware management. This controller has the following features:
- BMC RJ-45 serial console
- IPMI standard API library support through BMC network
- BMC web-based UI
The following screenshot provides a sample of the Putty BMC serial console screen shot:
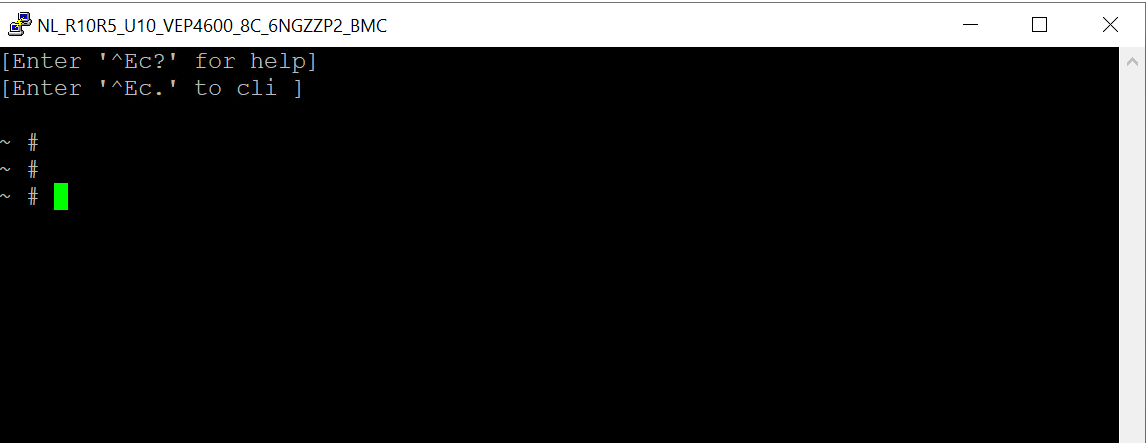
The BMC software is a lightweight Linux OS running on SoC chipset. It can run the following Linux commands to check OS version, NIC connectivity, file system, memory capacity, and standard IPMI API calls.
uname -a
Linux BMC3C2C301BD209 3.14.17-ami #1 Tue Jun 16 14:05:05 GMT 2020 armv6l GNU/Linux
df -h
Filesystem Size Used Available Use% Mounted on
/dev/root 45.4M 45.4M 0 100% /
devtmpfs 323.9M 0 323.9M 0% /dev
/dev/shm 362.0M 220.0K 361.8M 0% /var
/dev/shm 362.0M 76.0K 361.9M 0% /run
/dev/mtdblock1 960.0K 288.0K 672.0K 30% /conf
/dev/mtdblock3 1.6M 1.6M 0 100% /usr/local/www
~ # free -m
total used free shared buffers
Mem: 723 88 635 0 14
-/+ buffers: 74 649
Swap: 0 0 0
~ # route -n
Kernel IP routing table
Destination Gateway Genmask Flags Metric Ref Use Iface
0.0.0.0 172.17.76.254 0.0.0.0 UG 0 0 0 eth0
172.17.76.0 0.0.0.0 255.255.255.0 U 0 0 0 eth0
~ # ethtool eth0
Settings for eth0:
Supported ports: [ TP MII ]
Supported link modes: 10baseT/Half 10baseT/Full
100baseT/Half 100baseT/Full
1000baseT/Full
Supported pause frame use: Symmetric
Supports auto-negotiation: Yes
Advertised link modes: 10baseT/Half 10baseT/Full
100baseT/Half 100baseT/Full
1000baseT/Full
Advertised pause frame use: Symmetric
Advertised auto-negotiation: Yes
Speed: 1000Mb/s
Duplex: Full
Port: Twisted Pair
PHYAD: 0
Transceiver: internal
Auto-negotiation: on
MDI-X: Unknown
Link detected: yes
IPMI API calls
ipmitest power status
Chassis Power is on
Turn VEP4600 CPU on and off
ipmitest power reset
ipmitest power off
ipmitest power cycle
Reboot VEP4600 and park the system at BIOS settings
ipmitest chassis bootparam set bootflag force_bios
ipmitest power reset
Display VEP4600 hardware components status
ipmitool sel list
ipmitest sel list
1 | 12/31/1999 | 19:00:08 | Microcontroller/Coprocessor | Transition to Running
2 | 12/31/1999 | 19:00:09 | Power Supply #0x71 | Presence detected | Asserted
3 | 12/31/1999 | 19:00:09 | Power Supply #0x72 | Failure detected | Asserted
4 | 12/31/1999 | 19:00:09 | Power Supply #0x72 | Power Supply AC lost | Asserted
5 | 12/31/1999 | 19:00:09 | System ACPI Power State #0x77 | S0/G0: working | Asserted
…
29a | 01/01/2000 | 00:01:03 | System Event #0xff | Timestamp Clock Sync | Asserted
29b | 07/12/2022 | 20:12:59 | System Event #0xff | Timestamp Clock Sync | Asserted
29c | 07/12/2022 | 20:13:00 | System Event | Timestamp Clock Sync | Asserted
ipmitest sensor
PSU1_Status | 0x0 | discrete | 0x0180| na | na | na | na | na | na
PSU2_Status | 0x0 | discrete | 0x0080| na | na | na | na | na | na
AC_Status | 0x0 | discrete | 0x0080| na | na | na | na | na | na
Watchdog2 | 0x0 | discrete | 0x0080| na | na | na | na | na | na
SEL | 0x0 | discrete | 0x0080| na | na | na | na | na | na
Power_Status | 0x0 | discrete | 0x0180| na | na | na | na | na | na
Fan1_Status | 0x0 | discrete | 0x0180| na | na | na | na | na | na
…
VCCIO_CP | 0.994 | Volts | ok | 0.504 | 0.602 | 0.700 | 1.197 | 1.302 | 1.400
VCCIN_CP | 1.775 | Volts | ok | 0.898 | 1.081 | 1.265 | 2.162 | 2.336 | 2.519
VCCSA_CP | 0.840 | Volts | ok | 0.259 | 0.343 | 0.427 | 1.190 | 1.274 | 1.358
1. IPMI standard API calls through BMC network
ipmitool -I lanplus -H <BMC IP address> -U admin -P admin power status
ipmitool -I lanplus -H <BMC IP address> -U admin -P admin power reset
ipmitool -I lanplus -H <BMC IP address> -U admin -P admin power off
ipmitool -I lanplus -H <BMC IP address> -U admin -P admin power on
ipmitool -I lanplus -H <BMC IP address> -U admin -P admin power cycle
ipmitool -I lanplus -H <BMC IP address> -U admin -P admin chassis bootparam set bootflag force_bios
ipmitool -I lanplus -H <BMC IP address> -U admin -P admin power reset
ipmitool -I lanplus -H <BMC IP address> -U admin -P admin sel list
ipmitool -I lanplus -H <BMC IP address> -U admin -P admin sensor
ipmitool -I lanplus -H <BMC IP address> -U admin -P admin sol activate
ipmitool -I lanplus -H <BMC IP address> -U admin -P admin sol deactivate
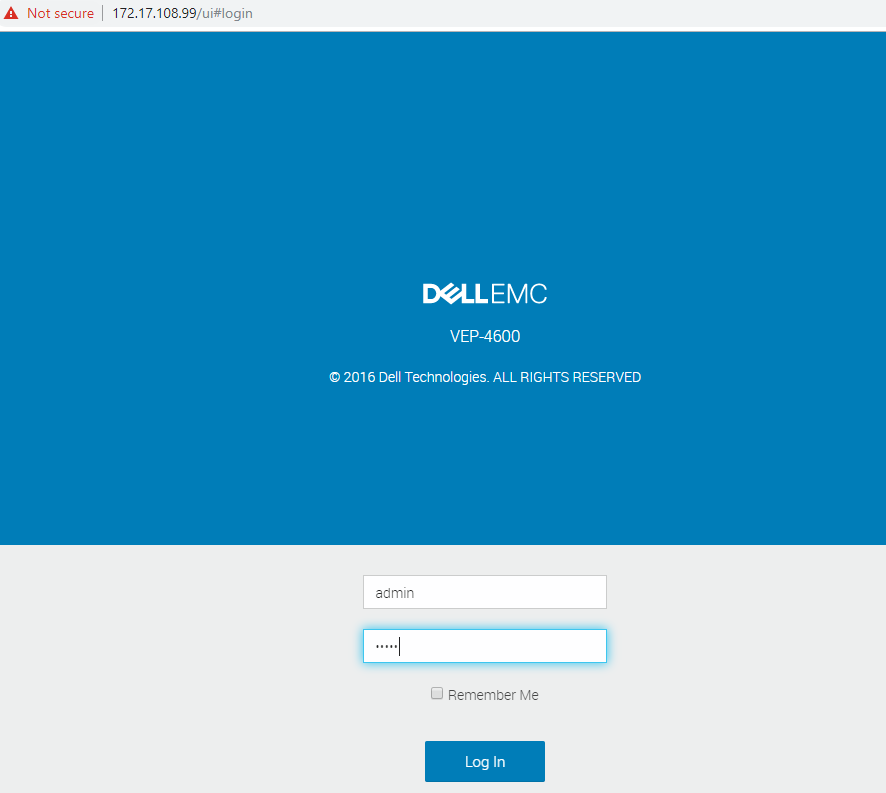
BMC Web based UI feature
In addition to BMC Command Line Interaction (CLI) feature, BMC also supports WEB based UI functions and features.
1. Open the following URL in a web browser:
https://<BMC IP address>/ui
Note: Make sure you type out the full URL or the web page will not be displayed.
2. Configure BMC network and credentials in BIOS settings
3. Enable BMC Support in a BIOS Server Management tab
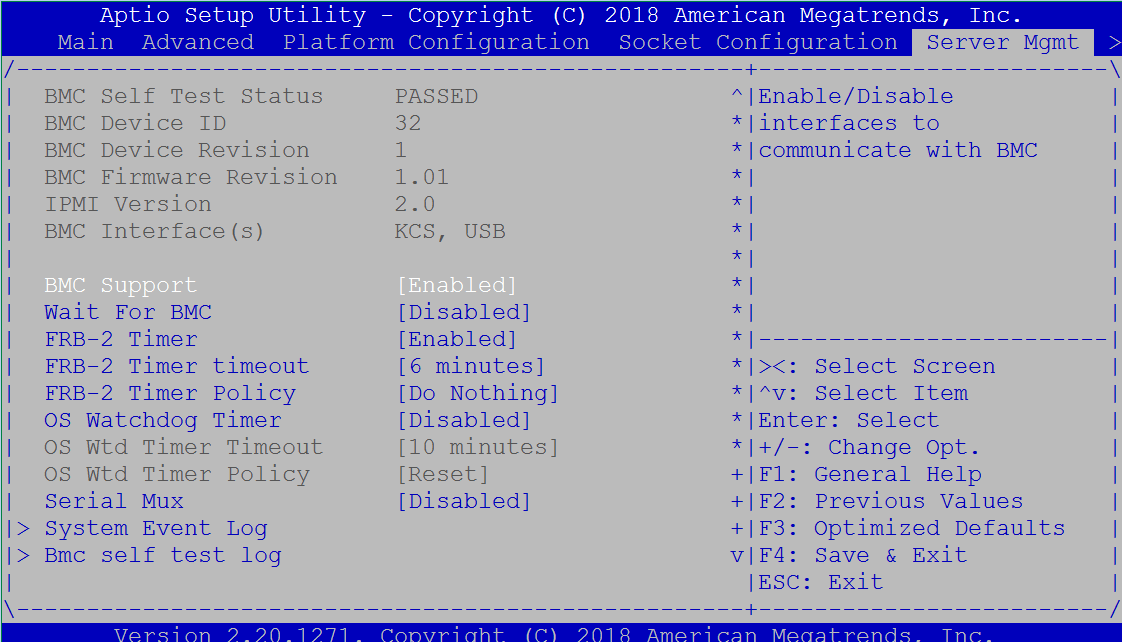
4. The following image shows the BMC/IPMI network setup. Navigate to the BMC network configuration and click Enter.
5. Navigate to BMC network setup address source configuration and click Enter.
6. Go to BMC/IPMI network setup address source configuration and select Static or DynamicBmcDhcp.
7. Navigate to BMC/IPMI network setup Static Address configuration and click Enter.
8. Go to BMC/IPMI network setup BMC interface IP address and click Enter.
9. Use ctrl-h to erase 0.0.0.0 and enter a new IP address.
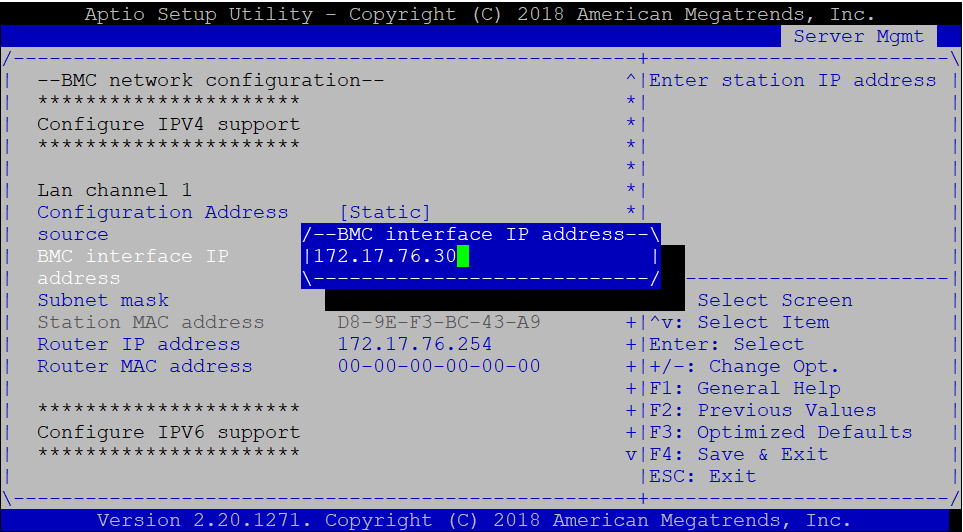 10. Go to BMC/IPMI network setup BMC interface IP address, enter the new IP address, and click Enter.
11. Use BMC/IPMI network setup and configure the Subnet mask and Router IP address.
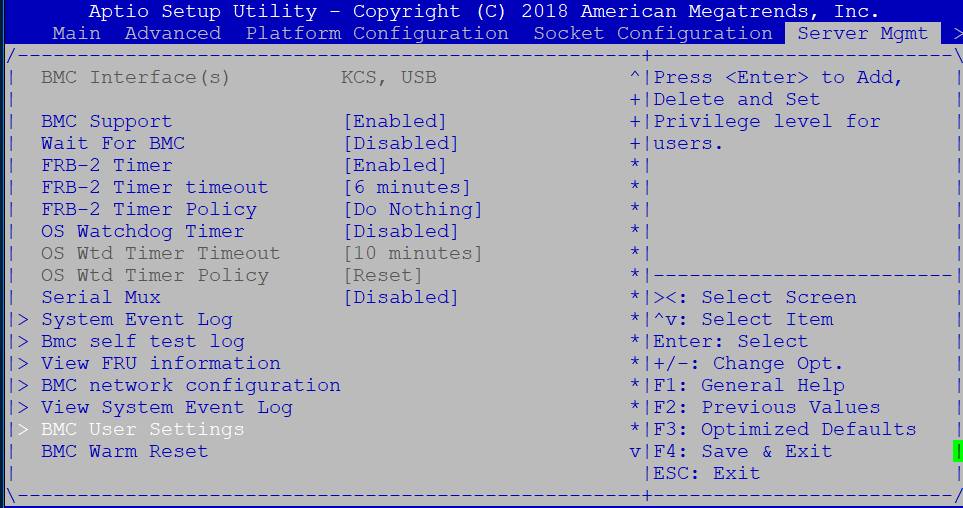 Note: The following graphic describes the BMC User Settings:
12. Go to the BMC User Settings and click Enter.
13. BMC User Settings Add User (hit enter)
14. Go to BMC User Settings, type in the username, and hit enter.
15. Go to BMC User Settings, type in the user password, and hit Enter.
16. Go to BMC User Settings Enable User Access and click Enter.
That concludes all of the BIOS configuration steps to configure BMC related features.
Related Blog Posts

Dell Enterprise SONiC Flexible and Robust VLAN QinQ, VXLAN, and VLAN Translation Solutions
Wed, 24 May 2023 17:24:24 -0000
|Read Time: 0 minutes
As a corporate business grows through mergers, acquisitions, and expansions, it must add or extend new business branches in many different locations. The network infrastructure must evolve to accommodate these new locations. Compute and network virtualization have also brought strong demand and requirements to transport local VLAN over WAN (Wide Area Network), Telco (Telecommunication), and many other network infrastructures.

Figure 1. Transport VLAN network through WAN network
In Figure 1, Laptop 1 is connected to the corporate network in San Francisco. Soon after, Laptop 2 was added to the same corporate network in New York. The users of these two laptops are in the same corporate business unit (BU), such as engineering, finance, or HR. Corporate IT wants to apply the same set of policies for network access, security, and service to these laptops. These policies are implemented through VLAN IDs, subnets, and other network provision parameters. Therefore, IT must transport the VLAN ID over WAN and its network infrastructures. Often, on corporate networks, endpoints must be on the same VLAN. These endpoints can be laptops, VMs, applications, and Virtual Network Function (VNF) entities, to name a few.
To help customers meet these network transport requirements, Dell Enterprise SONiC has built the new IEEE 802.1ad VLAN QinQ feature. This feature adds another VLAN tag in the original dot1q frame, creating a double-tagged VLAN frame.
The figures below demonstrate how the outer tag is used to identify the Telco provider’s traffic, while the inner tag is still the local dot1q VLAN ID. This process allows endpoints to use the same VLAN ID while traveling through Telco network infrastructures.
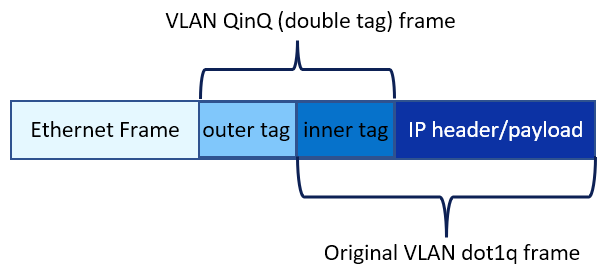
Figure 2. VLAN QinQ frame
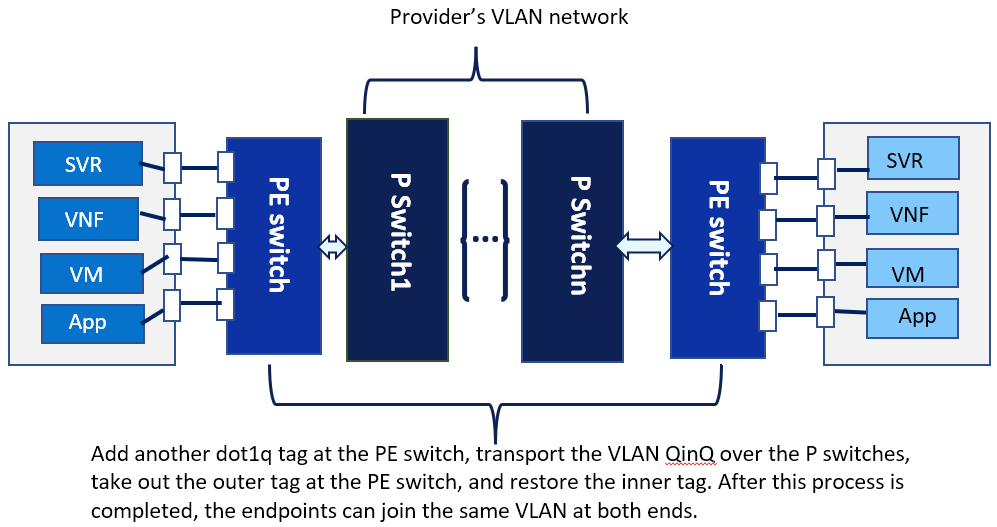
Figure 3. Transport local dot1q VLAN over VLAN QinQ enables switches
Dell Enterprise SONiC VXLAN (Virtual Extensible LAN) solution is designed to transport VLANs in Layer 4, the User Datagram Protocol (UDP) transport layer, which is defined in the Open Systems Interconnection (OSI) model. Packets that VXLAN encapsulates are not aware of the underlay networking protocols.
The figures below demonstrate how the VXLAN IP/UDP header is created in a VXLAN tunnel endpoint (VTEP) ingress tunnel server and decapsulated in the egress VTEP server.
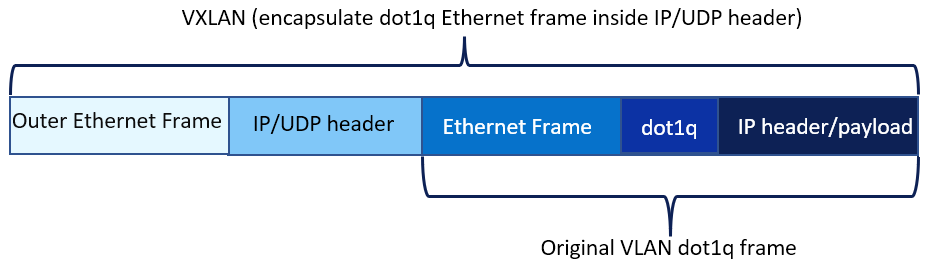
Figure 4. VXLAN header to encapsulate dot1q VLAN frame
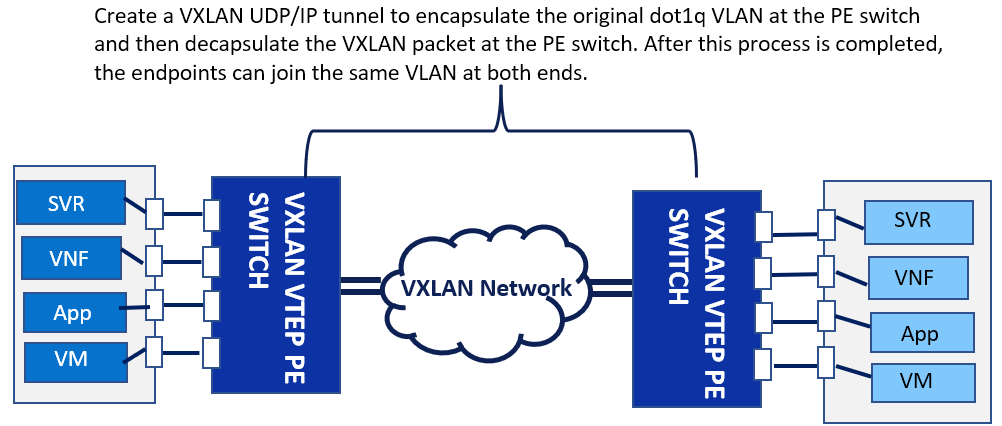
Figure 5. Transport dot1q VLAN frame over VXLAN enabled network infrastructure
Network infrastructures in Telco, Communication Service Provider (CSP), data center, and cloud providers often consist of different types of VLAN transportation technologies like QinQ, VXLAN, and dot1q. To transport VLAN frames over a mix of VLAN protocol networks, Dell Enterprise SONiC introduces the VLAN translation feature with the following options:
- Dynamically modify the tag in a single tag VLAN frame
- Dynamically modify one tag and remove the other in a double tag VLAN frame
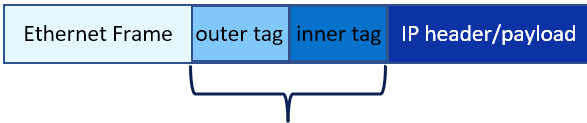
Figure 6. VLAN translation to modify VLAN tags
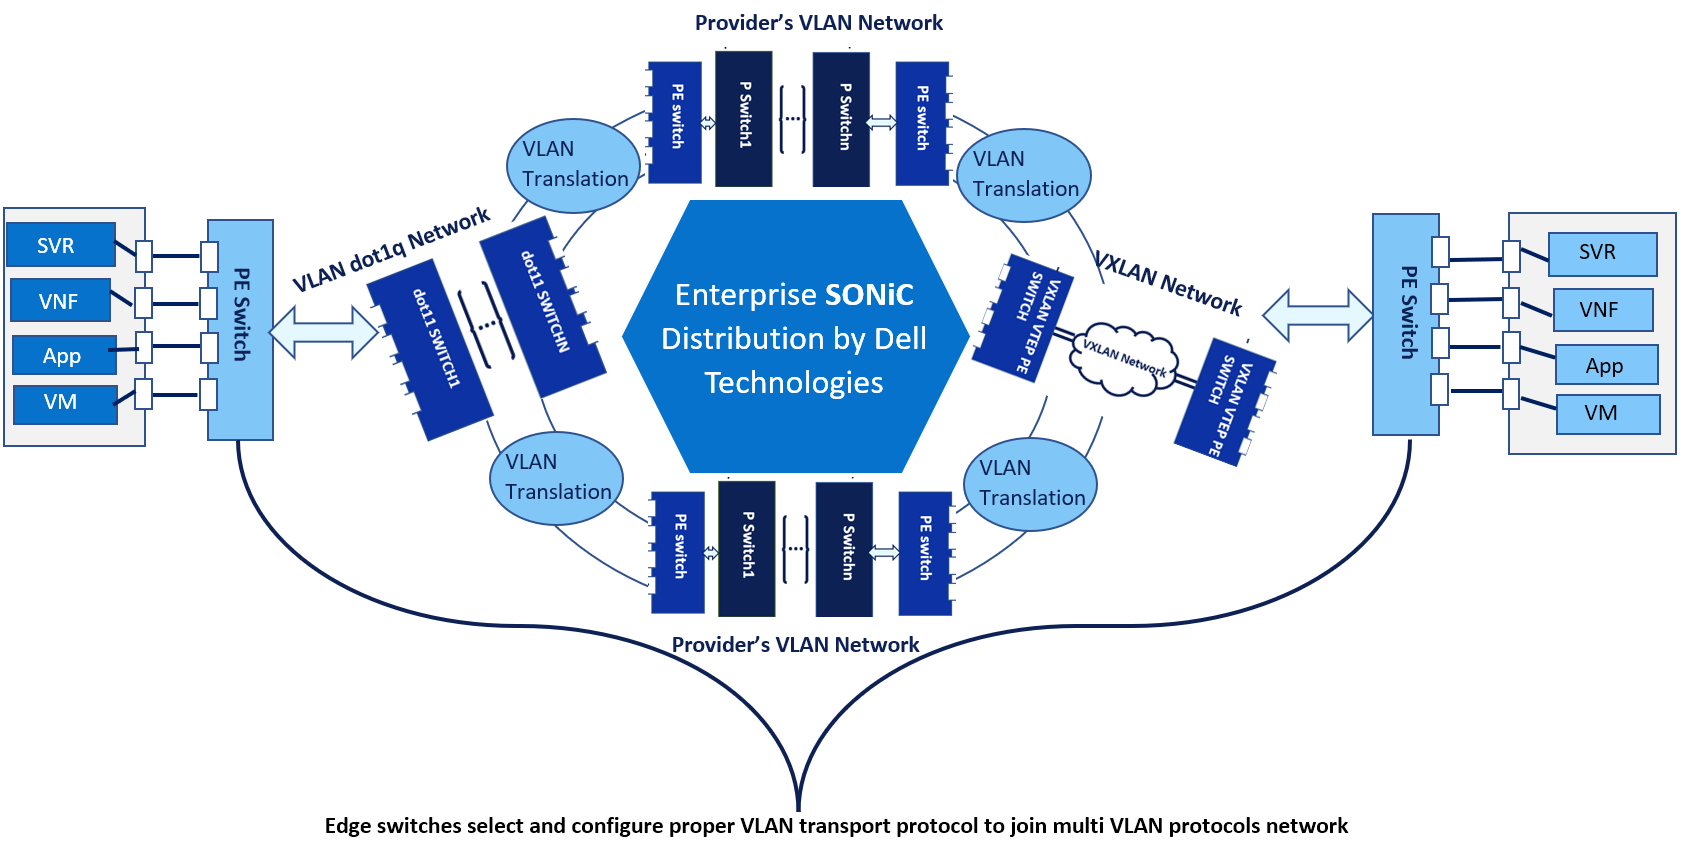
Figure 7. Illustration of Dell SONiC VLAN translation, QinQ, and VXLAN sample scenarios
Network service providers constantly face technical challenges and stringent requirements. For example, one common challenge is determining how to scale bandwidth up and out to address fast and spontaneous traffic growth. Other challenge include protecting and securing the networks through user and tenant isolations, or improving network efficiency.
Open source-based SONiC network software provides rapid feature development and a broad selection of network orchestration tools through a vibrant ecosystem and community. On top of that, Dell Enterprise SONiC has added special features and verifications, such as world class technical support for Dell networking hardware. This support can improve network security and flexibility, as well as increase network provisioning and monitoring capabilities.
Contact a Dell SONiC sales representative for additional information about Dell Enterprise SONiC solutions and technologies.
Contact Dell SONiC Sales representatives
Resources
To learn more about Dell Enterprise SONiC features, see the Enterprise SONiC Spec Sheet.
To learn more about Enterprise SONiC Distribution by Dell Technologies, see Enterprise SONiC Networking Solutions, Enterprise SONiC Distribution By Dell Technologies, and Dell SONiC Solution Overview.
For more information about specific steps and commands, see the Dell SONiC User’s Guide available on the Dell Digital Library.

uCPE Hypervisor Network Functions Virtualization Sizing Guideline
Tue, 06 Sep 2022 17:56:43 -0000
|Read Time: 0 minutes
This document describes how to make proper NFV sizing estimate and choose a right VEP model.
VEP4600 powered by Intel Xeon D CPU, hyperthreading function can be enabled or disabled in BIOS settings. The following screenshot shows the BIOS hyperthreading enable configuration.
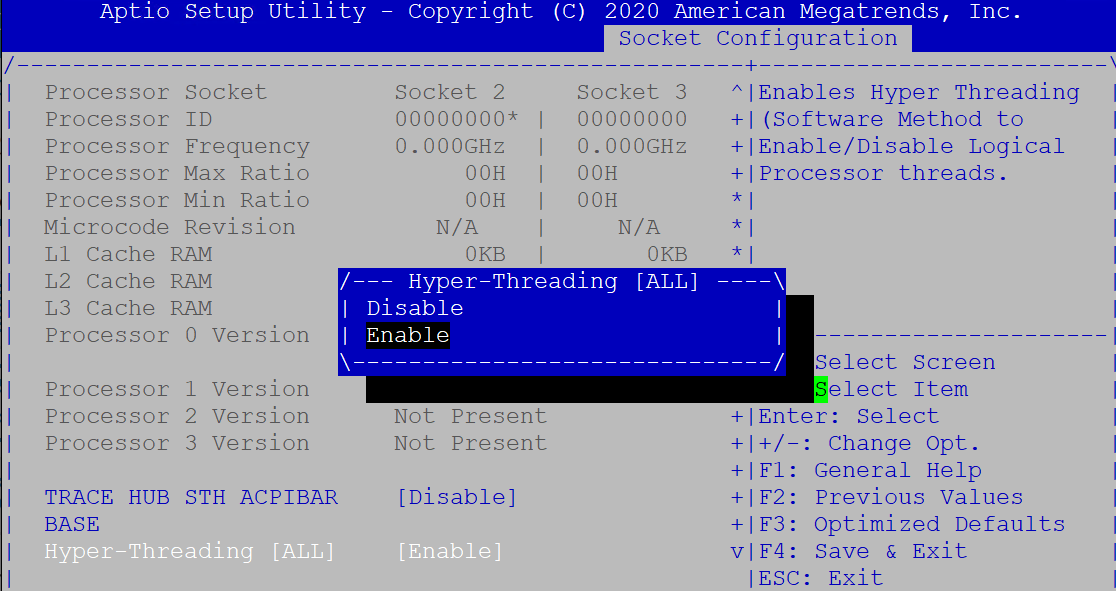
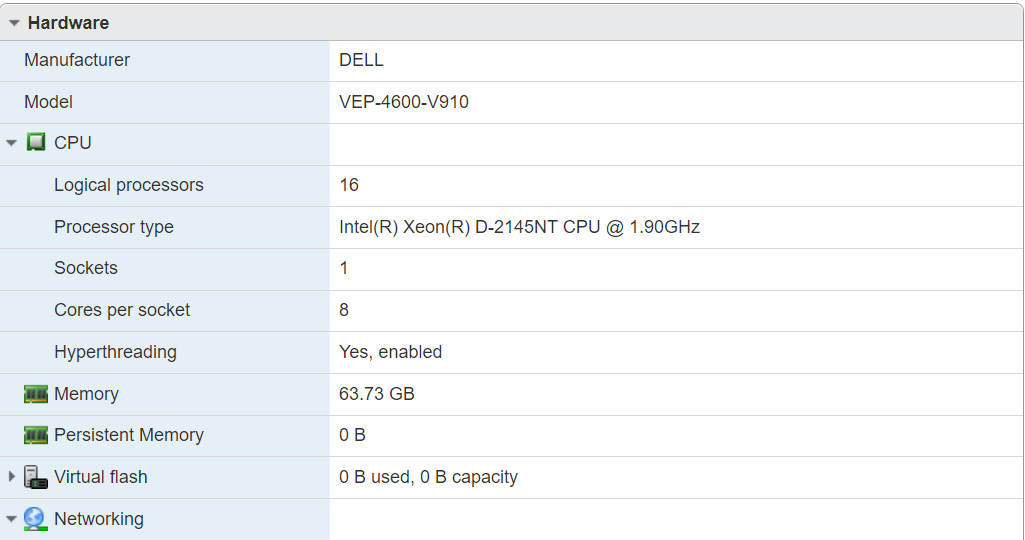
If hyperthreading is enabled in VEP4600 BIOS settings, ESXi web UI displays that the logical processor count is 16, which is the double of physical CPU core count.
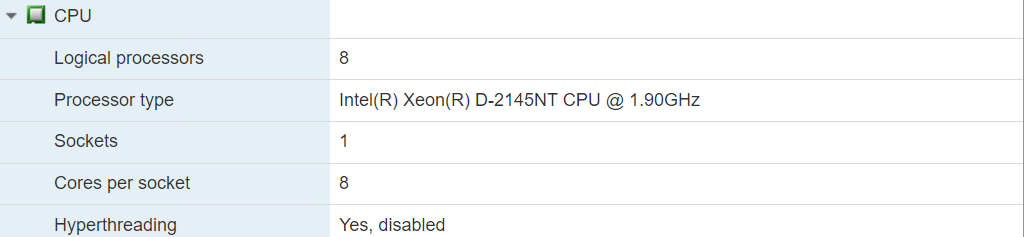
 If hyperthreading is disabled, ESXi displays that the logical core count is the same as CPU core count.
Hypervisor undersubscription and oversubscription
Size of VM/NFV
Here is a sample profile of VMware SD-WAN Edge running as a VM in ESXi.
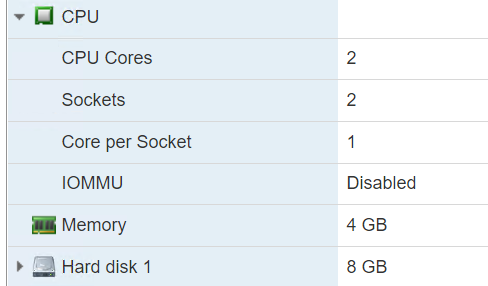
It takes two CPU cores from the total logical core/processor count in ESXi. If the total core count is larger than the ESXi core count, for example, in our previous VEP4600 eight core ESXi model, with hyperthreading enabled, the total core count is 16. If total VM/NFV core count is bigger than 16, then the ESXi hypervisor is running in oversubscription mode, meaning the hypervisor has to multiplexer among these NFVs, suspend one of them from time to time. If the total core count is less than 16, ESXi is running in undersubscription mode, no multiplexer is required, all NFVs can run simultaneously in ESXi hypervisor.
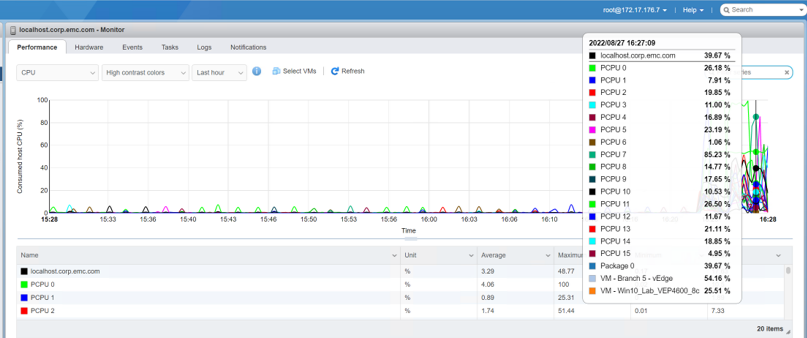
Use ESXi monitor feature to display graphical view of CPU/core performance.
VEP1405 Atom/Denverton CPU
In VEP1405 platform, Intel Deverton CPU does not support hyperthreading, the logical core count is always the same as physical CPU core count.
Summary
In VEP4600 platform, make sure to enable hyperthreading in BIOS to double the core count. Check every NFV/VM profile running in ESXi to make sure the total core count is not larger than the ESXi core count, so that it can run ESXi in undersubscription mode. It is still possible to run ESXi in over subscription mode if some of the VMs are not required to constantly hug CPU resource, for example if a VM is a DNS server, then most likely it is not constantly processing DNS client queries.