
Configure DD series appliance Virtual Tape Library and Veeam Backup and Replication
Configure DD series appliance Virtual Tape Library and Veeam Backup and Replication
-
The DD series appliance Virtual Tape Library (VTL) is a licensed feature that requires a special license registered on both DD series appliance and for backup server. To configure DD series appliances as a VTL backup target device, follow the steps below
Setup and Configure VTL on DD series appliance
Verify the license and VTL service running
- Login to DD System Manager with sysadmin credentials
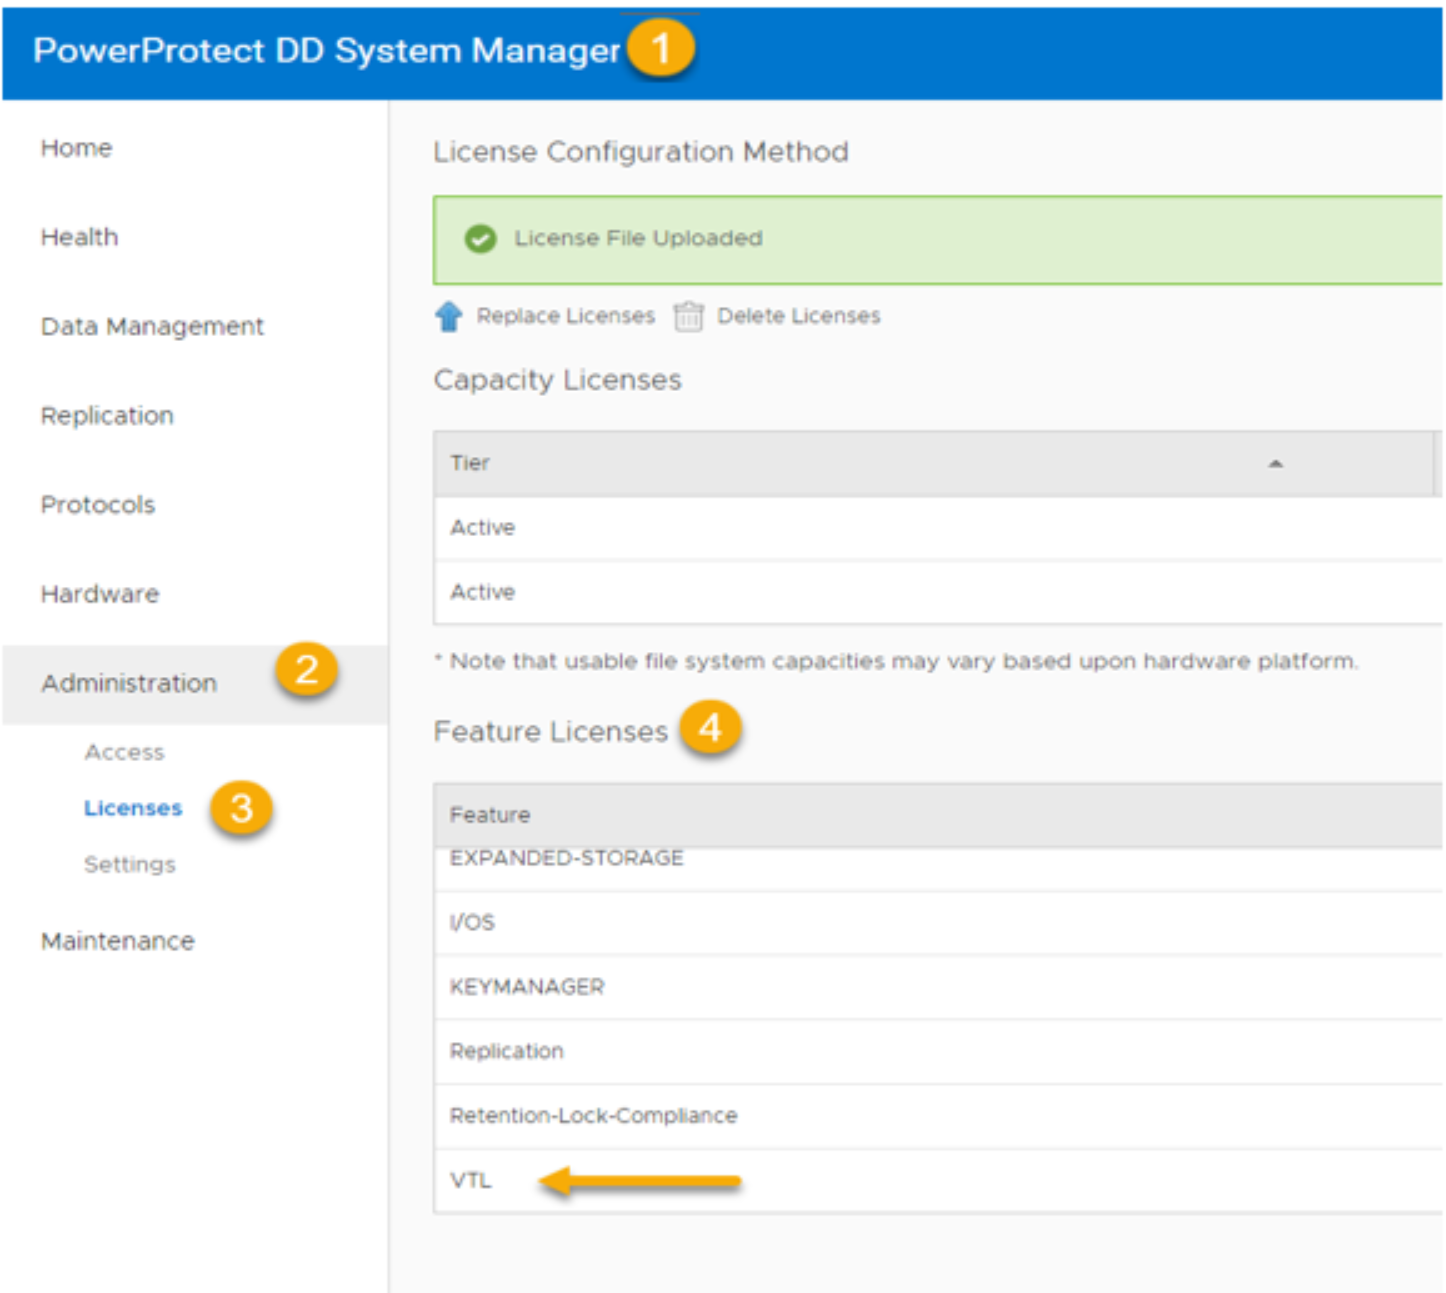
- Click the Administration tab from the left pane of dashboard
- Click Licenses
- Under the Feature Licenses section, verify VTL is available
- Click Protocols on the left pane of dashboard
- Click DD VTL
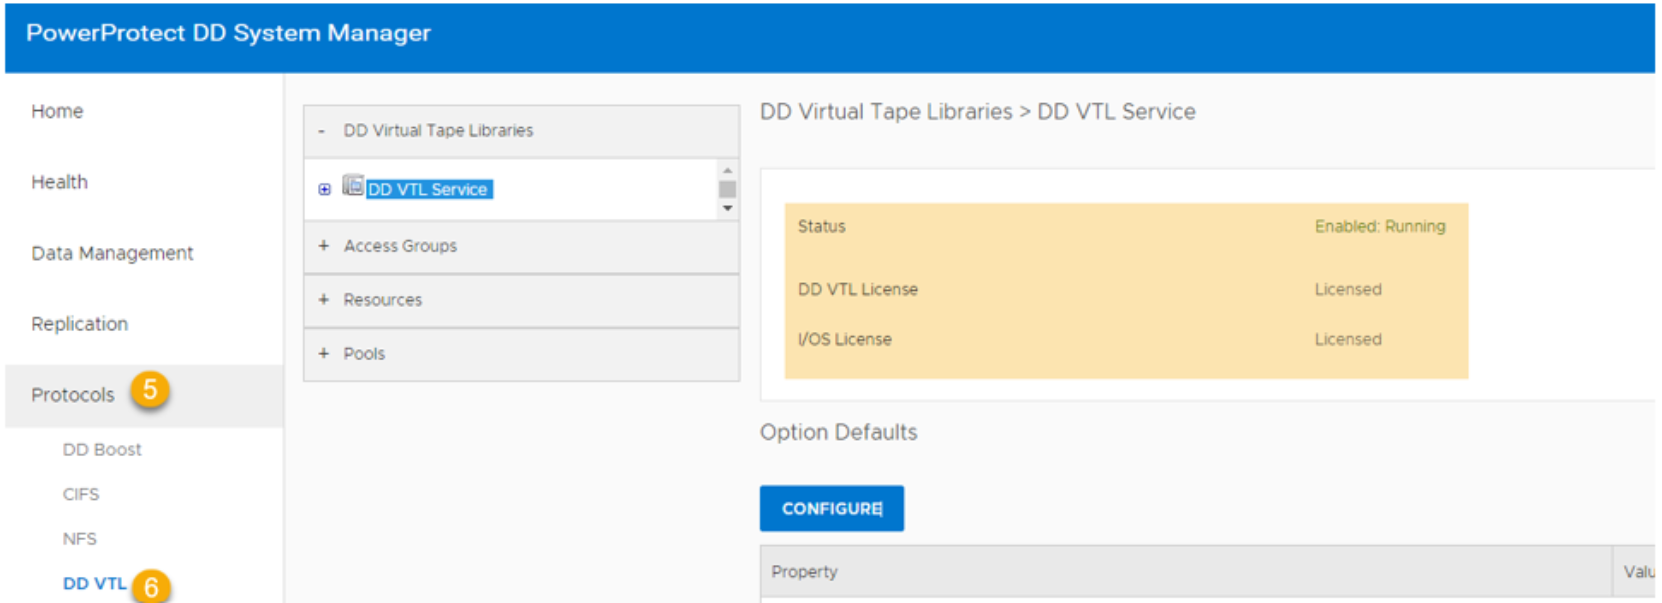
- Verify that the status is Enabled: Running and licensed
Verify the Fibre Channel Connection, Ports, link status, Endpoints and Initiators
Before discovering the VTL device with Veeam Backup and Replication server, ensure that the operating system and HBA drivers discover the VTL devices. Verify the Fibre Channel connectivity between DD series appliance and Veeam Backup and Replication infrastructure. The fibre channel status should be running, ports must be online, endpoints should be enabled with link status as “Online”. Also verify the zoned initiators are visible with endpoints.
- Login to the DD System Manager with sysadmin credentials
- Click the Hardware tab on the left pane of dashboard
- Click Fibre Channel
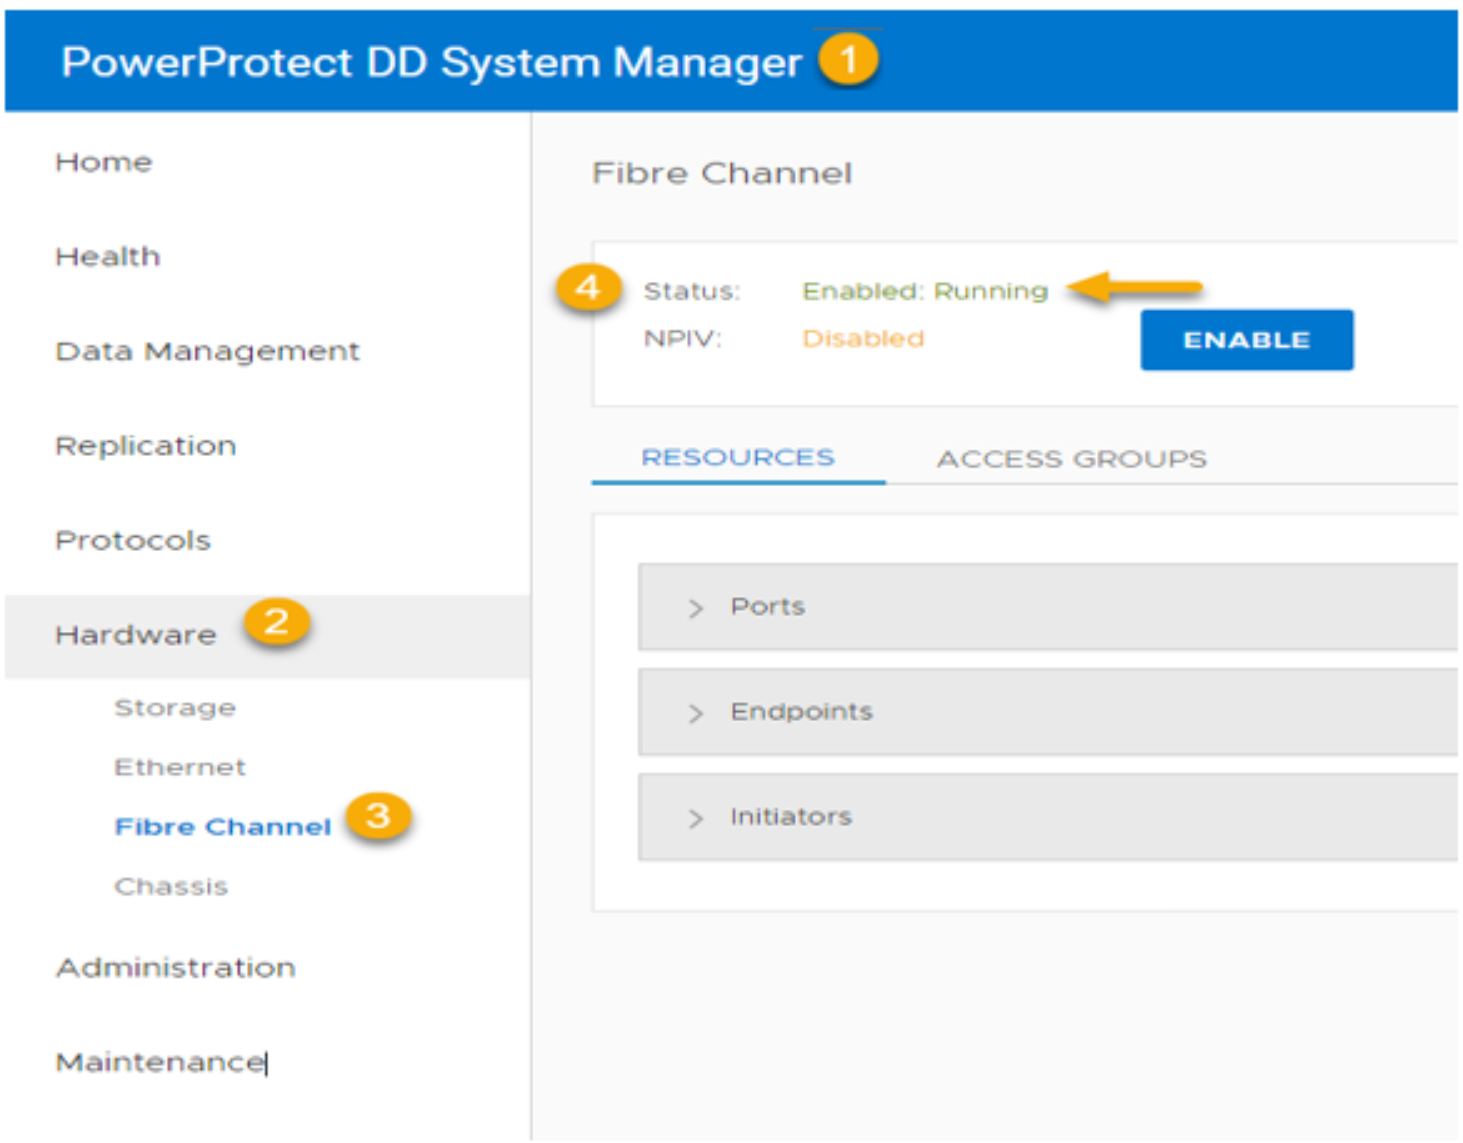
- Mark the Status as Enabled: Running
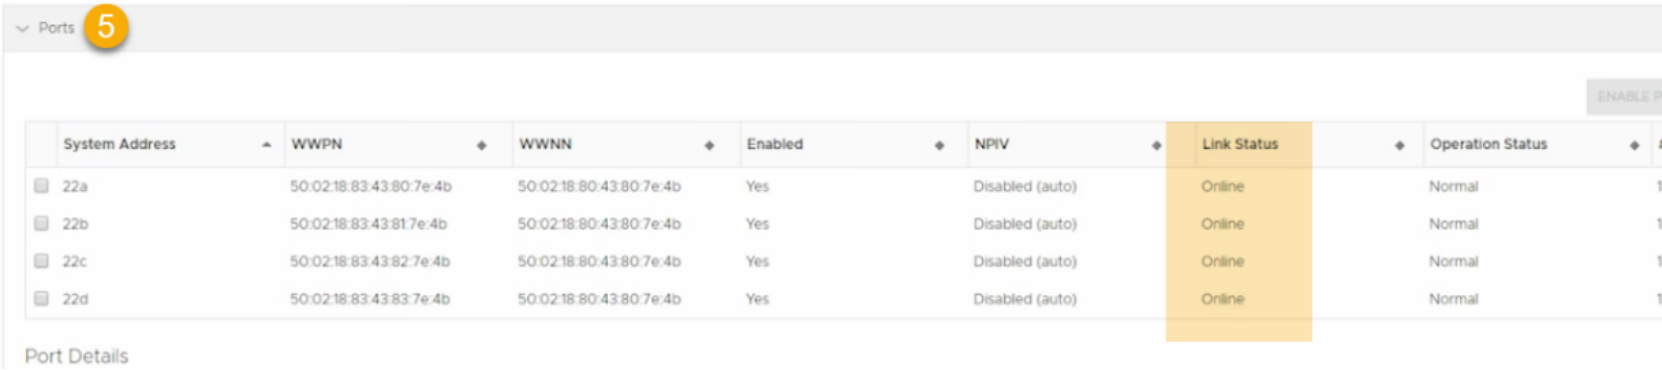
- Click the Ports section and mark the link status as “Online”
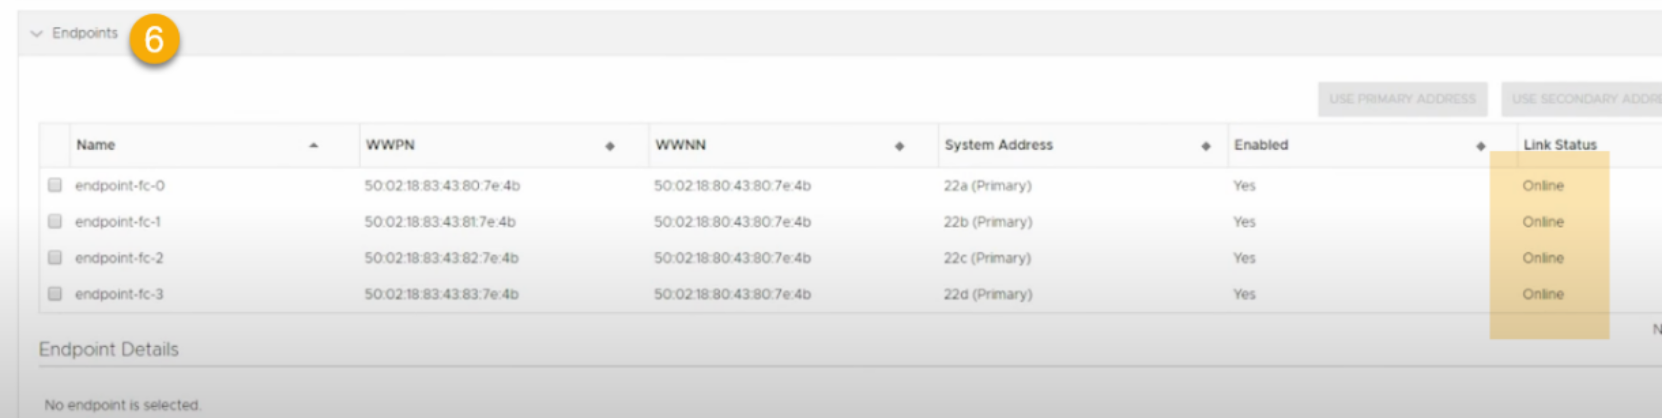
- Click the Endpoints section and verify the link status is marked as “Online”
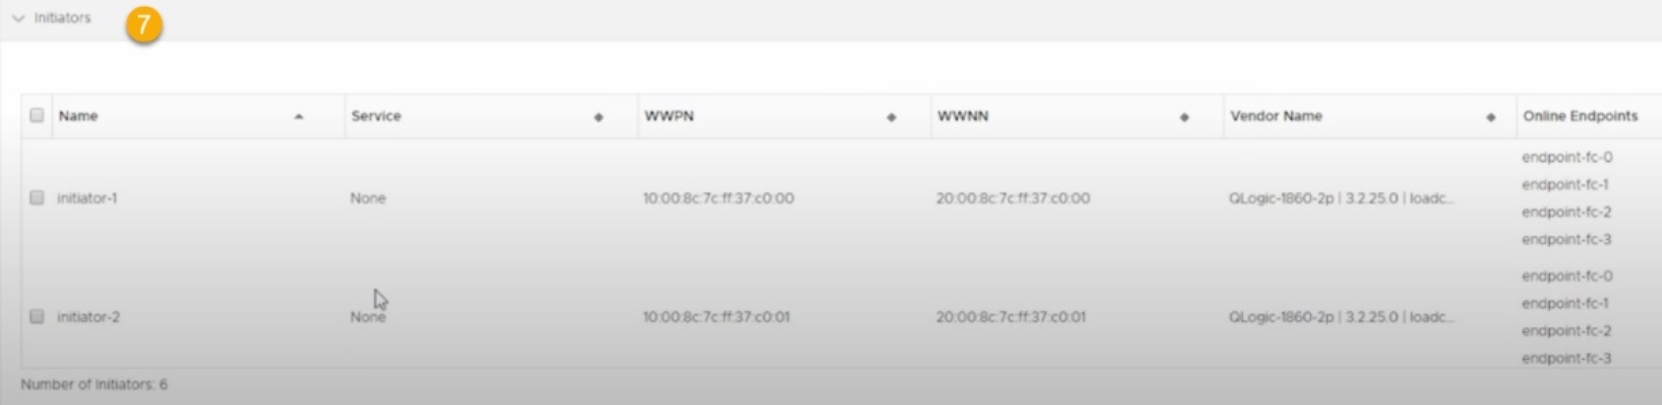
- Click Initiators to verify it is configured and the endpoints are added
Create a VTL group on the DD series appliance
The VTL group can be created from the DD OS command line or with the web interface. Check the "DD Virtual Tape Library" chapter of the PowerProtect DD Series Appliance OS Administration Guide for more information about the VTL feature, including the creation of virtual tape drives, virtual tape media, and virtual changers.
For reference, see the VTL group name “VeeamVTLlibrary” is created

- Login to DD System Manager with sysadmin credentials
- Click the Protocols tab from the left pane of dashboard
- Click DD VTL
- Expand DD Virtual Tape Libraries
- Click + to expand DD VTL Service
- Click Libraries
- Click MORE TASKS dropdown list (IBM-LTO-7 is default)
- Click Create under library
- Create Library: Specify the following details:
- Library Name: Specify the name (6 is an example for demo)
- Number of Drives: Specify the number of drives you want to create
- Drive Model: Select the drive model from the existing by clicking on dropdown
- Number of Slots: Specify the number of slots you want to create. The number of slots must be equal to or greater than the number of drives. (20 by default) (Optional)
- Number of CAPs: Specify the number of Cartridge Access Ports (CAPs). You can specify up to 100 CAPs per library (Optional)
- Changer Model Name: Select the desired model from the dropdown list. (L180 is default)
- Options: Auto-eject and auto-offline, choose the appropriate one from default (disabled), enable and disable and barcode-length, automatically set to 6 for L180, Restorer L180 and DD VTL changer models.
Click OK and wait for the task complete window.
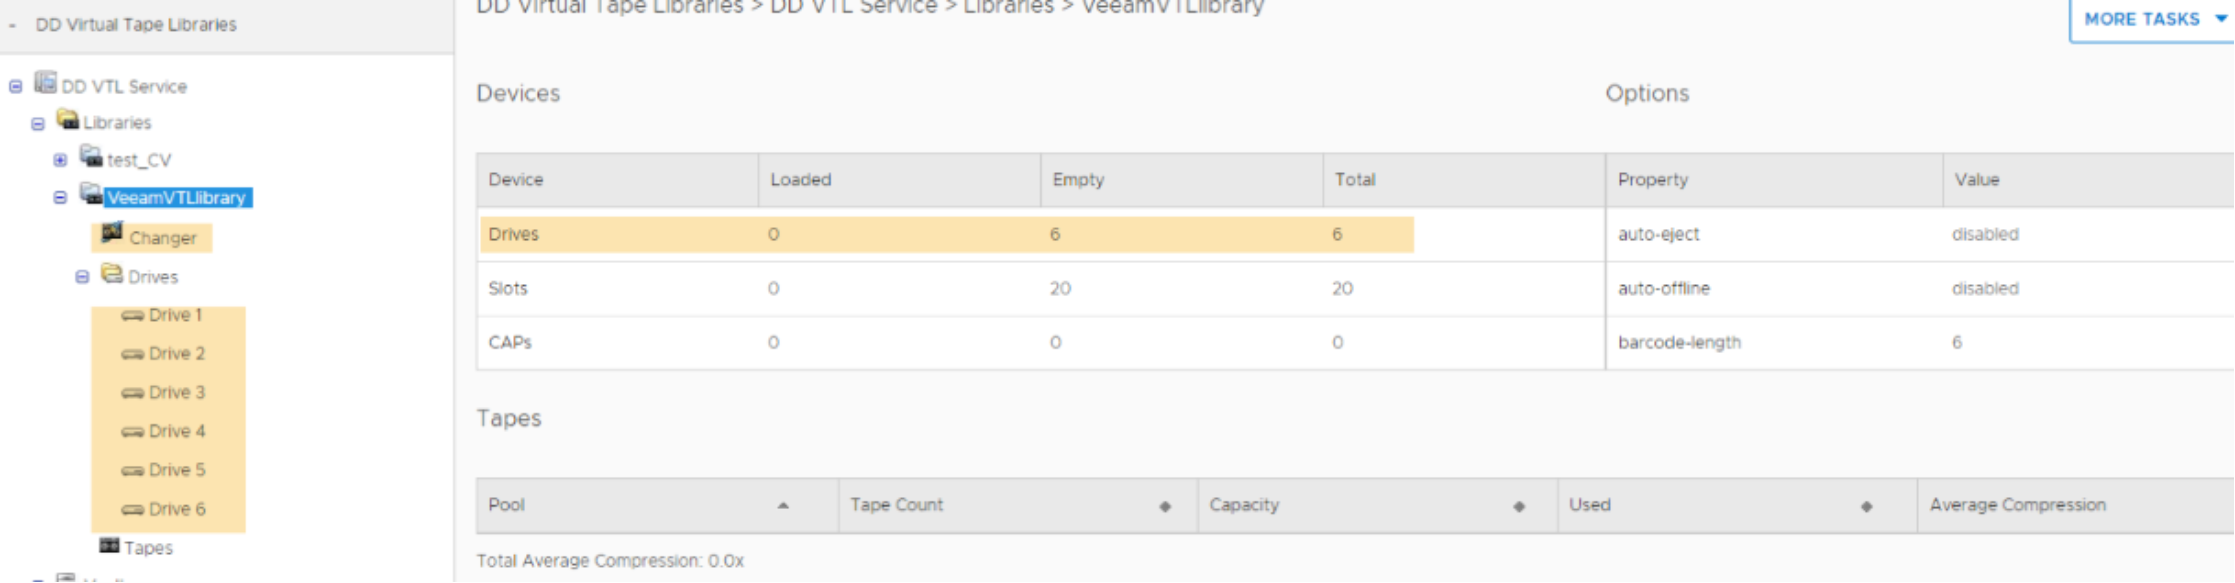
- The created library is visible under Libraries, with 6 drives and 1 changer
Configure VTL on Veeam Backup and Replication server
This section provides the procedure to configure VTL with Veeam Backup and Replication Server. Check https://helpcenter.veeam.com/docs/backup/vsphere/tape_supported_devices.html?ver=100 for supported devices and configuration for tape libraries
To configure the tape infrastructure, the tape server must be added to the Veeam Backup and Replication console. The tape server is a backup infrastructure component which helps with transferring data between source and tape device. The tape server runs a Data Mover service that creates a communication point over which data is transferred between the tape device and backup repositories. The Tape server must run Microsoft Windows and must have access to DD VTL on DD series appliance and to connect DD VTL over Fibre Channel.
Add Tape Server
Login to Veeam Backup and Replication console
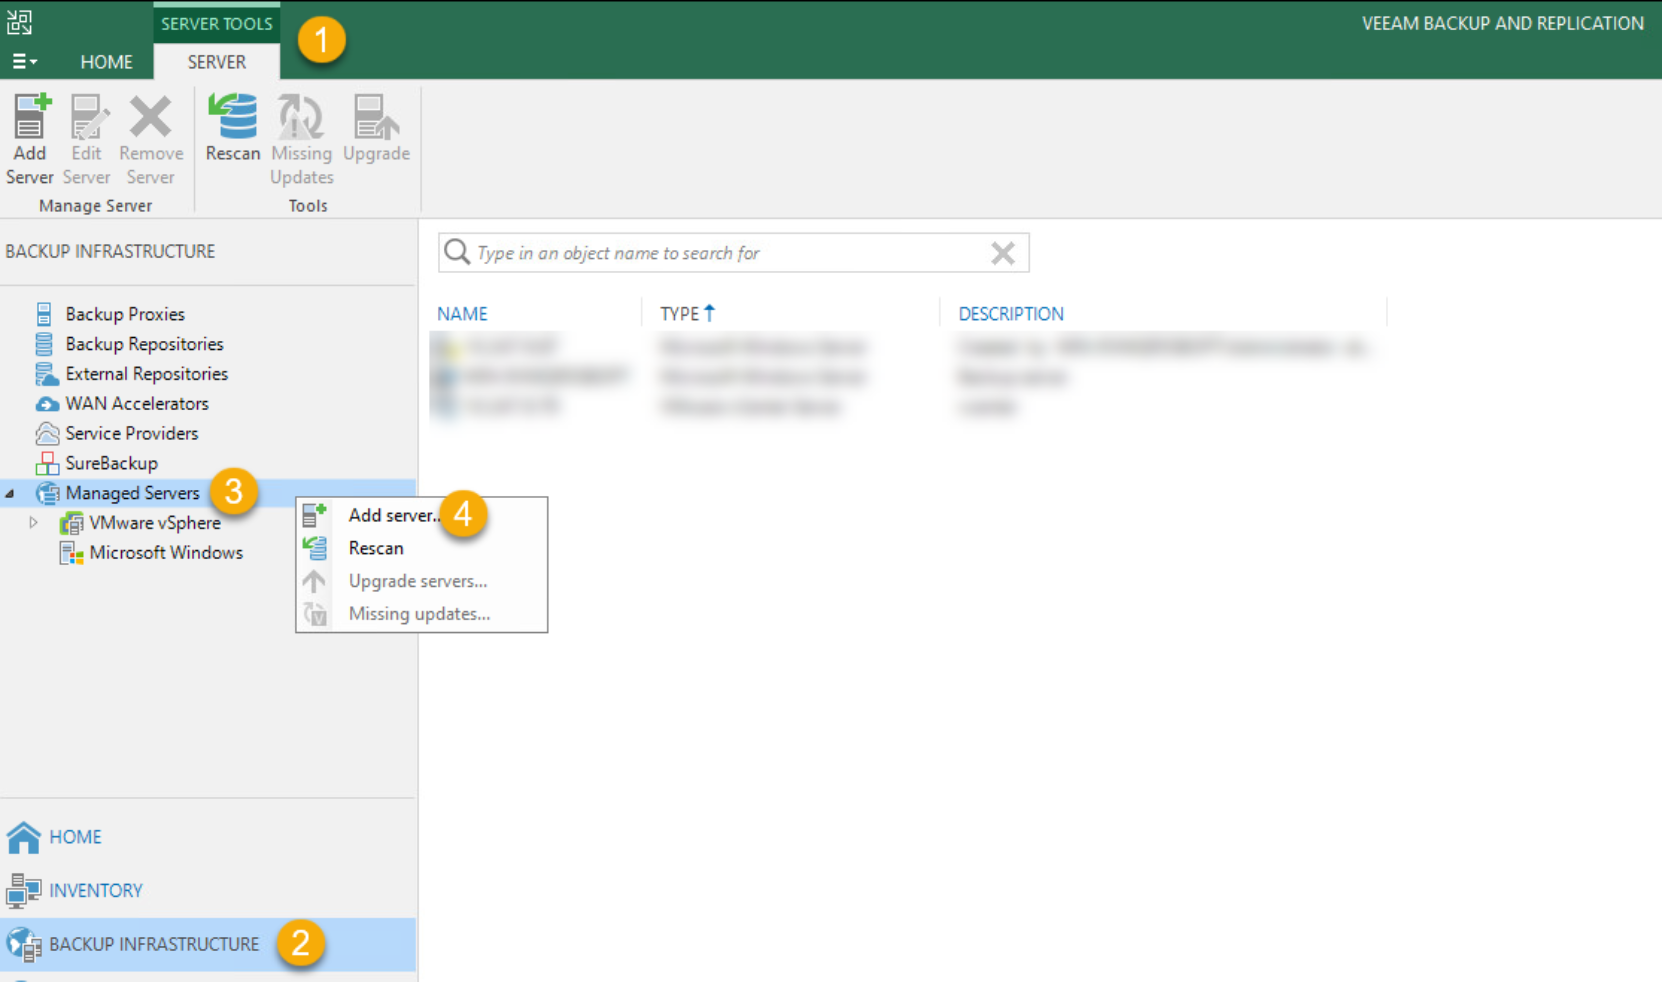
- Click BACKUP INFRASTRUCTURE on the left pane
- Select Managed Servers
- Click Add Server (or right click Managed Servers and select Add Server)
- Select Microsoft Windows
- New Windows Server
- Name: Specify DNS name or IP address of Microsoft Windows Server
- Credentials: Specify the credentials and port settings Microsoft Windows server
- Review: Follow the next steps without changing default settings
- Apply: Click apply if the steps are verified
- Summary: Click Finish to complete the server configuration
- The created servers are visible under managed servers > Microsoft Windows
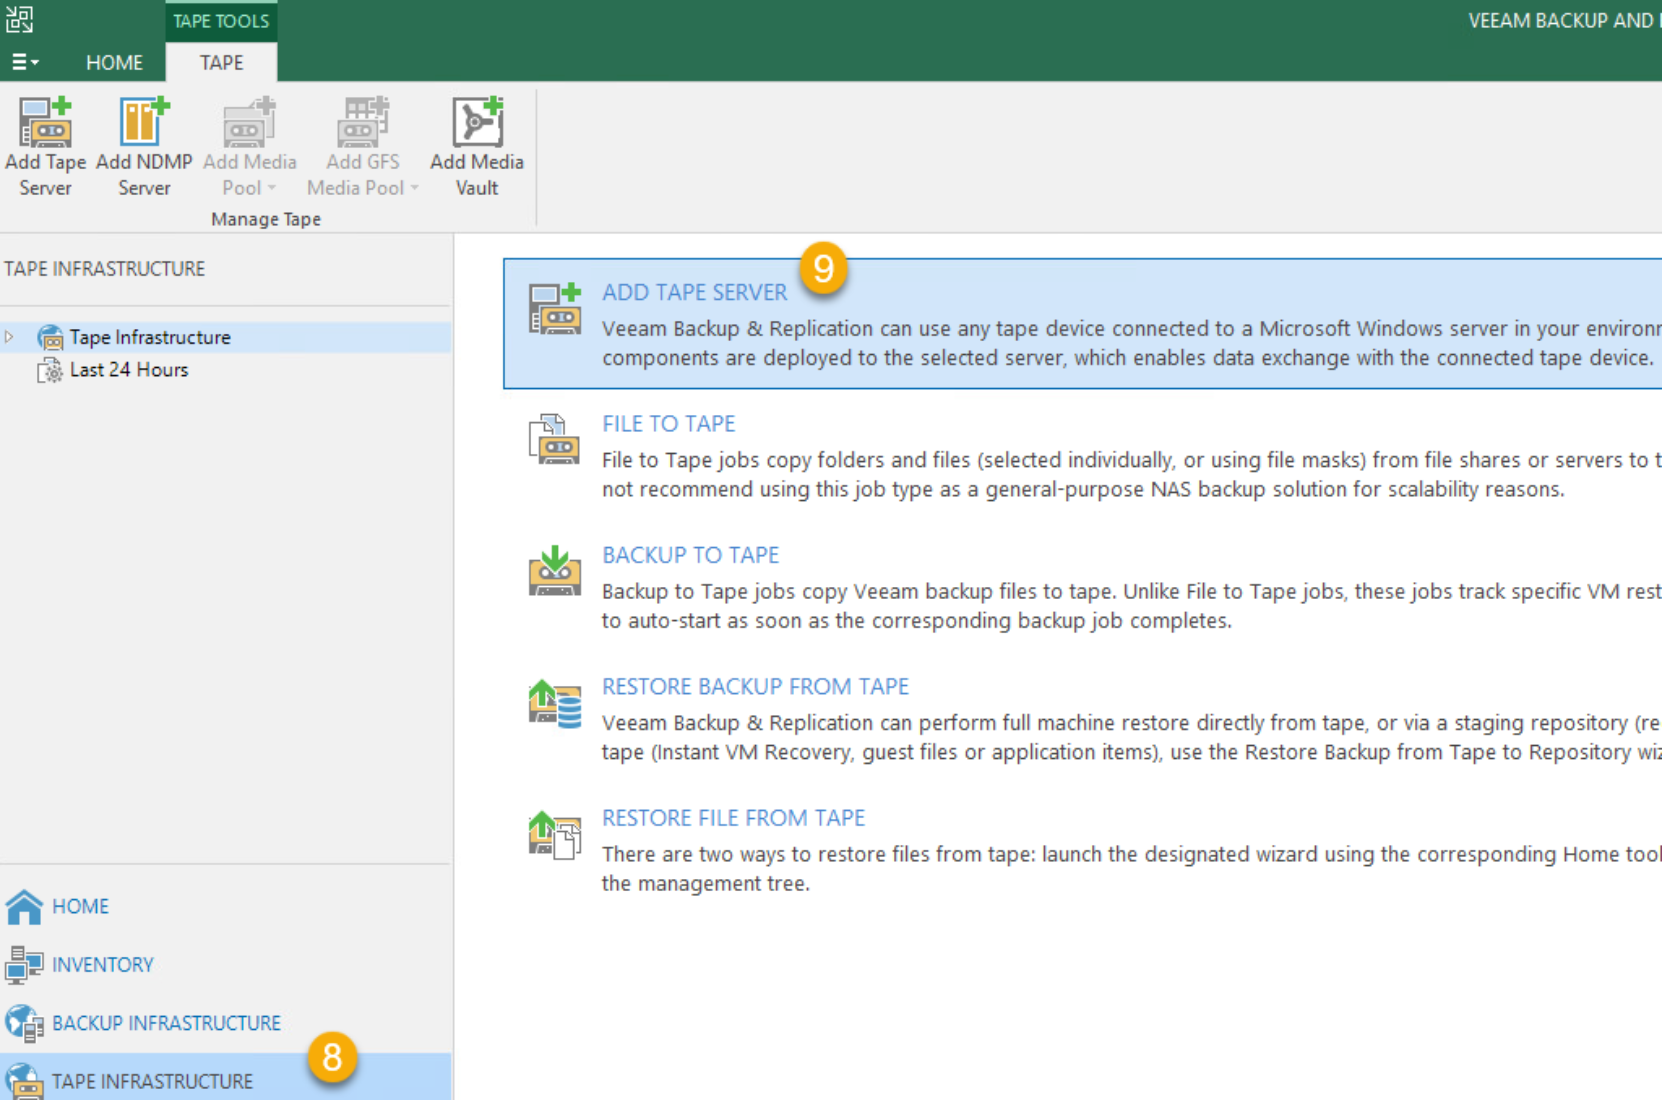
- Click TAPE INFRASTRUCTURE on the left pane
- Click Add Tape Server on the top (or right click tape infrastructure and select Add Tape server)
- New Tape Server
- Server: Choose a server to install Tape server components on. You can only select between Microsoft Windows servers added to the managed server trees in the console
- Traffic: Review the network traffic rules that apply to this server
- Review: Review the settings and click Apply to continue
- Summary: Select Start tape library inventory when you click Finish. When you complete the tape library configuration, Veeam Backup and Replication automatically inventories tapes in the tape library connected to the tape server, Click Finish
Configure a Tape Media Pool
Tape Media Pools are the logical tape containers used by Veeam Backup and Replication to manage tapes. There are three types of media pools that can be created
- Service Media Pools: These pools are used to sort tapes automatically and manage free tapes intended for writing data. These pools are created automatically. They cannot be created or edited
- Customer Media Pools: These pools are used as target destinations. To archive data, at least one custom media pool must be made manually
- GFS media Pools: GFS stands for Grandfather-Father-Son. These types of pools are used to create GFS tape archives. GFS keep one backup per 4 tiers: weekly, monthly, quarterly and yearly. These are created manually.
- To Create custom media pool
- Login to Veeam Backup and Replication console
- Click TAPE INFRASTRUCTURE
- Click Media Pools and select Add Media Pool
- New Media Pool
- Name: Type in the name and description
- Tapes: Configure global media pool settings and allocate tapes for the pool. In the tape library section, select the library from which the tapes are allocated for the media pool. To add multiple libraries, click Manage > Add to add the libraries. Use the Up and Down buttons to position the failover order. Also select the events on which the media pool must failover to the next library such as Library is offline, No media available and All tape drives are busy. Check box Add tapes from free media pool automatically when more tapes are required to make media pool replenishable.
- Media Set: Specify media set name and how often a new media set should be automatically created.
- Retention: Specify the period during which the data on the tapes must be stored. When the retention period ends, the tape becomes available for overwriting.
- Options: Specify the parallel processing and encryption settings. Hardware encryption will be used if the tape drive supports it. Otherwise, software encryption will be used which may result in small performance penalty
- Summary: Follow the next steps and click Finish
Configure a Tape Media Pool
Tape Media Pools are the logical tape containers used by Veeam Backup and Replication to manage tapes. There are three types of media pools that can be created:
- Service Media Pools: These pools are used to sort tapes automatically and manage free tapes intended for writing data. These pools are created automatically. They cannot be created or edited
- Customer Media Pools: These pools are used as target destinations. To archive data, at least one custom media pool must be created manually
- GFS media Pools: GFS stands for Grandfather-Father-Son. These types of pools are used to create GFS tape archives. GFS keep one backup per 4 tiers: weekly, monthly, quarterly and yearly. These are created manually.
To Create custom media pool
- Login to Veeam Backup and Replication console
- Click TAPE INFRASTRUCTURE
- Click Media Pools and select Add Media Pool
- New Media Pool
- Name: Type in the name and description
- Tapes: Configure global media pool settings and allocate tapes for the pool. In the tape library section, select the library from which the tapes are allocated for the media pool. To add multiple libraries, click Manage > Add to add the libraries. Use Up and Down buttons to position the failover order. Also select the events on which the media pool must failover to the next library such as Library is offline, No media available and All tape drives are busy. Check box Add tapes from free media pool automatically when more tapes are required to make media pool replenishable.
- Media Set: Specify media set name and how often a new media set should be automatically created.
- Retention: Specify the period during which the data on tapes must be stored. When the retention period ends, the tape becomes available for overwriting.
- Options: Specify the parallel processing and encryption settings. Hardware encryption will be used if the tape drive supports it. Otherwise, software encryption will be used which may result in small performance penalty
- Summary: Follow the next steps and click Finish