


PowerProtect Data Manager – How to Protect GKE (Google Kubernetes Engine) Workloads?
Mon, 05 Dec 2022 20:31:24 -0000
|Read Time: 0 minutes
As I said in my previous blog on EKS protection, the topic of Kubernetes protection is something I’m asked quite often. GKE is no different so why not publish another blog just for GKE protection in PPDM? Expect more blogs on these topics soon 😊.
Back to the topic at hand - GKE protection with PPDM. When talking about PPDM Protection of GKE workloads, the following pillars come to mind:
- GKE Cluster deployment
- Deployment of PowerProtect Data Manager and PowerProtect DD
- General Preparations
- GKE Preparations
- Add GKE to PowerProtect Data Manager
First, let’s briefly discuss the tools we need to install for managing GKE:
- kubectl – a command line tool to work with Kubernetes clusters
- Google Cloud CLI – gcloud is a command line management tool for working with Google Cloud resources. For installation instructions and other info, see gcloud CLI overview.
GKE Deployment
You can configure GKE clusters by using the Google Cloud console, the command line (gcloud), or REST. Documentation is your friend: https://cloud.google.com/kubernetes-engine/docs.
In my specific case, some fundamental configuration elements include the following:
- An enabled Kubernetes Engine API.
- A standard cluster deployment model
- Project-level constraints dictate using a specific region
- Zonal with a specific Region. Select Regional for multi-zonal configuration. Note that even with Zonal, the nodes can have a default location that is different from the control plane node (to increase availability). Note that in multi-zonal configurations, the configured number of nodes is set per zone.
- A project constraint: no public IPs allowed. I’ve therefore configured a private cluster but enabled external access to the control plane by selecting ‘Access control plane using its external IP address’.
- Configured a subnet for this GKE cluster with two additional secondary subnets. To keep things simple, I’ve configured this subnet on the same VPC network as the PPDM and DD subnet.
- Specified a control plane IP range that does not overlap with any subnet of the cluster VPC.
- Configured network parameters under the cluster networking level in the Google Cloud console. Configuring Pod Address Range though the node pool section would overwrite settings on the cluster level.
- Pay attention to the control plane version. Go with ‘Static channel’ to control the K8s version being used – it can still be upgraded automatically for security and compatibility, but it is not managed automatically by GKE as the Release channel is. In this case, I’ve opted to use the Static channel with the latest available release (K8s 1.24).
- Deployed a node pool with four nodes. Make sure to size the number of nodes and their specs in accordance with the workload that is going to be deployed and scale as needed. Watch out for pods in an “PodUnschedulable” status, especially as the powerprotect-controller and velero pods are rolled out after asset source discovery at the end of this blog.
- Make sure to enable ‘Compute Engine Persistent Disk CSI Driver’.
I’ve used the following gcloud command to deploy my GKE cluster (not the shortest command you’re ever going to run, but an effective one 😊):
gcloud container --project "gcp-dev-idan-pte" clusters create "idan-cluster-1" --region "us-east1-a" --no-enable-basic-auth --cluster-version "1.24.6-gke.1500" --release-channel "None" --machine-type "e2-medium" --image-type "COS_CONTAINERD" --disk-type "pd-balanced" --disk-size "100" --metadata disable-legacy-endpoints=true --scopes "https://www.googleapis.com/auth/cloud-platform" --max-pods-per-node "110" --num-nodes "4" --logging=SYSTEM,WORKLOAD --monitoring=SYSTEM --enable-private-nodes --master-ipv4-cidr "10.10.0.0/28" --enable-ip-alias --network "projects/gcp-dev-idan-pte /global/networks/gke" --subnetwork "projects/gcp-dev-idan-pte/regions/us-east1/subnetworks/gke1" --cluster-secondary-range-name "secondary2" --services-secondary-range-name "secondary" --no-enable-intra-node-visibility --default-max-pods-per-node "110" --no-enable-master-authorized-networks --addons HorizontalPodAutoscaling,HttpLoadBalancing,GcePersistentDiskCsiDriver --no-enable-autoupgrade --enable-autorepair --max-surge-upgrade 1 --max-unavailable-upgrade 0 --enable-shielded-nodes
Deploying PowerProtect
Deploying PowerProtect Data Manager and PowerProtect DD is a piece of cake. We just need to launch the deployment of PowerProtect Data Manager and PowerProtect DD Virtual Edition from the marketplace, provide the zone to deploy on, provide the network and subnet to deploy them, and optionally provide IP addresses for PPDM, DDVE, and DNS. This deployment process provisions the instances and rules for both PowerProtect Data Manager and PowerProtect DD. PowerProtect DD can be deployed separately or along with PPDM. (Remember that the newly deployed PowerProtect Data Manager can also leverage an existing PowerProtect DDVE.)

For more info, see Dell PowerProtect Data Manager: Deployment and Configuration on Google Cloud.
GKE Preparations
General
1. To configure the gcloud CLI, run the following command:
gcloud init
2. List your GKE clusters:
gcloud container clusters list --region <region-id>
3. To use the new gcloud auth plugin, enter:
gcloud components install gke-gcloud-auth-plugin
Note: You might need to run additional commands depending on the OS type you’re using so just follow the on-screen instructions.
4. Configure kubectl to interact with your GKE cluster:
gcloud container clusters get-credentials <your-gke-cluster-name>
5. Verify that kubectl works with your cluster:
kubectl get nodes
6. List CSI drivers and make sure that the Compute Engine Persistent Disk CSI Driver (pd.csi.storage.gke.io) is installed:
kubectl get csidrivers
7. List all storage classes:
kubectl get storageclasses
Storage and volume snapshot classes
In this blog, we are leveraging the ‘standard-rwo’ storage class. Although other storage classes can be created and used, make sure to use the pd.csi.storage.gke.io provisioned. Avoid using the legacy (deprecated) kubernetes.io/gce-pd in-tree storage plugin.
8. Create the Volume Snapshot Class YAML file:
cat <<EOF | tee snapclass-standard-rwo.yaml
apiVersion: snapshot.storage.k8s.io/v1
kind: VolumeSnapshotClass
metadata:
  name: standardrwo-pd-snapclass
driver: pd.csi.storage.gke.io
deletionPolicy: Delete
parameters:
   storage-locations: <your-region>
EOF
Make sure to provide the relevant region (such as us-east1) on which GKE runs under the ‘storage-locations’ parameter. It’s not just recommended from a performance standpoint but also for cases where there are project-level constraints that are set to limit resources to a specific region, or where there is a need to stick to a specific region.
9. Create the snapshot class:
kubectl apply -f snapclass-standard-rwo.yaml
10. Make sure it got created:
kubectl get volumesnapshotclass
11. Patch the standard storage class to remove the default setting:
kubectl patch storageclass standard -p "{\"metadata\": {\"annotations\":{\"storageclass.kubernetes.io/is-default-class\":\"false\"}}}"12. Set standard-rwo as the default storage class:
kubectl patch storageclass standard -p "{\"metadata\": {\"annotations\":{\"storageclass.kubernetes.io/is-default-class\":\"true\"}}}"13. Make sure that standard-rwo shows up as the default storage class:
kubectl get sc
PowerProtect K8s container images
For private GKE clusters, we would need to add the PowerProtect-required container images to a registry. The GKE cluster at hand would be able to pull images from this registry, but because they are hosted on Docker Hub, the images wouldn’t be available to a private cluster. This means that we would need to have a registry such as Google Container Registry (GCR) or Google Artifact Registry available. In this blog, I will be providing examples of how to work with Google Artifact Registry.
14. The required container images are:
- dellemc/powerprotect-k8s-controller
- dellemc/powerprotect-cproxy
- dellemc/powerprotect-velero-dd
- velero/velero
- vsphereveleroplugin/velero-plugin-for-vsphere (for K8s clusters on vSphere that use VMware CSI - irrelevant to GKE and shouldn’t be pulled from the registry)
- vsphereveleroplugin/backup-driver (irrelevant to GKE and shouldn’t be pulled)
15. The versions of these required container images might differ from one PPDM release to another. The supported versions of PPDM 19.12.0-9 are:
dellemc/powerprotect-k8s-controller:19.12.0-19
dellemc/powerprotect-cproxy:19.12.0-19
dellemc/powerprotect-velero-dd:19.12.0-19
velero/velero:1.9.1
Note: The image requirements for the respective PPDM release can be found in the following file on the PPDM server:
/usr/local/brs/lib/cndm/config/k8s-image-versions.info
16. On the same host that is running kubectl and gcloud, add credentials for Docker authentication to the Registry:
gcloud auth configure-docker us-east1-docker.pkg.dev
Be sure to specify the appropriate region.
17. Enable the Artifact Registry API as needed:
gcloud services enable artifactregistry.googleapis.com
18. Create the Artifact repository:
gcloud artifacts repositories create ppdm --repository-format=docker --location=us-east1
19. Pull the images by running the following commands:
docker pull dellemc/powerprotect-k8s-controller:19.12.0-19
docker pull dellemc/powerprotect-cproxy:19.12.0-19
docker pull dellemc/powerprotect-velero-dd:19.12.0-19
docker pull velero/velero:v1.9.1
20. Tag and push the images to the Artifact repository. Be sure to modify the project name:
docker tag dellemc/powerprotect-k8s-controller:19.12.0-19 us-east1-docker.pkg.dev/gcp-dev-idan-pte/ppdm/dellemc/powerprotect-k8s-controller:19.12.0-19

docker push us-east1-docker.pkg.dev/gcp-dev-idan-pte/ppdm/dellemc/powerprotect-k8s-controller:19.12.0-19

docker tag dellemc/powerprotect-cproxy:19.12.0-19 us-east1-docker.pkg.dev/gcp-dev-idan-pte/ppdm/dellemc/powerprotect-cproxy:19.12.0-19

docker push us-east1-docker.pkg.dev/gcp-dev-idan-pte/ppdm/dellemc/powerprotect-cproxy:19.12.0-19

docker tag dellemc/powerprotect-velero-dd:19.12.0-19 us-east1-docker.pkg.dev/gcp-dev-idan-pte/ppdm/dellemc/powerprotect-velero-dd:19.12.0-19

docker push us-east1-docker.pkg.dev/gcp-dev-idan-pte/ppdm/dellemc/powerprotect-velero-dd:19.12.0-19

docker tag velero/velero:v1.9.1 us-east1-docker.pkg.dev/gcp-dev-idan-pte/ppdm/velero/velero:v1.9.1

docker push us-east1-docker.pkg.dev/gcp-dev-idan-pte/ppdm/velero/velero:v1.9.1
21. Verify that all images are available on the repository:
gcloud artifacts docker images list us-east1-docker.pkg.dev/gcp-dev-idan-pte/ppdm
Add GKE to PowerProtect Data Manager
Finally, let’s add our GKE cluster to PPDM. Follow these steps to gather some information and register GKE to PPDM.
1. Get the K8s cluster control-plane endpoint:
kubectl cluster-info
2. For private clusters with external control plane, run the following command to obtain the private endpoint:
gcloud container clusters describe <your-gke-cluster-name> --zone <your-zone> | grep privateEndpoint
3. To create a service account on the GKE cluster for PPDM discovery and operations, PPDM RBAC YAML files need to be applied.
a. Retrieve the rbac.tar.gz file from the PPDM appliance at the following location:
/usr/local/brs/lib/cndm/misc/rbac.tar.gz
b. In PPDM 19.12, download the archive from the PowerProtect Data Manager UI (under System Settings > Downloads > Kubernetes) or directly using the following URL:
https://<your-ppdm-server>/k8s-binaries-download?filename=/usr/local/brs/lib/cndm/misc/rbac.tar.gz
Note that the link will only work if you’re logged into the PPDM UI. You can also find the archive on the PPDM server itself at the following path: /usr/local/brs/lib/cndm/misc/rbac.tar.gz
c. Extract the archive, navigate to the rbac directory, and apply the two YAML files using the following commands:
kubectl apply -f ppdm-discovery.yaml
kubectl apply -f ppdm-controller-rbac.yaml
d. If you’re using K8s 1.24 or later, you must manually create the secret for the PPDM discovery storage account:
kubectl apply -f - <<EOF
apiVersion: v1
kind: Secret
type: kubernetes.io/service-account-token
metadata:
  name: ppdm-discovery-serviceaccount-token
  namespace: powerprotect
  annotations:
    kubernetes.io/service-account.name: "ppdm-discovery-serviceaccount"
EOF
e. Retrieve the secret key:
kubectl describe secret $(kubectl get secret -n powerprotect | awk '/disco/{print $1}') -n powerprotect | awk '/token:/{print $2}'4. Retrieve the GKE cluster root CA:
gcloud container clusters describe <your-gke-cluster-name> --zone <your-zone> | grep -i clustercacert | awk '{print $2}'For cases like mine where PPDM does not have an external IP, we can configure a Launch Pad VM and connect to it using IAP (Identity Aware Proxy). Here are some high-level steps:
5. Create a Windows Launch Pad VM using the Google Cloud console or by running the following command:
gcloud compute instances create win2k22lp1 --machine-type=e2-medium --scopes=cloud-platform --enable-display-device --image-family=windows-2022 --image-project=windows-cloud --boot-disk-size=50GB --zone us-east1-a --network=gke --subnet=gke1 --no-address
Make sure to alter the network, subnet, and zone as needed.
6. Set the Windows password by using either the Google Cloud console or the CLI command:
gcloud compute reset-windows-password "win2k22lp1" --zone us-east1-a”
7. Enable and configure IAP at the project level if needed.
8. Download and install IAP Desktop.
9. Login, edit the connection settings to the Launch Pad VM, and enter the credentials retrieved in Step 6.
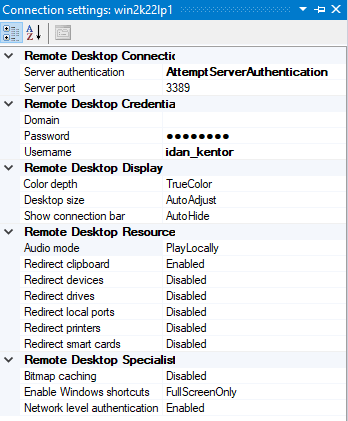
10. Connect to the Launch Pad VM.
Without further ado, let’s navigate to the PowerProtect Data Manager UI and register our GKE cluster as a Kubernetes Asset Source.
11. Navigate to Infrastructure -> Asset Sources.
12. Enable the Kubernetes Asset Source as needed and navigate to the Kubernetes tab.
13. Add the GKE cluster as a Kubernetes Asset Source:

Some guidelines for adding GKE as an asset source:
14. For FQDN/IP, use the endpoint retrieved in Step 1 – make sure to remove the https:// prefix or use the IP that we retrieved in Step 2.
15. Specify port 443. Make sure to allow tcp/443 in the firewall for GKE (ingress) and for PPDM (egress). Also, allow tcp/111, tcp/2049, and tcp/2052 from GKE to PowerProtect DD.
16. Create new credentials with the Service Account Token from Step 3e.
17. Specify the Root Certificate:
a. On PPDM versions earlier than 19.12, follow these steps:
-- Convert the GKE root CA to BASE64 using the following command:
gcloud container clusters describe <your-gke-cluster-name> --zone <your-zone> | grep -i clustercacert | awk '{print $2}' | base64 -d-- SSH to the PPDM server using the admin user and save the root CA in BASE64 to a file, say gke-cert.txt. Make sure to include the BEGIN and END CERTIFICATE lines.
-- Execute the following command:
ppdmtool -importcert -alias <your-gke-cluster-name> -file gke-cert.txt -t BASE64
b. On PPDM 19.12 and later, select Advanced Options in the same Add Kubernetes screen and scroll down. Specify the root certificate that we retrieved in Step 4.
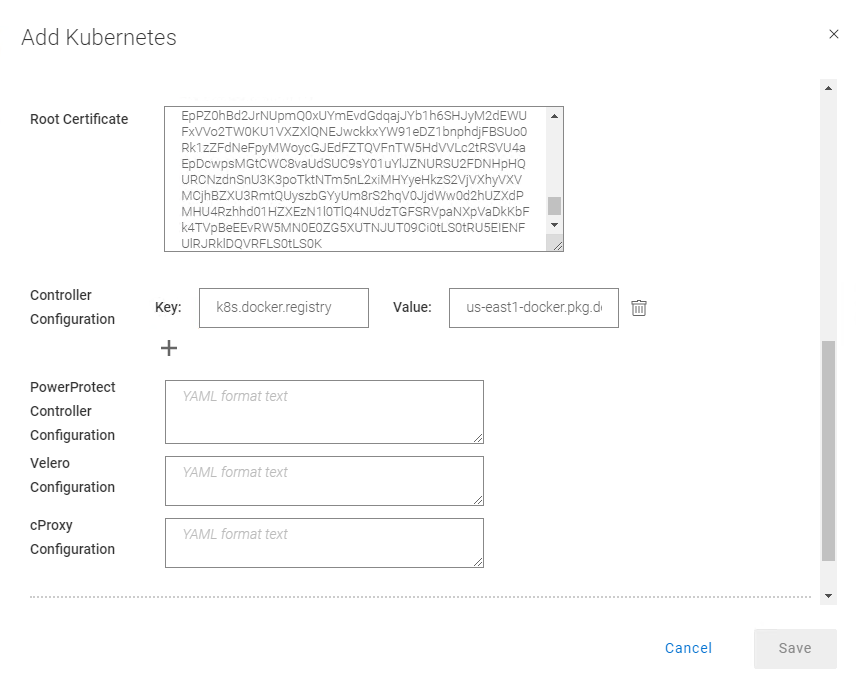
18. Under Controller Configuration, add the following to use the container images from the registry that we configured in Step 18 in the section “PowerProtect K8s container images”).
Key: k8s.docker.registry
Value: us-east1-docker.pkg.dev/gcp-dev-idan-pte/ppdm
Make sure to change the value to match your repository address.
With PPDM 19.10, this setting can be applied using REST API, specifically POST /api/v2/inventory-sources on an existing K8s asset source. To do this, follow the instructions described in Updating PowerProtect Data Manager pod configurations on https://developer.dell.com.
19. Scroll down, verify the certificate, and click Save to register the GKE cluster as a Kubernetes Asset Source.
There you have it! Now you can deploy your stateful applications on your GKE cluster using kubectl or straight from the GCP marketplace and protect their namespaces by creating a new Protection Policy 👍🏻.
Feel free to reach out with any questions or comments.
Thanks for reading,
Idan
Author: Idan Kentor
idan.kentor@dell.com