


PowerProtect Data Manager – How to Protect AWS EKS (Elastic Kubernetes Service) Workloads?
Thu, 17 Nov 2022 18:03:30 -0000
|Read Time: 0 minutes
PowerProtect Data Manager supports the protection of a multitude of K8s distributions for on-prem as well as in the cloud (see the compatibility matrix). In this blog, I’ll show how to use PowerProtect Data Manager (or PPDM for short) to protect AWS Elastic Kubernetes Service (EKS) workloads.
I’ve been asked many times recently if PPDM supports protection of Amazon EKS workloads, and if so, how the configuration goes. So, I thought it would be good to talk about that in a blog -- so here we are! In essence, the challenging piece (no issues, maybe challenges 😊) is the configuration of the EBS CSI driver, so I’ll cover that extensively in this blog. And because the deployment and configuration of the EBS CSI driver has changed recently, there is all the more reason to get this information out to you.
Deploying PowerProtect Data Manager and PowerProtect DD are both pretty straightforward. You just need to launch the PowerProtect Data Manager installation from the marketplace, answer some network and other questions, and off you go. It creates an AWS CloudFormation stack that deploys all the required services of both PowerProtect Data Manager and PowerProtect DD. PowerProtect DD can be deployed separately or along with PPDM. Naturally, the newly deployed PowerProtect Data Manager can also leverage an existing PowerProtect DD.
Deploying and configuring the EKS cluster and Node groups is rather simple and can be done using the AWS management console, AWS CLI, or eksctl. For more information, the official Amazon EKS documentation is your friend.
It’s important to talk about the tools we need installed for managing Amazon EKS and to deploy and manage the EBS CSI driver:
- kubectl – Probably needs no introduction but it’s a command line tool to work with Kubernetes clusters.
- AWS CLI – A command line tool for working with AWS services. For installation instructions and further info, see Installing or updating the latest version of the AWS CLI.
- eksctl – A command line tool to create and manage EKS clusters. For more info, see Installing or updating eksctl.
Let’s look at some general steps before we go ahead and deploy the EBS CSI driver.
To get started
1. To configure AWS CLI, run the following command:
aws configure
2. List your EKS clusters:
aws eks --region <region-code> list-clusters
3. Configure kubectl to operate against your EKS cluster:
aws eks update-kubeconfig --name <your-eks-cluster-name>
Deploying the External Snapshotter
The final step before we can deploy the EBS CSI driver is to deploy the external snapshotter.
1. To deploy the snapshotter, execute the following commands:
kubectl apply -f https://raw.githubusercontent.com/kubernetes-csi/external-snapshotter/master/client/config/crd/snapshot.storage.k8s.io_volumesnapshotclasses.yaml
kubectl apply -f https://raw.githubusercontent.com/kubernetes-csi/external-snapshotter/master/client/config/crd/snapshot.storage.k8s.io_volumesnapshotcontents.yaml
kubectl apply -f https://raw.githubusercontent.com/kubernetes-csi/external-snapshotter/master/client/config/crd/snapshot.storage.k8s.io_volumesnapshots.yaml
kubectl apply -f https://raw.githubusercontent.com/kubernetes-csi/external-snapshotter/master/deploy/kubernetes/snapshot-controller/rbac-snapshot-controller.yaml
kubectl apply -f https://raw.githubusercontent.com/kubernetes-csi/external-snapshotter/master/deploy/kubernetes/snapshot-controller/setup-snapshot-controller.yaml
2. Make sure the snapshot controller pods are running:
kubectl get pods -n kube-system
EBS CSI Driver Deployment
And now for the main event, the configuration of the EBS CSI driver. There are two ways to go about it – deploying the EKS CSI Driver as an EKS add-on or as a self-managed driver. You can use either the AWS management console or AWS CLI (eksctl) to deploy the EBS CSI Driver add-on. The self-managed driver is installed and operated exclusively using kubectl.
The following procedure represents my thoughts and experience for a quick and comprehensive configuration - there are few ways to climb a mountain as they say. Refer to the documentation for all possible ways.
Option 1: Self-managed EBS CSI Driver
1. Create or use an existing IAM user and map the required policy for the EBS CSI Driver to the user:
a. Create an IAM user:
aws iam create-user --user-name <user-name>
b. Create an IAM policy and record the Policy ARN:
aws iam create-policy --policy-name <policy-name> --policy-document https://raw.githubusercontent.com/
kubernetes-sigs/aws-ebs-csi-driver/master/docs/example-iam-policy.json
c. Attach the policy to the user:
aws iam attach-user-policy --user-name <user-name> --policy-arn <policy-arn>
d. Create an access key and record the AccessKeyId and SecretAccessKey:
aws iam create-access-key --user-name <user-name>
2. Create a secret. Here we’re creating a secret and mapping it to an existing IAM user and its credentials (for example, the access keys recorded in the previous step):
kubectl create secret generic aws-secret --namespace kube-system --from-literal "key_id=<iam-user-access-key-id>" --from-literal "access_key=<iam-user-secret-access-key>"
3. Install the EBS CSI Driver:
kubectl apply -k "github.com/kubernetes-sigs/aws-ebs-csi-driver/deploy/kubernetes/overlays/stable/?ref=release-1.12"
4. Make sure that the ebs-csi-controller and ebs-csi-nodes pods are running:
kubectl get pods -n kube-system
Option 2: EBS CSI Driver Add-on
1. Retrieve the EKS cluster OIDC provider:
aws eks describe-cluster --name <your-eks-cluster-name> --query "cluster.identity.oidc.issuer" --output text
2. Check if the OIDC provider of your cluster is not on the list of current IAM providers:
aws iam list-open-id-connect-providers
3. If the provider is not on the list, associate it by running the following command:
eksctl utils associate-iam-oidc-provider --cluster <your-eks-cluster-name> --approve
4. Create the IAM role. This would also attach the required policy and annotate the EBS CSI driver Service Account on the EKS cluster:
eksctl create iamserviceaccount --name ebs-csi-controller-sa --namespace kube-system --cluster <your-eks-cluster-name> --attach-policy-arn arn:aws:iam::aws:policy/service-role/AmazonEBSCSIDriverPolicy --approve --role-only --role-name <role-name>
5. Make sure that the aws-ebs-csi-driver is not installed:
aws eks list-addons --cluster-name <your-eks-cluster-name>
6. Get the AWS Account ID:
aws sts get-caller-identity --query "Account" --output text
7. Deploy the EBS CSI Driver add-on. Note that it will deploy the default add-on version for your K8s version. Specify the AWS account ID retrieved in the previous step and the IAM role specified in Step 4.
eksctl create addon --name aws-ebs-csi-driver --cluster <your-eks-cluster-name> --service-account-role-arn arn:aws:iam::<your-aws-account-id>:role/<role-name> --force
8. Make sure that the ebs-csi-controller and ebs-csi-nodes pods are running:
kubectl get pods -n kube-system
Storage Class Configuration
1. Create the Volume Snapshot Class YAML file:
cat <<EOF | tee snapclass.yaml
apiVersion: snapshot.storage.k8s.io/v1
kind: VolumeSnapshotClass
metadata:
   name: csi-aws-vsc
driver: ebs.csi.aws.com
deletionPolicy: Delete
EOF
2. Create the Snapshot Class:
kubectl apply -f snapclass.yaml
3. Make sure that the Snapshot Class got created:
kubectl get volumesnapshotclass
4. Create the Storage Class YAML file:
cat <<EOF | tee ebs-sc.yaml
apiVersion: storage.k8s.io/v1
kind: StorageClass
metadata:
   name: ebs-sc
   annotations:
     storageclass.kubernetes.io/is-default-class: "true"
provisioner: ebs.csi.aws.com
volumeBindingMode: WaitForFirstConsumer
EOF
5. Create the Storage Class:
kubectl apply -f ebs-sc.yaml
6. Patch the gp2 storage class to remove the default setting:
kubectl patch storageclass gp2 -p "{\"metadata\": {\"annotations\":{\"storageclass.kubernetes.io/is-default-class\":\"false\"}}}"7. Make sure that the EBS Storage Class got created and that it shows up as the default storage classone:
kubectl get storageclass
Add EKS to PowerProtect Data Manager
Now, for the grand finale – adding our EKS cluster to PPDM. Follow these steps to gather some information and then register EKS to PPDM.
1. Get the K8s cluster control-plane endpoint:
kubectl cluster-info
2. To create a service account on the EKS cluster for PPDM discovery and operations, PPDM RBAC YAML files need to be applied.
a. Retrieve the rbac.tar.gz file from the PPDM appliance at the following location:
/usr/local/brs/lib/cndm/misc/rbac.tar.gz
b. On PPDM 19.12, you can download the archive from the PowerProtect Data Manager UI under System Settings -> Downloads > Kubernetes, or directly using the following URL:
https://<your-ppdm-server>/k8s-binaries-download?filename=/usr/local/brs/lib/cndm/misc/rbac.tar.gz
Note that the link will only work if you’re logged into the PPDM UI. You can also find the archive on PPDM itself, at the following path:
/usr/local/brs/lib/cndm/misc/rbac.tar.gz
c. Extract the archive, navigate to the rbac directory, and apply the two YAML files using the following commands:
kubectl apply -f ppdm-discovery.yaml
kubectl apply -f ppdm-controller-rbac.yaml
d. If you’re using K8s 1.24 or later, then you must manually create the secret for the PPDM discovery storage account:
kubectl apply -f - <<EOF
apiVersion: v1
kind: Secret
type: kubernetes.io/service-account-token
metadata:
   name: ppdm-discovery-serviceaccount-token
   namespace: powerprotect
   annotations:
     kubernetes.io/service-account.name: "ppdm-discovery-serviceaccount"
EOF
e. Retrieve the secret key using the following command:
kubectl describe secret $(kubectl get secret -n powerprotect | awk '/disco/{print $1}') -n powerprotect | awk '/token:/{print $2}'3. Retrieve the EKS cluster root CA:
eksctl get cluster <your-eks-cluster-name> -o yaml | awk '/Cert/{getline; print $2}'Without further ado, let’s navigate to the PowerProtect Data Manager UI and register our EKS cluster as a Kubernetes Asset Source.
4. Navigate to Infrastructure -> Asset Sources.
5. Enable the Kubernetes Asset Source as needed and navigate to the Kubernetes tab.
6. Add the EKS cluster as a Kubernetes Asset Source:
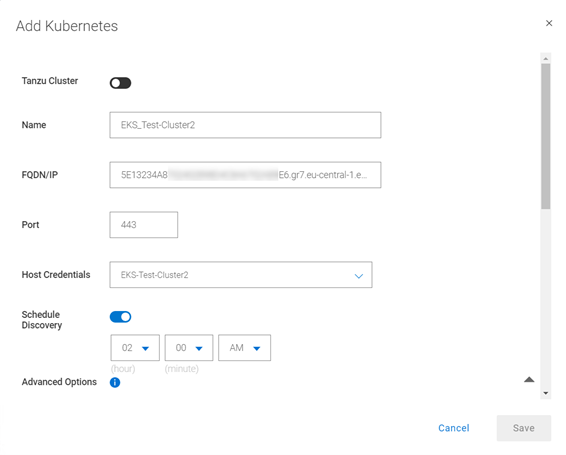
A few other notes:
7. Use the FDQN you retrieved in Step 1. Make sure to remove the https:// prefix.
8. Specify port 443. Make sure to add tcp/443 to the EKS security group (inbound) and the PPDM security group (outbound).
9. Create new credentials with the Service Account Token from Step 2e.
10. Root Certificate:
a. On PPDM versions earlier than 19.12, follow these steps:
- Convert the EKS root CA to BASE64 using the following command:
eksctl get cluster <your-eks-clsuter-name> -o yaml | awk '/Cert/{getline; print $2}' | base64 -d- SSH to the PPDM server using the admin user and save the root CA in BASE64 to a file, say eks-cert.txt. Make sure to include the BEGIN and END CERTIFICATE lines.
- Execute the following command:
ppdmtool -importcert -alias <your-eks-cluster-name> -file eks-cert.txt -t BASE64
b. On PPDM 19.12 and later, click Advanced Options on the same Add Kubernetes screen and scroll down. Specify the root certificate from Step 3.
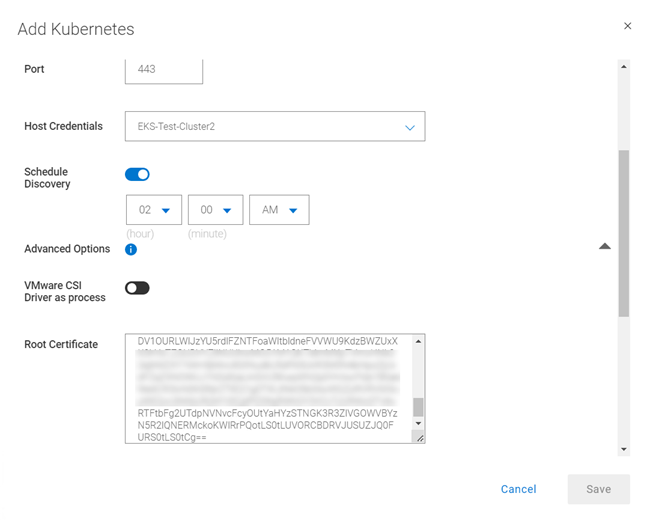
11. Verify the certificate and click Save to register the EKS cluster as a Kubernetes Asset Source.
That’s it, now you can deploy your stateful applications on your EKS cluster and protect their namespaces by creating a new Protection Policy 👍🏻.
Feel free to reach out with any questions or comments.
Thanks for reading,
Idan
Author: Idan Kentor
idan.kentor@dell.com