


Deploying the Llama 3.1 405b Model Using NVIDIA NIM

This blog is one in a series of three that shows how Dell Technologies and our partner AI ecosystem can help you to provision the most powerful open-source model available easily. In this series of blogs, we share information about the ease of deploying the Llama 3.1 405b model in the Dell PowerEdge XE9680 server using NVIDIA NIM microservices, Dell Enterprise Hub using Text Generation Inference (TGI), or vLLM for LLMs. We hope this series equips you with the knowledge and tools needed for a successful deployment.
This blog describes the NVIDIA NIM for LLMs option.
Overview
On July 23, 2024, Meta announced the most capable open-source LLM model, Llama 3.1 405b. This model is so powerful that it competes with the best-in-class commercial models, exceeding or matching the performance in several benchmarks. However, with great power comes considerable requirements.
Dell Technologies has been working with many partners to create an ecosystem to help customers succeed on their AI journey. For the Llama 3.1 405b model, we worked directly with Meta and published the Running Llama 3.1 405B models on Dell PowerEdge XE9680 blog. The blog explains how to run model inference on a Dell PowerEdge XE9680 server with torchrun from PyTorch, which is the base process provided by Meta with the Llama 3.1 405b model.
Deployment with NVIDIA NIM
We recently published a guide about how to run NVIDIA NIM using Docker in the Introduction to NVIDIA Inference Microservices, aka NIM blog. The following steps guide the deployment of the Llama 3.1 405b model.
NVIDIA provides documentation about how to deploy NVIDIA NIM for LLM at https://docs.nvidia.com/nim/large-language-models/latest/deploy-helm.html. However, before starting the deployment, note that NVIDIA prepared four different versions of the model that are called NIM Profiles. The NIM Profiles enable you to select the version of the model to deploy, based on your hardware availability and business requirements.
Inside the NIM container that is available for download from the NVIDIA NGC at nvcr.io/nim/meta/llama-3.1-405b-instruct:1.2.0, run the following command to list the profiles:
nim@my-nim-0:/$ list-model-profiles
SYSTEM INFO
- Free GPUs:
  -  [2330:10de] (0) NVIDIA H100 80GB HBM3 (H100 80GB) [current utilization: 0%]
  -  [2330:10de] (1) NVIDIA H100 80GB HBM3 (H100 80GB) [current utilization: 0%]
  -  [2330:10de] (2) NVIDIA H100 80GB HBM3 (H100 80GB) [current utilization: 0%]
  -  [2330:10de] (3) NVIDIA H100 80GB HBM3 (H100 80GB) [current utilization: 0%]
  -  [2330:10de] (4) NVIDIA H100 80GB HBM3 (H100 80GB) [current utilization: 0%]
  -  [2330:10de] (5) NVIDIA H100 80GB HBM3 (H100 80GB) [current utilization: 0%]
  -  [2330:10de] (6) NVIDIA H100 80GB HBM3 (H100 80GB) [current utilization: 0%]
  -  [2330:10de] (7) NVIDIA H100 80GB HBM3 (H100 80GB) [current utilization: 0%]
MODEL PROFILES
- Compatible with system and runnable:
  - 8860fe7519bece6fdcb642b907e07954a0b896dbb1b77e1248a873d8a1287971 (tensorrt_llm-h100-fp8-tp8-throughput)
  - With LoRA support:
- Incompatible with system:
  - b80e254301eff63d87b9aa13953485090e3154ca03d75ec8eff19b224918c2b5 (tensorrt_llm-h100-fp8-tp8-latency)
  - f8bf5df73b131c5a64c65a0671dab6cf987836eb58eb69f2a877c4a459fd2e34 (tensorrt_llm-a100-fp16-tp8-latency)
  - b02b0fe7ec18cb1af9a80b46650cf6e3195b2efa4c07a521e9a90053c4292407 (tensorrt_llm-h100-fp16-tp8-latency)
Looking closer at this profile information, we see:
- 8860fe7519bece6fdcb642b907e07954a0b896dbb1b77e1248a873d8a1287971—Sequence of characters that is used to select the version of the model that will be loaded into the GPU memory.
- tensorrt_llm—Backend used by Triton to load the model. For the Llama 3.1 405b model, we have only TRT-LLM, but for other models, vLLM is also available.
- h100—Model of the supported GPU.
- fp8—Float point of the model, which can be FP8 or FP16 for the Llama 3.1 405b model.
- tp8—Number of Tensor Parallelism used to deploy the model. This value represents the number of GPUs that must be available on your system to deploy it, in this case, eight GPUs per node.
- throughput—If the model is optimized for throughput or latency, this information indicates the number of nodes or Pipeline Parallelism (PP). For the throughput model, you can use a single PowerEdge XE9680 server with eight NVIDIA H100 GPUs. For the latency model, you use two PowerEdge XE9680 servers with PP2.
With this profile information in mind, you can select the model to use depending on the necessity and infrastructure available.
NVIDIA NIM prerequisites
To run the following procedure, the infrastructure must be deployed with Kubernetes, NVIDIA GPU Operator, one or two PowerEdge XE9680 servers with eight NVIDIA H100 or A100 GPUs, and follows the Support Matrix.
The Dell AI Factory easily deploys this model. The following figure shows the infrastructure used for the deployment:
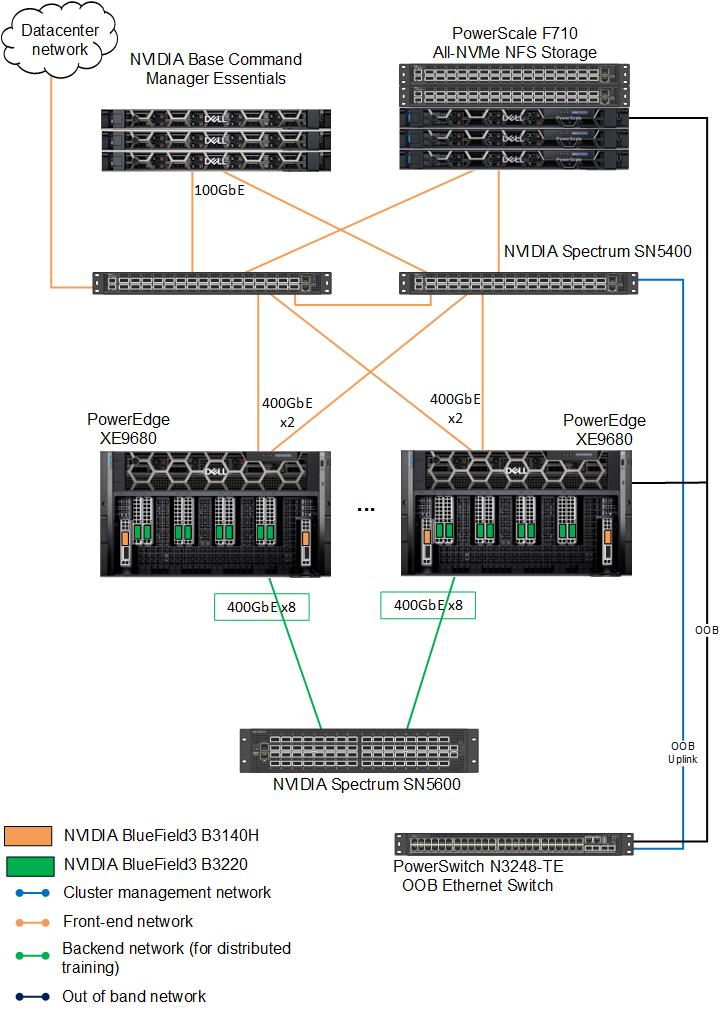
Figure 1: Dell AI Factory connection diagram
Downloading the Helm chart for NIM
To download the Helm chart for NIM:
- Set up the NGC API Key. See the Introduction to NVIDIA Inference Microservices, aka NIM blog for details.
- Download the Helm chart, which will enable installation on a Kubernetes cluster:
fbronzati@login01:/mnt/f710/NIM$ helm fetch https://helm.ngc.nvidia.com/nim/charts/nim-llm-1.1.2.tgz --username='$oauthtoken' --password=<replace_by_your_NGC_API_KEY>
fbronzati@login01:/mnt/f710/NIM$ ll
total 184
drwxrwxr-x  2 fbronzati fbronzati    35 Aug 29 11:30 ./
drwxrwxrwx 33 nobody     nogroup    1018 Aug 29 11:25 ../
-rw-r--r--  1 fbronzati fbronzati 27959 Aug 29 11:30 nim-llm-1.1.2.tgz
Creating the Kubernetes namespace and secret
To avoid any conflict, deploy the pod on a new namespace:
- Create the namespace:
fbronzati@login01:/mnt/f710/NIM$ kubectl create namespace nim
namespace/nim created
- Create the secret for downloading the container and models from NVIDIA NGC:
fbronzati@login01:/mnt/f710/NIM$ kubectl create secret docker-registry ngc-secret --docker-server="nvcr.io" --docker-username='$oauthtoken' --docker-password=<replace_by_your_NGC_API_KEY> -n nim
secret/ngc-secret created

fbronzati@login01:/mnt/f710/NIM$ kubectl create secret generic ngc-api --from-literal=NGC_API_KEY=<replace_by_your_NGC_API_KEY> -n nim
secret/ngc-api created
- Run the following command to verify that the secrets were properly created inside the NIM namespace:
fbronzati@login01:/mnt/f710/NIM$ kubectl get secrets -n nim
NAME         TYPE                             DATA   AGE
ngc-api      Opaque                           1      18s
ngc-secret    kubernetes.io/dockerconfigjson    1      50s
Installing LWS
We recommend LeaderWorkerSet (LWS) deployments as the method for deploying multimode models with NVIDIA NIM. To enable LWS deployments, see the installation instructions in the LWS documentation. The Helm chart defaults to LWS for multinode deployments.
With LWS deployments, Leader and Worker pods coordinate to run your multinode models.
LWS deployments support manual scaling and auto scaling, in which the entire set of pods are treated as a single replica. However, there are some limitations to scaling when using LWS deployments. If scaling manually (autoscaling is not enabled), you cannot scale above the initial number of replicas set in the Helm chart.
The following example command deploys and verifies that the pod was properly deployed and is running:
fbronzati@login01:/mnt/f710/NIM$ kubectl apply --server-side -f https://github.com/kubernetes-sigs/lws/releases/download/v0.3.0/manifests.yaml
namespace/lws-system serverside-applied
customresourcedefinition.apiextensions.k8s.io/leaderworkersets.leaderworkerset.x-k8s.io serverside-applied
serviceaccount/lws-controller-manager serverside-applied
role.rbac.authorization.k8s.io/lws-leader-election-role serverside-applied
clusterrole.rbac.authorization.k8s.io/lws-manager-role serverside-applied
clusterrole.rbac.authorization.k8s.io/lws-metrics-reader serverside-applied
clusterrole.rbac.authorization.k8s.io/lws-proxy-role serverside-applied
rolebinding.rbac.authorization.k8s.io/lws-leader-election-rolebinding serverside-applied
clusterrolebinding.rbac.authorization.k8s.io/lws-manager-rolebinding serverside-applied
clusterrolebinding.rbac.authorization.k8s.io/lws-proxy-rolebinding serverside-applied
secret/lws-webhook-server-cert serverside-applied
service/lws-controller-manager-metrics-service serverside-applied
service/lws-webhook-service serverside-applied
deployment.apps/lws-controller-manager serverside-applied
mutatingwebhookconfiguration.admissionregistration.k8s.io/lws-mutating-webhook-configuration serverside-applied
validatingwebhookconfiguration.admissionregistration.k8s.io/lws-validating-webhook-configuration serverside-applied
The following command shows if LWS was properly installed and is running on the cluster:
fbronzati@login01:/mnt/f710/NIM$ kubectl get pods --all-namespaces | grep lws
lws-system              lws-controller-manager-5c4ff67cbd-n4glc                           2/2     Running                  0                48s
Customizing the deployment file
Create a custom-values.yaml file and add the following content to the file, customizing as needed for your deployment:
image:
   # Adjust to the actual location of the image and version you want
   repository: nvcr.io/nim/meta/llama-3.1-405b-instruct
   tag: 1.2.0
imagePullSecrets:
   - name: ngc-secret
env:
   - name: NIM_MODEL_PROFILE
     #value: "8860fe7519bece6fdcb642b907e07954a0b896dbb1b77e1248a873d8a1287971" #Llama3.1 405b(tensorrt_llm-h100-fp8-tp8-throughput)
     #value: "b80e254301eff63d87b9aa13953485090e3154ca03d75ec8eff19b224918c2b5" #Llama 3.1 405b(tensorrt_llm-h100-fp8-tp8-latency) pp2
     value: "b02b0fe7ec18cb1af9a80b46650cf6e3195b2efa4c07a521e9a90053c4292407" #Llama3.1 405b(tensorrt_llm-h100-fp16-tp8-latency) pp2
nodeSelector:   # likely best to set this to `nvidia.com/gpu.present: "true"` depending on cluster setup
  nvidia.com/gpu.product: NVIDIA-H100-80GB-HBM3
model:
  name: meta/llama-3_1-405b-instruct
  ngcAPISecret: ngc-api
# NVIDIA recommends using an NFS-style read-write-many storage class.
# All nodes will need to mount the storage. In this example, we assume a storage class exists name "nfs".
nfs:
   enabled: true
   server: f710.f710
   path: /ifs/data/Projects/NIM/models
   readOnly: false

# This should match `multiNode.gpusPerNode`
resources:
   limits:
     nvidia.com/gpu: 8
multiNode:
   enabled: true
   workers: 2
   gpusPerNode: 8
# Downloading the model will take quite a long time. Give it as much time as ends up being needed.
startupProbe:
   failureThreshold: 1500
We already added the three NVIDIA H100 profiles on the configuration file. You can comment or uncomment the wanted model in the NIM_MODEL_PROFILE section.
Installing the Helm chart
To deploy the model, run the following command to download and start the Kubernetes pod inside the NIM namespace:
fbronzati@login01:/mnt/f710/NIM$ helm install my-nim nim-llm-1.1.2.tgz -f custom-values.yaml -n nim
NAME: my-nim
LAST DEPLOYED: Wed Sep 11 08:59:26 2024
NAMESPACE: nim
STATUS: deployed
REVISION: 1
NOTES:
Thank you for installing nim-llm.

**************************************************
| It may take some time for pods to become ready |
| while model files download                     |
**************************************************

Your NIM version is: 1.2.0
The pod will have one or two containers depending on the profile and number of workers. The following example shows the pod running the model over two containers:
fbronzati@login01:/mnt/f710/NIM$ kubectl get pods -n nim -o widefNAME          READY   STATUS    RESTARTS    AGE   IP              NODE       NOMINATED NODE   READINESS GATESfmy-nim-0     1/1      Running   0          14m    *.*.*.*        helios26    <none>            <none>
my-nim-0-1   1/1      Running   0          14m    *.*.*.*        helios24    <none>            <none>
Sending requests
The Helm chart also deploys a Kubernetes service to interact with the model sending a request. The following command provides the IP address and port that is created to access the model:
fbronzati@login01:/mnt/f710/NIM$ kubectl get services -n nim
NAME             TYPE        CLUSTER-IP      EXTERNAL-IP   PORT(S)     AGE
my-nim           ClusterIP   None            <none>        <none>     110s
my-nim-nim-llm   ClusterIP    *.*.*.*   <none>        8000/TCP   110s
NVIDIA NIM uses OpenAI API, therefore, there are many ways to interact with the model. See https://docs.api.nvidia.com/nim/reference/meta-llama-3_1-405b-infer for information to understand the best ways to send requests with Python, Node, and Shell. The following example is a simple shell script to test if the model was deployed correctly:
fbronzati@login01:/mnt/f710/NIM$ curl -X 'POST' \
    'http://*.*.*.*:8000/v1/completions' \
    -H 'accept: application/json' \
    -H 'Content-Type: application/json' \
    -d '{
"model": "meta/llama-3.1-405b-instruct",
"prompt": "Once upon a time",
"max_tokens": 64
}'
The response is similar to the following example:
{"id":"cmpl-5df0e556fcbf48738159707b65055d83","object":"text_completion","created":1726096116,"model":"meta/llama-3.1-405b-instruct","choices":[{"index":0,"text":", in a small village nestled in the rolling hills of Tuscany, there was a young apprentice named Dario . Dario was an aspiring sommelier, eager to learn the art of pairing wines with the region’s famous dishes. His mentor, the wise and kind-hearted Giovanni, noticed Dario’s passion and","logprobs":null,"finish_reason":"length","stop_reason":null}],"usage":{"prompt_tokens":5,"total_tokens":69,"completion_tokens":64}}Conclusion
Deploying the Llama 3.1 405b model can be challenging due to its size and hardware requirements. However, with NVIDIA NIM on Dell PowerEdge servers, most of the complexity is removed and the task becomes achievable, providing flexibility and scalability for a wide range of applications. The collaboration between Dell Technologies and NVIDIA showcases a high degree of synergy, offering a pathway to use cutting-edge AI capabilities in a production environment. This blog serves as a valuable resource for understanding the deployment intricacies and selecting the optimal approach based on hardware and performance requirements.
Dell AI Factory further simplifies this process by providing preconfigured environments and deployment templates, making it easier for enterprises to adopt the Llama 3.1 405b model without compromising performance or resource efficiency.