


Using Terraform to Deploy SUSE Rancher in an APEX Private Cloud Environment
Automating deployments and managing hardware through code is a beautiful thing. Not only does it free up time, it also enables environment standardization. Infrastructure as Code (IaC) manages and provides an infrastructure through machine-readable definition files rather than manual processes.
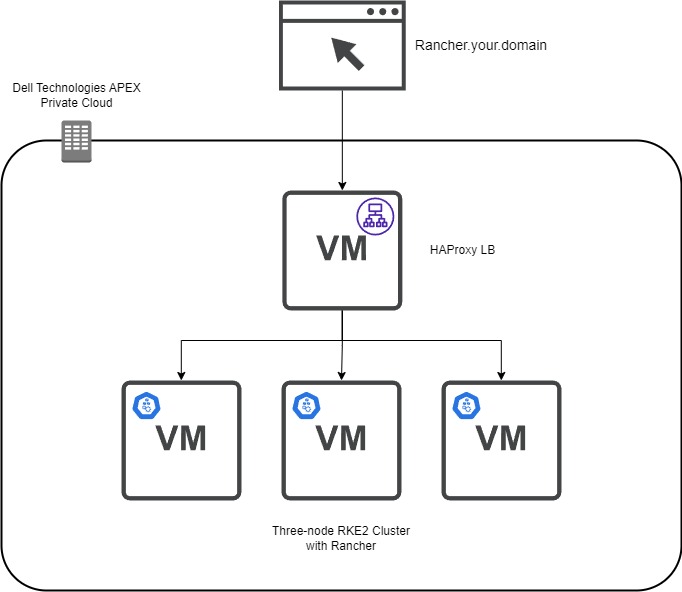
In this blog, I demonstrate how to use HashiCorp’s Terraform, a popular open-source Infrastructure-as-Code software tool, in an APEX Private Cloud environment to deploy a fully functional SUSE Rancher cluster. By doing so, infrastructure engineers can set up environments for developers in a short time. All of this is accomplished by leveraging vSphere, Rancher, and standard Terraform providers.
Note: The PhoenixNAP GitHub served as the basis for this deployment.
Pre-requisites
In this blog, we assume that the following steps have been completed:
- Network – This is a three-node RKE2 cluster and an optional HAProxy load balancer. Assign three IPs and DNS names for the RKE2 nodes and the same for the single load balancer.
- Virtual Machine Gold Image – This virtual machine template will be the basis for the RKE2 nodes and the load balancer. To create a SLES 15 SP4 template with the required add-ons, see the blog Using HashiCorp Packer in Dell APEX Private Cloud.
- Admin Account – Have a valid vCenter account with enough permissions to create and provision components.
- Here is the GitHub repo with all the files and templates to follow along. Using Terraform, here are the files used to provision Rancher:
- Main.tf file – Defines how secrets, tokens, and certificates are stored and defined in the variables.tf file. This file provides the steps for providers and resources to create the vSphere infrastructure and the commands to deploy provisioners. This is where the Rancher integration is outlined.
- Versions.tf – Specifies which version of Terraform, Rancher, and vSphere on which providers are required to run code that contains no syntax or fatal errors.
- Variables.tf – This file can be used for defining defaults for certain variables. It includes CPU, memory, and vCenter information.
- Templates Folder - During the RKE2 clustering, we require a configuration YAML file that contains the RKE2 Token. This folder stores Terraform’s templates that are used to create the RKE2 configuration files. These files contain Subject Alternative Name (SAN) information and the secret required for subsequent nodes to join the cluster. There is a method to obfuscate the configuration file in a template format, making it more secure when uploading the code to a GitHub repo.
- HAProxy Folder – This folder contains the certificate privacy enhanced mail (PEM) file, key, and configuration file for the HAProxy load balancer.
- Files folder – The configuration files are stored after being created from the templates. You also find the scripts to deploy RKE2 and Rancher.
Creating the HAProxy Node
The first virtual machine defined in the Main.tf file is the HAProxy load balancer. The resource “vsphere_virtual_machine” creation has a standard configuration such as assigning memory, CPU, network, and so on. The critical part is when we start provisioning files to the template files. We use file provisioners to add the HAProxy configuration, certificate, and key files to the virtual machine.
Note: HashiCorp recommends using provisioners as a last-resort option. The reason is that they do not track the state of the object that is modifying and require credentials that are exposed if not appropriately handled.
I used the following command to create a valid self-signed certificate in SLES15. The name of the PEM file must be “cacerts.pem” because it is a requirement by Rancher to propagate appropriately.
openssl req -newkey rsa:2048 -nodes -keyout certificate.key -x509 -days 365 -out cacerts.pem -addext "subjectAltName = DNS:rancher.your.domain"
Next, we use a remote execution provisioner that outlines the commands to install and configure HAProxy in the virtual machine:
    inline = [
      "sudo zypper addrepo https://download.opensuse.org/repositories/server:http/SLE_15/server:http.repo",
      "sudo zypper --gpg-auto-import-keys ref",
      "sudo zypper install -y haproxy",
      "sudo mv /tmp/haproxy.cfg /etc/haproxy",
      "sudo mv /tmp/certificate.pem /etc/ssl/",
      "sudo mv /tmp/certificate.pem.key /etc/ssl/",
      "sudo mkdir /run/haproxy/",
      "sudo systemctl enable haproxy",
      "sudo systemctl start haproxy"
    ]
We add a standard OpenSUSE repo with access to the HAProxy binaries that are compatible with SLES15. Next, the HAProxy installation takes place and moves critical files to the correct location. The last couple systemctl commands start the HAProxy service.
Here is the sample HAProxy configuration file:
global
        log /dev/log    daemon
        log /var/log    local0
        log /var/log    local1 notice
        chroot /var/lib/haproxy
        stats socket /run/haproxy/admin.sock mode 660 level admin
        stats timeout 30s
        user haproxy
        group haproxy
        daemon

        # Default SSL material locations
        ca-base /etc/ssl/certs
        crt-base /etc/ssl/private
        maxconn 1024
        # Default ciphers to use on SSL-enabled listening sockets.
        # For more information, see ciphers(1SSL). This list is from:
        # https://hynek.me/articles/hardening-your-web-servers-ssl-ciphers/
         ssl-default-bind-ciphers ECDH+AESGCM:DH+AESGCM:ECDH+AES256:DH+AES256:ECDH+AES128:DH+AES:ECDH+3DES:DH+3DES:RSA+AESGCM:RSA+AES:RSA+3DES:!aNULL:!MD5:!DSS
        ssl-default-bind-options ssl-min-ver TLSv1.2 prefer-client-ciphers
         tune.ssl.default-dh-param 2048
        cpu-map  1 1
        cpu-map  2 2
        cpu-map  3 3
        cpu-map  4 4

defaults
        log     global
        mode    http
        option  httplog
        option   forwardfor
        option  dontlognull
        timeout connect 50000s
        timeout client  50000s
        timeout server  50000s
        retries 4
        maxconn 2000000

frontend www-http
        mode http
        stats enable
        stats uri /haproxy?stats
        bind *:80
        http-request set-header X-Forwarded-Proto http
        option http-server-close
        option forwardfor except 127.0.0.1
        option forwardfor header X-Real-IP
        # MODIFY host
        acl host_rancher hdr(host) -i rancher.apca1.apextme.dell.com
        acl is_websocket hdr(Upgrade) -i WebSocket
        acl is_websocket hdr_beg(Host) -i wss
        use_backend rancher if host_rancher

frontend www-https
        bind *:443 ssl crt /etc/ssl/certificate.pem alpn h2,http/1.1
        option http-server-close
        http-request set-header X-Forwarded-Proto https if { ssl_fc }
        redirect scheme https code 301 if !{ ssl_fc }
        option forwardfor except 127.0.0.1
        option forwardfor header X-Real-IP
        # MODIFY host
        acl host_rancher hdr(host) -i rancher.apca1.apextme.dell.com
        acl is_websocket hdr(Upgrade) -i WebSocket
        acl is_websocket hdr_beg(Host) -i wss
        use_backend rancher if host_rancher

frontend kubernetes
        # MODIFY IP
        bind 100.80.28.72:6443
        option tcplog
        mode tcp
        default_backend kubernetes-master-nodes

frontend supervisor_FE
        # MODIFY IP
        bind 100.80.28.72:9345
        option tcplog
        mode tcp
        default_backend supervisor_BE

backend rancher
        redirect scheme https code 301 if !{ ssl_fc }
        mode http
        balance roundrobin
        option httpchk HEAD /healthz HTTP/1.0
        # MODIFY IPs
        server rke-dev-01 100.80.28.73:80 check
        server rke-dev-02 100.80.28.74:80 check
        server rke-dev-03 100.80.28.75:80 check

backend kubernetes-master-nodes
        mode tcp
        balance roundrobin
        option tcp-check
        # MODIFY IPs
        server rke-dev-01 100.80.28.73:6443 check
        server rke-dev-02 100.80.28.74:6443 check
        server rke-dev-03 100.80.28.75:6443 check

backend supervisor_BE
        mode tcp
        balance roundrobin
        option tcp-check
        # MODIFY IPs
        server rke-dev-01 100.80.28.73:9345 check
        server rke-dev-02 100.80.28.74:9345 check
        server rke-dev-03 100.80.28.75:9345 check
To troubleshoot the configuration file, you can execute the following command:
haproxy -f /path/to/haproxy.cfg -c
Another helpful troubleshooting tip for HAProxy is to inspect the status page for more information about connections to the load balancer. This is defined in the configuration file as stats uri /haproxy?stats. Use a browser to navigate to the page http://serverip/haproxy?stats.
After HAProxy starts successfully, the script deploys the RKE2 nodes. Again, the initial infrastructure configuration is standard. Let’s take a closer look to the files config.yaml and script.sh that are used to configure RKE2. The script.sh file contains the commands that will download and start the RKE2 service on the node. The script.sh file is copied to the virtual machine via the file provisioner and also made executable in the remote-exec provisoner. In a separate file provisioner module, the config.yaml file is moved to a newly created rke2 folder, the default location where the rke2 service looks for such a file.
Here is a look at the script.sh file:
sudo curl -sfL https://get.rke2.io | sudo sh -
sudo systemctl enable rke2-server.service
n=0
until [ "$n" -ge 5 ]
do
   sudo systemctl start rke2-server.service && break  # substitute your command here
   n=$((n+1))
   sleep 60
done
Notice that the start service command is in a loop to ensure that the service is running before moving on to the next node.
Next, we make sure to add the host information of the other nodes to the current virtual machine host file.
The subsequent two nodes follow the same sequence of events but use the config_server.yaml file, which contains the first node’s API address. The final node has an additional step: using the rancher_install.sh file to install Rancher on the cluster.
Here is a look at the rancher_install.sh file:
echo "Create ~/.kube"
mkdir -p /root/.kube
echo "Grab kubeconfig"
while [ ! -f /etc/rancher/rke2/rke2.yaml ]
do
  echo "waiting for kubeconfig"
  sleep 2
done
echo "Put kubeconfig to /root/.kube/config"
cp -a /etc/rancher/rke2/rke2.yaml /root/.kube/config
echo "Wait for nodes to come online."
i=0
echo "i have $i nodes"
while [ $i -le 2 ]
do
   i=`/var/lib/rancher/rke2/bin/kubectl get nodes | grep Ready | wc -l`
  echo I have: $i nodes
  sleep 2s
done
echo "Wait for complete deployment of node three, 60 seconds."
sleep 60
echo "Install helm 3"
curl -fsSL -o get_helm.sh https://raw.githubusercontent.com/helm/helm/master/scripts/get-helm-3
chmod 700 get_helm.sh
./get_helm.sh
echo "Modify ingress controller to use-forwarded-headers."
cat << EOF > /var/lib/rancher/rke2/server/manifests/rke2-ingress-nginx-config.yaml
---
apiVersion: helm.cattle.io/v1
kind: HelmChartConfig
metadata:
  name: rke2-ingress-nginx
  namespace: kube-system
spec:
  valuesContent: |-
    controller:
      config:
        use-forwarded-headers: "true"
EOF
echo "Install stable Rancher chart"
helm repo add rancher-stable https://releases.rancher.com/server-charts/stable
/var/lib/rancher/rke2/bin/kubectl create namespace cattle-system
/var/lib/rancher/rke2/bin/kubectl -n cattle-system create secret generic tls-ca --from-file=cacerts.pem=/tmp/cacerts.pem
# Modify hostname and bootstrap password if needed
helm install rancher rancher-stable/rancher \
  --namespace cattle-system \
  --set hostname=rancher.your.domain \
  --set bootstrapPassword=admin \
  --set ingress.tls.source=secret \
  --set tls=external \
  --set additionalTrustedCAs=true \
  --set privateCA=true

/var/lib/rancher/rke2/bin/kubectl -n cattle-system create secret generic tls-ca-additional --from-file=ca-additional.pem=/tmp/cacerts.pem
echo "Wait for Rancher deployment rollout."
/var/lib/rancher/rke2/bin/kubectl -n cattle-system rollout status deploy/rancher
Before the installation begins, there is a step that waits for all the rke2 nodes to be ready. This rancher_install.sh script follows the installation steps from the Rancher website. For this example, we are using an external load balancer. We, therefore, modified the ingress controller to use-forwarded-headers, as stated in the Rancher documentation. The other key parts of this script are the default bootstrap password and the TLS/CA flags assigned in the helm command. To change the administrator password successfully, it must be the same as the password used by the Rancher provider. The TLS and CA flags let the pods know that a self-signed certificate is being used and not to create additional internal certificates.
Note: The wait timers are critical for this deployment because they allow the cluster to be fully available before moving to the next step. Lower wait times can lead to the processes hanging and leaving uncompleted steps.
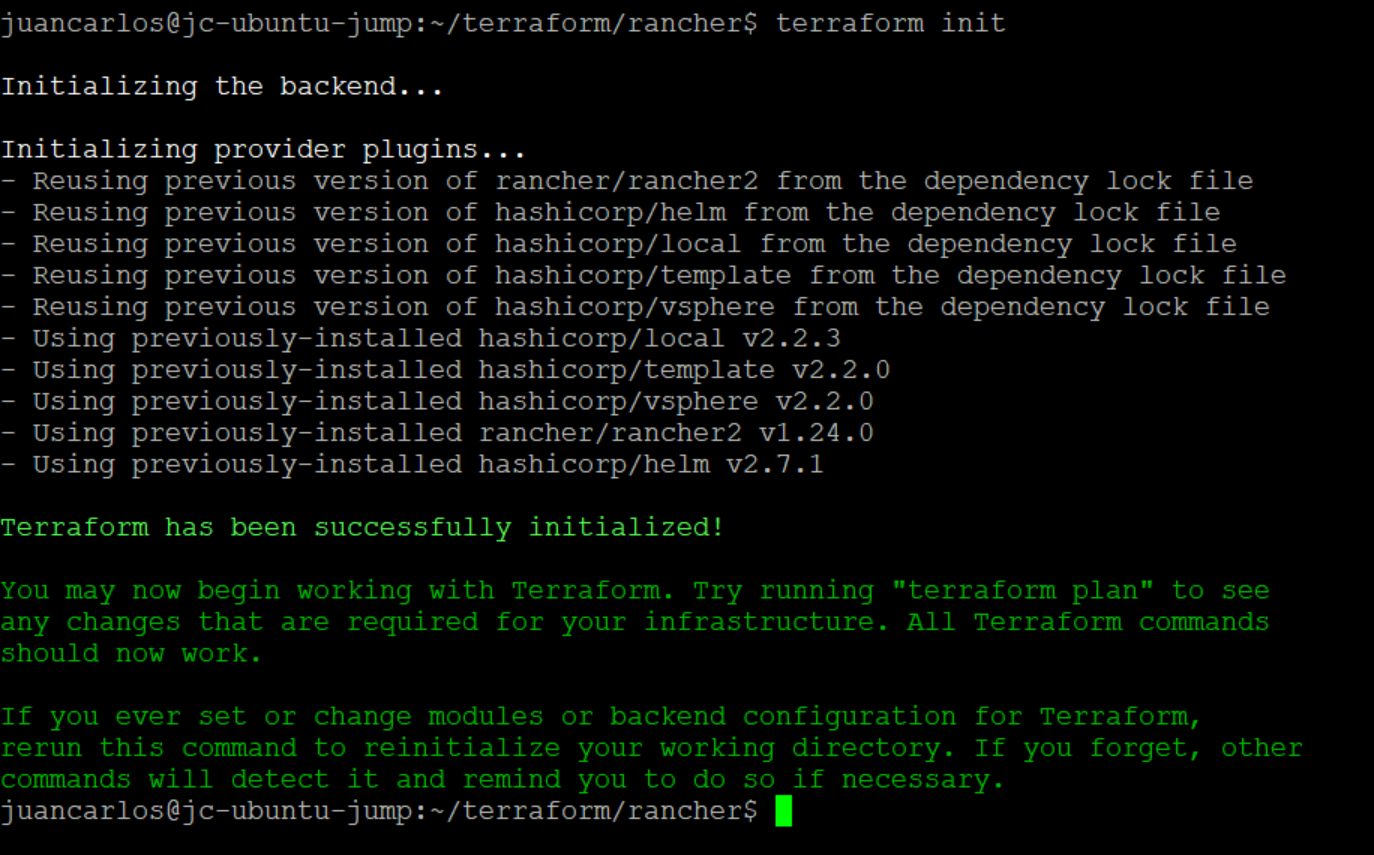
Navigate to the working directory, then use the following command to initialize Terraform:
terraform init
This command verifies that the appropriate versions of the project’s providers are installed and available.
Next, execute the ‘plan’ and ‘apply’ commands.
terraform plan

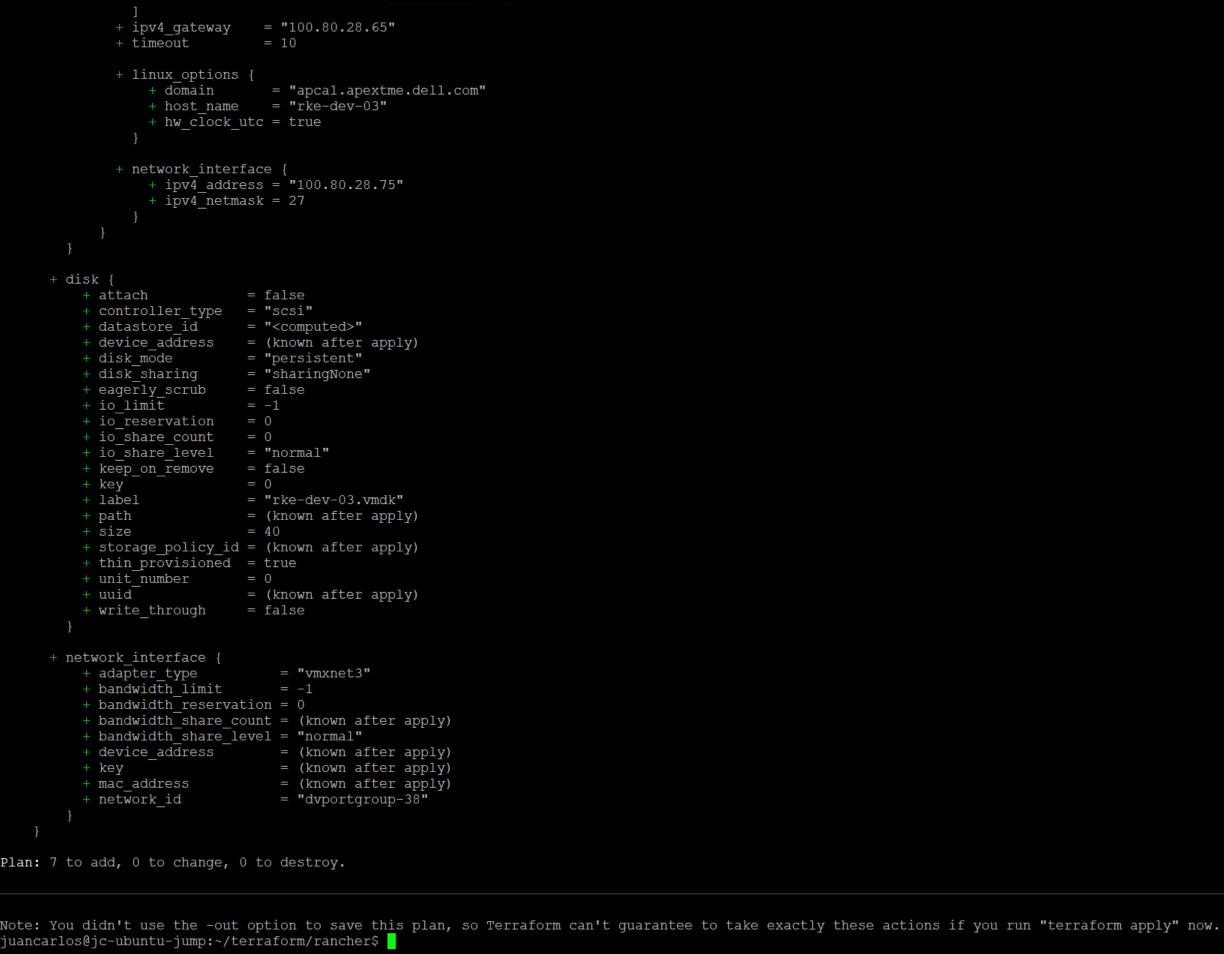
terraform apply –auto-approve

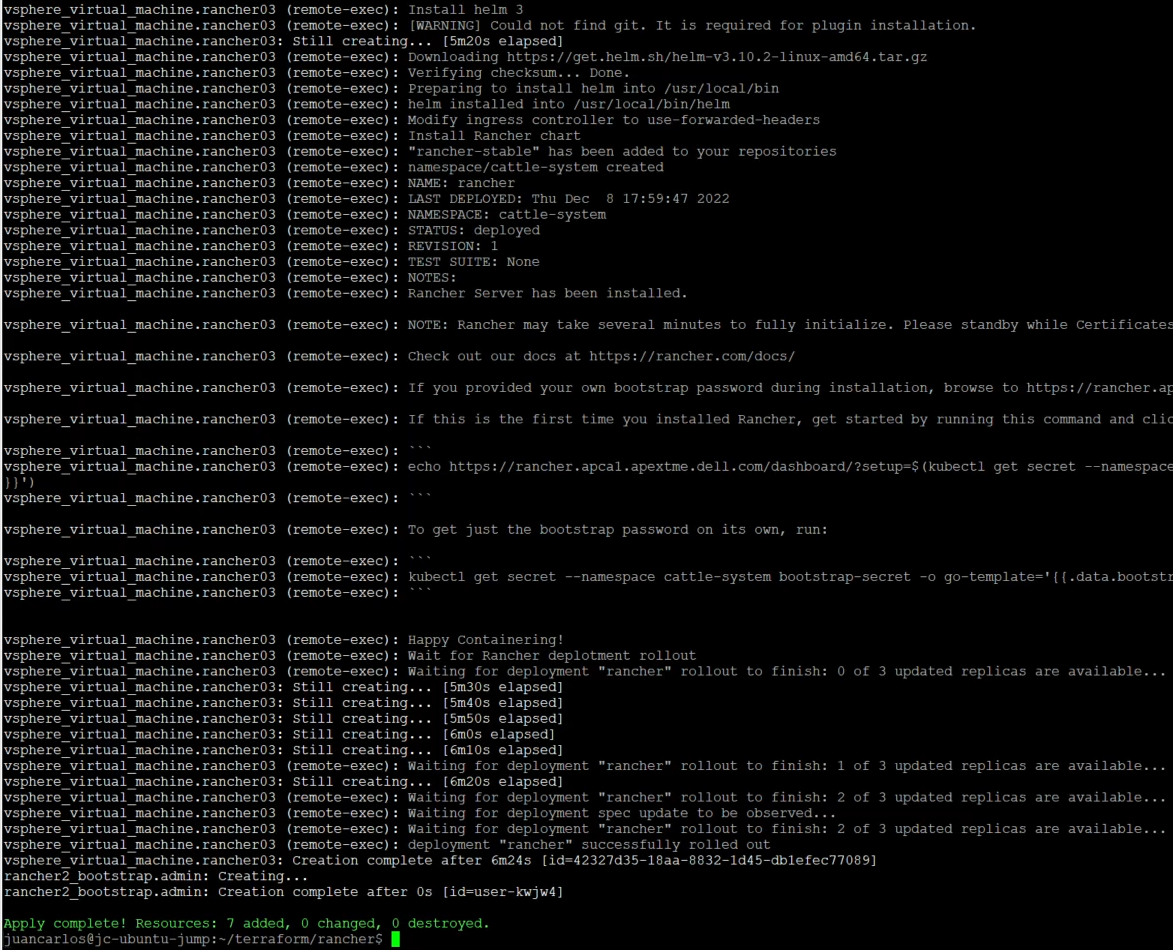
The deployment takes about 15 minutes. After a successful deployment, users can log in to Rancher and deploy downstream clusters (which can also be deployed using Terraform). This project also has a non-HAProxy version if users are interested in that deployment. The main difference is setting up a manual round-robin load balance within your DNS provider.
With this example, we have demonstrated how engineers can use Terraform to set up a SUSE Rancher environment quickly for their developers within Dell APEX Private Cloud.
Author: Juan Carlos Reyes