


Streamline operations with new and updated VMware vSphere 8.0 features on 16th Generation PowerEdge servers
Infographic Read the report See the scienceMon, 22 May 2023 17:07:42 -0000
|Read Time: 0 minutes
Managing infrastructure at scale requires significant monitoring and maintenance from data center administrators. By updating your environment with clusters of the latest 16th Generation Dell™ PowerEdge™ servers and the latest versions of software, you can arm administrators with cutting-edge tools to help simplify routine tasks. The latest release of VMware® vSphere®, version 8.0, offers new and updated features to make monitoring and managing Dell PowerEdge servers easier.
Connecting to a cluster of two remote 16th Generation Dell PowerEdge R6625 servers from our data center, we explored how vSphere 8.0 can simplify some PowerEdge server, host, and VM configuration tasks as well as some ongoing monitoring tasks. We found that the new and upgraded vSphere 8.0 features we evaluated provide the functionality they aim to deliver. For your organization, that could translate to better hardware and software performance and less downtime. In addition, your data center admins could focus less on routine management and monitoring tasks and spend more time on remediation or other work to help the organization.

For the latest 16th Generation Dell PowerEdge servers, what’s new and improved with VMware vSphere 8.0?
Centralized management capabilities for VMware vSphere 8.0 improved from the previous version to further ease management burdens for administrators. Figure 1 shows the improvements that we found.
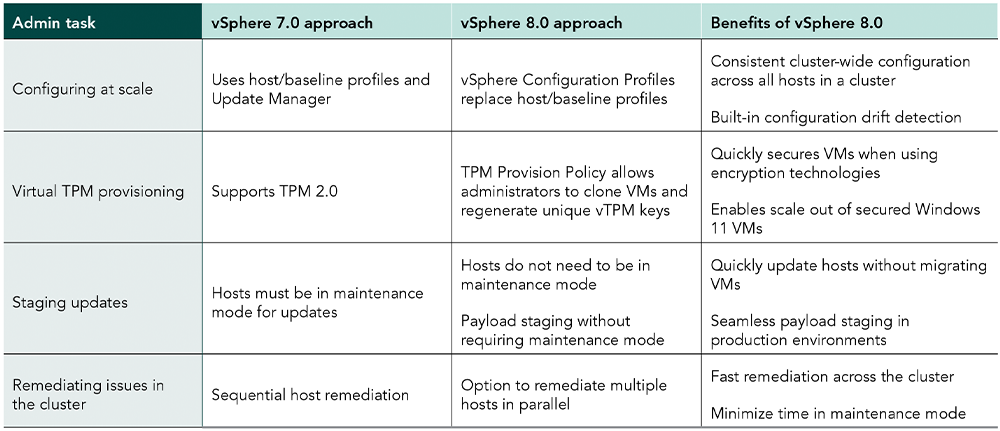
Stage cluster image updates
With vSphere 8, admins no longer need to put hosts into maintenance mode when staging updates for the 16th Gen PowerEdge cluster, which can lessen the time that hosts must spend in maintenance mode and thus reduce potential downtime due to host updating. In addition, VMs in the PowerEdge cluster do not need to shut down or migrate to a host not in maintenance mode.
Remediate hosts in a PowerEdge server cluster in parallel
Admins can remediate issues on multiple hosts in parallel in vSphere 8.0. Parallel remediation of hosts could reduce the overall time to remediate a cluster of latest-gen PowerEdge servers.
Configure hosts in a PowerEdge cluster at scale
Configuration Profiles, a new feature in vSphere 8.0, allows admins to configure all hosts in a PowerEdge cluster at once with the same configuration. Ensuring hosts in a cluster have the same configuration can help minimize errors at the host level so VMs can function properly regardless of placement within the cluster.
Reduce potential issues when securing VMs
Cloning a VM with a virtual TPM (vTPM) means cloning the secret Endorsement Key of a Trusted Platform Module (TPM), which could introduce security risks. vSphere 8 offers a new feature, called TPM Provision Policy, to ensure each cloned VM in the PowerEdge cluster can have a unique vTPM.
Conclusion
By using the latest software and 16th Generation Dell PowerEdge servers in your VMware vSphere environment, you can provide your data center administrators with new or updated tools that simplify routine tasks in both initial host setup and ongoing monitoring. In our exploration of the latest features in vSphere 8.0 Lifecycle Manager, we found that vSphere 8.0 on 16th Generation Dell PowerEdge servers offers advantages compared to the previous generation, which may make an infrastructure update worth your while. By introducing vSphere Configuration Profiles and providing simpler image updates to vSphere clusters, VMware vSphere 8.0 on latest 16th Generation Dell PowerEdge servers can help streamline operations for your administrative staff.
This project was commissioned by Dell Technologies.
April 2023. Revised April 2023.
Related Documents

VMware Cloud Foundation 5.1 on next gen Dell PowerEdge servers
Thu, 16 May 2024 15:42:24 -0000
|Read Time: 0 minutes
A Principled Technologies deployment guide

The release of VMware Cloud Foundation™ 5.1 offers new scalability, security, and enhancements that can help organizations meet essential infrastructure-as-a-service (IaaS) requirements. When backed by next gen Dell™ PowerEdge™ servers (with their own advantages in performance, security, management, and more), the VMware and Dell solution could deliver a robust, scalable, and efficient on-premises cloud infrastructure that provides the underlying infrastructure for your business to achieve your strategic business goals.
This comprehensive guide explains the deployment process for VMware Cloud Foundation 5.1 on a cluster of Dell PowerEdge servers, steps that we verified by doing the work ourselves. As your organization continues to evolve in the dynamic landscape of modern IT, this guide can empower your system administrators, architects, and IT professionals with the knowledge and expertise to implement the VMware and Dell cloud solution efficiently and effectively.
In addition to verifying the straightforward deployment process of VMware Cloud Foundation 5.1 on next gen Dell PowerEdge servers, we ran an online transaction processing (OLTP) workload on 24 VMs configured with MySQL database software. The consistent new orders per minute (NOPM) metrics that we captured demonstrate the potential transactional database performance value that the VMware and Dell cloud solution can deliver.
About 16th Generation Dell PowerEdge servers
With enhanced processing power, advanced security features, and transformative management capabilities, the 16th Generation servers can offer strong standards of server performance for your data center. According to Dell, “Whether your applications and data reside in the cloud, data centers, or edge environments, Dell’s PowerEdge portfolio empowers you to harness the full ease and agility of the cloud.”[i] Learn more about the portfolio of 16th Generation Dell PowerEdge rack, tower, purpose-built, and modular infrastructure servers.
VMware Cloud Foundation 5.1 overview
VMware Cloud Foundation (VCF) 5.1 allows your organization to build and operate a robust private or hybrid cloud infrastructure, seamlessly integrating essential resources and services into a unified platform. Boasting features such as automated lifecycle management and intrinsic security, Cloud Foundation 5.1 can simplify the deployment and management of cloud environments while ensuring efficiency.
This latest release includes security updates, fixes for UI and Lifecycle Management issues, enhancements to prechecks at the bundle level for VMware vCenter®, and several key enhancements that address requirements for cloud scale infrastructure.[ii],[iii] It provides a complete set of software-defined services for compute, storage, network, and security, along with cloud management capabilities.[iv],[v]
Learn more about VCF 5.1.
VMware Cloud Foundation components
VCF 5.1 comprises the following:
• VMware vSphere®
• VMware NSX®
• VMware vSphere with Tanzu™
• VMware ESXi™ 8.0 U1
• VMware vCenter Server® 8.0 U1
• VMware vSAN™ 8.0 U1
• VMware Aria Suite™
• VMware Cloud Builder
• VMware Software-Defined Data Center (SDDC) Manager 5.0.[vi]
VCF automates deployment and configuration of the private or hybrid cloud software stack for your virtual infrastructure. The initial VCF deployment creates a management domain that you can then use to add workload domains. Workload domains consist of clusters of at least three ESXi hosts and can manage and segregate resources and workloads in your private cloud.
For deploying and overseeing the logical infrastructure within the private cloud, VCF incorporates Cloud Builder and SDDC Manager virtual appliances to enhance VMware virtualization and management elements. These components were essential in our deployment to the next gen Dell PowerEdge server cluster.
VMware Cloud Builder automates the deployment of the management domain, the first cluster in a VCF deployment that manages the health of the VCF stack and the deployment of workload domains (server clusters that you use to run workload VMs).
SDDC Manager automates the virtualization software life cycle, encompassing configuration, provisioning, upgrades, and patching, including host firmware, while simplifying day-to-day management and operations. Through the SDDC Manager interface, which Figure 1 shows, the virtual infrastructure administrator or cloud administrator can provision new private cloud resources, monitor changes to the logical infrastructure, and oversee life cycle and other operational activities.

Figure 1: The VMware SDDC Manager interface. Source: Principled Technologies.
SDDC Manager uses vSphere Lifecycle to bundle, stage, and deploy software, OS, and firmware updates on a per-workload domain basis.
Additionally, VMware lists other features that we did not use in our deployment but that could be helpful in your next gen Dell PowerEdge cluster environment:[vii]
- vSphere with Tanzu/Workload Management integration to run Kubernetes workloads natively in vSphere
- vSAN stretched cluster configuration to provision two availability zones in a single workload domain, including a management domain, which could provide native high availability and physical resiliency and could minimize management service and workload downtime
- NSX Federation to manage network configuration across multiple VCF instances and management domains
- VMware Cloud Foundation+ to connect to VMware Cloud® using a subscription model rather than key-based component licensing and to manage your VCF instance via the VMware Cloud Console
Setting up the next gen Dell PowerEdge servers
The Dell PowerEdge servers that comprised our cluster included the following:
- Four Dell PowerEdge R750xs servers for management domain
- Three Dell PowerEdge R760 servers for virtual infrastructure workload domain
We deployed the VCF management domain on the four Dell PowerEdge R750xs servers. Each PowerEdge R750xs server had two BOSS drives for VMware ESXi 8.0.2 and eight SAS SSDs for VMware vSAN storage. The VCF management domain uses its own vCenter, NSX networking, and vSAN storage. To deploy and configure those resources and SDDC Manager automatically during the Cloud Builder deployment, VCF used our configuration details from the Deployment Parameter Workbook. This is an Excel workbook where you enter credentials, IPs, VLANs, and other configuration details for the VCF deployment and then upload it to Cloud Builder, which tests the input and allows you to continue deploying VCF once everything passes validation.
After deploying the VCF management domain, we deployed a virtual infrastructure (VI) workload domain on the three Dell PowerEdge R760 servers. Each Dell PowerEdge R760 server had two BOSS drives for ESXi 8.0.2, and four NVMe® drives and 20 SAS SSDs for vSAN storage. VI workload domains are additional vSphere clusters of at least three hosts with their own storage (in our case vSAN) and their own vCenter Server instance. VI workload domains provide physical and logical units for segregating and managing customer workloads.[viii]
All the Dell PowerEdge servers in our testbed had two 25Gb Ethernet connections to a Dell S5248F switch. We also used a Dell PowerEdge R6625 server as an infrastructure server where we deployed the AD/DNS server, the Certificate Authority server, a jumpbox VM, and routers to manage the VLANs on the Dell S5248F switch.
Overview of our VCF 5.1 deployment on a Dell PowerEdge server cluster
Figure 2 shows an example of how you can deploy all management components in VMware Cloud Foundation, which was the general process we followed.

Figure 2. Example flow chart of a VMware Cloud Foundation 5.1 deployment. Source: Principled Technologies based on VMware Deployment Overview of VMware Cloud Foundation.
You can install VCF 5.1 either “as a new release or perform a sequential or skip-level upgrade to VMware Cloud Foundation 5.1.”[ix] The new installation process, which we broadly followed, has three phases:[x]
- Preparing the environment: “The Planning and Preparation Workbook provides detailed information about the software, tools, and external services that are required to implement a Software-Defined Data Center (SDDC) with VMware Cloud Foundation, using a standard architecture model.”[xi] Note: Unlike the Deployment Parameter Workbook, an Excel file that you complete and upload to Cloud Builder, the Planning and Preparation Workbook is a long list of values, IPs, VLANs, domain names, usernames, passwords, etc. Your infrastructure team completes it with all the environment details and you use that as reference throughout the deployment process, but do not upload it at any point.
- Imaging all servers with ESXi: “Image all servers with the ESXi version mentioned in the Cloud Foundation Bill of Materials (BOM) section. See the VMware Cloud Foundation Deployment Guide for information on installing ESXi.”[xii] We installed the latest Dell-customized ESXi 8 version to each host under test at the start of testing and configured the OS as the Planning and Preparation Workbook specified.
- Installing Cloud Foundation 5.1: VMware Cloud Builder handles the bulk of the VCF deployment. Using the Planning and Preparation Workbook, in conjunction with the automation of VCF, made our deployment a smooth and almost entirely automated process. (Once you have uploaded the workbook and it passes validation with no errors, you click a button to kick off the automated deployment of the management domain.)
Key takeaway
Less-experienced infrastructure administrators might find some difficulty in setting up VMware Cloud Foundation due to the complex initial environment requirements, such as DNS, networking/IP pools, and preparing hosts and disks. In our experience, however, the validation process of the Parameter Workbook helped with troubleshooting and ensuring accuracy before our deployment. Once the software successfully validated the workbook, Cloud Builder fully automated the VCF deployment, including vSAN, NSX, vCenter, and SDDC Manager. This makes deployment much easier and faster for admins at any level rather than manually completing the same processes.
Deploying VMware Cloud Foundation 5.1 on Dell PowerEdge servers
Getting started
Note that we deployed our solution by following the steps in this document but skipped some optional steps, such as including Workspace ONE.
Prior to deploying VCF via the VMware Cloud Builder, we set up infrastructure components in our environment, including the following:
- A Windows Server 2022 VM that we configured as an Active Directory domain controller for our VCF domain (in our case, we used vcfdomain.local)
- This VM also included a DNS server with forward and reverse lookups for core infrastructure components as defined by the Planning and Preparation workbook, including fully qualified domain names (FQDNs) for SDDC Manager, vCenter, and other key components of the VCF deployment
- This VM also hosted an internal NTP server for VCF hosts
- DNS with forward and reverse lookups for all relevant DNS entries
- Another Windows Server 2022 VM that we configured as a child domain controller joined to the primary VCF domain that served as the Active Directory Certificate Services role
- SDDC Manager used this domain as an internal Certificate Authority to allow trusted communication between the various VCF components
- Other necessary infrastructure components, such as pfsense VMs to handle inter-VLAN routing, DHCP, and provide NAT to the internal network where we deployed VCF
- Configuring our Dell S5248F switch as required by the Planning Workbook
We also configured static IPs for the management domain hosts and vSAN ready disks for the management cluster.
Using the Planning and Preparation Workbook
We filled out the VCF Planning and Preparation Workbook with our environment’s details. This is a Microsoft Excel workbook that serves as a configuration guide for the required VCF components and for select components after the automated deployment. Download the Planning and Preparation Workbook.
Our environment details included our supporting virtual infrastructure and IP addresses, hostnames, credentials, and other relevant details. Some of these VMware Cloud Builder automatically configured during the deployment and others we manually configured after the deployment. As we mentioned earlier, this Planning and Preparation Workbook is different from the VCF Deployment Parameter Workbook, which we used to define the environment details for the automated VCF deployment via the Cloud Builder appliance.
Imaging the servers
After we fully populated the workbook, we followed the steps from this document to prepare the individual hosts for the management domain:
- We installed ESXi on each of the hosts. We used ESXi 8.0.2 build 22380479 (Dell Customized), the most recent Dell-customized ESXi 8 version at the time.
- We configured networking on each of the hosts. We used the ESXi direct console UI to set the network adapter, hostname, static IP address, subnet mask, gateway, and DNS as specified in the planning workbook. We also enabled SSH in troubleshooting options.
- We logged into the ESXi host client for each host and started the NTP server. We also ensured that the SSH service was running.
- After setting the hostnames, we regenerated the self-signed certificates on each host so that the common name of the certificate included the hostname. We connected to each host using SSH, regenerated the self-signed certificate, and restarted the hostd and vpxa services.
Installing VMware Cloud Builder
We then finished by populating the Deployment Parameter Workbook with our environment details, networking information, and credentials. (For more information on deploying Cloud Builder, see the guide.)
After preparing all four ESXi hosts for the management domain, we deployed the VMware Cloud Builder appliance to our infrastructure host using the ESXi host client, the Cloud Builder appliance OVA file, and specified admin and root credentials and networking details for the appliance. After we deployed Cloud Builder, we connected to the Cloud builder VM via SSH and confirmed that it could successfully ping the ESXi hosts. See this VMware document for more information.
We then logged into the VMware Cloud Builder appliance web interface by navigating to its FQDN in a web browser and following the steps listed on the web interface. The steps consisted of filling out the VCF Deployment Parameter Workbook with values from the Planning and Preparation Workbook and then uploading it to the Cloud Builder VCF deployment wizard. Cloud Builder validated the entire configuration as the Deployment Parameter Workbook specified. To learn more about the Deployment Parameter Workbook, visit https://docs.vmware.com/en/VMware-Cloud-Foundation/5.1/vcf-deploy/GUID-08E5E911-7B4B-4E1C-AE9B-68C90124D1B9.html.
After populating the Deployment Parameter Workbook with the relevant networking, existing infrastructure, credentials, and licensing information and testing that everything passed validation in the VMware Cloud Builder, we clicked Deploy SDDC and the Cloud Builder automatically deployed SDDC Manager and the other components of our initial VCF management cluster, including vCenter, NSX Manager, and vSAN.
VMware documentation states that Cloud Builder lists any issues with validation as errors or warnings in the UI. Users must address any configuration or environment errors before continuing. We did not encounter any errors or warnings in our deployment.
After validating and testing the environment parameters, the Cloud Builder appliance used our information to deploy the management domain cluster, consisting of four hosts. The deployment process included deploying a VMware vCenter Server environment, configuring NSX and vSAN, deploying SDDC Manager, and transferring control of the hosts and environment to SDDC Manager.
As we previously noted, VCF is compatible with vSphere with Tanzu workloads and Workload Management for running Kubernetes-based applications and workloads natively on the ESXi hypervisor layer. You could enable Workload Management on the management domain cluster or on specific workload domain clusters. We did not do this in our testing or use vSphere with Tanzu.[xiii]

Figure 3: The VMware Cloud Builder post-deployment success screen. Source: Principled Technologies.
Post-deployment configuration
With our core VCF components and management domain cluster deployed, we needed to complete some steps in SDDC Manager before deploying the first VI workload domain or VMware Aria Suite components.
Based on recommendations in VMware documentation,[xiv] we deployed Aria Operations after the initial management domain deployment and configured the software to provide workload and performance visibility into the VCF management domain and our eventual virtual infrastructure workload domains.
We logged into our newly deployed SDDC Manager instance and configured it to authenticate with VMware Customer Connect to download install and update bundles for Aria Suite Lifecycle Manager and the VI workload domain deployment. We also configured SDDC Manager to use our internal Certificate Authority server to manage CA-signed certificates for the physical infrastructure underlying our VCF deployment. In our management domain, we deployed an NSX Manager and Edge cluster and application virtual networks. We referenced these VMware documents.
Next, we followed the steps in this document to deploy VMware Aria Suite Lifecycle in the management domain. We used SDDC Manager to generate and sign a certificate for Lifecycle Manager by following these steps. We configured Lifecycle Manager to communicate with our management domain vCenter. We did the same for Aria Suite Operations: deployed it to our management domain for visibility into our virtual and physical infrastructure and then configured it in SDDC Manager. See how to configure Lifecycle Manager and more information on deploying Aria Suite Operations. After we installed VMware Aria Operations, the entire VCF management domain deployment was complete (see Figure 3).
Preparing for workload activity
To deploy a VI workload domain cluster, we prepared three new hosts the same way we configured the management domain ESXi hosts. We created a network pool for the workload domain cluster and commissioned them to the SDDC inventory. We then deployed the VI workload domain by following these steps. We deployed an NSX Edge cluster to the workload domain for virtual networking infrastructure and generated certificates in SDDC Manager for the VI workload domain hosts. We considered our workload domain fully configured at this point and ready for our proof-of-concept database workload.
Deploying the OLTP database workload
We used the TPROC-C benchmark from the HammerDB suite to simulate a real-world online transaction processing database workload. We created a VM running MySQL database software on the workload domain cluster with 16 vCPUs, 64 GB of memory, and 2 TB of storage from the VSAN datastore. We installed Ubuntu 22.04 and MySQL 8.0 on the VM. We then scaled out to 24 VMs on each Dell PowerEdge R760 server. We ran the HammerDB 4.9 TPROC-C workload on each VM with 500 warehouses and measured the new orders per minute.
About HammerDB
HammerDB is an open-source benchmarking tool that tests the performance of many leading databases. The benchmark tool includes two built-in workloads derived from industry standards: a transactional (TPROC-C) workload and an analytics (TPROC-H) workload. We chose the TPROC-C (TPC-C-like) workload to demonstrate the online transaction processing performance capabilities of each instance, which benefit from high core counts and fast memory. TPROC-C runs a transaction processing workload that simulates an ecommerce business with five types of transactions: receiving a customer order, recording a payment, delivering an order, checking an order’s status, and checking stock in inventory.[xv] Note that our test results do not represent official TPC results and are not comparable to official TPC-audited results. To learn more about HammerDB, visit https://www.hammerdb.com/.
Get strong cloud OLTP database performance
We ran the TPROC-C workload three times and collected the total NOPM and transactions per minute (TPM) across all 24 MySQL VMs (see Table 1). The median run is in bold.
Table 1: The total new orders per minute and transactions per minute for all 24 MySQL VMs in our testbed. Source: Principled Technologies.
TPROC-C run 1 | TPROC-C run 2 | TPROC-C run 3 | |
Total NOPM | 342,850 | 344,889 | 345,961 |
Total TPM | 796,817 | 801,329 | 803,411 |
Figure 4 shows CPU utilization during the median run (run 2). CPU utilization stayed around 70 percent during the test. We wanted to hit 70 percent utilization to simulate a real-world OLTP workload.

Figure 4: CPU utilization during the median run of our testing. Source: Principled Technologies.
Figure 5 shows the average vSAN storage latencies for the Dell PowerEdge cluster during run 2. Read latency stayed between 1.5 and 2 milliseconds, and write latency stayed 2.5 and 3 milliseconds, showing that storage access stayed relatively low and constant during for the OLTP workload.

Figure 5: Average vSAN storage latencies for the Dell PowerEdge cluster with VCF 5.1. Source: Principled Technologies.
Conclusion
Deploying VMware Cloud Foundation 5.1 on next gen Dell PowerEdge servers brings together critical virtualization capabilities and high-performing hardware infrastructure. Relying on our hands-on experience, this deployment guide offers a comprehensive roadmap that can guide your organization through the seamless integration of advanced VMware cloud solutions with the performance and reliability of Dell PowerEdge servers. In addition to the deployment efficiency, the Cloud Foundation 5.1 and PowerEdge solution delivered strong performance while running a MySQL database workload. By leveraging VMware Cloud Foundation 5.1 and PowerEdge servers, you could help your organization embrace cloud computing with confidence, potentially unlocking a new level of agility, scalability, and efficiency in your data center operations.
This project was commissioned by Dell Technologies.
May 2024
Principled Technologies is a registered trademark of Principled Technologies, Inc.
All other product names are the trademarks of their respective owners.
Read the report on the PT site at https://facts.pt/Hse6826 and see the science at https://facts.pt/vXo6g7E.
[i] Dell Technologies, “Dell PowerEdge Servers,” accessed January 3, 2024,
[ii] VMware, “VMware Cloud Foundation 5.0 Release Notes,” accessed December 20, 2023,
[iii] Rick Walsworth, “Announcing VMware Cloud Foundation 5.0,” accessed December 20, 2023,
https://blogs.vmware.com/cloud-foundation/2023/06/01/announcing-vmware-cloud-foundation-5-0/.
[iv] VMware, “VMware Cloud Foundation 5.0 Release Notes.”
[v] VMware, “VMware Cloud Foundation Overview,” accessed December 20, 2023,
[vi] VMware, “Frequently Asked Questions: VMware Cloud Foundation 5.0,” accessed December 19, 2023,
[vii] VMware, “VMware Cloud Foundation Features,” accessed February 9, 2024,
[viii] VMware, “VMware Cloud Foundation Glossary,” accessed February 9, 2024,
[ix] VMware, “VMware Cloud Foundation 5.1 Release Notes,” accessed January 3, 2024,
[x] VMware, “VMware Cloud Foundation 5.1 Release Notes.”
[xi] VMware, “VMware Cloud Foundation 5.1 Release Notes.”
[xii] VMware, “VMware Cloud Foundation 5.1 Release Notes.”
[xiii] VMware, “VMware Cloud Foundation with VMware Tanzu,” accessed February 9, 2024,
[xiv] VMware, “Unified Cloud Management for VMware Cloud Foundation,” accessed February 9, 2024,
[xv] HammerDB, “Understanding the TPROC-C workload derived from TPC-C,” accessed March 13, 2024,
https://www.hammerdb.com/docs/ch03s05.html.
Author: Principled Technologies

Improve performance by easily migrating to a modern OpenShift environment on PowerEdge R7615 servers
Tue, 14 May 2024 20:15:19 -0000
|Read Time: 0 minutes
Improve performance and gain room to grow by easily migrating to a modern OpenShift environment on Dell PowerEdge R7615 servers with 4th Generation AMD EPYC processors and high-speed 100GbE Broadcom NICs
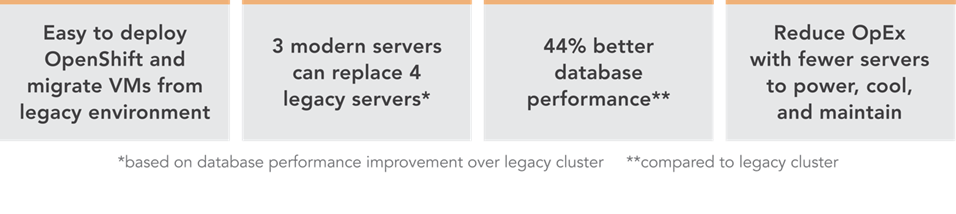
We deployed this modern environment, then migrated database VMs from legacy servers and saw performance improvements that support consolidation.
Transactional databases are the backbone of many business operations, powering ecommerce and order fulfillment, human resources and payroll, and a host of other activities. If your company is running these kinds of workloads on server infrastructure that is several years old, you might believe that performance is adequate and that you have little reason to consider upgrading to new servers with modern processors, networking, and a Red Hat® OpenShift® container-based environment. In fact, by continuing to use this older gear, you could be incurring higher than necessary operating expenditures by maintaining and powering more servers than you need to perform a given volume of work. You could also be risking downtime with aging hardware that is likelier to break down. By upgrading to a modern environment, you could mitigate these issues and future-proof your infrastructure. A 2019 Forrester Consulting report recommended that organizations refresh their servers at least every three years to maximize agility and productivity.[1] The report states not only that modern servers allow organizations to adopt more emerging technologies at a faster rate, but also “modern hardware has a profound impact on business benefits such as better customer experience, employee productivity, and innovation.”[2]
We explored the process of migrating VMs from a legacy environment and conducted testing to quantify the resulting improvements in network and database performance. We started with a legacy environment consisting of MySQL™ virtual machines (VMs) running on a cluster of three Dell™ PowerEdge™ R7515 servers with 3rd Generation AMD EPYC™ processors and 25Gb Broadcom® NICs. We then deployed a modern OpenShift container-based environment comprising three Dell PowerEdge R7615 servers with 4th Generation AMD EPYC processors and high-speed 100Gb Broadcom NICs. While the primary application of OpenShift is typically for containerized workloads, we used OpenShift Virtualization, which presents a familiar VM layer to administrators while utilizing the containerized technology on the underlying layer. Both environments used a Dell PowerStore 1200T for external storage that the servers accessed using iSCSI. We measured database performance using the HammerDB TPROC-C benchmark.
We found that the modern cluster environment of Dell PowerEdge R7615 servers with 4th Generation AMD EPYC processors and high-speed 100Gb Broadcom NICs outperformed the legacy cluster environment, delivering 44 percent greater database performance. These improvements mean that companies that upgrade can enjoy savings by meeting their workload requirements with fewer servers to license, maintain, power, and cool. Selecting 100Gb Broadcom NICs also positions companies well to take advantage of increasingly popular network-intensive technologies such as artificial intelligence (AI).
The benefits of containerization and Red Hat OpenShift Virtualization
Many organizations choose containers for DevOps due to their easy scalability and portability. Because a container encapsulates an application as well as everything necessary to run that application, it’s simple to move the container from development to test and production environments, adding instances of the application by replicating the container. Containers can also be useful for microservices, data streaming, and other use cases.[3]
Containers aren’t necessarily ideal for every use case, however, and for some infrastructures, IT teams may wish to incorporate both containers and VMs. Red Hat OpenShift Virtualization, which we used in our testing, enables organizations to run both VMs and containers on the same platform by bringing VMs into containers.[4] This lets IT reap the benefits of both containers and VMs with the efficiency benefit of relying on one management tool, rather than having to maintain two distinct infrastructures.
About our testing
We explored the process of deploying a modern data center environment and migrating VMs to it from a legacy environment. We also measured the database performance the VMs achieved in both environments:
Legacy environment
- Three Dell PowerEdge R7515 servers with 3rd Generation AMD EPYC 7663 56-core processors and Broadcom Advanced Dual 25Gb Ethernet NICs
- External storage using Dell PowerStore 1200T over iSCSI
- VMware® vSphere® 8
Modern environment
- Three Dell PowerEdge R7615 servers with 4th Generation AMD EPYC 9554 64-core processors and Broadcom NetExtreme-E BCM57508 100GB NICs
- External storage using Dell PowerStore 1200T over iSCSI
- Red Hat OpenShift 4.14
Figure 1 presents a diagram of our test configuration. In addition to our test server clusters, we needed three servers to host infrastructure VMs, workload client VMs, and the OpenShift control node VMs. We configured a Dell PowerEdge R7525 to serve as the host for our infrastructure VMs for services such as AD, DHCP, and DNS, as well as HammerDB client VMs. We also configured a Dell PowerEdge R7625 to host additional HammerDB client VMs. For the OpenShift environment, we deployed a Dell PowerEdge R540 to host the OCP control nodes. We virtualized the control nodes to reduce the number of servers needed for the test bed.
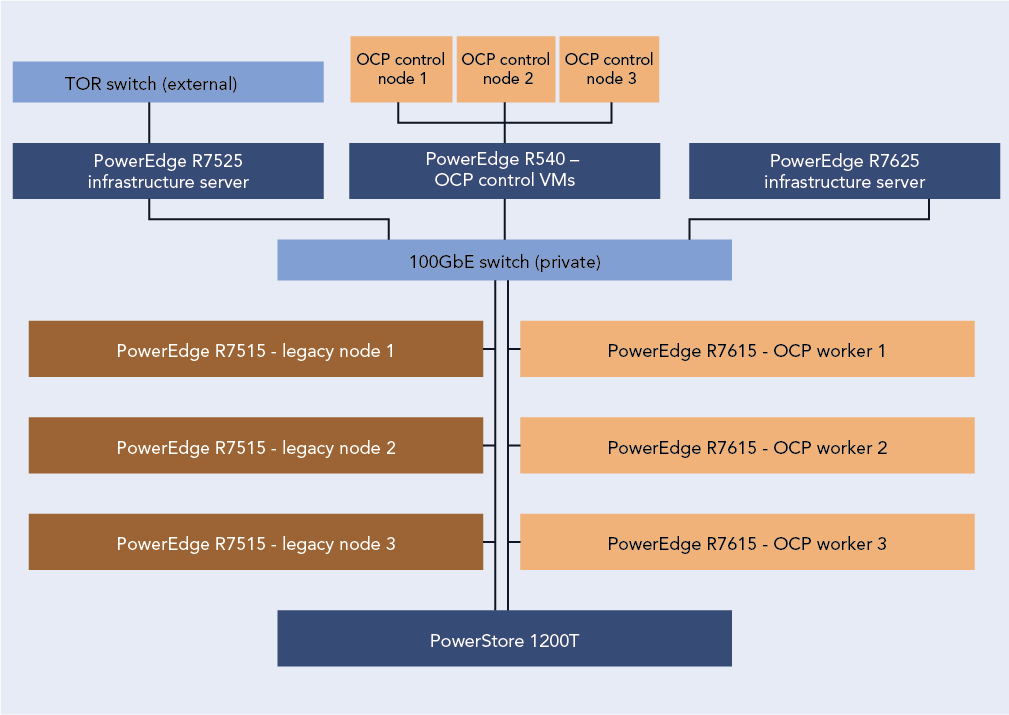
Figure 1: Our test configuration. Source: Principled Technologies.
To test the MySQL database performance of each environment, we used the TPROC-C workload from the HammerDB benchmark. HammerDB developers derived their OLTP workload from the TPC-C benchmark specifications; however, as this is not a full implementation of the official TPC-C standards, the results in this paper are not directly comparable to published TPC-C results. For more information, please visit https://www.hammerdb.com/docs/ch03s01.html.
Each VM had a single MySQL instance with a TPROC-C database. We targeted the maximum transactions per minute (TPM) each environment could achieve by increasing the user count until performance degraded.
What we learned
Finding 1: Deploying OpenShift in the modern environment was easy
For our environment, the OpenShift installation process using the Red Hat Assisted Installer to install an OpenShift Installer-Provisioned Cluster was straightforward and simple. We started by setting up the prerequisites for the environment, which included a VM for Active Directory, DNS, and DHCP. We created a domain for our private network and added the API and ingress routes as DNS A records. Next, we set up a VM as a router so that our OpenShift environment could access the internet from our private network. Finally, we created three blank VMs to serve as our OpenShift controller nodes. Once we had met the pre-requisite requirements, we logged into the Red Hat Hybrid Console and navigated to the Assisted Installer to create the cluster.
The Assisted Installer streamlined the process by walking us through configuration menus for storage, network, and access to the cluster. We started the cluster creation by assigning it a name, providing the domain, and selecting an OpenShift version. From there the installer guided us through the process of providing an installer image using the SSH public key of the server running the installer. After downloading the ISO, we booted each of the controller and worker nodes into the image and the Assisted Installer discovered each node. After discovering the controller and worker nodes, the installer walked us through the rest of the configuration process and then began the installation. The Assisted Installer made the process very simple with only six configuration tabs to advance through, and with our total install time after configuration taking around three hours. Once the installation was complete, each node rebooted into the OpenShift OS and the Assisted Installer provided us with a cluster console fully qualified domain name (FQDN) to connect to and manage the cluster from. For detailed steps on the OpenShift deployment process, see the science behind the report.
Finding 2: Migrating VMs from the legacy VMware environment to the modern OpenShift environment was easy
Migrating a VM from the VMware environment to OpenShift was also a straightforward process and quick to set up. While the actual migration time will vary depending on VM size and hardware speed, the setup consists of only a few steps and took us less than 10 minutes. We first installed the Migration Toolkit for Virtualization from the OpenShift OperatorHub. We then entered the IP address and credentials for the vCenter as a new provider. Next, we created a NetworkMap and a StorageMap to connect the respective resources between the environments. We then created a new migration plan to map the VMs to a namespace in OCP. We ran the migration plan on a single VM, and confirmed that we were able to enter the VM console once the migration was complete. For detailed steps on the process of migrating VMs from the legacy environment to the modern environment, see the science behind the report.
About 4th Gen AMD EPYC 9554 processors
According to AMD, EPYC 9554 processors deliver fast performance “for cloud, enterprise, and HPC workloads—helping accelerate your business.”[5] EPYC processors include AMD Infinity Guard, which per AMD is “a set of layered, cutting-edge security features that help you protect sensitive data and avoid the costly downtime cause by security breaches.”[6]
In addition to performance and security features, AMD claims their processors are energy-efficient, which can reduce energy costs and “minimize environmental impacts from data center operations while advancing your company’s sustainability objectives.”[7]
When comparing SPECCPU Floating Point peak rates and the default thermal design power (TDP) of the AMD EPYC 9554 and the AMD EPYC 7663, the 9554 has 54 percent better performance per watt, which demonstrates the improved power efficiency with the new 4th Gen AMD EPYC process.[8],[9]
For more information about 4th Gen AMD EPYC processors visit: https://www.amd.com/en/processors/epyc-server-cpu-family.
Finding 3: Database performance improved by 44 percent in the new environment
Figure 2 shows the results of our database performance testing using the TPROC-C workload from the HammerDB benchmark suite. The modern OpenShift cluster of Dell PowerEdge R7615 servers outperformed the legacy cluster by 44 percent. This extra capability could benefit companies upgrading to the new environment in several ways. The company could provide a better user experience, perform more work—or support more users—with a given number of servers, or reduce the number of servers necessary to execute a given workload.

Figure 2: Performance in transactions per minute using the TPROC-C workload of the HammerDB benchmark suite. Higher is better. Source: Principled Technologies.
Finding 4: Performance improved in the modern cluster, supporting consolidation, which leads to savings
Based on the results of our performance tests (see Figure 3), a company could consolidate the database workloads of a four-node Dell PowerEdge 7515 cluster with some additional headroom into three modern Dell PowerEdge R7615 servers with 4th Generation AMD EPYC processors and high-speed 100Gb Broadcom NICs.
The cluster of three modern servers delivered a total of 9,674,180 transactions per minute (3,224,726 TPMs per server). The cluster of three legacy servers delivered a total of 6,714,712 TPM (2,238,237 per server). Based on these results, four legacy servers would achieve a total of 8,952,948 TPM, which would leave 721,231 additional TPM room for growth on the modern three-node cluster.
Reducing the number of servers you need means that operational expenditures such as data center power and cooling and administrator time for maintenance also decrease, leading to ongoing savings.

Figure 3: Performance in transactions per minute that three modern servers and four legacy servers could achieve, based on our hands-on testing. Higher is better. Source: Principled Technologies.
About Dell PowerEdge R7615 servers
The Dell PowerEdge R7615 is a 2U, single-socket rack server. Dell states that it has designed this server to provide “performance and flexible, low-latency storage options in an air or Direct Liquid Cooling (DLC) configuration.”[10]
According to Dell, this server uses the AMD EPYC 4th generation processor to deliver up to 50 percent higher core count per single-socket platform in an innovative air-cooled chassis.[11] It also supports DDR5 at 4800 MT/s memory and PCIe® Gen5 with double the speed of previous Gen4 for faster access and transport of data, optimizing application output.[12] It supports up to six single-wide full-length GPUs or three double-wide full-length GPUs, to improve responsiveness or reduce app load time for power users, plus lower-latency, high-performance NVMe SSDs to help maximize compute performance.[13]
Learn more at https://www.delltechnologies.com/asset/en-us/products/servers/technicalsupport/poweredge-r7615-spec-sheet.pdf.
How high-speed 100Gb Broadcom NICs can help your organization
Even if a 25Gb NIC is sufficient to meet a company’s current networking needs, opting to equip new servers with the high-speed 100Gb Broadcom NIC can be a smart move. Future-proofing your network can allow you to meet the increasing demands of emerging technologies.
Advanced technologies such as artificial intelligence and machine learning, which can require the processing and transmission of large amounts of data, are becoming increasingly prevalent across businesses of all sizes. In a June 2023 survey of small business decision-makers, 74 percent were interested in using AI or automation in their business and 55 percent said their interest in these technologies had grown in the first half of 2023.[14] Upgrading to a modern environment with a highspeed 100Gb Broadcom NIC positions companies to take advantage of AI applications for social media, content creation, marketing, customer support, and many other use cases.
Another way that investing in the high-speed 100Gb Broadcom NIC can help your company is through improved efficiency. You might be tempted to go with a 25Gb NIC, thinking that as your networking needs increase, you can simply add more NICs of this size. However, consider a 2023 Principled Technologies study that compared the performance of a server solution with a 100Gb Broadcom 57508 NIC and a solution with four 25Gb NICs.[15] Testing revealed that the 100Gb NIC solution achieved up to 2.3 times the throughput of the solution with 25Gb NICs. It also delivered greater bandwidth consistency, which can translate to providing a better user experience; the report states that applications using the 25Gb NICs network configuration “would experience significant variation in available bandwidth, potentially causing jittery or interrupted service to multiple streams.”[16]
About the Broadcom BCM57508-P2100G Dual-Port 100GbE PCle 4.0 ethernet controller
A higher performing NIC can reduce latency, increase throughput, and allow the server to transmit and receive a great volume of data. The Dell PowerEdge R7615 we tested features the Broadcom BCM57508-P2100G DualPort 100GbE PCle 4.0 ethernet controller, which supports speeds of up to 200 Gigabits per second. Broadcom designed the BCM57508-P2100G “to build highlyscalable, feature-rich networking solutions in servers for enterprise and cloud-scale networking and storage applications, including high-performance computing, telco, machine learning, storage disaggregation, and data analytics.”[17]
The BCM57508-P2100G features BroadSAFE® technology, “to provide unparalleled platform security” and a “unique set of highly-optimized hardware acceleration engines to enhance network performance and improve server efficiency.”[18]
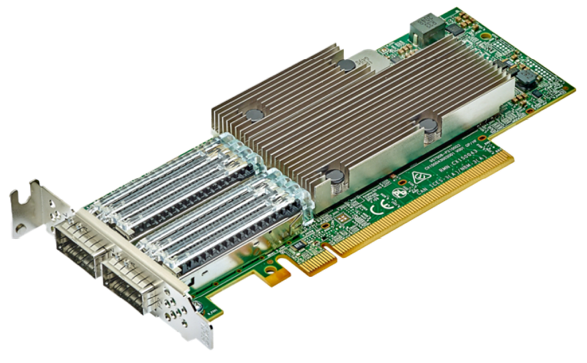 BCM57508-P2100G Dual-Port 100GbE PCle 4.0 ethernet controller. Image provided by Dell.
Conclusion
If your organization’s transactional databases are running on gear that is several years old, you have much to gain by upgrading to modern servers with new processors and networking components and an OpenShift environment. In our testing, a modern OpenShift environment with a cluster of three Dell PowerEdge R7615 servers with 4th Generation AMD EPYC processors and high-speed 100Gb Broadcom NICs outperformed a legacy environment with MySQL VMs running on a cluster of three Dell PowerEdge R7515 servers with 3rd Generation AMD EPYC processors and 25Gb Broadcom NICs. We also easily migrated a VM from the legacy environment to the modern environment, with only a few steps required to set up and less than ten minutes of hands-on time. The performance advantage of the modern servers would allow a company to reduce the number of servers necessary to perform a given amount of database work, thus lowering operational expenditures such as power and cooling and IT staff time for maintenance. The high-speed 100Gb Broadcom NICs in this solution also give companies better network performance and networking capacity to grow as they embrace emerging technologies such as AI that put great demands on networks.
This project was commissioned by Dell Technologies.
May 2024
Principled Technologies is a registered trademark of Principled Technologies, Inc.
All other product names are the trademarks of their respective owners.
Read the report on the PT site at https://facts.pt/2V6p3FG and see the science at https://facts.pt/Dj53ZJb.
Author: Principled Technologies
[1] Forrester, “Why Faster Refresh Cycles and Modern Infrastructure Management are Critical to Business Success,” accessed May 1, 2024, www.techrepublic.com/resource-library/casestudies/forrester-why-faster-refresh-cycles-and-modern-infrastructure-management-are-critical-to-business-success/.
[2] Forrester, “Why Faster Refresh Cycles and Modern Infrastructure Management are Critical to Business Success,” accessed May 1, 2024, www.techrepublic.com/resource-library/casestudies/forrester-why-faster-refresh-cycles-and-modern-infrastructure-management-are-critical-to-business-success/.
[3] Red Hat, “Understanding containers,” accessed April 12, 2024, https://www.redhat.com/en/topics/containers.
[4] Red Hat, “Red Hat OpenShift Virtualization,” accessed April 12, 2024,
https://www.redhat.com/en/technologies/cloud-computing/openshift/virtualization.
[5] AMD, “AMD EPYC Processors,” accessed April 12, 2024, https://www.amd.com/en/processors/epyc-server-cpu-Family.
[6] AMD, “AMD EPYC Processors.”
[7] AMD, “AMD EPYC Processors.”
[8] SPEC, “SPEC CPU®2017 Floating Point Rate Result for Dell PowerEdge R6615 (AMD EPYC 9554 64-Core Processor),” accessed May 2, 2024, https://www.spec.org/cpu2017/results/res2024q1/cpu2017-20240212-41481.html.
[9] SPEC, “SPEC CPU®2017 Floating Point Rate Result for Dell PowerEdge R6515 (AMD EPYC 7663 56-Core Processor),” accessed May 2, 2024, https://www.spec.org/cpu2017/results/res2021q3/cpu2017-20210913-29288.html.
[10] Dell, “PowerEdge R7615 Specification Sheet,” accessed April 12, 2024, https://www.delltechnologies.com/asset/en-us/products/servers/technical-support/poweredge-r7615-spec-sheet.pdf.
[11] Dell, “PowerEdge R7615 Specification Sheet.”
[12] Dell, “PowerEdge R7615 Specification Sheet.”
[13] Dell, “PowerEdge R7615 Specification Sheet.”
[14] Constant Contact, “AI Stats and Trends Small Businesses Need to Know Now,” accessed April 12, 2024, https://news.constantcontact.com/small-business-now-ai-2023.
[15] Principled Technologies, “Opt for modern 100Gb Broadcom 57508 NICs in your
Dell PowerEdge R750 servers for improved networking performance,” accessed April 12, 2024,
https://www.principledtechnologies.com/Dell/PowerEdge-R750-networking-iPerf-1023.pdf.
[16] Principled Technologies, “Opt for modern 100Gb Broadcom 57508 NICs in your
Dell PowerEdge R750 servers for improved networking performance,” accessed April 12, 2024,
https://www.principledtechnologies.com/Dell/PowerEdge-R750-networking-iPerf-1023.pdf.
[17] Broadcom, “BCM57508 – 200GbE,” accessed April 12, 2024,
https://www.broadcom.com/products/ethernet-connectivity/network-adapters/bcm57508-200g-ic.
[18] Broadcom, “BCM57508 – 200GbE.”