


Simplifying OneFS Deployment on AWS with Terraform
Wed, 20 Dec 2023 20:07:34 -0000
|Read Time: 0 minutes
In the first release of APEX File Storage for AWS in May 2023, users gained the capability to execute file workloads in the AWS cloud, thus harnessing the power of the PowerScale OneFS scale-out NAS storage solution. However, the initial implementation required the manual provisioning of all necessary AWS resources to provision the OneFS cluster—a less than optimal experience for embarking on the APEX File Storage journey in AWS.
With the subsequent release of APEX File Storage for AWS in December 2023, we are pleased to introduce a new, user-friendly open-source Terraform module. This module is designed to enhance and simplify the deployment process, alleviating the need for manual resource provisioning. In this blog post, we will delve into the details of leveraging this Terraform module, providing you with a comprehensive guide to expedite your APEX File Storage deployment on AWS.
Overview of Terraform onefs module
Terraform onefs module is an open-source module for the auto-deployment of AWS resources for a OneFS cluster. It is released and licensed under the MPL-2.0 license. You can find more details on the onefs module from the Terraform Registry. The onefs module provides the following features to help you deploy APEX File Storage for AWS OneFS clusters in AWS:
- Provision necessary AWS resources for a single OneFS cluster, including EC2 instances, EBS volumes, placement group, and network interfaces.
- Expand cluster size by provisioning additional AWS resources, including EC2 instances, EBS volumes, and network interfaces.
Getting Started
To use the Terraform onefs module, you need a machine that has Terraform installed and can connect to your AWS account. After you have fulfilled the prerequisites in documentation, you can start to deploy AWS resources for a OneFS cluster.
This blog provides instructions for deploying the required AWS infrastructure resources for APEX File Storage for AWS with Terraform.This includes: EC2 instances, spread strategy placement group, network interfaces, and EBS volumes.
1. Get the latest version of the onefs module from the Terraform Registry.
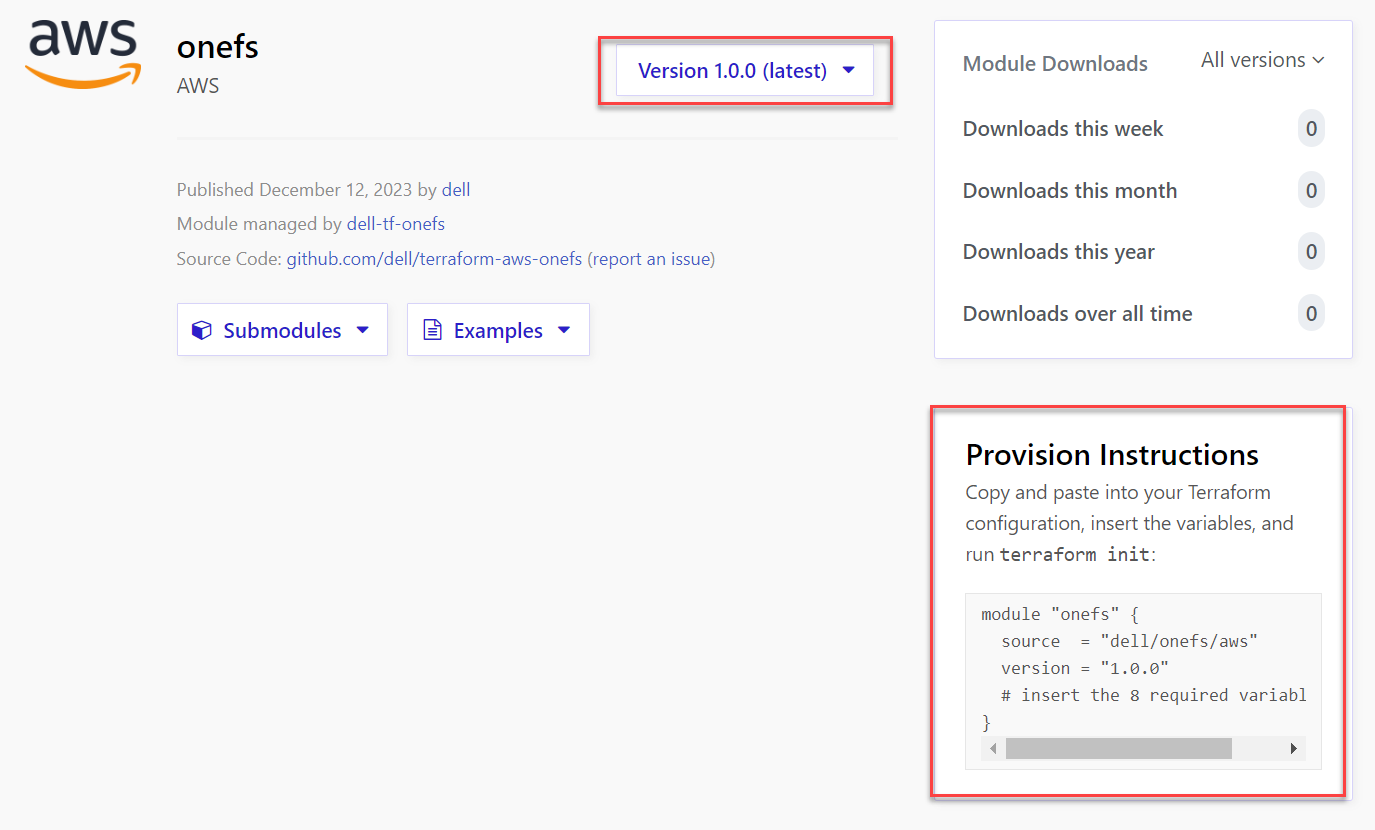
2. Prepare a main.tf file that uses the onefs module version collected in Step 1. The onefs module requires a set of input variables. The following is an example file named main.tf for creating a 4-nodes OneFS cluster.
module "onefs" {
source = "dell/onefs/aws"
version = "1.0.0"
region = "us-east-1"
availability_zone = "us-east-1a"
iam_instance_profile = "onefs-runtime-instance-profile"
name = "vonefs-cfv"
id = "vonefs-cfv"
nodes = 4
instance_type = "m5dn.12xlarge"
data_disk_type = "gp3"
data_disk_size = 1024
data_disks_per_node = 6
internal_subnet_id = "subnet-0c0106598b95ee7b6"
external_subnet_id = "subnet-0837801239d54e245"
contiguous_ips= true
first_external_node_hostnum = 5
internal_sg_id = "sg-0ee87249a52397219"
security_group_external_id = "sg-0635f298c9cb764da"
image_id = "ami-0f1a267119a34361c"
credentials_hashed = true
hashed_root_passphrase = "$5$9874f5d2c724b8ca$IFZZ5e9yfUVqNKVL82s.iFLIktr4WLavFhUVa8A"
hashed_admin_passphrase = "$5$9874f5d2c724b8ca$IFZZ5e9yfUVqNKVL82s.iFLIktr4WLavFhUVa8A"
dns_servers = ["169.254.169.253"]
timezone = "Greenwich Mean Time"
}
output "onefs-outputs" {
value = module.onefs
sensitive = true
}
3. Change your current working directory to the main.tf directory.
4. Initialize the module’s root directory by installing the required providers and modules for the deployment. In the following example, the onefs module is downloaded automatically from the Terraform Registry.
# terraform init
Initializing the backend...
Initializing modules...
Downloading registry.terraform.io/dell/onefs/aws 1.0.0 for onefs...
- onefs in .terraform\modules\onefs
- onefs.onefsbase in .terraform\modules\onefs\modules\base
- onefs.onefsbase.machineid in .terraform\modules\onefs\modules\machineid
Initializing provider plugins...
- Finding latest version of hashicorp/aws...
- Installing hashicorp/aws v5.30.0...
- Installed hashicorp/aws v5.30.0 (signed by HashiCorp)
5. Verify the configuration files in the onefs directory.
# terraform validate
6. Apply the configurations by running the following command.
# terraform apply
7. Enter “yes” after you have previewed and confirmed the changes.
Do you want to perform these actions?
Terraform will perform the actions described above.
Only 'yes' will be accepted to approve.
Enter a value: yes
8. Wait for the AWS resources to be provisioned. The output displays all the cluster information. If the deployment fails, re-run the terraform apply command to deploy.
Apply complete! Resources: 13 added, 0 changed, 0 destroyed.
Outputs:
onefs-outputs = <sensitive>
9. Get the cluster details information by running the following command.
# terraform output --json
The following example output is truncated.
additional_nodes = 3
cluster_id = "vonefs-cfv"
control_ip_address = "10.0.32.5"
external_ip_addresses = [
"10.0.32.5",
"10.0.32.6",
"10.0.32.7",
"10.0.32.8",
]
gateway_hostnum = 1
instance_id = [
"i-0eead1ee1dd67da6e",
"i-054efe96f6e605009",
"i-06e0b1ce06bad42a1",
"i-0e463c742974641d7",
]
internal_ip_addresses = [
"10.0.16.5",
"10.0.16.6",
"10.0.16.7",
"10.0.16.8",
]
internal_network_high_ip = "10.0.16.8"
internal_network_low_ip = "10.0.16.5"
mgmt_ip_addresses = []
node_configs = {
"0" = {
"external_interface_id" = "eni-09ddea1fd79f0d0ab"
"external_ips" = [
"10.0.32.5",
]
"internal_interface_id" = "eni-0caeee71581a8c429"
"internal_ips" = [
"10.0.16.5",
]
"mgmt_interface_id" = null
"mgmt_ips" = null /* tuple */
"serial_number" = "SV200-930073-0000"
}
"1" = {
"external_interface_id" = "eni-00869c96a27c20c93"
"external_ips" = [
"10.0.32.6",
]
"internal_interface_id" = "eni-0471bbba5a7f6596d"
"internal_ips" = [
"10.0.16.6",
]
"mgmt_interface_id" = null
"mgmt_ips" = null /* tuple */
"serial_number" = "SV200-930073-0001"
}
"2" = {
"external_interface_id" = "eni-0dac5052668bd3a4f"
"external_ips" = [
"10.0.32.7",
]
"internal_interface_id" = "eni-09d35ffa61b3dcd60"
"internal_ips" = [
"10.0.16.7",
]
"mgmt_interface_id" = null
"mgmt_ips" = null /* tuple */
"serial_number" = "SV200-930073-0002"
}
"3" = {
"external_interface_id" = "eni-028d211ef2d5b577c"
"external_ips" = [
"10.0.32.8",
]
"internal_interface_id" = "eni-02a99febea713f2d1"
"internal_ips" = [
"10.0.16.8",
]
"mgmt_interface_id" = null
"mgmt_ips" = null /* tuple */
"serial_number" = "SV200-930073-0003"
}
}
region = "us-east-1"
10. Write down the following output variables for setting up a cluster described in documentation.
- control_ip_address: The external IP address of the cluster’s first node
- external_ip_addresses: The external IP addresses of all provisioned cluster nodes
- internal_ip_addresses: The internal IP addresses of all provisioned cluster nodes
- internal_network_high_ip: The highest internal IP address assigned
- internal_network_low_ip: The lowest internal IP address assigned
- instance_id: The EC2 instance IDs of the cluster nodes
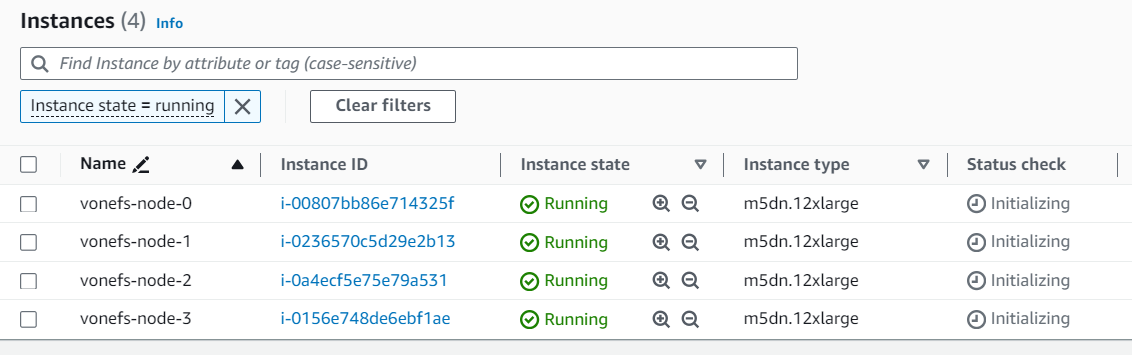
11. All AWS resources are now provisioned. After the cluster’s first node starts, it will form a single node cluster. You can use the cluster’s first node to add additional nodes to the cluster described in documentation. Below are the provisioned AWS EC2 instances with Terraform onefs module.
Available input variables
The Terraform onefs module provides a set of input variables for you to specify your own settings, including AWS resources and OneFS cluster, for example: AWS network resources, cluster name and password. See the table below for details used in the main.tf file.
Variable Name | Type | Description |
region | string | (Required) The AWS region of OneFS cluster nodes. |
availability_zone | string | (Required) The AWS availability zone of OneFS cluster nodes. |
iam_instance_profile | string | (Required) The AWS instance profile name of OneFS cluster nodes. For more details, see the AWS documentation Instance profiles. |
name | string | (Required) The OneFS cluster name. Cluster names must begin with a letter and can contain only numbers, letters, and hyphens. If the cluster is joined to an Active Directory domain, the cluster name must be 11 characters or fewer. |
id | string | (Required) The ID of the OneFS cluster. The onefs module uses the ID to add tags to the AWS resources. It is recommended to set the ID to your cluster name. |
nodes | number | (Required) The number of OneFS cluster nodes: it should be 4, 5, or 6. |
instance_type | string | (Required) The EC2 instance type of OneFS cluster nodes. All nodes in a cluster must have the same instance size. The supported instance sizes are:
Note: You must run PoC if you intend to use m5d.24xlarge or i3en.12xlarge EC2 instance types. For details, contact your Dell account team. |
data_disk_type | string | (Required) The EBS volume type for the cluster, gp3 or st1. |
data_disk_size | number | (Required) The single EBS volume size in GiB. Consider the Supported cluster configuration, it should be 1024 to 16384 for gp3, 4096 or 10240 for st1. |
data_disks_per_node | number | (Required) The number of EBS volumes per node. Consider the Supported cluster configuration, it should be 5, 6, 10, 12, 15, 18, or 20 for gp3, 5 or 6 for st1. |
internal_subnet_id | string | (Required) The AWS subnet ID for the cluster internal network interfaces. |
external_subnet_id | string | (Required) The AWS subnet ID for the cluster external network interfaces. |
contiguous_ips | bool | (Required) A boolean flag to indicate whether to allocate contiguous IPv4 addresses to the cluster nodes’ external network interfaces. It is recommended to set to true. |
first_external_node_hostnum | number | (Required if contiguous_ips=true) The host number of the first node’s external IP address in the given AWS subnet. Default is set to 5, The first four IP addresses in an AWS subnet are reserved by AWS, so the onefs module will allocate the fifth IP address to the cluster’s first node. If the IP is in use, the module will fail. Therefore, when setting contiguous_ips=true, ensure that you set a correct host number that has sufficient contiguous IPs for your cluster. Refer to Terraform cidrhost Function for more details about host number. |
internal_sg_id | string | (Required) The AWS security group ID for the cluster internal network interfaces. |
security_group_external_id | string | (Required) The AWS security group ID for the cluster external network interfaces. |
image_id | string | (Required) The OneFS AMI ID described in Find the OneFS AMI ID. |
credentials_hashed | bool | (Required) A boolean flag to indicate whether the credentials are hashed or in plain text. |
hashed_root_passphrase | string | (Required if credentials_hashed=true) The hashed root password for the OneFS cluster |
hashed_admin_passphrase | string | (Required if credentials_hashed=true) The hashed admin password for the OneFS cluster |
root_password | string | (Required if credentials_hashed=false) The root password for the OneFS cluster |
admin_password | string | (Required if credentials_hashed=false) The admin password for the OneFS cluster |
dns_servers | list(string) | (Optional) The cluster DNS server, default is set to ["169.254.169.253"], which is the AWS Route 53 Resolver. For details, see Amazon DNS server. |
dns_domains | list(string) | (Optional) The cluster DNS domain default is set to ["<region>.compute.internal"] |
timezone | string | (Optional) The cluster time zone, default is set to "Greenwich Mean Time". Several available options are: Greenwich Mean Time, Eastern Time Zone, Central Time Zone, Mountain Time Zone, Pacific Time Zone. You can change the time zone after the cluster is deployed by following the steps in the section OneFS documentation – Set the cluster date and time. |
resource_tags | map(string) | (Optional) The tags that will be attached to provisioned AWS resources. For example, resource_tags={“project”: “onefs-poc”, “tester”: “bob”}. |
Learn More
In this article, we have shown how to use Terraform onefs module. You can refer to the documentation below for more details about APEX File Storage for AWS:
- APEX File Storage for AWS
- Terraform onefs Module
- Technical white paper for AI use case: APEX File Storage for AWS with Amazon SageMaker
- Technical White Paper for M&E use case: APEX File Storage for AWS for Video Edit in AWS
- APEX File Storage for AWS Manual Deployment Guide
- APEX File Storage for AWS Deployment Guide with Terraform
- APEX File Storage for AWS Interactive Demo
Author: Lieven Lin
Related Blog Posts

OneFS Access Control Lists Overview
Thu, 18 Jan 2024 22:29:13 -0000
|Read Time: 0 minutes
As we know, when users access OneFS cluster data via different protocols, the final permission enforcement happens on the OneFS file system. In OneFS, this is achieved by the Access Control Lists (ACLs) implementation, which provides granular permission control on directories and files. In this article, we will look at the basics of OneFS ACLs.
OneFS ACL
OneFS provides a single namespace for multiprotocol access and has its own internal ACL representation to perform access control. The internal ACL is presented as protocol-specific views of permissions so that NFS exports display POSIX mode bits for NFSv3 and ACL for NFSv4 and SMB.
When connecting to an PowerScale cluster with SSH, you can manage not only POSIX mode bits but also ACLs with standard UNIX tools such as chmod commands. In addition, you can edit ACL policies through the web administration interface to configure OneFS permissions management for networks that mix Windows and UNIX systems.
The OneFS ACL design is derived from Windows NTFS ACL. As such, many of its concept definitions and operations are similar to the Windows NTFS ACL, such as ACE permissions and inheritance.
OneFS synthetic ACL and real ACL
To deliver cross-protocol file access seamlessly, OneFS stores an internal representation of a file-system object’s permissions. The internal representation can contain information from the POSIX mode bits or the ACL.
OneFS has two types of ACLs to fulfill different scenarios:
- OneFS synthetic ACL: Under the default ACL policy, if no inheritable ACL entries exist on a parent directory – such as when a file or directory is created through a NFS or SSH session on OneFS within the parent directory – the directory will only contain POSIX mode bits permission. OneFS uses the internal representation to generate a OneFS synthetic ACL, which is an in-memory structure that approximates the POSIX mode bits of a file or directory for an SMB or NFSv4 client.
- OneFS real ACL: Under the default ACL policy, when a file or directory is created through SMB or when the synthetic ACL of a file or directory is modified through an NFSv4 or SMB client, the OneFS real ACL is initialized and stored on disk. The OneFS real ACL can also be initialized using the OneFS enhanced chmod command tool with the +a, -a, or =a option to modify the ACL.
OneFS access control entries
In contrast to the Windows DACL and NFSv4 ACL, the OneFS ACL access control entry (ACE) adds an additional identity type. OneFS ACEs contain the following information:
- Identity name: The name of a user or group
- ACE type: The type of the ACE (allow or deny)
- ACE permissions and inheritance flags: A list of permissions and inheritance flags separated with commas
OneFS ACE permissions
Similar to the Windows permission level, OneFS divides permissions into the following three types:
- Standard ACE permissions: These apply to any object in the file system
- Generic ACE permissions: These map to a bundle of specific permissions
- Constant ACE permissions: These are specific permissions for file-system objects
The standard ACE permissions that can appear for a file-system object are shown in the following table:
ACE permission | Applies to | Description |
std_delete | Directory or file | The right to delete the object |
std_read_dac | Directory or file | The right to read the security descriptor, not including the SACL |
std_write_dac | Directory or file | The right to modify the DACL in the object's security descriptor |
std_write_owner | Directory or file | The right to change the owner in the object's security descriptor |
std_synchronize | Directory or file | The right to use the object as a thread synchronization primitive |
std_required | Directory or file | Maps to std_delete, std_read_dac, std_write_dac, and std_write_owner |
The generic ACE permissions that can appear for a file system object are shown in the following table:
ACE permission | Applies to | Description |
generic_all | Directory or file | Read, write, and execute access. Maps to file_gen_all or dir_gen_all. |
generic_read | Directory or file | Read access. Maps to file_gen_read or dir_gen_read. |
generic_write | Directory or file | Write access. Maps to file_gen_write or dir_gen_write. |
generic_exec | Directory or file | Execute access. Maps to file_gen_execute or dir_gen_execute. |
dir_gen_all | Directory | Maps to dir_gen_read, dir_gen_write, dir_gen_execute, delete_child, and std_write_owner. |
dir_gen_read | Directory | Maps to list, dir_read_attr, dir_read_ext_attr, std_read_dac, and std_synchronize. |
dir_gen_write | Directory | Maps to add_file, add_subdir, dir_write_attr, dir_write_ext_attr, std_read_dac, and std_synchronize. |
dir_gen_execute | Directory | Maps to traverse, std_read_dac, and std_synchronize. |
file_gen_all | File | Maps to file_gen_read, file_gen_write, file_gen_execute, delete_child, and std_write_owner. |
file_gen_read | File | Maps to file_read, file_read_attr, file_read_ext_attr, std_read_dac, and std_synchronize. |
file_gen_write | File | Maps to file_write, file_write_attr, file_write_ext_attr, append, std_read_dac, and std_synchronize. |
file_gen_execute | File | Maps to execute, std_read_dac, and std_synchronize. |
The constant ACE permissions that can appear for a file-system object are shown in the following table:
ACE permission | Applies to | Description |
modify | File | Maps to file_write, append, file_write_ext_attr, file_write_attr, delete_child, std_delete, std_write_dac, and std_write_owner |
file_read | File | The right to read file data |
file_write | File | The right to write file data |
append | File | The right to append to a file |
execute | File | The right to execute a file |
file_read_attr | File | The right to read file attributes |
file_write_attr | File | The right to write file attributes |
file_read_ext_attr | File | The right to read extended file attributes |
file_write_ext_attr | File | The right to write extended file attributes |
delete_child | Directory or file | The right to delete children, including read-only files within a directory; this is currently not used for a file, but can still be set for Windows compatibility |
list | Directory | List entries |
add_file | Directory | The right to create a file in the directory |
add_subdir | Directory | The right to create a subdirectory |
traverse | Directory | The right to traverse the directory |
dir_read_attr | Directory | The right to read directory attributes |
dir_write_attr | Directory | The right to write directory attributes |
dir_read_ext_attr | Directory | The right to read extended directory attributes |
dir_write_ext_attr | Directory | The right to write extended directory attributes |
OneFS ACL inheritance
Inheritance allows permissions to be layered or overridden as needed in an object hierarchy and allows for simplified permissions management. The semantics of OneFS ACL inheritance are the same as Windows ACL inheritance and will feel familiar to someone versed in Windows NTFS ACL inheritance. The following table shows the ACE inheritance flags defined in OneFS:
ACE inheritance flag | Set on directory or file | Description |
object_inherit | Directory only | Indicates an ACE applies to the current directory and files within the directory |
container_inherit | Directory only | Indicates an ACE applies to the current directory and subdirectories within the directory |
inherit_only | Directory only | Indicates an ACE applies to subdirectories only, files only, or both within the directory. |
no_prop_inherit | Directory only | Indicates an ACE applies to the current directory or only the first-level contents of the directory, not the second-level or subsequent contents |
inherited_ace | File or directory | Indicates an ACE is inherited from the parent directory |
Author: Lieven Lin

Unveiling APEX File Storage for AWS Enhancements
Wed, 13 Dec 2023 15:36:10 -0000
|Read Time: 0 minutes
We are thrilled to announce the latest version of APEX File Storage for AWS! This release brings a multitude of enhancements to elevate your AWS file storage experience, including expanded AWS regions with the support for additional EC2 instance types, a Terraform module for streamlined deployment, larger raw capacity, and additional OneFS features support.
APEX File Storage delivers Dell’s leading enterprise-class high-performance scale-out file storage as a software-defined customer-managed offer in the public cloud. Based on PowerScale OneFS, APEX File Storage for AWS brings enterprise file capabilities and performance and delivers operational consistency across multicloud environments, simplifying hybrid cloud environments by facilitating seamless data mobility between on-premises and the cloud with native replication and making it the perfect option to run AI workloads. APEX File Storage can enhance customers’ development and innovation initiatives by combining proven data services such as multi-protocol access, security features, and a proven scale-out architecture with the flexibility of public cloud infrastructure and services. APEX File Storage enables organizations to run the software they trust directly in the public cloud without retraining their staff or refactoring their storage architecture.
What's New?
1. Additional EC2 instance types support
We've expanded compatibility by adding support for a wider range of EC2 instance types. This means you have more flexibility in choosing the instance type that best suits your performance and resource requirements. We now support the following EC2 instance types:
- EC2 m5dn instances: m5dn.8xlarge, m5dn.12xlarge, m5dn.16xlarge, m5dn.24xlarge
- EC2 m6idn instances: m6idn.8xlarge, m6idn.12xlarge, m6idn.16xlarge, m6idn.24xlarge
- EC2 m5d instances: m5d.24xlarge
- EC2 i3en instances: i3en.12xlarge
Please note that it is required to run PoC if you intend to use m5d.24xlarge or i3en.12xlarge EC2 instance types. Please contact your Dell account team for the details.
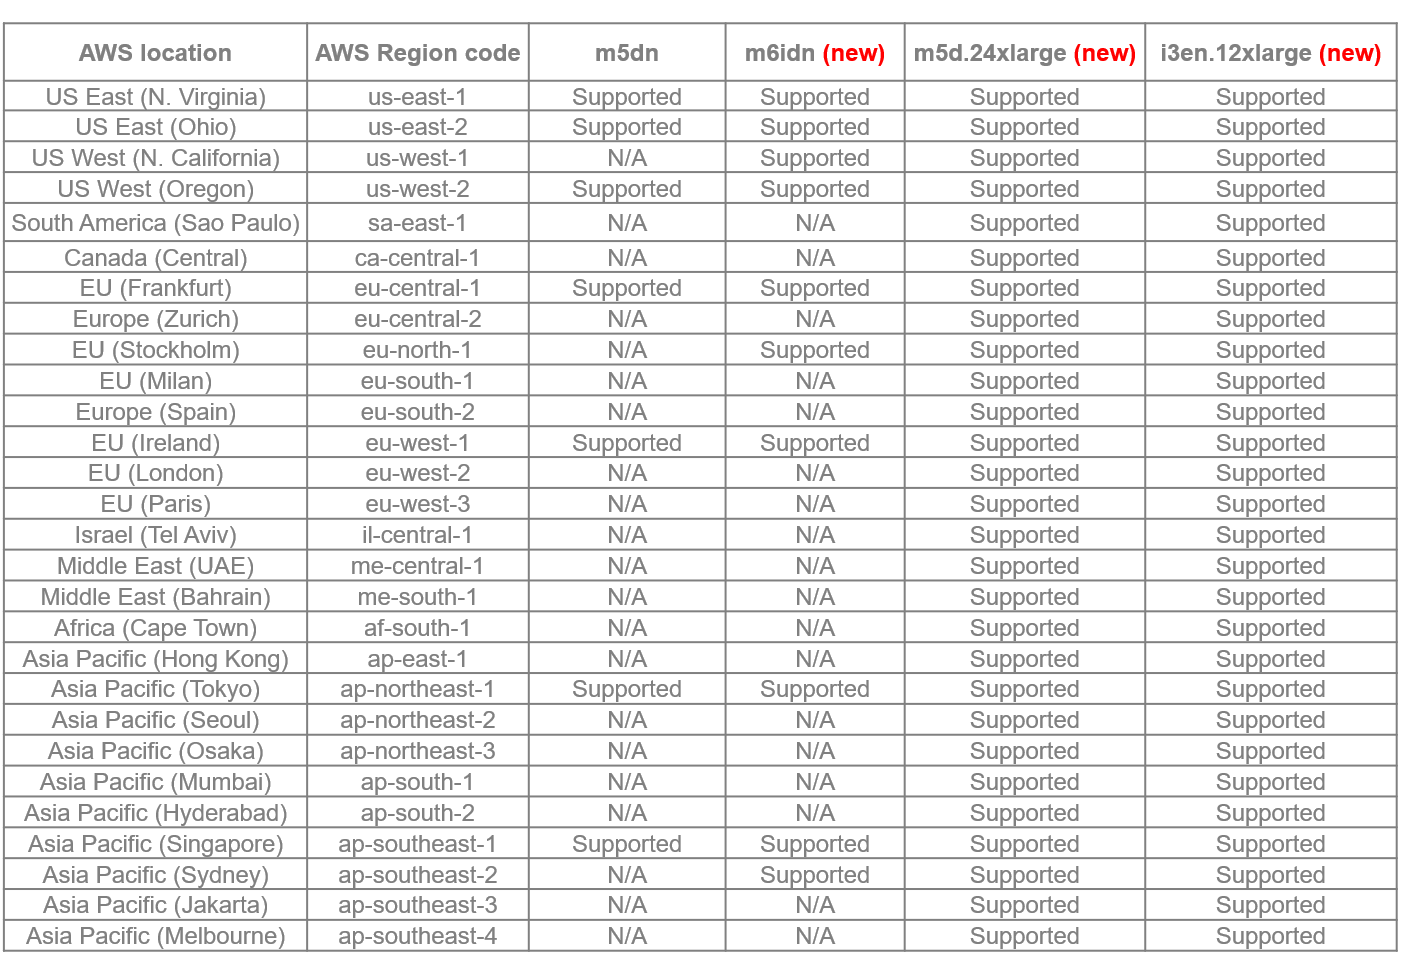
2. Extended AWS regions support
APEX File Storage is now available in more AWS regions than ever before. A total of 28 regions are available for you. We understand that our users operate globally, and this expansion ensures that you can leverage APEX File Storage wherever your AWS resources are located. The following table lists all available regions for different EC2 instance types:
3. Terraform module: auto-deployment made effortless
Simplify your deployment process with our new Terraform module, which automates the AWS resource deployment process to ensure a smooth and error-free experience.
Once you fulfill the deployment prerequisites, you can deploy a cluster with a single Terraform command. For more details, refer to documentation: APEX File Storage for AWS Deployment Guide with Terraform. Stay tuned for a blog with additional details coming soon.
4. Larger raw capacity: more room for your data
Your data is growing, and so should your storage capacity. APEX File Storage for AWS can now support up to 1.6PiB raw capacity, enabling workloads that produce a vast amount of data such as AI and ensuring that you have ample space to store, manage, and scale your data effortlessly.
5. Additional OneFS features support
The OneFS features not supported in the first release of APEX File Storage for AWS are now supported, including:
- Enhanced Protocols: With HDFS protocol support, you can seamlessly integrate HDFS into your workflows, enhancing your data processing capabilities in AWS. Enjoy expanded connectivity with support for HTTP and FTP protocols, providing more flexibility in accessing and managing your files.
- Quality of Service – SmartQoS: Ensure a consistent and reliable user experience with SmartQoS, which enables you to prioritize workloads and applications based on performance requirements.
- Immutable Data Protection - SmartLock: Enhance data protection by leveraging SmartLock to create Write Once Read Many (WORM) files, providing an added layer of security against accidental or intentional data alteration.
- Large File Support: Address the needs of large-scale data processing with improved support for large files, facilitating efficient storage and retrieval. A single file size can be up to 16TiB now.
Learn More
For deployment instructions and detailed information on these exciting new features, refer to our documentation:
- APEX File Storage for AWS
- terraform-aws-onefs Terraform Module
- Technical white paper for AI use case: APEX File Storage for AWS with Amazon SageMaker
- Technical White Paper for M&E use case: APEX File Storage for AWS for Video Edit in AWS
- APEX File Storage for AWS Manual Deployment Guide
- APEX File Storage for AWS Deployment Guide with Terraform
- APEX File Storage for AWS Interactive Demo
Author: Lieven Lin