


Running COSBench Performance Test on PowerScale
Tue, 09 Jan 2024 14:21:02 -0000
|Read Time: 0 minutes
Starting with OneFS version 9.0, PowerScale enables data access through the Amazon Simple Storage Service (Amazon S3) application programing interface (API) natively. PowerScale implements the S3 API as a first-class protocol along with other NAS protocols on top of its distributed OneFS file system.
COSBench is a popular benchmarking tool to measure the performance of Cloud Object Storage services and supports the S3 protocol. In the following blog, we will walk through how to set up COSBench to test the S3 performance of an PowerScale cluster.
Step 1:Choose v0.4.2.c4 version
I suggest choosing the v0.4.2 release candidate 4 instead of the latest v0.4.2 release, especially if you receive an error message like the following and your COSBench service cannot be started:
# cat driver-boot.log
Listening on port 0.0.0.0/0.0.0.0:18089 ...
!SESSION 2020-06-03 10:12:59.683 -----------------------------------------------
eclipse.buildId=unknown
java.version=1.7.0_261
java.vendor=Oracle Corporation
BootLoader constants: OS=linux, ARCH=x86_64, WS=gtk, NL=en_US
Command-line arguments:  -console 18089
!ENTRY org.eclipse.osgi 4 0 2020-06-03 10:13:00.367
!MESSAGE Bundle plugins/cosbench-castor not found.
!ENTRY org.eclipse.osgi 4 0 2020-06-03 10:13:00.368
!MESSAGE Bundle plugins/cosbench-log4j not found.
!ENTRY org.eclipse.osgi 4 0 2020-06-03 10:13:00.368
!MESSAGE Bundle plugins/cosbench-log@6:start not found.
!ENTRY org.eclipse.osgi 4 0 2020-06-03 10:13:00.369
!MESSAGE Bundle plugins/cosbench-config@6:start not found.
Step 2: Install Java
Both Java 1.7 and 1.8 work well with COSBench.
Step 3: Config ncat
Ncat is necessary for COSBench to work. Without it, you will receive the following error message:
[root]hopisdtmelabs14# bash ./start-driver.sh
Launching osgi framwork ...
Successfully launched osgi framework!
Booting cosbench driver ...
which: no nc in (/usr/local/bin:/usr/local/sbin:/usr/local/bin:/usr/sbin:/usr/bin:/root/bin:/usr/local/tme/bin:/usr/local/tme/tme_portal/perf_web/bin)
No appropriate tool found to detect cosbench driver status.
Use the following commands to install Ncat (example here is CentOS 7) and config it for COSBench:
yum -y install wget
wget [https://nmap.org/dist/ncat-7.80-1.x86_64.rpm](https://nmap.org/dist/ncat-7.80-1.x86_64.rpm)
yum localinstall ncat-7.80-1.x86_64.rpm
cd /usr/bin
ln -s ncat nc
Step 4: Unzip the COSBench files
After you download the 0.4.2.c4.zip, you can unzip it to a directory:
unzip 0.4.2.c4.zip
Grant all the bash script permission to be executed:
chmod +x /tmp/cosbench/0.4.2.c4/*.sh
Step 5: Start drivers and controller
On drivers and controller, find the cosbench-start.sh. Locate the java launching line, then add the following two options:
-Dcom.amazonaws.services.s3.disableGetObjectMD5Validation=true
-Dcom.amazonaws.services.s3.disablePutObjectMD5Validation=true
The COSBench tool has two roles: controller and driver. You can use the following command to start the driver:
bash ./cosbench/start-driver.sh
Before we start the controller, we need to change the configuration to let the controller knows how many drivers it has and their addresses. This is done by filling in information in the controller's main configuration file. The configuration file is under ./conf, and the name of the file is controller.conf. Following is an example of the controller.conf:
[controller]
drivers = 4
log_level = INFO
log_file = log/system.log
archive_dir = archive

[driver1]
name = driver1
url = [http://10.245.109.115:18088/driver](http://10.245.109.115:18088/driver)

[driver2]
name = driver2
url = [http://10.245.109.116:18088/driver](http://10.245.109.116:18088/driver)

[driver3]
name = driver3
url = [http://10.245.109.117:18088/driver](http://10.245.109.117:18088/driver)

[driver4]
name = driver4
url = [http://10.245.109.118:18088/driver](http://10.245.109.118:18088/driver)
Run the start-controller.sh to start the controller role:
bash ./start-controller.sh
Step 6: Prepare PowerScale
First, you need to prepare your PowerScale cluster for the S3 test. Make sure to record the secret key of the newly created user, s3. Run the following commands to prepare PowerScale for the S3 performance test:
isi services s3 enable
isi s3 settings global modify --https-only=false
isi auth users create s3 --enabled=true
isi s3 keys create s3
mkdir -p -m 777 /ifs/s3/bkt1
chmod 777 /ifs/s3
isi s3 buckets create --owner=s3 --name=bkt1  --path=/ifs/s3/bkt1
Compose the workload XML file, and use it to specify the details of the test you want to run. Here is an example:
<?xml version="1.0" encoding="UTF-8"?>
<workload name="S3-F600-Test1" description="Isilon F600 with original configuration">
        <storage type="s3" config="accesskey=1_s3_accid;secretkey=wEUqWNWkQGmgMos70NInqW26WpGf;endpoint=http://f600-2:9020/bkt1;path_style_access=true"/>
        <workflow>
               <workstage name="init-for-write-1k">
                       <work type="init" workers="1" config="cprefix=write-bucket-1k; containers=r(1,6)"/>
               </workstage>
               <workstage name="init-for-read-1k">
                       <work type="init" workers="1" config="cprefix=read-bucket-1k; containers=r(1,6)"/>
               </workstage>
               <workstage name="prepare-1k">
                       <work type="prepare" workers="1" config="cprefix=read-bucket-1k;containers=r(1,6);oprefix=1kb_;objects=r(1,1000);sizes=c(1)KB"/>
               </workstage>
               <workstage name="write-1kb">
                       <work name="main" type="normal" interval="5" division="container" chunked="false" rampup="0" rampdown="0" workers="6" totalOps="6000">
                               <operation type="write" config="cprefix=write-bucket-1k; containers=r(1,6); oprefix=1kb_; objects=r(1,1000); sizes=c(1)KB"/>
                       </work>
               </workstage>
               <workstage name="read-1kb">
                       <work name="main" type="normal" interval="5" division="container" chunked="false" rampup="0" rampdown="0" workers="6" totalOps="6000">
                               <operation type="read" config="cprefix=read-bucket-1k; containers=r(1,6); oprefix=1kb_; objects=r(1,1000)"/>
                       </work>
               </workstage>
        </workflow>
</workload>
Step 7: Run the test
You can directly submit the XML in the COSBench WebUI, or you can use the following command line in the controller console to start the test:
bash ./cli.sh submit ./conf/my-s3-test.xml
You will see the test successfully finished, as shown in the following figure.
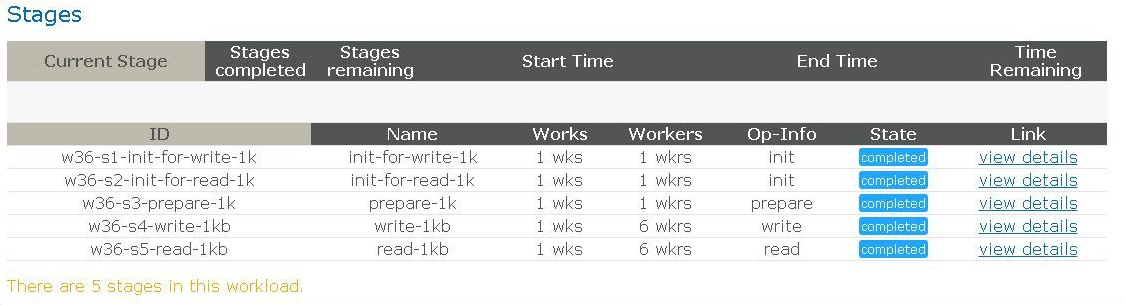
Figure 1. Completion screen after testing
Have fun testing!
Author: Yunlong Zhang
Related Blog Posts

Will More Disks Lead to Better Performance in APEX File Storage in AWS?
Mon, 08 Jan 2024 18:02:59 -0000
|Read Time: 0 minutes
Dell Technologies has developed a range of PowerScale platforms, including all flash models, hybrid models, and archive models, all of which exhibit exceptional design. The synergy between the disk system and the compute system is highly effective, showcasing a well-matched integration.
In the cloud environment, customers have the flexibility to control the number of CPU cores and memory sizes by selecting different instance types. APEX File Storage for AWS uses EBS volumes as its node disks. Customers can also select a different number of EBS volumes in each node, and for gp3 volumes, customers are able to customize the performance of each volume by specifying the throughput or IOPS capability.
With this level of flexibility, how shall we configure the disk system to make the most out of the entire OneFS system? Typically, in an on-prem appliance, the more disks a PowerScale node contains, the better performance the disk system can provide thanks to a greater number of devices contributing to the delivery of throughput or IOPS.
In a OneFS cloud environment, does it hold true that more EBS volumes indicates better performance? In short, it depends. When the aggregated EBS volume performance is smaller than the instance EBS bandwidth limit, test results show that more EBS volumes can improve performance. When aggregated EBS volume performance is larger than EBS bandwidth limit, adding more EBS volumes will not improve performance.
What is the best practice of setting the number of EBS volumes of each node?
1. Make the aggregated EBS volume bandwidth limit match the instance type EBS bandwidth limit.
For example, we want to use m5dn.16xlarge as the instance type of our OneFS cloud system. According to AWS, the EBS Bandwidth of m5dn.16xlarge is 13,600 Mbps, which is 1700 MB/sec. If we choose to use 10 EBS volumes in each node, then we should config each gp3 EBS volume to be capable of delivering 170 MB/sec throughput. This will make the aggregated EBS volume throughput equal to the m5dn.16xlarge EBS bandwidth limit.
Note that each gp3 EBS volume has 125MB/sec free throughput and 3,000 IOPS for free. As a cost-saving measure, we can config each node to have 12 EBS volumes to better leverage free EBS volume throughput.
For example, considering an m5dn.16xlarge instance type with 12 TB raw capacity per node, the disk cost of 10 volumes and 12 volumes are as follows:
- For 10 drives, each EBS volume should support 170 MB/sec throughput, and each node EBS storage cost is 1001.2 USD a month.
- For 12 drives, each EBS volume should support 142 MB/sec throughput, and each node EBS storage cost is 991.20 USD a month.
Using 12 EBS volumes can save $10 per node per month.
2. Do not set up more than 12 EBS volumes in each node.
Although APEX File Storage for AWS also supports 15, 18, and 20 gp3 volumes in each node, we do not recommend configuring more than 12 EBS volumes in each node for OneFS 9.7. This is best practice for keeping software journal space for each disk from being too small and is beneficial for write performance.
Author: Yunlong Zhang

Understanding ‘Total inlined data savings’ When Using ’isi_cstats’
Thu, 12 May 2022 14:22:45 -0000
|Read Time: 0 minutes
Recently a customer contacted us to tell us that he thought that there was an error in the output of the OneFS CLI command ‘isi_cstats’. Starting with OneFS 9.3, the ‘isi_cstats’ command includes the accounted number of inlined files within /ifs. It also contains a statistic called “Total inlined data savings”.
This customer expected that the ‘Total inlined data savings’ number was simply ‘Total inlined files’ multiplied by 8KB. The reason he thought this number was wrong was that this number does not consider the protection level.
In OneFS, for the 2d:1n protection level, each file smaller than 128KB is stored as 3X mirrors. Take the screenshot below as an example.
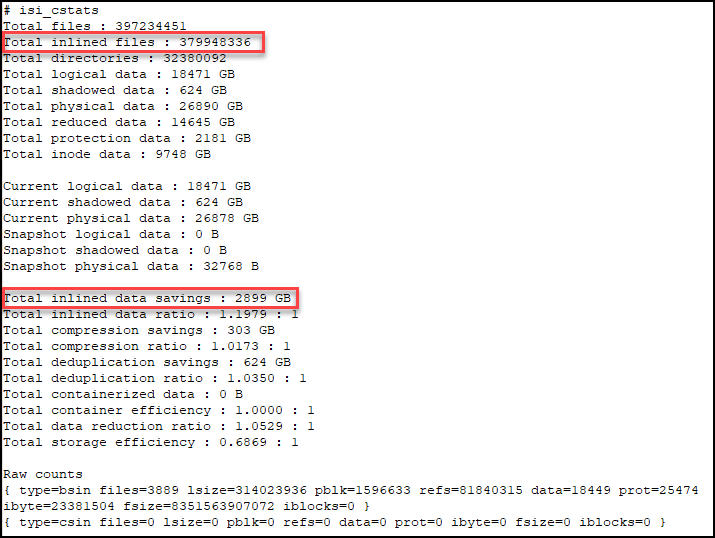
If we do some calculation here,
379,948,336 * 8KB = 3,039,586,688KiB = 2898.78GiB
we can see that the 2,899GiB from the command output is calculated as one block per inlined file. So, in our example, the customer would think that ‘Total inlined data savings’ should report 2898.78 GiB * 3, because of the 2d:1n protection level.
Well, this statistic is not the actual savings, it is really the logical on-disk cost for all inlined files. We can't accurately report the physical savings because it depends on the non-inlined protection overhead, which can vary. For example:
- If the protection level is 2d:1n, without the data inlining in 8KB inode feature, each of the inlined files would cost 8KB * 3.
- If the protection level is 3d:1n1d, it will become 8KB * 4.
One more thing to consider, if a file is smaller than 8KB after compression, it will be inlined into an inode as well. Therefore, this statistic doesn't represent logical savings either, because it doesn't take compression into account. To report the logical savings, total logical size for all inlined files should be tracked.
To avoid any confusion, we plan to rename this statistic to “Total inline data” in the next version of OneFS. We also plan to show more useful information about total logical data of inlined files, in addition to “Total inline data”.
For more information about the reporting of data reduction features, see the white paper PowerScale OneFS: Data Reduction and Storage Efficiency on the Info Hub.
Author: Yunlong Zhang, Principal Engineering Technologist