


OneFS NDMP Backup Overview
Fri, 15 Dec 2023 15:00:00 -0000
|Read Time: 0 minutes
NDMP (Network Data Management Protocol) specifies a common architecture and data format for backups and restores of NAS (Network Attached Storage), allowing heterogeneous network file servers to directly communicate to tape devices for backup and restore operations. NDMP addresses the problems caused by the integrations of different backup software or DMA (Data Management Applications), file servers, and tape devices.
The NDMP architecture is a client/server model with the following characteristics:
- The NDMP host is a file server that is being protected with an NDMP backup solution.
- The NDMP server is a virtual state machine on the NDMP host that is controlled using NDMP.
- The backup software is considered as a client to the NDMP server.
OneFS supports the following two types of NDMP backups:
- NDMP two-way backup
- NDMP three-way backup
In both backup models, OneFS takes a snapshot of the backup directory to ensure consistency of data. The backup operates on the snapshot instead of the source directory, which allows users to continue read/write activities as normal. OneFS makes entries in the file history that are transferred from the PowerScale cluster to the backup server during the backup.
NDMP two-way backup
The NDMP two-way backup is also known as the local or direct NDMP backup, which is considered the most efficient model and usually provides the best performance. The backup moves the backup data directly from the PowerScale cluster to the tape devices without moving to the backup server over the network.
In this model, OneFS must detect the tape devices before you back up data to them. The PowerScale cluster provides the option for NDMP two-way backups as shown in the following figure. You can connect the PowerScale cluster to a Backup Accelerator node and connect tape devices to that node. The Backup Accelerator node is synonymous with a Fibre Attached Storage node without adding primary storage and offloads NDMP workloads from the primary storage nodes. You can directly connect tape devices to the Fibre Channel ports on the PowerScale cluster or Backup Accelerator node using Fibre Channel. Alternatively, you can connect Fibre Channel switches to the Fibre Channel ports that connect tape devices to the PowerScale cluster or Backup Accelerator node.
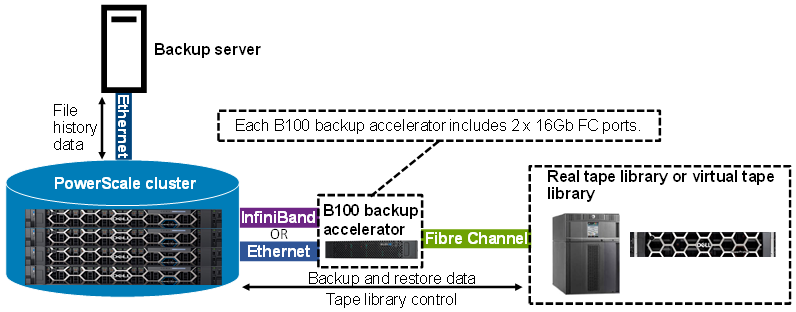 Figure 1. NDMP two-way backup with B100 backup accelerator connected to the PowerScale cluster
The following table shows details of the NDMP two-way backup supported by PowerScale:
NDMP two-way backup option | Generation 5 PowerScale nodes with an InfiniBand back end | Generation 6+ PowerScale nodes with an InfiniBand back end | Generation 6+ PowerScale nodes with an Ethernet back end |
B100 backup accelerator | Supported | Supported | Supported |
Note: The B100 backup accelerator requires OneFS 9.3.0.0 or later.
NDMP three-way backup
The NDMP three-way backup, also known as the remote NDMP backup, is shown in the following figure.
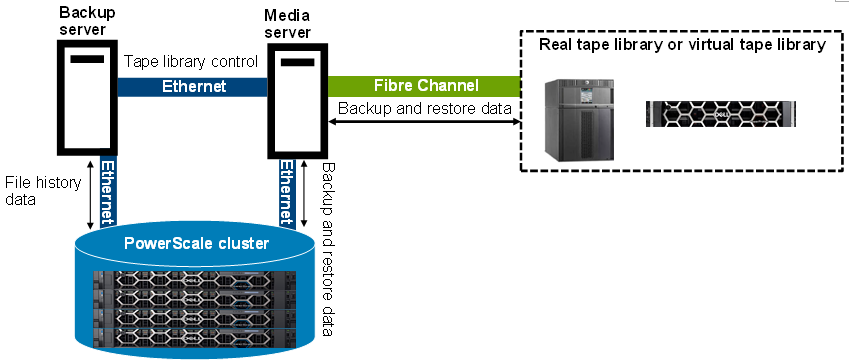 Figure 2. NDMP three-way backup
In this backup mode, the tape devices are connected to the backup media server. OneFS does not detect tape devices on the PowerScale cluster, and Fibre Channel ports are not required on the PowerScale cluster. The NDMP service runs on the NDMP server or the PowerScale cluster. The NDMP tape service runs on the backup media server. A DMA on the backup server instructs the PowerScale cluster to start backing up data from the PowerScale cluster to the backup media server over the network. The backup media server moves the backup data to tape devices. Both servers are connected to each other across the network boundary. Sometimes, the backup server and backup media server reside on the same physical machine.
For some specific DMA, DMA can write NDMP data to non-NDMP devices. For example, Dell NetWorker software writes NDMP data to non-NDMP devices, including tape, virtual tape, Advanced File Type Device (AFTD), and Dell PowerProtect DD series appliances. For more information on Data Protection with Dell NetWorker using NDMP, refer to this guide: Dell PowerScale: Data Protection with Dell NetWorker using NDMP.
Author: Jason He, Principal Engineering Technologist
Related Blog Posts

Backing Up and Restoring PowerScale Cluster Configurations in OneFS 9.7
Wed, 13 Dec 2023 14:00:00 -0000
|Read Time: 0 minutes
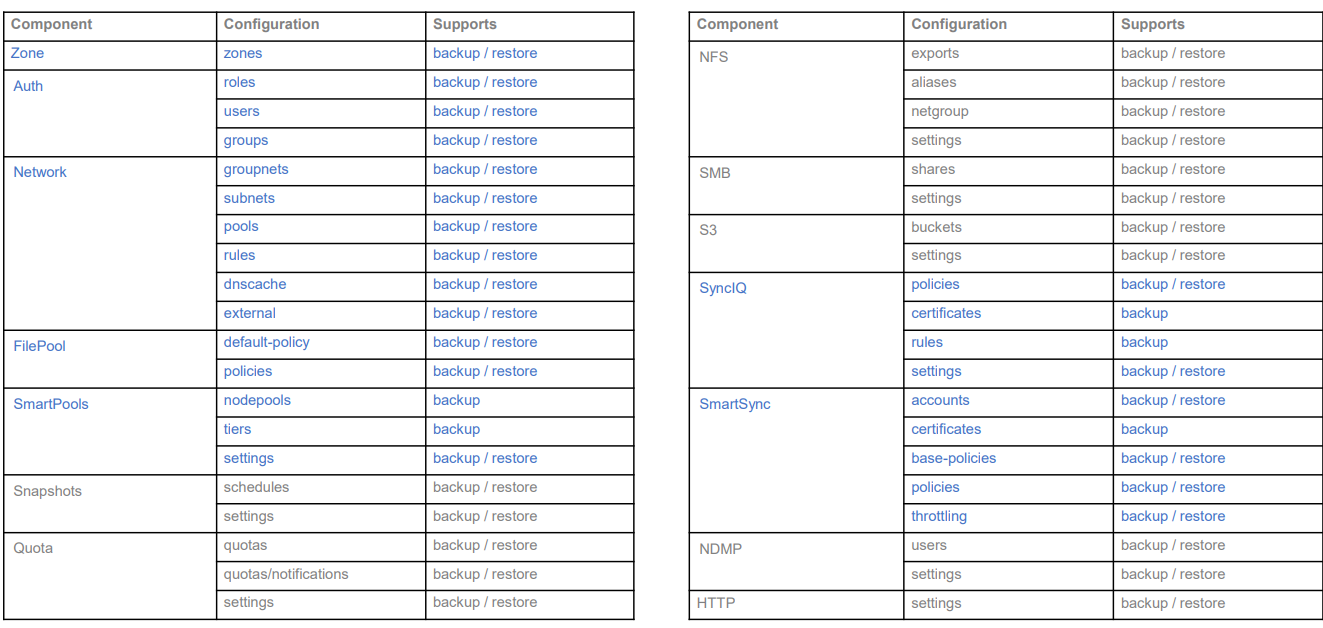
Backing up and restoring OneFS cluster configurations is not new, as it was introduced in OneFS 9.2. However, only a limited set of components can be backed up or restored. This is a popular feature and we have received a lot of feedback that we should add more supported components. Now, with the release of OneFS 9.7, this feature gets a big enhancement. The following is a complete list of the components we support in 9.7. (The new ones are marked in blue.)
Some other enhancements include:
- Lock configuration during backup
- Support custom rules for restoring subnet IP addresses
Next, I’ll walk you through an example and explain the details of these enhancements.
Let’s take a look at the backup first.
Like what we have in the previous version, backup and restore are only available through PAPI and CLI (there is no WebUI at this stage). But I can guarantee you that the overall process is very simple and straightforward. If you are familiar with how to do it in the previous version, it’s almost the same.
You can use the following CLI command to back up a cluster configuration:
isi cluster config exports create [--components …]
Here is an example where I want to export the network configuration:
# isi cluster config exports create –components=Network
The following components’ configuration are going to be exported:
[‘Network’]
Notice:
    The exported configuration will be saved in plain text. It is recommended to encrypt it according to your specific requirements.
Do you want to continue? (yes/[no]): yes
This may take a few seconds, please wait a moment
Created export task ‘vshen-0eis0wn-20231128032252’
You can see that once the backup is triggered, a task is automatically created, and you can use the following command to view the details of the task:
isi cluster config exports view <export-id>
Here is what I have in my environment:
# isi cluster config exports view –id vshen-0eis0wn-20231128032252
     ID: vshen-0eis0wn-20231128032252
 Status: Successful
   Done: [‘network’]
 Failed: []
Pending: []
Message:
   Path: /ifs/data/Isilon_Support/config_mgr/backup/vshen-0eis0wn-20231128032252
During backup, to make a consistent configuration, a temporary lock is enabled to prevent new PAPI calls like POST, PUT, and DELETE. (The GET method will not be impacted.) In most cases, the backup job is completed quickly and it releases the lock when it finishes running.
You can use the following command to view the backup lock:
# isi cluster config lock view
Configuration lock enabled: Yes
You can also use the CLI command to manually enable or disable the lock:
# isi cluster config lock modify –action=enable
WARNING: User won’t be able to make any configuration changes after enabling configuration lock.
Are you sure you want to enable configuration lock? (yes/[no]): yes
After the backup task completes, the backup files will be generated under: /ifs/data/Isilon_Support/config_mgr/backup. Although the backup files are in plain text format, the sensitive information doesn’t appear here.
cat ./network_vshen-0eis0wn-20231128032252.json
{
  "description": {
    "component": "network",
    "release": "9.7.0.0",
    "action": "backup",
    "job_id": "vshen-0eis0wn-20231128032252",
    "result": "successful",
    "errors": []
  },
  "network": {
    "dnscache": {
      "cache_entry_limit": 65536,
       "cluster_timeout": 5,
       "dns_timeout": 5,
       "eager_refresh": 0,
       "testping_delta": 30,
       "ttl_max_noerror": 3600,
       "ttl_max_nxdomain": 3600,
…
When doing an import, you can use a command similar to the following:
# isi cluster config imports create --export-id=vshen-0eis0wn-20231128032252
Source Cluster Information:
          Cluster name: vshen-0eis0wn
       Cluster version: 9.7.0.0
            Node count: 1
  Restoring components: ['network']
Notice:
    Please review above information and make sure the target cluster has the same hardware configuration as the source cluster, otherwise the restore may fail due to hardware incompatibility. Please DO NOT use or change the cluster while configurations are being restored. Concurrent modifications are not guaranteed to be retained and some data services may be affected.
Do you want to continue? (yes/[no]): yes
This may take a few seconds, please wait a moment
Created import task 'vshen-0eis0wn-20231128064821'
When you deal with network component restore, to avoid connectivity breaks you can restore the configuration without destroying any existing subnets or pools’ IP addresses.
To do this, use the parameter “--network-subnets-ip”:
# isi cluster config imports create --export-id=vshen-0eis0wn-20231128032252 --network-subnets-ip="groupnet0.subnet0:10.242.114.0/24"
Source Cluster Information:
          Cluster name: vshen-0eis0wn
       Cluster version: 9.7.0.0
            Node count: 1
  Restoring components: ['network']
Notice:
    Please review above information and make sure the target cluster has the same hardware configuration as the source cluster, otherwise the restore may fail due to hardware incompatibility. Please DO NOT use or change the cluster while configurations are being restored. Concurrent modifications are not guaranteed to be retained and some data services may be affected.
Do you want to continue? (yes/[no]): yes
This may take a few seconds, please wait a moment
Created import task 'vshen-0eis0wn-20231128070157'
That’s how it works! As I said, it’s very simple and straightforward. If you see any errors, you can check the log: /var/log/config_mgr.log.
Author: Vincent Shen

Velero Backup to PowerScale S3 Bucket
Fri, 23 Dec 2022 21:50:39 -0000
|Read Time: 0 minutes
Velero is one of the most popular tools for backup and restore of Kubernetes resources.
You can use Velero for different backup options to protect your Kubernetes cluster. The three modes are:
- Protect the Kubernetes resource objects such as Pod, Namespace, and so on, with CRDs included
- Protect the PersistentVolume data with the help of VolumeSnapshot
- Protect the content of the PVs with the help of restic
In all cases, Velero syncs the information (YAML and restic data) to a storage object.
PowerScale is Dell Technologies’ leading scale-out NAS solution. It supports many different access protocols including NFS, SMB, HTTP, FTP, HDFS, and, in the case that interests us, S3!
Note: PowerScale is not 100% compatible with the AWS S3 protocol (for details, see the PowerScale OneFS S3 API Guide).
For a simple backup solution of a few terabytes of Kubernetes data, PowerScale and Velero are a perfect duo.
Deployment
To deploy this solution, you need to configure PowerScale and then install and configure Velero.
PowerScale S3 configuration
Prepare PowerScale to be a target for the backup as follows:
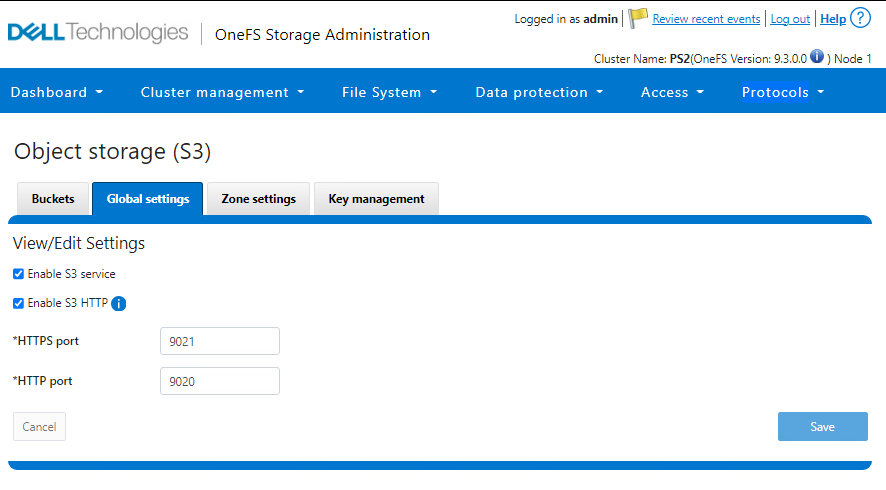
- Make sure the S3 protocol is enabled.
You can check that in the UI under Protocols > Object Storage (S3) > Global Settings or in the CLI.
In the UI:
In the CLI:
PS1-1% isi s3 settings global view
         HTTP Port: 9020
        HTTPS Port: 9021
        HTTPS only: No
S3 Service Enabled: Yes
2. Create a bucket with the permission to write objects (at a minimum).
That action can also be done from the UI or CLI.
In the UI:
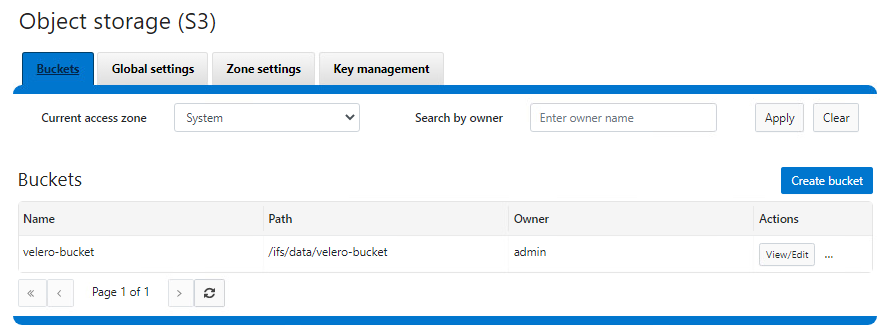
In the CLI:
See isi S3 buckets create in the PowerScale OneFS CLI Command Reference.
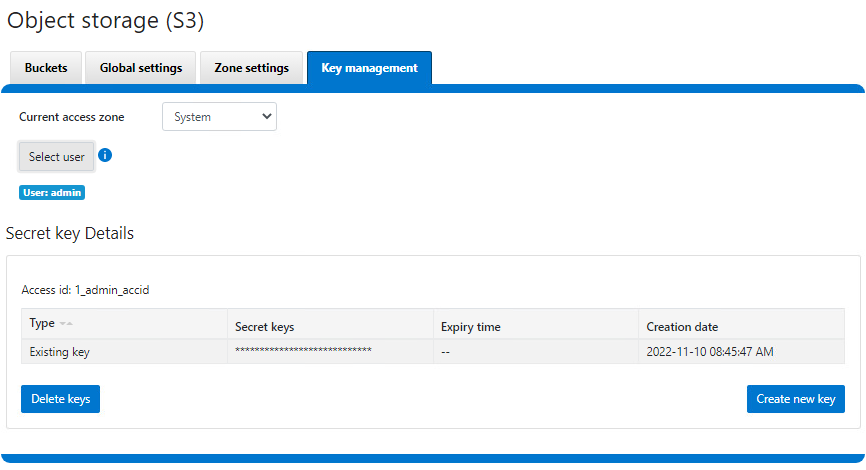
3. Create a key for the user that will be used to upload the objects.
Important notes:
- The username is the one indicated in the interface, not the one from the file system or provider (for example, here, the admin user is 1_admin_accid S3 user)
- The key is only displayed upon creation and cannot be retrieved later. Be sure to copy it right away.
Now that PowerScale is ready, we can proceed with the Velero deployment.
Velero installation and configuration
We assume that the Velero binary is installed and has access to the Kubernetes cluster. If not, see the Velero installation document for the deployment instructions.
Configure Velero:
- Create a file with the credentials previously obtained from PowerScale.
$ cat ~/credentials-velero
[default]
aws_access_key_id = 1_admin_accid
aws_secret_access_key = 0**************************i
…
- Optionally, obtain the PowerScale SSL certificate.
In our case, the HTTPS endpoint uses a self-signed certificate, so we have to get it and pass it to Velero. Note that we can use HTTP protocol, and that step can be skipped at the cost of plain text data transit. For more information on the self-signed certificates in the context of Velero, see https://velero.io/docs/v1.9/self-signed-certificates/. - Install Velero itself:
$ velero install \
    --provider aws \
    --plugins velero/velero-plugin-for-aws:v1.5.1 \
    --bucket velero-backup \
    --secret-file ./credentials-velero \
    --use-volume-snapshots=false \
    --cacert ./ps2-cacert.pem \
    --backup-location-config region=powerscale,s3ForcePathStyle="true",s3Url=https://192.168.1.21:9021
…
The preceding command shows how to use Velero most simplistically and securely.
It is possible to add parameters to enable protection with snapshots. Every Dell CSI driver has snapshot support. To take advantage of that support, we use the install command with this addition:
velero install \
--features=EnableCSI \
--plugins=velero/velero-plugin-for-aws:v1.5.1,velero/velero-plugin-for-csi:v0.3.0 \
--use-volume-snapshots=true
...
Now that CSI snaps are enabled, we can enable restic to move data out of those snapshots into our backup target by adding:
--use-restic
As you can see, we are using the velero/velero-plugin-for-aws:v1.5.1 image, which is the latest available at the time of the publication of this article. You can obtain the current version from GitHub: https://github.com/vmware-tanzu/velero-plugin-for-aws
After the Velero installation is done, check that everything is correct:
kubectl logs -n velero deployment/velero
If you have an error with the certificates, you should see it quickly.
You can now back up and restore your Kubernetes resources with the usual Velero commands. For example, to protect the entire Kubernetes except kube-system, including the data with PV snapshots:
velero backup create backup-all --exclude-namespaces kube-system
You can check the actual content directly from PowerScale file system explorer:
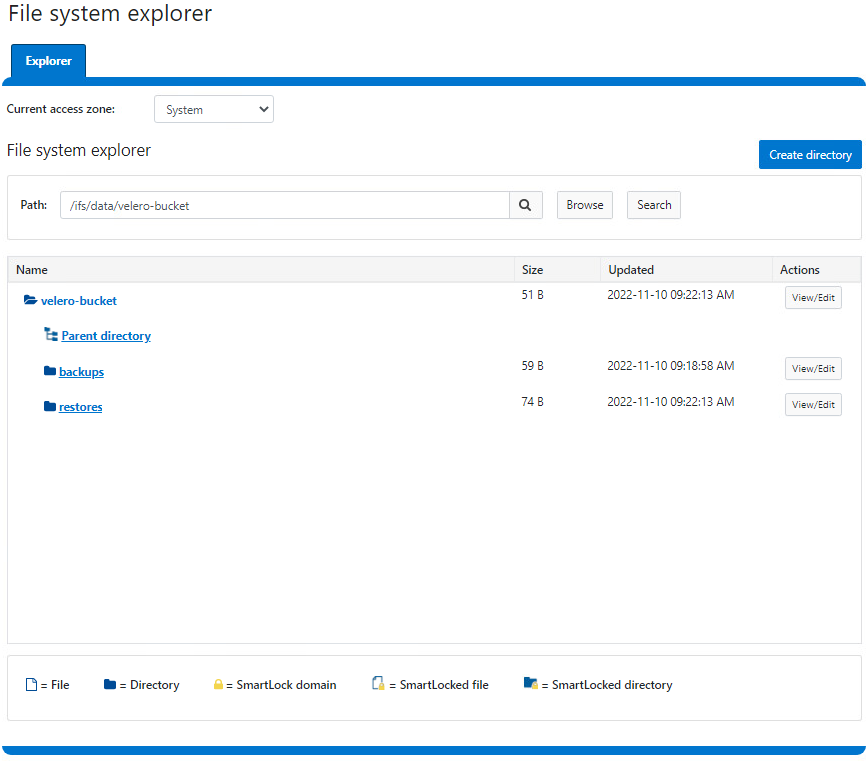
Here is a demo:
Conclusion
For easy protection of small Kubernetes clusters, Velero combined with PowerScale S3 is a great solution. If you are looking for broader features (for a greater amount of data or more destinations that go beyond Kubernetes), look to Dell PowerProtect Data Manager, a next-generation, comprehensive data protection solution.
Interestingly, Dell PowerProtect Data Manager uses the Velero plug-in to protect Kubernetes resources!
Resources