


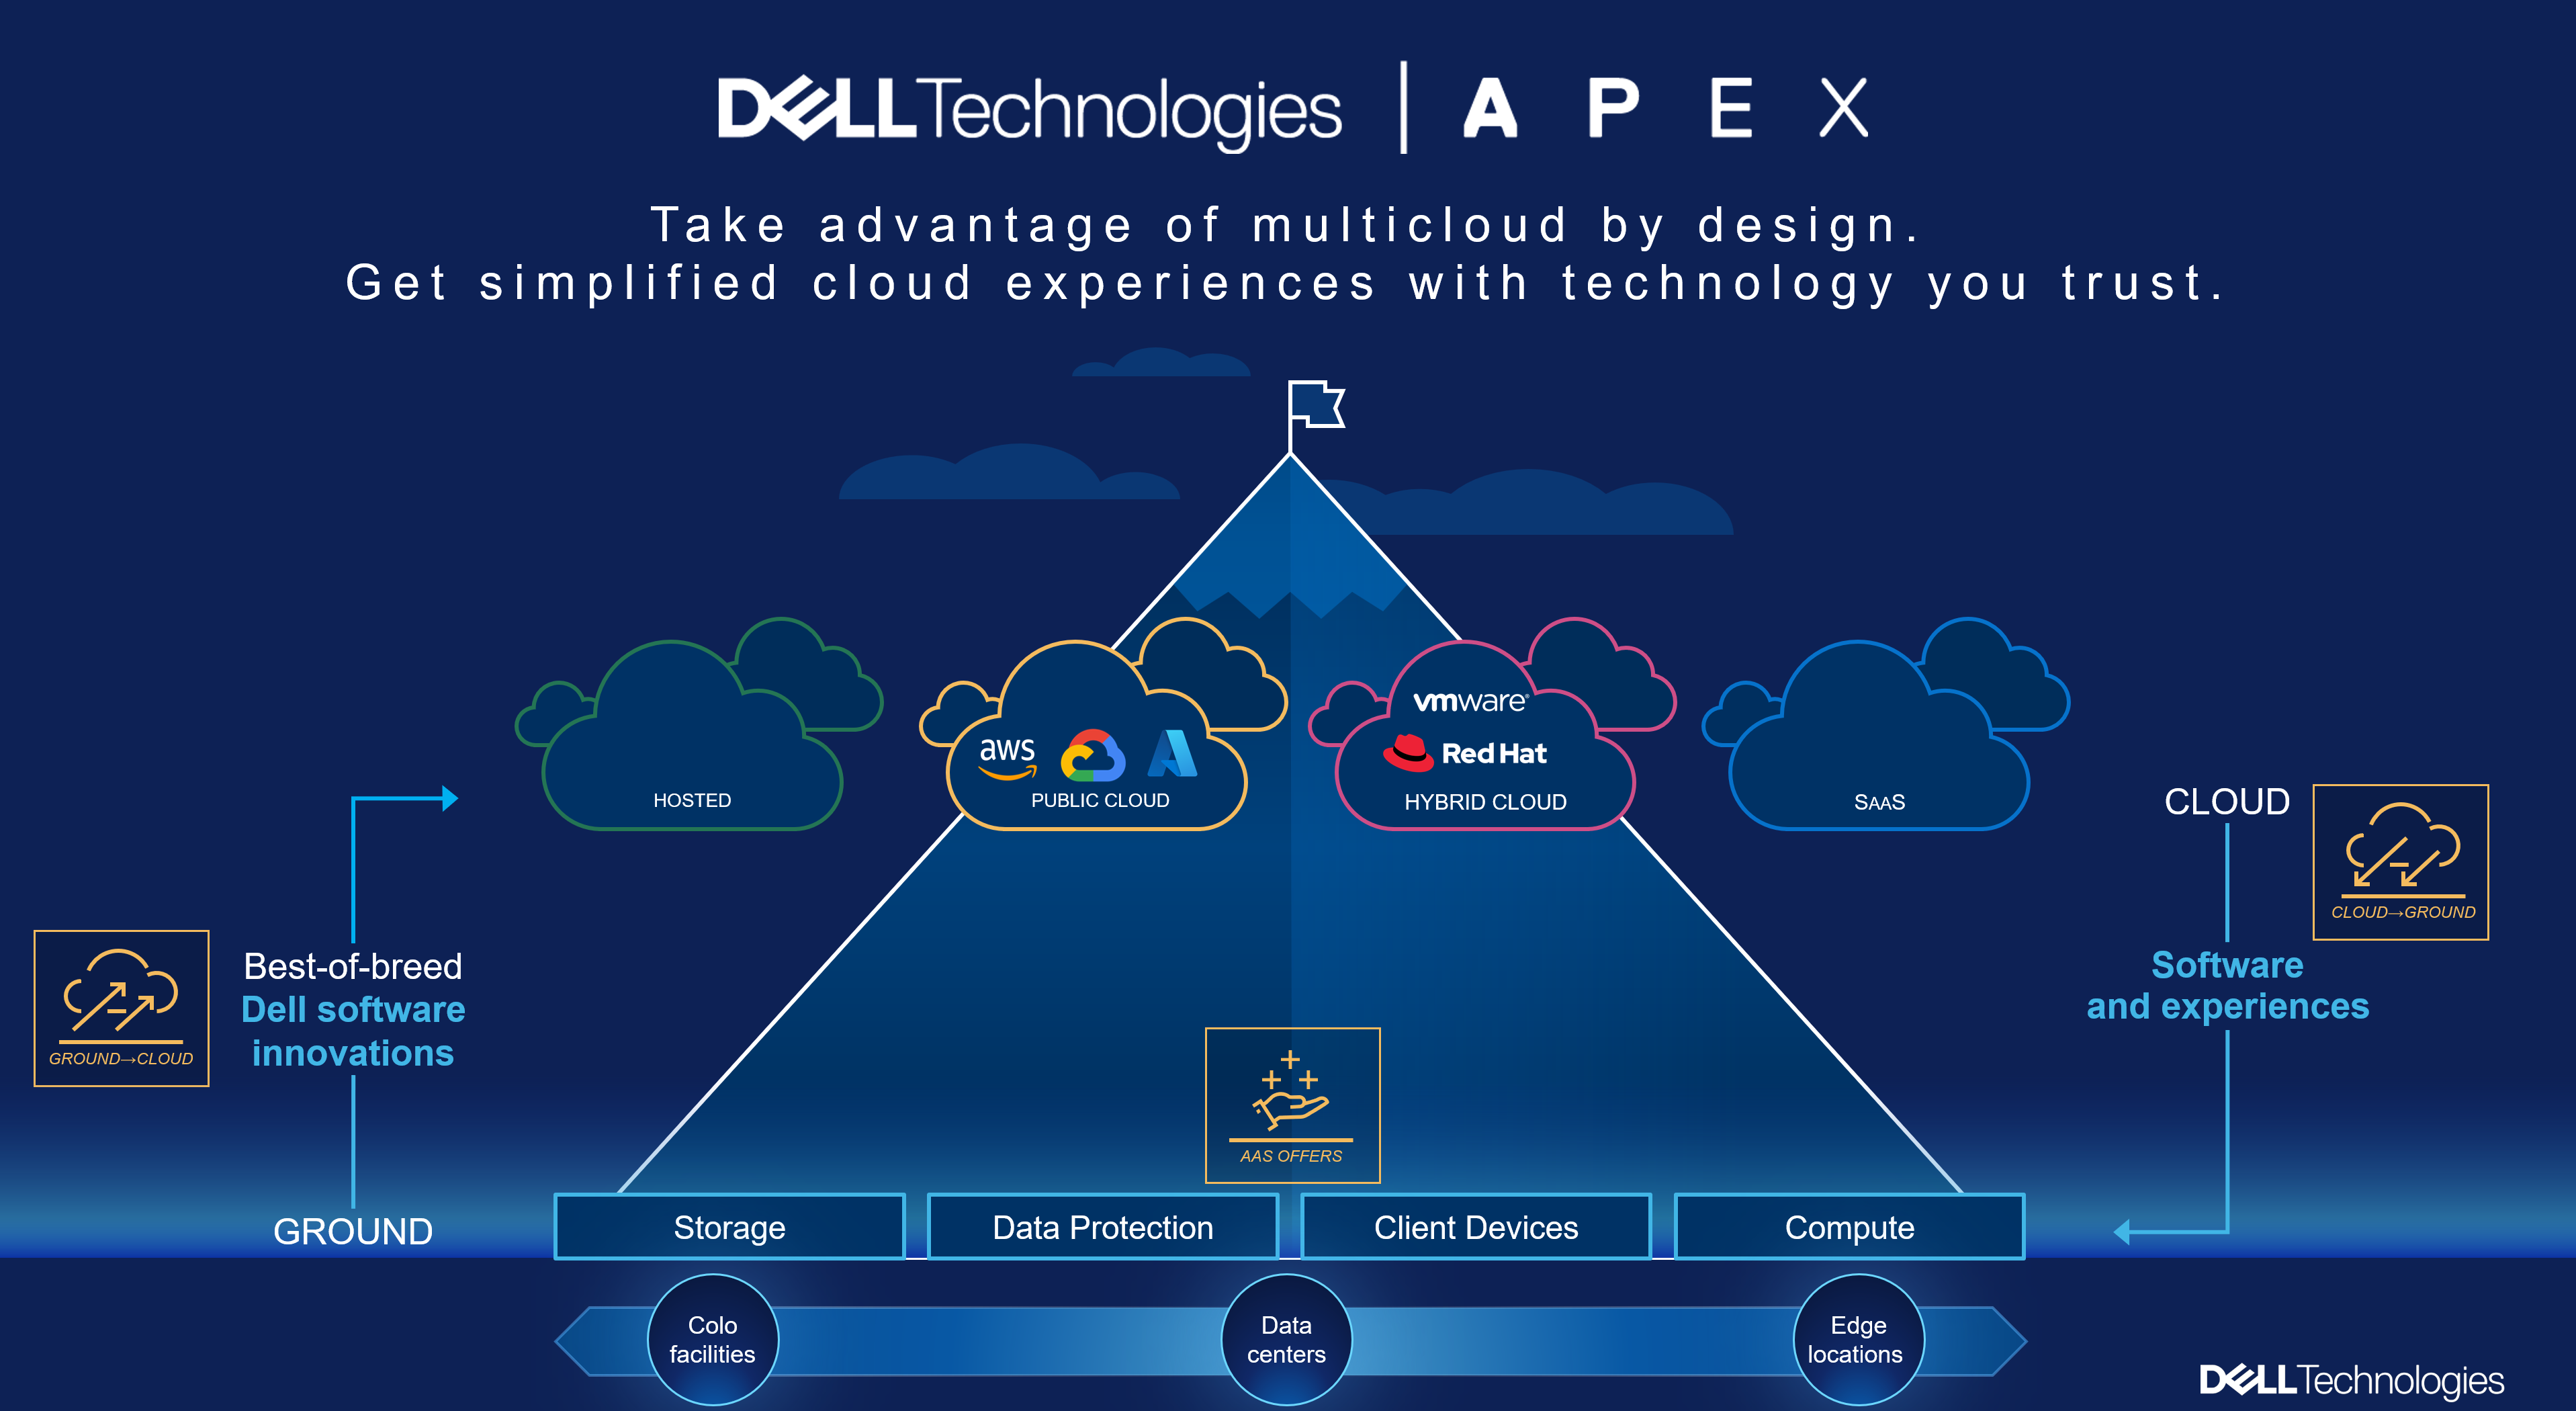
Multicloud—All the things!

It has been a few months now since I moved over from pre-sales to a Dell Technical Staff role, supporting all our multicloud storage software offerings here at Dell Technologies. Once again, just like my previous role, this role is very broad and also very deep. Dell APEX has many facets, from both a horizontal view and a deep dive into each offering. I’m now part of the team driving the world’s most comprehensive multicloud portfolio, spanning the data center to the public cloud!
Over the past months, I have realized even more than before how awesome this opportunity is. It’s just like working for a startup, except at a big corporation. The teams are building exactly what our clients have been asking for. I am in the unique position to test, evaluate, document, and evangelize, all while getting the word out through training sessions, white papers, and so on.
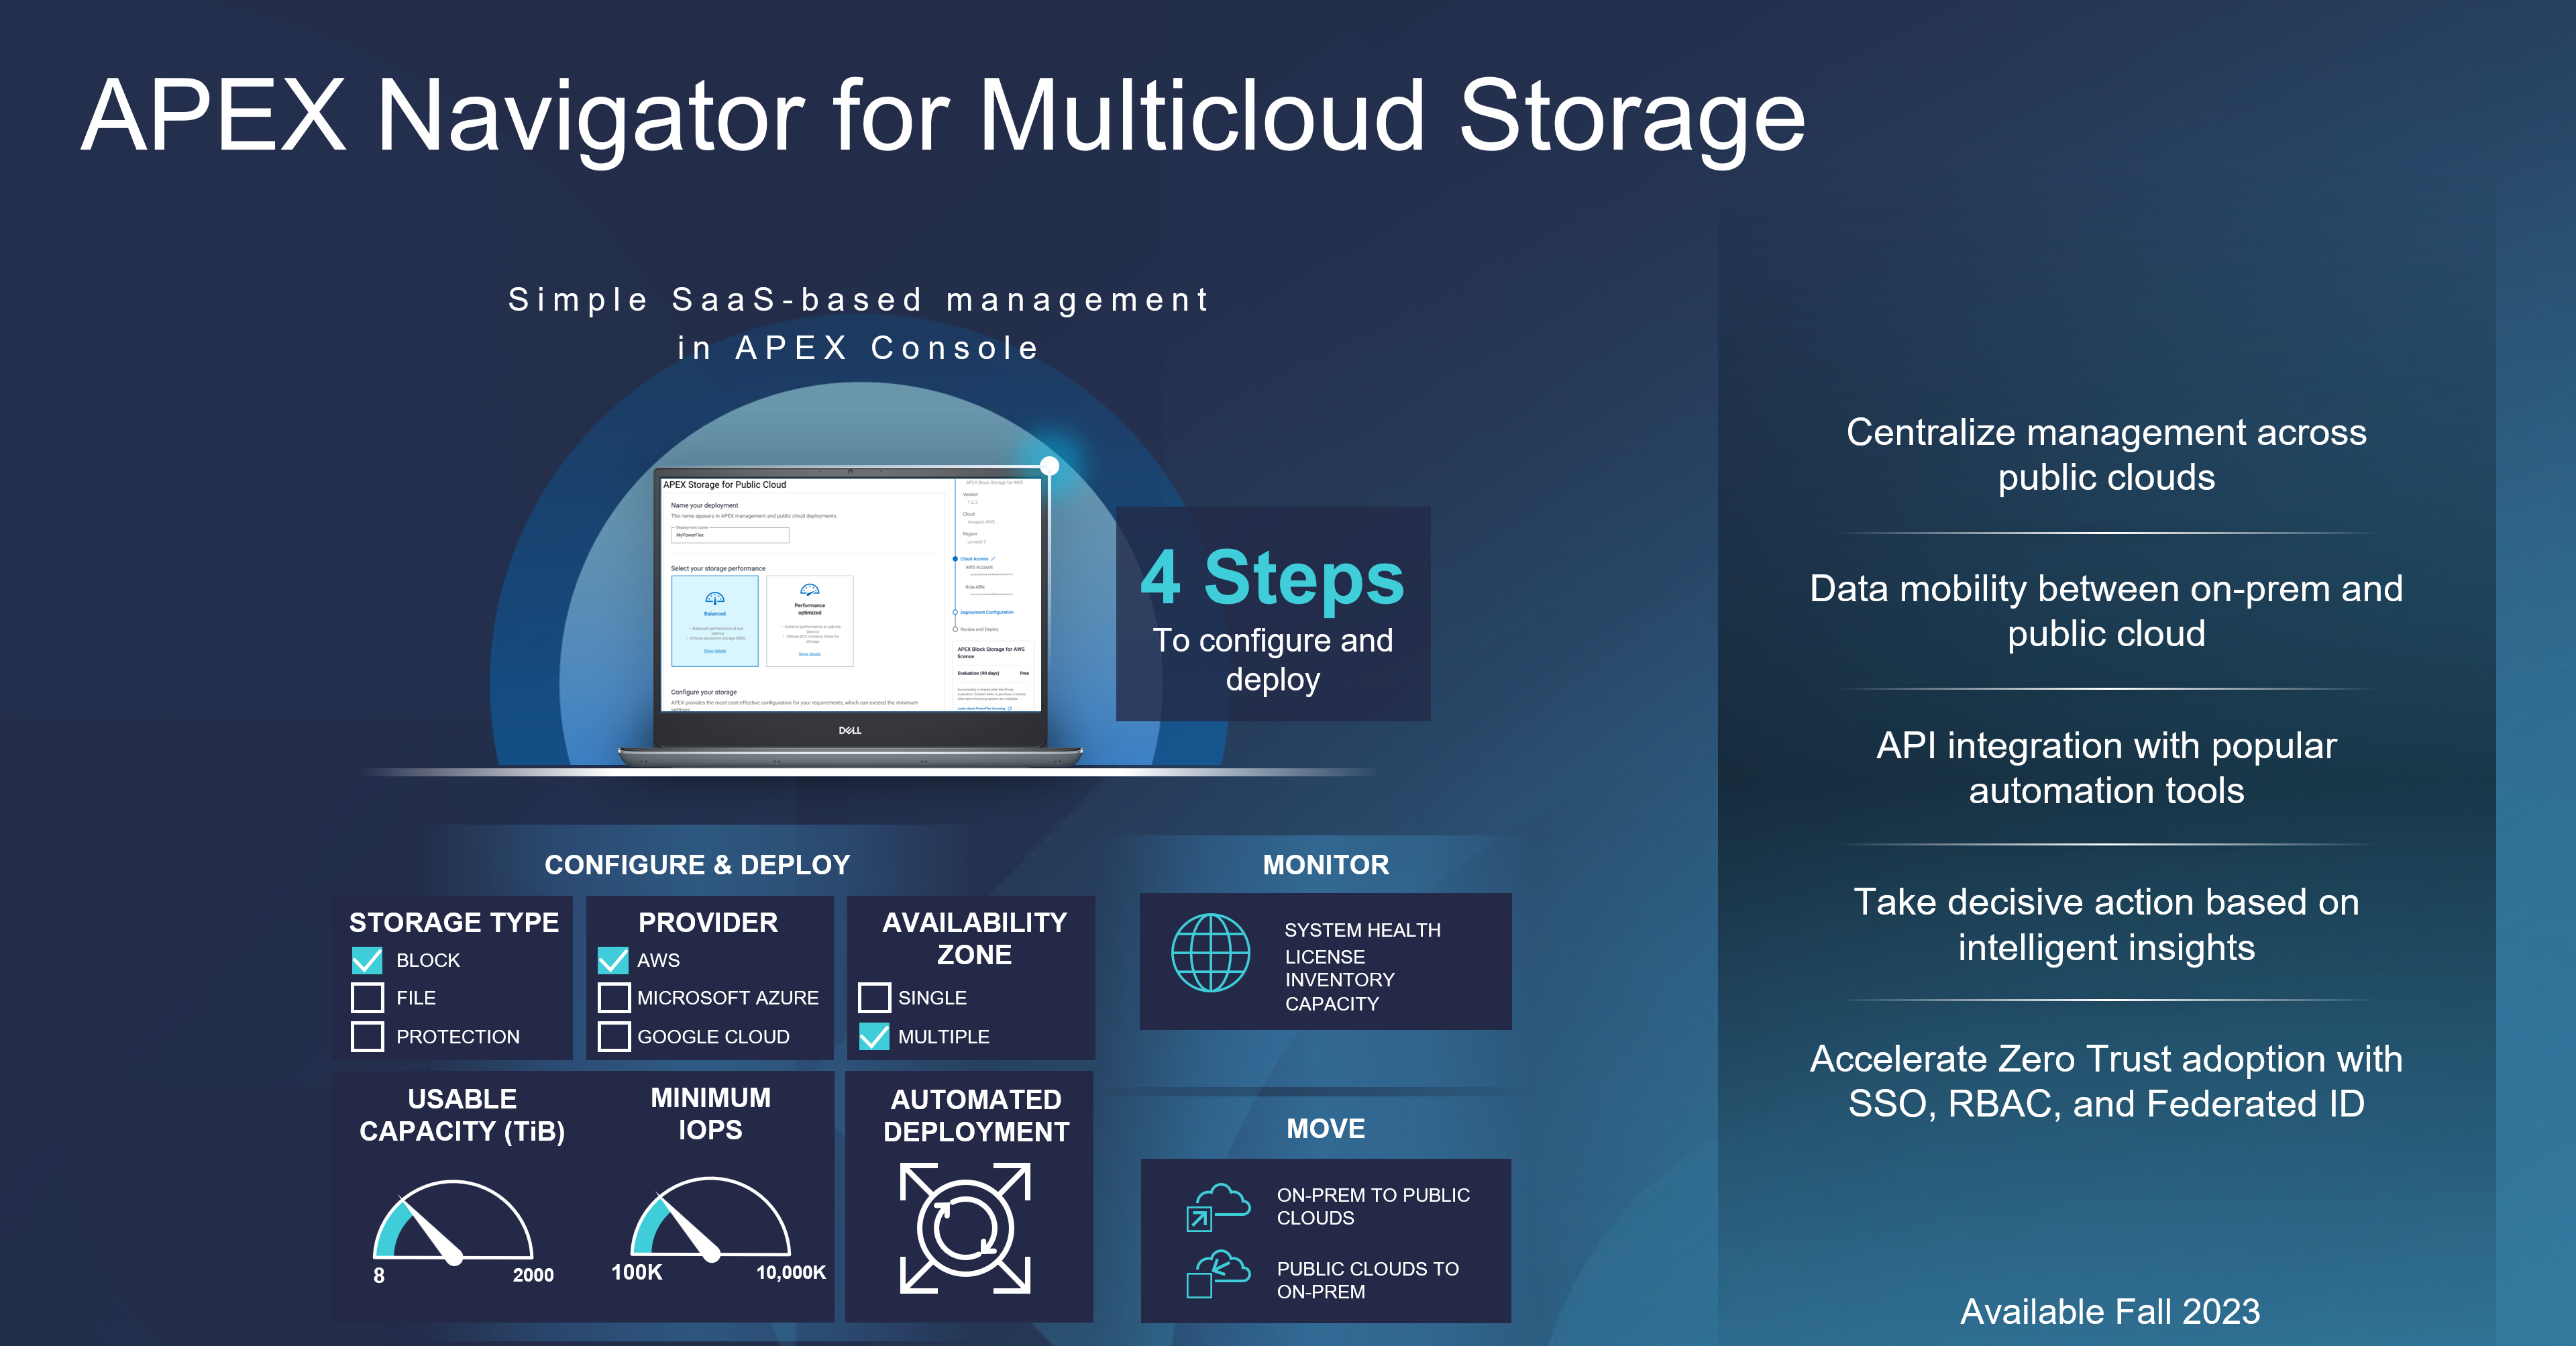
Our latest announcement from Dell Tech World 2023 is APEX Navigator, which provides our client teams in the SysOps and DevOps spaces the ability to actually “Multicloud—all the things!” Previously, the reference to “multicloud” sounded great, on paper. Now, Dell has made multicloud a reality. And, as a bonus, Dell has also made it easy, by removing the need for any manual deployment management that could cause “day zero” failures. The same flexibility you have in your own data center can now be achieved in the public cloud with APEX Navigator at the helm.
We now have the SaaS offerings as APEX Navigator for multicloud storage management, which aligns our best of breed, enterprise-class technology with:
- APEX Block Storage for Public Cloud
- PowerFlex software-defined block storage
- APEX File Storage for Public Cloud
- PowerScale (OneFS file system – multi-protocol, NFS, SMB, and my favorite—S3 Object!)
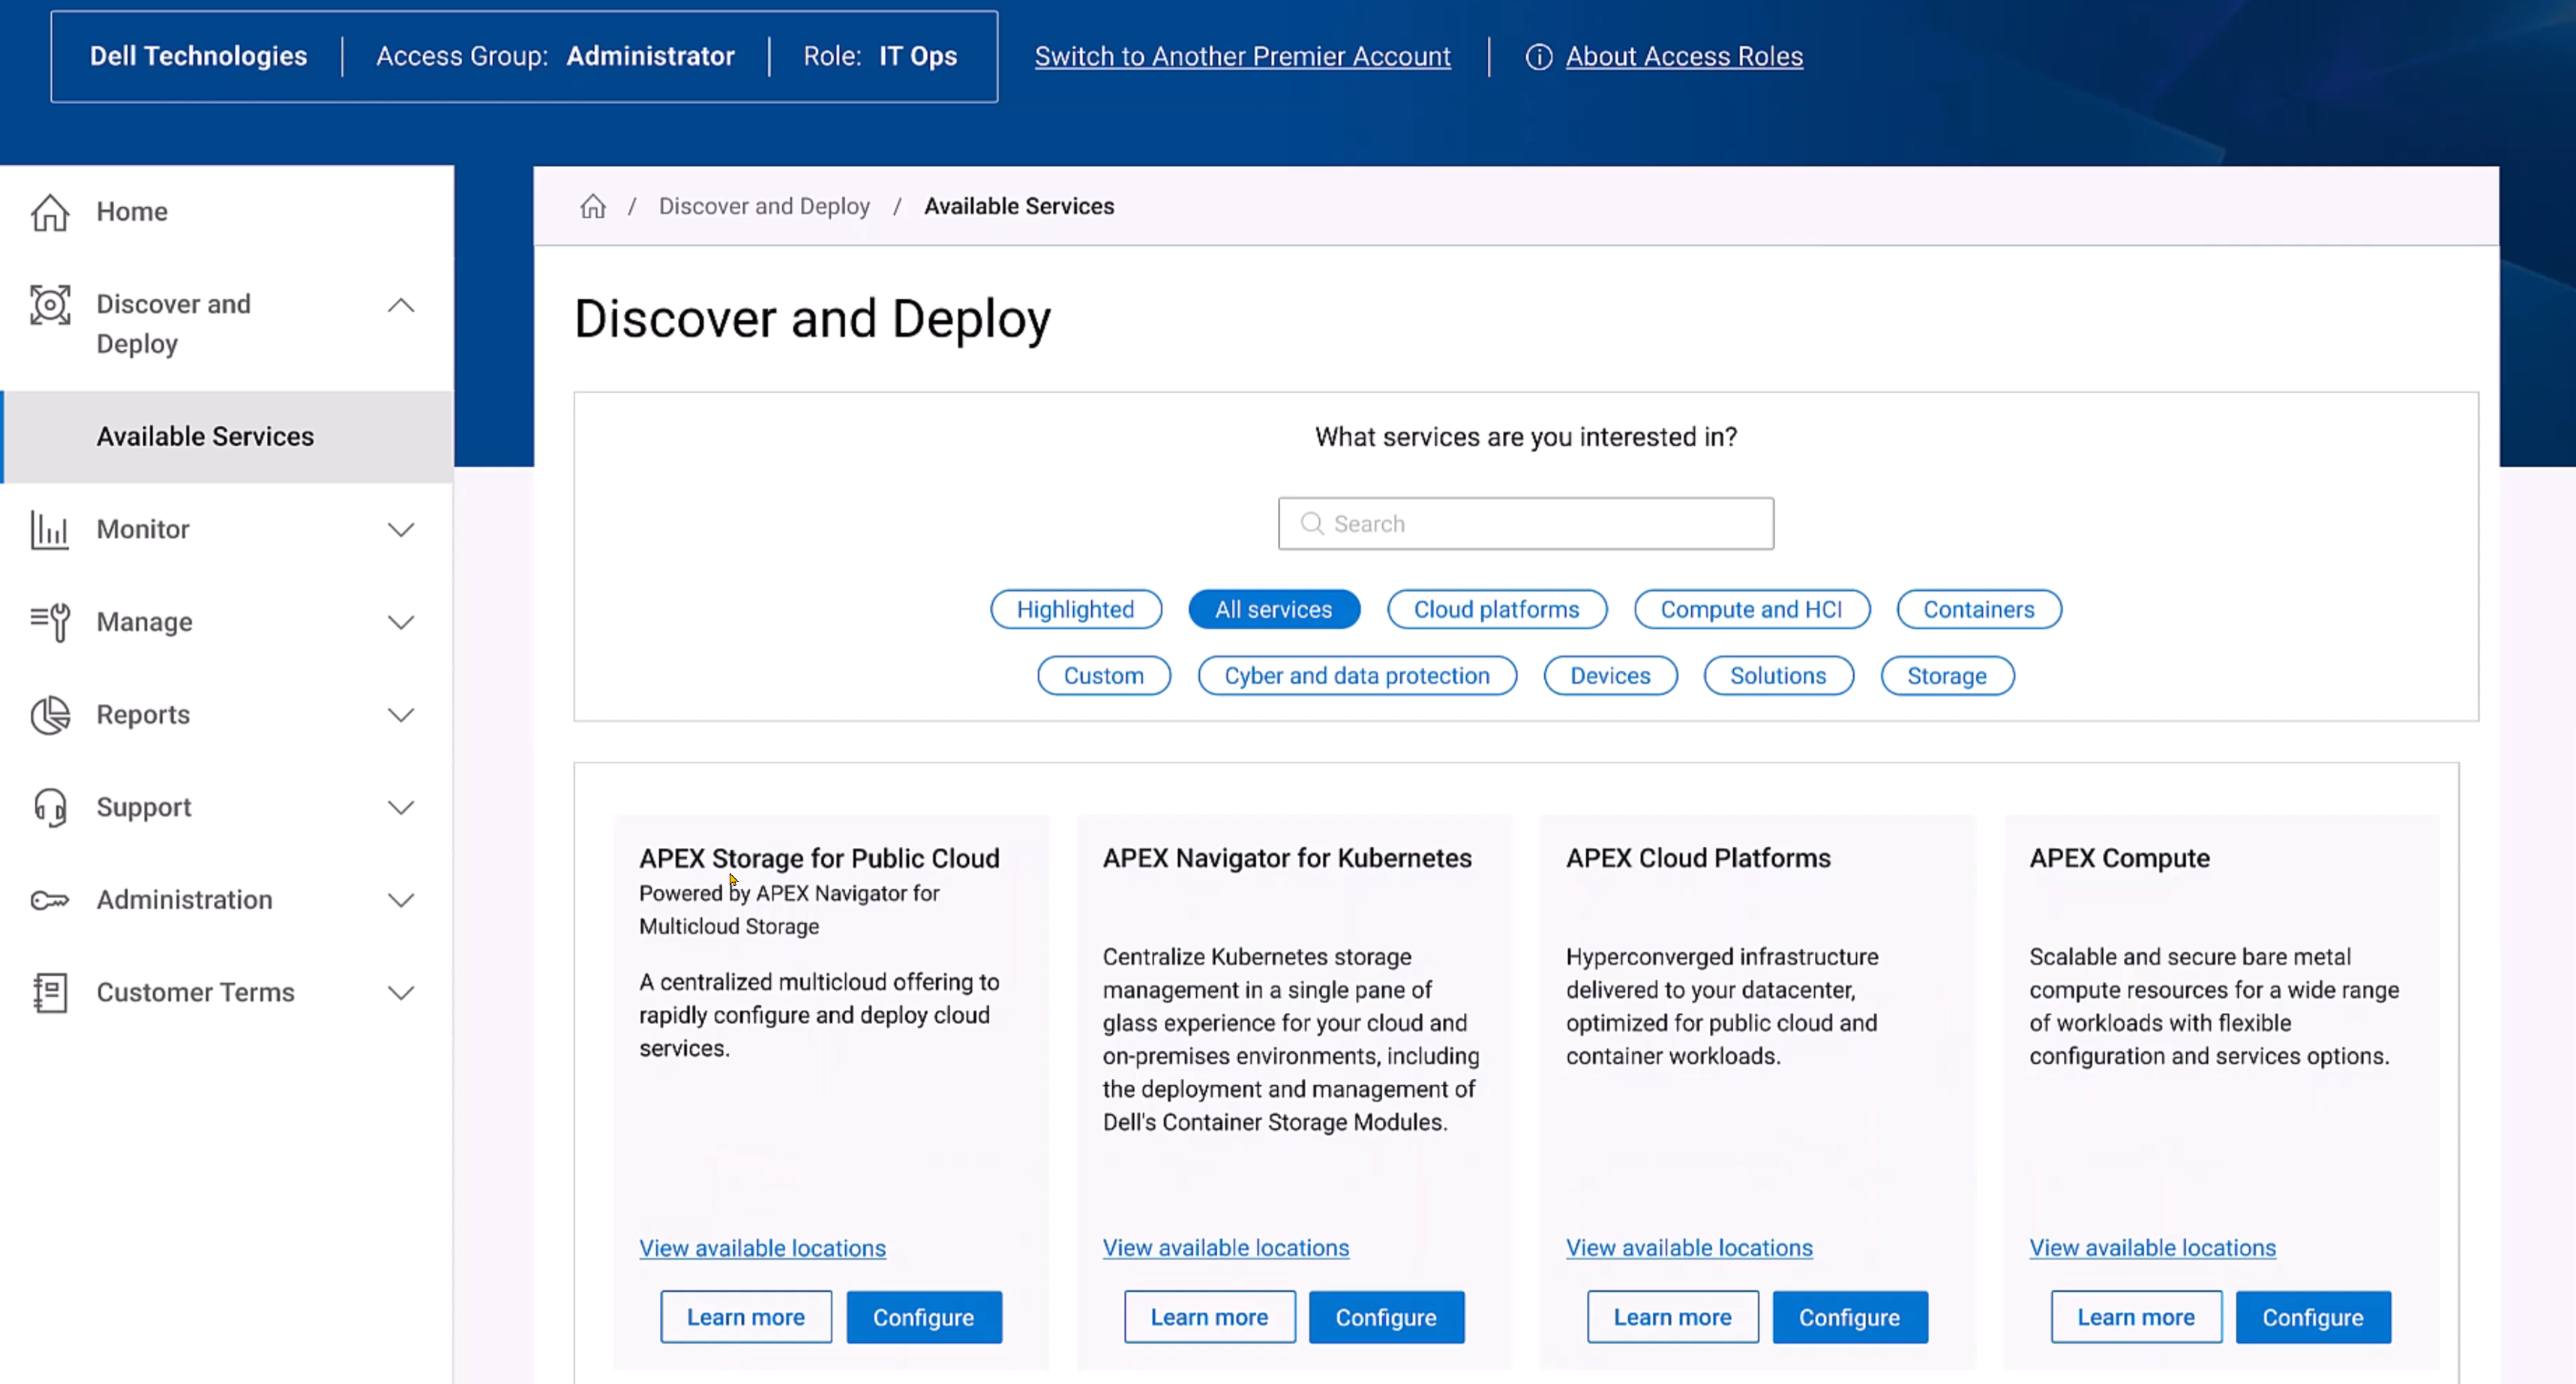
The login experience has also been refactored to be clean and simple. The Dell Premier portal experience will guide our users directly to the full APEX experience. Where all things multicloud reside.
We also have, as part of Navigator:
- APEX Navigator for Kubernetes
- Data persistence management along with deployment and monitoring of Dell Container Storage Modules at scale
APEX Storage for Public Cloud is available in AWS today and will be available in Azure in the second half of 2023.
In this video, you can see how simple it is to configure and deploy APEX Navigator— with only four steps and just a few more clicks. This process has removed the error-prone time on keyboard to a fully automated deployment in the public cloud of your choice. Here is what the process looks like in AWS, so none of this work in AWS is needed. It provides a clean interface, with day two CloudIQ monitoring included. CloudIQ, described here, also brings real-time intelligence to your storage endpoints. It offers both predictive and AI anomaly detection to provide XOps engineers and developers quick insight into their multicloud world and allows them to take action where it might be required.
The reality is this: Today’s data center has also been modernized. The initial attraction to public-only was the rich service offerings that existed in cloud-only. Now, with Dell Technologies leading the way, our clients can manage all their distributed data requirements, and all with predictable costs. Ground to cloud and cloud to ground are all part of the “All Things” story.
Our clients who are investing in multicloud are also growing and retaining the top industry engineers. The APEX Navigator portal delivers the rich automation to partner with our client engineers for consistent operations, wherever the data resides. This is a BIG deal!
The right data, placed in the right location, at the right time, for the right consumption service.
We have also announced APEX Navigator for Kubernetes. Simply put, Kubernetes is vast. APEX Navigator for Kubernetes can provide observability across the multicloud, multisite, microservice landscape. Make your DevOps teams happy while protecting and governing these assets.
Why Navigator?
I am asked this question almost daily: Why use Navigator and all the software-defined storage deployment, management, and monitoring? Here are the answers:
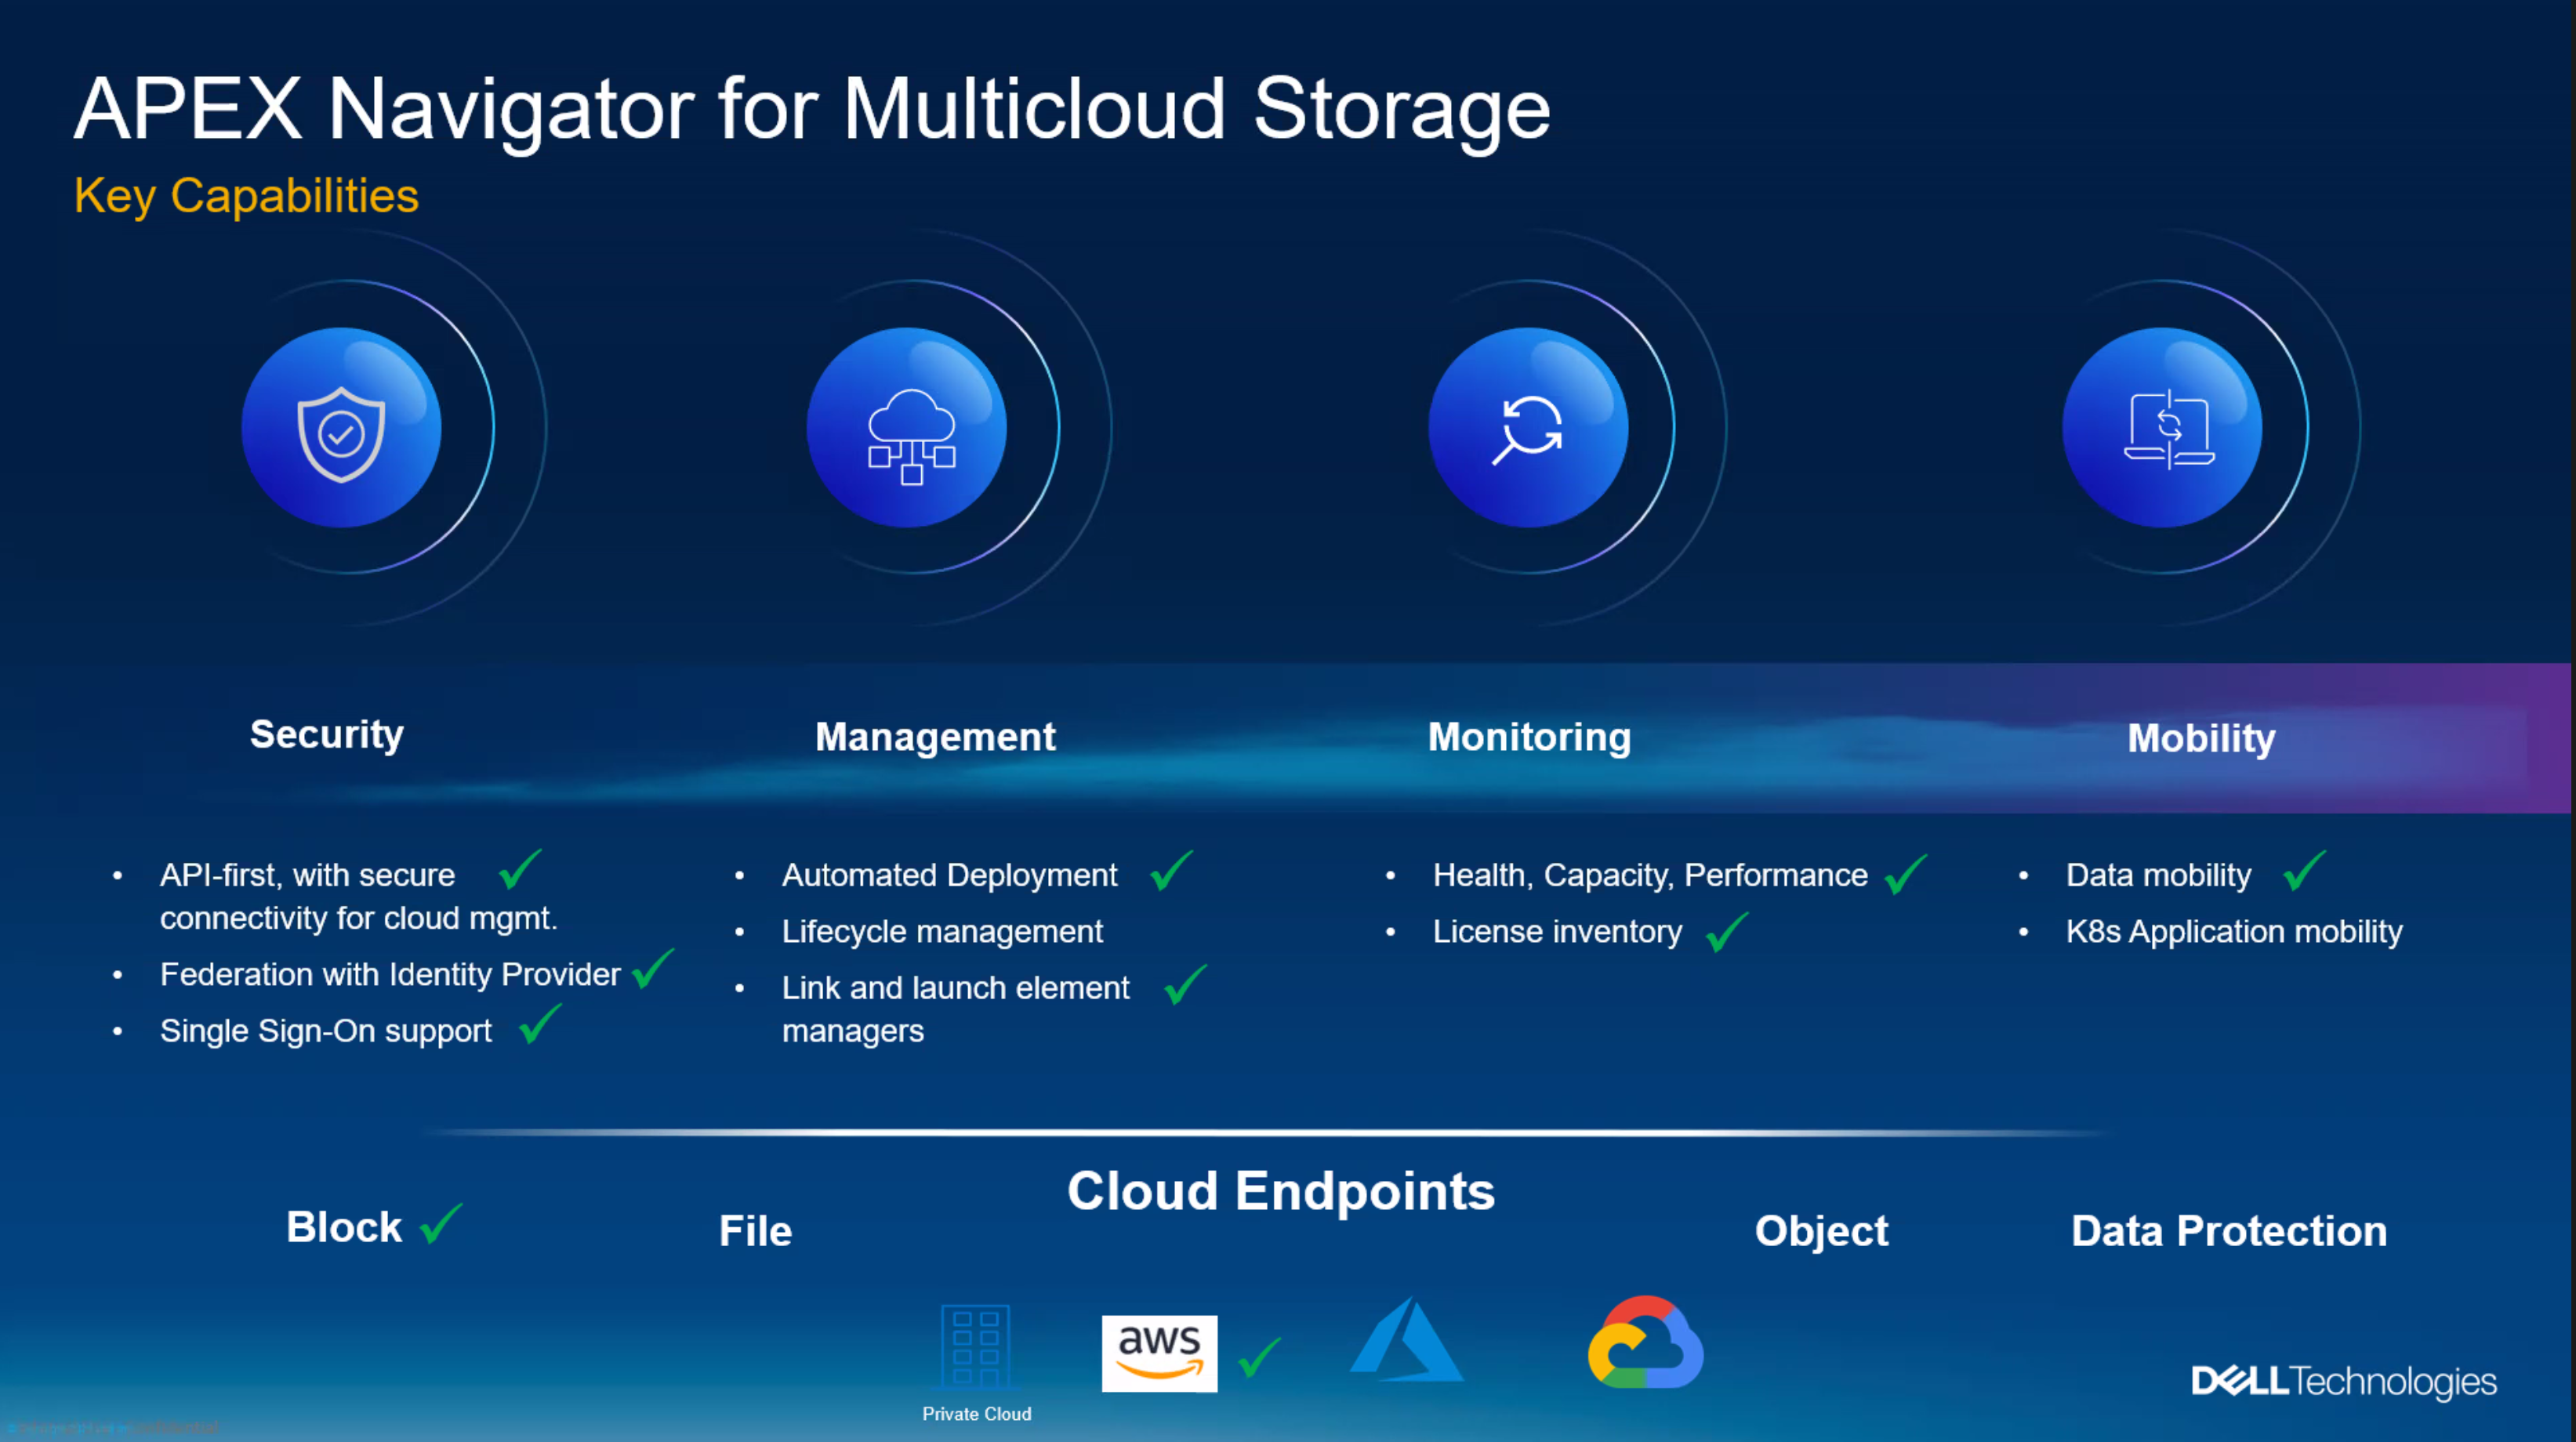
- Integrated zero trust security (SSO, RBAC, and Identity Federation)
- Seamless SSO!
- Unique performance and deployment
- Extremely high I/O performance is cheaper with PowerFlex deployed into any public cloud.
- Simple, day zero deployment
- A deployment process the only requires four simple steps.
- 90-day evaluation license! (applies to Dell licensing only)
- Federated storage protection with multi-availability zone resiliency and flexibility
- Protection and scalability reach across availability zones.
- Rebuild times decrease with additional availability zones.
- Data mobility, ground to cloud, cloud to ground
- Meet any shifting cloud strategy
- Crash consistent copies
- Efficient – Changed blocks only snapshot shipping
- API-first integration with many of the most popular automation tools
- Ansible and Terraform – Yes and yes!
- Currently, our customers can create their own artifacts for API integration
- Ansible and Terraform – Yes and yes!
- Cost
- Predictable
- Data services that the cloud alone cannot provide
- Better services at a reduced cost
- Thin provisioning
- Multiple and efficient snapshots
- Public cloud PaaS services, with only data attributes you want, consumed in the cloud—a true hybrid model—as shown here
- Rich PaaS feature set reporting capability
- AI/ML model training
- Consuming just what you need without incurring any egress fees; then, rinse and repeat
- If you need to export—we have the proper compression in place to minimize any egress fees
- Mountable snapshots
- Kubernetes namespace data mobility, inclusive of all PV (Persistent Volumes) and PVC (Persistent Volume Claims), with an option to even rename a namespace in flight (think Dev, Test, Stage for micro-services)
- Evolving S3 Object solution sets (to be discussed in a future blog)
- Monitoring all endpoints from a single pane of glass
- Robust monitoring—View of all systems, public or private, to observe and act on the performance, health, inventory, and capacity
- Licensing inventory
- Active AI for anomaly detection
My next white paper will go into the details of each of these answers.
Release timelines
APEX Navigator will be generally available in the United States around the second half of 2023. At the same time, APEX Navigator for Kubernetes will be generally available in North America, France, Germany, and the UK. Additionally, APEX Block Storage for Microsoft Azure will be available through RPQ.
Finally, it is important to mention that not all feature sets previously referenced will be available on the release-to-service dates. The teams are working hard to solve all the complex problems—with great success.
If your organization is interested in participating in our APEX Navigator program, visit here.
Resources
For more information on our APEX Storage for Public Cloud, visit this page.
Video 1 APEX Navigator for Multicloud Storage demo
Video 2 APEX Navigator PowerFlex deployment into AWS
Video 3 APEX Navigator and CloudIQ – Day 2 management and monitoring
Video 4 APEX Navigator and Data Mobility
Video APEX Navigator for Kubernetes
Here is a link to the full APEX demo playlist
Author: Robert F. Sonders
Technical Staff – Engineering Technologist
Multicloud Storage Software
@RobertSonders | |
Blog | |
Location | Scottsdale AZ, USA (GMT-7) |
Related Blog Posts

Looking Ahead: Dell Container Storage Modules 1.2
Mon, 29 Apr 2024 18:11:07 -0000
|Read Time: 0 minutes
The quarterly update for Dell CSI Drivers & Dell Container Storage Modules (CSM) is here! Here’s what we’re planning.
CSM Features
New CSM Operator!
Dell Container Storage Modules (CSM) add data services and features that are not in the scope of the CSI specification today. The new CSM Operator simplifies the deployment of CSMs. With an ever-growing ecosystem and added features, deploying a driver and its affiliated modules need to be carefully studied before beginning the deployment.
The new CSM Operator:
- Serves as a one-stop-shop for deploying all Dell CSI driver and Container Storage Modules
- Simplifies the install and upgrade operations
- Leverages the Operator framework to give a clear status of the deployment of the resources
- Is certified by Red Hat OpenShift
In the short/middle term, the CSM Operator will deprecate the experimental CSM Installer.
Replication support with PowerScale
For disaster recovery protection, PowerScale implements data replication between appliances by means of the the SyncIQ feature. SyncIQ replicates the data between two sites, where one is read-write while the other is read-only, similar to Dell storage backends with async or sync replication.
The role of the CSM replication module and underlying CSI driver is to provision the volume within Kubernetes clusters and prepare the export configurations, quotas, and so on.
CSM Replication for PowerScale has been designed and implemented in such a way that it won’t collide with your existing Superna Eyeglass DR utility.
A live-action demo will be posted in the coming weeks on our VP YouTube channel: https://www.youtube.com/user/itzikreich/.
CSI features
Across the portfolio
In this release, each CSI driver:
- Supports OpenShift 4.9
- Supports Kubernetes 1.23
- Supports the CSI Spec 1.5
- Updates the latest UBI-minimal image
- Supports fsGroupPolicy
fsGroupPolicy support
Kubernetes v1.19 introduced the fsGroupPolicy to give more control to the CSI driver over the permission sets in the securityContext.
There are three possible options:
- None -- which means that the fsGroup directive from the securityContext will be ignored
- File -- which means that the fsGroup directive will be applied on the volume. This is the default setting for NAS systems such as PowerScale or Unity-File.
- ReadWriteOnceWithFSType -- which means that the fsGroup directive will be applied on the volume if it has fsType defined and is ReadWriteOnce. This is the default setting for block systems such as PowerMax and PowerStore-Block.
In all cases, Dell CSI drivers let kubelet perform the change ownership operations and do not do it at the driver level.
Standalone Helm install
Drivers for PowerFlex and Unity can now be installed with the help of the install scripts we provide under the dell-csi-installer directory.
A standalone Helm chart helps to easily integrate the driver installation with the agent for Continuous Deployment like Flux or Argo CD.
Note: To ensure that you install the driver on a supported Kubernetes version, the Helm charts take advantage of the kubeVersion field. Some Kubernetes distributions use labels in kubectl version (such as v1.21.3-mirantis-1 and v1.20.7-eks-1-20-7) that require manual editing.
Volume Health Monitoring support
Drivers for PowerFlex and Unity implement Volume Health Monitoring.
This feature is currently in alpha in Kubernetes (in Q1-2022), and is disabled with a default installation.
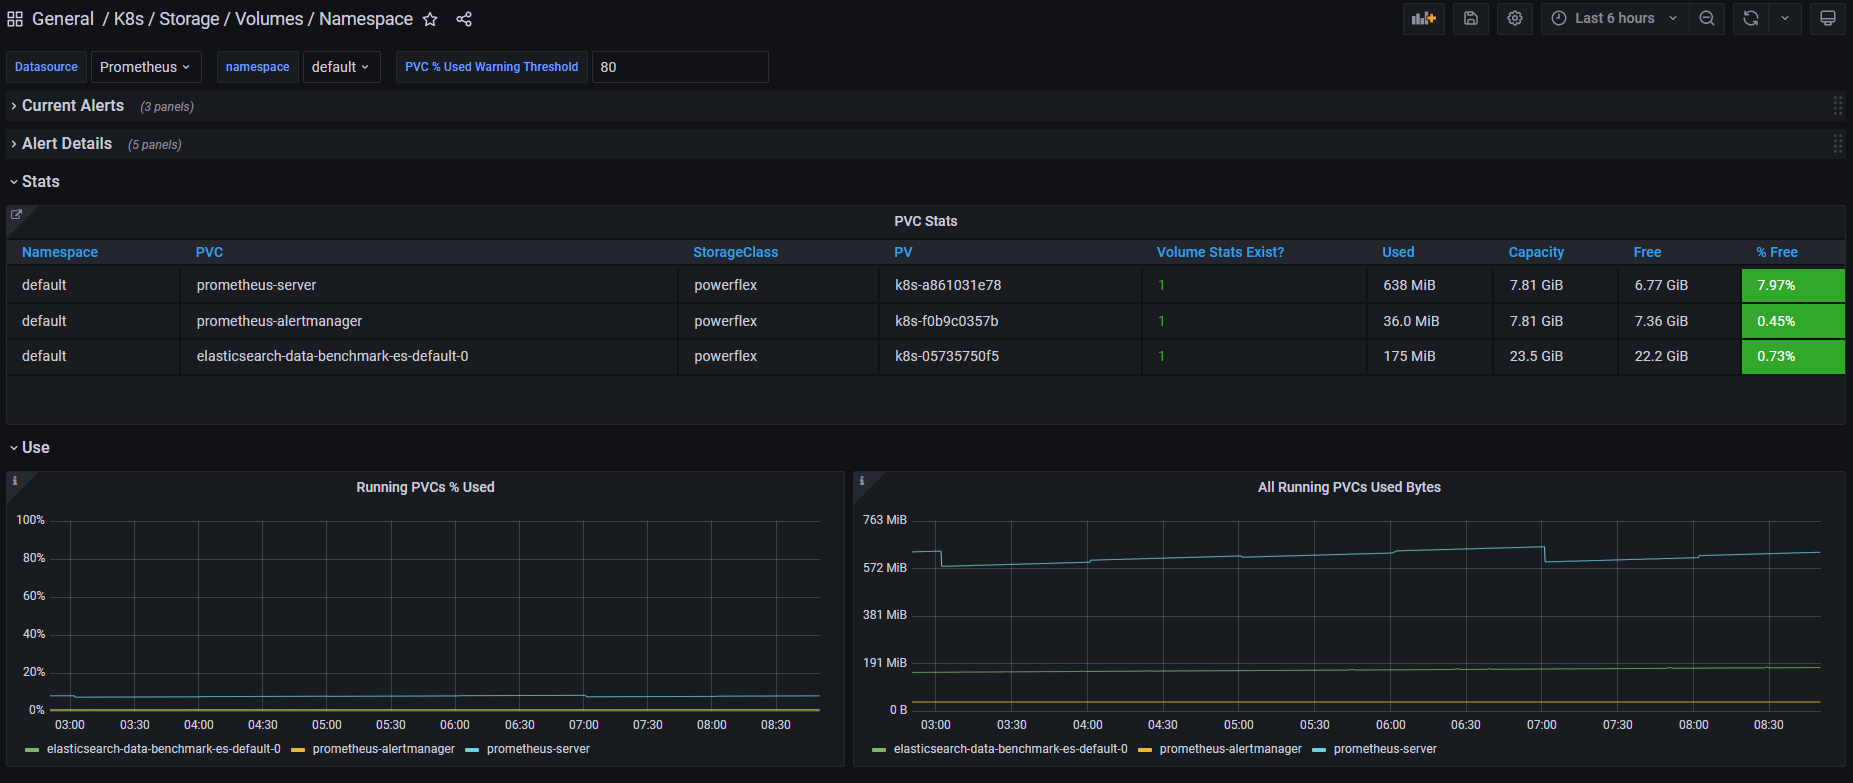
Once enabled, the drivers will expose the standard storage metrics, such as capacity usage and inode usage through the Kubernetes /metrics endpoint. The metrics will flow natively in popular dashboards like the ones built-in OpenShift Monitoring:
Pave the way for full open source!
All Dell drivers and dependencies like gopowerstore, gobrick, and more are now on Github and will be fully open-sourced. The umbrella project is and remains https://github.com/dell/csm, from which you can open tickets and see the roadmap.
Google Anthos 1.9
The Dell partnership with Google continues, and the latest CSI drivers for PowerScale and PowerStore support Anthos v1.9.
NFSv4 POSIX and ACL support
Both CSI PowerScale and PowerStore now allow setting the default permissions for the newly created volume. To do this, you can use POSIX octal notation or ACL.
- In PowerScale, you can use plain ACL or built-in values such as private_read, private, public_read, public_read_write, public or custom ones;
- In PowerStore, you can use the custom ones such as A::OWNER@:RWX, A::GROUP@:RWX, and A::OWNER@:rxtncy.
Useful links
For more details you can:
- Watch these great CSM demos on our VP YouTube channel: https://www.youtube.com/user/itzikreich/
- Subscribe to Github notification and be informed of the latest releases on: https://github.com/dell/csm
- Ask for help or chat with us on Slack
Author: Florian Coulombel

Q1 2024 Update for Terraform Integrations with Dell Infrastructure

Tue, 02 Apr 2024 14:45:56 -0000
|Read Time: 0 minutes
This post covers all the new Terraform resources and data sources that have been released in the last two quarters: Q4’23 and Q1 ‘24. You can check out previous releases of Terraform providers here: Q1-2023, Q2-2023, and Q3-2023. I also covered the first release of PowerScale provider here.
Here is a summary of the Dell Terraform Provider versions released over the last two quarters:
- v1.1 and v1.2 of the provider for PowerScale
- v1.3 and v1.4 of the provider for PowerFlex
- v1.3 and v1.4 of the provider for PowerStore
- v1.2 of the Provider for OME
- v1.1 and v1.2 of the Provider for Redfish
PowerScale Provider v1.1 and v1.2
PowerScale received the most number of new Terraform capabilities in the last few months. New resources and corresponding data sources have been under the following workflow categories:
- Data Management
- User and Access Management
- Cluster Management
Data management
Following is the summary for the different resource-datasource pairs introduced to automate operations related to Data management on PowerScale:
Snapshots: CRUD operations for Snapshots
Here's an example of how to create a snapshot resource within a PowerScale storage environment using Terraform:
resource "powerscale_snapshot" "example_snapshot" {
  name        = "example-snapshot"
  filesystem  = powerscale_filesystem.example_fs.id
  description = "Example snapshot description"
  // Add any additional configurations as needed
}- name: Specifies the name of the snapshot to be created.
- filesystem: References the PowerScale filesystem for which the snapshot will be created.
- description: Provides a description for the snapshot.
Here's an example of how to retrieve information about existing snapshots within a PowerScale environment using Terraform:
data "powerscale_snapshot" "existing_snapshot" {
  name = "existing-snapshot"
}

output "snapshot_id" {
  value = data.powerscale_snapshot.existing_snapshot.id
}- name: Specifies the name of the existing snapshot to query.
Snapshot schedules: CRUD operations for Snapshot schedules
Following is an example of how to define a snapshot schedule resource:
resource "powerscale_snapshot_schedule" "example_schedule" {
  name                = "example-schedule"
  filesystem          = powerscale_filesystem.example_fs.id
  snapshot_type       = "weekly"
  retention_policy    = "4 weeks"
  snapshot_start_time = "23:00"
  // Add any additional configurations as needed
}- name: Specifies the name of the snapshot schedule.
- filesystem: References the PowerScale filesystem for which the snapshot schedule will be applied.
- snapshot_type: Specifies the type of snapshot schedule, such as "daily", "weekly", and so on.
- retention_policy: Defines the retention policy for the snapshots created by the schedule.
- snapshot_start_time: Specifies the time at which the snapshot creation process should begin.
Data Source Example:
The following example shows how to retrieve information about existing snapshot schedules within a PowerScale environment using Terraform. The powerscale_snapshot_schedule data source fetches information about the specified snapshot schedule. An output is defined to display the ID of the retrieved snapshot schedule:
data "powerscale_snapshot_schedule" "existing_schedule" {
  name = "existing-schedule"
}

output "schedule_id" {
  value = data.powerscale_snapshot_schedule.existing_schedule.id
}- name: Specifies the name of the existing snapshot schedule to query.
File Pool Policies: CRUD operations for File Pool Policies
File policies in PowerScale help establish policy-based workflows like file placement and tiering of files that match certain criteria. Following is an example of how the new file pool policy resource can be configured:
resource "powerscale_filepool_policy" "example_filepool_policy" {
  name = "filePoolPolicySample"
  is_default_policy = false

  file_matching_pattern = {
    or_criteria = [
      {
        and_criteria = [

          {
            operator = ">"
            type     = "size"
            units    = "B"
            value    = "1073741824"
          },
          {
            operator          = ">"
            type              = "birth_time"
             use_relative_time = true
            value             = "20"
          },
          {
            operator          = ">"
            type              = "metadata_changed_time"
             use_relative_time = false
            value             = "1704742200"
          },
          {
            operator          = "<"
            type              = "accessed_time"
             use_relative_time = true
            value             = "20"
          }
        ]
      },
      {
        and_criteria = [
          {
            operator          = "<"
            type              = "changed_time"
             use_relative_time = false
            value             = "1704820500"
          },
          {
             attribute_exists = false
            field            = "test"
            type             = "custom_attribute"
            value            = ""
          },
          {
            operator = "!="
            type     = "file_type"
            value    = "directory"
          },
          {
             begins_with    = false
            case_sensitive = true
            operator       = "!="
            type           = "path"
            value          = "test"
          },
          {
            case_sensitive = true
            operator       = "!="
            type           = "name"
            value          = "test"
          }
        ]
      }
    ]
  }
  # A list of actions to be taken for matching files. (Update Supported)
  actions = [

    {
       data_access_pattern_action = "concurrency"
      action_type                = "set_data_access_pattern"
    },
    {
       data_storage_policy_action = {
        ssd_strategy = "metadata"
        storagepool  = "anywhere"
      }
      action_type = "apply_data_storage_policy"
    },
    {
       snapshot_storage_policy_action = {
        ssd_strategy = "metadata"
        storagepool  = "anywhere"
      }
      action_type = "apply_snapshot_storage_policy"
    },
    {
       requested_protection_action = "default"
      action_type                 = "set_requested_protection"
    },
    {
       enable_coalescer_action = true
      action_type             = "enable_coalescer"
    },
    {
      enable_packing_action = true,
      action_type           = "enable_packing"
    },
    {
      action_type = "set_cloudpool_policy"
       cloudpool_policy_action = {
         archive_snapshot_files = true
        cache = {
          expiration = 86400
          read_ahead = "partial"
          type       = "cached"
        }
        compression                  = true
        data_retention               = 604800
        encryption                   = true
         full_backup_retention        = 145152000
         incremental_backup_retention = 145152000
        pool                         = "cloudPool_policy"
         writeback_frequency          = 32400
      }
    }
  ]

  description = "filePoolPolicySample description"

  apply_order = 1
}
You can import existing file pool policies using the file pool policy ID:
terraform import powerscale_filepool_policy.example_filepool_policy <policyID>
or by simply referencing the default policy:
terraform import powerscale_filepool_policy.example_filepool_policy is_default_policy=true
The data source can be used to get a handle to a particular file pool policy:
data "powerscale_filepool_policy" "example_filepool_policy" {
  filter {
    # Optional list of names to filter upon
    names = ["filePoolPolicySample", "Default policy"]
  }
}
or to get the complete list of policies including the default policy:
data "powerscale_filepool_policy" "all" {
}
You can then deference into the data structure as needed.
User and Access management
Following is a summary of the different resource-datasource pairs introduced to automate operations related to User and Access management on PowerScale:
LDAP Providers: CRUD operations
To create and manage LDAP providers, you can use the new resource as follows:
resource "powerscale_ldap_provider" "example_ldap_provider" {
  # Required params for creating and updating.
  name = "ldap_provider_test"
  # root of the tree in which to search identities.
  base_dn = "dc=tthe,dc=testLdap,dc=com"
  # Specifies the server URIs. Begin URIs with ldap:// or ldaps://
  server_uris = ["ldap://10.225.108.54"]
}
You can import existing LDAP providers using the provider name:
terraform import powerscale_ldap_provider.example_ldap_provider <ldapProviderName>
and also get a handle using the corresponding data source using a variety of criteria:
data "powerscale_ldap_provider" "example_ldap_provider" {
  filter {
    names = ["ldap_provider_name"]
    # If specified as "effective" or not specified, all fields are returned. If specified as "user", only fields with non-default values are shown. If specified as "default", the original values are returned.
    scope = "effective"
  }
}
ACL Settings: CRUD operations
PowerScale OneFS provides very powerful ACL capabilities, including a single namespace for multi-protocol access and its own internal ACL representation to perform access control. The internal ACL is presented as protocol-specific views of permissions so that NFS exports display POSIX mode bits for NFSv3 and shows ACL for NFSv4 and SMB. Now, we have a new resource to manage the global ACL settings for a given cluster:
resource "powerscale_aclsettings" "example_acl_settings" {
  # Optional fields both for creating and updating
  # Please check the acceptable inputs for each setting in the documentation
  #     access                  = "windows"
  #     calcmode                = "approx"
  #     calcmode_group          = "group_aces"
  #     calcmode_owner          = "owner_aces"
  #     calcmode_traverse       = "ignore"
  #     chmod                   = "merge"
  #     chmod_007               = "default"
  #     chmod_inheritable       = "no"
  #     chown                   = "owner_group_and_acl"
  #     create_over_smb         = "allow"
  #     dos_attr                = "deny_smb"
  #     group_owner_inheritance = "creator"
  #     rwx                     = "retain"
  #     synthetic_denies        = "remove"
  #     utimes                  = "only_owner"
}
Import is supported, and there is corresponding data source for the resource as well.
Smart Quotas: CRUD operations
Following is an example that shows how to define a quota resource:
resource "powerscale_quota" "example_quota" {
  name         = "example-quota"
  filesystem   = powerscale_filesystem.example_fs.id
  size         = "10GB"
  soft_limit   = "8GB"
  hard_limit   = "12GB"
  grace_period = "7d"
  // Add any additional configurations as needed
}- name: Specifies the name of the quota.
- filesystem: References the PowerScale filesystem to associate with the quota.
- size: Sets the size of the quota.
- soft_limit: Defines the soft limit for the quota.
- hard_limit: Defines the hard limit for the quota.
- grace_period: Specifies the grace period for the quota.
Data Source Example:
The following code snippet illustrates how to retrieve information about existing smart quotas within a PowerScale environment using Terraform. The powerscale_quota data source fetches information about the specified quota. An output is defined to display the ID of the retrieved quota:
data "powerscale_quota" "existing_quota" {
  name = "existing-quota"
}

output "quota_id" {
  value = data.powerscale_quota.existing_quota.id
}- name: Specifies the name of the existing smart quota to query.
Cluster management
Groupnet: CRUD operations
Following is an example that shows how to define a GroupNet resource:
resource "powerscale_groupnet" "example_groupnet" {
  name       = "example-groupnet"
  subnet     = powerscale_subnet.example_subnet.id
  gateway    = "192.168.1.1"
  netmask    = "255.255.255.0"
  vlan_id    = 100
  // Add any additional configurations as needed
}- name: Specifies the name of the GroupNet.
- subnet: References the PowerScale subnet to associate with the GroupNet.
- gateway: Specifies the gateway for the GroupNet.
- netmask: Defines the netmask for the GroupNet.
- vlan_id: Specifies the VLAN ID for the GroupNet.
Data Source Example:
The following code snippet illustrates how to retrieve information about existing GroupNets within a PowerScale environment using Terraform. The powerscale_groupnet data source fetches information about the specified GroupNet. An output is defined to display the ID of the retrieved GroupNet:
data "powerscale_groupnet" "existing_groupnet" {
  name = "existing-groupnet"
}

output "groupnet_id" {
  value = data.powerscale_groupnet.existing_groupnet.id
}- name: Specifies the name of the existing GroupNet to query.
Subnet: CRUD operations
Resource Example:
The following code snippet shows how to provision a new subnet:
resource "powerscale_subnet" "example_subnet" {
  name         = "example-subnet"
  ip_range     = "192.168.1.0/24"
  network_mask = 24
  gateway      = "192.168.1.1"
  dns_servers  = ["8.8.8.8", "8.8.4.4"]
  // Add any additional configurations as needed
}- name: Specifies the name of the subnet to be created.
- ip_range: Defines the IP range for the subnet.
- network_mask: Specifies the network mask for the subnet.
- gateway: Specifies the gateway for the subnet.
- dns_servers: Lists the DNS servers associated with the subnet.
Data Source Example:
The powerscale_subnet data source fetches information about the specified subnet. The following code snippet illustrates how to retrieve information about existing subnets within a PowerScale environment. An output block is defined to display the ID of the retrieved subnet:
data "powerscale_subnet" "existing_subnet" {
  name = "existing-subnet"
}

output "subnet_id" {
  value = data.powerscale_subnet.existing_subnet.id
}- name: Specifies the name of the existing subnet to query. The result is stored in the data object called existing_subnet.
Network pool
Following is an example demonstrating how to define a network pool resource:
resource "powerscale_networkpool" "example_network_pool" {
  name       = "example-network-pool"
  subnet     = powerscale_subnet.example_subnet.id
  gateway    = "192.168.1.1"
  netmask    = "255.255.255.0"
  start_addr = "192.168.1.100"
  end_addr   = "192.168.1.200"
  // Add any additional configurations as needed
}- name: Specifies the name of the network pool.
- subnet: References the PowerScale subnet to associate with the network pool.
- gateway: Specifies the gateway for the network pool.
- netmask: Defines the netmask for the network pool.
- start_addr and end_addr: Specify the starting and ending IP addresses for the network pool range.
Data Source Example:
The following code snippet illustrates how to retrieve information about existing network pools. The powerscale_networkpool data source fetches information about the specified network pool. An output is defined to display the ID of the retrieved network pool:
data "powerscale_networkpool" "existing_network_pool" {
  name = "existing-network-pool"
}

output "network_pool_id" {
  value = data.powerscale_networkpool.existing_network_pool.id
}- name: Specifies the name of the existing network pool to query.
SmartPool settings
Here's an example that shows how to configure SmartPool settings within a PowerScale storage environment using Terraform:
resource "powerscale_smartpool_settings" "example_smartpool_settings" {
  name                    = "example-smartpool-settings"
  default_policy          = "balanced"
  compression             = true
  deduplication           = true
  auto_tiering            = true
  auto_tiering_policy     = "performance"
   auto_tiering_frequency  = "weekly"
  // Add any additional configurations as needed
}- name: Specifies the name of the SmartPool settings.
- default_policy: Sets the default policy for SmartPool.
- compression: Enables or disables compression.
- deduplication: Enables or disables deduplication.
- auto_tiering: Enables or disables auto-tiering.
- auto_tiering_policy: Sets the policy for auto-tiering.
- auto_tiering_frequency: Sets the frequency for auto-tiering.
Data Source Example:
The following example shows how to retrieve information about existing SmartPool settings within a PowerScale environment using Terraform. The powerscale_smartpool_settings data source fetches information about the specified SmartPool settings. An output is defined to display the ID of the retrieved SmartPool settings:
data “powerscale_smartpool_settings” “existing_smartpool_settings” {
  name = “existing-smartpool-settings”
}

output “smartpool_settings_id” {
  value = data.powerscale_smartpool_settings.existing_smartpool_settings.id
}- name: Specifies the name of the existing SmartPool settings to query.
New resources
New resources and datasources are also available for the following entities:
- NTP Server
- NTP Settings
- Cluster Email Settings
In addition to the previously mentioned resource-datasource pairs for PowerScale Networking, an option to enable or disable “Source based networking” has been added to the Network settings resource. The corresponding datasources can retrieve this setting on a PowerScale cluster.
PowerFlex Provider v1.3 and v1.4
The following new resources and corresponding datasources have been added to PowerFlex:
Fault Sets: CRUD and Import operations
The following is an example that shows how to define a Fault Set resource within a PowerFlex storage environment using Terraform:
resource "powerflex_fault_set" "example_fault_set" {
  name           = "example-fault-set"
  protection_domain_id = powerflex_protection_domain.example_pd.id
  fault_set_type = "RAID-1"
  // Add any additional configurations as needed
}- name: Specifies the name of the Fault Set.
- protection_domain_id: References the PowerFlex Protection Domain to associate with the Fault Set.
- fault_set_type: Defines the type of Fault Set, such as "RAID-1".
If you would like to bring an existing fault set resource into Terraform state management, you can import it using the fault set id:
terraform import powerflex_fault_set.fs_import_by_id "<id>"
Data Source Example:
The following code snippet illustrates how to retrieve information about existing Fault Sets within a PowerFlex environment using Terraform. The powerflex_fault_set data source fetches information about the specified Fault Set. An output is defined to display the ID of the retrieved Fault Set:
Ldata "powerflex_fault_set" "existing_fault_set" {
  name = "existing-fault-set"
}

output "fault_set_id" {
  value = data.powerflex_fault_set.existing_fault_set.id
}- name: Specifies the name of the existing Fault Set to query.
Snapshot policies: CRUD operations
- Snapshot policy resource – create, update, and delete.
- Snapshot policy data source – to get information of an existing policy.
Two new data sources
- powerflex_node: to get complete information related to a PowerFlex node firmware, hardware, and node health details.
- powerflex_template: this is a massive object that has information categorized into multiple groups within this object.
OME Provider v1.2
Following are the new resources to support Firmware baselining and compliance that have been added to the Dell OME Provider:
- Firmware Catalog
- Firmware Baselines
Firmware Catalog
Here is an example of how the catalog resource can be used to create or update catalogs:
# Resource to manage a new firmware catalog
resource "ome_firmware_catalog" "firmware_catalog_example" {
  # Name of the catalog required
  name = "example_catalog_1"

  # Catalog Update Type required.
  # Sets to Manual or Automatic on schedule catalog updates of the catalog.
  # Defaults to manual.
  catalog_update_type = "Automatic"

  # Share type required.
  # Sets the different types of shares (DELL_ONLINE, NFS, CIFS, HTTP, HTTPS)
  # Defaults to DELL_ONLINE
  share_type = "HTTPS"

  # Catalog file path, required for share types (NFS, CIFS, HTTP, HTTPS)
  # Start directory path without leading '/' and use alphanumeric characters.
  catalog_file_path = "catalogs/example_catalog_1.xml"

  # Share Address required for share types (NFS, CIFS, HTTP, HTTPS)
  # Must be a valid ipv4 (x.x.x.x), ipv6(xxxx:xxxx:xxxx:xxxx:xxxx:xxxx:xxxx:xxxx), or fqdn(example.com)
  # And include the protocol prefix ie (https://)
  share_address = "https://1.2.2.1"

  # Catalog refresh schedule, Required for catalog_update_type Automatic.
  # Sets the frequency of the catalog refresh.
  # Will be ignored if catalog_update_type is set to manual.
  catalog_refresh_schedule = {
    # Sets to (Weekly or Daily)
    cadence = "Weekly"
    # Sets the day of the week (Monday, Tuesday, Wednesday, Thursday, Friday, Saturday, Sunday)
    day_of_the_week = "Wednesday"
    # Sets the hour of the day (1-12)
    time_of_day = "6"
    # Sets (AM or PM)
    am_pm = "PM"
  }

  # Domain optional value for the share (CIFS), for other share types this will be ignored
  domain = "example"

  # Share user required value for the share (CIFS), optional value for the share (HTTPS)
  share_user = "example-user"

  # Share password required value for the share (CIFS), optional value for the share (HTTPS)
  share_password = "example-pass"
}
Existing catalogs can be imported into the Terraform state with the import command:
# terraform import ome_firmware_catalog.cat_1 <id>
terraform import ome_firmware_catalog.cat_1 1
After running the import command, populate the name field in the config file to start managing this resource.
Firmware Baseline
Here is an example that shows how a baseline can be compared to an array of individual devices or device groups:
# Resource to manage a new firmware baseline
resource "ome_firmware_baseline" "firmware_baseline" {
  // Required Fields
  # Name of the catalog
  catalog_name = "tfacc_catalog_dell_online_1"
  # Name of the Baseline
  name = "baselinetest"

  // Only one of the following fields (device_names, group_names , device_service_tags) is required
  # List of the Device names to associate with the firmware baseline.
  device_names = ["10.2.2.1"]

  # List of the Group names to associate with the firmware baseline.
  # group_names = ["HCI Appliances","Hyper-V Servers"]

  # List of the Device service tags to associate with the firmware baseline.
  # device_service_tags = ["HRPB0M3"]

  // Optional Fields
  // This must always be set to true. The size of the DUP files used is 64 bits."
  #is_64_bit = true

  // Filters applicable updates where no reboot is required during create baseline for firmware updates. This field is set to false by default.
   #filter_no_reboot_required = true

  # Description of the firmware baseline
  description = "test baseline"
}
Although the resource supports terraform import, in most cases a new baseline can be created using a Firmware catalog entry.
Following is a list of new data sources and supported operations in Terraform Provider for Dell OME:
- Firmware Repository
- Firmware Baseline Compliance Report
- Firmware Catalog
- Device Compliance Report
RedFish Provider v1.1 and 1.2
Several new resources have been added to the Redfish provider to access and set different iDRAC attribute sets. Following are the details:
Certificate Resource
This is a resource for the import of the ssl certificate to iDRAC based on the input parameter Type. After importing the certificate, the iDRAC will automatically restart. By default, iDRAC comes with a self-signed certificate for its web server. If the user wants to replace with his/her own server certificate (signed by Trusted CA), two kinds of SSL certificates are supported: (1) Server certificate and (2) Custom certificate. Following are the steps to generate these certificates:
- Server Certificate:
- Generate the CSR from iDRAC.
- Create the certificate using CSR and sign with trusted CA.
- The certificate should be signed with hashing algorithm equivalent to sha256
- Custom Certificate:
- An externally created custom certificate which can be imported into the iDRAC.
- Convert the external custom certificate into PKCS#12 format, and it should be encoded via base64. The conversion requires passphrase which should be provided in 'passphrase' attribute.
Boot Order Resource
This Terraform resource is used to configure Boot Order and enable/disable Boot Options of the iDRAC Server. We can read the existing configurations or modify them using this resource.
Boot Source Override Resource
This Terraform resource is used to configure Boot sources of the iDRAC Server. If the state in boot_source_override_enabled is set once or continuous, the value is reset to disabled after the boot_source_override_target actions have completed successfully. Changes to these options do not alter the BIOS persistent boot order configuration.
Manager Reset
This resource is used to reset the manager.
Lifecycle Controller Attributes Resource
This Terraform resource is used to get and set the attributes of the iDRAC Lifecycle Controller.
System Attributes Resource
This Terraform resource is used to configure System Attributes of the iDRAC Server. We can read the existing configurations or modify them using this resource. Import is also supported for this resource to include existing System Attributes in Terraform state.
iDRAC Firmware Update Resource
This Terraform resource is used to update the firmware of the iDRAC Server based on a catalog entry.
Resources
Here are the link sets for key resources for each of the Dell Terraform providers:
- Provider for PowerScale
- Provider for PowerFlex
- Provider for PowerStore
- Provider for Redfish
Author: Parasar Kodati, Engineering Technologist, Dell ISG