Driving Innovation with the Dell Validated Platform for Red Hat OpenShift and IBM Instana
Wed, 14 Dec 2022 21:20:39 -0000
|Read Time: 0 minutes
“There is no innovation and creativity without failure. Period.” – Brené Brown
In the Information Technology field today, it seems like it’s impossible to go five minutes without someone using some variation of the word innovate. We are constantly told we need to innovate to stay competitive and remain relevant. I don’t want to spend time arguing the importance of innovation, because if you’re reading this then you probably already understand its importance.
What I do want to focus on is the role that failure plays in innovation. One of the biggest barriers to innovation is the fear of failure. We have all experienced some level of failure in our lives, and the costly mistakes can be particularly memorable. To create a culture that fosters innovation, we need to create an environment that reduces the costs associated with failure – these can be financial costs, time costs, or reputation costs. This is why one of the core tenets of modern application architecture is “fail fast”. Put simply, it means to identify mistakes quickly and adjust. The idea is that a flawed process or assumption will cost more to fix the longer it is present in the system. With traditional waterfall processes, that flaw could be present and undetected for months during the development process, and in some cases, even make it through to production.
While the benefits of fail fast can be easy to see, implementing it can be a bit harder. It involves streamlining not just the development process, but also the build process, the release process, and having proper instrumentation all the way through from dev to production. This last part, instrumentation, is the focus of this article. Instrumentation means monitoring a system to allow the operators to:
- See current state
- Identify application performance
- Detect when something is not operating as expected
While the need for instrumentation has always been present, developers are often faced with difficult timelines and the first feature areas that tend to be cut are testing and instrumentation. This can help in the short term, but it often ends up costing more down the road, both financially and in the end-user experience.
IBM Instana is a tool that provides observability of complete systems, with support for over 250 different technologies. This means that you can deploy Instana into the environment and start seeing valuable information without requiring any code changes. If you are supporting web-based applications, you can also take things further by including basic script references in the code to gain insights from client statistics as well.
Announcing Support for Instana on the Dell Validated Platform for Red Hat OpenShift
Installing IBM Instana into the Dell Validated Platform for Red Hat OpenShift can be done by Operator, Helm Chart, or YAML File.
The simplest way is to use the Operator. This consists of the following steps:
- Create the instana-agent project
- Set the policy permissions for the instana-agent service account
- Install the Operator
- Apply the Operator Configuration using a custom resource YAML file
You can configure IBM Instana to point to IBM’s cloud endpoint. Or for high security environments, you can choose to connect to a private IBM Instana endpoint hosted internally.
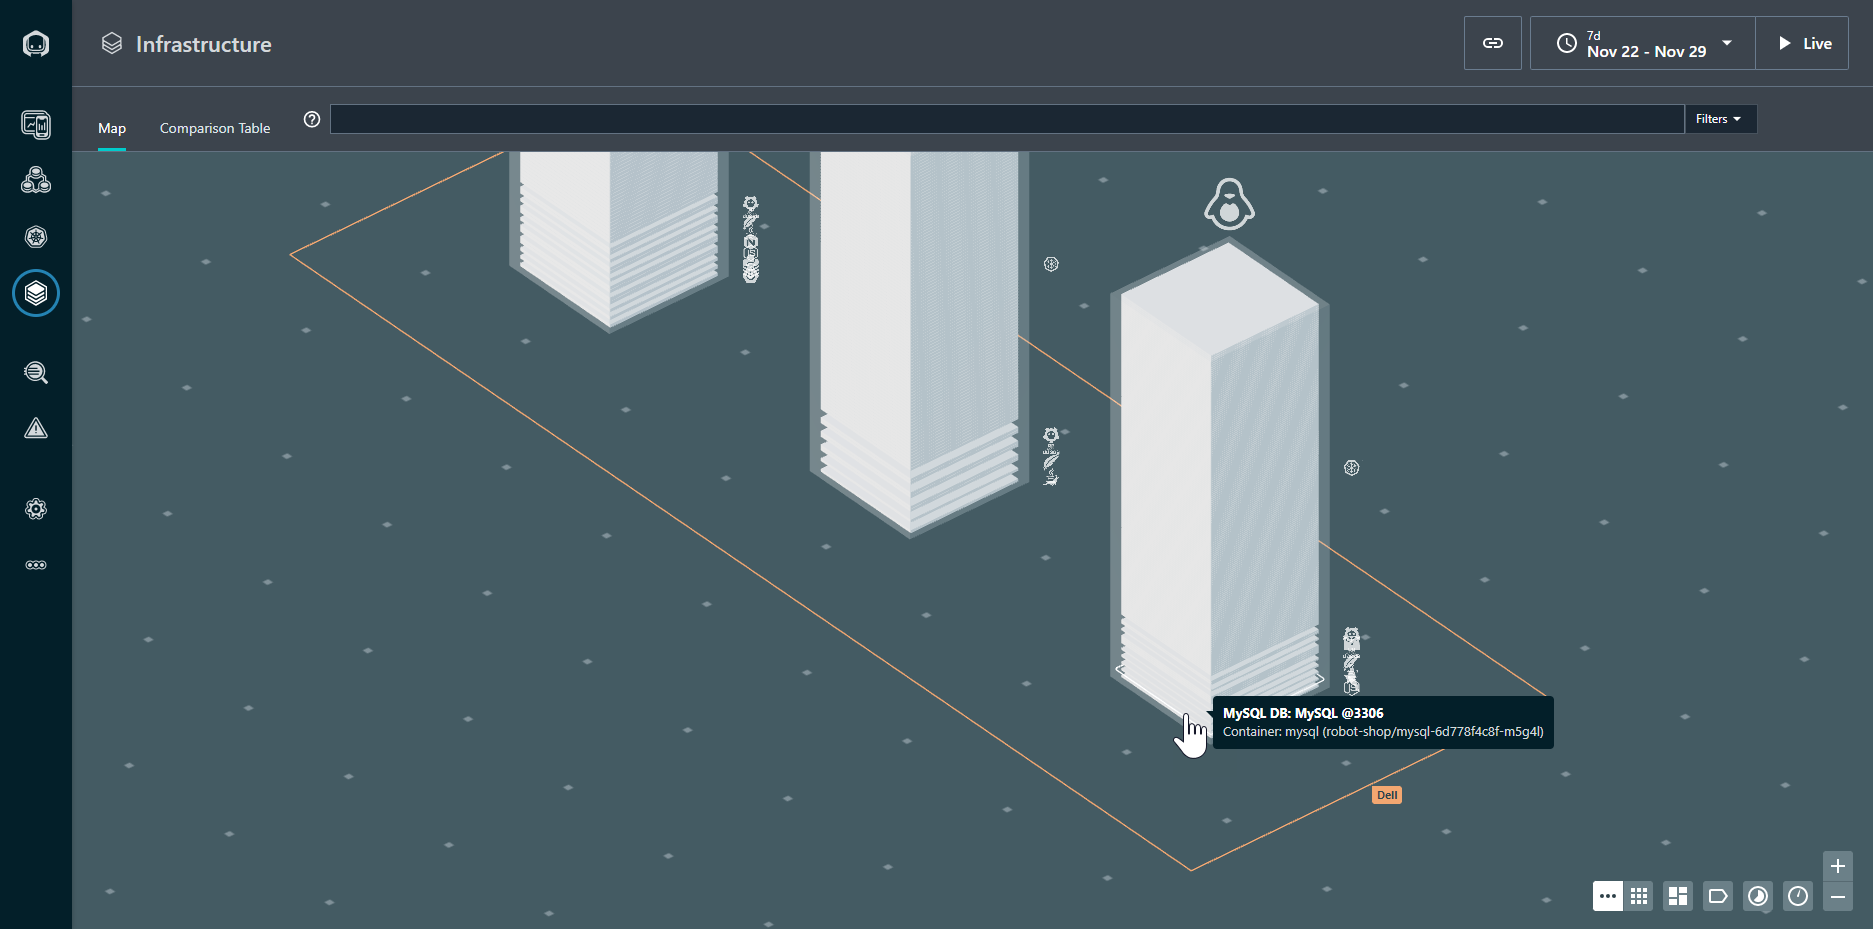
Figure 1. Infrastructure view of the OpenShift Cluster
Once configured, the IBM Instana agent starts sending data to the endpoint for analysis. The graphical view in Figure 1 shows the overall health of the Kubernetes cluster, and the node on which each resource is located. The resources in a normal state are gray: any resource requiring attention would appear in a different color.
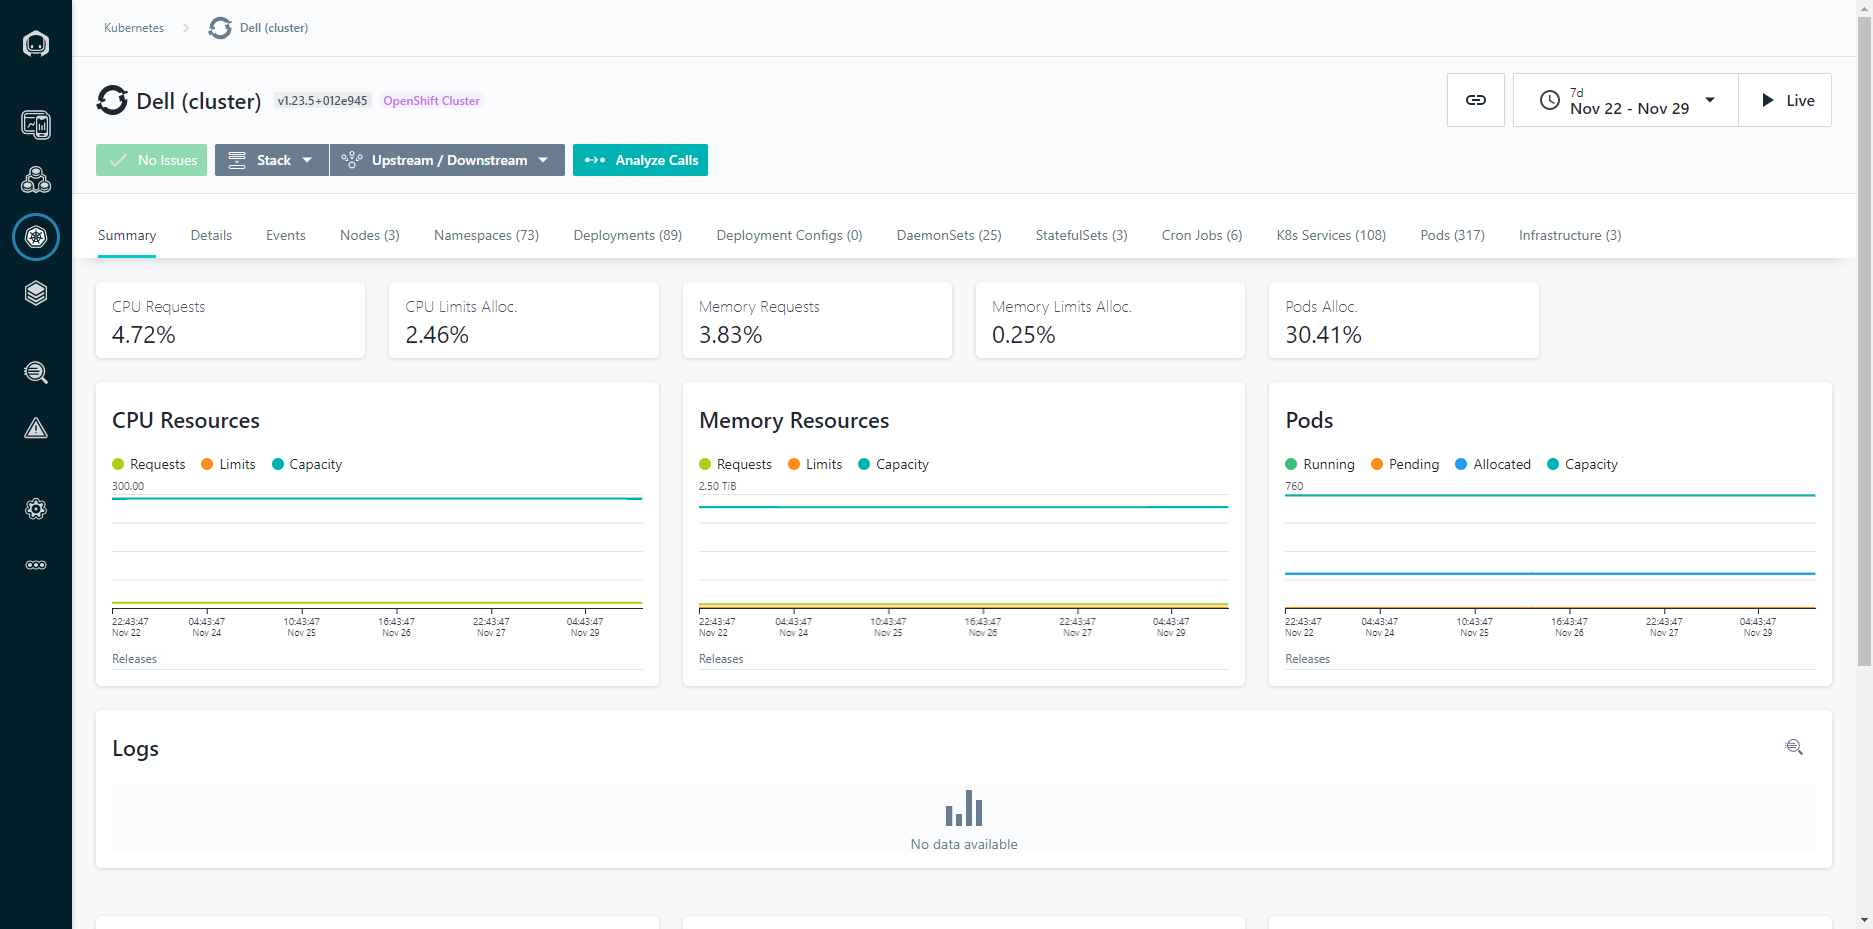
Figure 2: Cluster View
We can also see the metrics across the cluster, including CPU and Memory statistics. The charts are kept in time sync, so if you highlight a given area or narrow the time period, all of the charts remain in the same context. This makes it easy to identify correlations between different metrics and events.
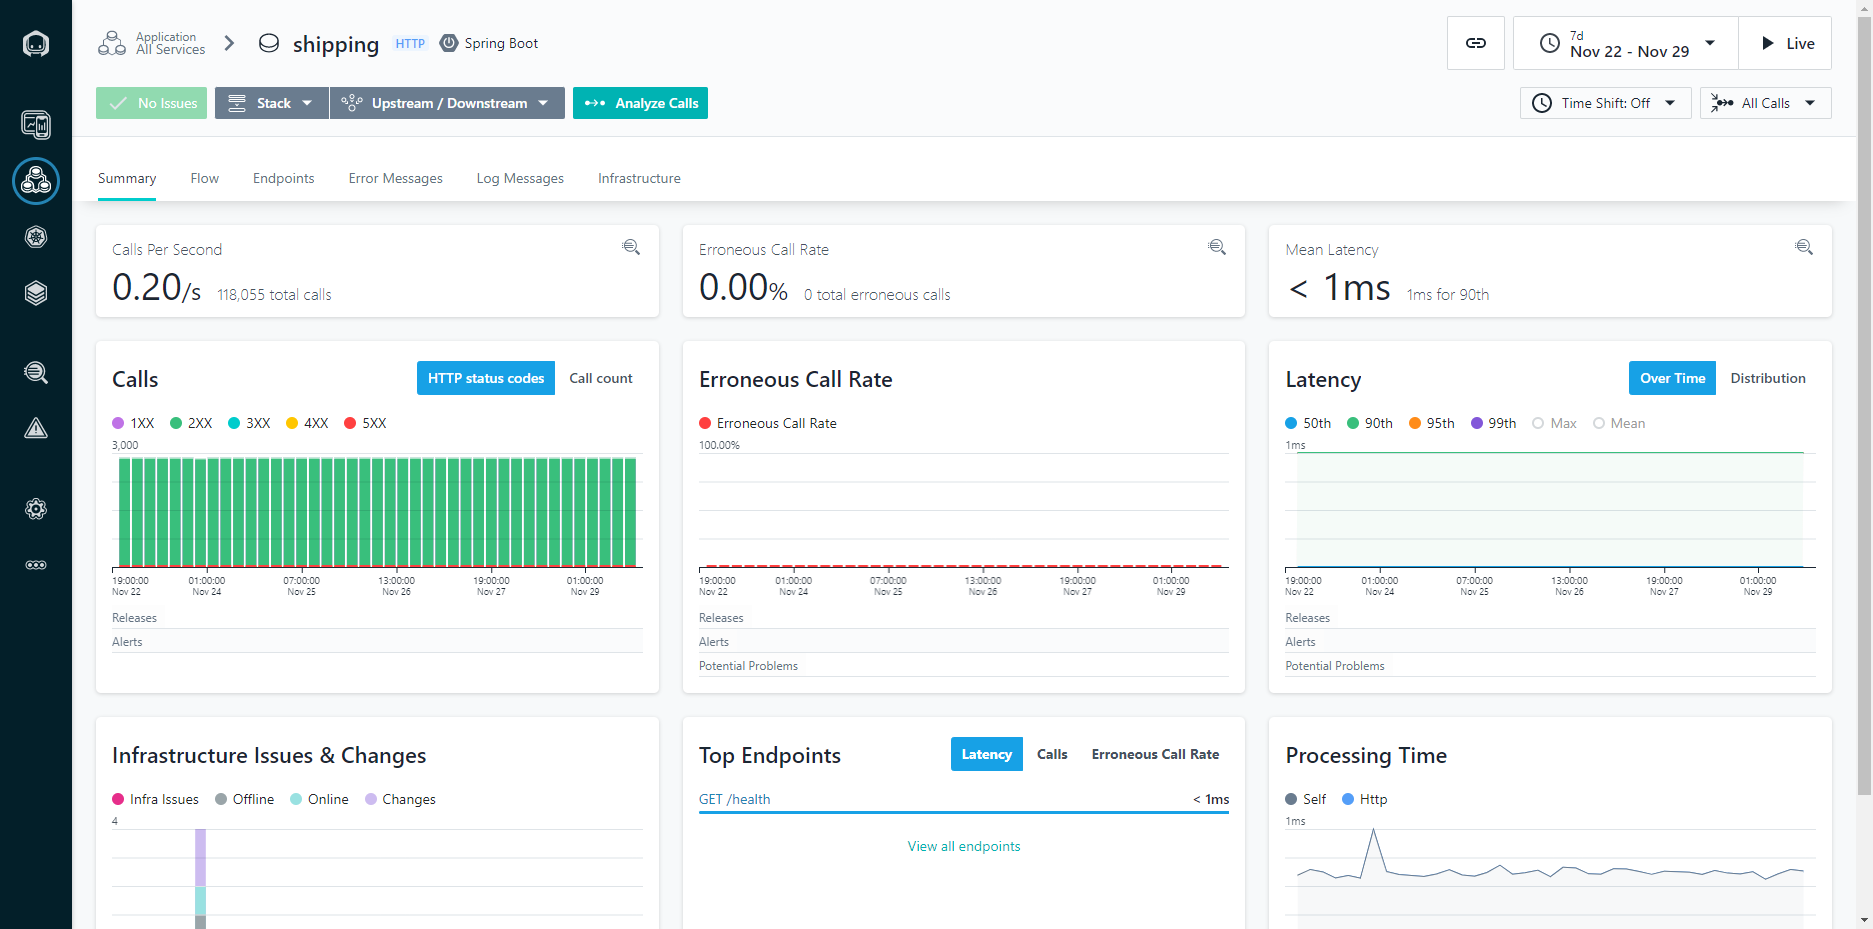
Figure 3: Application Calls View
Looking at the application calls allows you to see how a given application is performing over time. Being able to narrow down to a one second granularity means that you can actually follow individual calls through the system and see things like the parameters passed in the call. This can be incredibly helpful for troubleshooting intermittent application issues.
Figure 4: Application Dependencies View
The dependencies view gives you a graphical representation of all the components within a system and how they relate to each other, in a dependency diagram. This is critically important in modern application design because as you implement a larger number of more focused services, often created by different DevOps teams, it can be difficult to keep track of what services are being composed together.
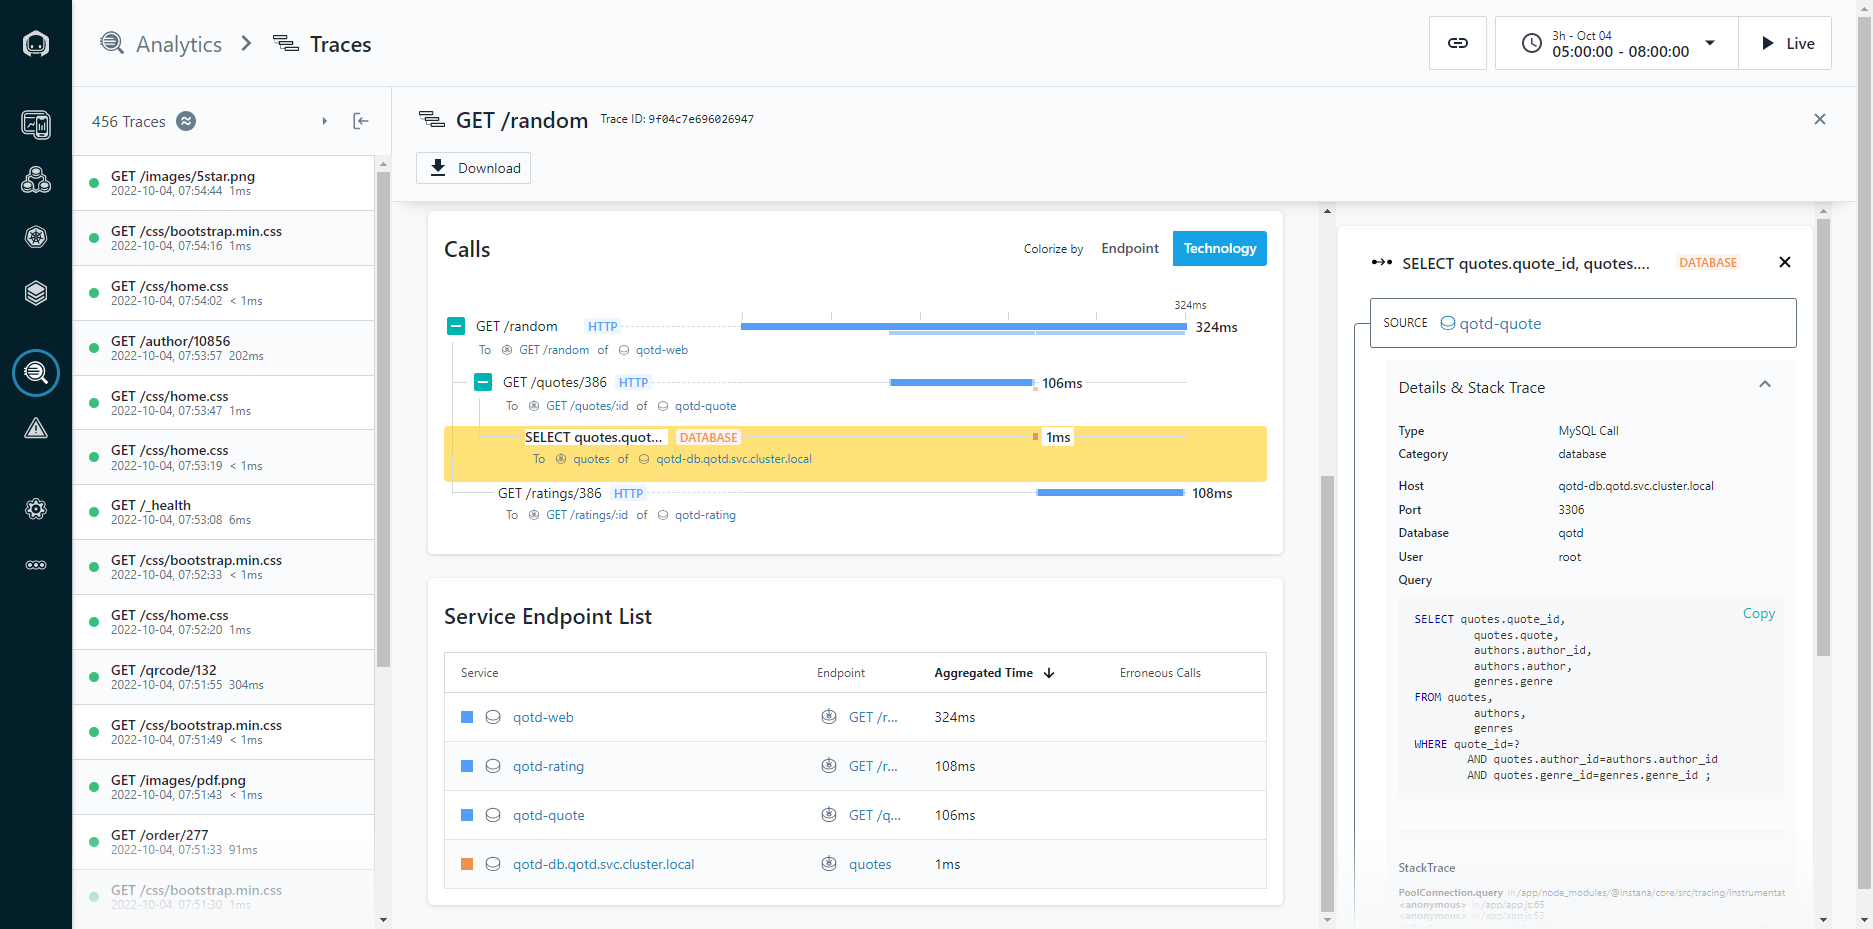
Figure 5: Application Stack Traces
The application stack trace allows you to walk the stack of an application to see what calls were made, and how much time each call took to complete. Knowing that a page load took five seconds can help indicate a problem, but being able to walk the stack and identify that 4.8 seconds was spent running a database query (and exactly what query that was) means that you can spend less time troubleshooting, because you already know exactly what needs to be fixed.
For more information about the Dell Validated Platform for Red Hat OpenShift, see our launch announcement: Accelerate DevOps and Cloud Native Apps with the Dell Validated Platform for Red Hat OpenShift | Dell Technologies Info Hub.
Author: Michael Wells, PowerFlex Engineering Technologist
Twitter: @SqlTechMike
LinkedIn
Related Blog Posts
Accelerate DevOps and Cloud Native Apps with the Dell Validated Platform for Red Hat OpenShift
Thu, 15 Sep 2022 13:28:43 -0000
|Read Time: 0 minutes
Today we announce the release of the Dell Validated Platform for Red Hat OpenShift. This platform has been jointly validated by Red Hat and Dell, and is an evolution of the design referenced in the white paper “Red Hat OpenShift 4.6 with CSI PowerFlex 1.3.0 Deployment on Dell EMC PowerFlex Family”.
Figure 1: The Dell Validated Platform for Red Hat OpenShift
The world is moving faster and with that comes the struggle to not just maintain, but to streamline processes and accelerate deliverables. We are no longer in the age of semi-annual or quarterly releases, as some industries need multiple releases a day to meet their goals. To accomplish this requires a mix of technology and processes … enter the world of containers. Containerization is not a new technology, but in recent years it has picked up a tremendous amount of steam. It is no longer just a fringe technology reserved for those on the bleeding edge; it has become mainstream and is being used by organizations large and small. However, technology alone will not solve everything. To be successful your processes must change with the technology – this is where DevOps comes in. DevOps is a different approach to Information Technology; it involves a blending of resources usually separated into different teams with different reporting structures and often different goals. It systematically looks to eliminate process bottlenecks and applies automation to help organizations move faster than they ever thought possible. DevOps is not a single process, but a methodology that can be challenging to implement.
Why Red Hat OpenShift?
Red Hat OpenShift is an enterprise-grade container orchestration and management platform based on Kubernetes. While many organizations understand the value of moving to containerization, and are familiar with the name Kubernetes, most don’t have a full grasp of what Kubernetes is and what it isn’t. OpenShift uses their own Kubernetes distribution, and layers on top critical enterprise features like:
- Built-in underlying hardware management and scaling, integrated with Dell iDRAC
- Multi-Cluster deployment, management, and shift-left security enforcement
- Developer Experience – CI/CD, GitOps, Pipelines, Logging, Monitoring, and Observability
- Integrated Networking including ServiceMesh and multi-cluster networking
- Integrated Web Console with distinct Admin and Developer views
- Automated Platform Updates and Upgrades
- Multiple workload options – containers, virtual machines, and serverless
- Operators for extending and managing additional capabilities
All these capabilities mean that you have a full container platform with a rigorously tested and certified toolchain that can accelerate your development, and reduce the costs associated with maintenance and downtime. This is what has made OpenShift the number 1 container platform in the market.
Figure 2: Realizing business value from a hybrid strategy - Source: IDC White Paper, sponsored by Red Hat, "The Business Value of Red Hat OpenShift", doc # US47539121, February 2021.
Meeting the performance needs
Scalable container platforms like Red Hat OpenShift work best when paired with a fast, scalable infrastructure platform, and this is why OpenShift, and Dell PowerFlex are the perfect team. With PowerFlex, organizations can have a single software-defined platform for all their workloads, from bare metal, to virtualized, to containerized. All on a blazing-fast infrastructure that can scale to thousands of nodes. Not to mention the API-driven architecture of PowerFlex fits perfectly in a methodology centered on automation. To help jumpstart customers on their automation journey we have already created robust infrastructure and DevOps automation through our extensive tooling that includes:
- Dell Container Storage Modules (CSM)/Container Storage Interface (CSI) Plugins
- Ansible Modules
- AppSync Integration
Being software-defined means that PowerFlex can deliver linear performance by being able to balance data across all nodes. This ensures that you can spread the work out over the cluster to scale well beyond the limits of the individual hardware components. This also allows PowerFlex to be incredibly resilient, capable of seamlessly recovering from individual component or node failures.
Putting it all together
Introducing the Dell Validated Platform for Red Hat OpenShift, the latest collaboration in the long 22-year partnership between Red Hat and Dell. This platform brings together the power of Red Hat OpenShift with the flexibility and performance of Dell PowerFlex into a single package.
Figure 3: The Dell Validated Platform for Red Hat OpenShift Architecture
This platform uses PowerFlex in a 2-tier architecture to give you optimal performance, and the ability to scale storage and compute independently, up to thousands of nodes. We are also taking advantage of Red Hat capabilities to run PowerFlex Manager and its accompanying services in OpenShift Virtualization to make efficient use of compute nodes and minimize the required hardware footprint.
The combined platform gives you the ability to become more agile and increase productivity through the extensive automation already available, along with the documented APIs to extend that automation or create your own.
This platform has been fully validated by both Dell and Red Hat, so you can run it with confidence. We have also streamlined the ordering process, so the entire platform can be acquired directly from Dell, including the Red Hat software and subscriptions. All of this is implemented using Dell’s ProDeploy services to ensure that the platform is implemented optimally and gets you up and running faster. This means you can start realizing the value of the platform faster, while reducing risk.
If you are interested in getting more information about the Dell Validated Platform for Red Hat OpenShift please contact your Dell representative.
Authors:
Michael Wells, PowerFlex Engineering Technologist
Twitter: @SqlTechMike
LinkedIn
Rhys Oxenham, Director, Customer & Field Engagement
Q1 2024 Update for Terraform Integrations with Dell Infrastructure
Tue, 02 Apr 2024 14:45:56 -0000
|Read Time: 0 minutes
This post covers all the new Terraform resources and data sources that have been released in the last two quarters: Q4’23 and Q1 ‘24. You can check out previous releases of Terraform providers here: Q1-2023, Q2-2023, and Q3-2023. I also covered the first release of PowerScale provider here.
Here is a summary of the Dell Terraform Provider versions released over the last two quarters:
- v1.1 and v1.2 of the provider for PowerScale
- v1.3 and v1.4 of the provider for PowerFlex
- v1.3 and v1.4 of the provider for PowerStore
- v1.2 of the Provider for OME
- v1.1 and v1.2 of the Provider for Redfish
PowerScale Provider v1.1 and v1.2
PowerScale received the most number of new Terraform capabilities in the last few months. New resources and corresponding data sources have been under the following workflow categories:
- Data Management
- User and Access Management
- Cluster Management
Data management
Following is the summary for the different resource-datasource pairs introduced to automate operations related to Data management on PowerScale:
Snapshots: CRUD operations for Snapshots
Here's an example of how to create a snapshot resource within a PowerScale storage environment using Terraform:
resource "powerscale_snapshot" "example_snapshot" { name = "example-snapshot" filesystem = powerscale_filesystem.example_fs.id description = "Example snapshot description" // Add any additional configurations as needed }
- name: Specifies the name of the snapshot to be created.
- filesystem: References the PowerScale filesystem for which the snapshot will be created.
- description: Provides a description for the snapshot.
Here's an example of how to retrieve information about existing snapshots within a PowerScale environment using Terraform:
data "powerscale_snapshot" "existing_snapshot" { name = "existing-snapshot" } output "snapshot_id" { value = data.powerscale_snapshot.existing_snapshot.id }
- name: Specifies the name of the existing snapshot to query.
Snapshot schedules: CRUD operations for Snapshot schedules
Following is an example of how to define a snapshot schedule resource:
resource "powerscale_snapshot_schedule" "example_schedule" { name = "example-schedule" filesystem = powerscale_filesystem.example_fs.id snapshot_type = "weekly" retention_policy = "4 weeks" snapshot_start_time = "23:00" // Add any additional configurations as needed }
- name: Specifies the name of the snapshot schedule.
- filesystem: References the PowerScale filesystem for which the snapshot schedule will be applied.
- snapshot_type: Specifies the type of snapshot schedule, such as "daily", "weekly", and so on.
- retention_policy: Defines the retention policy for the snapshots created by the schedule.
- snapshot_start_time: Specifies the time at which the snapshot creation process should begin.
Data Source Example:
The following example shows how to retrieve information about existing snapshot schedules within a PowerScale environment using Terraform. The powerscale_snapshot_schedule data source fetches information about the specified snapshot schedule. An output is defined to display the ID of the retrieved snapshot schedule:
data "powerscale_snapshot_schedule" "existing_schedule" { name = "existing-schedule" } output "schedule_id" { value = data.powerscale_snapshot_schedule.existing_schedule.id }
- name: Specifies the name of the existing snapshot schedule to query.
File Pool Policies: CRUD operations for File Pool Policies
File policies in PowerScale help establish policy-based workflows like file placement and tiering of files that match certain criteria. Following is an example of how the new file pool policy resource can be configured:
resource "powerscale_filepool_policy" "example_filepool_policy" { name = "filePoolPolicySample" is_default_policy = false file_matching_pattern = { or_criteria = [ { and_criteria = [ { operator = ">" type = "size" units = "B" value = "1073741824" }, { operator = ">" type = "birth_time" use_relative_time = true value = "20" }, { operator = ">" type = "metadata_changed_time" use_relative_time = false value = "1704742200" }, { operator = "<" type = "accessed_time" use_relative_time = true value = "20" } ] }, { and_criteria = [ { operator = "<" type = "changed_time" use_relative_time = false value = "1704820500" }, { attribute_exists = false field = "test" type = "custom_attribute" value = "" }, { operator = "!=" type = "file_type" value = "directory" }, { begins_with = false case_sensitive = true operator = "!=" type = "path" value = "test" }, { case_sensitive = true operator = "!=" type = "name" value = "test" } ] } ] } # A list of actions to be taken for matching files. (Update Supported) actions = [ { data_access_pattern_action = "concurrency" action_type = "set_data_access_pattern" }, { data_storage_policy_action = { ssd_strategy = "metadata" storagepool = "anywhere" } action_type = "apply_data_storage_policy" }, { snapshot_storage_policy_action = { ssd_strategy = "metadata" storagepool = "anywhere" } action_type = "apply_snapshot_storage_policy" }, { requested_protection_action = "default" action_type = "set_requested_protection" }, { enable_coalescer_action = true action_type = "enable_coalescer" }, { enable_packing_action = true, action_type = "enable_packing" }, { action_type = "set_cloudpool_policy" cloudpool_policy_action = { archive_snapshot_files = true cache = { expiration = 86400 read_ahead = "partial" type = "cached" } compression = true data_retention = 604800 encryption = true full_backup_retention = 145152000 incremental_backup_retention = 145152000 pool = "cloudPool_policy" writeback_frequency = 32400 } } ] description = "filePoolPolicySample description" apply_order = 1 }
You can import existing file pool policies using the file pool policy ID:
terraform import powerscale_filepool_policy.example_filepool_policy <policyID>
or by simply referencing the default policy:
terraform import powerscale_filepool_policy.example_filepool_policy is_default_policy=true
The data source can be used to get a handle to a particular file pool policy:
data "powerscale_filepool_policy" "example_filepool_policy" { filter { # Optional list of names to filter upon names = ["filePoolPolicySample", "Default policy"] } }
or to get the complete list of policies including the default policy:
data "powerscale_filepool_policy" "all" { }
You can then deference into the data structure as needed.
User and Access management
Following is a summary of the different resource-datasource pairs introduced to automate operations related to User and Access management on PowerScale:
LDAP Providers: CRUD operations
To create and manage LDAP providers, you can use the new resource as follows:
resource "powerscale_ldap_provider" "example_ldap_provider" { # Required params for creating and updating. name = "ldap_provider_test" # root of the tree in which to search identities. base_dn = "dc=tthe,dc=testLdap,dc=com" # Specifies the server URIs. Begin URIs with ldap:// or ldaps:// server_uris = ["ldap://10.225.108.54"] }
You can import existing LDAP providers using the provider name:
terraform import powerscale_ldap_provider.example_ldap_provider <ldapProviderName>
and also get a handle using the corresponding data source using a variety of criteria:
data "powerscale_ldap_provider" "example_ldap_provider" { filter { names = ["ldap_provider_name"] # If specified as "effective" or not specified, all fields are returned. If specified as "user", only fields with non-default values are shown. If specified as "default", the original values are returned. scope = "effective" } }
ACL Settings: CRUD operations
PowerScale OneFS provides very powerful ACL capabilities, including a single namespace for multi-protocol access and its own internal ACL representation to perform access control. The internal ACL is presented as protocol-specific views of permissions so that NFS exports display POSIX mode bits for NFSv3 and shows ACL for NFSv4 and SMB. Now, we have a new resource to manage the global ACL settings for a given cluster:
resource "powerscale_aclsettings" "example_acl_settings" { # Optional fields both for creating and updating # Please check the acceptable inputs for each setting in the documentation # access = "windows" # calcmode = "approx" # calcmode_group = "group_aces" # calcmode_owner = "owner_aces" # calcmode_traverse = "ignore" # chmod = "merge" # chmod_007 = "default" # chmod_inheritable = "no" # chown = "owner_group_and_acl" # create_over_smb = "allow" # dos_attr = "deny_smb" # group_owner_inheritance = "creator" # rwx = "retain" # synthetic_denies = "remove" # utimes = "only_owner" }
Import is supported, and there is corresponding data source for the resource as well.
Smart Quotas: CRUD operations
Following is an example that shows how to define a quota resource:
resource "powerscale_quota" "example_quota" { name = "example-quota" filesystem = powerscale_filesystem.example_fs.id size = "10GB" soft_limit = "8GB" hard_limit = "12GB" grace_period = "7d" // Add any additional configurations as needed }
- name: Specifies the name of the quota.
- filesystem: References the PowerScale filesystem to associate with the quota.
- size: Sets the size of the quota.
- soft_limit: Defines the soft limit for the quota.
- hard_limit: Defines the hard limit for the quota.
- grace_period: Specifies the grace period for the quota.
Data Source Example:
The following code snippet illustrates how to retrieve information about existing smart quotas within a PowerScale environment using Terraform. The powerscale_quota data source fetches information about the specified quota. An output is defined to display the ID of the retrieved quota:
data "powerscale_quota" "existing_quota" { name = "existing-quota" } output "quota_id" { value = data.powerscale_quota.existing_quota.id }
- name: Specifies the name of the existing smart quota to query.
Cluster management
Groupnet: CRUD operations
Following is an example that shows how to define a GroupNet resource:
resource "powerscale_groupnet" "example_groupnet" { name = "example-groupnet" subnet = powerscale_subnet.example_subnet.id gateway = "192.168.1.1" netmask = "255.255.255.0" vlan_id = 100 // Add any additional configurations as needed }
- name: Specifies the name of the GroupNet.
- subnet: References the PowerScale subnet to associate with the GroupNet.
- gateway: Specifies the gateway for the GroupNet.
- netmask: Defines the netmask for the GroupNet.
- vlan_id: Specifies the VLAN ID for the GroupNet.
Data Source Example:
The following code snippet illustrates how to retrieve information about existing GroupNets within a PowerScale environment using Terraform. The powerscale_groupnet data source fetches information about the specified GroupNet. An output is defined to display the ID of the retrieved GroupNet:
data "powerscale_groupnet" "existing_groupnet" { name = "existing-groupnet" } output "groupnet_id" { value = data.powerscale_groupnet.existing_groupnet.id }
- name: Specifies the name of the existing GroupNet to query.
Subnet: CRUD operations
Resource Example:
The following code snippet shows how to provision a new subnet:
resource "powerscale_subnet" "example_subnet" { name = "example-subnet" ip_range = "192.168.1.0/24" network_mask = 24 gateway = "192.168.1.1" dns_servers = ["8.8.8.8", "8.8.4.4"] // Add any additional configurations as needed }
- name: Specifies the name of the subnet to be created.
- ip_range: Defines the IP range for the subnet.
- network_mask: Specifies the network mask for the subnet.
- gateway: Specifies the gateway for the subnet.
- dns_servers: Lists the DNS servers associated with the subnet.
Data Source Example:
The powerscale_subnet data source fetches information about the specified subnet. The following code snippet illustrates how to retrieve information about existing subnets within a PowerScale environment. An output block is defined to display the ID of the retrieved subnet:
data "powerscale_subnet" "existing_subnet" { name = "existing-subnet" } output "subnet_id" { value = data.powerscale_subnet.existing_subnet.id }
- name: Specifies the name of the existing subnet to query. The result is stored in the data object called existing_subnet.
Network pool
Following is an example demonstrating how to define a network pool resource:
resource "powerscale_networkpool" "example_network_pool" { name = "example-network-pool" subnet = powerscale_subnet.example_subnet.id gateway = "192.168.1.1" netmask = "255.255.255.0" start_addr = "192.168.1.100" end_addr = "192.168.1.200" // Add any additional configurations as needed }
- name: Specifies the name of the network pool.
- subnet: References the PowerScale subnet to associate with the network pool.
- gateway: Specifies the gateway for the network pool.
- netmask: Defines the netmask for the network pool.
- start_addr and end_addr: Specify the starting and ending IP addresses for the network pool range.
Data Source Example:
The following code snippet illustrates how to retrieve information about existing network pools. The powerscale_networkpool data source fetches information about the specified network pool. An output is defined to display the ID of the retrieved network pool:
data "powerscale_networkpool" "existing_network_pool" { name = "existing-network-pool" } output "network_pool_id" { value = data.powerscale_networkpool.existing_network_pool.id }
- name: Specifies the name of the existing network pool to query.
SmartPool settings
Here's an example that shows how to configure SmartPool settings within a PowerScale storage environment using Terraform:
resource "powerscale_smartpool_settings" "example_smartpool_settings" { name = "example-smartpool-settings" default_policy = "balanced" compression = true deduplication = true auto_tiering = true auto_tiering_policy = "performance" auto_tiering_frequency = "weekly" // Add any additional configurations as needed }
- name: Specifies the name of the SmartPool settings.
- default_policy: Sets the default policy for SmartPool.
- compression: Enables or disables compression.
- deduplication: Enables or disables deduplication.
- auto_tiering: Enables or disables auto-tiering.
- auto_tiering_policy: Sets the policy for auto-tiering.
- auto_tiering_frequency: Sets the frequency for auto-tiering.
Data Source Example:
The following example shows how to retrieve information about existing SmartPool settings within a PowerScale environment using Terraform. The powerscale_smartpool_settings data source fetches information about the specified SmartPool settings. An output is defined to display the ID of the retrieved SmartPool settings:
data “powerscale_smartpool_settings” “existing_smartpool_settings” { name = “existing-smartpool-settings” } output “smartpool_settings_id” { value = data.powerscale_smartpool_settings.existing_smartpool_settings.id }
- name: Specifies the name of the existing SmartPool settings to query.
New resources
New resources and datasources are also available for the following entities:
- NTP Server
- NTP Settings
- Cluster Email Settings
In addition to the previously mentioned resource-datasource pairs for PowerScale Networking, an option to enable or disable “Source based networking” has been added to the Network settings resource. The corresponding datasources can retrieve this setting on a PowerScale cluster.
PowerFlex Provider v1.3 and v1.4
The following new resources and corresponding datasources have been added to PowerFlex:
Fault Sets: CRUD and Import operations
The following is an example that shows how to define a Fault Set resource within a PowerFlex storage environment using Terraform:
resource "powerflex_fault_set" "example_fault_set" { name = "example-fault-set" protection_domain_id = powerflex_protection_domain.example_pd.id fault_set_type = "RAID-1" // Add any additional configurations as needed }
- name: Specifies the name of the Fault Set.
- protection_domain_id: References the PowerFlex Protection Domain to associate with the Fault Set.
- fault_set_type: Defines the type of Fault Set, such as "RAID-1".
If you would like to bring an existing fault set resource into Terraform state management, you can import it using the fault set id:
terraform import powerflex_fault_set.fs_import_by_id "<id>"
Data Source Example:
The following code snippet illustrates how to retrieve information about existing Fault Sets within a PowerFlex environment using Terraform. The powerflex_fault_set data source fetches information about the specified Fault Set. An output is defined to display the ID of the retrieved Fault Set:
Ldata "powerflex_fault_set" "existing_fault_set" { name = "existing-fault-set" } output "fault_set_id" { value = data.powerflex_fault_set.existing_fault_set.id }
- name: Specifies the name of the existing Fault Set to query.
Snapshot policies: CRUD operations
- Snapshot policy resource – create, update, and delete.
- Snapshot policy data source – to get information of an existing policy.
Two new data sources
- powerflex_node: to get complete information related to a PowerFlex node firmware, hardware, and node health details.
- powerflex_template: this is a massive object that has information categorized into multiple groups within this object.
OME Provider v1.2
Following are the new resources to support Firmware baselining and compliance that have been added to the Dell OME Provider:
- Firmware Catalog
- Firmware Baselines
Firmware Catalog
Here is an example of how the catalog resource can be used to create or update catalogs:
# Resource to manage a new firmware catalog resource "ome_firmware_catalog" "firmware_catalog_example" { # Name of the catalog required name = "example_catalog_1" # Catalog Update Type required. # Sets to Manual or Automatic on schedule catalog updates of the catalog. # Defaults to manual. catalog_update_type = "Automatic" # Share type required. # Sets the different types of shares (DELL_ONLINE, NFS, CIFS, HTTP, HTTPS) # Defaults to DELL_ONLINE share_type = "HTTPS" # Catalog file path, required for share types (NFS, CIFS, HTTP, HTTPS) # Start directory path without leading '/' and use alphanumeric characters. catalog_file_path = "catalogs/example_catalog_1.xml" # Share Address required for share types (NFS, CIFS, HTTP, HTTPS) # Must be a valid ipv4 (x.x.x.x), ipv6(xxxx:xxxx:xxxx:xxxx:xxxx:xxxx:xxxx:xxxx), or fqdn(example.com) # And include the protocol prefix ie (https://) share_address = "https://1.2.2.1" # Catalog refresh schedule, Required for catalog_update_type Automatic. # Sets the frequency of the catalog refresh. # Will be ignored if catalog_update_type is set to manual. catalog_refresh_schedule = { # Sets to (Weekly or Daily) cadence = "Weekly" # Sets the day of the week (Monday, Tuesday, Wednesday, Thursday, Friday, Saturday, Sunday) day_of_the_week = "Wednesday" # Sets the hour of the day (1-12) time_of_day = "6" # Sets (AM or PM) am_pm = "PM" } # Domain optional value for the share (CIFS), for other share types this will be ignored domain = "example" # Share user required value for the share (CIFS), optional value for the share (HTTPS) share_user = "example-user" # Share password required value for the share (CIFS), optional value for the share (HTTPS) share_password = "example-pass" }
Existing catalogs can be imported into the Terraform state with the import command:
# terraform import ome_firmware_catalog.cat_1 <id> terraform import ome_firmware_catalog.cat_1 1
After running the import command, populate the name field in the config file to start managing this resource.
Firmware Baseline
Here is an example that shows how a baseline can be compared to an array of individual devices or device groups:
# Resource to manage a new firmware baseline resource "ome_firmware_baseline" "firmware_baseline" { // Required Fields # Name of the catalog catalog_name = "tfacc_catalog_dell_online_1" # Name of the Baseline name = "baselinetest" // Only one of the following fields (device_names, group_names , device_service_tags) is required # List of the Device names to associate with the firmware baseline. device_names = ["10.2.2.1"] # List of the Group names to associate with the firmware baseline. # group_names = ["HCI Appliances","Hyper-V Servers"] # List of the Device service tags to associate with the firmware baseline. # device_service_tags = ["HRPB0M3"] // Optional Fields // This must always be set to true. The size of the DUP files used is 64 bits." #is_64_bit = true // Filters applicable updates where no reboot is required during create baseline for firmware updates. This field is set to false by default. #filter_no_reboot_required = true # Description of the firmware baseline description = "test baseline" }
Although the resource supports terraform import, in most cases a new baseline can be created using a Firmware catalog entry.
Following is a list of new data sources and supported operations in Terraform Provider for Dell OME:
- Firmware Repository
- Firmware Baseline Compliance Report
- Firmware Catalog
- Device Compliance Report
RedFish Provider v1.1 and 1.2
Several new resources have been added to the Redfish provider to access and set different iDRAC attribute sets. Following are the details:
Certificate Resource
This is a resource for the import of the ssl certificate to iDRAC based on the input parameter Type. After importing the certificate, the iDRAC will automatically restart. By default, iDRAC comes with a self-signed certificate for its web server. If the user wants to replace with his/her own server certificate (signed by Trusted CA), two kinds of SSL certificates are supported: (1) Server certificate and (2) Custom certificate. Following are the steps to generate these certificates:
- Server Certificate:
- Generate the CSR from iDRAC.
- Create the certificate using CSR and sign with trusted CA.
- The certificate should be signed with hashing algorithm equivalent to sha256
- Custom Certificate:
- An externally created custom certificate which can be imported into the iDRAC.
- Convert the external custom certificate into PKCS#12 format, and it should be encoded via base64. The conversion requires passphrase which should be provided in 'passphrase' attribute.
Boot Order Resource
This Terraform resource is used to configure Boot Order and enable/disable Boot Options of the iDRAC Server. We can read the existing configurations or modify them using this resource.
Boot Source Override Resource
This Terraform resource is used to configure Boot sources of the iDRAC Server. If the state in boot_source_override_enabled is set once or continuous, the value is reset to disabled after the boot_source_override_target actions have completed successfully. Changes to these options do not alter the BIOS persistent boot order configuration.
Manager Reset
This resource is used to reset the manager.
Lifecycle Controller Attributes Resource
This Terraform resource is used to get and set the attributes of the iDRAC Lifecycle Controller.
System Attributes Resource
This Terraform resource is used to configure System Attributes of the iDRAC Server. We can read the existing configurations or modify them using this resource. Import is also supported for this resource to include existing System Attributes in Terraform state.
iDRAC Firmware Update Resource
This Terraform resource is used to update the firmware of the iDRAC Server based on a catalog entry.
Resources
Here are the link sets for key resources for each of the Dell Terraform providers:
- Provider for PowerScale
- Provider for PowerFlex
- Provider for PowerStore
- Provider for Redfish
Author: Parasar Kodati, Engineering Technologist, Dell ISG