Dell Technologies PowerEdge MX Platform: MX IOM Firmware Update Process
Thu, 08 Dec 2022 23:40:12 -0000
|Read Time: 0 minutes
If you are reading this blog, most likely your interest is in how to update the firmware on the Dell Networking MX I/O modules (IOMs). This blog will go through all the necessary steps to update both the Dell OME-Modular application and the networking IOMs for all types of deployments.
Starting with OME-M 2.00.00, a new recommended order for updating the MX chassis and all its components has been documented in Appendix B of the Dell OpenManage Enterprise – Modular Edition Version 2.00.00 for PowerEdge MX7000 Chassis User’s Guide. The new process, called phased update order, is supported for upgrading from OME-M 1.40.xx to OME-M 2.00.00 and later.
Note: If updating to a version prior to OME-M 2.00.00 or updating from a version prior to OME-M 1.40.00, use the update process documented in the section titled Updating firmware for PowerEdge MX solution in the appropriate Dell OpenManage Enterprise – Modular Edition PowerEdge MX7000 Chassis User’s Guide.
This blog will follow the phased update order process. After updating the Networking IOMs, please refer to the MX7000 Chassis User Guide linked above for server update instructions.
The following image shows the update order for all deployment types. In the sections below, the instructions will provide additional information when updating multichassis or using different IOM operating modes.
Note: The update order for versions prior to OME-M 2.00.00 recommended an order of servers, followed by OME-M, and then network IOMs. Although the order is different, the steps to update OME-M and network IOMs remain the same.
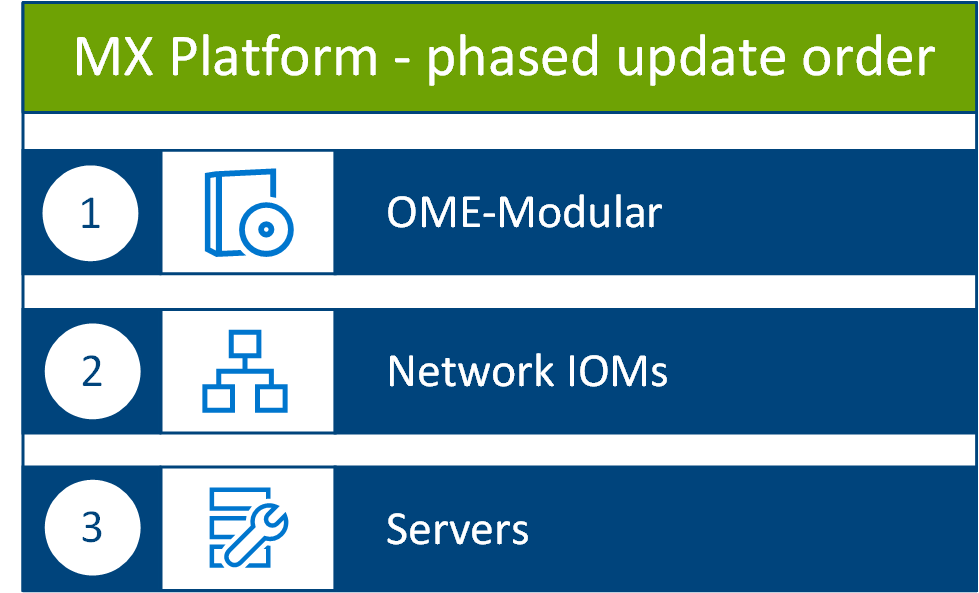 MX Platform phased update order
MX7000 Solution Baseline
All components and devices within the MX chassis are tested as a validated solution stack or firmware baseline. Each release of the OME-Modular software includes an update to the firmware baseline. The MX7000 Chassis User Guide will contain the current baseline for that release and baselines for past OME-M. The details are listed in a table within the Updating firmware for PowerEdge MX section.
The firmware baseline information can also be seen at the Networking Support & Interoperability Matrix.
Firmware location and catalogs
Firmware location
Dell update packages (DUPs): https://www.dell.com/support
OME-M DUPs: https://www.dell.com/support/home/en-us/product-support/product/poweredge-mx7000/drivers
IOM DUPs:
- https://www.dell.com/support/home/en-us/product-support/product/networking-mx9116n/drivers
- https://www.dell.com/support/home/en-us/product-support/product/networking-mx5108n/drivers
Catalogs
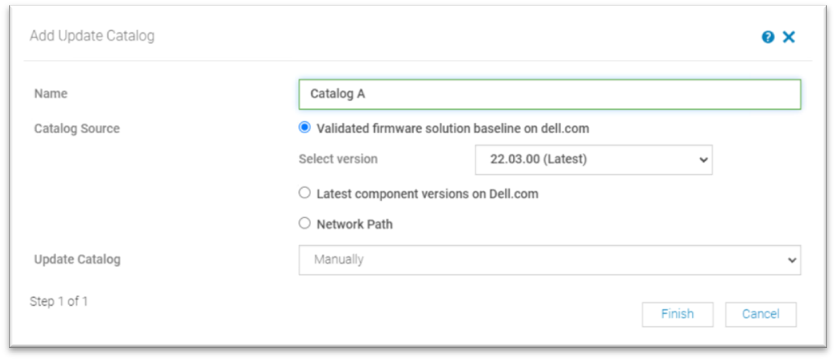
Catalogs are a list of firmware available for the components and devices installed on the chassis. There are three main types of catalogs:
- Validated firmware solution baseline on dell.com
- Latest component versions on Dell.com
- Network Path (Custom catalog from Dell Repository Manger)
The most common catalog method is the Validated firmware solution baseline on dell.com and will ensure you follow the baseline. Catalogs based on baselines are available approximately 30 days after the release of a new OME-M version. This blog focuses on the validated firmware solution baseline.
Catalogs can be added to OME-M through the Configuration > Firmware Compliance section of the OME-M GUI.
Once a catalog is established, it can be used to establish a Firmware Compliance baseline to check compliance to that catalog. Once a compliance check is completed, the compliance report can be used to show components that do not match the catalog. From the compliance report, you can select components to update via the Make Compliant button. This is especially helpful for server components.
For chassis updates with OME-Modular and IOMs, the process described in this blog will start from the Devices view within OME-M.
OME-Modular update process
OME-M resides in the management module. Updating the chassis to the latest OME-M will update all components within the management module.
When updating a single chassis deployment, access the OME-M GUI using the chassis management IP address.
When updating a multi-chassis deployment, access the OME-M GUI of the lead chassis. If you select all the management modules in an MCM group, OME-M updates them in the required order.
Single chassis OME-M update
Follow the below steps to update the desired OME-M release for a single chassis deployment.
- Navigate to the chassis IP address.
- Click the Firmware tab.
 Click the Firmware tab
- Click Update.
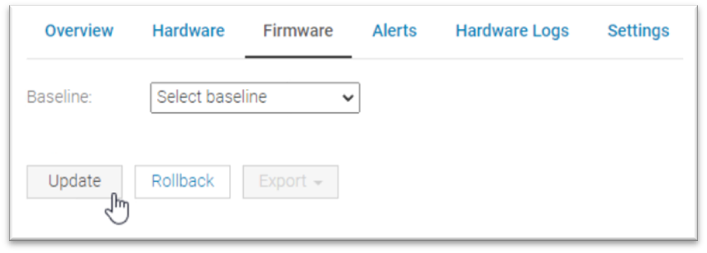 Click Update
- Select the update source. If you have downloaded the DUP package from the Dell support site, choose Individual package and choose the file from your local directory. You can also download the update file directly from the OME-M GUI using the Baseline selection.
- Select both instances of OpenManage Enterprise Modular and click Next.
- Click either Update Now or Schedule Later, depending on your preference.
- Click Finish.
OME-Modular starts a job for the update process. You can monitor the job in the Monitor > Jobs area of the OME-M GUI. - Wait for the job to fully complete. The OME-M GUI will not be reachable for all parts of the upgrade process. Check the job for full completion before starting IOM updates.
Multi-chassis OME-M update
The process for updating multiple chassis is the same as the single chassis. The main difference is to select all of the chassis in the group.
- Navigate to the lead chassis IP address.
- Click Devices > Chassis.
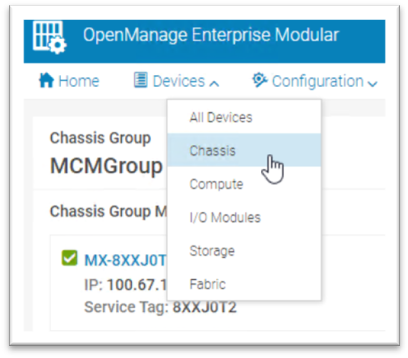 Click Devices > Chassis
 - Select all of the chassis in the group desired for update.
- Click Update.
- Select the update source. If you have downloaded the DUP package from the Dell support site, choose Individual package and choose the file from your local directory. You can also download the update file directly from the OME-M GUI using the Baseline selection.
- Select all instances of OpenManage Enterprise Modular and click Next.
- Click either Update Now or Schedule Later, depending on your preference.
- Click Finish.
OME-Modular starts a job for the update process. You can monitor the job in the Monitor > Jobs area of the OME-M GUI. - Wait for the job to fully complete. The OME-M GUI will not be reachable for all parts of the upgrade process. Check the job for full completion before starting IOM updates.
Networking IOM update process
Once the chassis update process is completed, the IOMs are ready for the update process. The following sections will show the update process using the OME-M GUI and the DUP firmware package.
SmartFabric mode updates
SmartFabric and OME-Modular controls the update process of the IOM pair in SmartFabric mode in the MX deployment. Updating an IOM on a fabric will start the update process for all IOMs in the fabric. OME-M will coordinate the update process to ensure continuity of the fabric, updating each IOM one at a time.
- Navigate to the lead chassis IP address.
- Click Devices > I/O Modules.
- From the list of available IOMs, choose a single IOM in a desired fabric by using the selection box on the left side of the list. Ensure the selection is a MX9116n or MX5108n model. Use the selection box on the left side of the list.
- Click Update directly above the list.
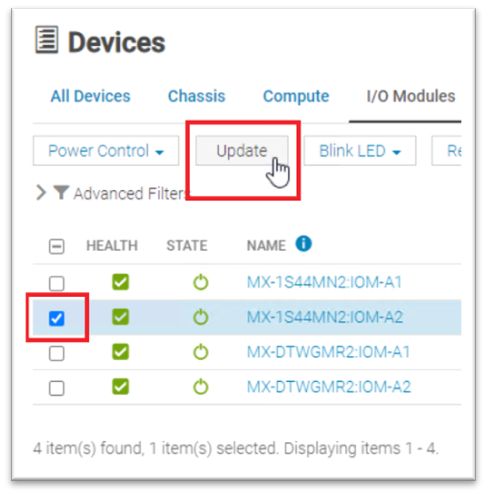 Select a single IOM and click Update
 - Select the update source. If you downloaded the DUP package from the Dell support site, choose Individual package and choose the file from your local directory. You can also download the update file directly from the OME-M GUI using the Baseline selection.
- Select the IOM device again and click Next or Finish.
Note: No servers were included in this update. Disregard the warnings for server options.
From this point, the SmartFabric and OME-M coordinates the upgrade of all IOMs in the SmartFabric. All IOMs will be shown in a single job. To monitor the IOM upgrades, navigate to Monitor > Jobs, select the desired job, and click View Details.
The job is not fully complete until the job messages show completed and the green status checkmark is displayed. This update process can take 2 hours or more to complete. It is common to see the first IOM reboot and then have a long waiting period between status messages. The SmartFabric is performing checks to ensure the databases and configuration are properly established before reloading the second IOM.
If there is another fabric with a second set of IOMs in the chassis or scalable fabric, repeat the above steps for the other fabric.
Full Switch mode updates
IOMs operating in Full Switch mode operate and are configured much like traditional rack switches. However, the MX platform has the OME-Modular GUI to manage the IOMs. Dell Technologies recommends that you use the IOM-Modular GUI to download and initiate the update process, as described in the SmartFabric operation steps above.
In Full Switch mode, you manage the update process and ensure connectivity is maintained throughout the update process. Update only one switch at a time to ensure connectivity is maintained.
For deployments with storage uplinks such as FCoE or FC, Dell Technologies recommends that you verify the active path and maintain storage connectivity throughout the process. If any issues occur in migrating the active storage uplink during the update process, contact Dell Support for assistance.
- Navigate to the lead chassis IP address.
- Click Devices > I/O Modules.
- From the list of available IOMs, choose a single IOM from the desired fabric. Ensure the selection is a MX9116n or MX5108n model. Use the selection box on the left side of the list.
- Click Update directly above the list.
- Select the update source. If you downloaded the DUP package from the Dell support site, choose Individual package and choose the file from your local directory. You can also download the update file directly from the OME-M GUI using the Baseline selection.
- Select the IOM device again and click Next or Finish.
- Wait for the update job to fully complete. To monitor the IOM upgrades, navigate to Monitor > Jobs, select the desired job, and click View Details. The job is not fully complete until the job messages show completed and the green status checkmark is displayed.
- Repeat the update process for the second IOM in steps 2 through 7.
Video
Dell PowerEdge MX7000 Platform firmware update process example: