


Dell Technologies PowerEdge MX Platform: Backing Up and Restoring the MX Platform
An essential part of any data center disaster recovery plan is the ability to back up and restore the infrastructure. As a best practice, logs, server settings, routing information, and switch configurations should be backed up, with several copies secured in multiple locations.
The Dell Technologies PowerEdge MX Platform OME-M 1.40.00 release includes a significant new addition to the backup and restore feature: SmartFabric settings are now included.
This blog describes the full network backup and restore process, with emphasis on the SmartFabric settings and complete IOM startup.xml configuration.
Backing up the MX7000 chassis
In the following scenarios, you might need to restore the MX7000 chassis:
- The chassis was misconfigured
- The MX platform is unresponsive or malfunctioning
- Configurations were deleted due to disaster or human error
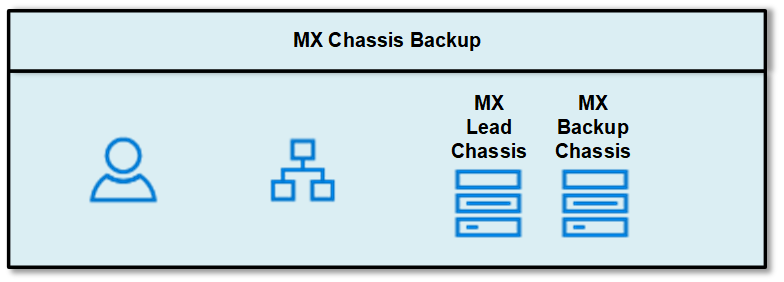
Note: If the MX chassis is in a MultiChassis Management (MCM) group, the backup will only be performed on the lead chassis. Member chassis do not need to be backed up because they inherit the configuration from the lead chassis.
MX Chassis, OME-M, and SmartFabric settings and configurations
MX platform backups include the following configurations and settings:
- Application settings
- Setup configuration
- Power configuration
- Chassis network configuration
- Local access configuration
- Location configuration
- Slot configuration
- OME Modular network settings
- User's settings
- Security settings
- Alert settings
OME-M 1.40.00 introduces the following:
- System configuration
- Templates
- Profiles
- Identity pools and VLANs
- Catalogs and baselines
- Alert policies
- SmartFabric
- MCM configuration
Back up the MX platform
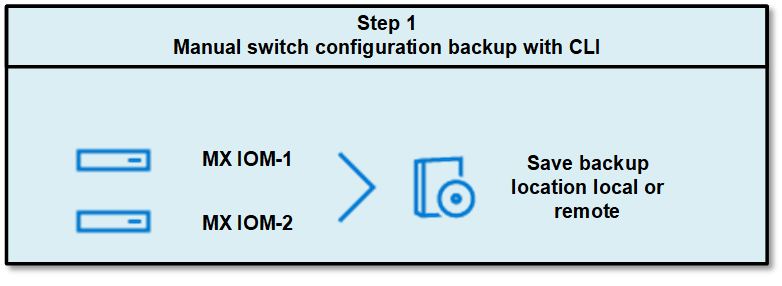
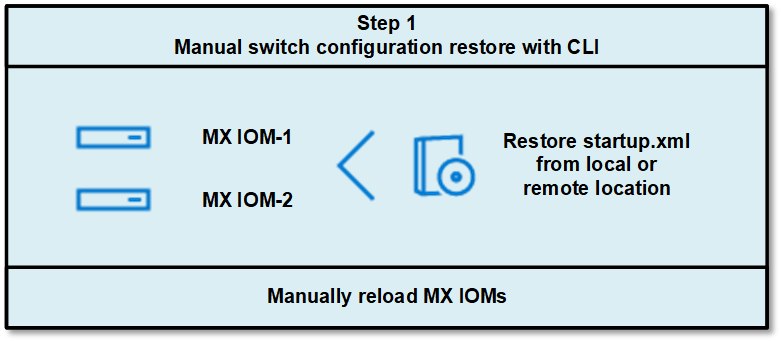
The OME-M Chassis Backup wizard includes chassis settings and configurations, but it does not include the I/O Modules (IOMs) configuration. Let’s get started by backing up the IOM configurations manually through the CLI.
Manual backup of IOM configuration provides a backup of the running configuration. The running configuration contains the current OS10 system configuration and consists of a series of OS10 commands in a text file that you can view and edit with a text editor. Copy the configuration file to a remote server or local directory as a backup or for viewing and editing.
- In the CLI, run the following command to manually save each IOM switch configuration:
OS10# copy running-configuration startup-configuration - Back up the startup file to the local directory or on external resources such as an TFTP server, an FTP server, or a USB drive.
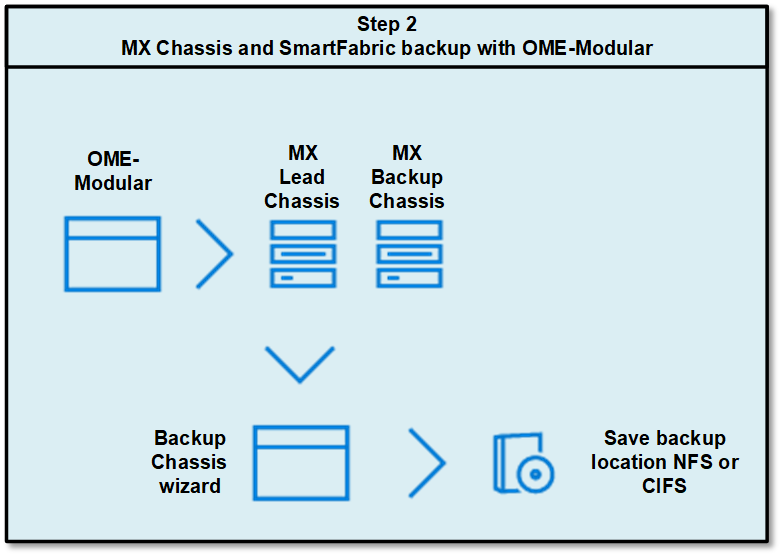
In the example below, the configuration is saved on a local directory of the switch by running the following CLI:OS10# copy config://startup.xml config://backup-3-22.xml - Access the MX lead chassis Overview page and click More Actions > Backup.
The Chassis Backup wizard is displayed.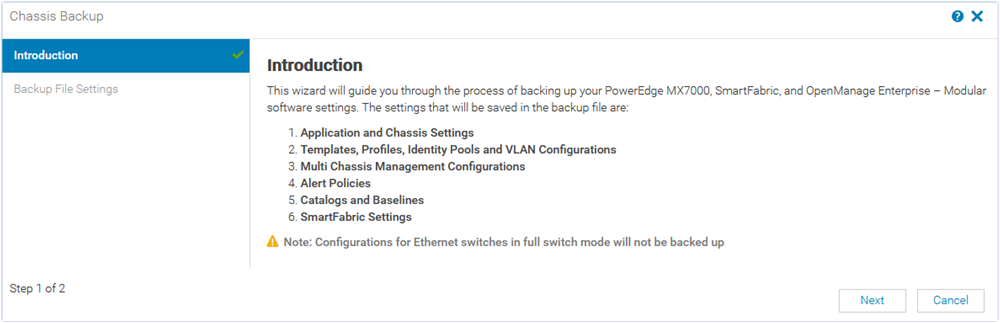
- On the Introduction page, review the settings that are included in the backup file and click Next.
The Backup File Settings page is displayed.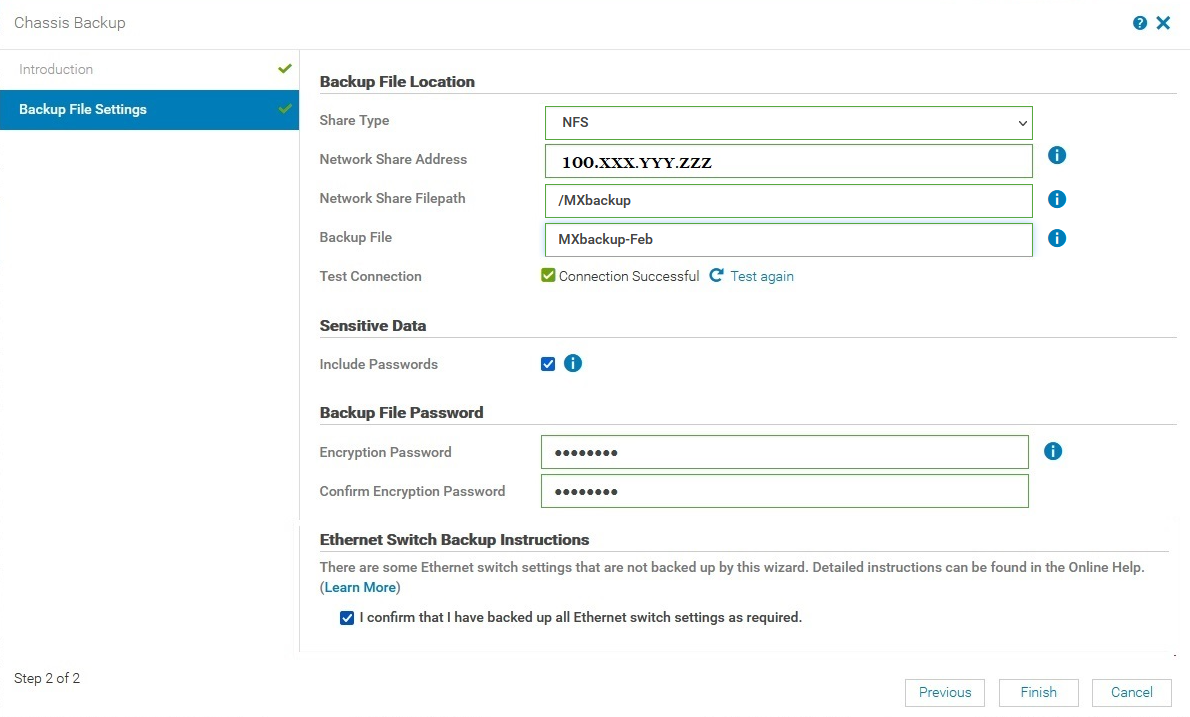
- In Backup File Location, select the Share Type where you want to store the chassis backup file.
The available options are CIFS and NFS.
In this example, NFS is selected. Therefore, the NFS server should be preconfigured and the network connection should be tested before starting the backup process. - Enter the Network Share Address and the Network Share FilePath name of the backup file after a forward slash. For example /MXbackup
The Network Share Address is the NFS server NIC IP. The Network Share FilePath must be predefined on the NFS server, the file path, or the folder where the backup file will be saved. - Enter a name for the Backup File.
In this example, MXbackup-Feb is entered. - (Optional) Select Test connection. If the MX chassis and NFS server are in the same network, you can skip this step.
- (Optional) To allow users to include passwords while backing up the chassis, select Sensitive Data.
For more information about sensitive data, see Chassis Backup and Restore. - In Backup File Password, enter a password in the Encryption Password and Confirm Encryption Password textboxes.
The backup file is encrypted and cannot be edited. Only authorized users can retrieve and restore the file on the chassis. Provide the password and secure it in a safe place.
Note: The password must be 8 to 32 characters long and must be a combination of an uppercase, a lowercase, a special character (+, &, ?, >, -, }, |, ., !, (, ', ,, _, [, ", @, #, ), *, ;, $, ], /, §, %, =, <, :, {, I) , and a number.
- In the Ethernet Switch Backup Instructions, select the check box to confirm that you have manually saved the Ethernet switch backup settings.
For more detailed information about all Ethernet switch CLI settings, see CLI commands not part of chassis backup.- When the MX7000 chassis is in SmartFabric mode, the backup process does not include some switch settings.
- In Full Switch mode, the chassis backup process does not include any switch settings.
- To start the backup, click Finish.
- (Optional) To view the progress of the backup operation:
- Click Monitor > Jobs.
- Select the appropriate job and click View Details.
Available information includes current task status, percentage complete, elapsed time, and much more.
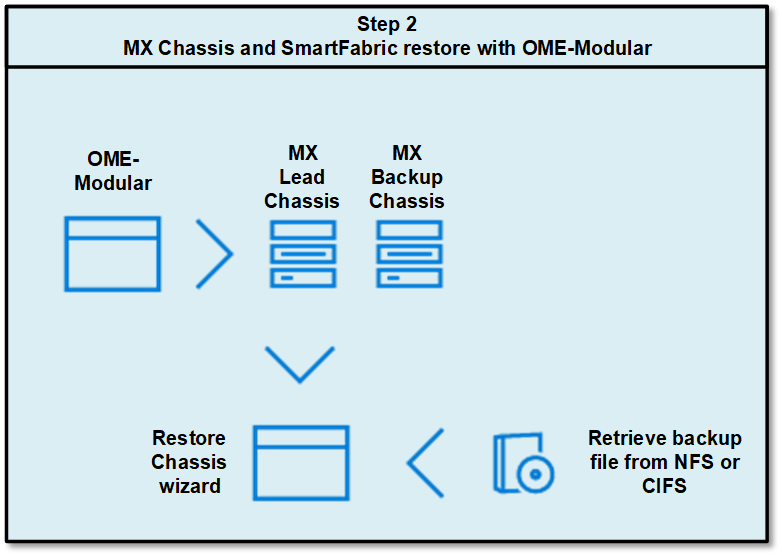
Restore the MX platform
This section describes the steps to restore an MX chassis and the IOM configuration.
You can use the OME-M GUI to restore the MX chassis working configuration with the backup file we created in the previous section.
The GUI doesn’t restore the IOM configuration, so you can manually restore the IOM configuration through the CLI.
Before you start the restore operation, make sure you have network access to the location where the backup file has been saved.

Restore the system
As a best practice, verify network connectivity to the location where the backup file has been saved.
You can restore the chassis through the OME-M GUI. The GUI doesn’t restore the IOM configuration, so the IOM configuration must be restored manually through the CLI.
- From the lead chassis, open the OME-M GUI and browse to Overview > More Actions > Restore.
The Introduction page displays.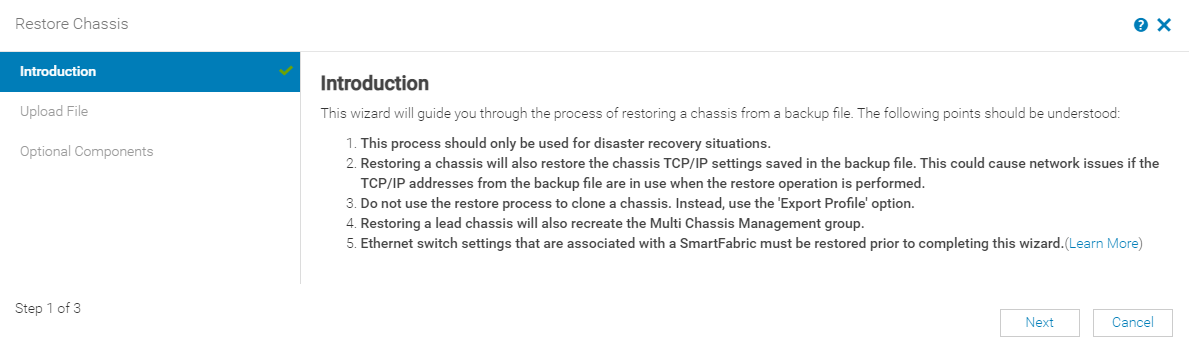
- Read the process and click the Learn More link in point 5 (shown in the figure above) to see more information about the Ethernet switch restore.
Note: Do not click Next. The Ethernet switch configuration must be manually restored before proceeding to the next step in the restore wizard. - Access the MX IOM CLI of each switch and restore the Ethernet Switch configuration.
The IOMs can be restored manually from the local directory on the switch or from external resources such as an TFTP server, an FTP server, or a USB drive. In this example, the IOMs manually restore through the CLI from the local directory on the switch.
In the CLI, run the following command:OS10# copy config://backup-3-22.xml config://startup.xmlOS10# reloadProceed to reboot the system? [confirm yes/no]:yesSystem configuration has been modified. Save? [yes/no]:noCaution: Reload the IOMs immediately after restoring the startup configuration, because the running configuration is automatically written to the startup.xml every 30 minutes. Reloading the IOM immediately after each startup configuration restore avoids the startup.xml being overwritten.
- After the IOMs are restored and reloaded successfully, resume the restore process in the OME-M GUI. Click Next on the Introduction page.
The Upload File page displays.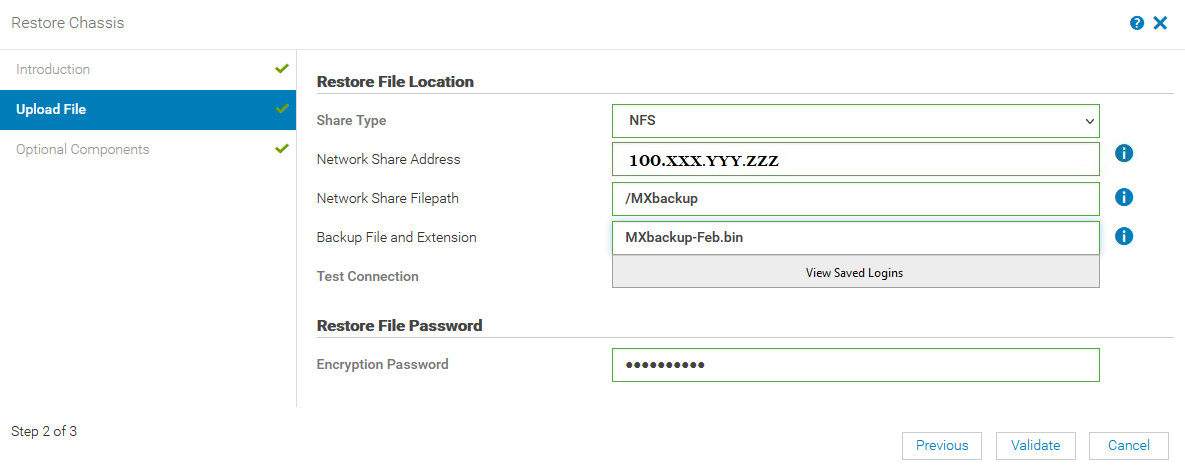
- Enter the restore file location details and enter the encryption password.
- In the Restore File section, enter the appropriate information.
Field
Input
Share Type
Select the share type where the configuration backup file is located.
In our example, since we selected the NFS server option for our backup, select NFS.
Network Share Address
Provide the NFS server NIC IP.
Network Share Filepath
Enter the same Network Share Filepath used for the backup file, including a forward slash: /MXbackup
Backup Filename
Type the Backup Filename with extension as shown in the figure above: MXbackup-Feb.bin.
- In the Restore File Password section, provide the same Encryption Password used during the backup process. The encryption password prevents unauthorized access.
- In the Restore File section, enter the appropriate information.
- To validate the chassis connectivity with the NFS server or location where backup file is saved, click Validate.
After the validation completes successfully, the Optional Components section is displayed.
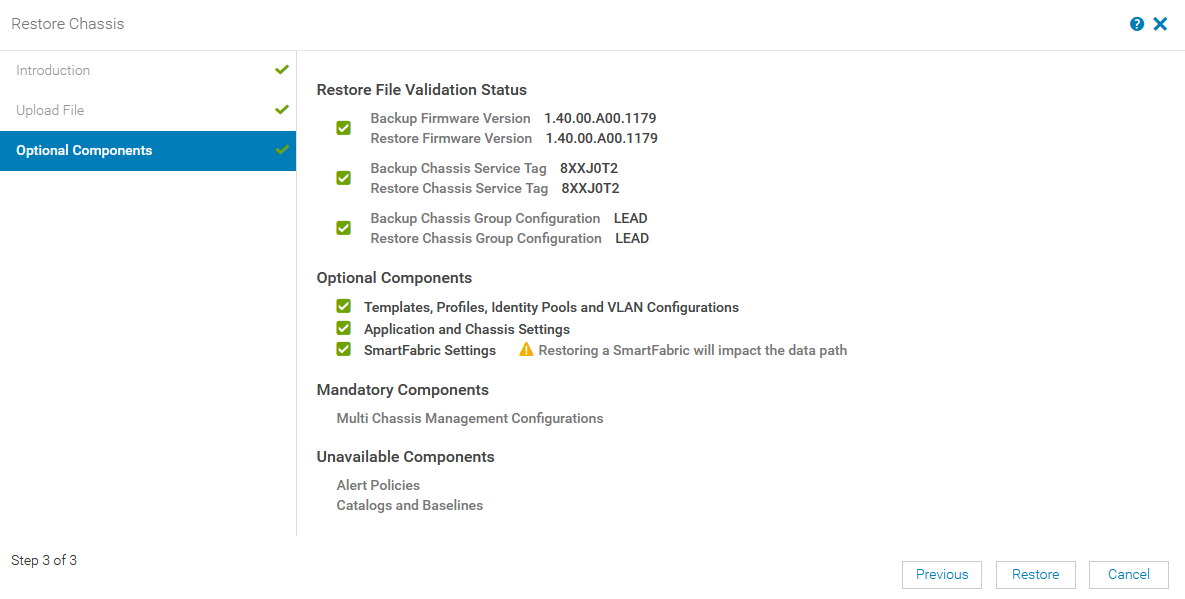
- (Optional) On the Optional components page, you can choose to restore files on the selected components.
The following table provides details about the available options:Component
Description
Restore File Validation Status
Displays the validation status of the restore files
- Backup and restore chassis firmware version
Note: The restore chassis firmware version must match the firmware version that was installed when the backup file was created. - Backup and restore chassis service tag information
- The role of the backup chassis and the restore chassis
Optional Components
Displays the components that you can select for the restore operation.
Mandatory Components
Displays mandatory components, if applicable.
A restoring chassis that is in the MCM group is a Mandatory Component. Mandatory components restore automatically in the restore process.
Unavailable Components
Displays all other components that were not backed up during the backup process and are therefore unavailable for the restore operation.
- Backup and restore chassis firmware version
- Click Restore to start the chassis restore process.
- (Optional) To view the progress of the restore operation:
- Click Monitor > Jobs.
- Select the appropriate job and click View Details.
Available information includes current task status, percentage complete, elapsed time, and much more.
Notes:
- The restore process may take several hours, depending on the network settings and configuration.
- Once the MCM lead chassis has been restored, set the backup lead manually by assigning a backup lead chassis.
Resources
Dell Technologies PowerEdge MX7000 Networking Deployment Guide
Dell Technologies OME-M for PowerEdge MX7000 Chassis User’s Guide
Dell Technologies PowerEdge MX7000 Networking Interactive Demos