


Alert in IIQ 5.0.0 – Part II
Mon, 11 Dec 2023 16:10:19 -0000
|Read Time: 0 minutes
My previous post introduced one of the key features in IIQ 5.0.0 – Alert and explained how it works. In this blog, we will go into the details of how to configure it.
How to configure an alert in IIQ 5.0.0
Configure SMTP server in IIQ
Follow the steps below to add the SMTP server in IIQ:
- Access Configure SMTP under Settings from the left side menu.
- Enter the SMTP Server IP or FQDN. Username and Password are optional.
- Click the Save button.
You can send a test email to verify the settings.
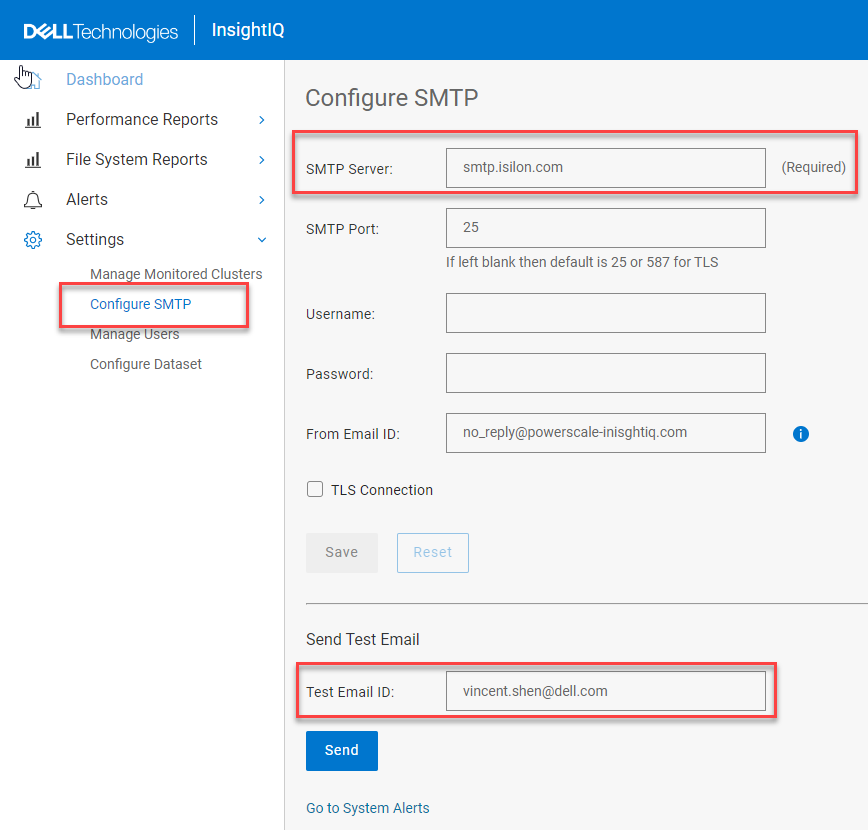
- SMTP configuration
Note: If you keep the SMTP Port number blank, the default will be 25 or 587 for TLS.
Manage Alerts
Create Alert Rules
To create alert rules, follow these steps:
- Navigate to Manage Alerts under Alerts from the left side menu.
- Click the Alert Rules.
- Click the Create Alert Rule button and a pop-up window will appear as shown below:

- Create Alert Rule
- Specify the KPI, Severity, and Threshold for it. Click the Save button.
- (Optional) You can create multiple Alert Rules.
Create a Notification Rule
A notification rule specifies the recipient(s) of SMTP alerts and its associated alert severity. To create a notification rule, follow these steps:
- Navigate to Manage Alerts located below Alerts from the left side menu.
- Click the Notification Rules.
- Click the button Create Notification Rule and it will pop up a window as shown below.
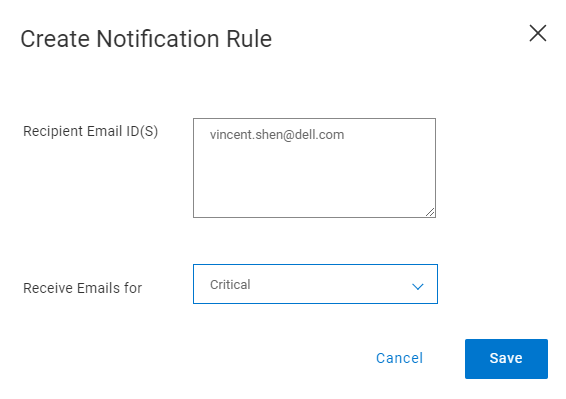
- Create Notification Rule
- Input the Recipient Email ID(s) and choose the severity from the dropdown list of Receive Emails for.
- Click the Save button.
Create an alert policy
To create an alert policy, follow these steps:
- Navigate to Manage Alerts located under Alerts from the left side menu.
- Click the Alert Policies.
- Click the Create Policy button.
- Input the Name and Description in the Policy Details window and click the Next button.
- In the Alert Rules subpage, you can choose either Existing Alert Rules or Create Alert Rule by clicking the corresponding button. After you create the alert rules, click the Next Button.

- Add Alert Rules
- On the Cluster subpage, choose the cluster to which you want to apply the alert settings, and click the Next button.
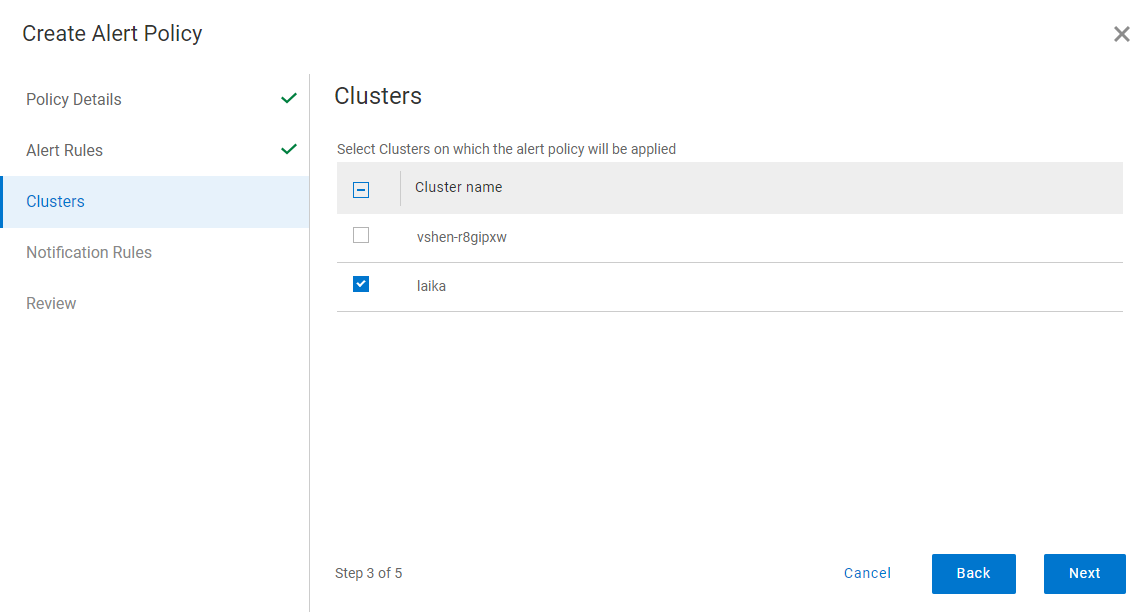
- Choose clusters
- On the Notification Rules subpage, you can choose either Existing Notification Rules or Create Notification Rule by clicking the corresponding button. After you choose the rule, click the Next button.
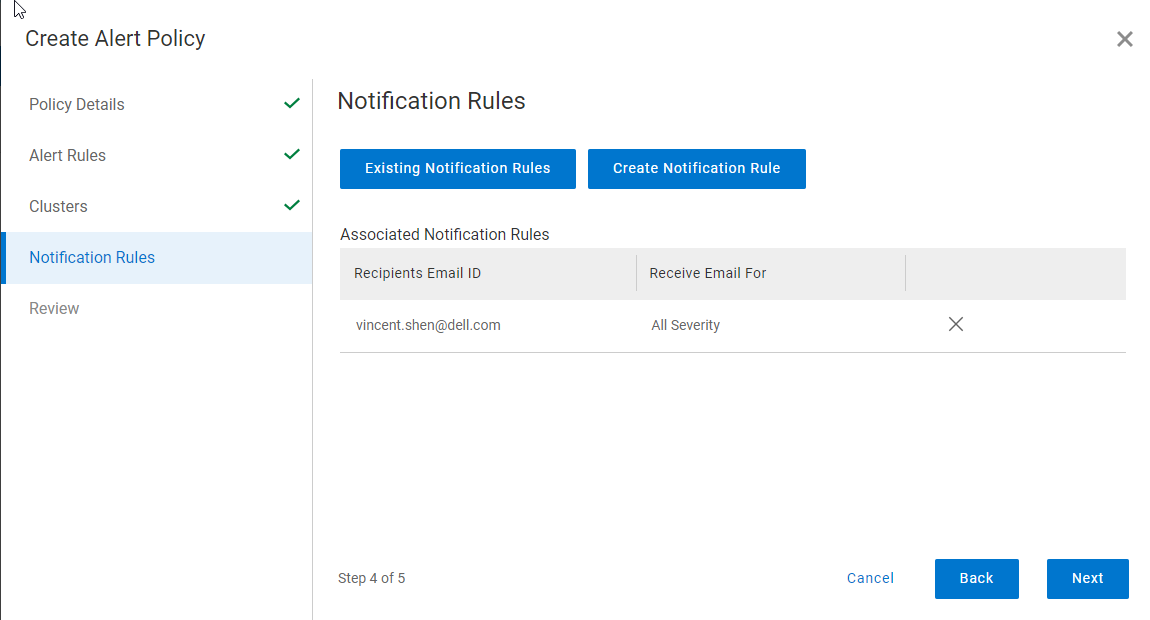
- Specify Notification Rules
- Click the Save button in the final Review subpage.
- The following screenshot is a sample alert email:
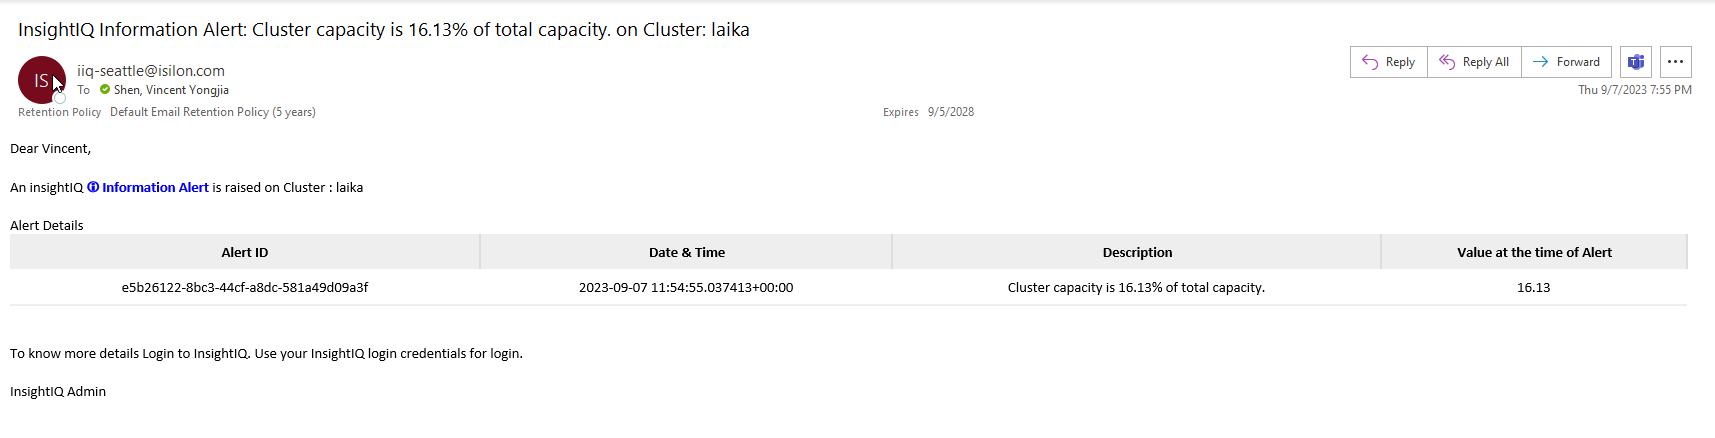
- Sample email alert
View Alerts
All the alerts can be accessed in Alerts > View Alerts from the left side menu.
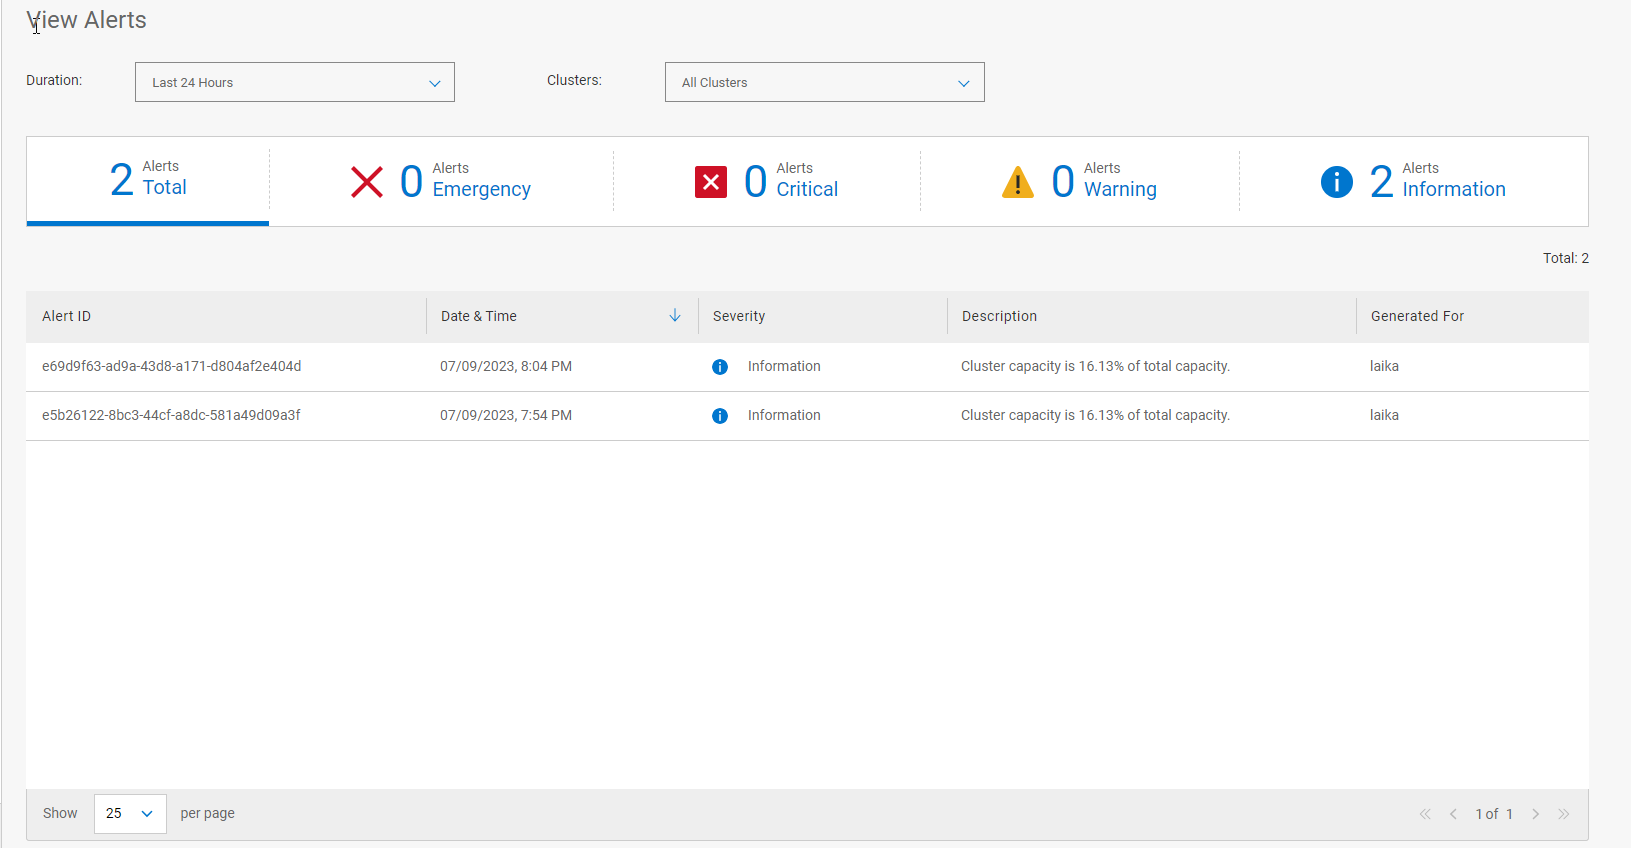
- View Alert
On this page you can:
- Filter alerts by selecting the Duration.
- Show alerts by choosing specific Clusters.
- Categorize alerts by different severity levels.
- Sort alerts by the Date & Time.
Hope you enjoy the reading. If you have any questions for suggestion on this feature, please feel free to reach out to me. (Vincent.shen@dell.com)
Related Blog Posts

Unveiling APEX File Storage for Microsoft Azure – Running PowerScale OneFS on Azure
Tue, 09 Apr 2024 20:30:02 -0000
|Read Time: 0 minutes
Overview
PowerScale OneFS 9.8 now brings a new offering in Azure — APEX File Storage for Microsoft Azure! It is a software-defined cloud file storage service that provides high-performance, flexible, secure, and scalable file storage for Microsoft Azure environments. It is also a fully customer managed service that is designed to meet the needs of enterprise-scale file workloads running on Azure. This offer joins another native cloud solution that was released last year - APEX File Storage for AWS, for more information, refer to the link: https://www.dell.com/en-us/dt/apex/storage/public-cloud/file.htm?hve=explore+file
Benefits of running OneFS in Cloud
APEX File Storage for Microsoft Azure brings the OneFS distributed file system software into the public cloud, allowing users to have the same management experience in the cloud as with their on-premises PowerScale appliance.
With APEX File Storage for Microsoft Azure, you can easily deploy and manage file storage on Azure. The service provides a scalable and elastic storage infrastructure that can grow, according to your actual business needs.
Some of the key features and benefits of APEX File Storage for Microsoft Azure include:
- Scale-out: APEX File Storage for Microsoft Azure is powered by the Dell PowerScale OneFS distributed file system. You can start with a small OneFS cluster (minimal 4 nodes) and then expand it incrementally as your data storage requirements grow up to 5.6 PiB in cluster capacity with a single namespace (maximum 18 nodes). This large capacity helps support the most demanding, data intensive workloads such as AI.
- Data management: APEX File Storage for Microsoft Azure provides powerful data management capabilities such as: snapshot, data replication, and backup and restore. Because OneFS features are the same in the cloud as they are in on-premises, organizations can simplify operations and reduce management complexity with a consistent user experience.
- Simplified journey to hybrid cloud: More and more organizations operate in a hybrid cloud environment, where they need to move data between on-premises and cloud-based environments. APEX File Storage for Microsoft Azure can help you bridge this gap by facilitating seamless data mobility between on-premises and the cloud with native replication and by providing a consistent data management platform across both environments. Once in the cloud, customers can take advantage of enterprise-class OneFS features such as: multi-protocol support, CloudPools, data reduction, security, and snapshots, to run their workloads in the same way as they do on-premises.
- Data resilience: Ensuring data resilience is critical for businesses to maintain continuity and to safeguard information. APEX File Storage for Microsoft Azure implements erasure coding techniques. This advanced approach optimizes storage efficiency and enhances fault tolerance, enabling the cluster to withstand multiple node failures. By spreading nodes across different racks using Azure availability set, the cluster ensures that data accessibility is maintained in the event of a rack failure.
- High performance: APEX File Storage for Microsoft Azure delivers high-performance file storage with low-latency access to data, ensuring that you can access data quickly and efficiently. Compared to Azure NetApp Files, Dell APEX File Storage for Microsoft Azure enables: about 6x greater cluster performance, up to 11x larger namespace, up to 23x more snapshots per volume, 2x higher cluster resiliency, and an easier and more robust cluster expansion.
- Proactive support: With a 97% customer satisfaction rate, Dell Support Services provides highly trained experts around the clock and around the globe to address your OneFS needs, minimize disruptions, and help you maintain a high level of productivity and outcomes.
Architecture
APEX File Storage for Microsoft Azure is a software-defined cloud file storage service that combines the power of OneFS distributed file system with the flexibility and scalability of cloud infrastructure. It is a fully customer-managed service that is designed to meet the needs of enterprise-scale file workloads running on Azure.
The architecture of APEX File Storage for Microsoft Azure is built on the OneFS distributed file system. This architecture uses multiple cluster nodes to establish a single global namespace. Each cluster node operates as an instance of the OneFS software, running on an Azure VM to deliver storage capacity and compute resources. It is worth noting that the network bandwidth limit at the Azure VM level is shared between the cluster internal network and the external network.
APEX File Storage for Microsoft Azure uses cloud-native technologies and leverages the elasticity of cloud infrastructure, so that you can easily scale the storage infrastructure as your business requirements grow. APEX File Storage for Microsoft Azure can dynamically scale storage capacity and performance to meet changing demands. It is able to add additional cluster nodes without disruption enabling the storage infrastructure to scale in a more cost-effective and efficient manner. To guarantee the durability and resiliency of data, APEX File Storage for Microsoft Azure distributes data across multiple nodes within the cluster. It also uses advanced data protection techniques such as erasure coding and it provides features such as SyncIQ to ensure that data is available. Even in the event of one or more node failures, the data remains accessible from the remaining cluster nodes.
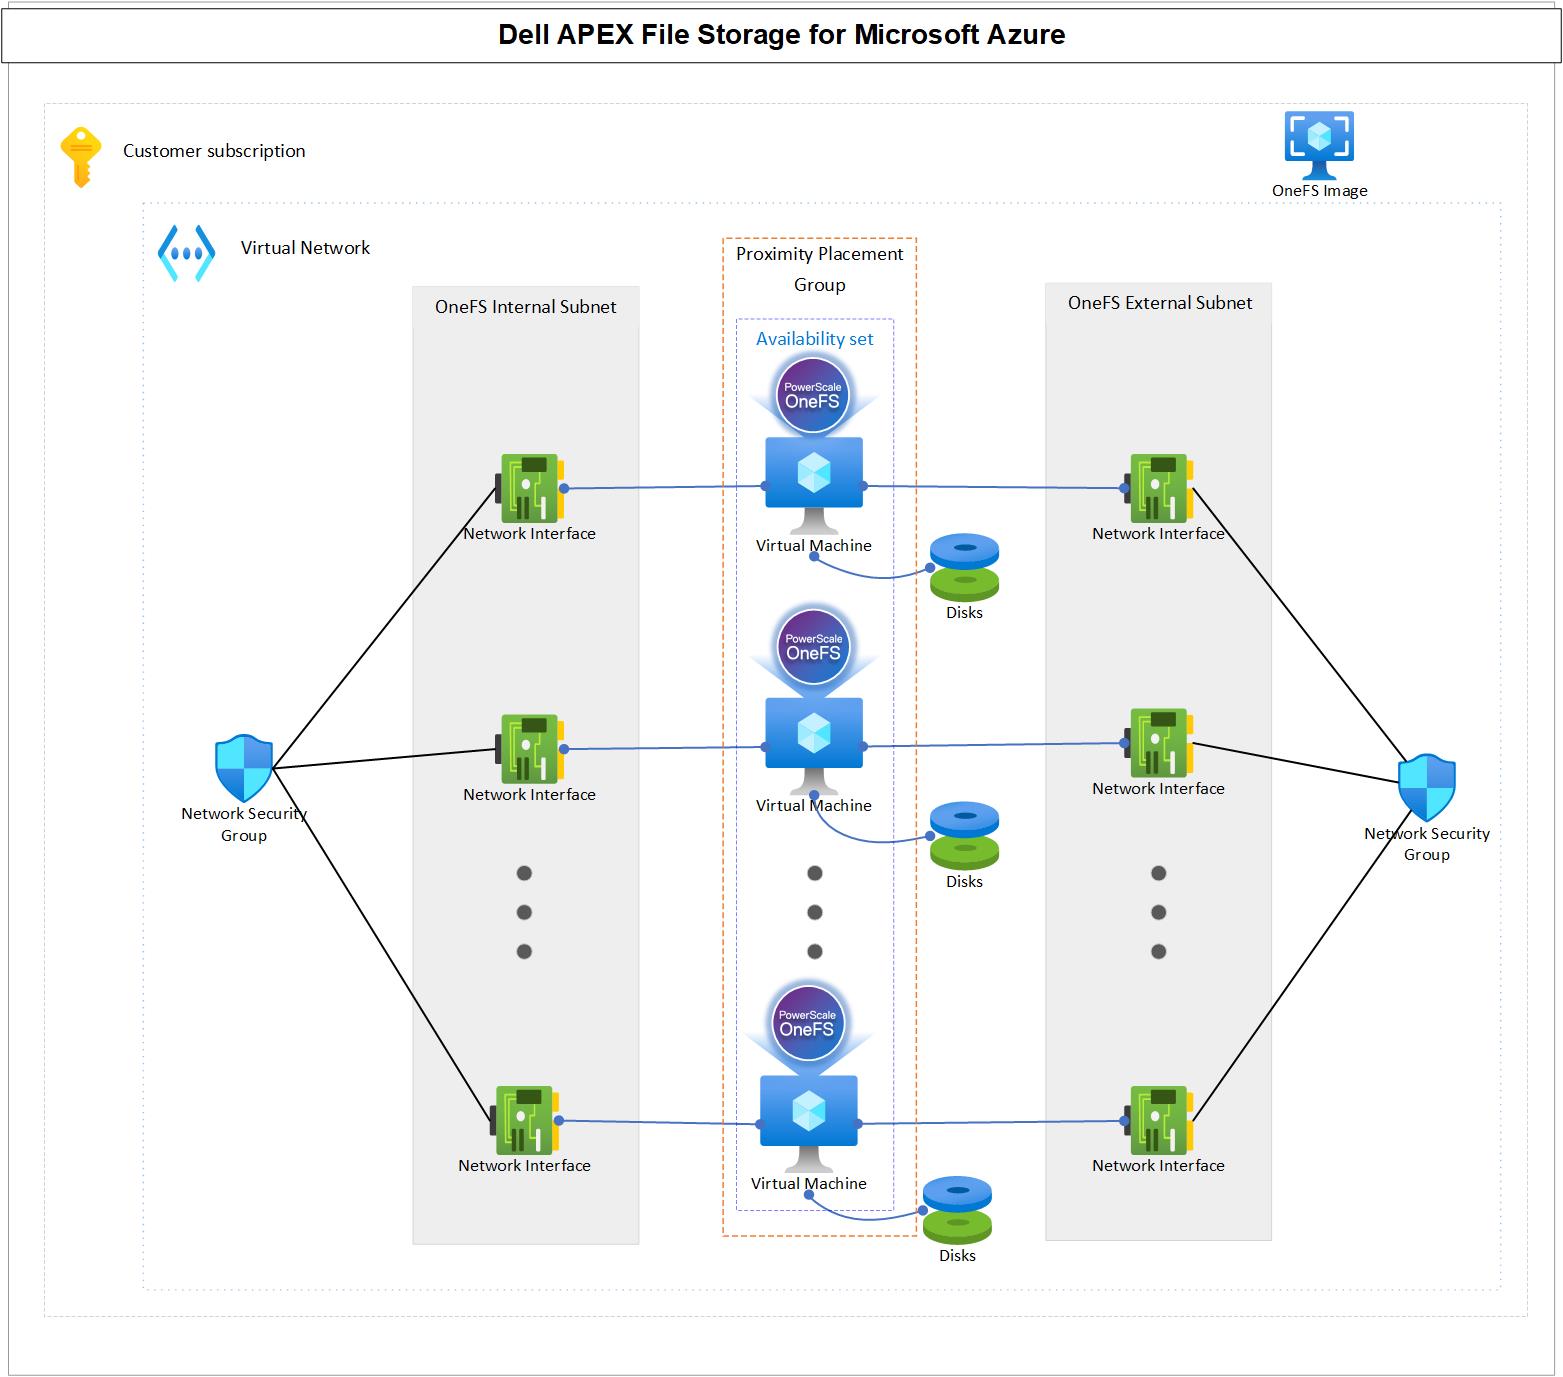
Availability set and proximity placement group: APEX File Storage for Microsoft Azure is designed to run in an availability set, and the availability set is associated with a dedicated proximity placement group. In this way, APEX File Storage for Microsoft Azure can have better reliability by ensuring more consistent, lower latency on the cluster backend network.
Virtual network: APEX File Storage for Microsoft Azure requires an Azure virtual network to provide network connectivity.
- OneFS cluster internal subnet: The cluster nodes communicate with each other through the internal subnet. The internal subnet must be isolated from VMs that are not in the cluster. Therefore, a dedicated subnet is required for the internal network interfaces of cluster nodes that do not share the internal subnets with other Azure VMs.
- OneFS cluster external subnet: The cluster nodes communicate with clients through the external subnet by using different protocols, such as NFS, SMB, and S3.
- OneFS cluster internal network interfaces: Network interfaces are in the internal subnet.
- OneFS cluster external network interfaces: Network interfaces are in the external subnet.
- Network security group: The network security group applies to the cluster network interfaces, which allows/denies specific traffic to OneFS cluster.
- Azure VMs: These VMs serve as cluster nodes running the OneFS file system, backed by Azure managed disks. Each node within the cluster is strategically placed in an availability set and a proximity placement group. This configuration ensures that all nodes reside in separate fault domains, enhancing reliability, and it brings them physically closer together to enable lower network latency between cluster nodes. See the Azure availability sets overview and Azure proximity placement groups documentation for more details.
Overall, APEX File Storage for Microsoft Azure offers a powerful and flexible scale-out file storage solution that can help you improve data management, optimize costs, scalability, and security in a cloud-based environment.
Supported cluster configurations
Table 1 shows the supported configuration for APEX File Storage on Azure. It provides you the flexibility to choose different cluster size, various Azure VM size/SKU and so many Azure disk options to meeting your business requirements. For the detailed explanation of these configurations, refer to https://infohub.delltechnologies.com/en-US/t/apex-file-storage-for-microsoft-azure-deployment-guide.
- Supported configuration for a single cluster
Configuration items | Supported options |
Cluster size | 4 to 18 nodes |
Azure VM size/SKU | All nodes in a cluster must use the same VM size/SKU. The supported VM sizes are:
|
Azure managed disk type | All nodes in a cluster muse use the same disk type. The supported disk types are:
Note: Premium SSDs are only supported with Ddsv5-series and Edsv5-series |
Azure managed disk size | All nodes in a cluster muse use the same disk size. The supported disk sizes are:
|
Disk count per node | All nodes in a cluster muse use the same disk count. The supported disk counts are:
|
Cluster raw capacity | Minimum: 10 TiB, maximum: 5760 TiB |
Cluster protection level | Default is +2n. Also supports +2d:1n with additional capacity restrictions. |
Support Regions
APEX File Storage for Microsoft Azure is globally available. For the detailed regions, refer to https://infohub.delltechnologies.com/en-US/t/apex-file-storage-for-microsoft-azure-deployment-guide.
Performance
Compared to Azure NetApp Files, Dell APEX File Storage for Microsoft Azure enables about 6x greater cluster performance, up to 11x larger namespace, up to 23x more snapshots per volume, 2x higher cluster resiliency, and easier and more robust cluster expansion.

Besides that, I will show you an example of how sequential read and sequential write performance can be linearly scaled out from 4 nodes to 18 nodes to make sure it meets your business requirements.
This is what we have set up:
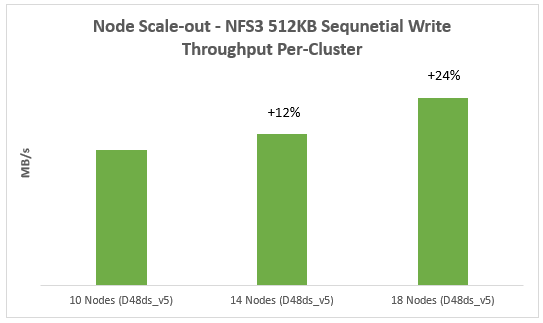
We are using Azure Standard D48ds_v5 VM type and we scale from 10 nodes to 14 nodes and in the end to 18 nodes for testing purposes. With each deployment we kept all the other factors the same, we maintained 12 P40 Azure premium SSDs for data disks in each node. The following table displays the configuration:
Node type | Node count | Data disk type | Data disk count |
10 | P40 | 12 | |
14 | P40 | 12 | |
18 | P40 | 12 |
The diagram below demonstrates how read performance increases when we scale out our APEX File Storage for Microsoft Azure. You can see a clear positive trend starting from 10 nodes to 18 nodes. The same conclusion also applies with write performance.

Another example is that you can also scale-up the overall performance of an APEX File Storage for Microsoft Azure by choosing a more powerful Azure VM size/SKU:
In this example, we tested the following Azure VM size/SKU with the same node number (4) and disk number per node (12):
- D32ds_v5
- D48ds_v5
- D64ds_v5
- E104ids_v5
From the results, we can easily find that with the scale-up of Azure VM size/SKU, both read and write performance increase:
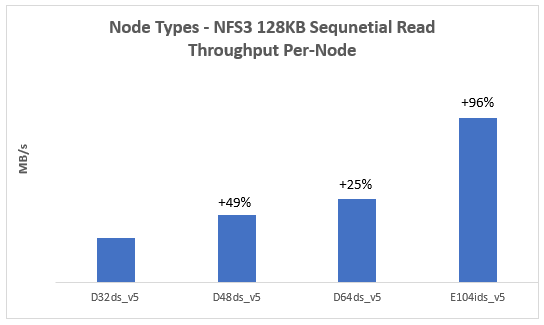
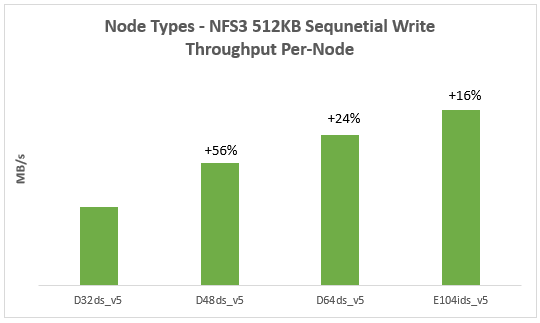
For more details on the performance results and best practices, refer to the following whitepaper https://infohub.delltechnologies.com/en-US/t/introduction-to-apex-file-storage-for-azure-1/.
Resources
https://infohub.delltechnologies.com/en-US/t/apex-file-storage-for-microsoft-azure-deployment-guide
https://infohub.delltechnologies.com/en-US/t/introduction-to-apex-file-storage-for-azure-1/
https://www.dell.com/en-us/blog/ai-anywhere-with-apex-file-storage-for-microsoft-azure/
Authors:
Vincent Shen, Lieven Lin, and Jason He

Backing Up and Restoring PowerScale Cluster Configurations in OneFS 9.7
Wed, 13 Dec 2023 14:00:00 -0000
|Read Time: 0 minutes
Backing up and restoring OneFS cluster configurations is not new, as it was introduced in OneFS 9.2. However, only a limited set of components can be backed up or restored. This is a popular feature and we have received a lot of feedback that we should add more supported components. Now, with the release of OneFS 9.7, this feature gets a big enhancement. The following is a complete list of the components we support in 9.7. (The new ones are marked in blue.)
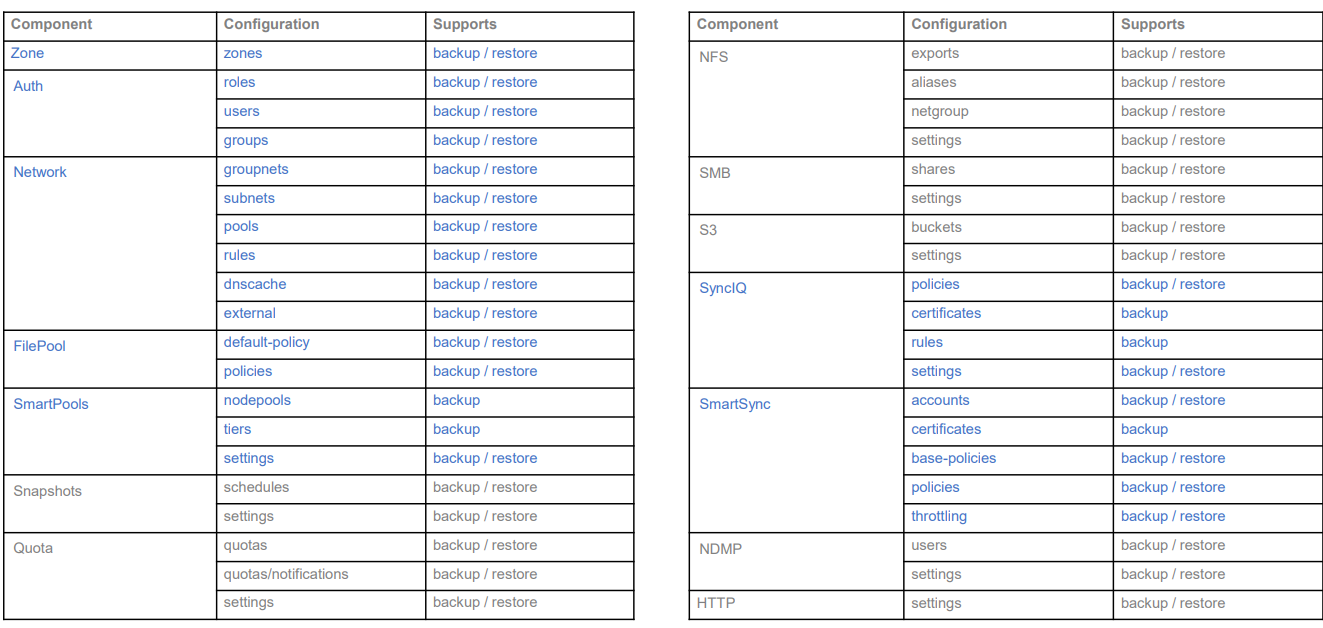
Some other enhancements include:
- Lock configuration during backup
- Support custom rules for restoring subnet IP addresses
Next, I’ll walk you through an example and explain the details of these enhancements.
Let’s take a look at the backup first.
Like what we have in the previous version, backup and restore are only available through PAPI and CLI (there is no WebUI at this stage). But I can guarantee you that the overall process is very simple and straightforward. If you are familiar with how to do it in the previous version, it’s almost the same.
You can use the following CLI command to back up a cluster configuration:
isi cluster config exports create [--components …]
Here is an example where I want to export the network configuration:
# isi cluster config exports create –components=Network
The following components’ configuration are going to be exported:
[‘Network’]
Notice:
    The exported configuration will be saved in plain text. It is recommended to encrypt it according to your specific requirements.
Do you want to continue? (yes/[no]): yes
This may take a few seconds, please wait a moment
Created export task ‘vshen-0eis0wn-20231128032252’
You can see that once the backup is triggered, a task is automatically created, and you can use the following command to view the details of the task:
isi cluster config exports view <export-id>
Here is what I have in my environment:
# isi cluster config exports view –id vshen-0eis0wn-20231128032252
     ID: vshen-0eis0wn-20231128032252
 Status: Successful
   Done: [‘network’]
 Failed: []
Pending: []
Message:
   Path: /ifs/data/Isilon_Support/config_mgr/backup/vshen-0eis0wn-20231128032252
During backup, to make a consistent configuration, a temporary lock is enabled to prevent new PAPI calls like POST, PUT, and DELETE. (The GET method will not be impacted.) In most cases, the backup job is completed quickly and it releases the lock when it finishes running.
You can use the following command to view the backup lock:
# isi cluster config lock view
Configuration lock enabled: Yes
You can also use the CLI command to manually enable or disable the lock:
# isi cluster config lock modify –action=enable
WARNING: User won’t be able to make any configuration changes after enabling configuration lock.
Are you sure you want to enable configuration lock? (yes/[no]): yes
After the backup task completes, the backup files will be generated under: /ifs/data/Isilon_Support/config_mgr/backup. Although the backup files are in plain text format, the sensitive information doesn’t appear here.
cat ./network_vshen-0eis0wn-20231128032252.json
{
  "description": {
    "component": "network",
    "release": "9.7.0.0",
    "action": "backup",
    "job_id": "vshen-0eis0wn-20231128032252",
    "result": "successful",
    "errors": []
  },
  "network": {
    "dnscache": {
      "cache_entry_limit": 65536,
       "cluster_timeout": 5,
       "dns_timeout": 5,
       "eager_refresh": 0,
       "testping_delta": 30,
       "ttl_max_noerror": 3600,
       "ttl_max_nxdomain": 3600,
…
When doing an import, you can use a command similar to the following:
# isi cluster config imports create --export-id=vshen-0eis0wn-20231128032252
Source Cluster Information:
          Cluster name: vshen-0eis0wn
       Cluster version: 9.7.0.0
            Node count: 1
  Restoring components: ['network']
Notice:
    Please review above information and make sure the target cluster has the same hardware configuration as the source cluster, otherwise the restore may fail due to hardware incompatibility. Please DO NOT use or change the cluster while configurations are being restored. Concurrent modifications are not guaranteed to be retained and some data services may be affected.
Do you want to continue? (yes/[no]): yes
This may take a few seconds, please wait a moment
Created import task 'vshen-0eis0wn-20231128064821'
When you deal with network component restore, to avoid connectivity breaks you can restore the configuration without destroying any existing subnets or pools’ IP addresses.
To do this, use the parameter “--network-subnets-ip”:
# isi cluster config imports create --export-id=vshen-0eis0wn-20231128032252 --network-subnets-ip="groupnet0.subnet0:10.242.114.0/24"
Source Cluster Information:
          Cluster name: vshen-0eis0wn
       Cluster version: 9.7.0.0
            Node count: 1
  Restoring components: ['network']
Notice:
    Please review above information and make sure the target cluster has the same hardware configuration as the source cluster, otherwise the restore may fail due to hardware incompatibility. Please DO NOT use or change the cluster while configurations are being restored. Concurrent modifications are not guaranteed to be retained and some data services may be affected.
Do you want to continue? (yes/[no]): yes
This may take a few seconds, please wait a moment
Created import task 'vshen-0eis0wn-20231128070157'
That’s how it works! As I said, it’s very simple and straightforward. If you see any errors, you can check the log: /var/log/config_mgr.log.
Author: Vincent Shen