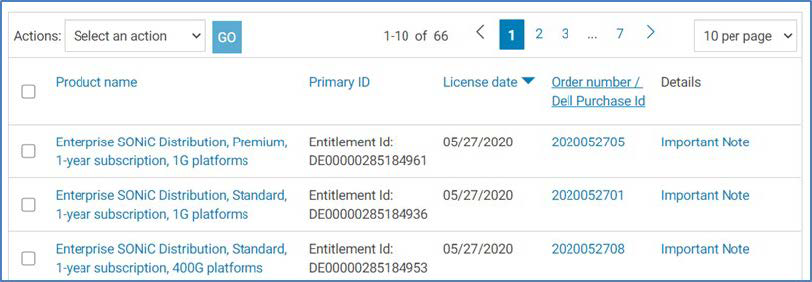
Select the appropriate Enterprise SONiC entitlement for your switches and download the installer:
Figure 7. Enterprise SONiC images
To run this POC, select Enterprise_SONiC_OS_3.2.0_Enterprise_Standard version, or later.
Note: The
Enterprise_Premium version is also supported for this POC.
Extract the .zip file and copy the .bin file to your HTTP, TFTP, or FTP server.
Uninstall any existing images.
When you reboot the switches, a startup menu is displayed. Use the arrow keys on the keyboard to select the ONIE: Uninstall OS option, as shown in the following figure:
Figure 8. ONIE startup switch menu: Uninstall OS
Install the newly downloaded Enterprise SONiC image:
Use the arrow keys on the keyboard to select the ONIE: Install OS option, as shown in the following figure:
Figure 9. ONIE startup switch menu: Install OS
The switch reboots.
At the prompt, enter the onie-discovery-stop command to stop the ONIE discovery process.
ONIE:/ # onie-discovery-stop
If a DHCP server is not available, manually configure an IP address (for example, 192.168.0.2). To configure an IP address on the switch’s management interface, run the following commands at the ONIE# prompt:
ONIE:/ # ifconfig eth0 192.168.0.2 netmask 255.255.255.0
ONIE:/ # ip route add default via 192.168.0.1
Ensure that the switches can contact the HTTP server hosting the image before attempting the installation. Pinging the HTTP server verifies this.
ONIE:/ # ping 192.168.2.210
Run the following command to install the Enterprise SONiC 3.2 code on the switches:
When the image has been installed, the switches reboot with the correct image.
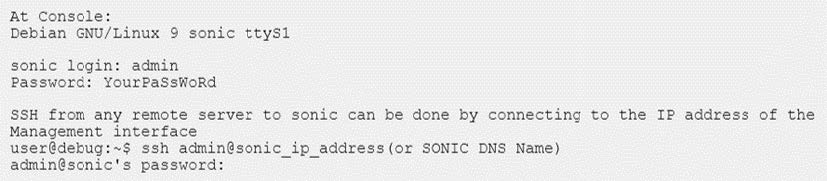
Log in to the switches:
Use username admin and password YourPaSsWoRd, as shown in the following figure:
Figure 10. Logging in to the switch
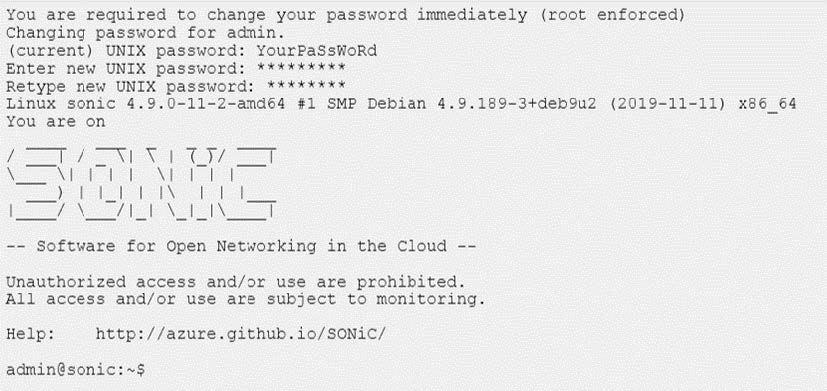
Change the default password, as shown in the following figure:
Figure 11. Changing the password from the default
Disable the Zero-Touch Provisioning (ZTP) process:
Run the following command at the switch prompt:
admin@sonic:~$ sudo config ztp disable -y
The switches run ZTP when they first start up. This process must be disabled when the ZTP server is not being used to configure the switches. Allow a few minutes for the switch restart and allow manual configuration.
Verify that the switches are ready by running the following command at the switch prompt:
admin@sonic:~$ show system status
System is ready
Perform the actions in this step only if Enterprise SONiC has not been recently loaded from ONIE.
Ensure that the switches have set the default port profile.
The correct HwSku for a PowerSwitch S5248F-ON is: DellEMC-S5248f-P-25G-DPB (Present).
The correct HwSku for a PowerSwitch S5232F-ON is: DellEMC-S5232f-C32 (Present).
To view the effective port profile, run the HwSku command:
admin@sonic:~$ sudo config-hwsku list
To change the port profile, run the appropriate command:
For the PowerSwitch S5248F-ON, run the following command:
admin@sonic:~$ sudo config-hwsku set DellEMC-S5248f-P-25G-DPB
For the PowerSwitch S5232F-ON, run the following command:
admin@sonic:~$ sudo config-hwsku set DellEMC-S5232f-C32
The switch configuration is cleared, and a reboot occurs.
Verify Layer 2 or Layer 3 mode on the ASIC:
Note: After installing Enterprise SONiC from ONIE, the default switching profile for a switch running Enterprise SONiC is Layer 3.
If Enterprise SONiC was not installed from ONIE, verify the switching profile configuration:
The switch reboots after the appropriate command is run.
If necessary, configure breakout ports:
Note: This guide uses the default port breakouts. If any of the high-speed ports (Eth1/49 – Eth1/56 on a PowerSwitch S5248F-ON or Eth1/1 – Eth1/32 on a PowerSwitch S5232F-ON) must be broken out (4 x 25 GbE, 4x 10 GbE), do so before configuring the switch.
The Dynamic Port Breakout in-progress, use
show interface breakout port 1/53 to check status message displays.
Verify the success of the breakout.
sonic# show interface breakout port 1/53
-----------------------------------------------
Port  Breakout Mode  Status        Interfaces
-----------------------------------------------
1/53  4x25G          Completed     Eth1/53/1
                                   Eth1/53/2
                                   Eth1/53/3
                                   Eth1/53/4
If using 10 GbE server interfaces on a S5200 series switch, change the port group to support 10 GbE interfaces. These are applied to groups of four, for example, Eth1/1-1/4.
Note: Only the S5212F-ON, S5224F-ON, S5248F-ON, and S5296F-ON switches have port groups.
For example, change interfaces Eth1/1 to Eth 1/4 from 25 GbE to 10 GbE.


 The switch reboots.