
Example: using snapshots to create a SQL Server database copy
Example: using snapshots to create a SQL Server database copy
-
Create database snapshots
PowerMax snapshots and clones can be taken using Unisphere, Solutions Enabler CLI, or REST APIs. Snapshots can be created manually or using Snapshot Policies. The following high-level steps show how to create a database snapshot:
- Identify the database SG. The snapshot must include all the user database files, including datafiles and transaction logs. Ideally, a parent SG is used for that purpose and the snapshot is taken for that SG.
- Create the snapshot manually.
The following figure shows an example of using Unisphere to create a snapshot manually. In the Storage section, select the appropriate SG and click Protect. Then, select Create a snapshot using SnapVX.
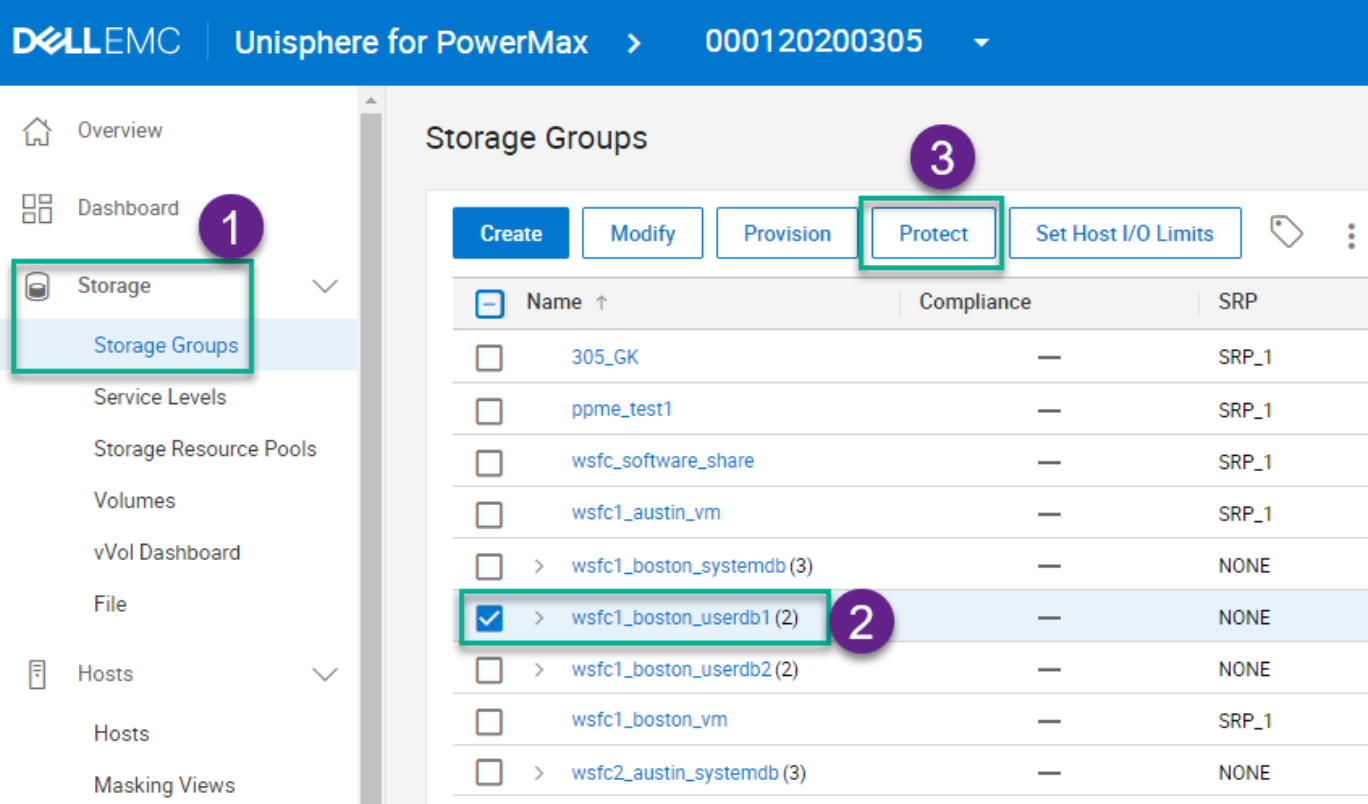
Figure 17. Unisphere: Creating a snapshot manually
- Create a snapshot using a Unisphere Snapshot Policies.
- First create a policy, as shown in the following figure:
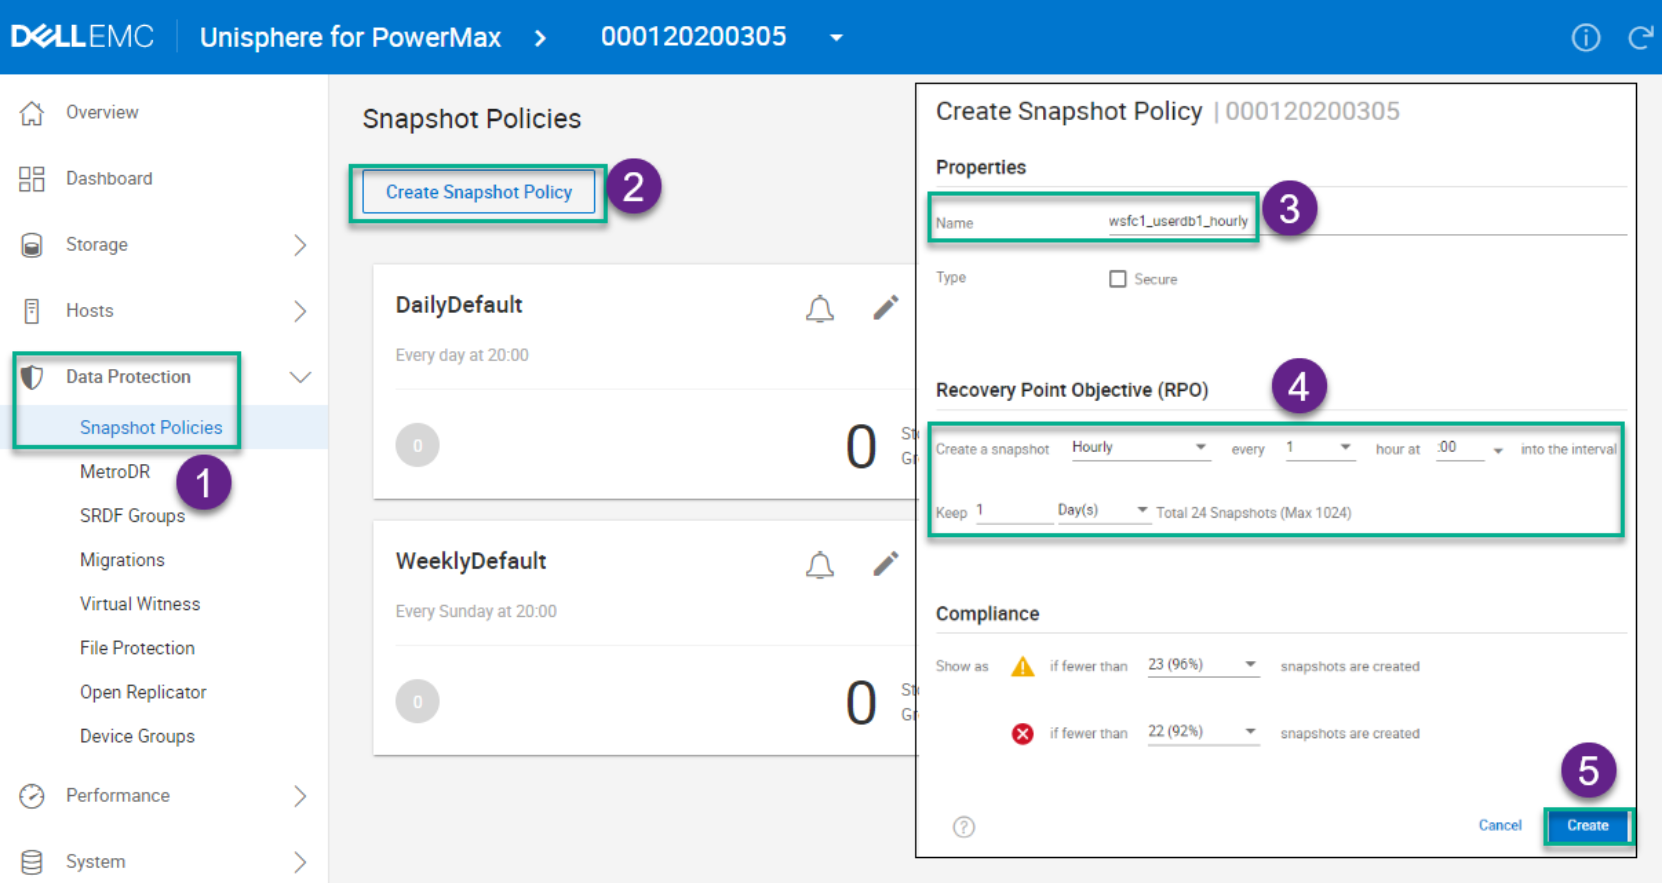
Figure 18. Unisphere: Create a Snapshot Policy
- Then, apply the policy to the appropriate SG. Select the SG in Unisphere, click Protect, and then select Add Snapshot Policy, as shown in the following figure:
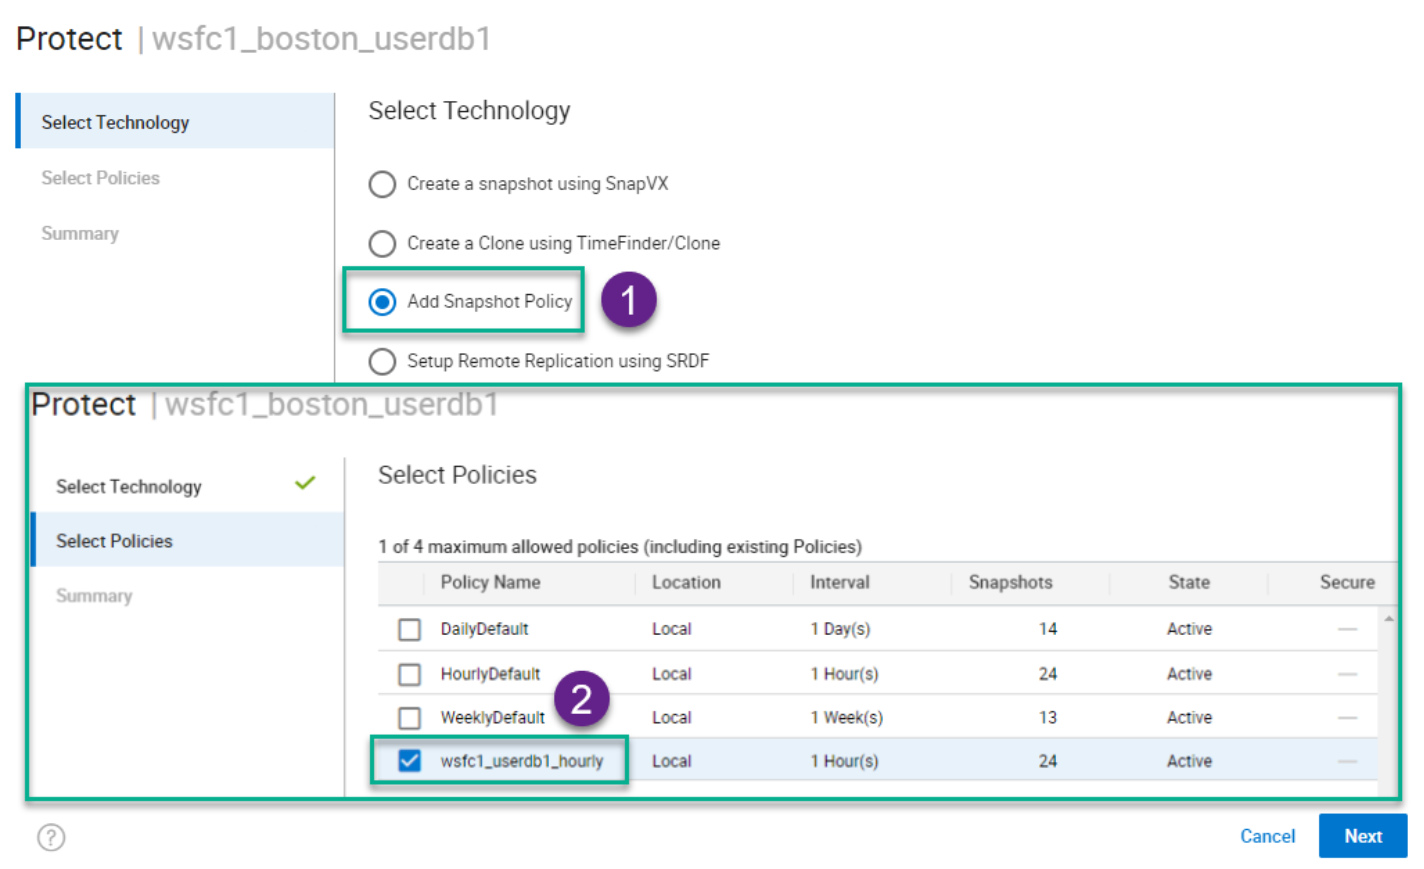
Figure 19. Unisphere: Apply a Snapshot Policy to a storage group
Link the database snapshot to target volumes
To select a snapshot after it is created, select the SG and review the available snapshots under the DATA PROTECTION tab. Then, select a snapshot and click Link, as shown in the following figure:
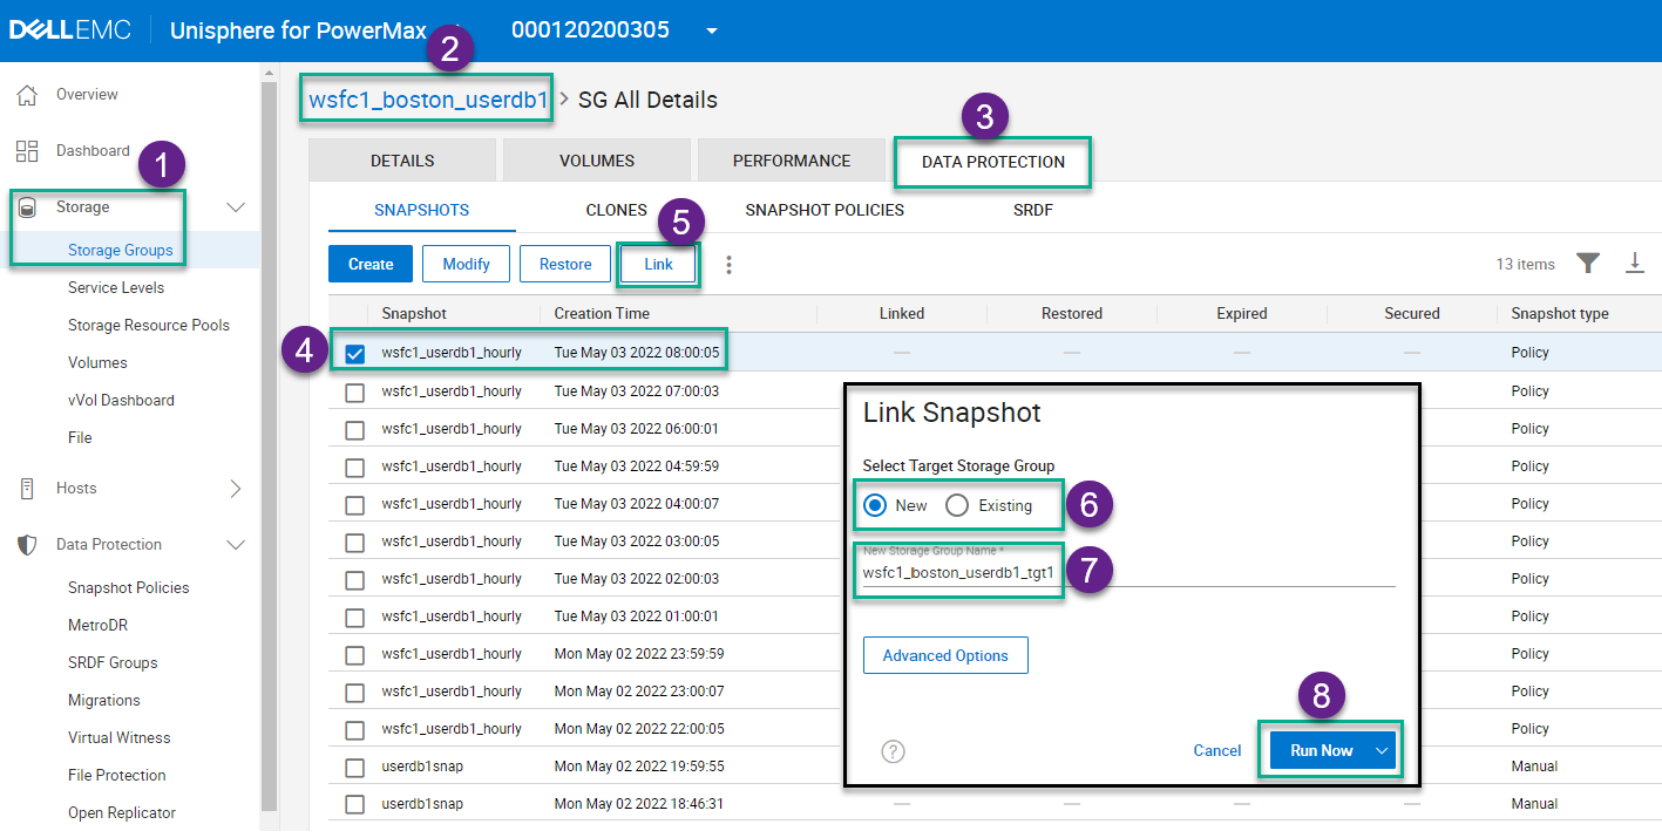
Figure 20. Unisphere: Link a snapshot to a new target storage group
If the target SG for the snapshot is newly created, add a masking view that presents it to the hosts where it is mounted. In this example, a new target SG is created and presented to a different WSFC with an existing SQL Server instance.
Add target SG volumes to Windows Disk Management
By default, shared volumes disks appear as offline in Windows Disk Management.
- From one of the WSFC nodes, start Disk Management, rescan the storage, right-click each of the new disks and change its state to online. The disks labels from the source volumes are displayed.
- If the disks are displayed with a drive letter and you prefer to use CSV or mount-point file-placement, remove the drive letters.
Add target SG volumes to WSFC
When the disks are online, add them to WSFC:
- In WSFC, connect to the cluster, select Storage -> Disks, and click Add Disk. All new disks are displayed in the list. You can add all of them at once.
- Note that the disks appear with a generic label and when you select a disk, there is a disk label at the bottom of the screen. Update the WSFC disk labels to match the Windows disk labels for ease of management (right-click each disk and select Properties).
- If CSV file-placement is used, set the disks as CSV and go to Attach the database with a new name.
Mount the disks (if mount points are used)
If mount point file-placement is used, mount the disks. When using mount points, configure a root-directory with a drive letter ahead of time on shared storage. This example shows a small PowerMax volume with drive letter U:\.
- Prepare a subdirectory for each disk on the root-directory. For example:
U:\userdb1copy_data1, U:\userdb1copy_data2, …., U:\userdb1copy_log
- In Disk Management, mount each disk to its appropriate mount point on the root-disk, as shown in the following figure:
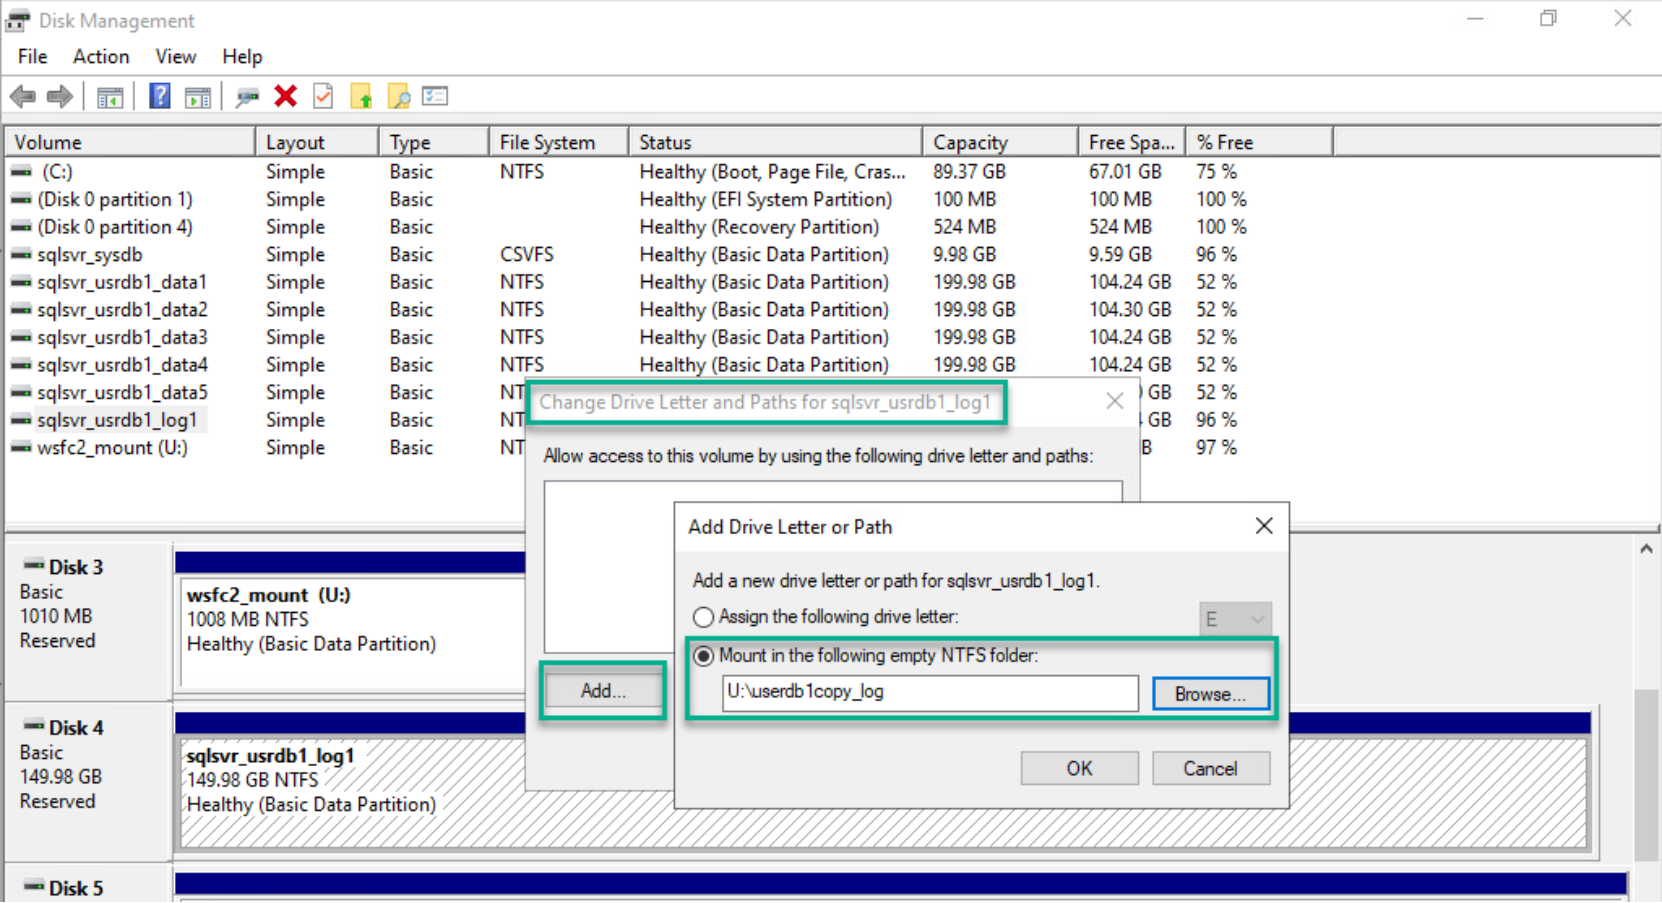
Figure 21. Disk Management: Mount the snapshot target volumes
Set WSFC mount point dependencies (if mount points are used)
To set dependencies between the SQL Server service and the disks:
- In Failover Cluster Manager, right-click each of the appropriate disks, select More Actions -> Assign to Another Role. Then, select the SQL Server instance name.
- In Failover Cluster Manager, select the Roles, select the SQL Server instance name (default is MSSQLSERVER), in the list of resources for that instance under Other Resources select the SQL Server resources, then click Properties. In the window that opens, select Dependencies and add all the disks for that instance with an AND type dependency, including the root-mount disk.
- While the SQL Server instance is still selected, go to the Storage tab with the disks. Select each disk and add an AND dependency to the root-mount disk. Perform this step on the database disks, not the root-mount disk as it cannot be dependent on itself).
- Print a dependencies report, which is shown in the following figure:
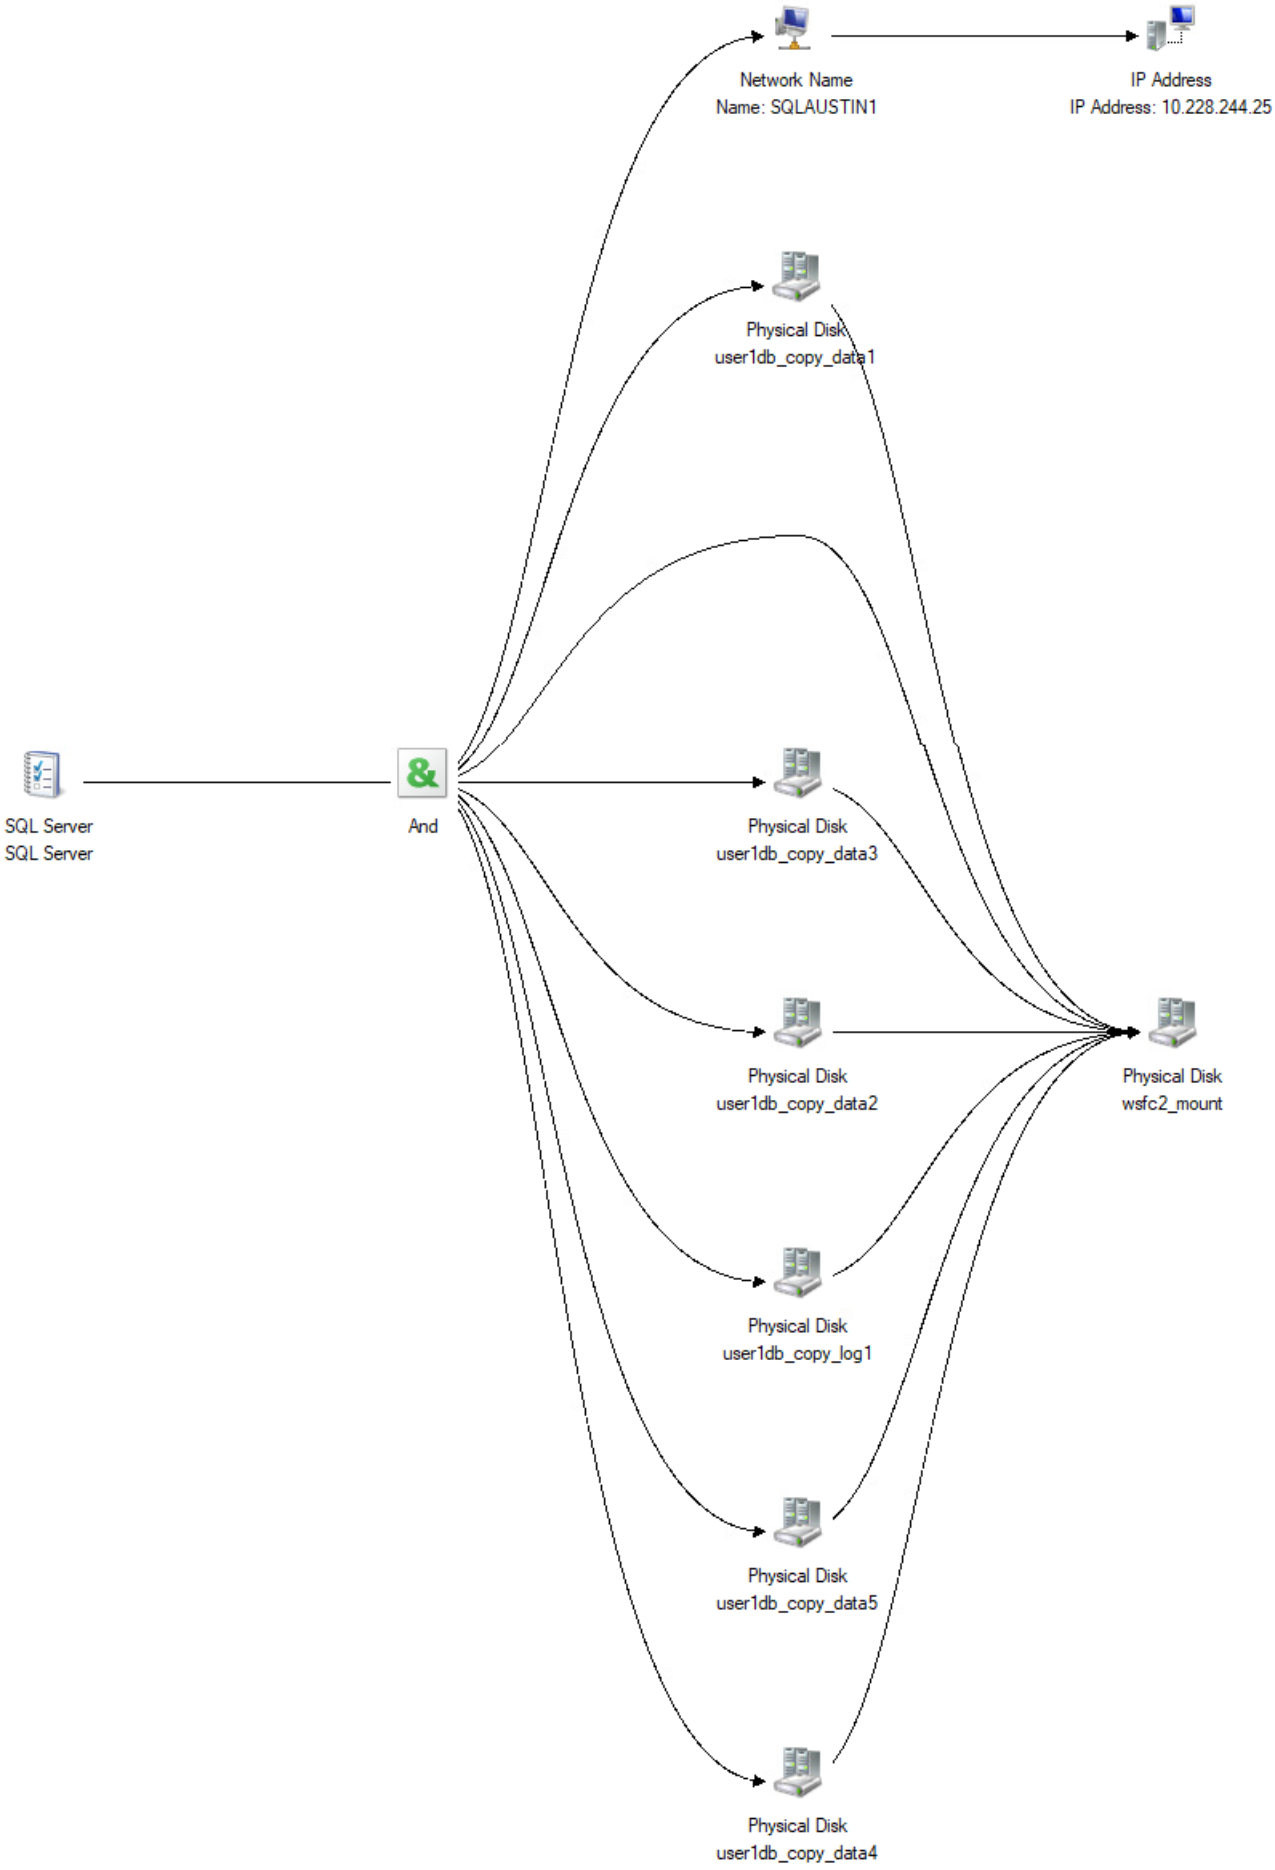
Figure 22. WSFC: Disk dependencies
Attach the database with a new name
The preceding steps ensure that the snapshot target volumes with a consistent point-in-time copy of the user database from the source WSFC is available to the target WSFC to attach. Attach the database with a new name from SQL Server Management Studio (SSMS) or from a command line. For example:
PS C:\scripts> cat .\attach_userdb1copy.txt
USE [master]
GO
CREATE DATABASE userdb1_copy ON
( FILENAME = N'U:\userdb1copy_data1\SQLSERVER\userdb1_data1.mdf' ),
( FILENAME = N'U:\userdb1copy_data2\SQLSERVER\userdb1_data2.ndf' ),
( FILENAME = N'U:\userdb1copy_data3\SQLSERVER\userdb1_data3.ndf' ),
( FILENAME = N'U:\userdb1copy_data4\SQLSERVER\userdb1_data4.ndf' ),
( FILENAME = N'U:\userdb1copy_data5\SQLSERVER\userdb1_data5.ndf' ),
( FILENAME = N'U:\userdb1copy_log\SQLSERVER\userdb1_log.ldf' )
FOR ATTACH
GO
PS C:\scripts> $SQLSERVER = “SQLAUSTIN1”
PS C:\scripts> Invoke-Sqlcmd -ServerInstance $SQLSERVER -InputFile C:\Scripts\attach_userdb1copy.txt
The steps in this procedure can be accomplished in several ways. They can be scripted and automated to take place at regular times or on-demand.
When refreshing the snapshot target volumes, first remove the database disks dependencies from the target instance (if dependencies were created), remove the disks from the target WSFC, set the disks as offline in Disk Management, and refresh the snapshot target devices data. When the snapshot link operation starts, add the disks and their dependencies back to the cluster and attach the database.