Networking has evolved drastically over the years—from VLANs and Spanning Tree CLI to software-defined API-based provisioning. Modern networking requires automation to :
Build scalable infrastructure
Build predictable infrastructure
Minimize errors
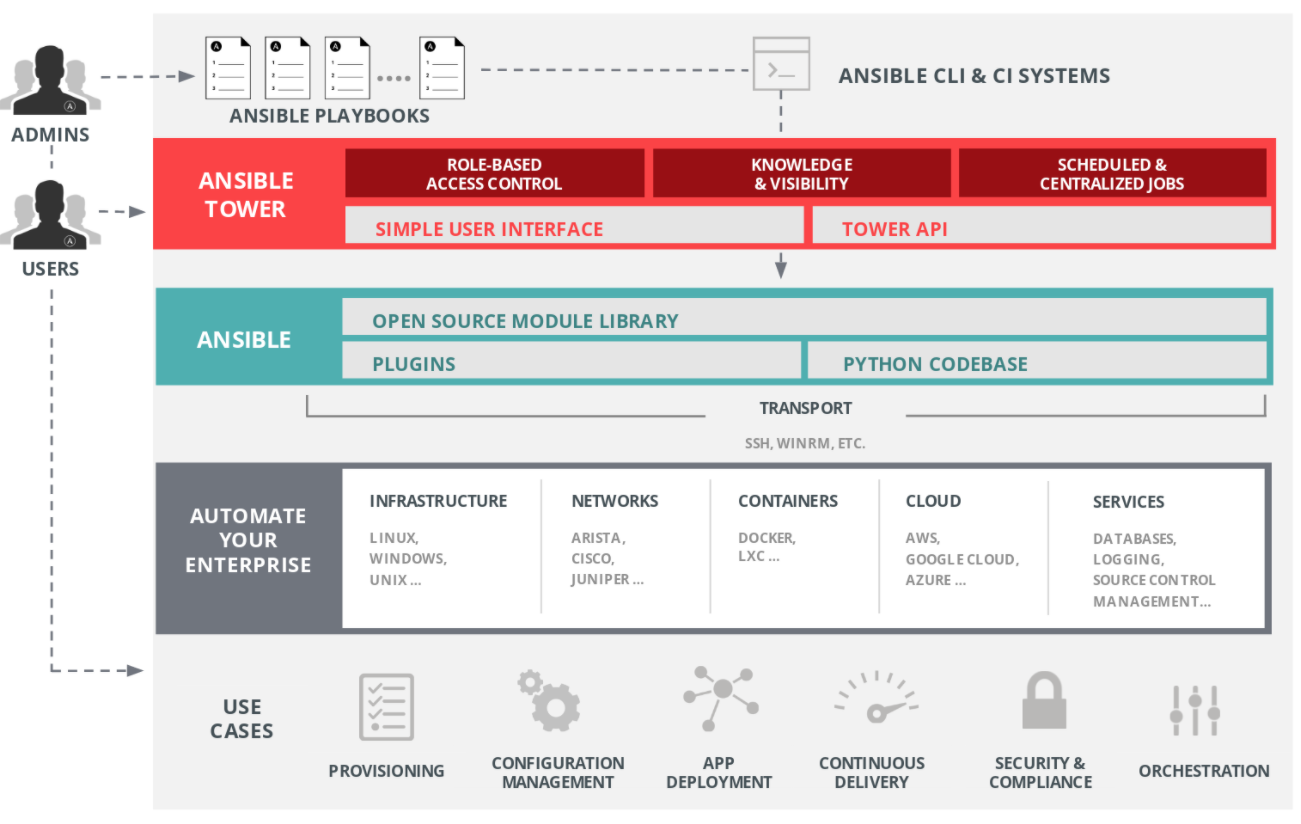
Ansible is a simple IT automation engine for achieving configuration management and automation. It is an agentless solution that runs sets of instructions remotely over a Secure Shell (SSH) connection.
This guide provides information about to how to configure Dell EMC PowerSwitch switches by using Dell EMC Networking Ansible modules and roles. It introduces Ansible Collections, which is a new model to package and deliver Ansible content, and provides configuration examples for leaf-spine architectures.
Install Ansible
Install Ansible 2.10 or later to use Dell EMC Networking Ansible Collections, which then uses SSH by default to communicate with the end devices that you want to automate (managed nodes).
Requirements for the control node and managed nodes are:
Control node — Python 2.7 or higher and Python 3.5 or higher
Managed node—SSH to communicate remotely with OS10 switches
Log in to your Ansible control node.
In the terminal window, run the following commands:
For more information about installing Ansible on different platforms, see Installing Ansible in the Ansible Installation Guide.
Ansible configuration file
You can adjust certain settings in Ansible by using ansible.cfg.
Run the following command to view the Ansible configuration file:
$ cat /etc/ansible/ansible.cfg
The stock configuration is sufficient for most users; however, in some cases, you might want to change the default values. For example, host key checking is turned on by default in Ansible 1.3 and later. To disable host key checking, set the value to False:
host_key_checking = False
Ansible UI
Ansible Tower, which was previously called the AWX project, is a comprehensive web-based UI for Ansible. You can use it to centralize and control your IT infrastructure with a visual dashboard and REST API for Ansible. Tower includes real-time output of playbook runs, a new dashboard, and expanded cloud support.
Within Ansible Tower, playbook runs stream by in real time. As Ansible performs automation across your infrastructure, it displays plays and tasks as they are completed, per machine, and each success or failure, complete with output. With Ansible Tower, you can launch playbooks with a single click. It can prompt you for variables, let you choose from available secure credentials, and monitor the resulting deployments.
Ansible can configure multiple systems simultaneously. By default, the Ansible inventory is saved at /etc/ansible/hosts. To specify a different inventory file, use the -i <path> option.
The inventory file can be of many formats. Here is one example:
You can make one or more groups, as shown by [Leaf] in the preceding example. In the example, Leaf1 specifies the host with IP address 192.168.1.202. You can specify a group of groups by using the :children suffix. In the preceding example, datacenter is a super group. You can include variables by specifying vars: or :vars. Ansible host and group variables provides more information about variables.
Ansible host and group variables
Ansible uses variables to enable flexibility in playbooks and roles. Although you can store variables in the main inventory file, storing separate host and group variable files might help you organize the variable values more easily.
Host and group variable files must use YAML syntax. Most commonly used variables are the user-defined variables host_vars and group_vars.
Host variable files contain host-specific configuration variables and role variables, as shown in this example:
Playbooks are the basis for simple configuration management and multi-machine deployments. They are designed to be human-readable and are expressed in YAML format.
Each playbook includes one or more plays in a list. The following example shows a playbook file that is designed to configure a VLAN on a switch:
The following example shows how the playbook, by working with the inventory file, runs the play to create the VLAN:
$ ansible-playbook -i inventory.yaml vlan_os10.yaml
PLAY [Leaf] *******************************************************
TASK [Configure vlan on the Dell EMC OS10 Device] *******************************************************
changed: [leaf2]
changed: [leaf1]
PLAY RECAP ********************************************************
leaf1 : ok=2 changed=1 unreachable=0 failed=0
leaf2 : ok=2 changed=1 unreachable=0 failed=0
The PLAY RECAP section confirms that the VLAN has been configured on the leaf1 and leaf2 switches, which belong to the Leaf group.
Ansible password protection
Ansible Vault is an Ansible feature that allows you to keep sensitive data such as passwords or keys in encrypted files, rather than as plain text in playbooks or roles. You can then distribute the vault files or put them in source control.
To enable Ansible Vault, edit files by using the command-line tool ansible-vault and a command-line flag (--ask-vault-pass, --vault-password-file, or --vault-id). Alternately, specify the location of a password file or edit your ansible.cfg file to command Ansible to always prompt for the password. These options require no command-line flag usage. Ansible Vault can encrypt any structured datafile used by Ansible. The advantage of variable-level encryption is that files are still easily legible even if they mix plain text and encrypted variables.
If you have existing files that you want to encrypt, use the ansible-vault encrypt command. This command can operate on multiple files at once:
ansible-vault encrypt main.yaml
To permanently decrypt the files, run the ansible-vault decrypt command: