


Thinking About How to Import from VNX2 File Storage Environments?
Wed, 13 Jul 2022 09:30:08 -0000
|Read Time: 0 minutes
In the world today, many users are overwhelmed with the rapid pace of technology and innovation. Businesses are growing at swift rates and many users know they need to migrate off of older storage hardware that may be under heavy load or running out of support.
Dell PowerStore has made it simple to import other storage systems through orchestration wizards so that users can get their existing data up and running quickly on the new technology. Previous versions of PowerStoreOS allowed for block import — and now, we have come full circle to support file import!
PowerStoreOS 3.0 and higher now supports importing virtual data movers (VDMs) and their filesystems from the Dell VNX2 system. This includes both NFS and SMB file systems. Users can natively import their data without any special migration solution or hardware required. PowerStore handles all the creation, monitoring, and management.
This blog provides a quick high-level overview of the import stages. For additional details, see also a video that shows this process.
The file import workflow contains six major steps:
- Prepare VNX system
- Prepare PowerStore system
- Add Remote System
- Create Import Session
- Cutover Import Session
- Commit Import Session
Step 1 – Ensure that your VNX2 has the proper code levels and connectivity to talk to the PowerStore system. (For the latest details, see the PowerStore documentation listed at the bottom of this blog.)
Step 2 – Verify that the PowerStore system is running PowerStoreOS 3.0 or higher, and has the “file mobility network” configured. You can configure this network by selecting Settings -> Networking -> Network IP’s under “File Mobility”.
Step 3 – Add the remote system by navigating to Migration -> Import External Storage from the PowerStore management console, as shown here.

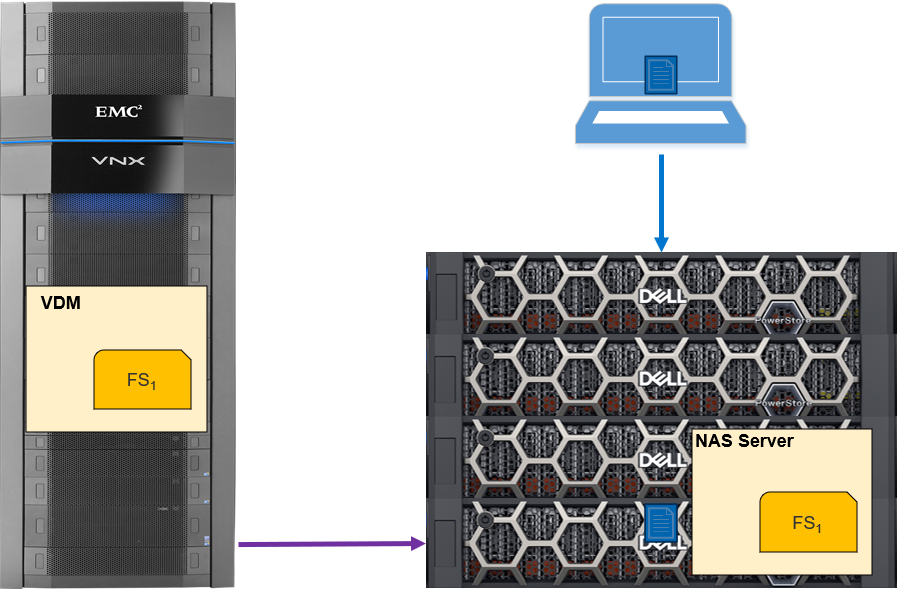
Step 4 – Create the import session. This is where you select the VNX2 VDM for import. The host is still accessing data on the VNX2. A connection is established, and resources are created on the target PowerStore. Cold data is now being copied to the PowerStore, as shown here.
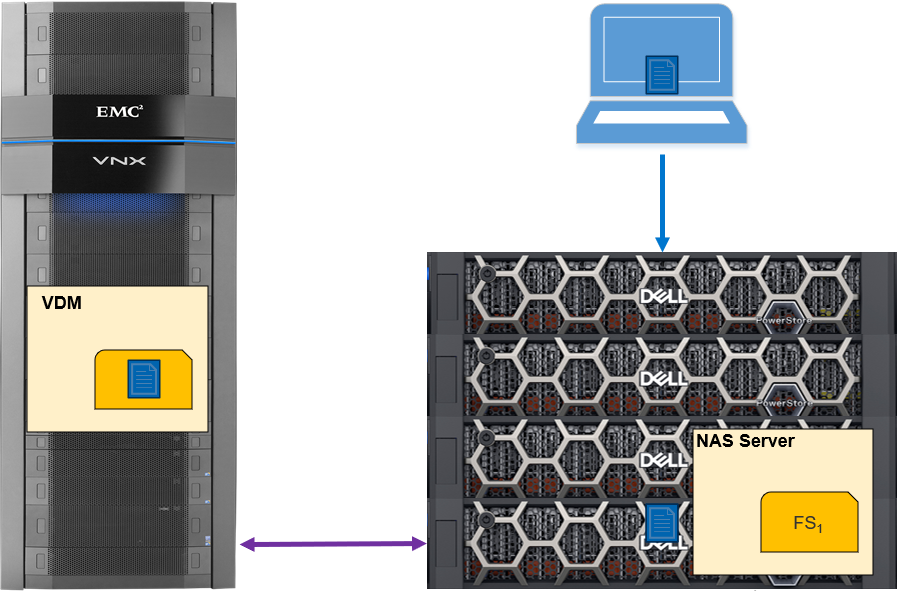
Step 5 – The cutover import session begins. Data is copied from the source VNX2 to the PowerStore, which then services the read requests from the host. Data that remains on the VNX2 is read from it. Incoming writes are mirrored to the VNX2 and to the PowerStore system, The data continues to be copied in the background to the PowerStore, as shown in the following figure.
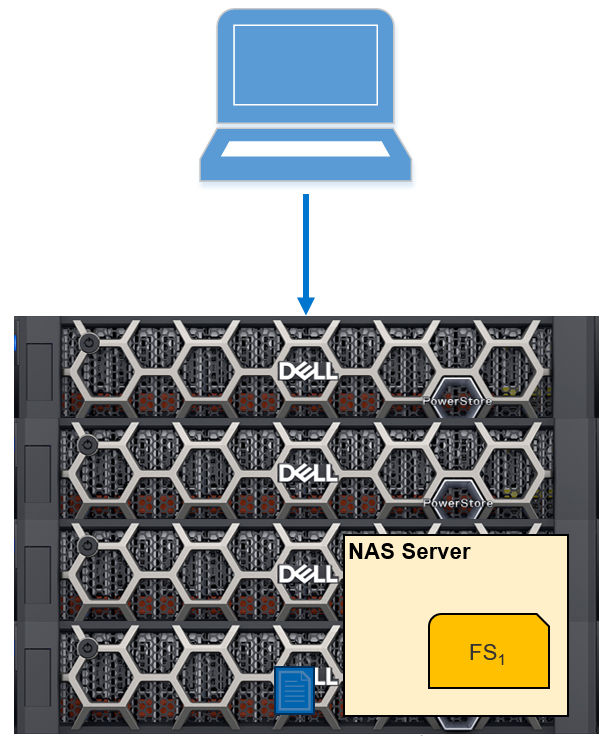
Step 6 – the final step, commits the import session. When all the data has been transferred from the VNX2 to the PowerStore, the state will show “Ready for Cutover”, and you can commit the import session. This will suspend the write mirroring: the session cannot be rolled back from this point. This process will also clean up the source VNX2 system. Because the import has completed, the data is now being accessed just from the PowerStore (as in the following figure).
Conclusion
I’ve outlined just a few of the import and migration features in the Dell PowerStoreOS 3.0 release. For more information about these and other features in this release, check out these resources:
- PowerStore: Migration Technologies
- Dell Technologies Info Hub
- Dell PowerStore Simple Support Matrix
- Video: Dell PowerStore: Import Dell VNX File Resources
Author: Andrew Sirpis